| Oracle® Retail Xstore Point of Service Shipping, Receiving, and Inventory Guide Release 18.0 F11872-01 |
|

 Previous |
| Oracle® Retail Xstore Point of Service Shipping, Receiving, and Inventory Guide Release 18.0 F11872-01 |
|
Previous |
Location based inventory tracks all merchandise items that leave or enter the store by associating all items with a specific inventory location. This type of merchandise tracking creates an audit trail record that tracks an item from the time it enters the store until the time it leaves.
This chapter covers the following topics:
The store assigns and adds received items to a specific inventory location. Then, when the item is removed from the initial inventory location, it...
is transferred to another inventory location, or
leaves the store as the result of a sale transaction, or
is shipped out as an inventory transaction, or
is adjusted as part of an inventory adjustment transaction.
These item movements are tracked through Location IDs and Bucket IDs that are used to track the physical location and the current status of each item in inventory.
This section uses the terms Location ID and Bucket ID frequently. As used in this document, a Location ID generally refers to a physical location where items are found, and it includes specific inventory buckets that are associated with it.
A bucket is a descriptive term that usually relates to the status of an item in a particular location. For example, the On Hand bucket is a very inclusive category relating to currently available items. Layaway is a different bucket that relates only to items that are included in a layaway account, but may (or may not) be in the same Location ID as on- hand items.
Depending on your system setup, items with one Location ID may not need to belong to a specific Bucket ID, and items with a specific Bucket ID do not need to belong to a specific Location ID. For example, the Warehouse location could contain items that are assigned to the Repair, Special Order, and Layaway buckets. Meanwhile, the Special Order bucket could contain items in the Warehouse and On Order locations.
Some inventory locations are configured at the corporate level, though additional inventory locations can be added and configured at the store level. Inventory buckets are configured solely at the corporate level.
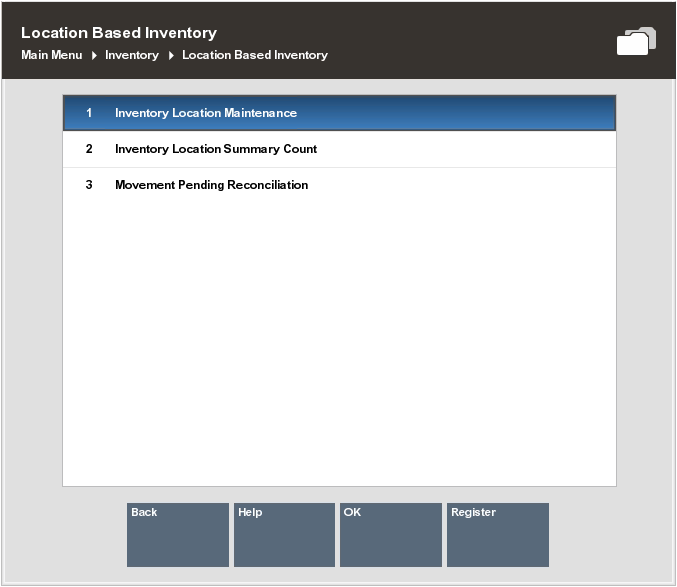
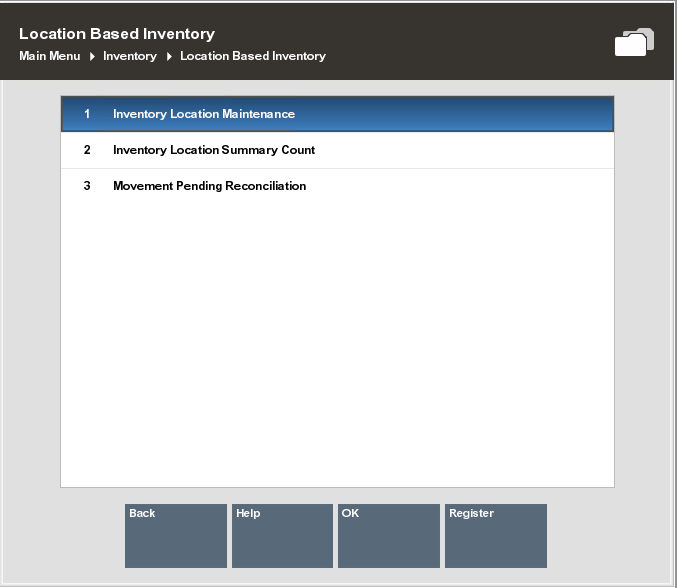
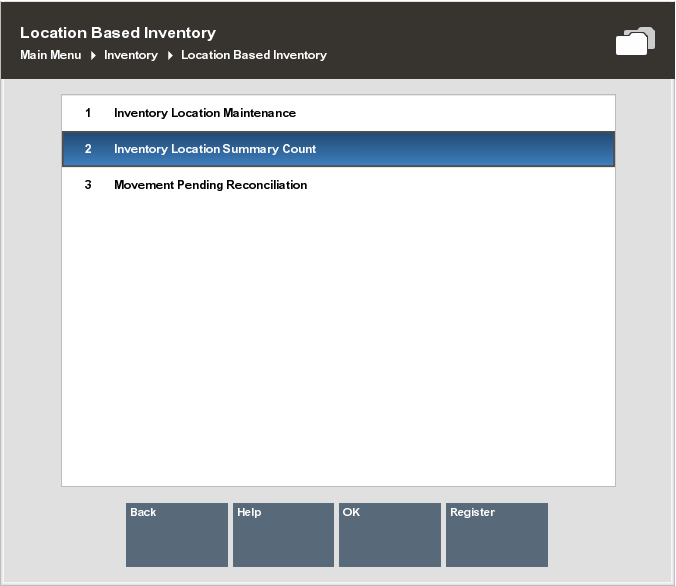
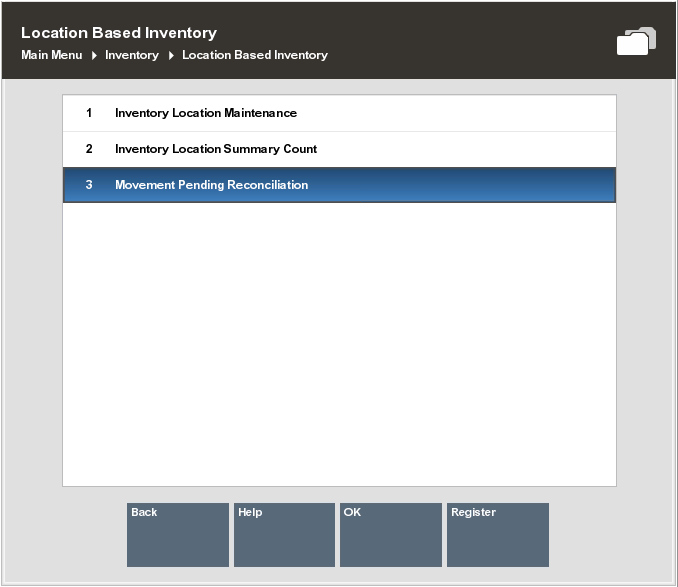
The Location Based Inventory Menu offers selections that allow you to perform various operations related to inventory locations and the items that are located there:
Inventory Location Maintenance: Existing inventory locations may be maintained (viewed, edited, and deleted). See Inventory Location Maintenance. You also have the option to create a new inventory location. See Define a New Inventory Location.
Inventory Location Summary Count: Summary counts may be performed by inventory location (entering totals for each of the inventory buckets that are assigned to an existing inventory location). See Inventory Location Summary Count.
Movement Pending Reconciliation: Use this option to reconcile inventory changes stored in a temporary location with the actual inventory. See Movement Pending Reconciliation.
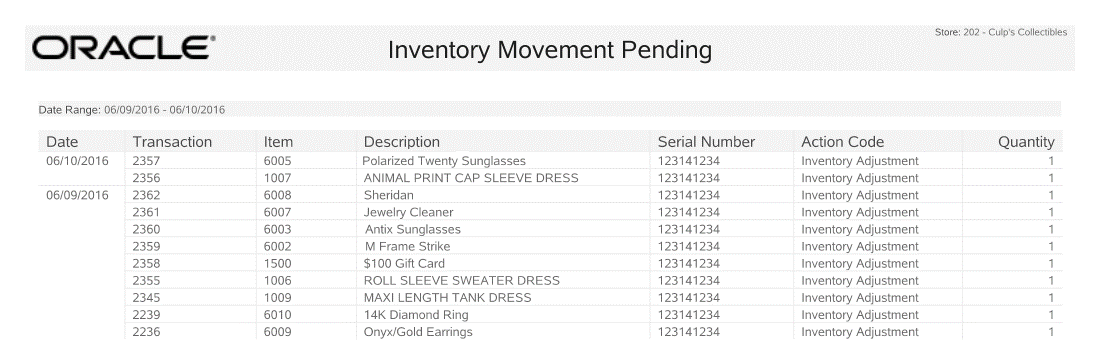
Inventory Movement Pending Report: The Inventory Movement Pending Report shows items from transactions in which an inventory location has not yet been specified when Location Based Inventory is being used. This report shows the transaction number, transaction date, item ID and quantity, and the inventory action code that is currently assigned. Refer to the Oracle Retail Xstore Reports Guide for information about this report, as well as the Inventory Movement Report, Inventory Movement History Report, and Item List Report
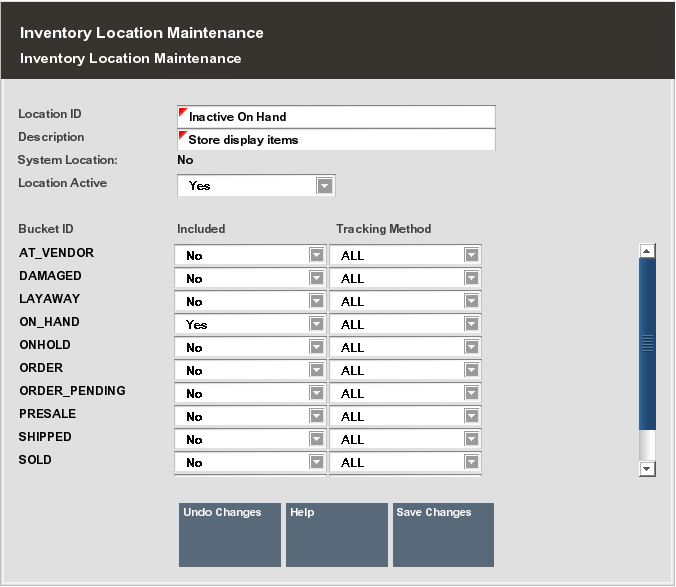
Inventory Location Maintenance allows you to edit the parameters of an inventory location, or add/delete store-specific inventory locations for the local store. When editing an inventory location, Inventory Location Maintenance allows you to search for a specific inventory location by Location ID, location description, or associated bucket.
|
Note: System Locations defined and set up by the Home Office cannot be changed or deleted. Home-office defined locations show a Yes status in the System Location field.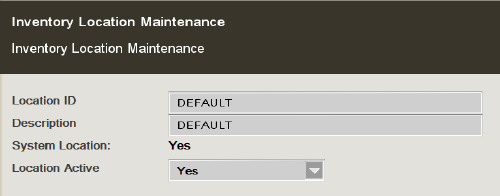
Inventory Location Maintenance does not allow you to edit items. Item edits within an inventory location must be performed within the Item Transfer function. See Item Transfer. |
After logging in to the Back Office by entering your employee ID and password, select the Inventory option on the Main Menu.
Select Location Based Inventory on the Inventory Menu.
At the Location Based Inventory Menu, select the Inventory Location Maintenance option.
The system displays the Inventory Location Search form.
Search options:
If you know a Location ID, enter it in the Location Id field and select Process. The system lists the matching Location IDs, and you may select the one you want. Continue with step 5.
If you do not know the ID of the location you want to see, select List All. The system displays all of the existing Location IDs. Select the one you want and choose OK. Continue with step 5.
To search by the Bucket, select one or more buckets from the list and then select Process.
If you want to create a new inventory location, select Add New Location. See Define a New Inventory Location.
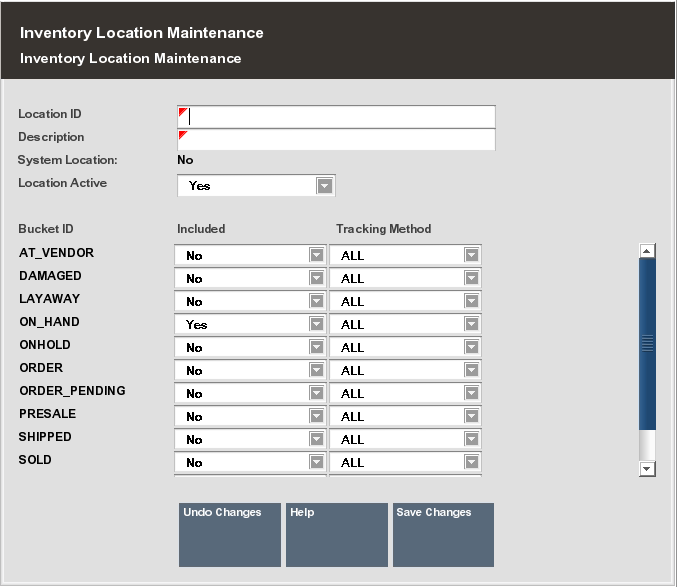
Maintain the location as needed at the Inventory Location Maintenance form.
Select one of these options:
Back: This returns you to the Inventory Location Search form.
Edit Location: Select this option to make changes to the location. The Location ID cannot be changed.
Description: Edit the description as needed.
Location Active: Yes indicates the location is currently being used and No means the location is inactive and cannot be counted unless its status is reset to Yes.
For each Bucket ID:
Indicate whether or not it is included as part of the Location ID. Select Yes or No from the drop-down list in the Included column.
Indicate the tracking method used by selecting an option from the drop- down list in the Tracking Method column.
After making your changes, select the Save Changes option to update the location.
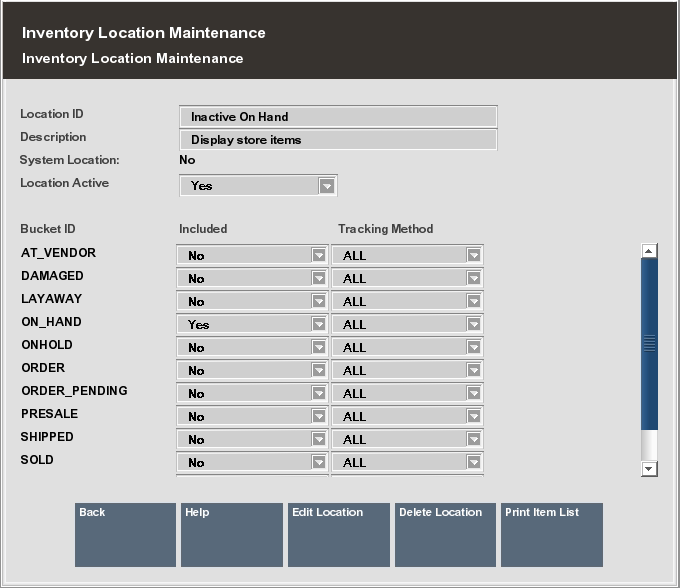
Delete Location: Select this option if you decide to remove the location. You are prompted to confirm the deletion. Select Yes to proceed or No to continue without deleting the location.
Print Item List: Select this option to print a list showing all items in the location.
|
Note: To edit items within an inventory location, use the Item Transfer function. See Item Transfer. |
This feature allows you to specify a new inventory location within your store.
After logging in to the Back Office by entering your employee ID and password, select the Inventory option on the Main Menu.
Select Location Based Inventory on the Inventory menu.
At the Location Based Inventory menu, select the Inventory Location Maintenance option.
The system displays the Inventory Location Search form (Figure 6-4).
Select Add New Location. The system displays a form where you can define a new inventory location for your store:
In the Location ID field, enter the name you are assigning to the new location.
In the Description field, enter a brief text description for the new location.
Select the Location Active status by selecting Yes or No from the drop-down list. Yes indicates the location is currently being used and No means the location is inactive and cannot be counted unless its status is reset to Yes.
For each Bucket ID listed on the left side of the screen, you must decide:
whether or not it is included as part of the new Location ID. Select Yes or No from the drop-down list in the Included column.
what tracking method is used for each bucket that you include in the new Location ID. Select an option from the drop-down list in the Tracking Method column for each bucket that you assign to the location.
|
Note: You cannot define new buckets. All buckets are defined by and downloaded from the home office. |
After you have determined which buckets are included and you have assigned their respective tracking methods, select Save Changes to create the new location. The system displays a read-only view of the selections for the new Location ID.
Select one of these options:
Back: This returns you to the Inventory Location Search form.
Edit Location: Select this option to make changes to the new location.
Delete Location: Select this option if you decide to remove the location. You are prompted to confirm the deletion. Select Yes to proceed or No to continue without deleting the location.
Print Item List: Select this option to print a list with all items in the location, according to the Bucket IDs that you assigned to that location.
|
Note: To edit items within an inventory location, use the Item Transfer function. See Item Transfer. |
An inventory location summary count can be performed at any time for a specific inventory location. This process compares the total item count performed by the user (actual) with the total system item count (expected) for each inventory location and bucket. This summary count process does not update inventory, it is used only to identify discrepancies between an actual count performed by the user and the count expected by the system.
After logging in to the Back Office by entering your employee ID and password, select the Inventory option on the Main Menu.
Select Location Based Inventory on the Inventory menu.
At the Location Based Inventory menu, select the Inventory Location Summary Count option.
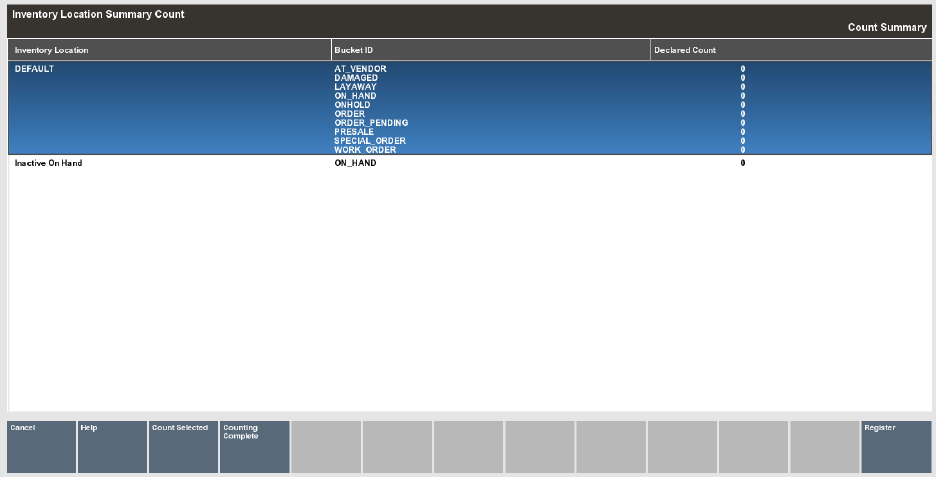
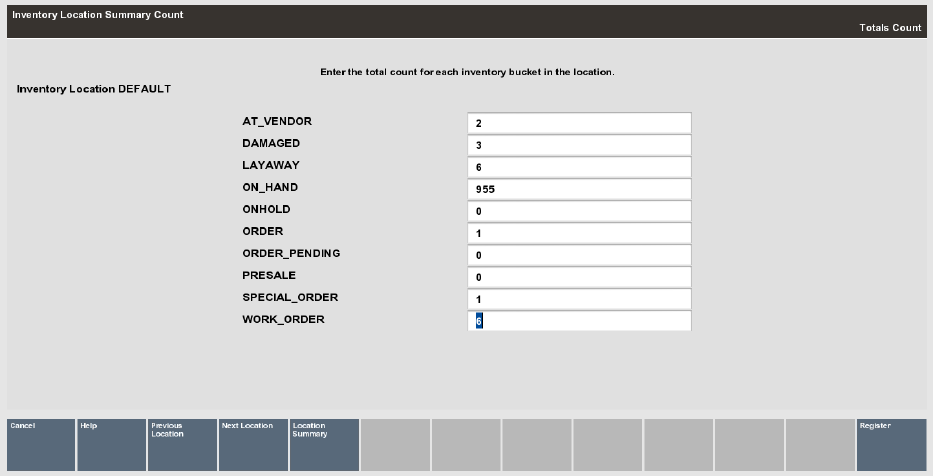
The system displays a screen that shows the currently-defined inventory locations and the inventory buckets that are assigned to them. On this screen you may enter the counts for each bucket in the location you select.
Select an inventory location and choose the Count Selected menu option.
The system displays the inventory buckets for the location you selected. Enter the count for each inventory bucket listed on the screen.
After you enter all counts, choose one of these options:
Previous Location: Displays the inventory buckets for the previously viewed inventory location.
Next Location: Displays inventory buckets for the next location in the list.
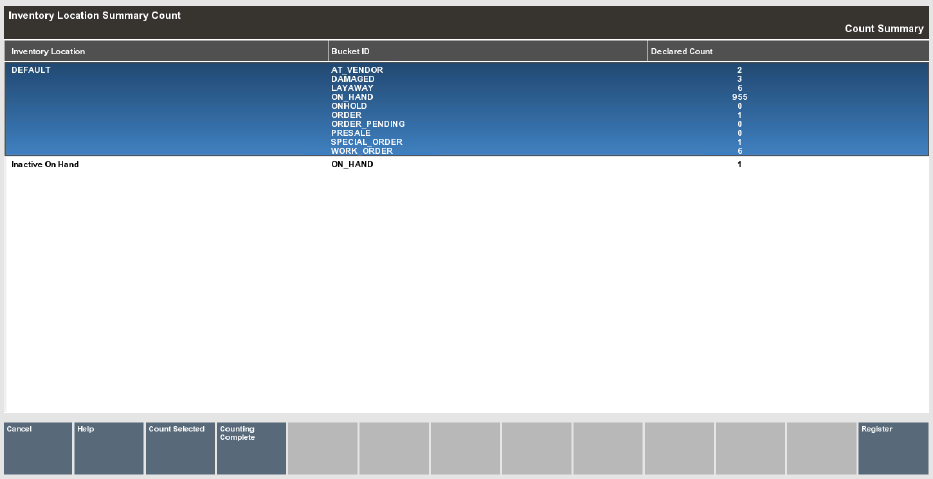
Location Summary: Returns to the list of all inventory locations and shows the counts you entered for the buckets in the Declared Count column. You can select Count Selected to enter your counts for a different inventory location. See Figure 6-9) or continue with step 7 to complete the count
Select Counting Complete when you are finished entering summary counts for all of the inventory locations.
The system displays a message if the counts for any of the inventory locations are out of balance (different from the system counts).
Select Accept Count to continue, or Recount Locations to return to the summary screen and choose a location that you want to count again.
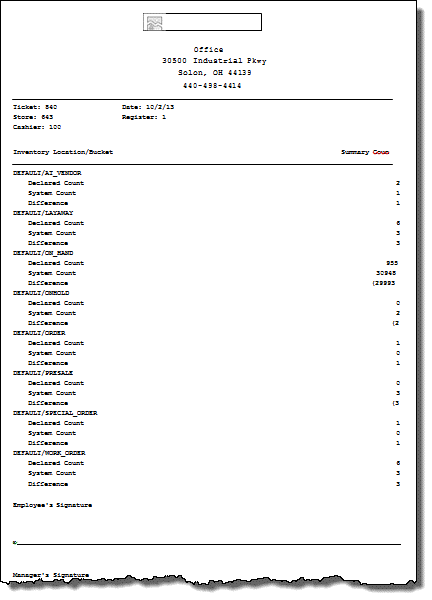
Once your counts are complete, the system prints a receipt with the counts for each bucket in each inventory location.
The Movement Pending inventory location is a default, virtual location for any items for which an inventory location was not specified at the time of a sale, layaway setup, or inventory shipment. This inventory location is a temporary location and items in this inventory location must be reconciled.
To reconcile items in this virtual inventory location, the sold item must first be transferred from the Movement Pending inventory location to a defined merchandise inventory location/bucket. Next, the item must be removed from the merchandise inventory location/bucket, and transferred to either the SOLD bucket, LAYAWAY bucket, or SHIPPED bucket (based on the transaction type).
An item appears on the Movement Pending Reconciliation list if the following criteria are met:
Your system is set up to track inventory movements that are pending.
Your system does not prompt for a Location ID during a transaction (sales transactions and shipping transactions).
An item is found in more than one Location ID or is not assigned to any Location ID in your store.
An item is assigned to a specific Bucket ID within the Location ID where it is found. For example, for sales, shipping, and layaway setup transactions, the item must be in the ON_HAND bucket.
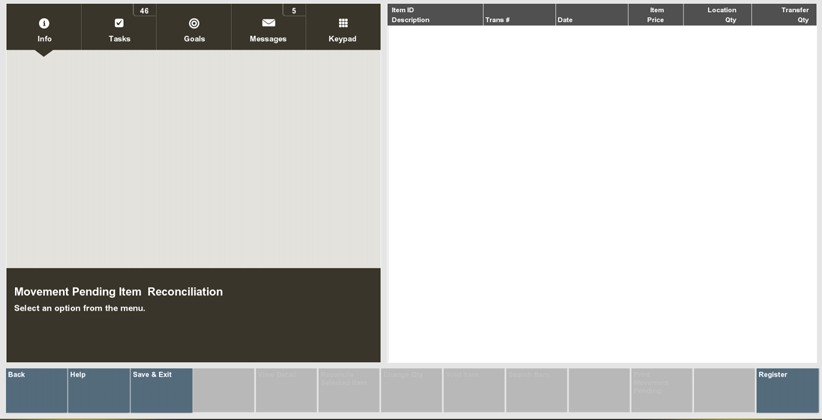
Select Movement Pending Reconciliation from the Location Based Inventory Menu.
The system displays a screen where you can select pending items and reconcile them.
If you would like to have a printed report of the items pending reconciliation, select the Print Movement Pending option.
Select the item on the list that you want to reconcile. Use the up and down arrow keys to scroll through the list and choose the Reconcile Selected Item option. See Figure 6-14.
|
Note: If the item list is long, you can quickly find a specific item if you know its item ID. Select the Search Item menu option, enter the item ID when prompted, and press Enter. The system locates and highlights that item in the list. |
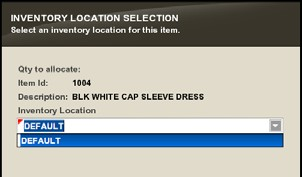
The system prompts for the item's source location. Select a location from the drop- down list and choose Process.
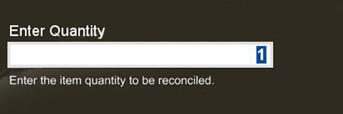
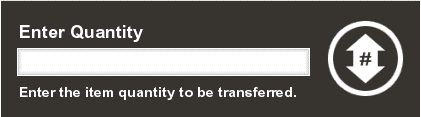
The system prompts for the item quantity. Enter the number of items being moved from the location you selected and press Enter.
The system returns to the list of items that are awaiting reconciliation. The item that you just reconciled is highlighted in green, and the Transfer Qty column now displays the quantity that you entered for the item.
If needed, select one of the following menu options:
Change Quantity: You are prompted to select the item and then enter the quantity that you want to reconcile for the item.
Void Item: This resets the quantity for an item that you reconciled to the previous quantity.
Search Item: Enter an item ID and press Enter to locate and highlight that item in the list. This is useful when the item list is long and extends off of the screen.
Select the Save & Exit option to retain the reconciliation(s) that you just completed.
You are prompted to confirm that you want to save your changes. Choose Yes to save the information, or No to return to the list of reconcilable items. If you choose Yes, the item is removed from the list of items awaiting reconciliation.
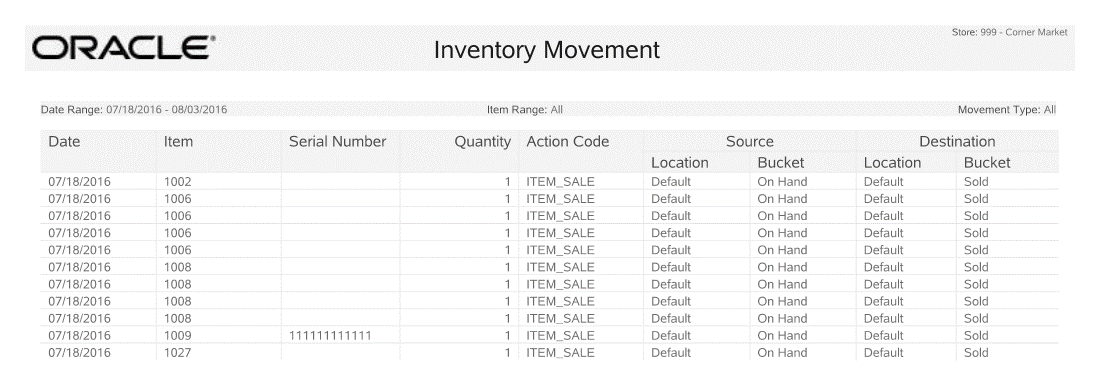
The system automatically prints the Inventory Movement Report and includes all of the items that were just reconciled and saved.
After printing the report, the system returns to the Location Based Inventory menu.
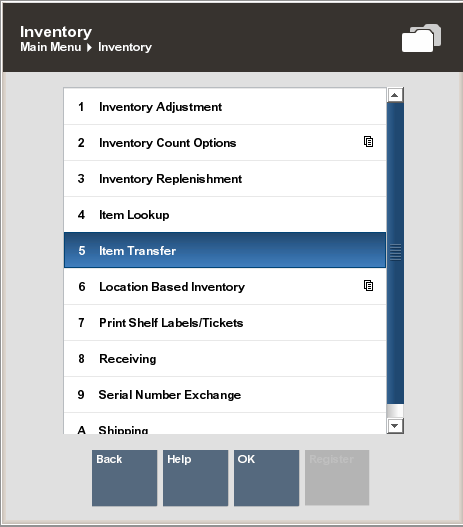
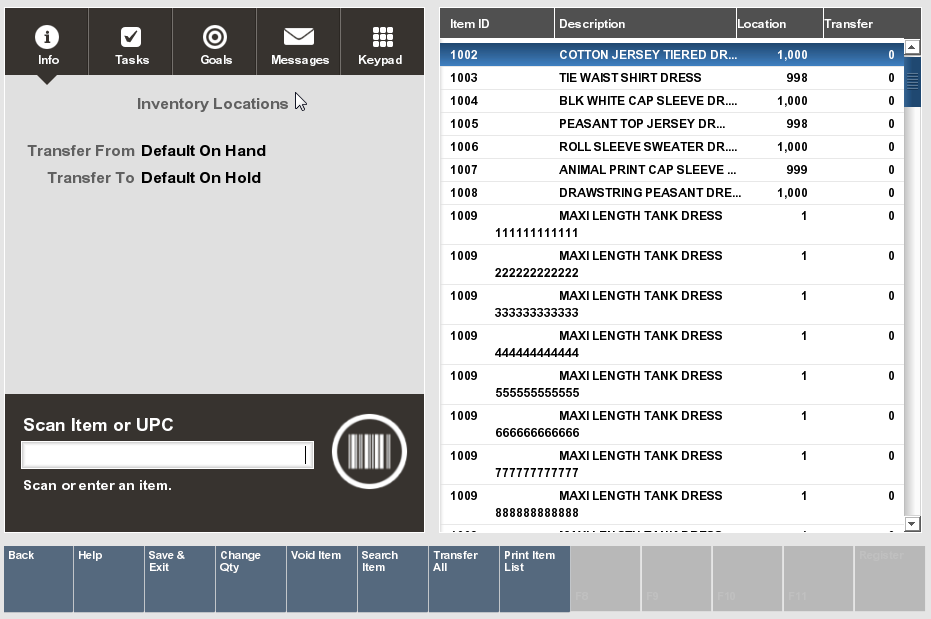
The Item Transfer option allows you to transfer an item from one inventory location to another within the store. The transfer can be made for a single item, multiple items, or even an entire inventory location.
After logging in to the Back Office by entering your employee ID and password, select the Inventory option on the Main Menu.
Select Item Transfer on the Inventory menu.
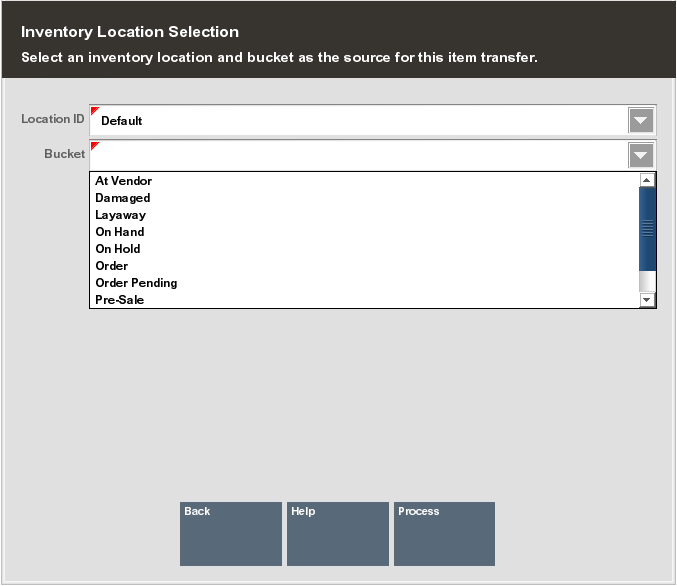
The system prompts you to select the inventory Location ID and bucket from which the item(s) will be taken. Select a Location ID from the drop-down list on the Location Id field, and select a Bucket from the drop-down list on the Bucket field. Select Process to continue.
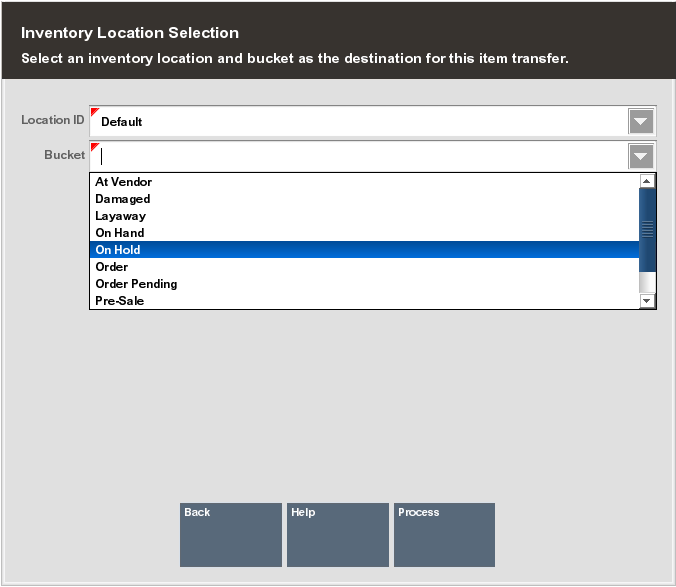
Next, select the destination location and bucket to which the item(s) will be transferred. Select Process to continue.
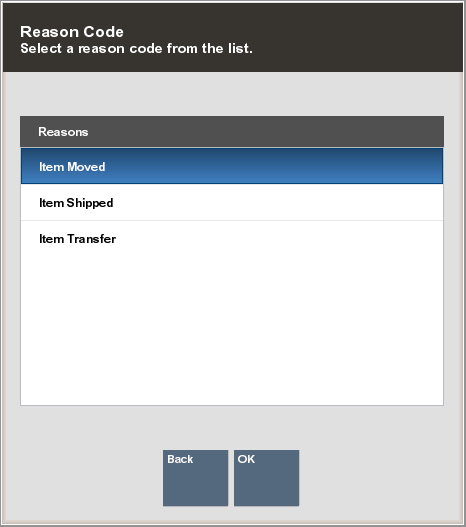
The system displays a list of reasons for transferring the item(s) to a new location. Choose a reason from the list and press Enter.
The system prompts you to enter an item ID for the transfer. Scan or enter the item ID and press Enter.
The system prompts you to enter the quantity of the item that you want to transfer. Enter the number of items and press Enter.
|
Note: If the item you want to transfer is serialized, you are prompted to enter the serial number. Type it in and press Enter. |
|
Note: You can select the Transfer All option to transfer all of the listed items to a new location.The system prompts you to confirm that all items listed on the screen should be transferred from the source location to the new location. Select Yes to transfer all items listed on the screen or No to return to the previous screen. 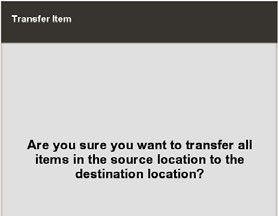 |
You may change the transfer information you have entered for any of the items listed by choosing the Edit Item option:
Change Quantity: You are prompted to select the item and then enter the number of items you want to transfer.
Void Item: This resets the number of items transferred to the previously recorded transfer quantity.
Search Item: Enter an item ID and press Enter to locate and highlight that item in the list. This is useful when the item list is long and extends off of the screen.
Select Save & Exit when finished transferring items from one location to another.
You are prompted to confirm that you want to save the transfer information you have entered.
Select Yes to complete the process.
Select No to return to the previous screen and continue selecting (or editing) items you want to include in the transfer.
The system automatically prints the Inventory Movement Report showing the items that you just transferred.