| Oracle® Retail Xstore Point of Service Shipping, Receiving, and Inventory Guide Release 18.0 F11872-01 |
|

 Previous |
 Next |
| Oracle® Retail Xstore Point of Service Shipping, Receiving, and Inventory Guide Release 18.0 F11872-01 |
|
Previous |
Next |
All merchandise items, whether entering the store through receiving and return functions or leaving the store through sales and shipping functions, are tracked using an inventory process. This inventory tracking occurs at the item level, resulting in an audit trail from the time the item enters the store and continuing until the item leaves the store.The inventory process allows you to enter item inventory counts and make adjustments to the inventory quantity of items. The Xstore Physical Inventory function allows you to accurately and efficiently count on-hand merchandise. After a count takes place, the local inventory is updated and accurate counts are posted to the home office. Physical Inventory can be conducted through the register system.
Real-time inventory is adjusted automatically during normal POS activity. This normal activity includes-but is not limited to-sales, returns, shipping, and receiving of physical, saleable store merchandise. Real-time inventory does not require any additional interaction by the user during normal transaction processing.
The physical inventory method uses counting as the means by which store personnel manually count merchandise items in the retail store. A store associate performs the count, and then enters the count values into the system where they are stored. The system applies the adjustments to each item's inventory.
Xstore provides three different types of inventory counts to meet your specific requirements:
Physical Count: Counting all in-stock items.
To perform a physical count, a layout must be set up for the store using the Store Layout functionality. Multiple count sheets are created to allow several associates to count different sections of the store. Additional cycles of counting can be performed if there are variances from the expected values and from previous counts. See Physical Count Process for more information.
Cycle Count: Counting a subset of the entire stock.
Only one count sheet is used for a Cycle Count, although additional cycles of counting can be performed if there are variances from the expected values and from previous counts. See Cycle Count Process for more information.
Supply Count: Counting internally-used supplies, rather than saleable items.
This count type is similar to a Cycle Count; however, it automatically populates the count sheet with all supply items defined for your store. See Supply Count Process for more information.
The following processes described in this section are used to create and find the count documents, create count sheets, and count the on-hand merchandise.
The following steps describe the generalized process that conforms to the system- enforced steps for conducting inventory counts. Submitting and initiating counts can be done while the store is open (can be configured on or off). However, a warning message is displayed if you are performing an inventory count while the store is open. Xstore will automatically adjust for inventory changes during the count process. Sales and returns are calculated into the counts. It is recommended that all inventory movements are suspended while an inventory count is underway if the store is open.
The initial step is to find an existing Inventory Count document, or to create a new document if allowed by your store policy. Once the Inventory Count document is located, perform the following steps:
Generate Count Sheets for the Inventory Count document. This step applies to a Physical Count type only. Skip this step for Cycle Count and Supply Count sheets since they are generated automatically for the Inventory Count document.
Print the count sheet(s). Depending on your store policy, this step may be optional, or performed at another time in the counting process.
|
Note: Print the count sheet (s) option may be unavailable depending on your store's configuration. |
Initiate the count for the selected Inventory Count document BASED ON SECURITY PRIVILEGE. This step is usually performed on the day of the count, and takes a snapshot of the current inventory ledger. It is only performed when the store is
online. The count must be initiated before the count quantities can be submitted (posted). This step allows your count to be compared to the system-expected quantity. Any variances between your count and the system-expected quantity is reported, allowing you to resolve any discrepancies through additional counting cycles.
Perform the actual count of the items and enter the quantities into the system. Depending on your store policy, you may be able to perform this step before initiating the count. However, even though you may be able to enter your counts into the system, you cannot submit the count until the initiation step is performed.
Submit the count. Your count is compared to the system-expected quantity captured during the initialization process (step 3).
Perform a recount if there is a variance between the system-expected quantity and the count quantity:
If your system is set up for automatic variance processing, Xstore automatically creates a second count cycle for you, with only the items you must recount. If the second count results in any variances, the system creates another count cycle automatically, and continues to create as many cycles as needed to resolve any discrepancies, up to the maximum number of cycles allowed by your store policy.
If your system is set up for manual variance processing, the system will not create additional cycle counts automatically. However, you can mark individual sheets to be moved to the next cycle for recounting until the maximum number of cycles is reached, or the count is completed.
Complete and post the final counted quantities to update your inventory BASED ON SECURITY PRIVILEGE
An Inventory Count document can be created at the home office and downloaded to a store, or a store can create its own Inventory Count documents, if allowed by store policy. An Inventory Count document contains the summary information for the count, specifies the date the count should be started, and identifies the items for the count.
If an Inventory Count document exists for the count you want to perform, see Finding an Existing Inventory Count Document below.
If an Inventory Count document does not exist for the count you want to perform, see Creating a New Inventory Count Document. This option will only be available if your store policy allows store-created Inventory Count documents.
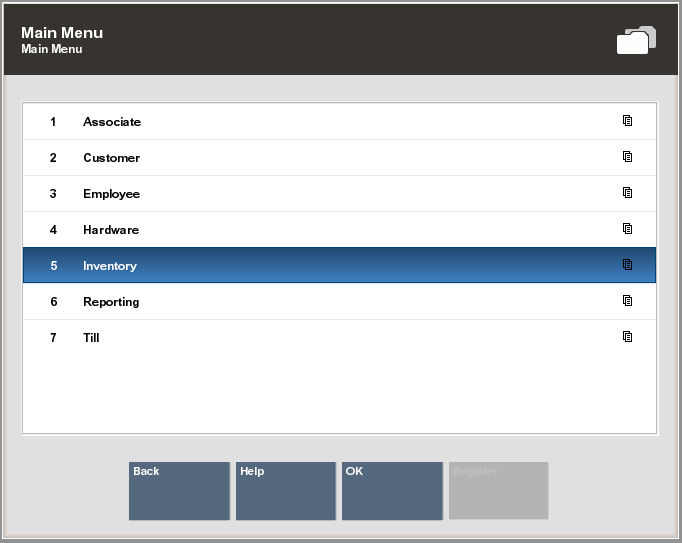
At the Register Login screen, select the Back Office option, and log in to the Back Office by entering your employee ID and password when prompted.
Select the Inventory option from the Main Menu and press Enter.
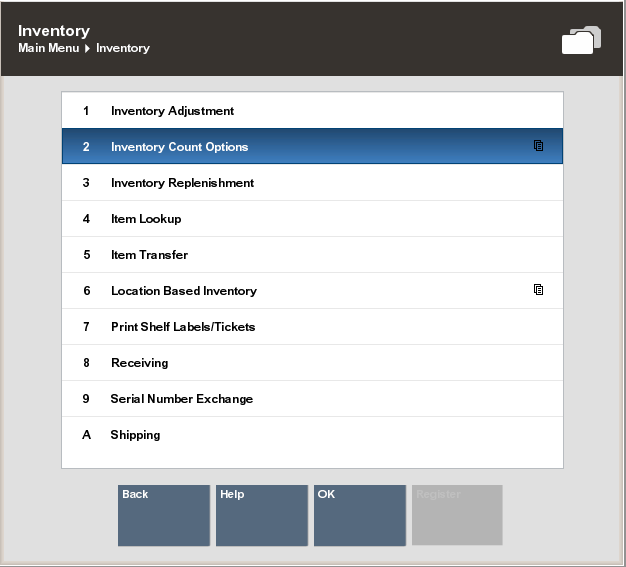
At the Inventory menu, select Inventory Count Options and press Enter.
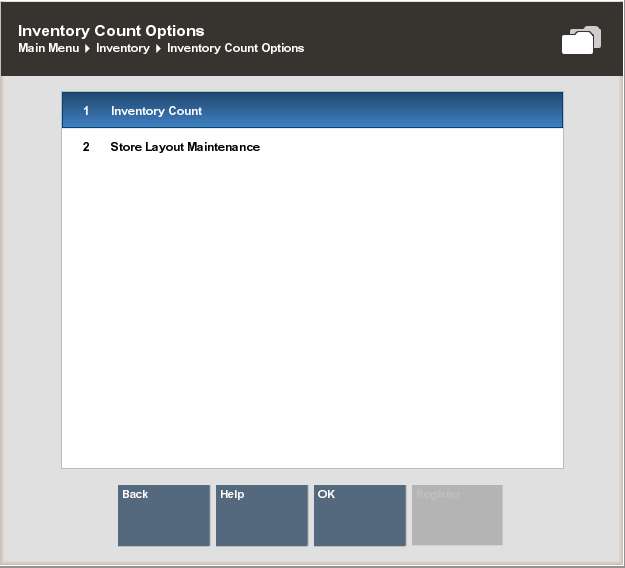
Select Inventory Count.
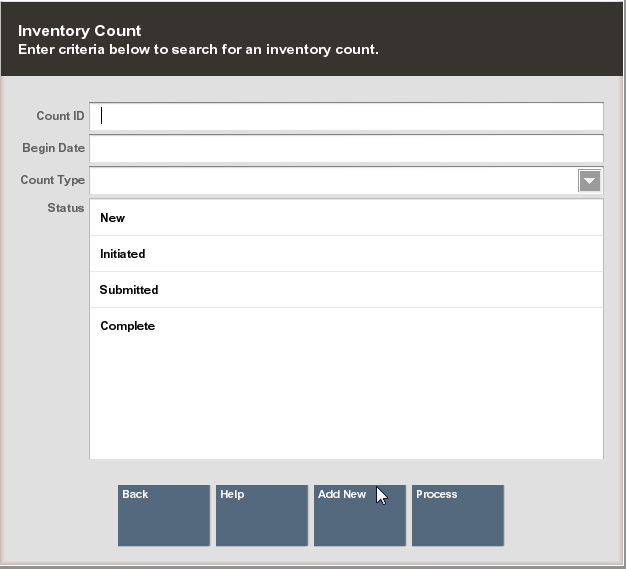
At the Inventory Count search form, enter search criteria to find the Inventory Count document, then select Process to initiate the search.
|
Important: This form is based on security privilege. If the logged in user does not have the search privilege, the search form will not display. Instead, Xstore displays a list of Initiated and Submitted counts. |
|
Note: Leave all fields blank and select Process to list all Inventory Count documents. |
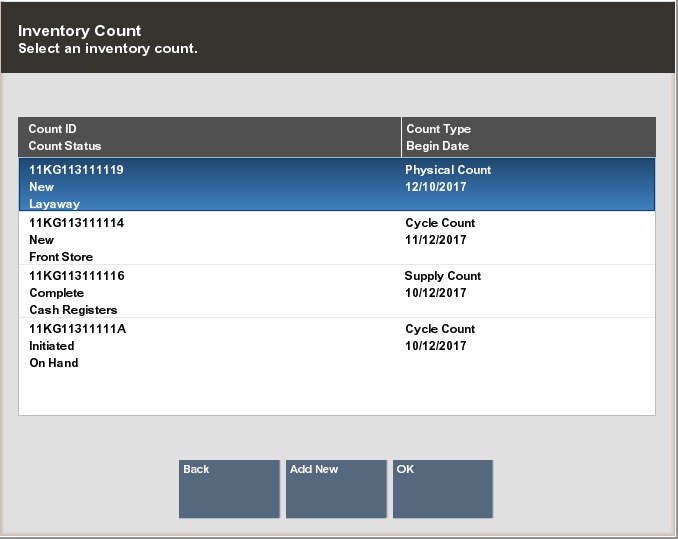
The Inventory Count search form contains the following fields:
Count ID: This is the auto-generated count identifier associated with the Inventory Count document. Type or scan the count identifier in this field.
Begin Date: This is the date the count is to be performed.
Count Type: Select the type of count from the list: Physical Count, Cycle Count, or Supply Count. See the chapter summary Physical Inventory Counting for more information about these three different types of inventory counts.
Status: Select the count document status from the list:
New - No action has been taken on this Inventory Count document.
Initiated - A snapshot of the database has been taken for this Inventory Count document.
Submitted - All count sheet status for this Inventory Count are submitted.
Complete - Items on this Inventory Count document have been counted, submitted, and completed.
|
Note: If an Inventory Count document matching your search criteria is not found, or you want to create a new inventory count, select the Add New option. See Creating a New Inventory Count Document for a step-by-step procedure describing how to create a new Inventory Count document. |
Xstore displays a list of Inventory Count documents based on your search criteria. Use the up and down arrows to select the document you want and press Enter.
The Inventory Count list shows the following information for each document:
Count ID: The inventory count identifier.
Description: The brief description of the Inventory Count.
Count Type: The type of count: Physical Count, Cycle Count, or Supply Count.
Count Status: The current status of the count: New, Initiated, Submitted, or Complete.
Begin Date: The date the count is scheduled to begin.
|
Note: Inventory Count documents created by the Home Office cannot be cancelled or edited. |
Xstore displays the count screen for the selected Inventory Count document:
If you are performing a Cycle Count, continue with Cycle Count Process for step-by-step instructions.
If you are performing a Supply Count, continue with Supply Count Process for step-by-step instructions.
If you are performing a Physical Count, continue with Physical Count Process for step-by-step instructions.
The following steps describe how to create a new Inventory Count document. Any Inventory Count documents you create will be flagged as Store Created for tracking purposes.
|
Important: Inventory Counts cannot be created or initiated in offline mode. Creating a new Inventory Count document is based on security privilege. |
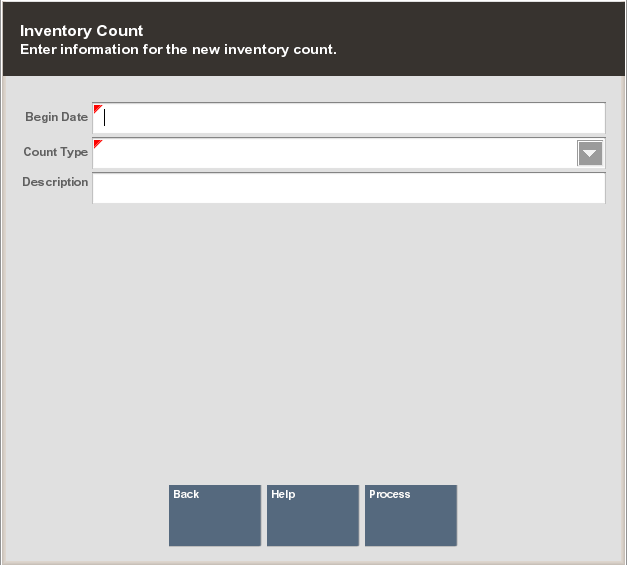
After selecting the Add New option at the Inventory Count Search form (refer to Figure 5-4), Xstore displays the Inventory Count document form. Enter the information in the fields as required to create a new Inventory Count document for the type of count you want to perform, and select Process.
Begin Date: Enter the date on which the counting should be started.
Count Type: Select the type of count for this Inventory Count document. The following count types are available in Xstore:
Cycle Count - Counts a subset of the entire stock. See Cycle Count Type Setup for setup instructions.
Supply Count - Counts internally-used supplies, rather than saleable items.
See Supply Count Type Setup for setup instructions.
Physical Count - Counts all in-stock items. See Physical Count Type Setup for setup instructions.
Description: Type a brief description of the Inventory Count. The description does not need to be unique.
Refer to the count types below for the specific information required for each type of count.
|
Note: You can create multiple initiated Cycle Count documents. Xstore will not check for overlap of inventory so be sure to create counts for different areas of the store. |
...continued from step 1
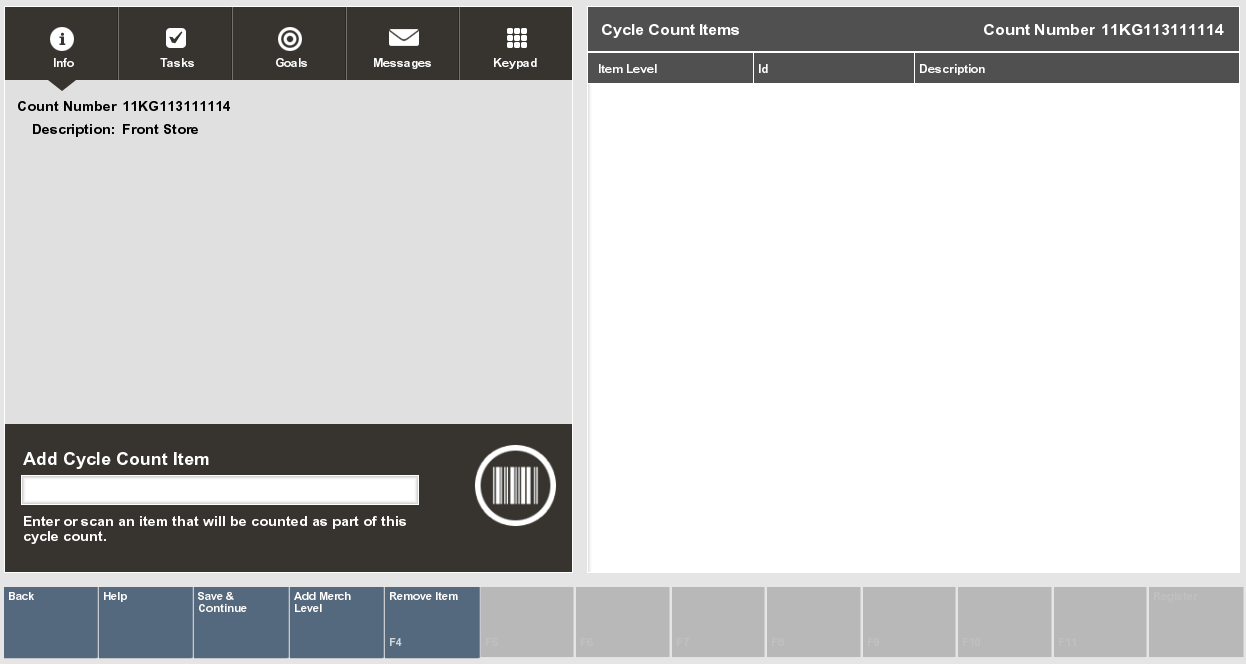
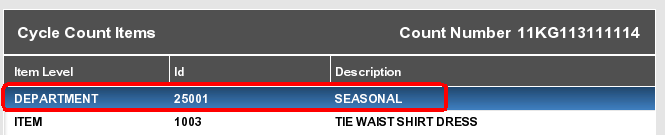
Choose one of the following options to add the items to the new Cycle Count document:
Scan or enter the item IDs to be counted on this Inventory Count document.
<OR>
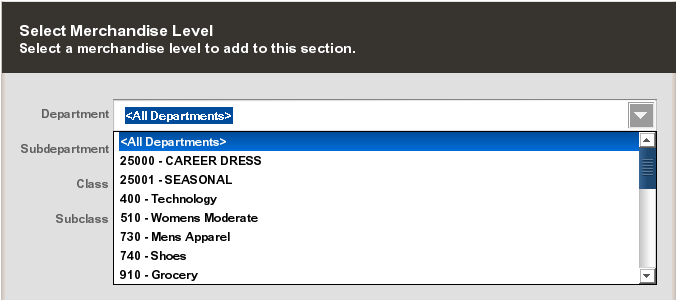
Select the Add Merch Level option to add all items in a merchandise level.
If you select the Add Merch Level option you will be prompted to select a merchandise level to be added to the Inventory Count document:
Department, SubDepartment, Class, Subclass.
The actual items associated with each merchandise level are not shown in the list of items to be counted on the Inventory Count document. The merchandise level identifier (CLASS, DEPARTMENT, and so on) is displayed as a place holder and will be expanded to show the items within this merchandise level on the count sheets created in a later step.
|
Note: Select the Remove Item option if you need to remove a count item from the list. You will be prompted to select the item/merchandise level to be removed form the Inventory Count document. |
After adding the items to be counted on this Inventory Count document, select Save & Continue to create the new Cycle Count. Cycle Counts only use a single count sheet for all items.
At the confirmation prompt, select Yes to save the Cycle Count items you added.
The system displays the Cycle Count screen:
Refer to Cycle Count Process to continue with the counting process.
<OR>
Press Esc at the Cycle Count screen if you are not ready to begin counting at this time. The Cycle Count document will be available in the list of existing Inventory Count documents when you are ready to continue with the count process.
...continued from step 1
For a Supply Count, all items identified as supplies in your store are automatically added to the count sheet. Supply Counts use a single count sheet for all items. You cannot remove supply items or add any items to this sheet.
|
Note: Supply Count items are listed automatically. You do not need to create the list. |
Press Esc if you are not ready to begin counting at this time. The Supply Count document will be available in the list of existing Inventory Count documents when you are ready to continue with the count process.
Refer to Supply Count Process to continue the counting process.
...continued from step 1
Select the Generate Count Sheets menu option to add the items in each section to this new Inventory Count Document.
|
Note: For a Physical Count, the Store Layout defined for your store is used to add items to be counted. See Store Layout Maintenance for detailed information about defining sections and items for your store. |
The actual items associated with each section are not shown in the list of items to be counted on the Inventory Count document. The section identifier is displayed as a place holder and will be expanded to show the items within this section on the count sheets created in a later step.
Once the count is created, do one of the following:
To continue the counting process, refer to Physical Count Process.
If you are not ready to begin counting at this time, press Esc. The Physical Count document will be available in the list of existing Inventory Count documents when you are ready to continue with the count process.
The initial step in the Cycle Count process is to find an existing Inventory Count document, or to create a new document if allowed by your store policy. See Inventory Count Documents for detailed information about locating an Inventory Count document.
Once the Inventory Count document is located, perform the following steps.
Select the Cycle Count document you want to count and press Enter.
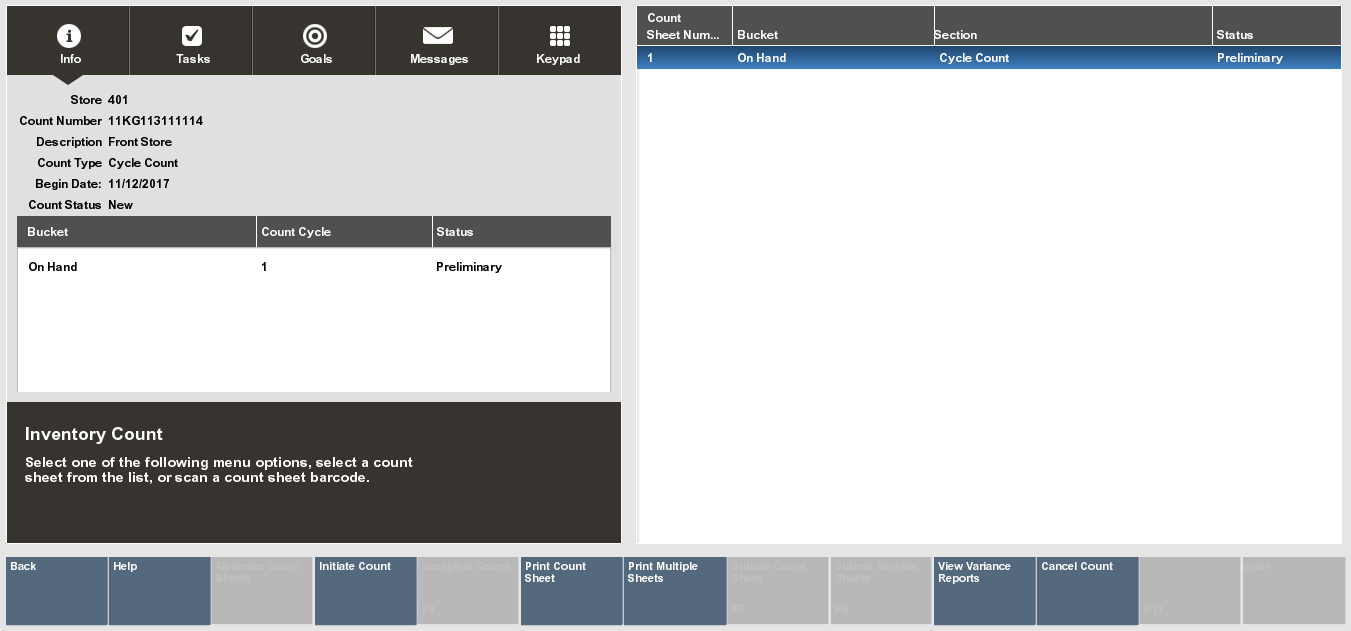
The Cycle Count screen displays showing the Cycle Count status for both the Inventory Count document and for the count:
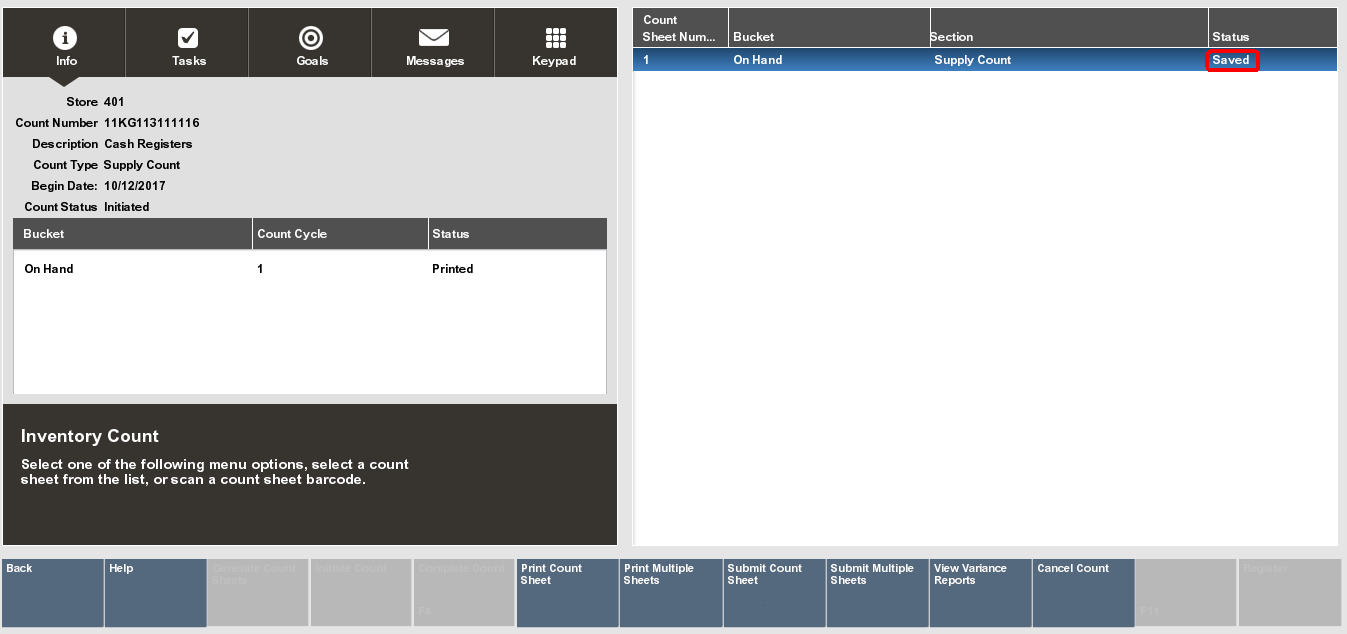
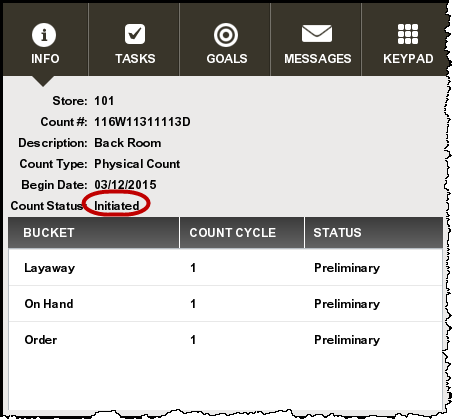
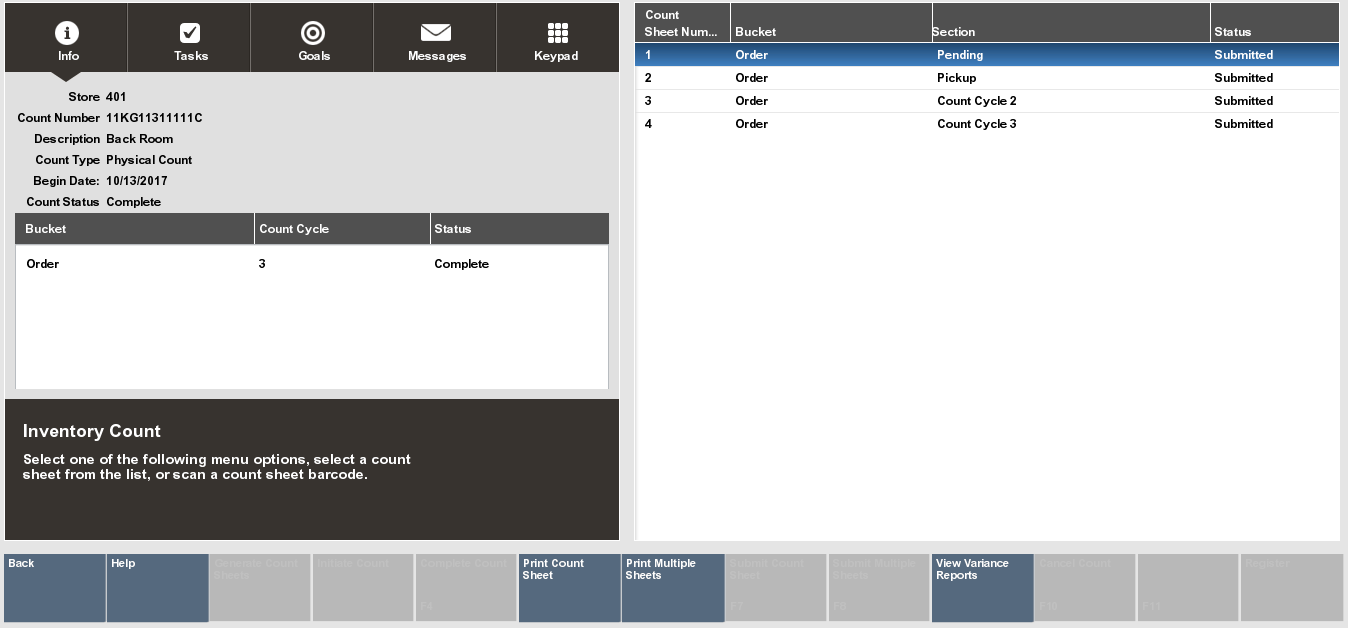
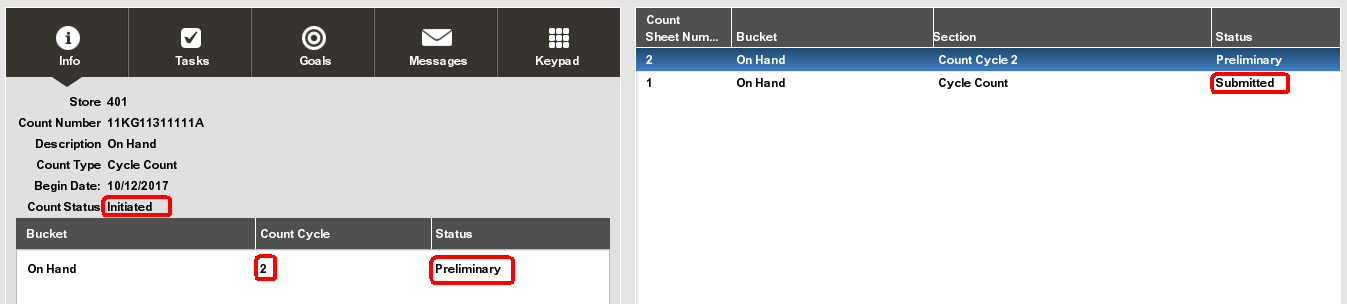
The top area of the screen displays the information for the Inventory Count document: Store ID, Count ID number, Count Type, Begin Date, and Count Status (New, Initiated, or Complete).
Beneath this area displays information for the count sheet:
Bucket: The inventory bucket identifier for this count sheet. Inventory buckets are pre-defined for your store. For cycle counts, only the On Hand bucket is counted.
Count Cycle: Indicates the number of times the bucket has been counted so far in order to reconcile any count variances and complete the count. The count cycle will always be set to 1 for the first count. If additional counts are needed to resolve a discrepancy, this number will increment for each recount.
Status: The status of the bucket within the current count and cycle:
Preliminary - The beginning status for a new count.
Printed - Indicates the count sheet has been printed.
Saved - Indicates the count sheet has been saved.
Complete - Indicates the count sheet has been completed.
To begin the counting process, you have the following options:
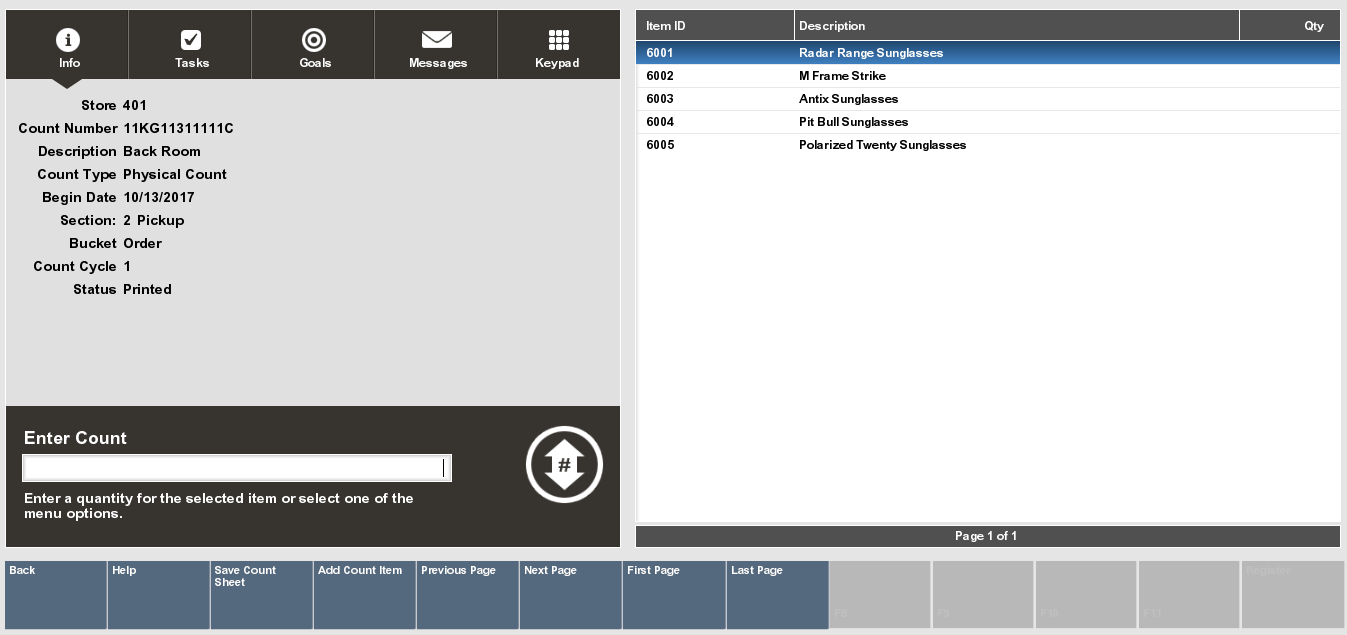
OPTIONAL If you want to see the items on the count sheet, press Enter to open the selected count sheet; or, if you have a printed count sheet available, scan the barcode on the sheet. The items to be counted are listed on the view port.
Press Back to return to the previous screen and print the count sheet.
Select the Print Count Sheet menu option to print the count sheet on the report printer. The count sheet status is updated to Printed and a count sheet is created.
Use this sheet to manually record your item counts.
|
Note: The Print Multiple Sheets option is usually used for Physical Counts of the entire store when more than one count sheet exists, not for Cycle Counts.To print multiple count sheets, select the Print Multiple Sheets menu option. Select the count sheets to be printed. When prompted, select Yes to confirm. The count sheet status will be updated from Preliminary to Printed. |
|
Important: The store no longer needs to be closed to initiate a count and submit your counts. However, a warning message is displayed if you are performing an inventory count while the store is open. Counts are usually initiated on the day the inventory count takes place.If enforced by your store policy, you cannot enter your counts until the count has been initiated. |
|
Note: About the count menu options:
|
Select Initiate Count to take a snapshot of current inventory. If the store is open, a warning message is displayed. Select Yes to continue or No to exit the count.
This initiation process takes a snapshot of your current inventory ledger to be used to calculate variances between the
expected (snapshot) quantity and the quantity you entered into the system.
Counts must be initiated before they can be submitted.
Count the items listed on the cycle count sheet. When you have finished counting the inventory items, return to the Inventory module to enter your counts into the system. Refer to the Cycle Count Process, if you need instructions for locating the Inventory Count document you are working on.
If the item to be counted is keyed, select the item to be counted from the list and enter the count. Xstore moves to the next item on the list.
If the item to be counted is scanned, scan the item. Xstore will increment the counted quantity by 1, unless your store is setup to prompt for quantity.
|
Note: You cannot add new items to a Cycle Count sheet. Only items listed on the count sheet can be included in the count. |
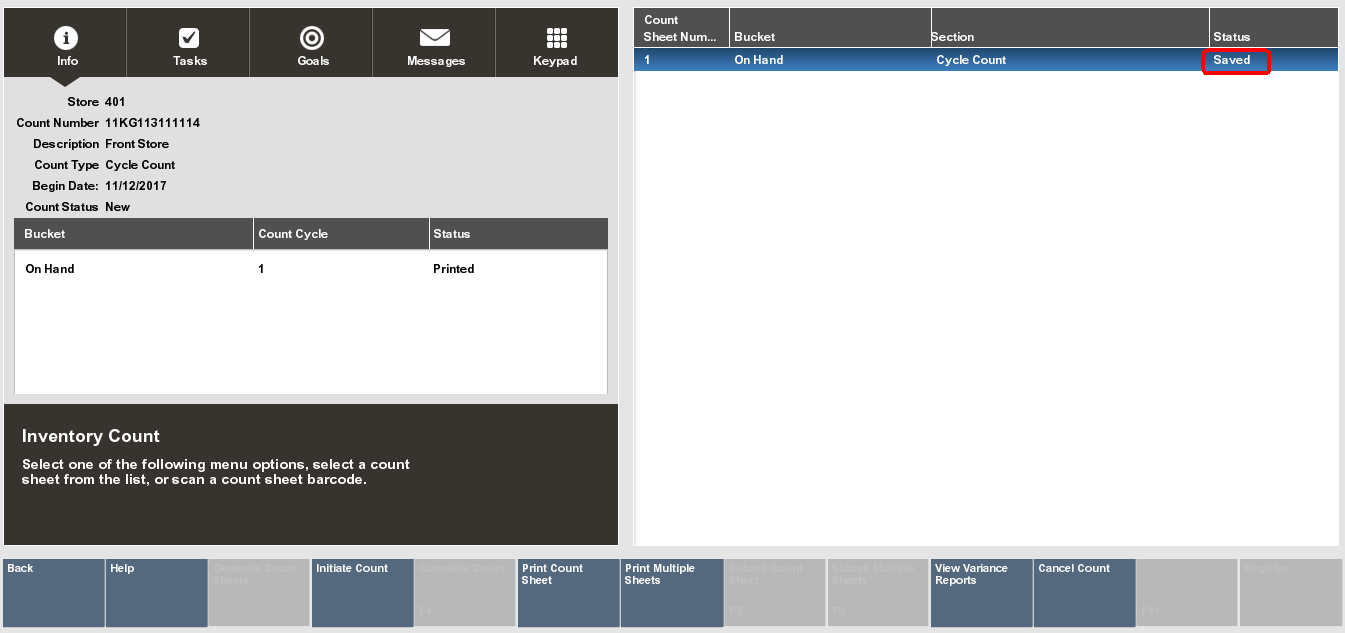
Select Save Count Sheet.
Select Yes to confirm. The count sheet status changes to saved.
Select Submit Count Sheet.
|
Note: The Submitting Multiple Sheets option is usually used for physical counts of the entire store when more than one count sheet exists.To submit multiple count sheets at one time, select the Submit Multiple Sheets menu option. With the count sheet highlighted, press the Spacebar to select each sheet. |
The system compares the count quantity you entered with the expected quantity based on the snapshot taken of the inventory ledger:
If the counted quantity and the expected quantity match, the inventory bucket for the item is marked as settled - no variance, and the count is complete. Skip to step 13.
If the counted quantity and the expected quantity do not match, the inventory bucket for the item is marked as having a variance.
If your system is set up for Automatic Variance Processing, any variances will automatically result in a new count cycle: count cycle 2. See Automatic Variance Processing for detailed information about this type of variance processing.
If your system is set up for Manual Variance Processing, you can choose whether or not to perform a recount. See Manual Variance Processing for detailed information about this type of variance processing.
If you must recount any items, perform the same steps you used for count cycle 1:
|
Note: Since subsequent count cycles are always compared to the initial snapshot taken for the first count cycle, you cannot initiate the count again. |
Print the count sheet. Only the items with variances will be listed for a recount.
When the recount is finished and saved, select the Submit Count Sheet menu option. Once again, the system will compare the entered counts with the expected counts.
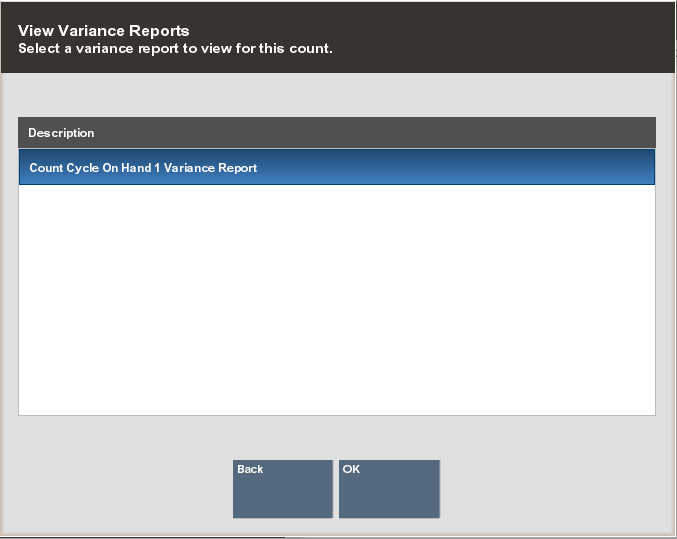
OPTIONAL You can select the View Variance Reports menu option to create a variance report showing the count discrepancies. See Figure 5-29. If prompted, select a Variance Report from the list.
The system creates and displays the report. See Variance Report for more information about these reports.
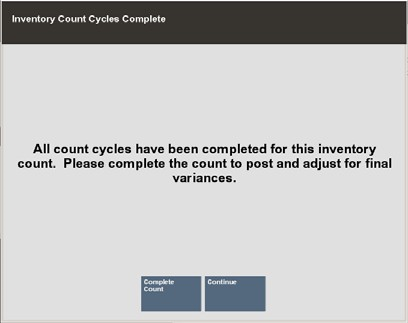
After the final count cycle sheet is submitted, the system displays a prompt indicating you have completed all count cycles:
Select one of the following options to continue the counting process:
Select Continue to return to the Inventory Count screen. From the Inventory Count screen you can:
View/Print Variance Reports from all count cycles that had variances.
|
Note: No Variance Report will be available for a count cycle that had no variances since all variance values would be 0. |
Save the submitted count cycles and post inventory counts at another time.
Print count sheets (if available).
Cancel the count BASED ON SECURITY PRIVILEGE.
Complete the count to post inventory counts and adjust the inventory counts in the system BASED ON SECURITY PRIVILEGE.
<OR>
Select Complete Count to post inventory counts and adjust the inventory counts in the system BASED ON SECURITY PRIVILEGE.
After completing the count sheets, the system marks the Inventory Count document as Complete and inventory quantity will be adjusted accordingly.
A Supply Count is a count of items not sold in your store, but are required for normal store operations, such as rolls of receipt paper for cash registers or printer paper for report printers. The Supply Count process is similar to the Cycle Count process; however, the count sheets are automatically populated with only the items identified as supplies in your store. Usually Supply Counts are not downloaded from the home office, and you cannot add items to the count sheets.The initial step in the Supply Count process is to find an existing Inventory Count document, or to create a new document. To locate a Supply Count document refer to Finding an Existing Inventory Count Document. To create a new supply count document see Creating a New Inventory Count Document.
Select the Supply Count document you want to count and press Enter.
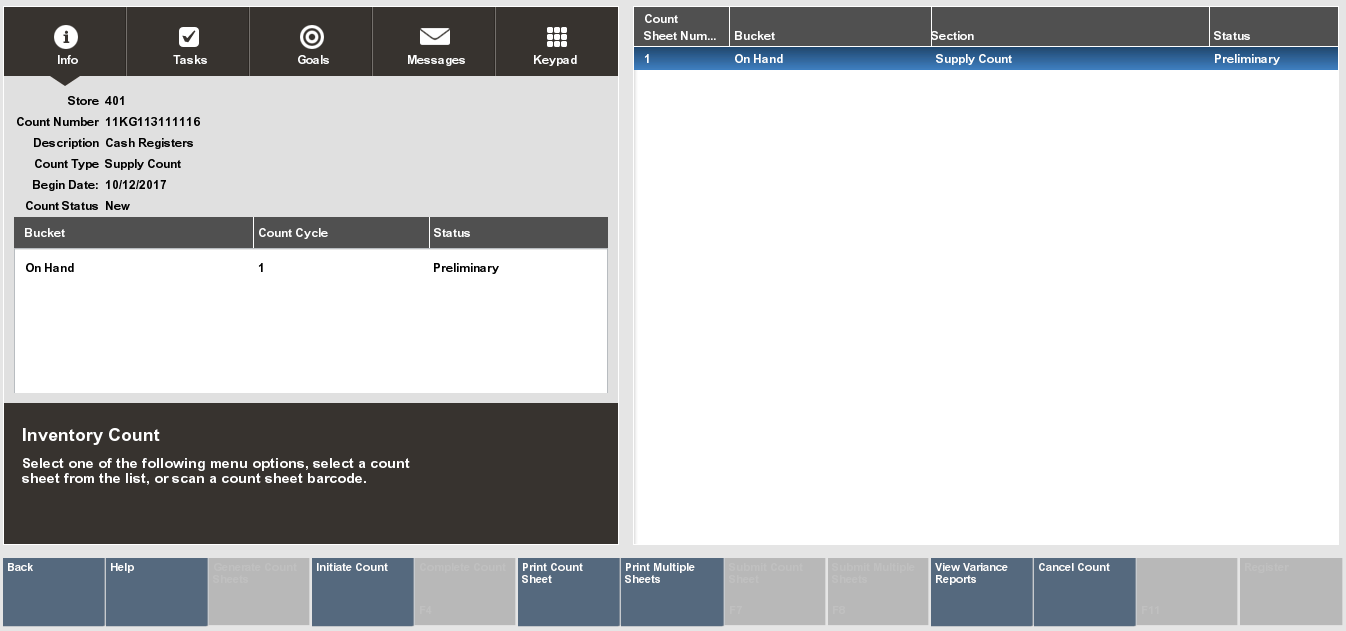
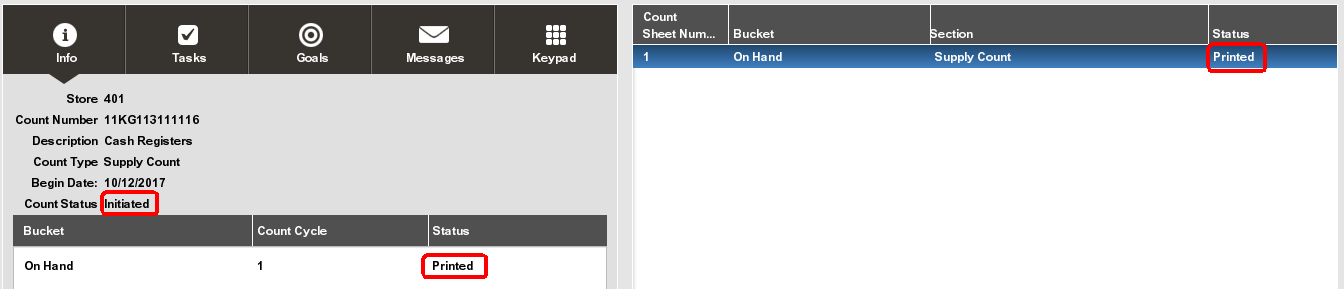
The Supply Count screen displays showing the count status for both the Inventory Count document and for the count sheet:
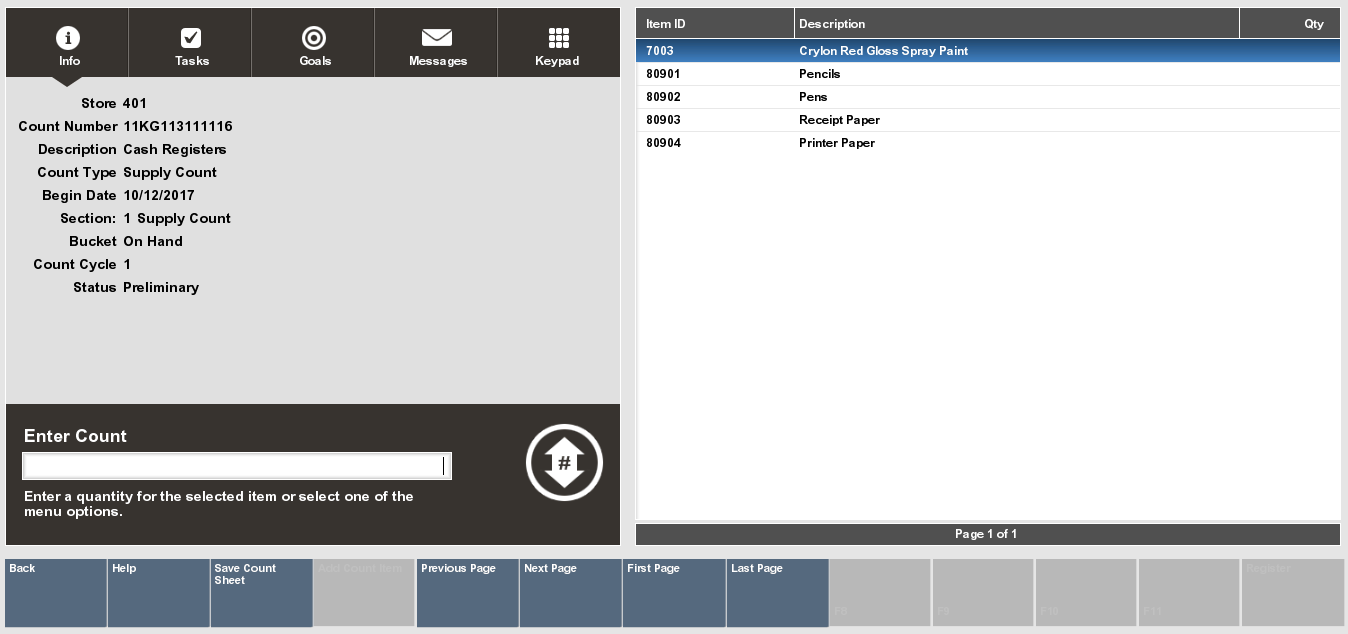
The top area of the screen displays the information for the Inventory Count document: Store ID, Count ID number, Description, Count Type, Begin Date, and Count Status. See page 5 for additional detail about these elements.
Beneath this area displays information for the count sheet:
Bucket - The inventory bucket identifier for this count sheet. Inventory buckets are pre-defined for your store. For supply counts, only the On Hand bucket is counted.
Count Cycle - Indicates the number of times the bucket has been counted in order to reconcile any count variances and complete the count. The count cycle will always be set to 1 for the first count. If additional counts are needed to resolve a discrepancy, this number will increment for each recount.
Status - The status of the bucket within the current count and cycle:
Preliminary - The beginning status for a new count.
Printed - Indicates the count sheet has been printed.
Saved - Indicates the count sheet has been saved.
Complete - Indicates the count sheet has been completed.
To begin the counting process you have the following options. See Figure 5-22:
OPTIONAL Press Enter to open the selected count sheet, or, if you have a printed count sheet available, scan the barcode on the sheet. The supply items are listed on the view port. Press Esc to return to the previous screen and print the count sheet.
The Print Count Sheet menu option to print the count sheet on the report printer. The count sheet status is updated to Printed and a count sheet is created.
|
Note: Print Multiple Sheets - This option is usually used for Physical Counts of the entire store when more than one count sheet is used, not for Supply CountsTo print multiple count sheets, select the Print Multiple Sheets menu option. The system prompts you to select the count sheets to be printed. When prompted, select Yes to confirm the count sheets to be printed. The count sheet status will be updated from Preliminary to Printed. |
|
Note: If enforced by your store policy, you may not be able to enter your counts until the count has been initiated. Counts are usually initiated on the day of the count.If the store is open, a warning message is displayed. Select Yes to continue or No to exit the count. |
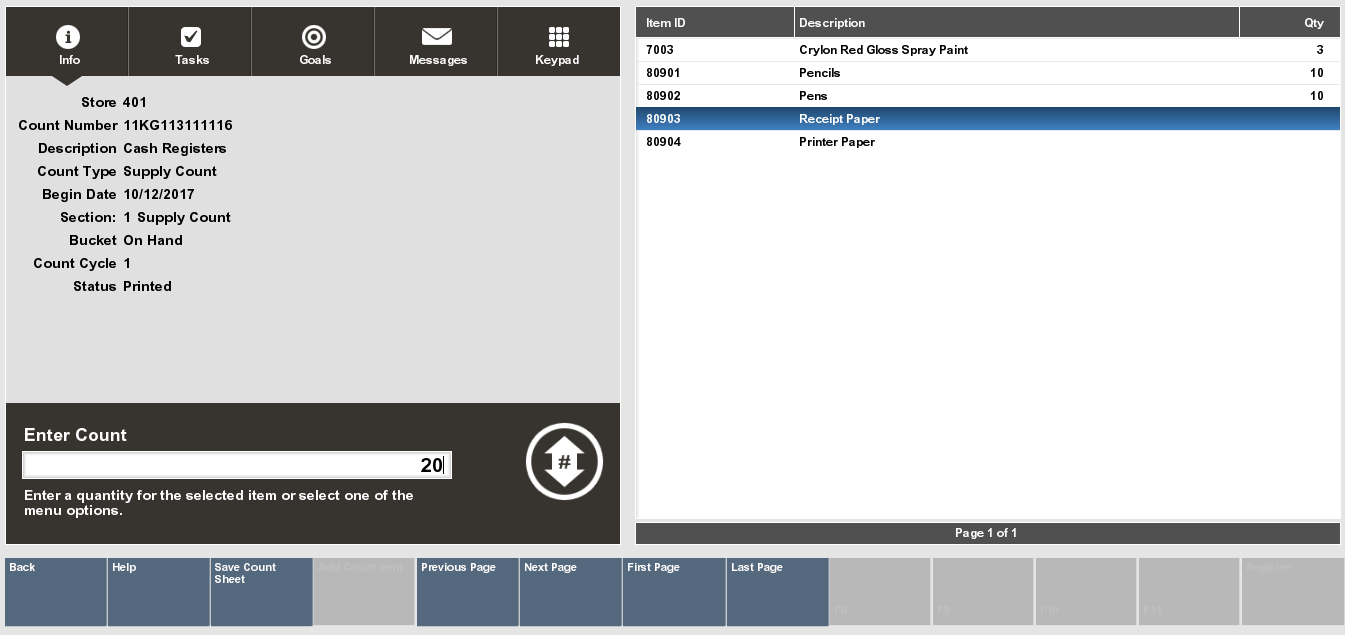
Use the printed count sheet to record your supply item counts.
|
Note: About the count menu options:
|
Select Initiate Count to take a snapshot of current supply inventory. If the store is open, a warning message is displayed. Select Yes to continue and the Count Status changes to initiated, or No to exit the count.
Count the items listed on the supply count sheet.
When you have finished counting the inventory items, return to the Inventory module to enter your counts into the system. Refer to Supply Count Process if you need instructions for locating the Inventory Count document you are working on.
At the Supply Count screen, press Enter to open the selected count sheet, or, if you have a printed count sheet available, scan the barcode on the sheet.
In the Enter Count prompt, enter a quantity for the selected item and press Enter. Xstore will enter the count and move to the next item in the list.
|
Note: To modify a count, select the item from the list and enter a new count in the prompt. Press Enter. Xstore displays the new value. |
Select Save Count Sheet.
Select Yes to confirm. The count sheet status changes to saved.
Select Submit Count Sheet.
Continue with step 8 through step 13 to submit and complete your supply count following the same process used for cycle counts.
The system compares the count quantity you entered with the expected quantity based on the snapshot taken of the inventory ledger for supply items.
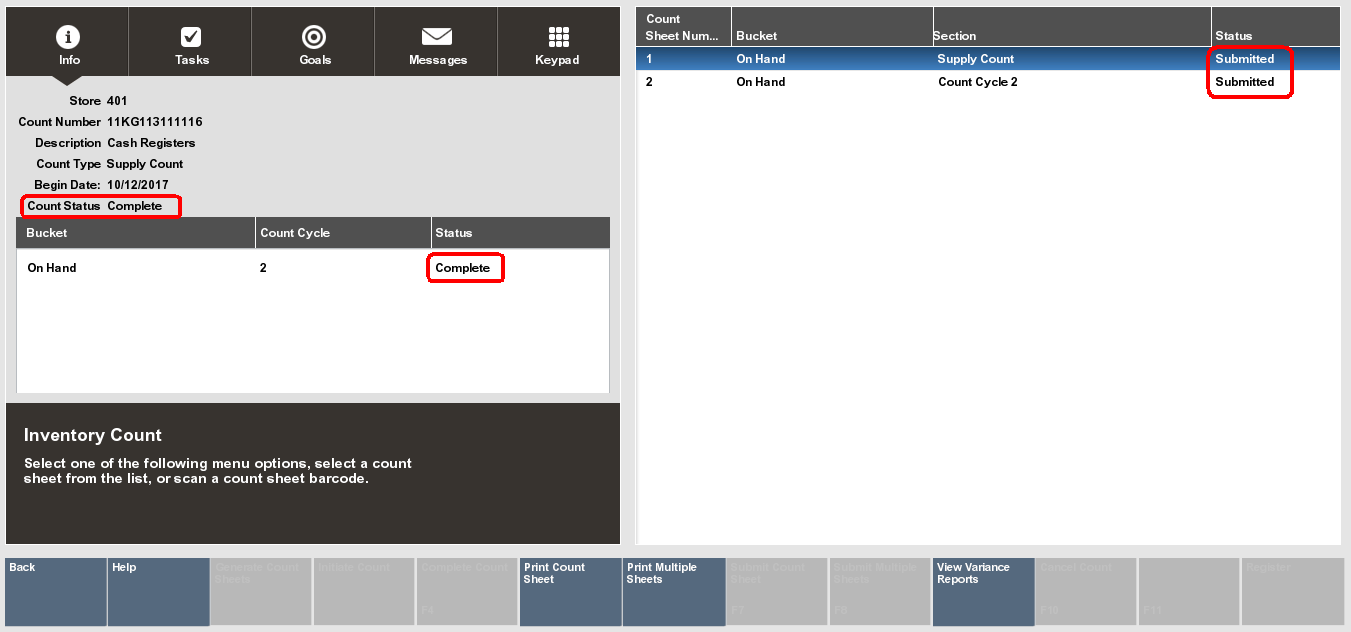
When the Supply Count is completed, select Complete Count. The count screen shows the following status information:
Inventory Document Count Status: Complete
Count Status: Complete and the number of count cycles required to complete the count Each count sheet status for all cycles is set to Submitted
Before you can perform a Physical Count for all items in your store, you must set up a store layout plan to divide your store into manageable sections. Each section will have its own count sheet showing the items in that section. These count sheets can then be distributed to the associates responsible for counting each section. Refer to Store Layout Maintenance for more information about setting up your store layout.
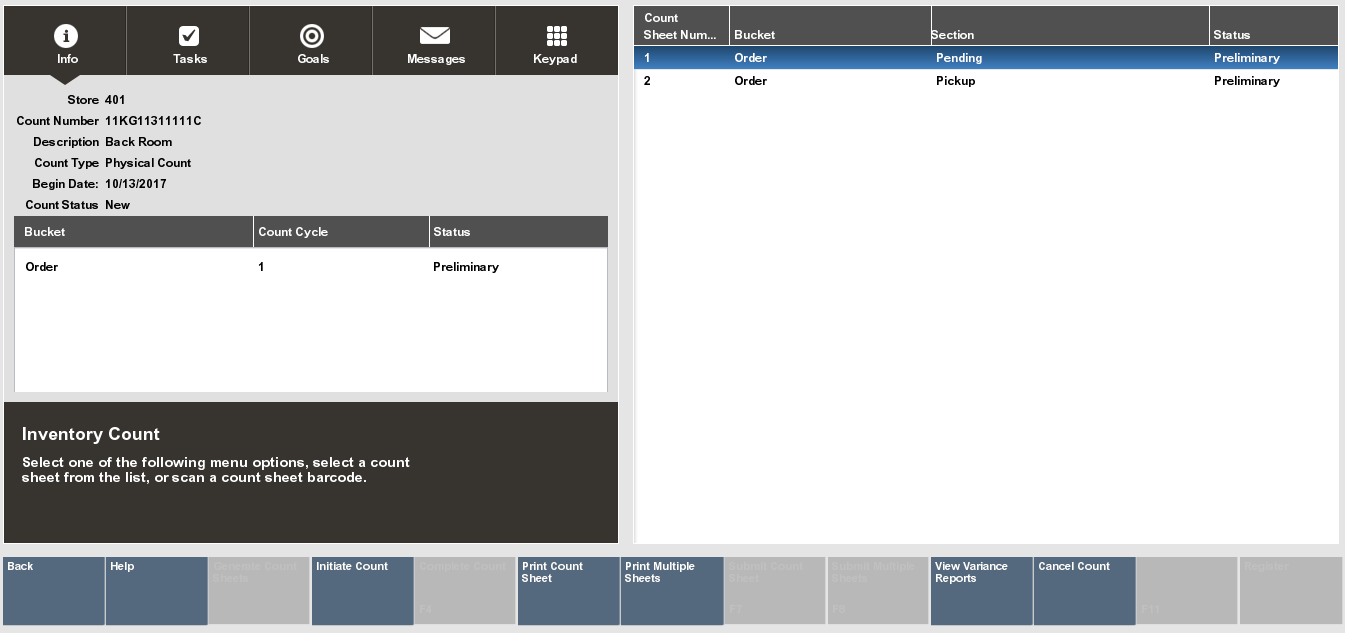
The initial step in the Physical Count process is to find an existing Inventory Count document, or to create a new document if allowed by your store policy.
See Inventory Count Documents for detailed information about locating an Inventory Count document. See Creating a New Inventory Count Document for detailed information about creating an Inventory Count document.
Once the Inventory Count document is located, perform the following steps:
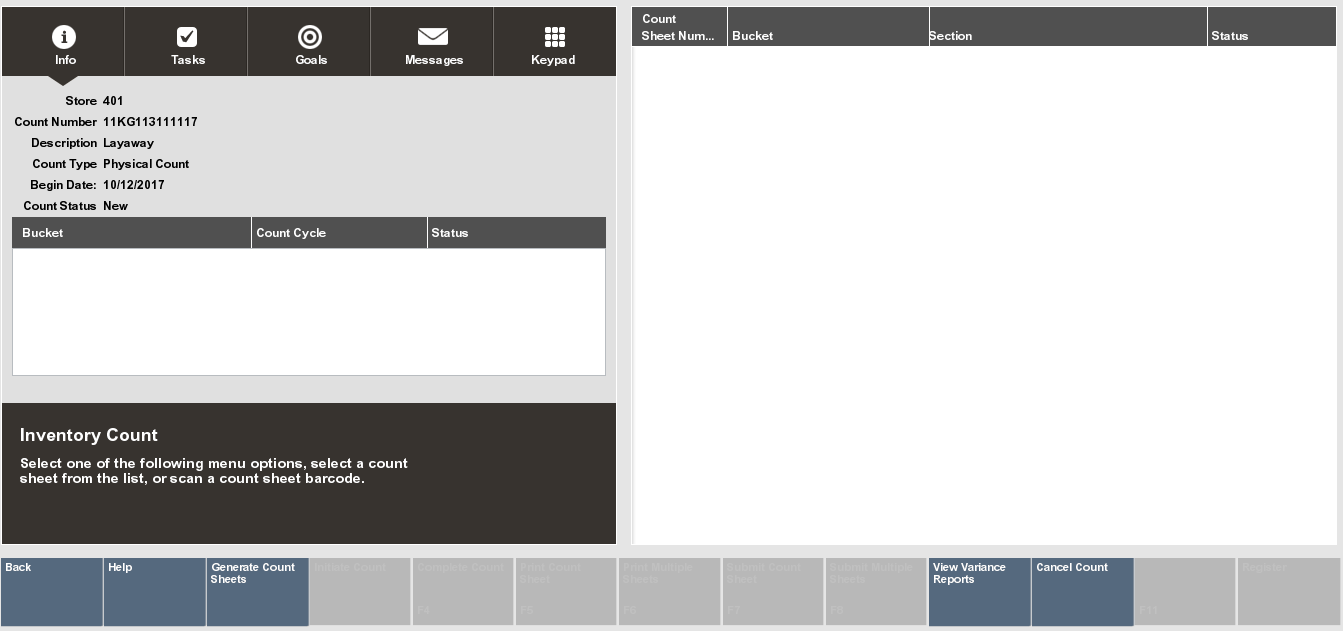
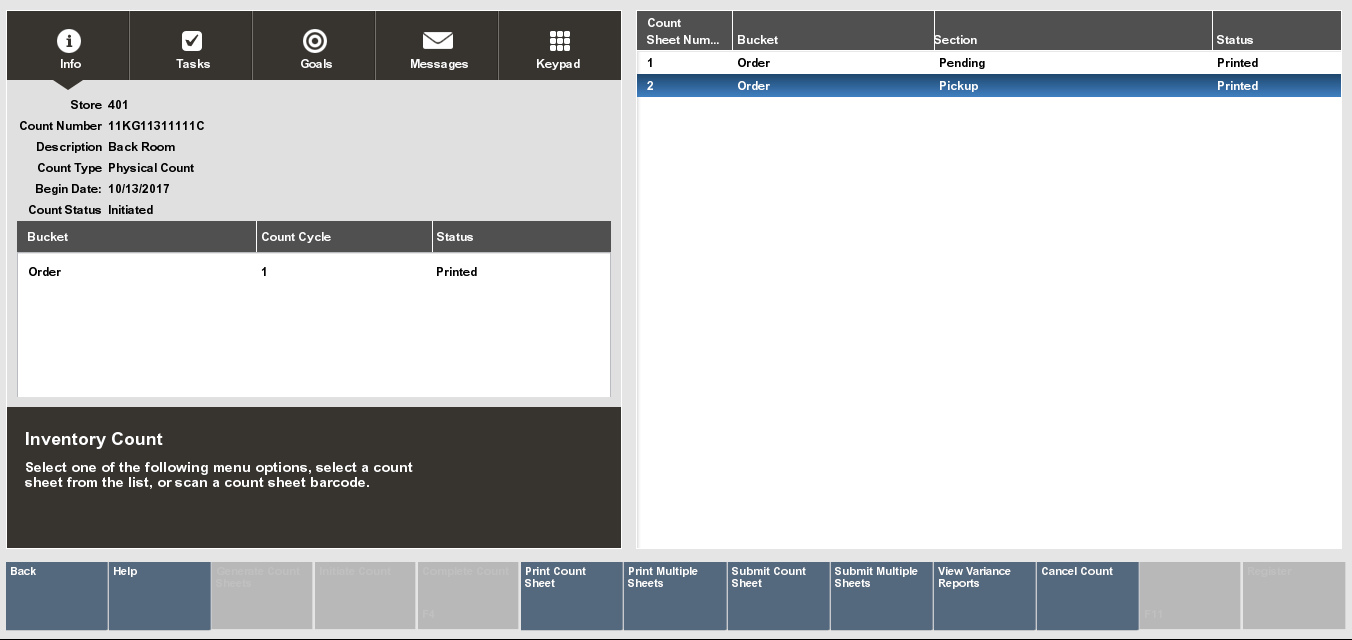
Select the Physical Count document you want to count and select Process. The system displays the Physical Count screen.
Select the Generate Count Sheets menu option on the Physical Count screen to create the count sheets based on your store layout. This screen shows the following information for the new Physical Count:
The top left area of the screen displays the information for the Inventory Count document: Store ID, Count ID number, Count Type, Description, Begin Date, and Count Status.
Beneath this area of the screen displays information for the count sheet:
Bucket - The inventory bucket identifier for this count sheet. Inventory buckets are pre-defined for your store.
Count Cycle - Indicates the number of times the bucket has been counted in order to reconcile any count variances and complete the count. The count cycle will always be set to 1 for the first count. If additional counts are needed to resolve a discrepancy, this number will increment for each recount.will always be set to 1 for the first count. If additional counts are needed to resolve a discrepancy, this number will increment for each recount.
Status - The status of the bucket within the current count and cycle:
Preliminary - The beginning status for a new count.
Printed - Indicates the count sheet has been printed.
Saved - Indicates the count sheet has been saved.
Complete - Indicates the count sheet has been completed.
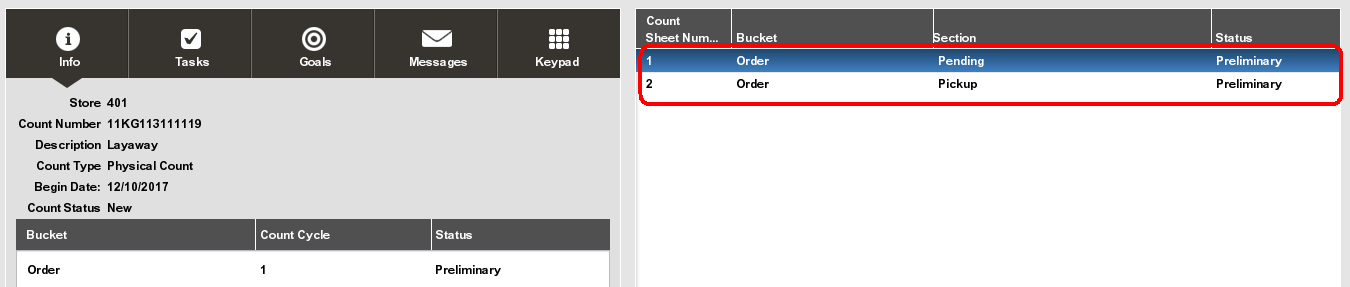
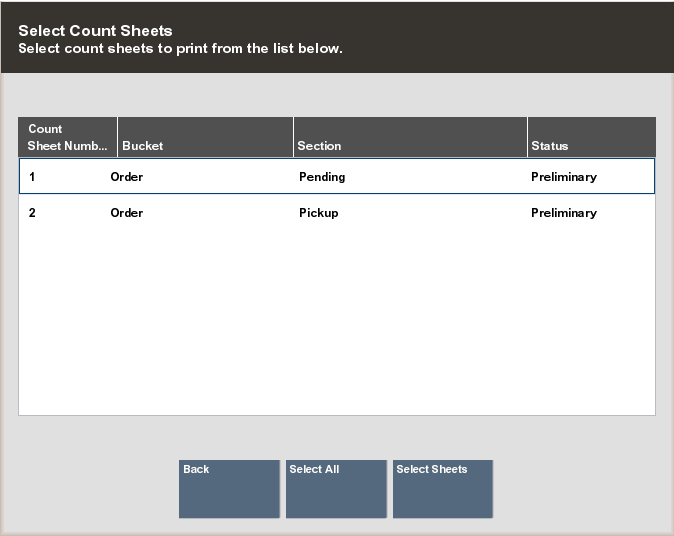
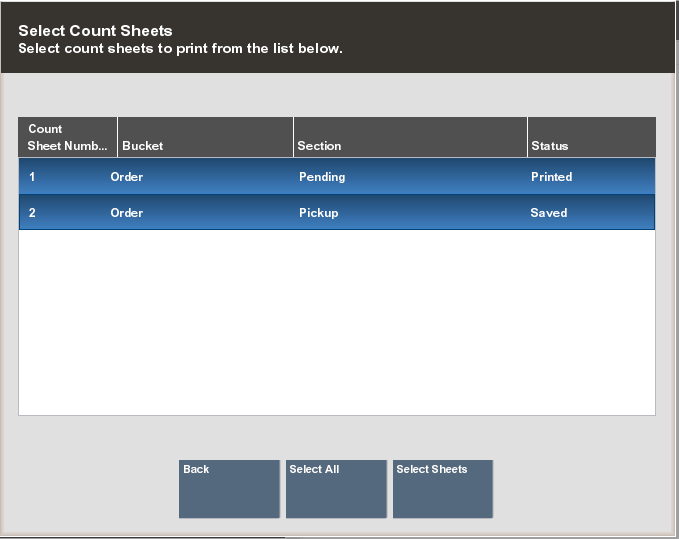
On the right, the screen lists each count sheet based on your store layout:
Count Sheet # - The sequential number associated with each count sheet for this Physical Count.
Bucket - The inventory bucket associated with the count sheet.
Section - The store area to be counted as defined in your store layout.
Status - The status for each count sheet.
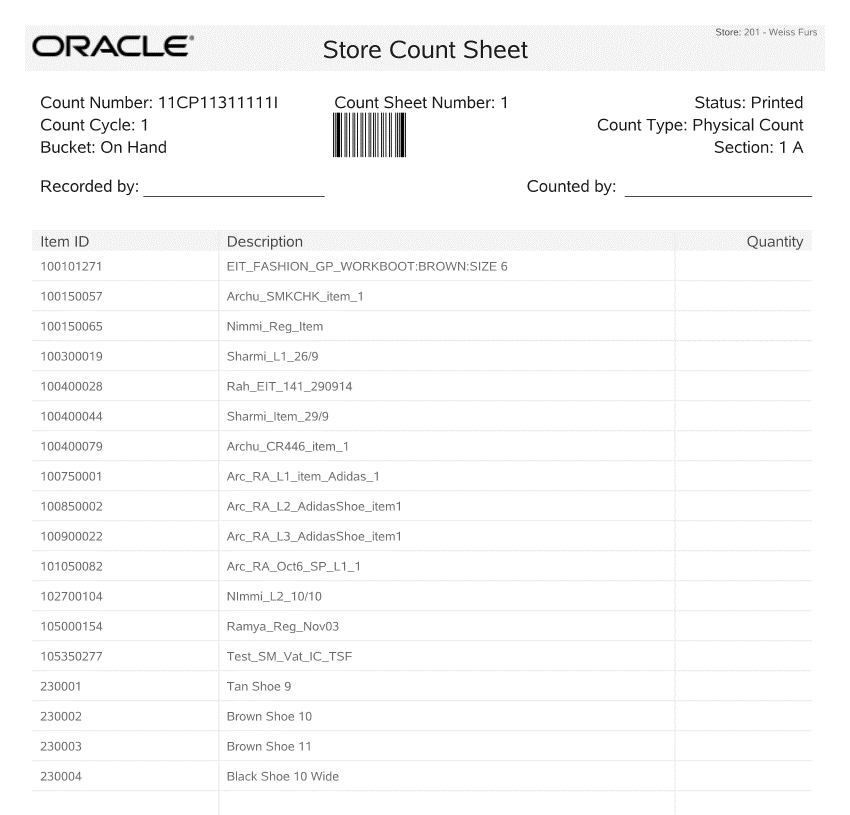
Print the count sheets:
To print one count sheet at a time, highlight the count sheet and select the Print Count Sheet menu option. The count sheet is printed and the status will be updated from Preliminary to Printed.
To print multiple count sheets, select the Print Multiple Sheets menu option. The system prompts you to select the count sheets to be printed. With the count sheet highlighted, press the Spacebar to select each sheet individually, or choose the Select All menu option to print all sheets. When prompted, select Yes to confirm the count sheets to be printed. The count sheet status will be updated from Preliminary to Printed.
Use the printed count sheets to record the item counts. Blank lines are provided so that you can write in any items you find in the section that were not included on the printed list. When you have finished counting the items, return to the Inventory module to enter your counts into the system.
|
Important: If allowed by your store policy, you can enter your counts before initiating the count.If enforced by your store policy, you cannot enter your counts until the count has been initiated. See step 4. |
Select Initiate Count to take a snapshot of current inventory. If the store is open, a warning message is displayed. Select Yes to continue and the Count Status changes to initiated, or No to exit the count.
|
Note: About the count menu options:Initiate Count BASED ON SECURITY PRIVILEGE - This process allows your counts to be compared to the snapshot system-expected quantity. Depending on your store policy, you may be required to initiate the count before entering any counts into the system. Or, if your store policy allows, you may be able to enter your counts before initiating the count. Cancel Count BASED ON SECURITY PRIVILEGE - This option allows you to cancel your count up until it is completed. Only store-created Inventory Counts can be cancelled. When prompted, select Yes to cancel the count. 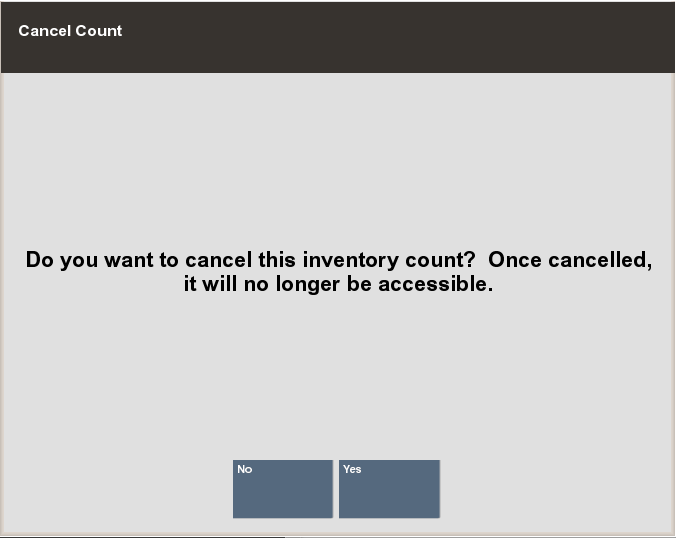
About the count menu options: Initiate Count BASED ON SECURITY PRIVILEGE - This process allows your counts to be compared to the snapshot system-expected quantity. Depending on your store policy, you may be required to initiate the count before entering any counts into the system. Or, if your store policy allows, you may be able to enter your counts before initiating the count. Cancel Count BASED ON SECURITY PRIVILEGE - This option allows you to cancel your count up until it is completed. Only store-created Inventory Counts can be cancelled. When prompted, select Yes to cancel the count Complete Count BASED ON SECURITY PRIVILEGE - This option marks the count sheet as complete. The Complete Count menu option will only be enable after the count cycles for the inventory count are complete. Esc - This option will exit the current Count document and take you back to the Inventory Count search form (Figure 5-4). |
Now count the items listed on the count sheets...
When you have finished counting the inventory items, return to the Inventory module to enter your counts into the system. Refer to Physical Count Process if you need instructions for locating the Inventory Count document you are working on.
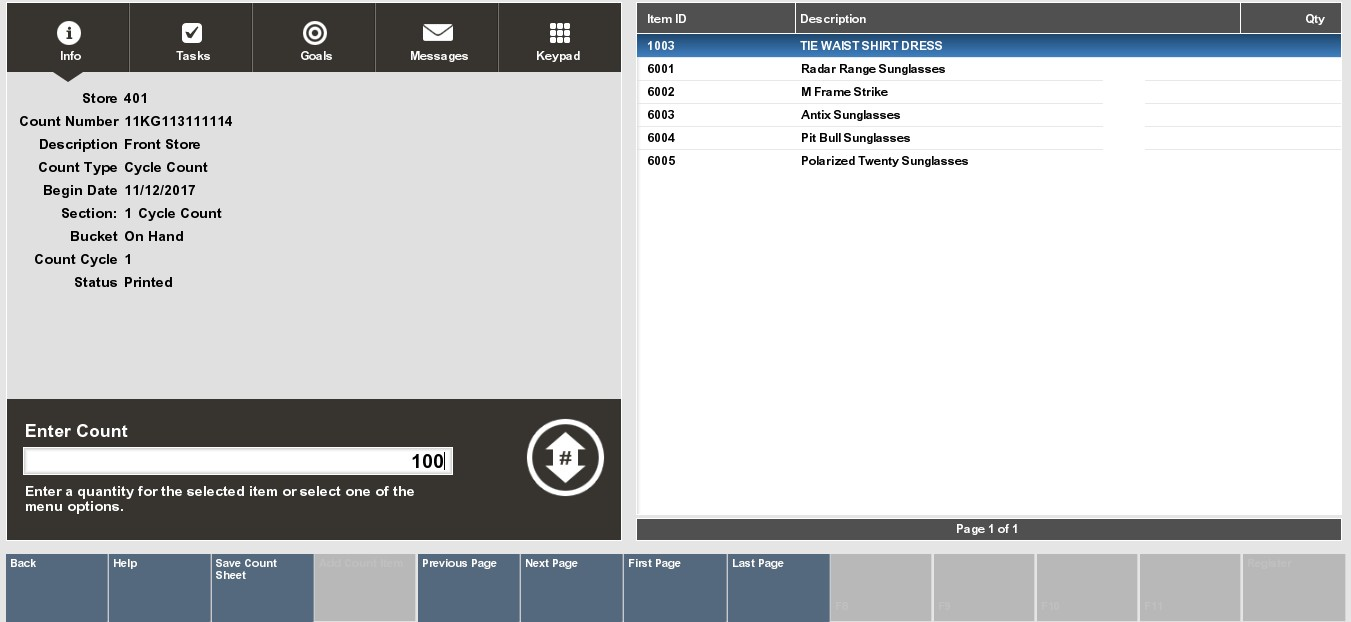
At the Physical Count screen, select a count sheet from the list and press Enter, or scan the barcode from the count sheet to display the items in the bucket and section.
In the Enter Count prompt, enter a quantity for the selected item and press Enter. Xstore will enter the count and move to the next item in the list.
|
Note: f you counted any items that are not found on the list, select the Add Count Item menu option. When prompted, enter or scan the item ID and enter the quantity you counted for this item.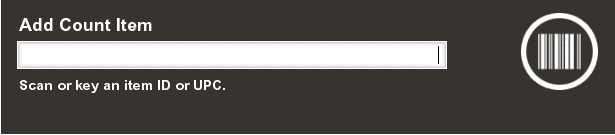 |
Select Save Count Sheet. Repeat steps 6-8 for all count sheets.
Submit the counts.
In this step, your count is compared to the system-expected quantity captured during the initiation process. Any variances between your count and the system- expected quantity will be reported, allowing you to resolve any discrepancies through additional counting cycles.
To submit a single count sheet, select the count sheet in the list and select the Submit Count Sheet option.
To submit multiple count sheets at one time, select the Submit Multiple Sheets menu option. The system prompts you to select the count sheets to be submitted. With the count sheet highlighted, press the Spacebar to select each sheet individually, or choose the Select All menu option to submit all sheets. When prompted, select Yes to confirm the count sheets to be submitted.
The next step depends on the type of variance processing used: Automatic or Manual.
If the counted quantity and the expected Snapshot quantity match, the inventory bucket for the item is marked as settled – no variance, and the count is complete.
If the counted quantity and the expected Snapshot quantity do not match, the inventory bucket for the item is marked as having a variance.
If your system is set up for Automatic Variance Processing, any variances will result in a new count cycle: Count Cycle 2. See Automatic Variance Processing for detailed information about this type of variance processing.
If your system is set up for Manual Variance Processing, you can choose whether or not to perform a recount. See Manual Variance Processing for detailed information about this type of variance processing.
|
Note: In Count Cycle 2 (and higher), all items with variances will be grouped by Bucket. The Sections used for counting in Cycle 1 are not used for Cycle 2 and greater.For example, if you have sections within the Layaway bucket such as an Earrings Section, a Watch Section, and a Jewelry Section with variances reported in Cycle 1 (1), then in Count Cycle 2 ( 2 ), the three Layaway sections (Earrings Section, Watch Section, and Jewelry Section) will be consolidated into a single Layaway bucket and the Section identifier will be ignored. |
If you must recount any items, perform the same steps you used for count cycle 1:
|
Note: Since subsequent count cycles are always compared to the initial snapshot taken for the first count cycle, you cannot initiate the count again. |
Print the count sheet. Only the items with variances will be listed for a recount.
You cannot add additional items to Count Cycle 2.
When the recount is finished and saved, select the Submit Count Sheet menu option. Once again, the system will compare the entered counts with the expected counts.
You can select the View Variance Reports menu option to create a variance report showing the count discrepancies. When prompted, select a Variance Report from the list and press Enter. The system creates and displays the report.
After the final count cycle sheet is submitted, the system displays a prompt indicating you have completed all count cycles.
Select one of the following options to continue the counting process:
Select Continue to return to the Inventory Count screen. From the Inventory Count screen you can:
View/Print Variance Reports from all count cycles that had variances.
|
Tip: No Variance Report will be available for a count cycle that had no variances since all variance values would be 0. |
Save the submitted count cycles and post inventory counts at another time.
Print count sheets.
Cancel the count.
Complete the count to post inventory counts and adjust the inventory counts in the system.
<OR>
Select Complete Count to post inventory counts and adjust the inventory counts in the system.
After completing the count sheets, the system marks the Inventory Count document as Complete and inventory quantity will be adjusted accordingly.
In Automatic Variance Processing only items with count variances are moved to the next cycle of counting. This process will continue moving items with count variances to the next count cycle automatically until the count for the item matches the value expected by the system (from the snapshot), or the quantity counted for two count cycles matches.
About Count Cycle 2:
The Inventory Count document status is Initiated. Any subsequent count cycles are always compared to the initial snapshot taken for the first count cycle. You cannot initiate the count again for this Count document.
If using Automatic Variance Processing, count cycle 2 is created automatically any time there is a count discrepancy between the counted and expected quantities in count cycle 1.
Any items with variances in count cycle 1 are moved to count cycle 2 for a recount. Items that matched the entered quantity and expected quantity will not be included in the recount.
Physical Inventory count processing for count cycle 2: Consolidating Sections
In Count Cycle 2 (and higher), all items with variances will be grouped by Bucket. The Sections used for counting in Cycle 1 are not used for Cycle 2 and greater.
For example, if you have sections within the Layaway bucket such as an Earrings Section, a Watch Section, and a Jewelry Section with variances reported in Cycle 1, then in Count Cycle 2, the three Layaway sections (Earrings Section, Watch Section, and Jewelry Section) will be consolidated into a single Layaway bucket and the Section identifier will be ignored.
The count sheet status for count cycle 2 is set to Preliminary, indicating this is a new count.
The count sheet status for count cycle 1 is set to Submitted status and cannot be changed.
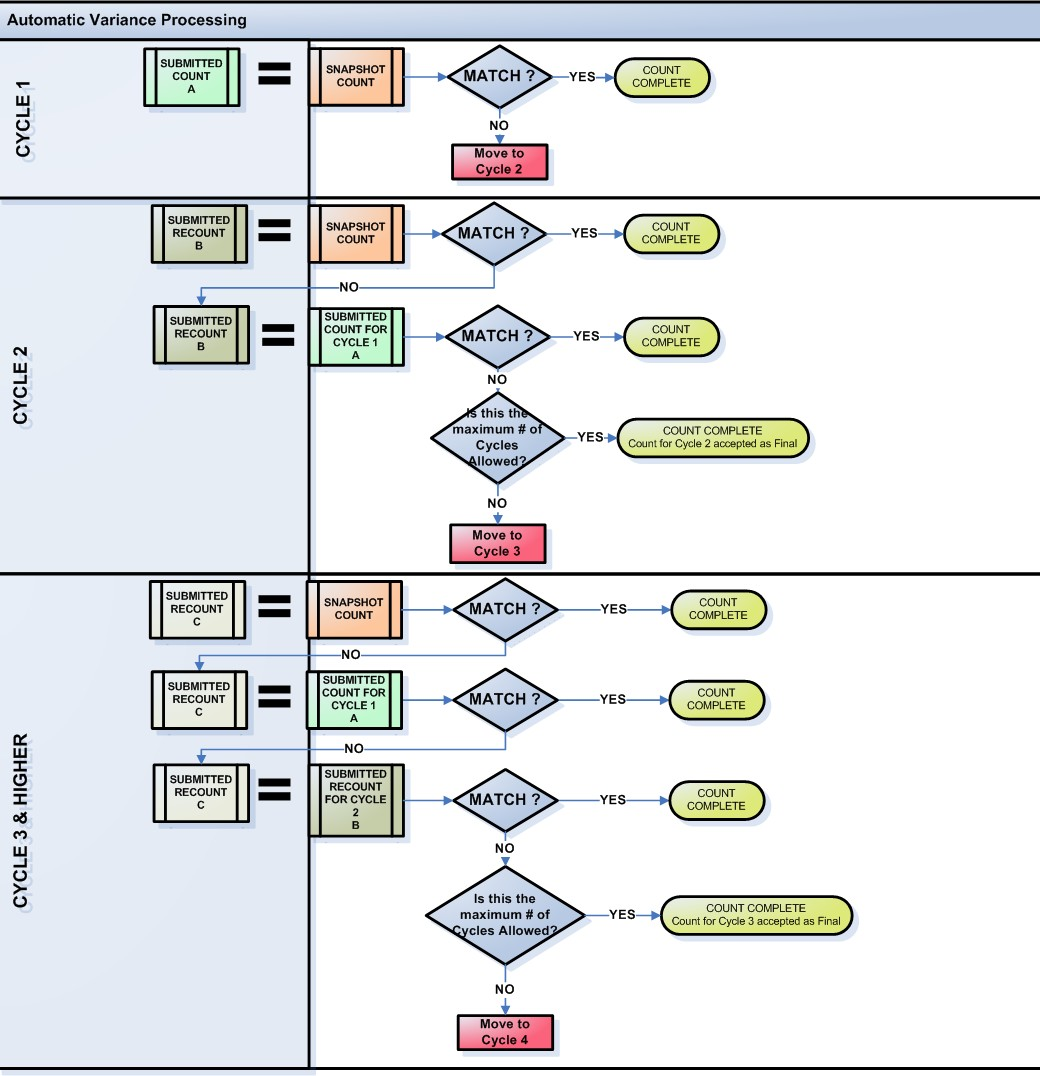
This section shows a simple example of the process the system uses to calculate variances between expected quantity and counted quantity. In this example, the store is set up to use a maximum of 4 count cycles per Inventory Count document.
Count Cycle 1
The system compares the submitted item count for the inventory bucket against the snapshot:
If the numbers match, the inventory bucket for the item is considered settled - no variance, and the count for the item is Complete.
If the numbers do not match, the item is moved to the next count cycle (count cycle 2) and must be recounted.
Count Cycle 2
The system compares the submitted item recount for the inventory bucket against the snapshot:
If the recount and snapshot numbers match, the inventory bucket for the item is considered settled - no variance, and the count for the item is complete.
If the recount and snapshot numbers do not match, the count is compared against the inventory bucket's prior count for count cycle 1.
If the count matches the count for count cycle 1, the recount of the inventory bucket is considered as matched, the count for the item is complete, and the matched count will be used to compute the variance.
If the count does not match the count for count cycle 1, or the original snapshot, the item is moved to the next count cycle (count cycle 3) and must be recounted.
|
Note: Count Cycle Grouping: In a Physical Count, only a single count sheet will be created for Count Cycle 2 (and higher). The items to be recounted on the count sheet will be grouped by Bucket, and the Sections defined for Count Cycle 1 are no longer referenced. |
Count Cycle 3 and Higher
The process is generally the same as described in Count Cycle 2. However, if the numbers do not match for the inventory bucket, the count will be compared against the inventory buckets for all prior count cycle counts, in addition to the original snapshot. If the item is not settled or matched once the maximum number of count cycles is reached, the system considers the last count as final and uses it to calculate the variance.
Example 1 (Maximum: 4 count cycles)
Snapshot value = 4
Count for cycle 1 = 3
Count for cycle 2 = 4
Item is considered settled Cycle 2 = Snapshot, no variance 4-4=0
Example 2 (Maximum: 4 count cycles)
Snapshot value = 4
Count for cycle 1 = 3
Count for cycle 2 = 3
Item is considered matched Cycle 2 = Cycle 1, variance= -1 3-4=-1
Example 3 (Maximum: 4 count cycles)
Snapshot value = 4
Count for cycle 1 = 3
Count for cycle 2 = 2
Item automatically moved to count cycle 3 for recount No match between Snapshot or Cycles 1 and 2
Example 4 (Maximum: 4 count cycles)
Snapshot value = 4
Count for cycle 1 = 3
Count for cycle 2 = 2
Count for cycle 3 = 2
Item is considered matched Cycle 3 = Cycle 2, variance= -2 2-4=-2
Example 5 (Maximum: 4 count cycles)
Snapshot value = 4
Count for cycle 1 = 3
Count for cycle 2 = 2
Count for cycle 3 = 1
Count for cycle 4 = 6
The 4th count of 6 is final, variance= +2 6-4=2(System uses last count cycle value as the final count when there are no matches once the maximum cycles allowed is reached).
In Manual Variance Processing, the system does not perform any automatic movement of items from one count to the next. Instead, you can select individual count sheets to be recounted in the next cycle. The sheet can be moved to the next cycle until you determine that the count is complete, or until the maximum number of cycles is reached. The entire count sheet is provided for the recount, not only items that had a count variance from the expected quantity. However, on the last count cycle, or once the maximum cycles allowed is reached, only items with variances will appear on the Inventory Count Variance Report.
After submitting the last count sheet for an inventory bucket, the system displays a prompt to ask whether or not you want to recount this count sheet.
To recount the count sheet, press the Spacebar to select the sheet from the list and press Enter. This moves the sheet to the next cycle of the count. Recount
the items on the count sheet following the same process used for count cycle 1. However, it is not necessary (or possible) to initiate the count again. Any subsequent count cycles are always compared to the initial snapshot taken for the first count cycle. You can recount the count sheet as many times as necessary, up to the maximum number of cycles permitted by your store policy.
|
Note: If you select a Count Sheet for a recount and the maximum number of cycles has been reached, you will be prompted to complete the count and no additional count cycles are permitted. |
To complete the count sheet, accepting any variances if applicable, select Complete Count Bucket. This option does not move any counts into the next count cycle, but completes the count for this inventory bucket. The counts from
the last cycle completed will be used to calculate the final variances for the bucket against the snapshot.
A variance report is created for each bucket in each cycle of the inventory count. After the final count cycle sheet has been submitted, or once all inventory bucket statuses are complete, the system posts inventory and creates the final variance report for all buckets.
To view a variance report, select the View Variance Reports menu option. See Figure 5-39.
Select a variance report from the list:
Select Print report to execute the report and send the results to a printer.
Select Save report to save this report with the current data, or save only the report parameters to run this specific report with these parameters again. If you save the report, assign a name to it so it can be viewed whenever needed. Xstore suggests a name, but you may type in the Save Report As field and change it.
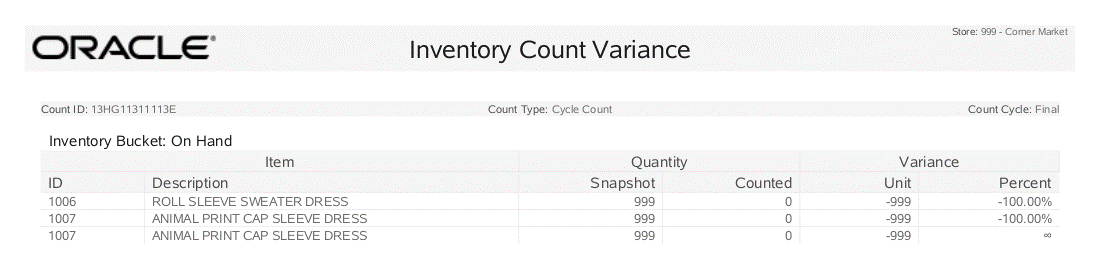
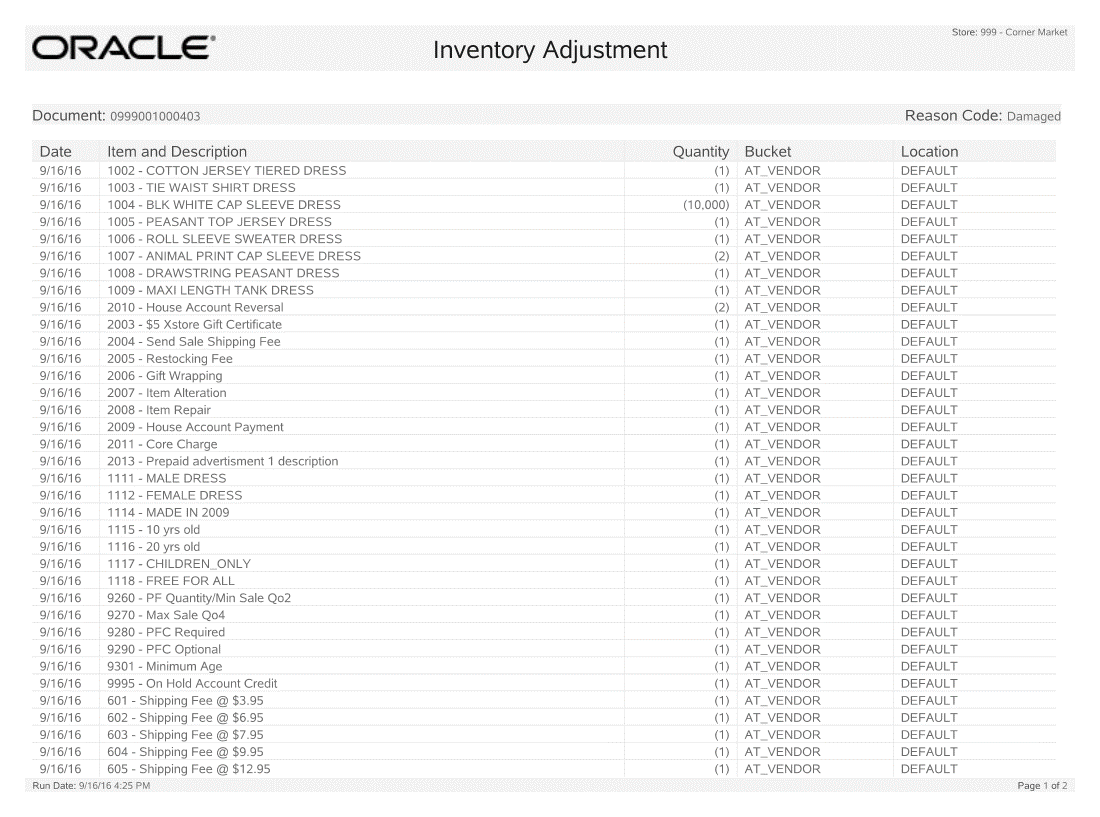
Variance Reports include the following header information:
Count #: The auto-generated count identifier associated with the Inventory Count document.
Count Type: The type of count: Physical Count, Cycle Count, Supply Count
Count Cycle: Indicates the number of times the bucket was counted to obtain these results.
Inventory Bucket Section: Used for Physical Inventory counts; defines the store layout area for the count.
For each Item ID with a variance in the inventory bucket, the following information is shown:
Item ID: The item identifier.
Description: The item description.
Snapshot quantity: The quantity recorded when the count was initialized.
Counted quantity: The count value submitted by the associate after counting the items.
Unit variance: The difference between the snapshot value and the submitted count value.
% variance: The difference between the snapshot value and the submitted count value, as a percentage.
Variance Percentage Calculation Formula: If snapshot quantity = 0 then infinity,
else,
If snapshot quantity < 0 then (-1 * (unit variance / snapshot quantity)) * 100, else,
(unit variance / snapshot quantity) * 100
Please note that rather large variance percentages (well over 100%) are correct if you have a small snapshot quantity and a large unit variance.
The most efficient way to count physical inventory is to divide the store into specific count sections, based on the physical store layout, and possibly the number of associates that will be counting the items. These count sections are set up for inventory buckets you have defined for your store. Each count section will generate a list of items on a count sheet. For example, if you set up four sections, then four separate count sheets will be created for the count process. This allows you to assign the associates to specific areas of the store, equipped with a count sheet specifying the items to be counted in that section.
At the Register Login screen, select the Back Office option.
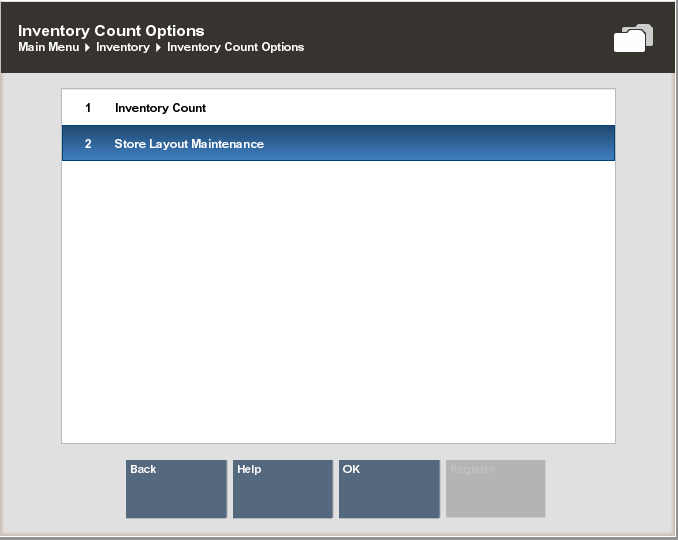
After logging in to the Back Office by entering your employee ID and password, select the Inventory option from the Main Menu and OK.
At the Inventory menu, select the Inventory Count Options option.
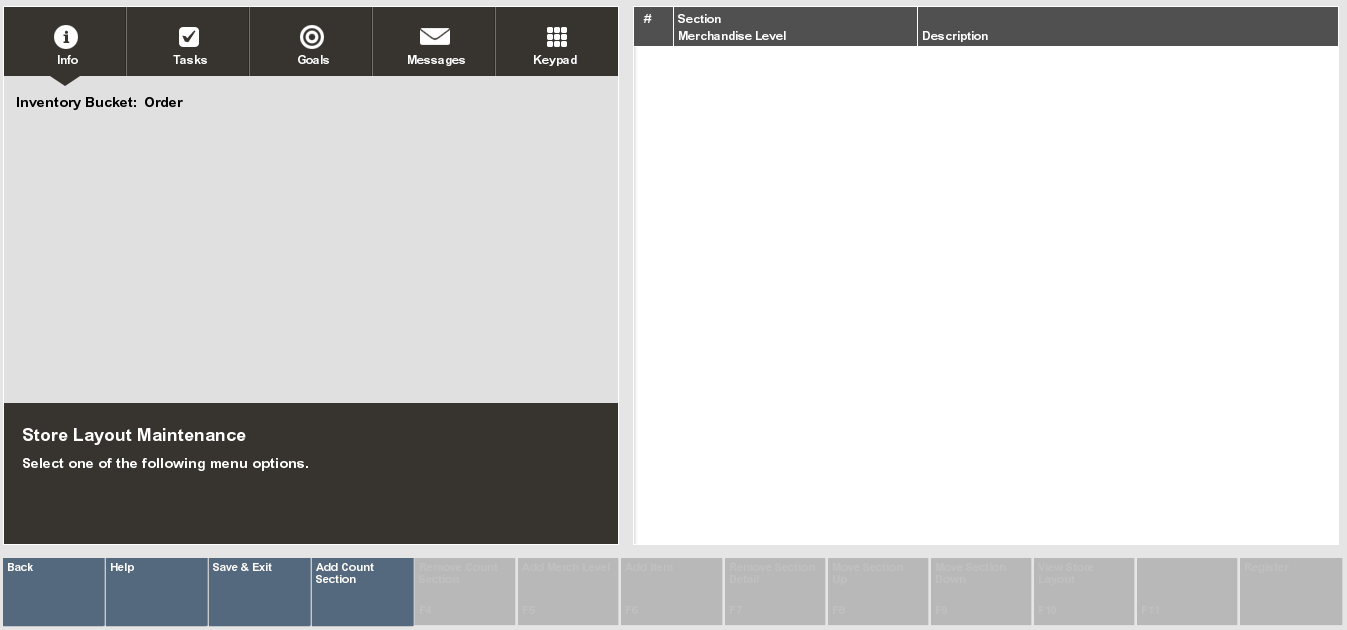
At the Inventory Count Options menu, select the Store Layout Maintenance option.
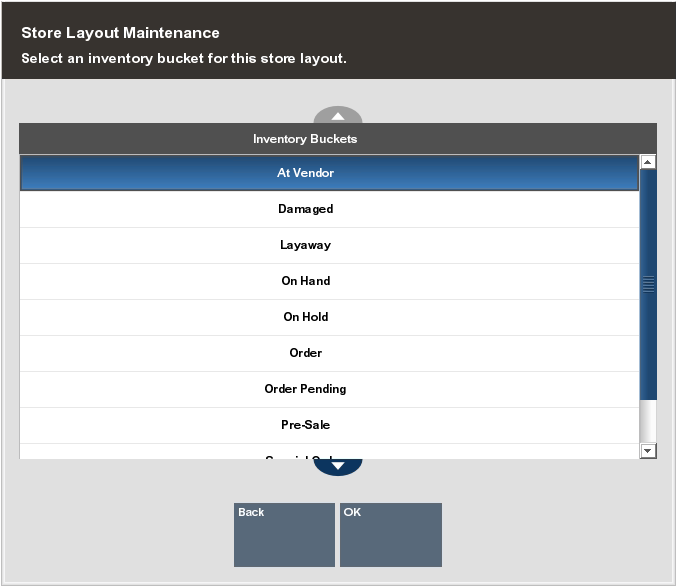
The system displays a list of the inventory buckets defined for the store. Select an inventory bucket for this count section.
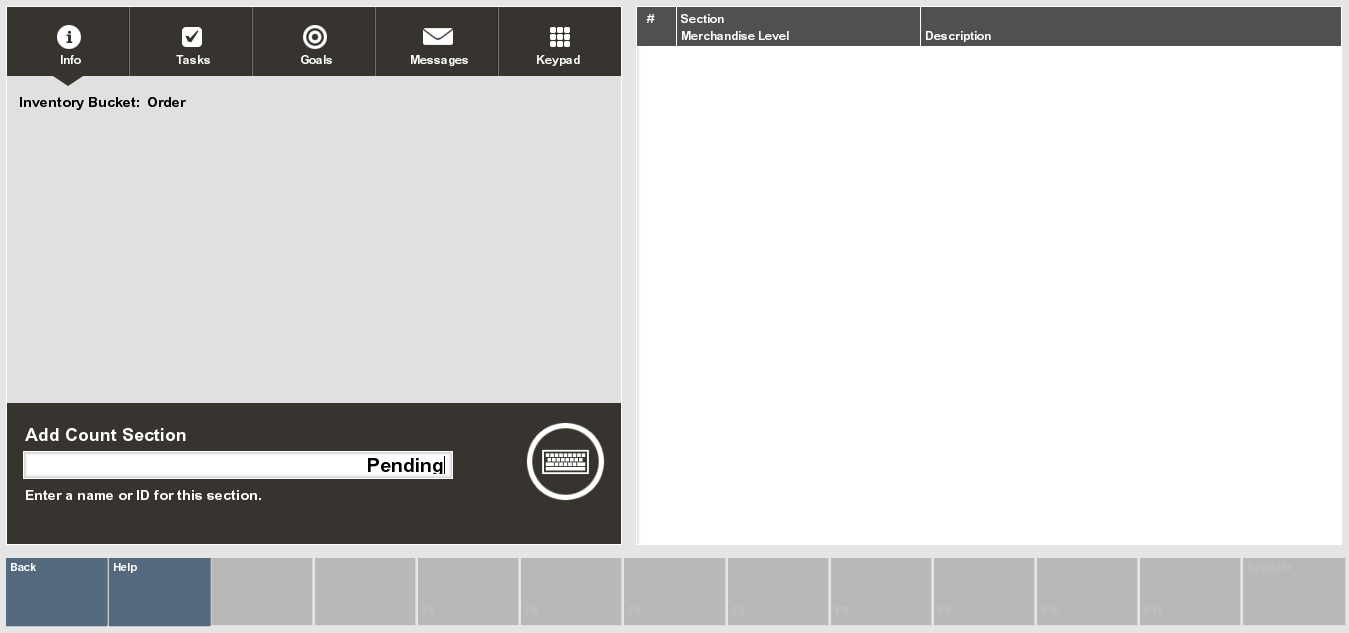
The system opens the Inventory Bucket - Add Count Section window. Select the Add Count Section menu option to create a count section for the bucket.
|
Note: If the inventory bucket has other count sections defined, the disabled menu options shown in Figure 5-48 above will be enabled and the count sections will be listed on the view port. |
Type a name or ID for the new count section within this inventory bucket and press Enter to add the count section to the bucket.
|
Note: Repeat adding count and entering name sections to the inventory bucket as needed. |
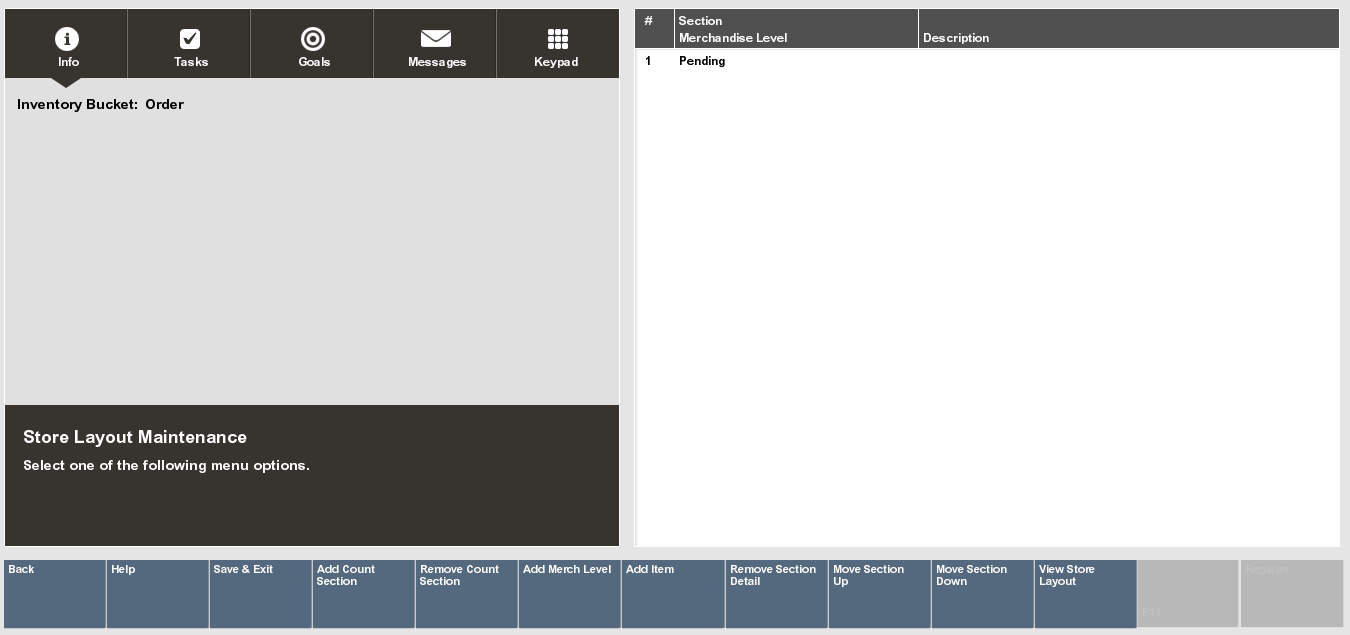
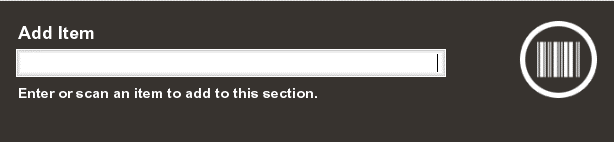
Next, define the items that are part of the count section. Items can be added individually (Add Item option) or by merchandise level (Add Merch Level option).
Select either the Add Item option or the Add Merch Level option (Figure 5-50).
Select the count section from the list and press Enter.
If you chose to add an item, scan or enter the item ID at the prompt and press Enter.
If you chose to add a merchandise level, select the merchandise level from the list and select Process.
The items and/or merchandise levels are added to each count section for the inventory bucket and shown on the view port.
The following options are available if you need to modify the count sections and items:
Select the Remove Count Section option to remove a count section and the associated items from the store layout.
Select the Remove Section Detail option to remove an item or merchandise level from a count section.
Select the Move Section Up or Move Section Down options to move the count section position higher or lower in the list of count sections.
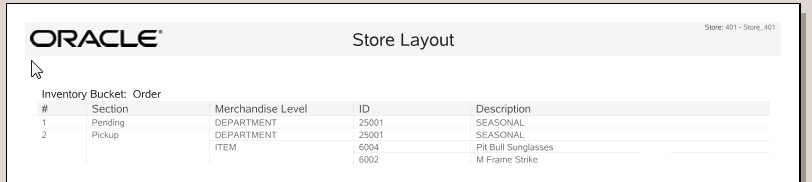
Select the View Store Layout option to view or print a report showing the Store Layout setup for the inventory bucket.
Select the Save & Exit menu option to save the store layout and return to the Inventory Count Options menu.
Once count sections are set up for an inventory bucket, you can maintain these sections by adding or removing items and merchandise levels as needed. However, any updates you make to the store layout will only apply to new Inventory Counts going forward. Any existing Inventory Counts that have been generated will use the layout defined at the time the Inventory Count was set up.
Use this function to adjust an item's inventory count outside of the actual physical inventory process. You can categorize the relative location of merchandise within the retail environment by selecting the location that is impacted by adding or removing an item from inventory.
At the Register Login screen, select the Back Office option.
After logging in to the Back Office by entering your employee ID and password, select the Inventory option from the Main Menu and press Enter.
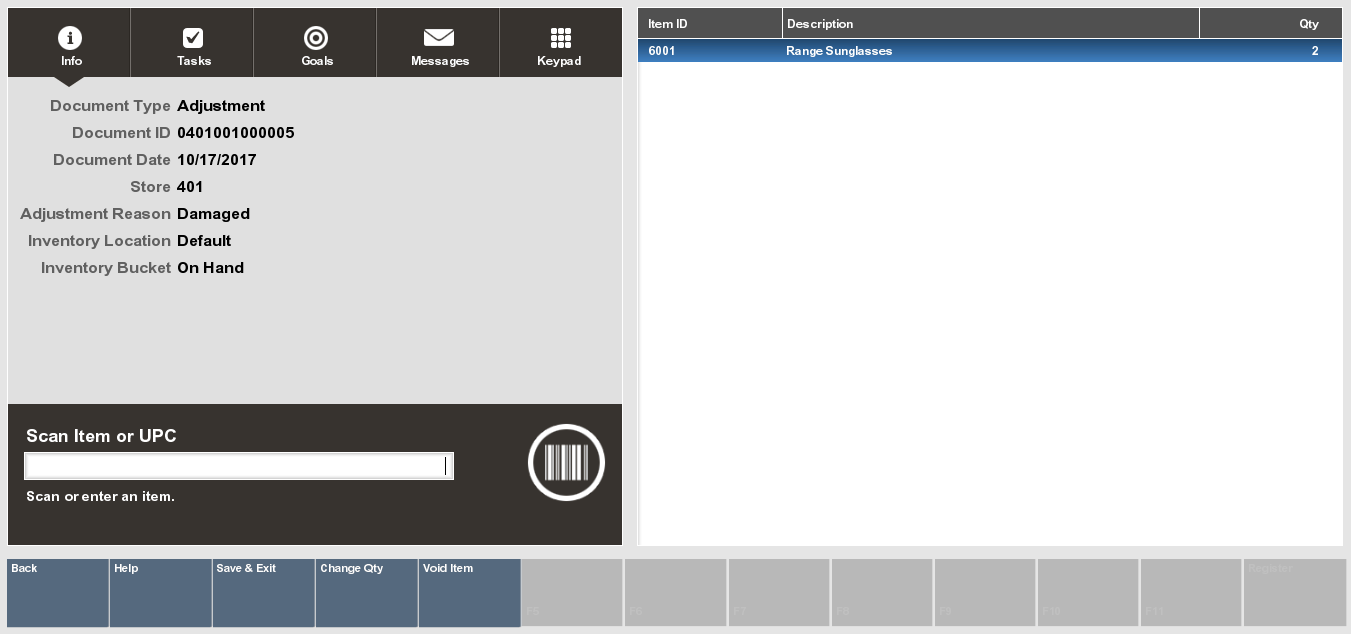
At the Inventory menu, select the Inventory Adjustment option and press Enter.
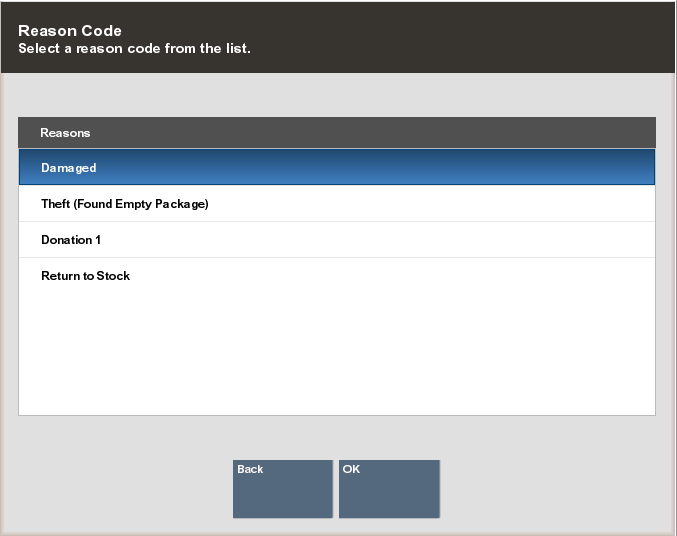
The system prompts you to select the reason for the inventory adjustment. Select a reason from the list and press Enter to continue.
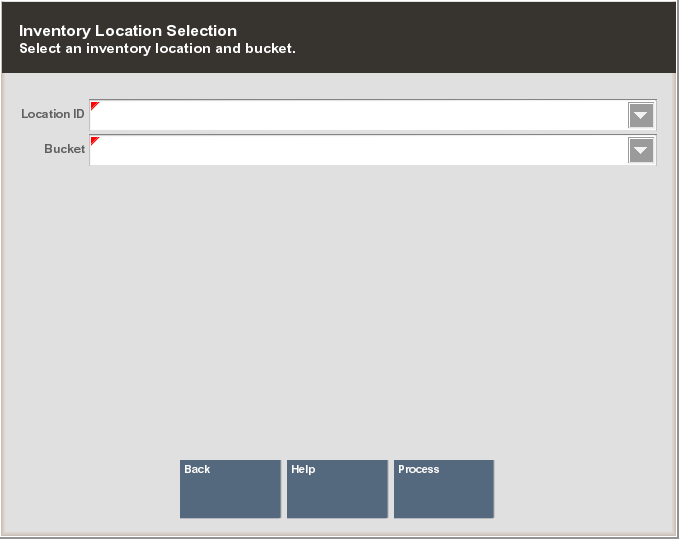
The system prompts you to select the Location ID and bucket for the item. Choose an option from the drop-down lists for each field, then select Process. See Location Based Inventory Functions for an explanation of Location IDs and buckets.
The system displays the adjustment information that you have entered and prompts you to scan or enter the item ID. Scan the item ID or enter the item ID and press Enter to continue.
The system prompts for the item's quantity to be adjusted. Enter the item's quantity at the prompt and press Enter to continue.
The system displays the item's information and adjustment quantity in the view port area of the screen.
You also have the following edit options before saving the adjustment record:
Change Quantity: Select this option to edit the item's quantity to be adjusted.
Void Item: Select this option to remove an item from the list of adjusted items.
Select the Save & Exit option to retain the inventory adjustment.
The system displays a prompt asking you to confirm that you want to keep the changes. Select Yes to continue or No to return to the Adjustment screen.
The system automatically prints an Inventory Adjustment report for your records.
Inventory counts have several technical limitations to which they must adhere based on the amount of system resources available to a computer running Xstore. All size limitations are necessitated by either a memory concern, or an imposed technical limitation of supporting software, such as Microsoft® SQL Server®.
Limitations/Information
The following numbers are based on a system running Xstore with a maximum of 512MB of memory allocated to it.
The maximum number of items that can be on an inventory count is 300,000. When the count sheets are generated, an algorithm is employed to determine what the final count size will be. If it will be greater than 300,000, generation of count sheets will not be allowed to continue. This limit is necessary to prevent systems from running out of memory while processing an inventory count.
The maximum number of items that can be on a cycle count or supply count is 2,000. This limitation exists due to the required functionality of these types of counts in conjunction with the limitations of Microsoft SQL Server.
The maximum number of inventory adjustments that will be processed by Xstore at the conclusion of an inventory count is 15,000. If a count produces more than 15,000 final variances, the user will be prompted that inventory levels cannot be adjusted. Xstore automatically notifies the corporate office via the inventoryCount.xml file to indicate that variances were not adjusted. The corporate office can then take appropriate action to account for the variances. This limit is necessary to prevent systems from running out of memory while processing an inventory count.
Inventory count data must be deleted routinely at the corporate level to ensure the optimal performance of the queries involved in inventory counts. Also, the inventoryCount.xml file must be deleted after it reaches a certain size (a maximum size is about 250MB). After this size, performance in writing to this file will be significantly decreased