| Oracle® Retail Xstore Point of Service Shipping, Receiving, and Inventory Guide Release 18.0 F11872-01 |
|

 Previous |
 Next |
| Oracle® Retail Xstore Point of Service Shipping, Receiving, and Inventory Guide Release 18.0 F11872-01 |
|
Previous |
Next |
The Receiving functions in Xstore allow you to process a shipment that has arrived and record actions performed on it. The receiving Xstore options allow you to document merchandise that has been shipped to the store from the home office or distribution center and is accompanied by an advanced shipping notice (ASN) in a Receiving Document.Although Receiving Documents are usually downloaded from the home office, you can also create a Receiving Document in your store.A variety of shipment types may be received. They include shipments such as special orders, work orders, orders, vendor shipments, store transfers, and inventory replenishments. After a shipment arrives, you can count items, add comments, change quantities, add cartons, and ultimately, close the receiving document. When the receiving document is closed, inventory is updated.Each Receiving Document has an identifying number for the entire shipment. Each carton belonging to the shipment also has an identifying number. The Receiving Document and carton numbers usually appear on a label or shipping document affixed to each carton. A detailed list of the items in each carton is also sent.You can also view and print a Receiving Exception Report. Refer to the Oracle Retail Xstore Reports Guide for more information about this report.All receiving functions are accessed from the Back Office Menu.
This chapter covers the following topics:
Select the Back Office option.
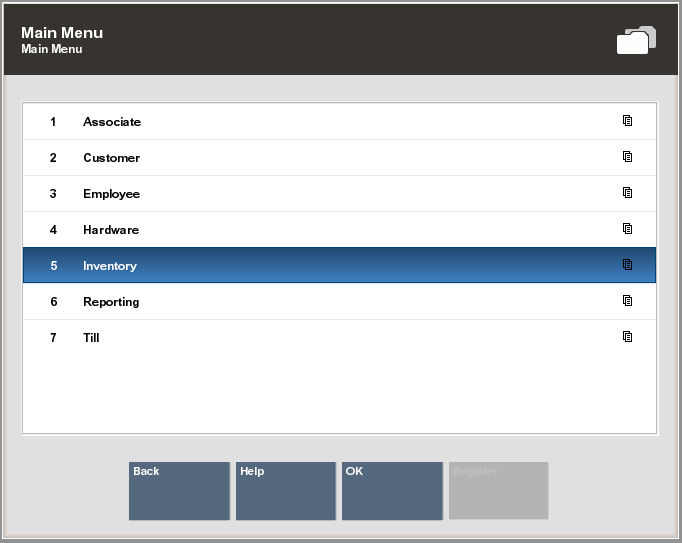
After logging in to the Back Office, select the Inventory option from the Main Menu and press Enter.
|
Tip: You can quickly select any menu option by pressing its associated number on the keyboard. For example, at the Main Menu, press the number 3 on the keyboard to display the Inventory options. |
|
Note: Touch-screen users tap the item to select. See the Xstore Point-of- Service Manager's Guide for Back Office touch-screen options. |
At the Inventory menu, select the Receiving option and press Enter.
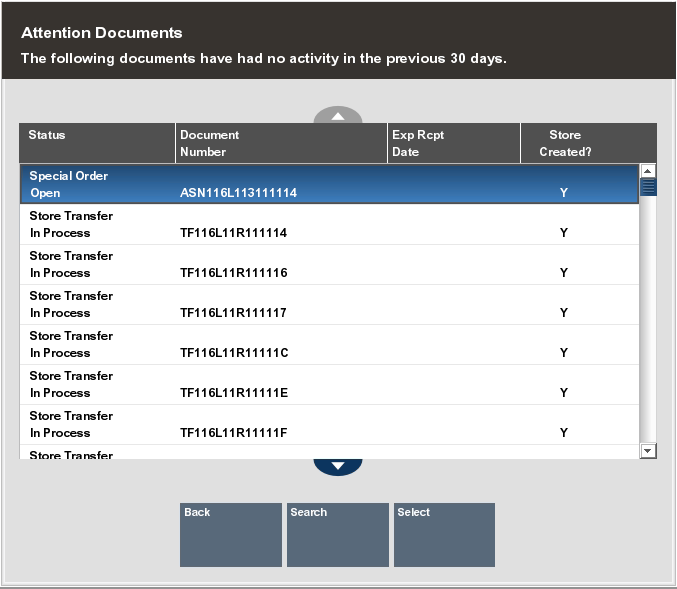
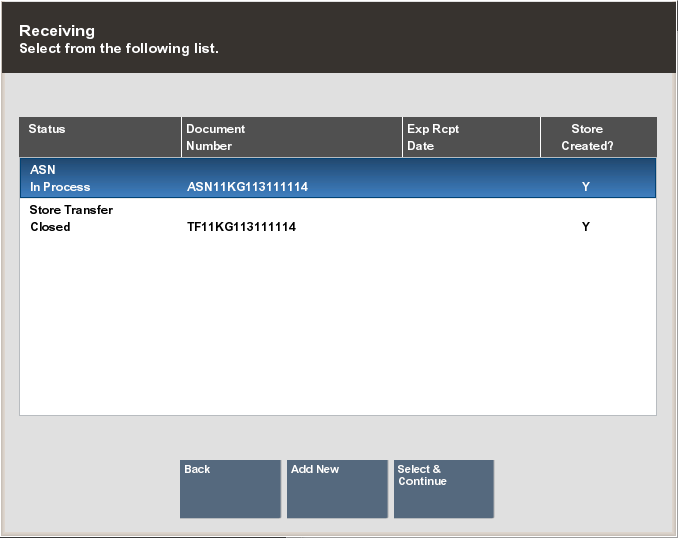
If any Receiving Documents require your attention (as determined by your store's policies), Xstore lists the documents that require follow-up.
You have the following options:
Select a document from the list. Xstore displays the Receiving screen for the selected Receiving Document.
<OR>
Search for a different Receiving Document. Xstore prompts for the search criteria. Enter the search criteria and Xstore displays the Receiving screen for the Receiving Document.
|
Note: If no documents require your attention, Xstore immediately prompts for Receiving Document search criteria. |
Refer to the following sections for information about processing Receiving Documents.
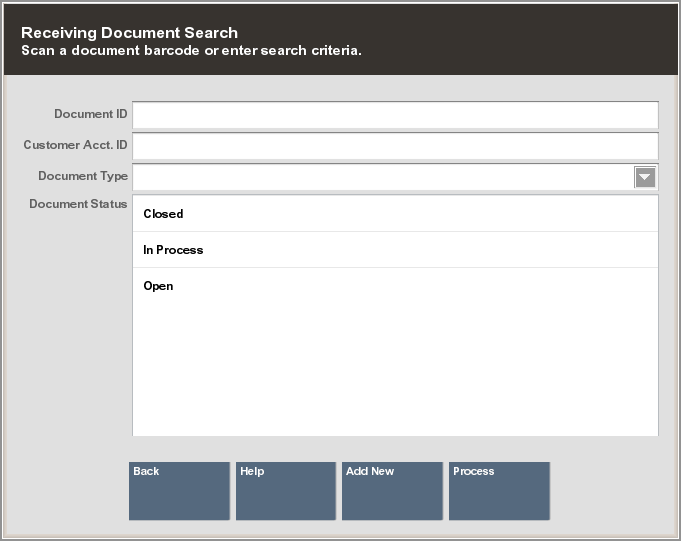
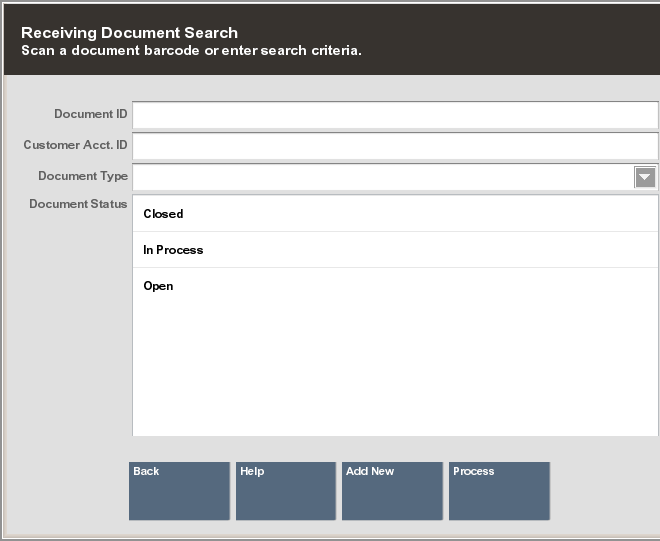
This section describes the Receiving Document search.
At the Receiving Document Search form, enter your search criteria:
|
Note: To return a list of all Receiving Documents, leave all fields blank and select Process. |
Scan or enter a specific Receiving Document ID.
Enter a Customer Account ID.
Select a document type from the list in the Document Type field:
ASN
Replenishment
Transfer
Special Order
Order
Select one or more Document Status options:
Open
In Process
Closed
Select Process to display Receiving Documents that match your search criteria.
More Information about Receiving Document Searches
If you know a Receiving Document does not exist, you can select the Add New option at the Document Search form to create a new Receiving Document. See Figure 2-4. For example, if a shipment arrives in your store without an accompanying Receiving Document, you can create the document so that the shipment can be received
Refer to Creating a New Receiving Document for more information about creating a new Receiving Document at the store.
If you enter a Document ID and the specific document you are looking for is not found, you can search for the document at other stores by selecting the Search All Stores option at the Search Results form. This option is only available if your system is configured for centralized lookups. Xstore will query the centralized database for the Receiving Document.
Use this function if you receive a shipment that is intended for another location (you can receive the shipment so that the home office knows its location, and then perform a store transfer to ship the shipment to the correct store, or follow the instructions for the shipment as instructed by the home office).
If the document you are looking for is not found in the list of Receiving Documents, select the New option at the Receiving Document Search Results form (Figure 2-4) to create a new Receiving Document. Refer to Creating a New Receiving Document for more information about creating a new Receiving Document at the store.
You must select the record you want from the list of documents returned. Select the Receiving Document from the list and press Enter.
Xstore displays the Receiving screen for the selected Receiving Document.
|
Note: Blind Receiving refers to processing a Receiving Document that does not include a list of the items contained in each carton. It may also refer to processing a Receiving Document that lists the items, but does not show their corresponding quantities. If you use a Blind Receiving process, your screens may differ from those shown in this section; however, the Blind Receiving process is essentially the same as outlined in the steps below. |
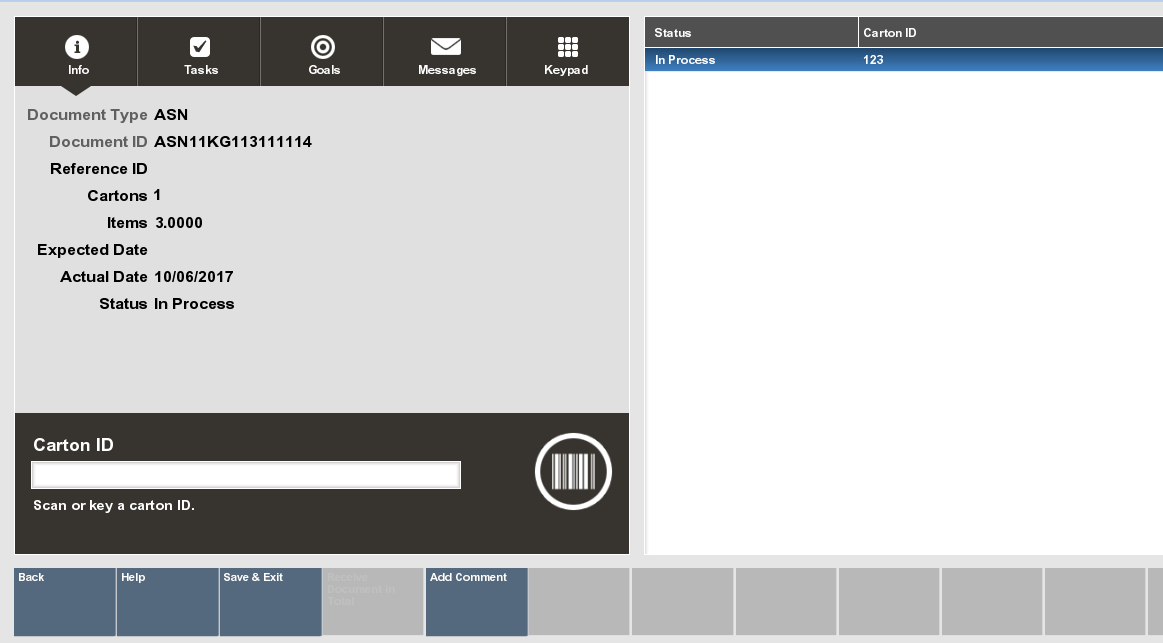
This screen shows the following information for the Receiving Document:
Document Type
Receiving Document Identifier
OPTIONAL Reference Identifier
Number of cartons in the Receiving Document
Total Number of items in the Receiving Document
Expected Receipt Date for the shipment
Actual Date of shipping
Status of the shipment (OPEN, IN PROCESS, CLOSED)
This screen also shows the following information for the cartons within the Receiving Document:
Status of each carton (OPEN, IN PROCESS, CLOSED)
Carton identifier
Number of items in each carton
The following options are available before you enter or scan a carton ID:
Add Comment: Select this option to add comments for this Receiving Document.
Receive Document in Total: Depending upon your system's configuration and your store policies, you may have the option to receive the entire shipment at once by selecting this option. The items will be received based on expected quantities.
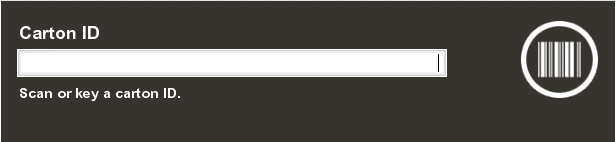
At the Receiving screen, scan or enter a carton ID at the Carton ID prompt and press Enter.
Xstore displays the Receiving screen showing the carton level information.
|
Note: Depending upon your system's configuration and your store's policies, the information displayed on the receiving screens shown here may differ from the screens in your system. |
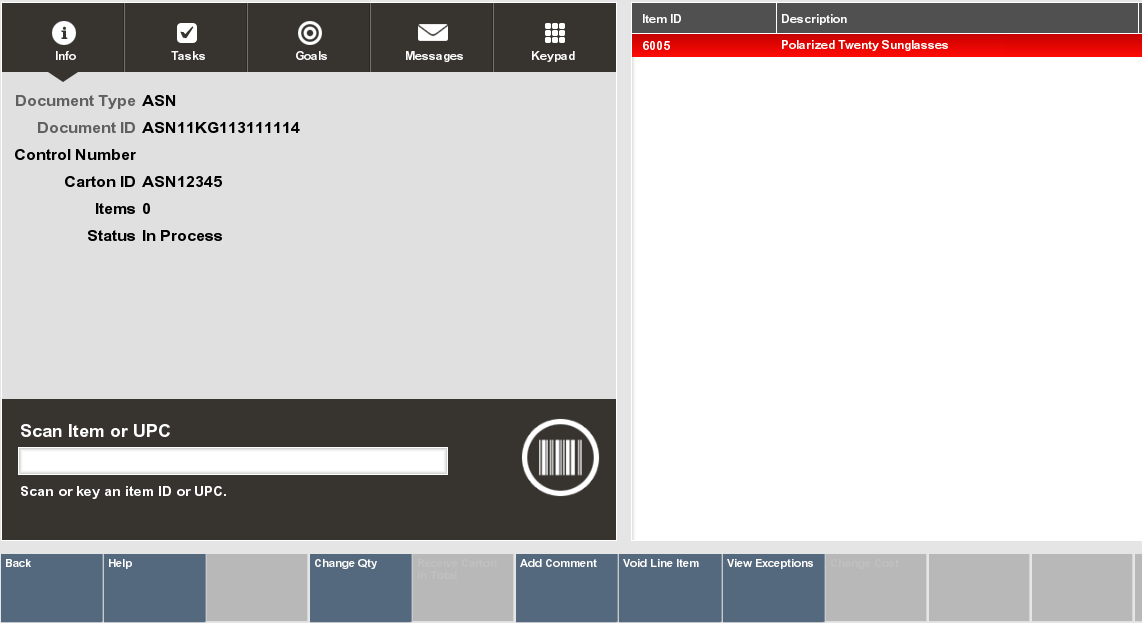
The Receiving Screen shows the following information for the Receiving Document carton:
Document Type
Receiving Document identifier
Control Number for the carton
Carton identifier
Number of items in the carton
Status of the carton (OPEN, IN PROCESS, CLOSED)
The Receiving Screen also shows the following information for the items within the carton:
Item Identifier
Item Description
Item Cost
Number of items expected in this carton
Number of items actually counted in this carton
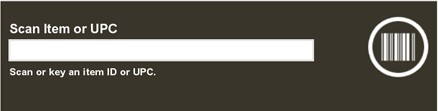
Scan or enter the item ID you are receiving at the Item ID or UPC prompt. Refer to Figure 2-8.
You can scan each item individually at this prompt and the system increments the total by one each time you scan an item.
If you enter an item ID manually, the system prompts for the total number received for this item ID.
|
Note: You can also scan an item ID and then select the Change Quantity option to enter total number of items counted for this carton. |
If prompted, enter the total number of items received for this item ID and press Enter to continue.
|
Important: If the item is not in the list, the system adds the item ID to the item list with an expected count of zero, if allowed per your store policy for the Document Type. |
Continue counting all items in this carton and press Esc (Back) to return to the Receiving screen to count another carton on the Receiving Document.
The line items in the carton are color-coded to indicate whether a follow-up condition exists:
GREEN: indicates the counted amount matches the expected amount.
RED: indicates the counted amount is different from the expected amount.
|
Important: As you count cartons and items, the Document status and Carton status is updated from Open to In Process. |
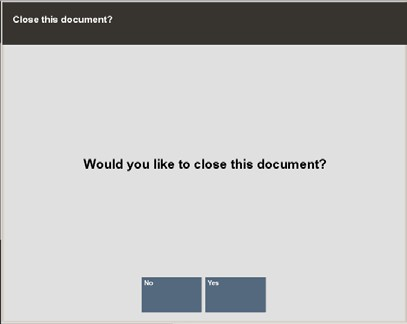
Continue counting all cartons and items. When you have counted all cartons and items for this Receiving Document, select the Save & Exit option. If prompted, select Yes to confirm that you want to save your changes.
The system prompts if you would like to close this Receiving Document:
Select Yes to close the Receiving Document and set the status to CLOSED.
Select No to leave this document in an in-process state so that you can continue to access this document. In base, when partially receiving a document and choosing No to close the document, inventory is updated. Then if the inventory item is canceled or the document is canceled, the inventory is decremented.
You have the following options available at the Receiving screen as you are receiving cartons and items:
Change Quantity: Select this option to edit the quantity counted for the selected item. Refer to To Change the Quantity of an Item for procedural information.
Void Line Item: Select this option to remove the selected item from the list of carton items. Refer to To Void an Item for procedural information.
Item Search: Select this option to locate an item in the carton. Refer to To Find an Item in the Carton List for procedural information.
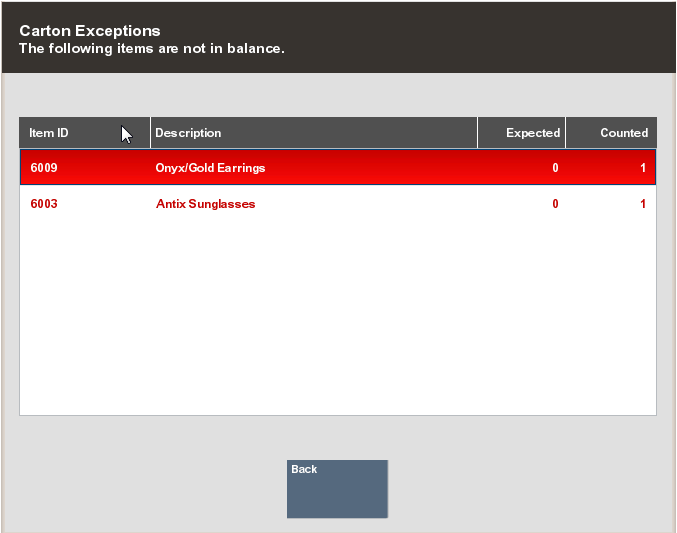
View Exceptions: Select this option to view a list of exceptions found in this carton. This list includes only those items where there is a difference between the number of expected items on the shipment and the actual counted items on the shipment. Items that are in balance are not included. Refer to To View Exceptions for procedural information.
Add Comment: Select this option to add comments for this Receiving Document. Refer to To Add a Comment for procedural information.
Receive Carton in Total: Depending upon your system's configuration and your store's policies, you may receive the entire carton at once by selecting this option.
Items are received based on expected quantities. Refer to To Receive a Carton in Total for procedural information.
The Change Quantity option allows you to record the actual number of items that you count in a carton or to change a number that has already been recorded for the item. For example, if you receive a large quantity of an item in the shipment, you can scan the barcode on one item to add it to the list of items. Then use the Change Quantity option to enter the actual number counted rather than scanning each item individually.
At the Receiving screen, select the Change Quantity option.
Use the up and down arrow keys to select the item in the carton that you want to count and press Enter.
When prompted, enter the count (quantity) of items and then press Enter.
Xstore updates the count on the Receiving screen.
|
Important: If you add a line item to a carton you may void the line if you make a mistake. |
At the Receiving screen, select the Void Line Item option.
Use the up and down arrow keys to select the item in the carton that you want to void and press Enter.
If the item can be voided, Xstore removes the item from the list of items in the carton.
If the carton contains a long list of items, you can use the Item Search option to quickly locate a specific item ID.
At the Receiving screen, select the Item Search option.
Xstore prompts for the item you are looking for. Enter the item ID and press Enter.
Xstore locates and highlights the item in the list.
|
Note: If the item is not in the list, the system displays a message indicating that it was not found. Acknowledge the message by pressing Enter to return to the Receiving screen. |
Use the View Exceptions option to list any items that have a difference between the number of expected items in the shipment and the actual counted items in the shipment. Items that are in balance are not included.
|
Note: For user-created documents, the expected item count is always zero. Only documents created by the home office and downloaded to the store, or documents created automatically by the Order process, show an expected quantity greater than zero. |
At the Receiving screen, select the View Exceptions option.
Xstore displays the items in the carton that have a discrepancy between the number of items expected and the number of items counted.
Press Esc or select Back to return to the Receiving screen. There you can make adjustments after recounting the items in the carton.
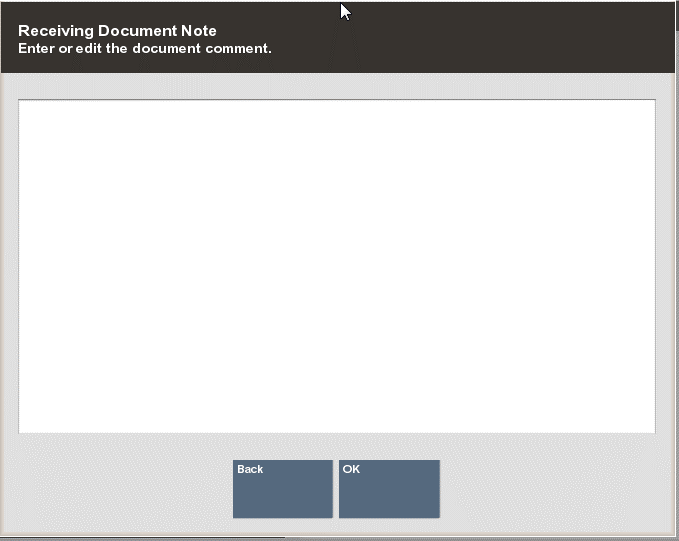
Use the Add Comment option to add any pertinent comments about the carton. The comments will be associated with the carton in the receiving document.
At the Receiving screen, select the Add Comment option.
|
Note: Comments may be added at both the Document and Carton levels. |
Xstore displays the Receiving Document Note form.
Type a comment and press Enter to return to the Receiving screen.
Use the Receive Carton in Total option to accept the entire carton at once, based on the expected quantities in the carton.
|
Important: You cannot receive the carton in total if the shipment has been partially processed. If some of the items have been received previously, the system prompts with a message indicating that you cannot receive the carton in total. |
At the Receiving screen, select the Receive Carton in Total option.
The items are received based on expected quantities in the carton. The status of the carton and the Receiving Document is changed to In Process.
Select the Save & Exit option, and when prompted to confirm that you want to close the document, select Yes. The carton status and the document status are changed to Closed.
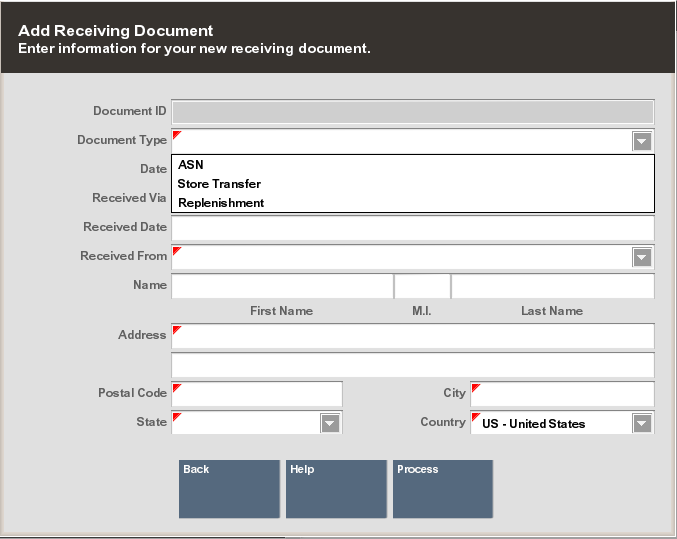
Receiving Documents are usually downloaded from the home office; however, you can also create a Receiving Document in your store if a shipment arrives without one. Use the following process to create a new Receiving Document so that you can receive the shipment and update inventory.
At the Receiving Document Search form or the Receiving search results form, select the Add New option to create a new Receiving Document.
Xstore displays the Add Receiving Document form:
Enter the information as required:
Document ID: Depending upon your system's configuration, Xstore may generate this number automatically.
Document Type REQUIRED: Select the Receiving Document type from the list.
Date: The date the Receiving Document was created. The default is today's date.
Received Via: Select the method by which the shipment was received (for example, UPS, FedEx, and so on).
Track #: Enter the Tracking Number found on the shipment, if it is known.
Received Date: Enter the date the shipment was received in your store.
Received From REQUIRED: Select the location from which the shipment was shipped.
Name: Enter the name.
Address REQUIRED fields: Enter the address information.
When you have entered all the information for this new Receiving Document, select the Process option.
Xstore prompts for the carton and item information. Refer to Adding a New Carton to a Receiving Document for procedural information.
If you receive a carton that is not listed on the Receiving Document, you can add the carton and its associated items to receive it. You can also add cartons to a new Receiving Document you created in your store.
Xstore prompts for the Carton ID whenever you create a new Receiving Document in your store.
Scan or enter the Carton ID at the prompt and press Enter.
At the Item ID or UPC prompt, scan or enter the item ID you are receiving.
If you scan each item individually at this prompt, Xstore increments the total by one each time you scan an item.
If you enter an item ID manually, Xstore prompts for the total number received for this item ID.
|
Important: You can also scan an item ID and then select the Change Quantity option to enter the total number of items counted for this carton. |
If prompted, enter the total number of items received for this item ID and press Enter to continue.
Continue adding all items in the carton. After all items in the carton have been added, including each item's quantity, press Esc to return to the Receiving screen. You may add another carton on the Receiving Document, if needed.
After you have counted all cartons and items for this Receiving Document, select the Save & Exit option.
Xstore prompts you to close the Receiving Document:
Select Yes to close the Receiving Document and set the status to CLOSED.
Select No to leave this document in an IN PROCESS state. You can continue to make additional changes until you close the document and update inventory.
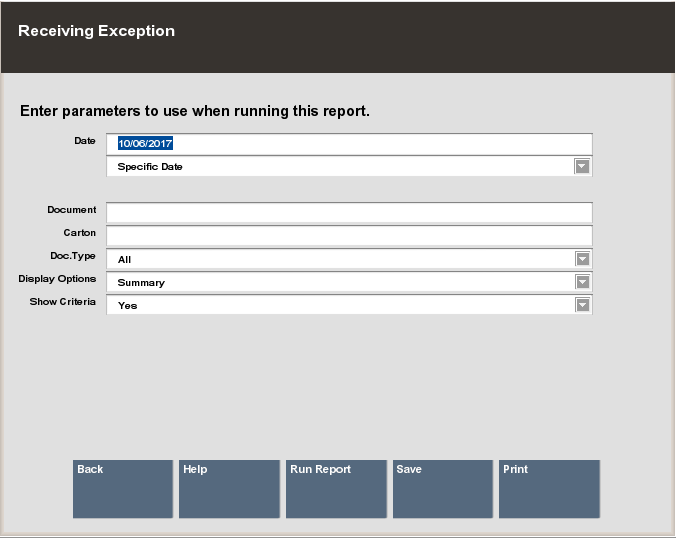
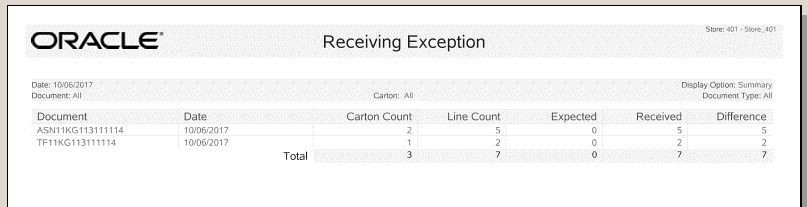
This report shows a document-by-document list of items that were received but had a difference between the expected quantity and the actual quantity. The report includes the total number of items in each carton (expected and actual), for each Receiving Document number.
This report allows you to query by Date, Document ID Number, Carton Number and Document Type. The report can be viewed on the screen and printed.
This report includes the following information:
Date
Item ID
Serial Number
Description
Expected Amount
Received Amount
Difference Between Expected and Received
Document ID
Carton #
Document Total
Carton Total
After logging in to the Back Office, select and enter Reporting, Inventory Reports, then Receiving Exception Report.
The Receiving Exception Report parameters form displays. Enter your criteria to generate the report:
A specific start date (as shown in Figure 2-22 above)
<OR>
A relative date option from the list. For example, yesterday or today.
Receiving Document#
Carton Number
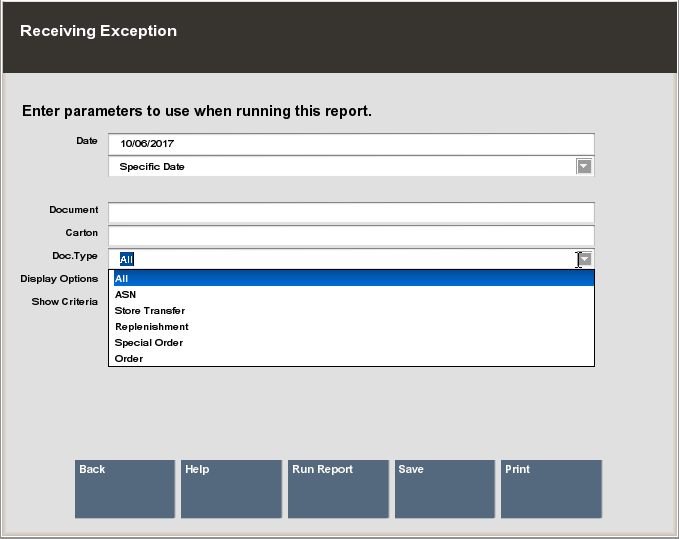
Document Type (list below)
Select one of these options to finish your report:
Run Report: Execute the report and display the results on the screen.
Print: Execute the report and send the results to a printer.
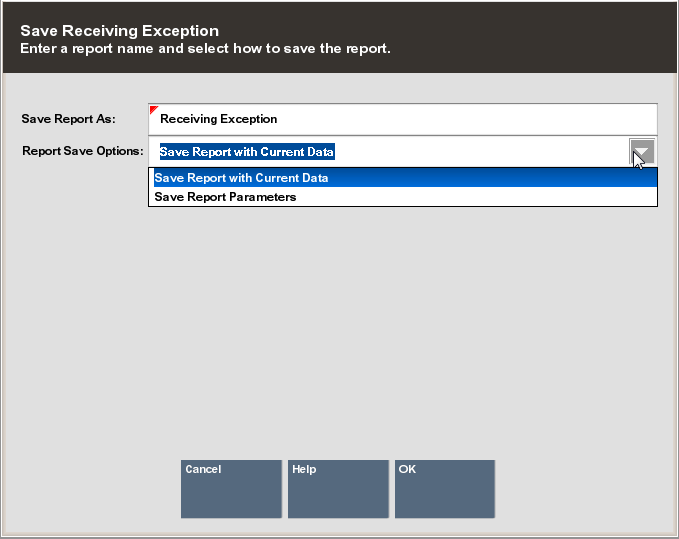
Save: You can save this report with the current data, or save only the report parameters to run this specific report with these parameters again.
If you save the report, assign a name to it so it can be viewed whenever needed. Xstore suggests a name, but you may type in the Save Report As field and change it.
Choose one of the options in the Report Save Options list:
Save Report with Current Data - To save the report with the current values.
Save Report Parameters - To save only the parameters to use these parameters as a template to generate a new report later.
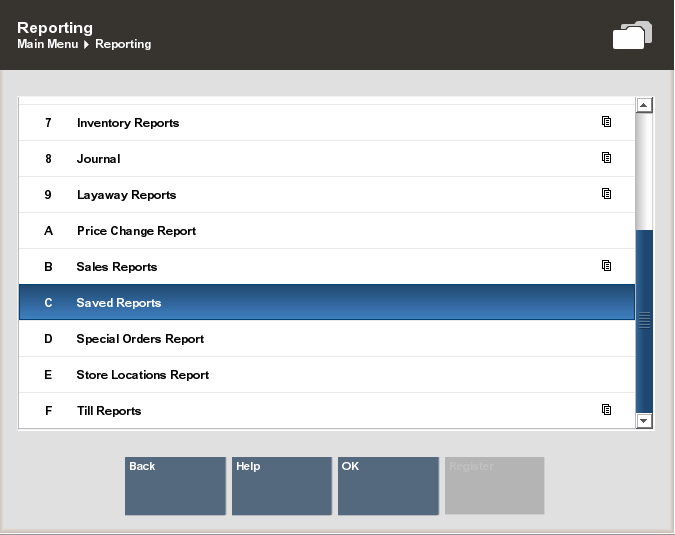
Select OK to save the report. Reports are saved to your personal report area and can be retrieved from the Reporting Saved Reports menu option and press Enter.
|
Note: Refer to the Oracle Retail Xstore Reports Guide for more information about setting up and running reports. |
|
Important: In this example, the expected count is zero for all items. User-created receiving documents always have an expected item count of zero. Only documents downloaded from the home office or generated automatically by the Order process, show an expected item count. |