| Oracle® Retail Xstore Point of Service Manager's Guide Release 19.0 F25016-03 |
|

 Previous |
 Next |
| Oracle® Retail Xstore Point of Service Manager's Guide Release 19.0 F25016-03 |
|
Previous |
Next |
Employee Scheduling allows you to perform a variety of scheduling activities:
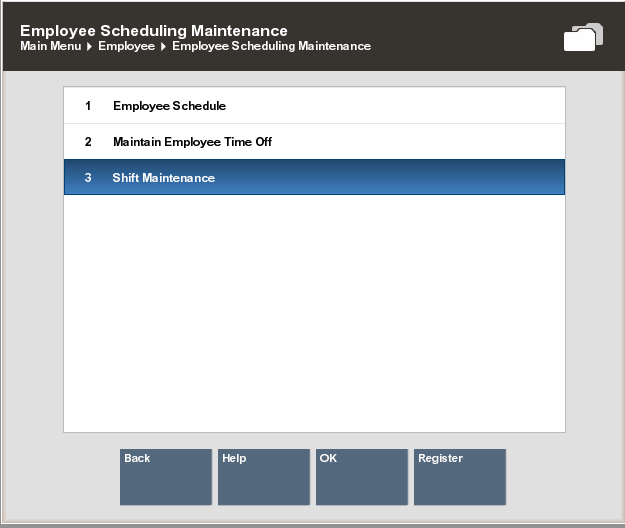
Create and maintain employee work shifts
Schedule and maintain employee time-off events such as vacations and other times when employees may not be available for work
Assign employees to defined work shifts
Employees can view and print their schedules at the Register Login screen. They may also view a list of other employees who are assigned to work on a specific day. Refer to the Oracle Retail Xstore Point-of-Service User Guide for more information.
Work shifts may be created to define a specific set of working hours or days (weekday mornings, weekend evenings, and so on), or with the intent that individuals who belong to a particular group (day managers, night managers, and so on) may be assigned to it. After a shift has been created, an individual employee may be assigned to it. See Maintaining Employee Shifts.
Use the Maintain Employee Time Off function to define times when an employee is not available to work. These times can be set up as recurring events that span several days or as single events. See Maintaining Employee Time-Off Schedules.
The following scheduling reports are available:
Employee Performance Report - This report shows the scheduled hours for an employee or all employees, the hours actually worked, and the difference between scheduled and worked hours. The employee's total sales and average sales for the period are also shown.
Employee Schedule Detail - This report shows the employees who are scheduled for each day in the selected week. Each day of the week is listed, the employees scheduled, their individual start and end times, and the total hours for each day. This report also includes the total scheduled hours for the week.
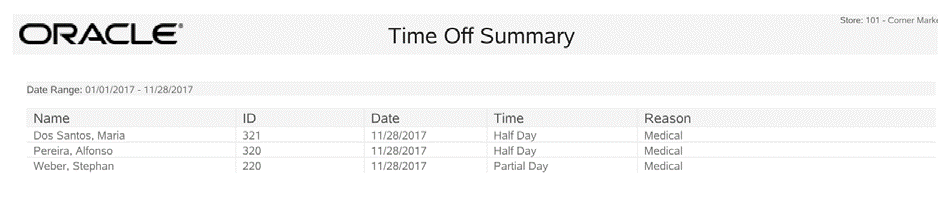
Employee Time Off Summary Report - This report lists all employees who have time off scheduled for the selected week, and it shows the time-off days, hours (if less than a full day), and the reason for the time-off.
|
Note: Refer to the Oracle Retail Xstore Point-of-Service Reports Guide for detailed information about these reports. |
Use this procedure to create an employee schedule for a designated week.
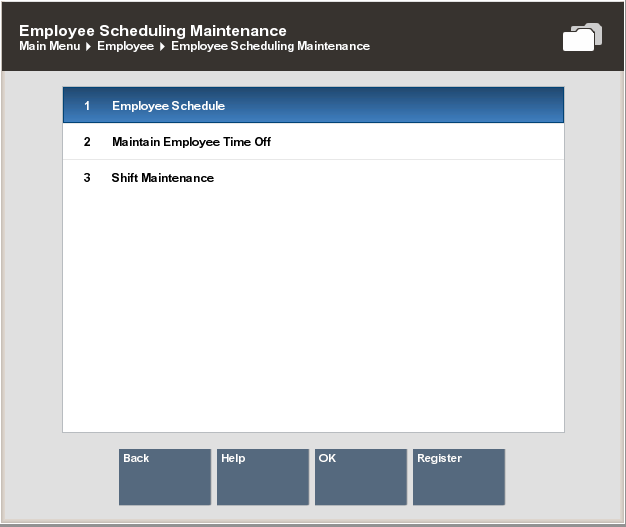
After logging in to the Back Office (see Accessing the Back Office), select Employee and press Enter.
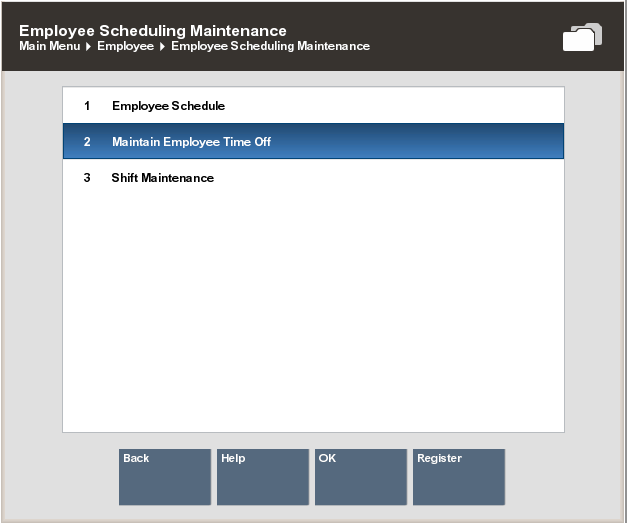
At the Employee Menu, select Employee Scheduling Maintenance and press Enter.
Select the Employee Schedule option.
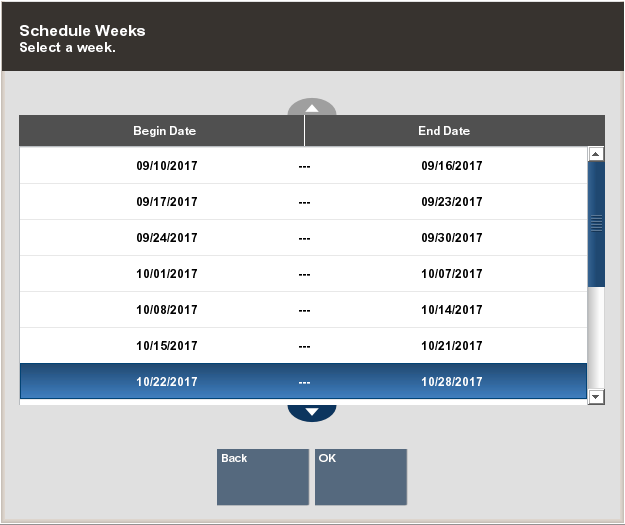
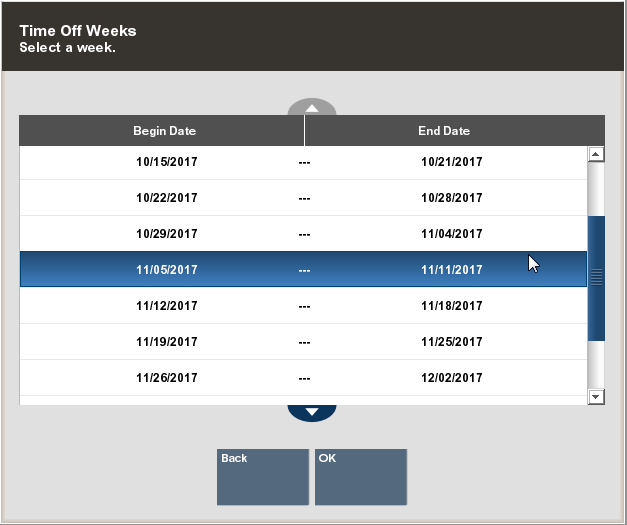
Oracle Retail Xstore Point-of-Service prompts for the week to be scheduled. Select the week you want to schedule and press Enter to continue.
|
Note: The current week is selected by default. |
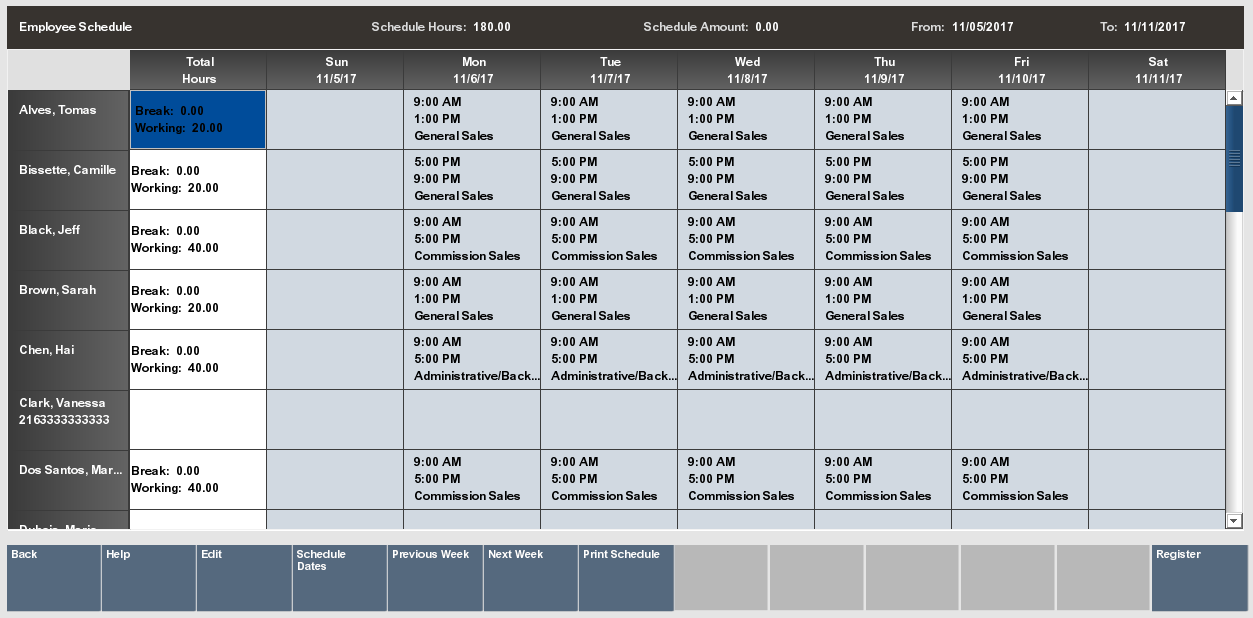
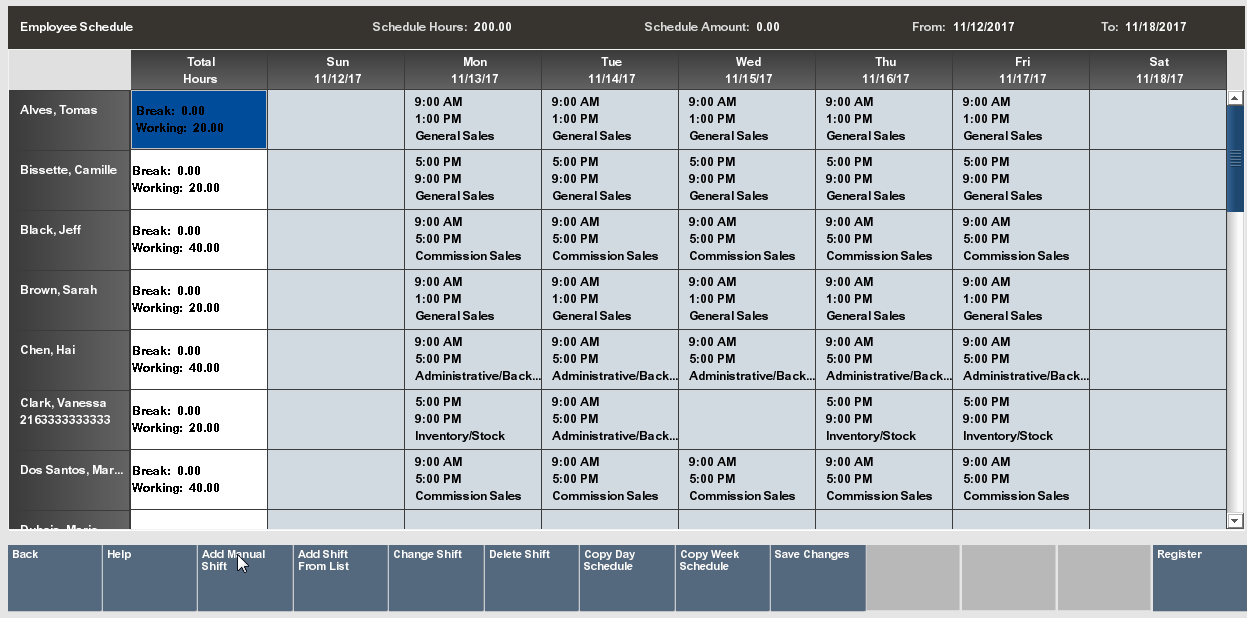
Oracle Retail Xstore Point-of-Service displays the Employee Schedule screen for the selected week. This is the view used to create an employee schedule.
Select the Edit option to begin creating a new employee schedule.
Oracle Retail Xstore Point-of-Service provides several options for creating a new schedule:
Add Manual Shift - Use this option to create a shift to apply to a specific employee/day on the schedule. See Adding a Manual Shift.
Add Shift From List - Use this option to apply a pre-defined shift to a specific employee/day on the schedule. See Adding a Pre-Defined Shift.
Copy Day Schedule - Use this option to copy an existing schedule from one day to a day (or days) in this new schedule. See Copying a Day Schedule.
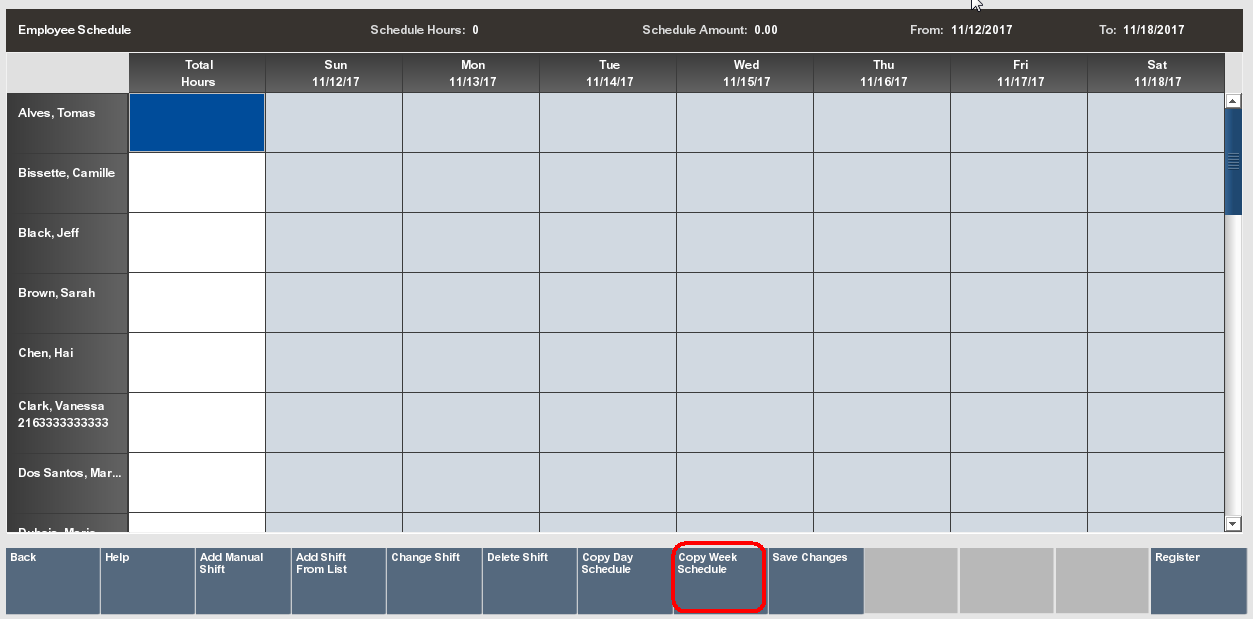
Copy Week Schedule - Use this option to copy an existing weekly schedule from one week to this new weekly schedule. See Copying a Week Schedule.
|
Note: Scheduling Exceptions...
<OR>
|
|
Note:
|
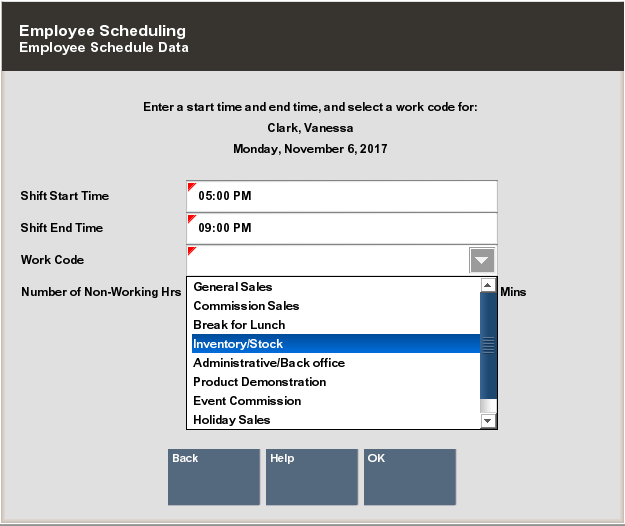
Use this option to create a new shift for an employee on the schedule.
...continued from step 5.
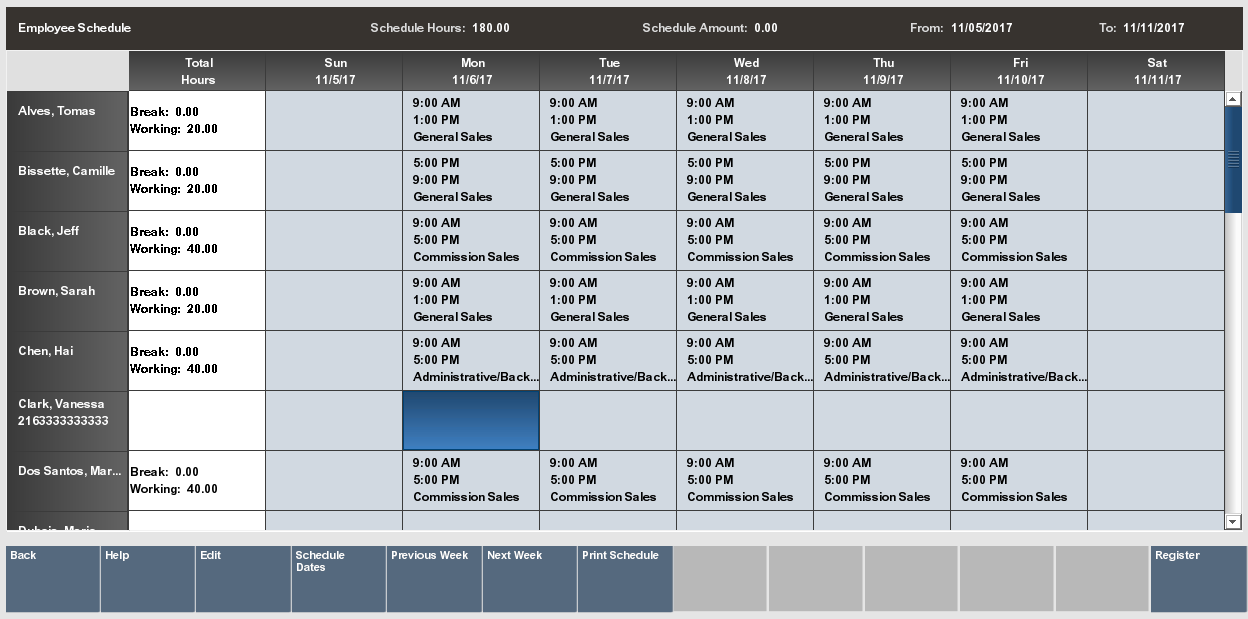
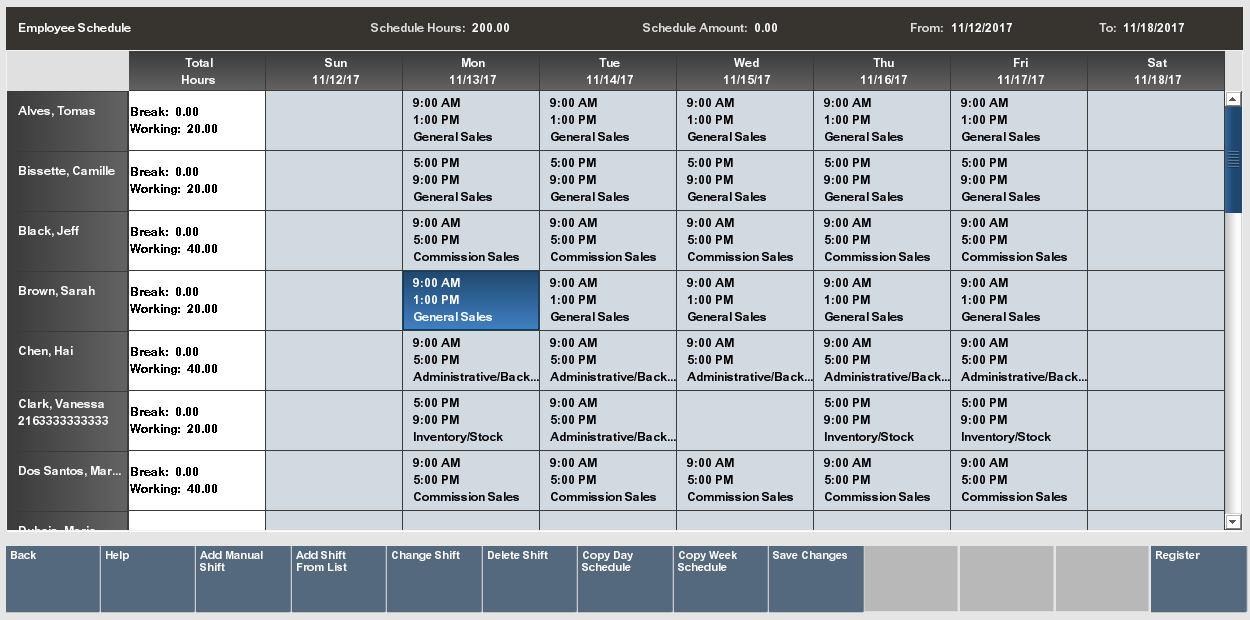
Select the employee and the day you want to schedule. Use the arrow keys to navigate the scheduling screen grid. The highlighted area indicates the selected cell in the grid.
|
Note: Touch-screen users, tap the desired cell to select the employee and the day you want to schedule. |
From the Edit Menu, select the Add Manual Shift option.
|
Tip: Make sure you have a valid shift selected, not a cell in the Total Hours column. |
Oracle Retail Xstore Point-of-Service prompts for schedule information for the selected employee and date. Enter the information as required, then select OK to continue:
Shift Start Time - Enter the starting time for this shift.
Shift End Time - Enter the ending time for this shift.
Work Code - Select a work code for this shift.
Number of Non-Working Hours - Enter the hours and/or minutes that are counted as non-working hours, such as meal breaks.
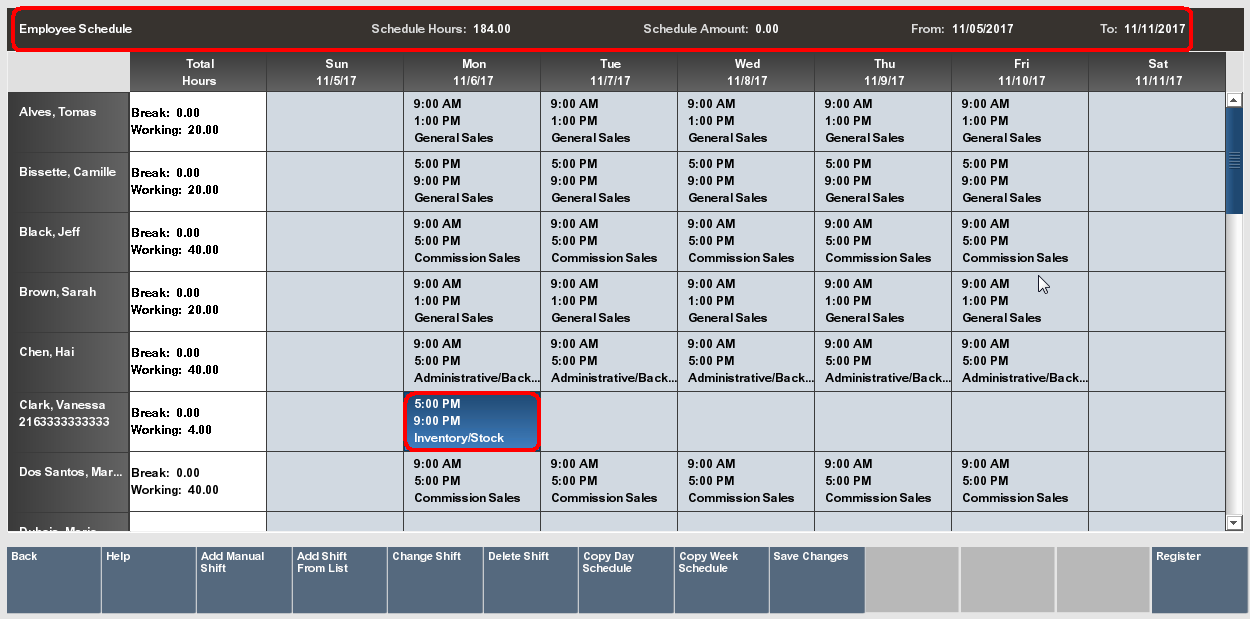
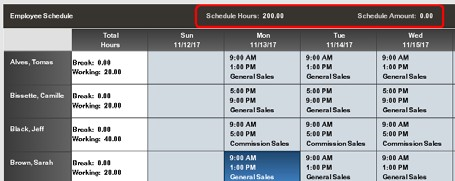
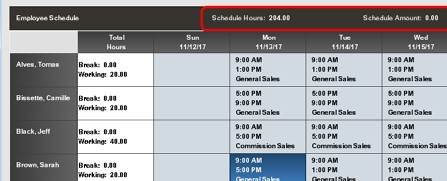
Oracle Retail Xstore Point-of-Service totals the scheduled hours for the week and calculates the scheduled budget amount (if it is configured for your store) as you build the schedule. The total scheduled hours and scheduled dollar amount is shown in the top panel of the screen. It is updated automatically each time you add or remove a shift.
Oracle Retail Xstore Point-of-Service displays the Weekly Summary Scheduling screen that shows the shift you created for the employee on the scheduled day.
Information on this screen includes the starting and ending times, the work code, break times, and the amount of working time.
Continue scheduling all employees for the week as needed and select the Save Changes option to save your schedule.
|
Note: Depending on your system's configuration, Oracle Retail Xstore Point-of- Service may provide a warning if you schedule an employee who has a conflict with restrictions defined by your store's policy. For example, there may be a maximum number of scheduled hours that cannot be exceeded. |
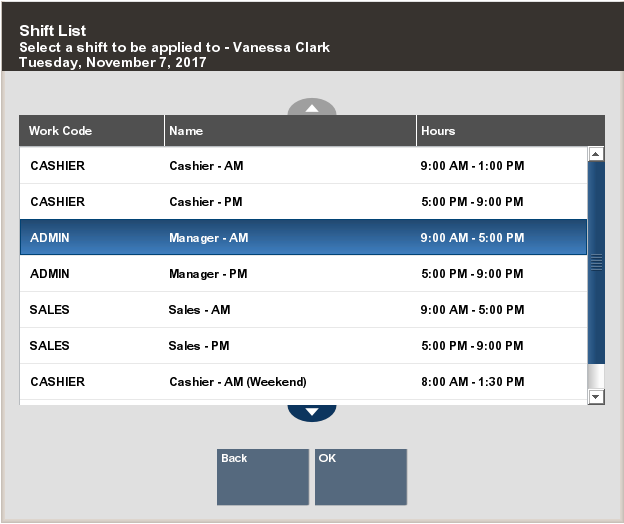
Use this option to apply an existing shift type to the schedule for a selected employee/ day.
...continued from step 5.
Select the employee and the day you want to schedule. Use the arrow keys to navigate the scheduling screen grid. The highlighted area indicates the selected cell in the grid.
|
Note: Touch-screen users, tap the desired cell to select the employee and the day you want to schedule. |
On the Edit Menu, select the Add Shift From List option.
|
Tip: Make sure you have a valid shift selected, not a cell in the Total Hours column. |
Oracle Retail Xstore Point-of-Service displays the list of pre-defined shifts. Select a shift from the list that you want to apply to the selected employee and day, then select OK to continue.
Oracle Retail Xstore Point-of-Service displays the Weekly Summary Scheduling screen showing the shift you applied to the employee/day. Information shown here includes the pre-defined starting and ending times, the work code, the time allotted for breaks, and the amount of working time. Oracle Retail Xstore Point-of-Service also totals the scheduled hours for the week as you build the schedule and the scheduled budgeted dollar amount (if configured for your store).
Continue scheduling all employees for the week, and select the Save Changes option to save your schedule.
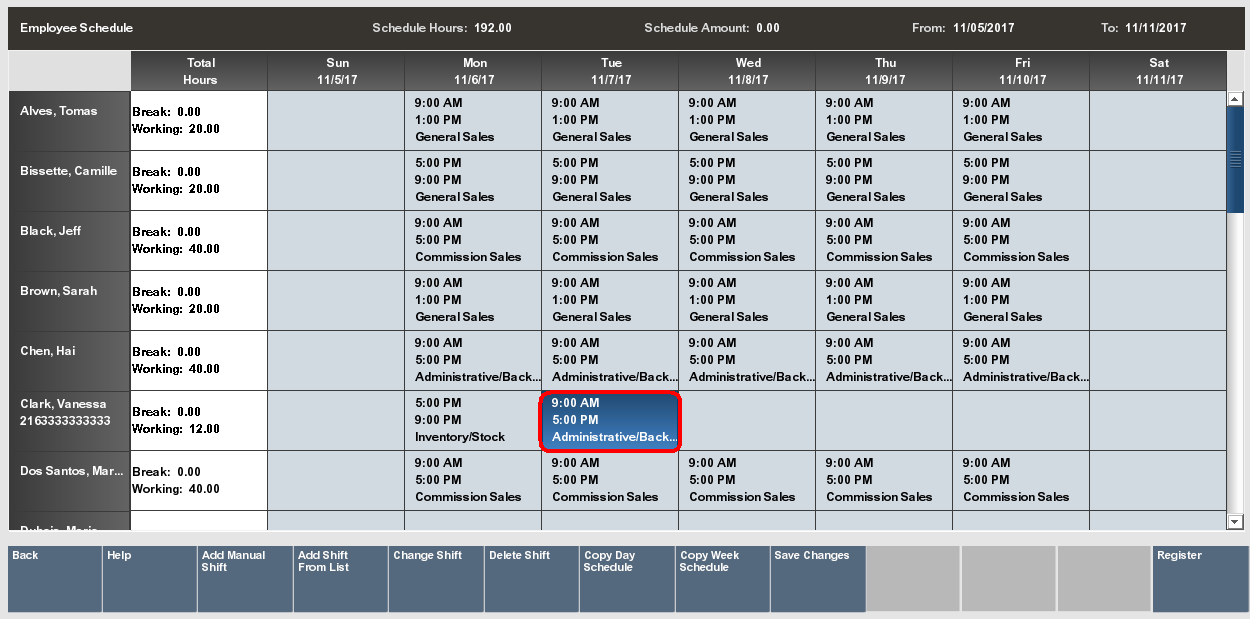
Use this option if your daily schedules are consistent within the week you are currently scheduling. For example, if your Monday through Wednesday staffing needs are similar, use this option to simply set up one day's schedule (Monday) and copy it to the other days (Tuesday and Wednesday) in the current week.
|
Note: This option copies the schedule that every employee has on the selected day and duplicates it to the additional days that are selected. Therefore, any employee's cell may be selected, as long as it is in the correct day from which the schedule is copied. |
For example, Bob works sales from 9:00 a.m. to noon on Monday, and Mary works inventory from 1:00 p.m. to 5:00 p.m. on Monday. If the Copy Day Schedule duplicates the Monday schedule to Tuesday and Wednesday, then Bob works from 9:00 a.m. to noon on Monday, Tuesday and Wednesday. Mary works inventory from 1:00 p.m. to 5:00
p.m. on Monday, Tuesday and Wednesday.
...continued from step 5.
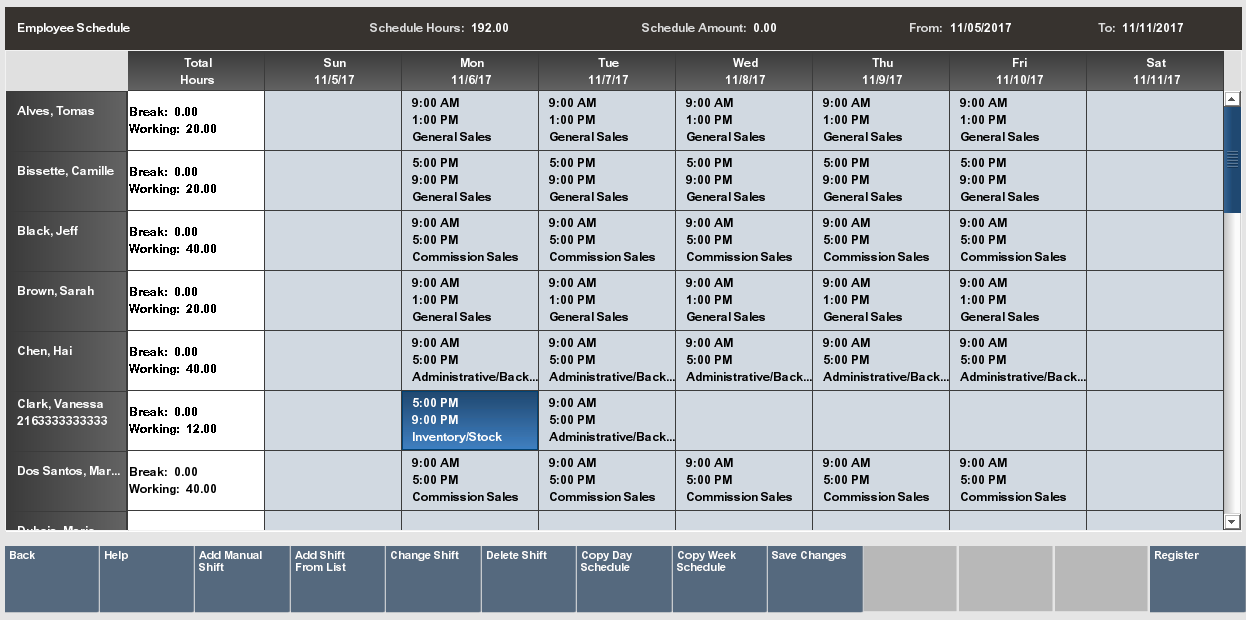
Select the day you want to copy the schedule from. Use the arrow keys to navigate among the days on the scheduling screen grid. The highlighted area indicates the selected cell and day in the grid. In Figure 5-10, the Monday schedule is selected.
|
Note: Touch-screen users, tap the desired cell to select the day you want to copy the schedule from. |
Select the Copy Day Schedule option from the Edit menu.
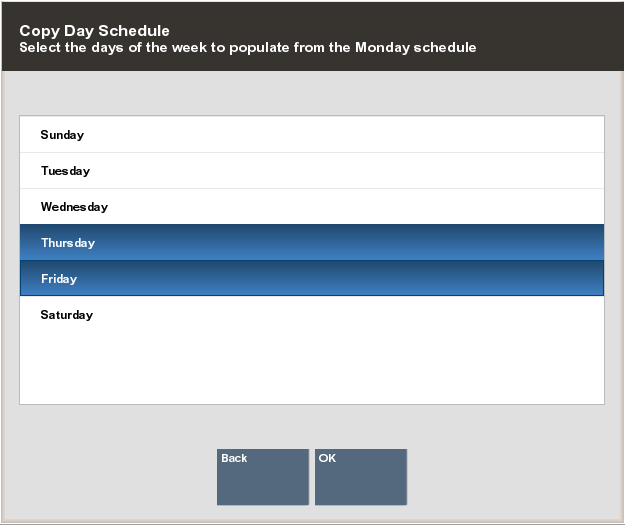
Oracle Retail Xstore Point-of-Service prompts for the day (or days) you want to copy the selected day schedule to. In this example, select the day or days you want to copy Monday's schedule to and press Enter.
|
Tip: To select multiple days, use the Spacebar to select each day. In this example, Monday's schedule is copied to Thursday, and Friday. |
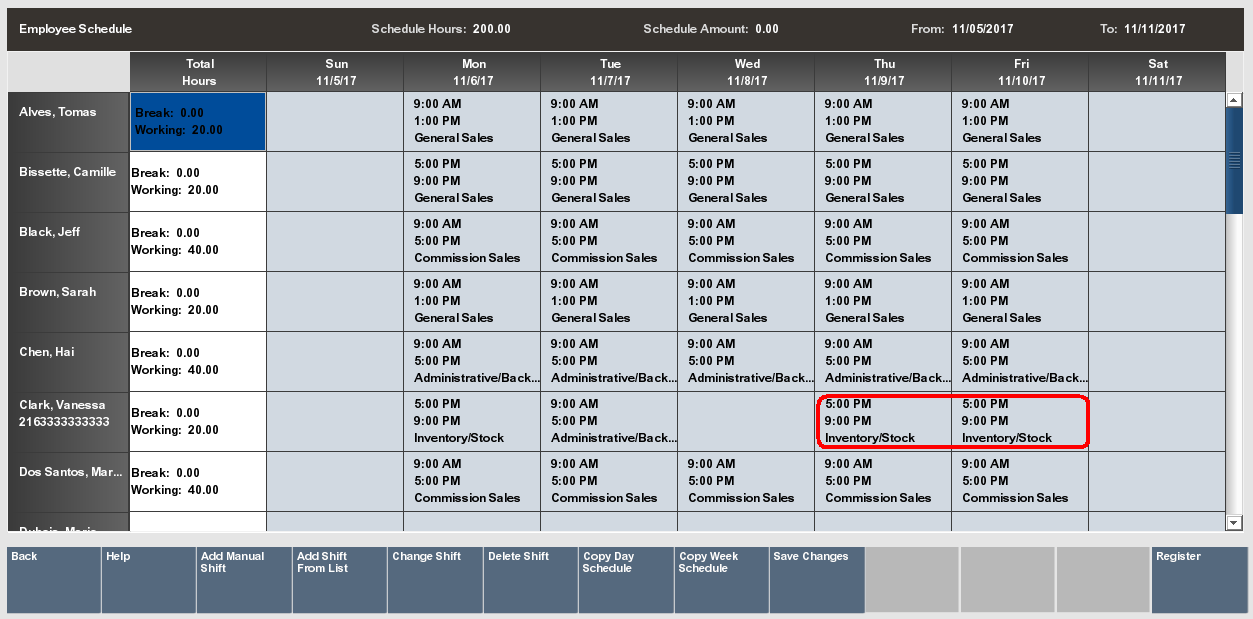
Oracle Retail Xstore Point-of-Service copies the schedule to each day you selected. Oracle Retail Xstore Point-of-Service totals the scheduled hours for the week as you build the schedule and the scheduled budgeted amount (if configured for your store).
Continue scheduling all employees for the week as needed. Select Save Changes on the Edit Menu to save your schedule.
|
Note: If configured, Oracle Retail Xstore Point-of-Service warns of an attempt to schedule an employee when it conflicts with your store's hourly constraints or other restrictions. |
Use this option if your weekly schedules are relatively consistent from week to week. For example, if your weekly summer staffing needs are similar, use this option to set up one week's schedule and copy it from week to week. Once the existing schedule is copied to the week you are scheduling, you can easily make adjustments to the schedule as needed.
At the Employee Scheduling Maintenance Menu select Employee Schedule.
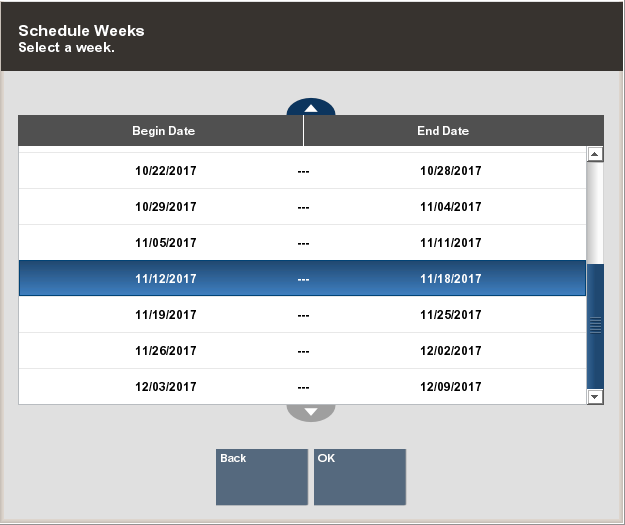
At the Schedule Weeks form, select the week that you want to schedule and press Enter.
At the Weekly Summary screen, select the Edit option.
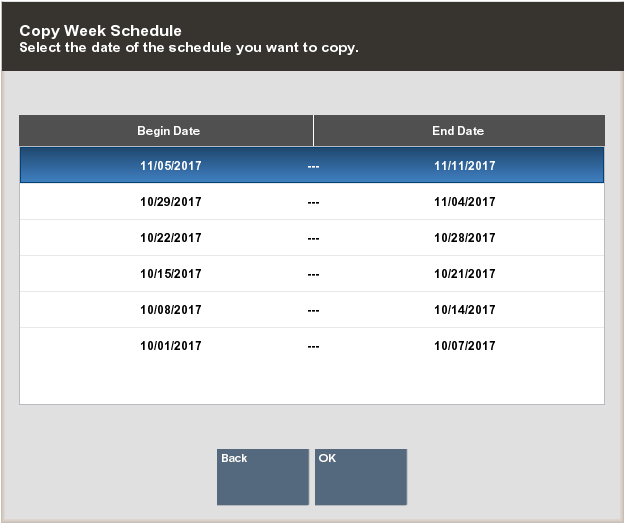
Select the Copy Week Schedule option.
Oracle Retail Xstore Point-of-Service displays a list of weeks that have been scheduled previously. Use the up and down arrow keys to select a week from the list and press Enter to continue.
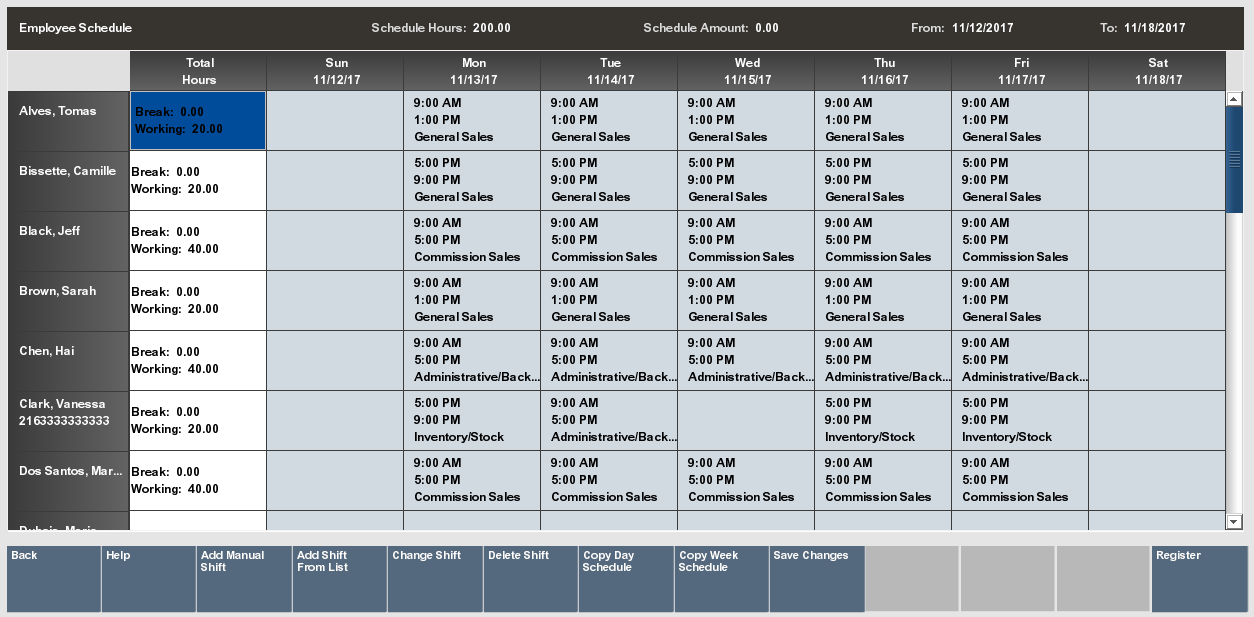
Oracle Retail Xstore Point-of-Service copies the schedule from the displayed week to the selected week. Oracle Retail Xstore Point-of-Service totals the scheduled hours for the week as you build the schedule and the scheduled budgeted amount (if that is configured for your store).
Continue scheduling all employees for the week and make any edits as needed. Select the Save Changes option to save your schedule. Refer to Editing a Schedule for more information about changing schedule information.
Use this function to make changes to an existing employee schedule for a designated week.
|
Note: Schedule records from previous days cannot be edited. |
At the Back Office Main Menu, select Employee and press Enter.
At the Employee Menu, select Employee Scheduling Maintenance and press Enter.
At the Employee Scheduling Maintenance Menu, select Employee Schedule and press Enter.
Oracle Retail Xstore Point-of-Service prompts for a schedule week. Use the up and down arrow keys to select the week that you want to edit and press Enter to continue.
|
Note: The current week is selected by default. You cannot edit a record from a date that is earlier than the current date. |
Oracle Retail Xstore Point-of-Service displays the Employee Schedule screen for the selected week. This is the view used to edit the existing employee schedule. Select the Edit option to begin editing this employee schedule.
|
Note: You can select the Print Schedule option to print the displayed schedule on the report printer. |
Xstore provides several options for editing an existing schedule.
Change Shift - Use this option to edit an existing shift on the schedule. See Changing a Shift.
Delete Shift - Use this option to remove a shift from the schedule. See Deleting a Shift.
You can also add shifts to the schedule as needed. Refer to Adding a Manual Shift Adding a Pre-Defined Shift, Copying a Day Schedule, and Copying a Week Schedule for more information.
Use this option to edit an existing shift for an employee on the schedule.
In edit mode, select the shift you want to change. Use the arrow keys to navigate the scheduling screen grid. The highlighted area indicates the selected shift in the grid.
|
Note: Touch-screen users, tap the desired cell to select the shift you want to change. |
Select the Change Shift option.
Oracle Retail Xstore Point-of-Service displays the Employee Scheduling Data form that shows the current schedule information for the selected shift. Change the information as required:
Shift Start Time - Enter the starting time for this shift.
Shift End Time - Enter the ending time for this shift.
Work Code - Select a work code for this shift.
Number of Non-Working Hours - Enter the hours and/or minutes that are counted as non-working hours, such as meal breaks.
Select Ok to continue.
Oracle Retail Xstore Point-of-Service displays the Weekly Summary Scheduling screen showing the shift you changed for the employee/day. Information shown here includes the starting and ending times, the work code, the time allotted for breaks, and the amount of working time. Oracle Retail Xstore Point-of-Service also totals the scheduled hours for the week as you build the schedule and the scheduled budget amount (if configured for your store).
Make additional schedule changes as needed and select the Save Changes option to save the edited schedule.
|
Note: If configured, Oracle Retail Xstore Point-of-Service warns you if an employee's schedule conflicts with hourly constraints or other restrictions as determined by your store. |
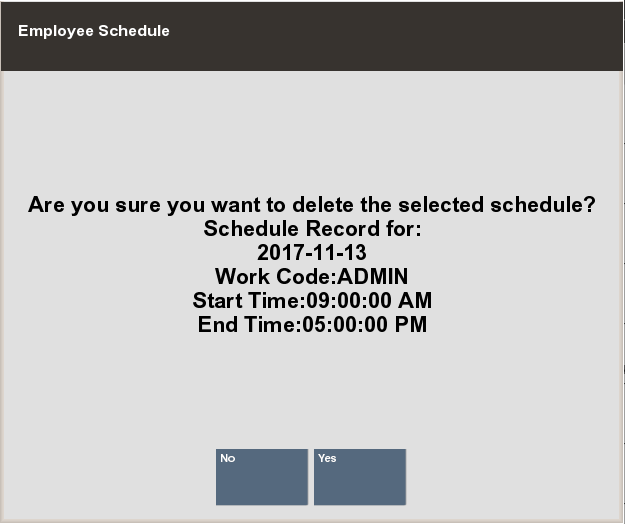
Use this option to remove a shift from the schedule for a selected employee/day.
Select the shift you want to remove from the schedule. Use the arrow keys to navigate the scheduling screen grid. The highlighted area indicates the selected shift in the grid.
|
Note: Touch-screen users, tap the desired cell to select the shift you want to remove. |
Select the Delete Shift option. Oracle Retail Xstore Point-of-Service displays a prompt to verify that the selected shift is the one you want to delete.
Press Yes to delete the shift from the schedule.
Oracle Retail Xstore Point-of-Service displays the Weekly Summary Scheduling screen, removing the shift you deleted for the employee/day. Oracle Retail Xstore Point-of-Service also recalculates the scheduled hours for the week and the scheduled budget amount (if configured for your store) as you edit the schedule.
Continue making any changes to the schedule as needed and select the Save Changes option to save the edited schedule.
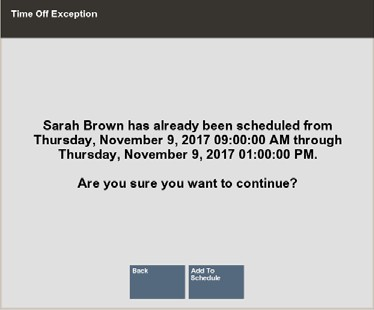
To create and edit time-off events, Oracle Retail Xstore Point-of-Service prompts you for information such as the type of time-off period (whole day, half day, partial day), whether the time-off period spans multiple days or a single day, and the dates and times of the time-off period. This information is shown during the employee scheduling process, alerting you to scheduling exceptions if you try to schedule an employee with previously-approved time off for the time period you are scheduling.
Use this function to add employees' time-off requests to the schedule.
From the Back Office Employee Scheduling Maintenance menu, select the Maintain Employee Time Off option and press Enter.
Oracle Retail Xstore Point-of-Service prompts you to select a schedule week. Select the week for the time-off event and press Enter to continue.
|
Note: The current week is selected by default. |
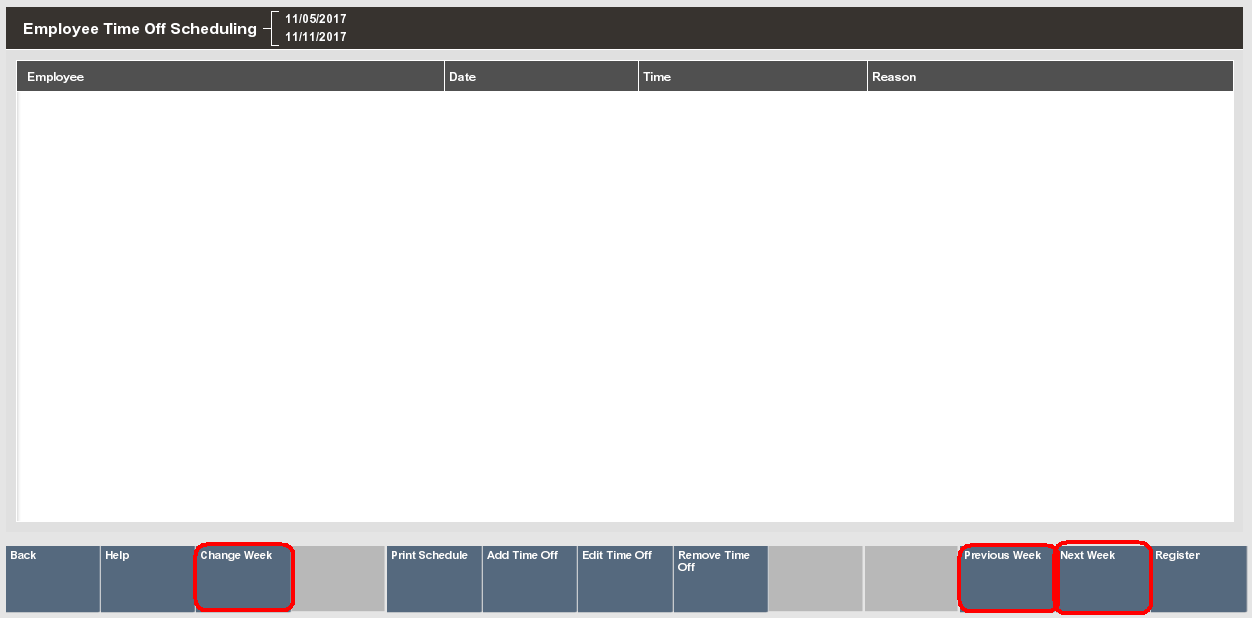
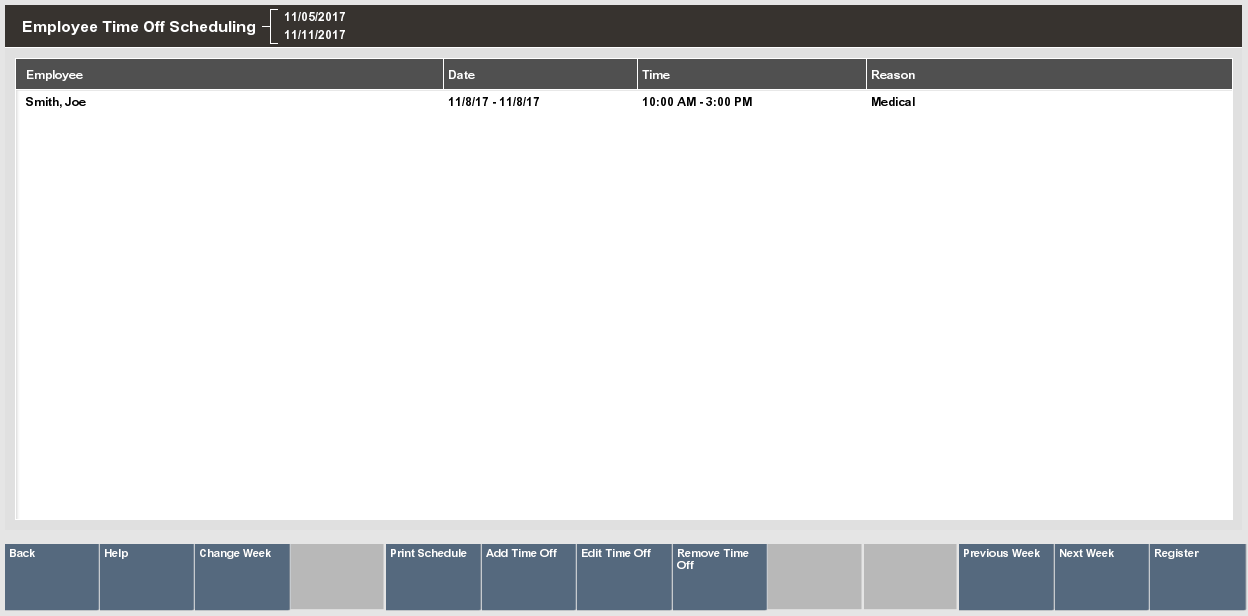
Oracle Retail Xstore Point-of-Service displays the Employee Time Off Scheduling screen showing any previously scheduled time-off events for this week. Select the Add Time Off option to create a new time-off event for an employee.
|
Tip: Select Previous Week to view time-off from the week before the week that is displayed.Select the Next Week option to view time-off for the week after the week that is displayed. To view any other time-off schedule, select the Change Week option to select a specific schedule date from the list of weeks. |
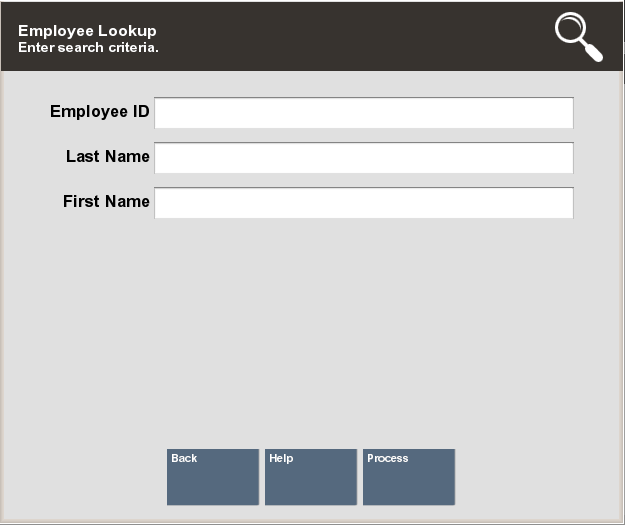
Oracle Retail Xstore Point-of-Service prompts for the employee's information. Enter the employee's information and select Process to continue.
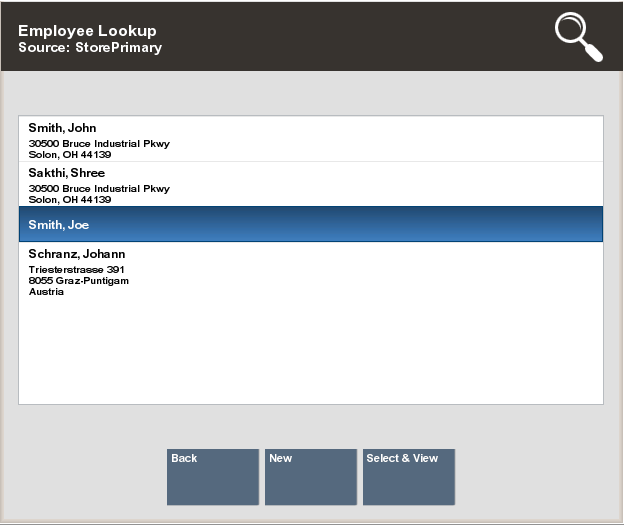
Oracle Retail Xstore Point-of-Service displays a list of employees who match the search criteria. Select an employee from the list and choose Select & Continue.
After the employee has been selected, Oracle Retail Xstore Point-of-Service prompts for the type of time-off event information. Select the time-off type to continue:
Select the Full Day option if the employee has requested time off for the entire day or days.
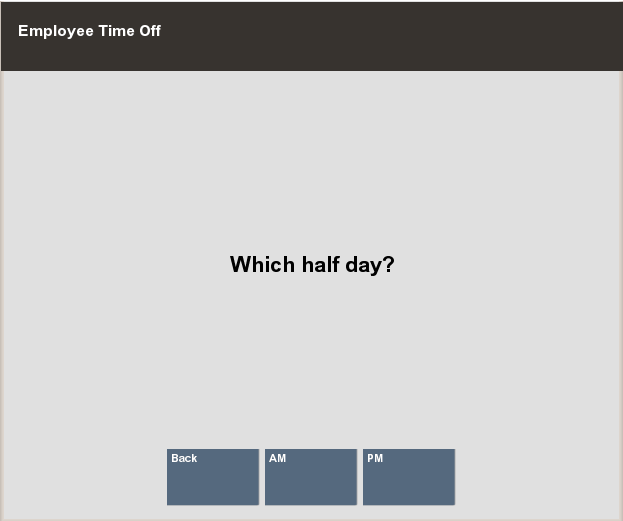
Select the Half Day option if the employee has requested half of the day off, such as morning or afternoon.
Select the Partial Day option if the employee has requested part of the day, such as 2 hours off.
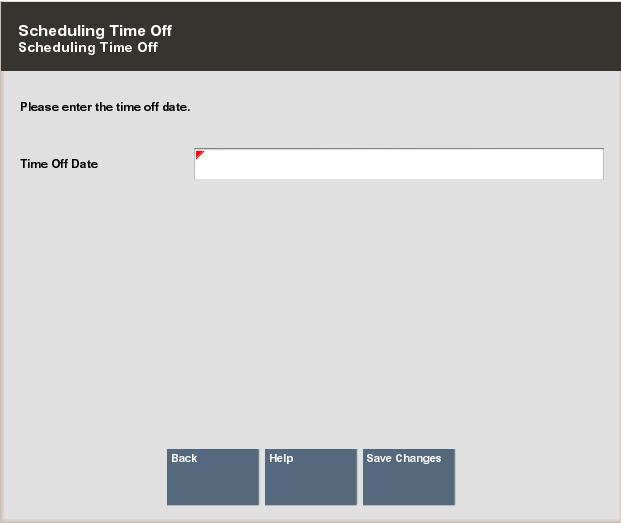
Oracle Retail Xstore Point-of-Service prompts for the time-off event date. Enter the starting time-off date and select Save Changes to continue.
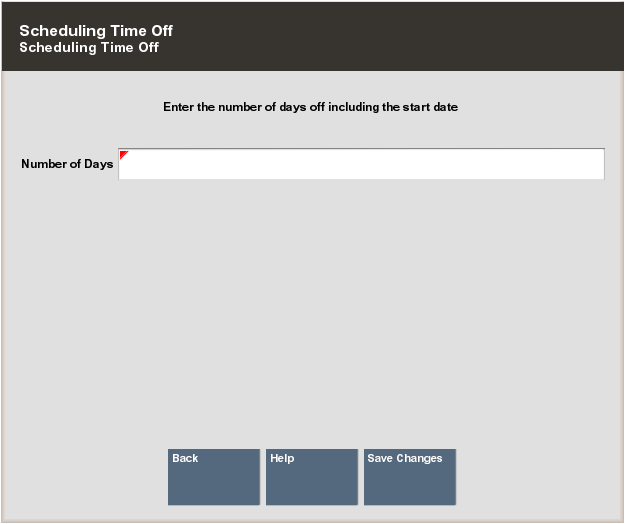
FULL DAY - If you chose the full day option, Oracle Retail Xstore Point-of- Service prompts for the number of days for this time-off event. Enter the number of full days the employee has requested off and select Save Changes to continue. Go to step 7.
HALF DAY - If you chose the half day option, Oracle Retail Xstore Point-of- Service prompts for the part of day. Select whether the time off is morning (AM) or afternoon (PM). Go to step 7.
|
Note: The number of hours allotted for the half-day time-off option is determined by your store's policy. |
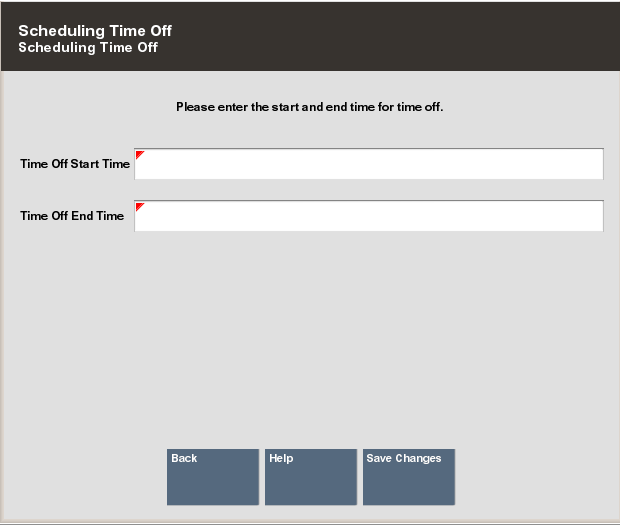
PARTIAL DAY - If you chose the partial day option, Oracle Retail Xstore Point- of-Service prompts for the start and end times. Enter the information as required and select Save Changes. Go to step 7.
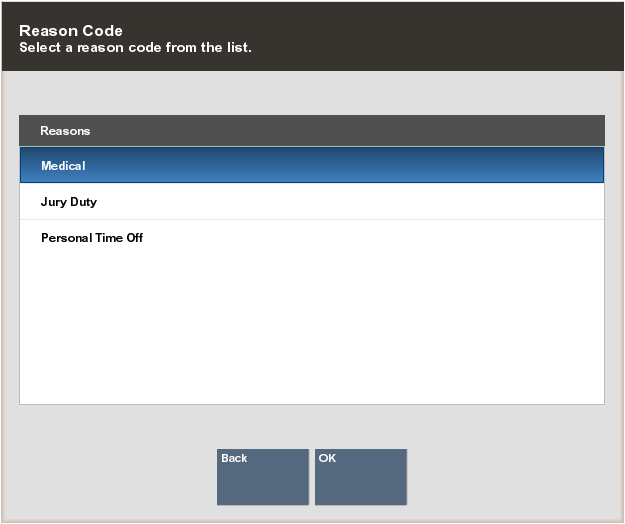
Oracle Retail Xstore Point-of-Service prompts for the time-off reason. Select a reason for the time-off event from the list and press Enter to continue.
Oracle Retail Xstore Point-of-Service adds the employee's time-off event to the Employee Time Off Scheduling screen for the selected week.
|
Note: Time Off ExceptionIf the employee has already been scheduled to work on that day (or days), the system prompts you that there is a time-off exception.
 |
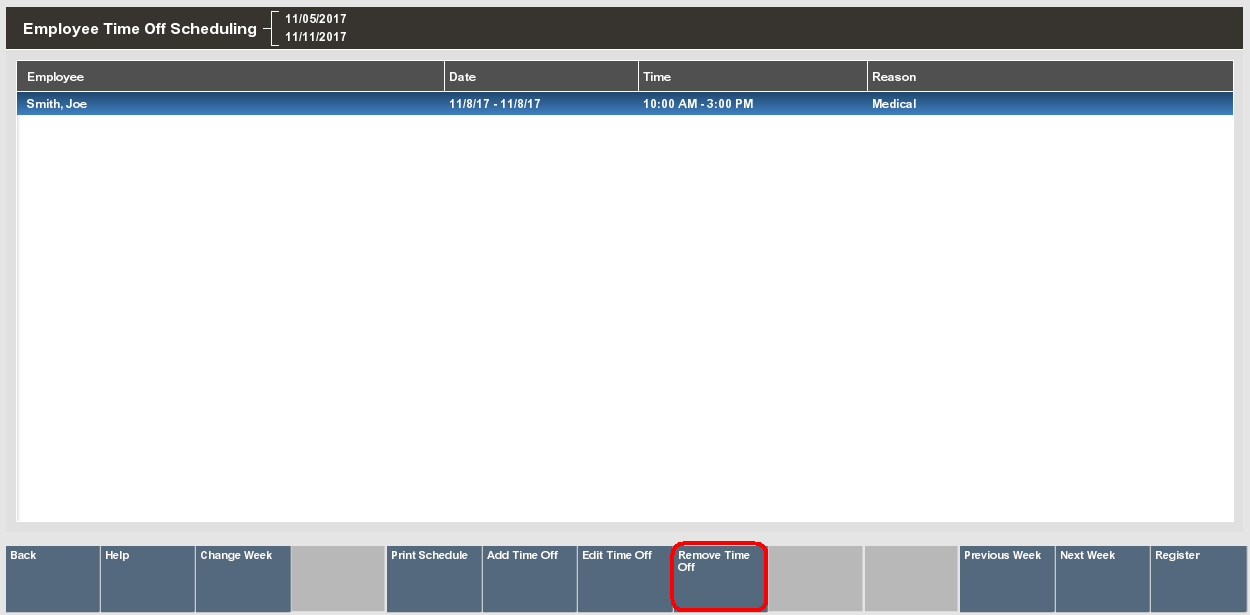
Use this function when an employee wants to cancel a previously-scheduled time-off. This function removes the time-off event from the schedule.
From the Back Office Employee Scheduling Maintenance Menu, select the Maintain Employee Time Off menu option and press Enter.
Oracle Retail Xstore Point-of-Service prompts for a schedule week. Select the week for the time-off event and press Enter to continue.
|
Note: The current week is selected by default. |
Oracle Retail Xstore Point-of-Service displays the Employee Time Off Scheduling screen showing the previously scheduled time-off events. Select the employee time-off event you want to remove from the schedule, and select the Remove Time Off option.
|
Tip: Select the Previous Week and the Next Week options to view the time-off schedule for the week before, or after, the current week you are viewing. To view any other time-off schedule, select the Change Week option to select a specific schedule date from the list of weeks displayed. |
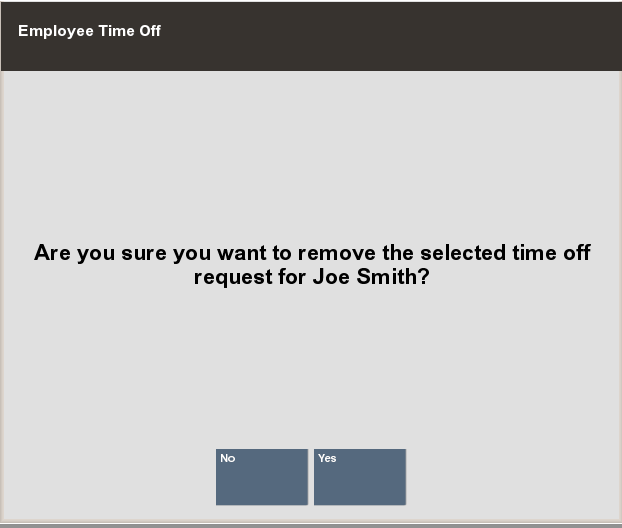
Oracle Retail Xstore Point-of-Service prompts you to confirm the time-off event to be removed from the schedule. Press Yes to remove the selected employee time-off event. Oracle Retail Xstore Point-of-Service removes the selected time-off event from the schedule.
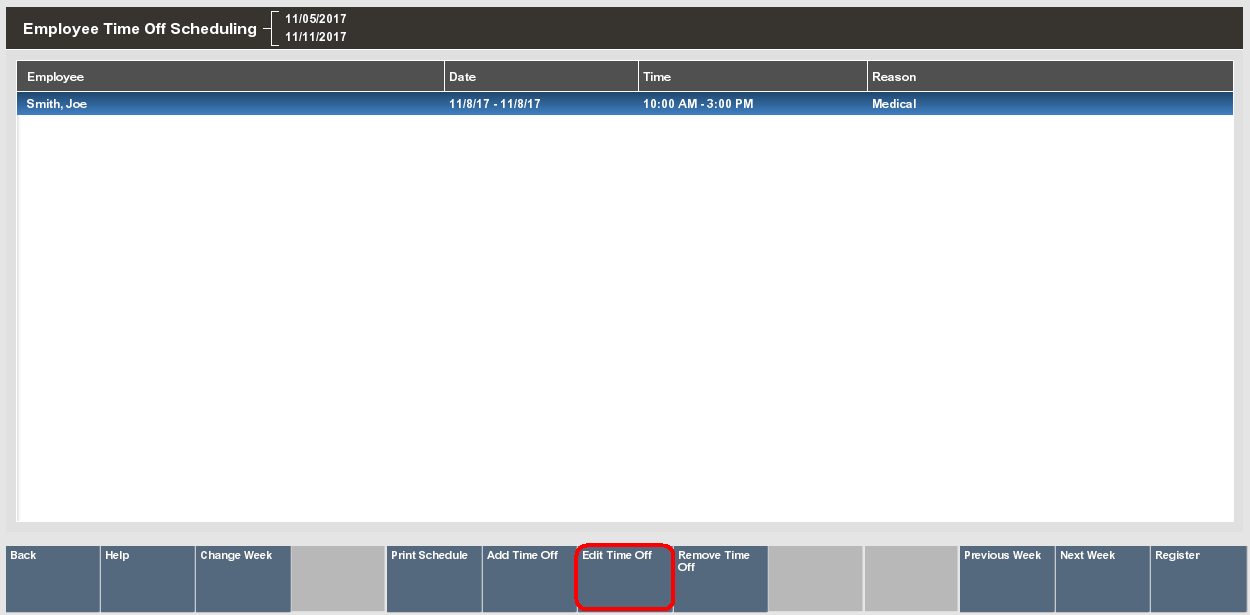
Use this option to change an employee's previously scheduled time-off request. You can change the type of time off (full day, half day, or part of day), change the time-off date, the number of days for the time-off period, the time-off hour duration, and the time-off reason.
From the Back Office Employee Scheduling Maintenance Menu, select the Maintain Employee Time Off menu option and press Enter.
Oracle Retail Xstore Point-of-Service prompts for a schedule week. Select the week for the time-off event and press Enter to continue.
|
Note: The current week is selected by default. |
Oracle Retail Xstore Point-of-Service displays the Employee Time Off Scheduling screen showing the previously scheduled time-off events. Select the employee time- off event you want to change and select the Edit Time Off option.
|
Note: Select the Previous Week and the Next Week options to view the time-off schedule for the week before, or after, the current week you are viewing. To view any other time-off schedule, select the Change Week option to select a specific schedule date from the list of weeks displayed. |
Oracle Retail Xstore Point-of-Service prompts for the type of time off (full day, half day or partial day), the time off date, and other information as required. Refer to Adding Time-Off Periods for detailed information about the time-off prompts.
Enter/select the time-off information as required. Oracle Retail Xstore Point-of- Service replaces the employee's original time-off event on the schedule with the updated request.
You can print the Employee Time-off Summary Report from both the Employee Time Off Scheduling screen and from the Back Office Employee Scheduling Maintenance menu.
Printing the schedule from the Employee Time Off Scheduling screen (Print Schedule button) prints the current schedule shown on the screen.
Printing the schedule from the Back Office Employee Scheduling Maintenance menu prompts you to select a week to be printed.
|
Note: Refer to the Oracle Retail Xstore Point-of-Service Reports Guide for detailed information about running reports |
To make employee scheduling easier, you can create and edit pre-defined shifts that may be applied during the employee scheduling function.
Use this procedure to create a new shift to be used during employee scheduling.
From the Back Office Employee Scheduling Maintenance Menu, select the Shift Maintenance menu option and press Enter.
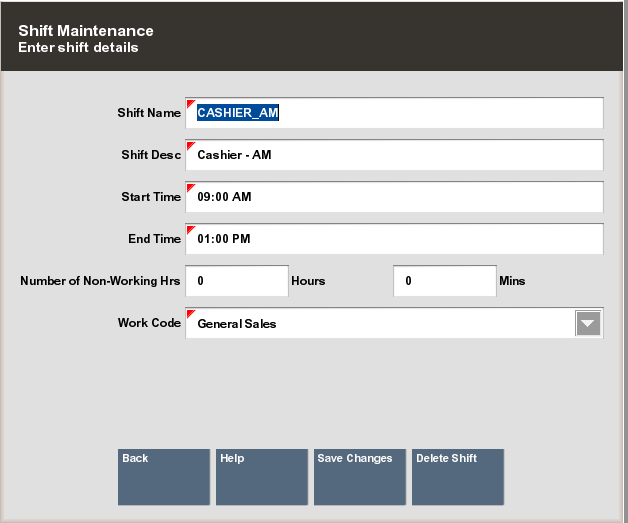
Oracle Retail Xstore Point-of-Service prompts for the shift information. Select the New option to create a new shift type.
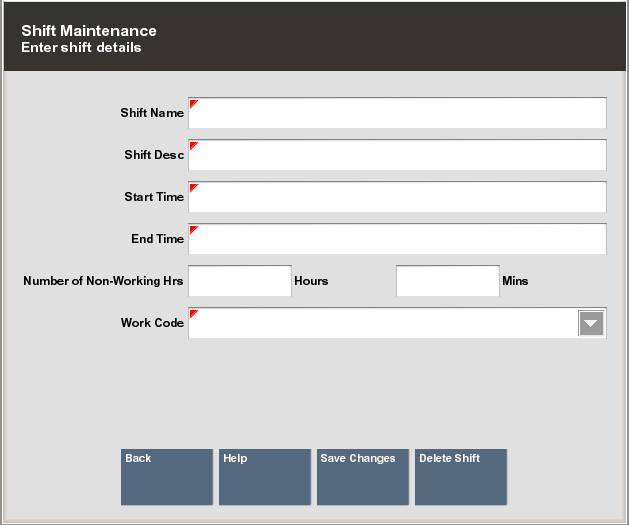
Oracle Retail Xstore Point-of-Service prompts for the shift detail information. Enter the information for the new shift:
Shift Name - Enter a name for this shift. This is the label that is shown in the list of pre-defined shifts.
Shift Description - Enter a short description for this shift.
Start Time - Enter the starting time for this shift. If you enter the time as military time, it is converted to a.m. or p.m. For example: 16:00 is converted to 04:00 PM.
End Time - Enter the ending time for this shift. If you enter the time as military time, it is converted to a.m. or p.m. For example: 16:00 is converted to 04:00 PM.
Number of Non-Working Hours - Enter the hours and minutes that are counted as non-working hours, such as meal breaks.
Work Code - Select a work code for this shift.
Select the Save Changes option to create the new shift.
|
Note: During employee scheduling, this new shift is available as an option in the pre-defined list of shifts. See Adding a Pre-Defined Shift for detailed information about using the Add Shift From List schedule option. |
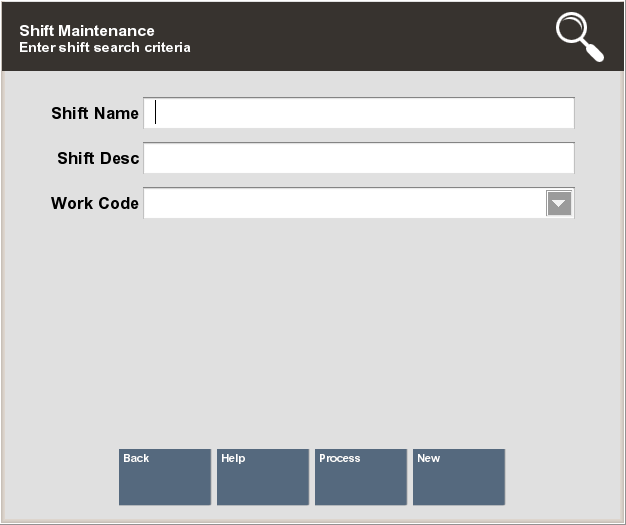
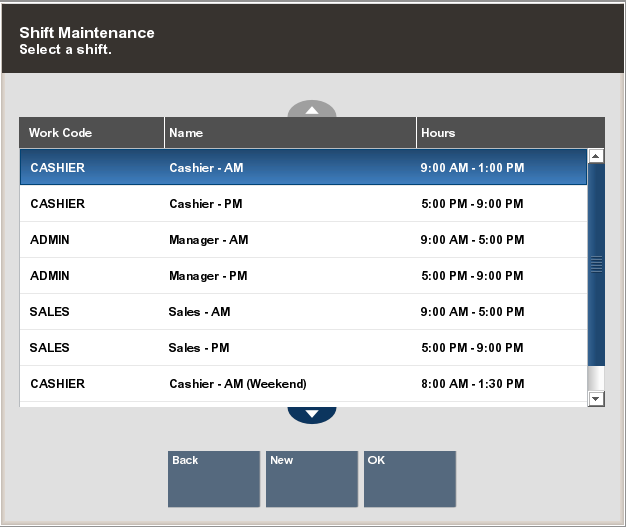
Use this procedure to change the information for a pre-defined shift.
From the Back Office Employee Scheduling Maintenance Menu, select the Shift Maintenance option and press Enter.
Oracle Retail Xstore Point-of-Service prompts for the shift information. Enter the required information and select the Process option to continue. If you do not enter any information, Xstore displays a list of all shifts.
If more than one pre-defined shift matches the search criteria you entered, Oracle Retail Xstore Point-of-Service displays a list of shifts. Select the shift you want to change from the list and press Enter to continue.
Oracle Retail Xstore Point-of-Service displays the shift's detail information.
|
Note: To delete the shift entirely, select the Delete Shift option here. The deleted shift will no longer available as an option when setting up employee schedules. |
Change the shift information as needed and select the Save Changes option to continue.
|
Note: Refer to the Oracle Retail Xstore Point of Service Reports Guide for detailed information about creating these reports. |
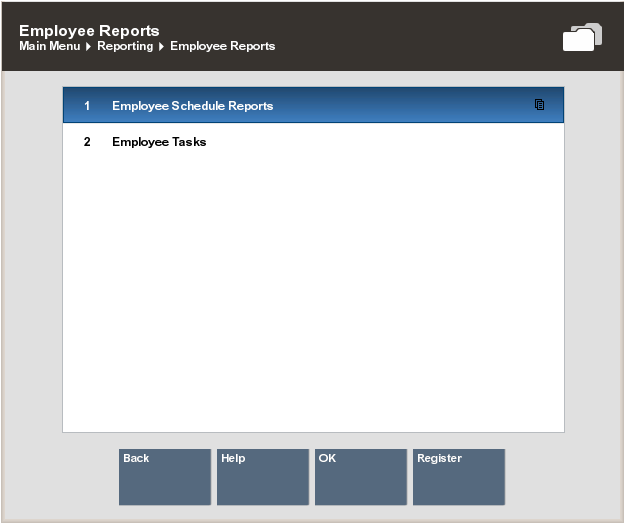
Schedule reports are available from the Schedule Reports menu.
At the Back Office Main menu, select Reporting and press Enter.
At the Reporting menu, select Employee Reports and press Enter.
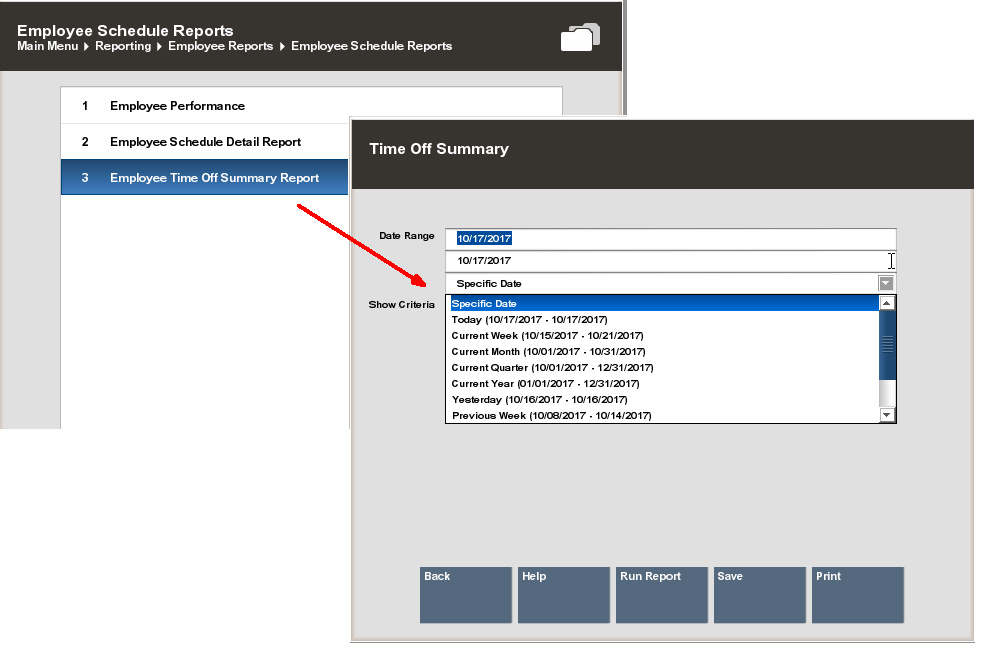
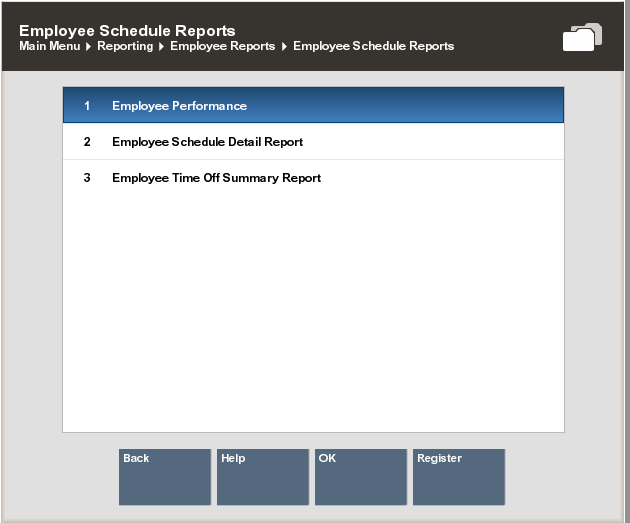
At the Employee Reports menu, select Employee Schedule Reports.
Select a report from the Schedule Reports list.
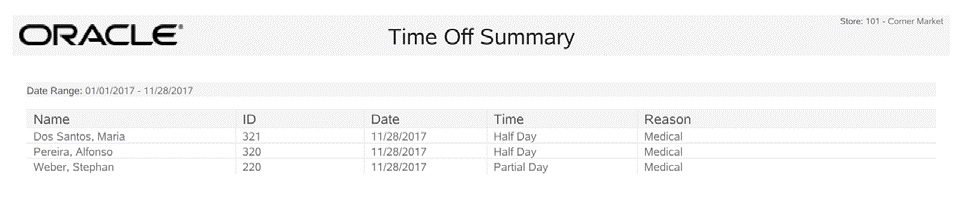
The Employee Time Off Summary Report provides a listing of employees who have scheduled time off during the weekly period selected for the report. For every employee selected, the report shows the date, amount of time off, and the reason for the time off.
See Printing the Time-Off Schedule for more information.
This report shows employee performance information within a selected date range for a specified work code (or all codes), for an individual employee, or for all employees.
This report includes the following employee information:
Total scheduled hours for an employee or all employees
The hours actually worked by the employee
The difference between the scheduled hours and the hours worked
The employee's total sales amount for the period
The number of sales for the period
The average dollar amount per sale
The average number of sales per hours worked
This report shows employees scheduled for each day in a selected week. It contains the following information:
Date
Employee name
Work Code
The individual start and end times and hours scheduled for sales and non-sales (work code)
Total hours for each employee per day
A report total for the schedule week is shown on the last page of the report