| Oracle® Retail Xstore Point of Service Manager's Guide Release 19.0 F25016-03 |
|

 Previous |
 Next |
| Oracle® Retail Xstore Point of Service Manager's Guide Release 19.0 F25016-03 |
|
Previous |
Next |
You can print shelf labels for any item in the current item file. Shelf labels can be printed to a laser report printer if the report printer supports printing multiple labels per page, or to a label printer if using ZPL II communication.In addition to scanning/entering items in order to print labels, the system also provides an option to print shelf labels for all of the items on an entire receiving document at once, and from previously saved batches if using ZPL II communication.
|
Note: You must load the appropriate label stock into the printer for each label printing job. The system does not perform a check for the correct stock before printing. |
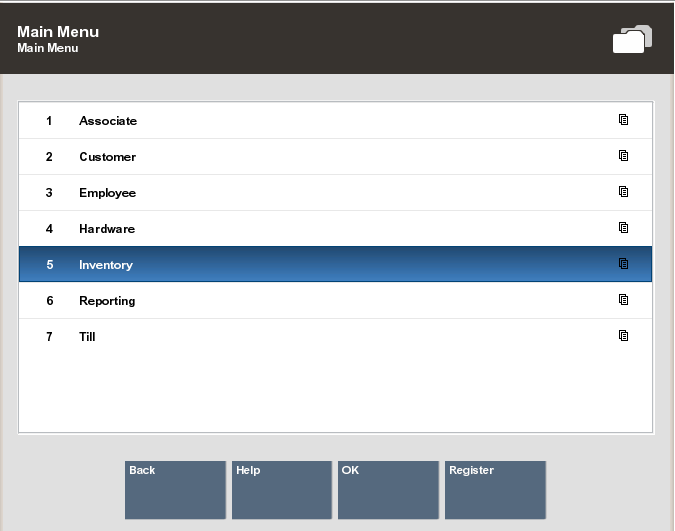
After logging in to the Back Office (see Accessing the Back Office), select the Inventory option from the Main Menu and press Enter.
|
Note: Instead of scrolling up or down the menu list to select an option, you can immediately access any option on the menu by pressing the number or letter associated with it on the keyboard (3=Employee, 5=Inventory, C= Customer, and so on). |
At the Inventory menu, select the Print Shelf Labels/Tickets option and press Enter.
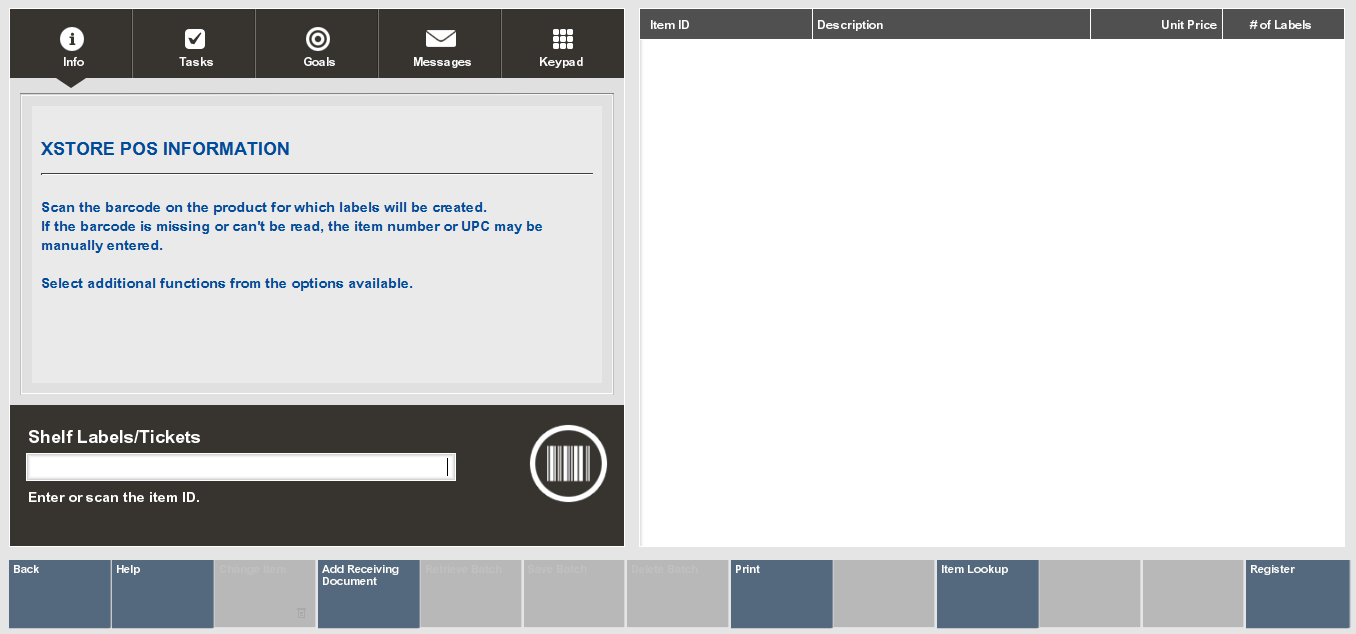
When prompted scan the barcode or manually enter the item Id and press Enter.
|
Note: If you are using ZPL II communication with a label printer, the Retrieve Batch option is available if you previously defined and saved a named print batch. See To Retrieve a Batch - ZPL II Only. |
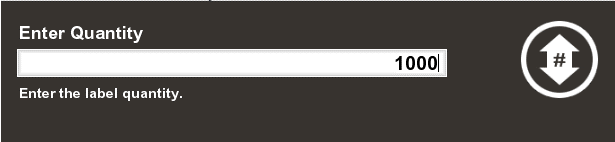
When prompted for the number of labels you want to print for this item, type the quantity and press Enter.
|
Note: By default, the system displays the number of items in your on hand inventory. |
The next steps depend upon your label printer setup:
If you are not using ZPL II communication with a label printer, continue with step 5 below.
If you are using ZPL II communication with a label printer, skip to ZPL II Label Printers.
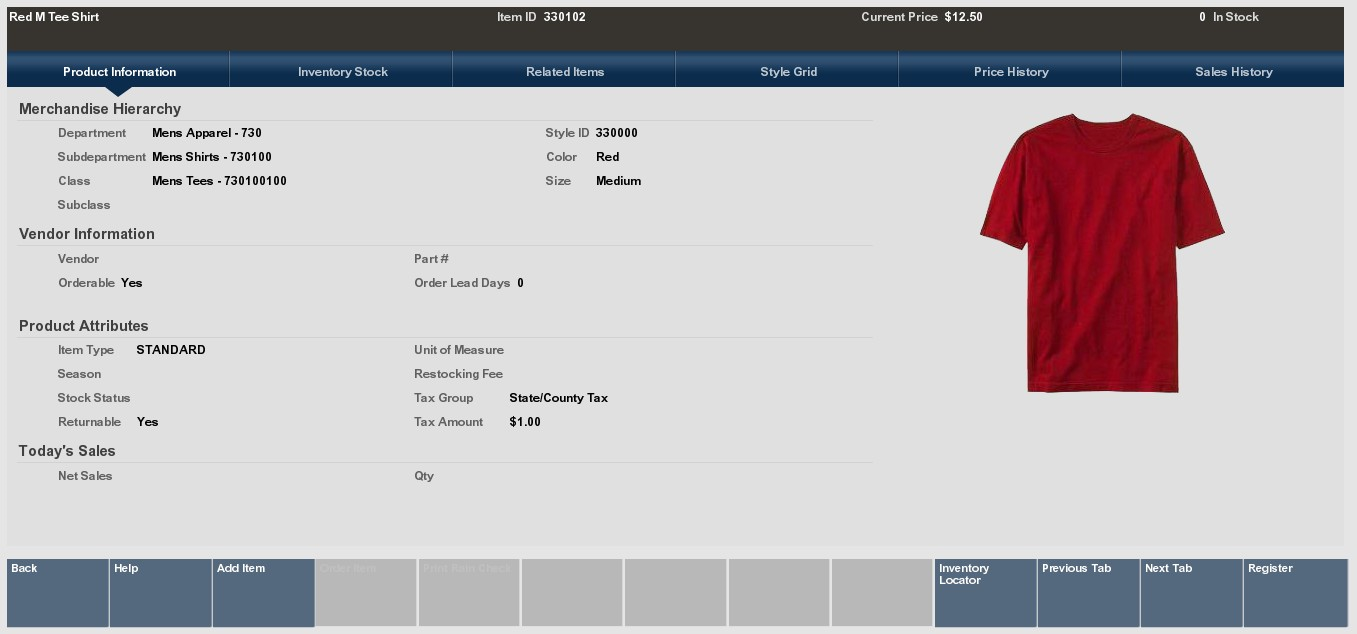
Oracle Retail Xstore Point of Service adds each Item Id and number of labels to the View Port area of the screen. The item description and unit price are also shown.
Additional Options:
|
Note:
|
When you have entered and/or edited all the items and label quantities, select the Process option to continue with label setup.
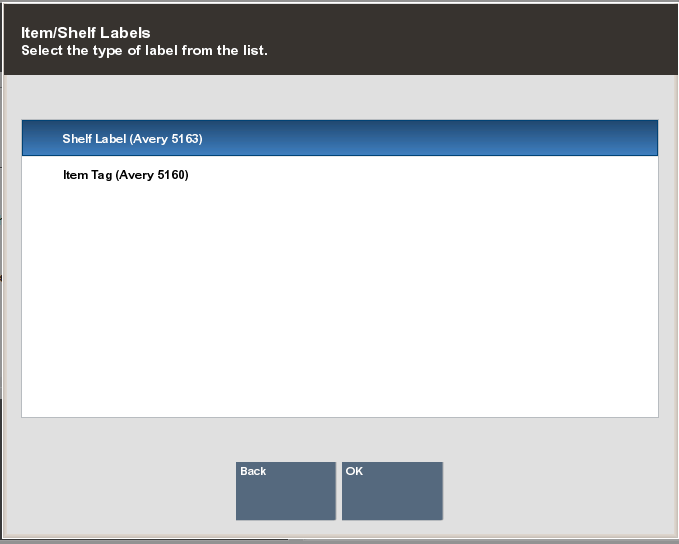
Oracle Retail Xstore Point of Service prompts you to select the type of label from the list. Select the label type and press Enter to continue.
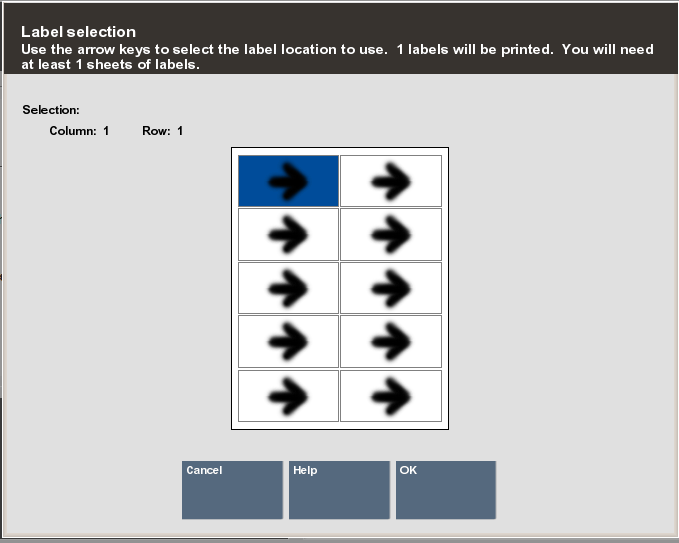
Oracle Retail Xstore Point of Service shows the number of label sheets you need and prompts you to select the location for the first printed label. Select the location for the first label and press Enter.
|
Note: The column/row you selected is shown in the Selection area on the form. In Figure 21-7, Column: 1, Row: 1: |
|
Note: Label location selection allows you to use partial sheets of labels to ensure that expensive labels are not wasted. |
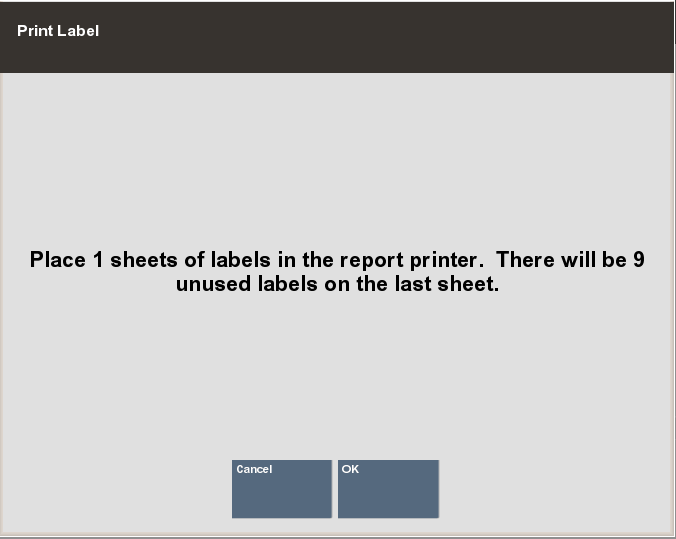
When prompted, press Enter to acknowledge the message informing you of the number of label sheets required.
Oracle Retail Xstore Point of Service flashes a message Calculating label layout and prints the labels.
|
Note: If you exit from the Item/Shelf Labels screen without printing the labels, Oracle Retail Xstore Point of Service displays a warning message that all current label settings will be lost. Select Yes to return to return to the Inventory Menu or select No to continue working with labels. |
...continued from step 4.
|
Note: If you previously defined and saved a Named Batch, you can retrieve the batch by selecting Retrieve Batch from the Item/Shelf Labels menu. See To Retrieve a Batch - ZPL II Only. |
After entering the item Id and label quantity:
If the item you entered is associated with a pre-defined stock label type, the item is automatically added to the view port with this icon Go to step 2.
If the item you entered is not associated with a pre-defined stock label type, you are prompted to select a label type from the list. This assigns the selected label type to the item for this instance only not for future label printing, and does not affect future label printing.
Select the stock label type.
Select a processing option:
Select Process to associate the stock label type to the item.
<OR>
Select Assign To All to assign the selected Stock type to all items in the current list.
|
Note: All items in the list will print on the same label stock type. However, this selection will not update the pre-defined stock type of the items and will not apply to items that are added after the Assign To All option is selected. |
Xstore returns to the Enter/Scan Item Id prompt screen.
The following options are available before printing the labels:
Change Item - To remove an item from the list, change the label quantity, change the item label price, or change an item's stock label type, see To Change an Item.
Item lookup - To search for an item to add to the list, see To Look Up an Item.
Add Receiving Document - To add items from a receiving document, see To Add a Receiving Document.
Retrieve Batch - To print a previously saved batch, see To Retrieve a Batch - ZPL II Only.
Save Batch - To save this label printing instance as a batch, see To Retrieve a Batch - ZPL II Only.
When you have entered and/or edited all the items and label quantities, select the Process option to continue with label printing.
|
Note: Before printing, Oracle Retail Xstore Point of Service automatically groups the items by stock type and verifies all items are associated with a label stock type. If Oracle Retail Xstore Point of Service detects that any of the items do not have an assigned label stock, you are prompted to select a label stock. |
Xstore displays the Load Label Type message.
Select Print to print the labels in this stock group. Continue printing all stock groups, making sure you have loaded the appropriate label stock for each. Go to step 5.
<OR>
Select Skip Group if you do not want to print these labels at this time. If there is another stock group, the Load Label Type message displays for the next group. Make sure you have loaded the appropriate label stock for each group. Continue printing all stock groups.
Go to step 5 below.
|
Note: You can select Back to return to the item entry screen. |
If prompted, select Yes to save and name this batch so it can be printed in the future, or select No if you do not want to print this batch again.
If you are not prompted, you can save the batch by selecting the Save Batch option. For more information see To Save a Batch - ZPL II Only andTo Retrieve a Batch - ZPL II Only.
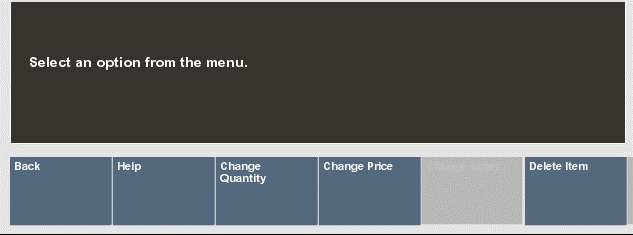
Select Change Item to edit an item. The following options are available from the Change Item menu before you print labels for the items.
Change Quantity: Select Change Quantity to change the number of labels to be printed.
Use the arrow keys to select the item and press Enter.
At the Enter Quantity prompt (see Figure 21-4), enter the number of labels you want to print for the item and press Enter.
Oracle Retail Xstore Point of Service updates the label quantity on the View Port for the item.
Change Price: Select Change Price to change the price that is printed on the label.
Use the arrow keys to select the item and press Enter.
At the Enter Price prompt, enter the price of the item to be printed on the label and press Enter.
Oracle Retail Xstore Point of Service updates the label unit price on the View Port for the item.
Change Label - ZPL II ONLY Select Change Label to specify a different stock label type for the item.
Use the arrow keys to select the item and press Enter.
Select the stock label type.
Select a processing option:
Select Process to associate the Stock Label type to the item.
<OR>
Select Assign To All to assign the selected Stock Label type to all items in the current list.
|
Note: All items in the list print on the same label stock type. This selection does not update the pre-defined stock type of the items and does not apply to items that are added after the Assign To All option is selected. |
Delete Item: Select Delete Item to remove an item from the list of item labels to be printed.
Use the arrow keys to select the item and press Enter.
|
Note: There is no confirmation prompt before deleting the item. Be sure you are highlighting the correct item in the View Port display area. |
Oracle Retail Xstore Point of Service removes the item from the list of item labels to be printed.
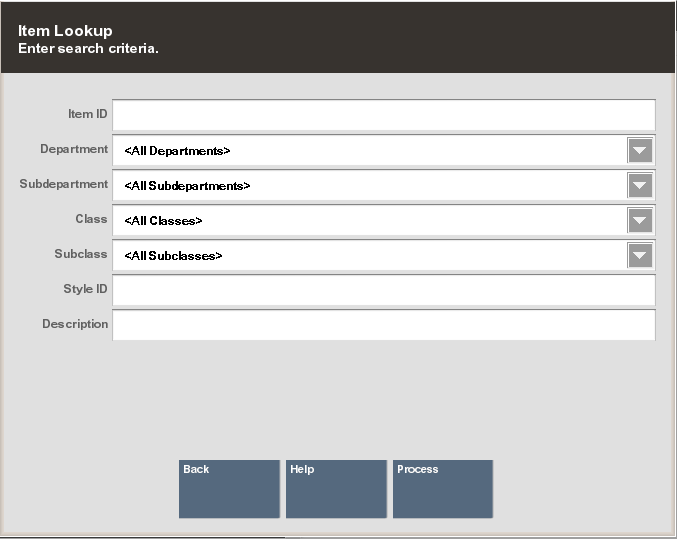
Item Lookup: Select Item Lookup to find an item using the item lookup search criteria form. The item can be added to the list of item labels to be printed.
At the Item Lookup form, enter the search criteria and select Process.
|
Tip: Your store may be configured with advanced lookup options, which provide the ability to add Custom Groups and Details to further define your search criteria. Select the exclude box to not include an item in your search.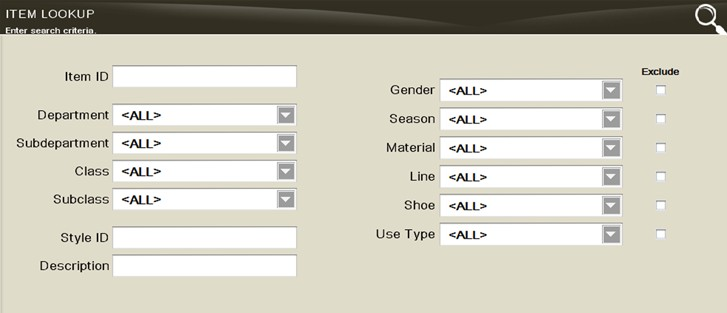 |
If more than one item matched the search criteria you entered, select the item from the list and OK. Oracle Retail Xstore Point of Service displays the item information.
Select the Add Item option to include the item on the list of item labels to be printed.
Enter the number of labels to be printed for the item and press Enter to add the item to the list of item labels to be printed. By default, the on hand quantity for the item is shown in the Label Quantity focus bar prompt (Figure 21-4).
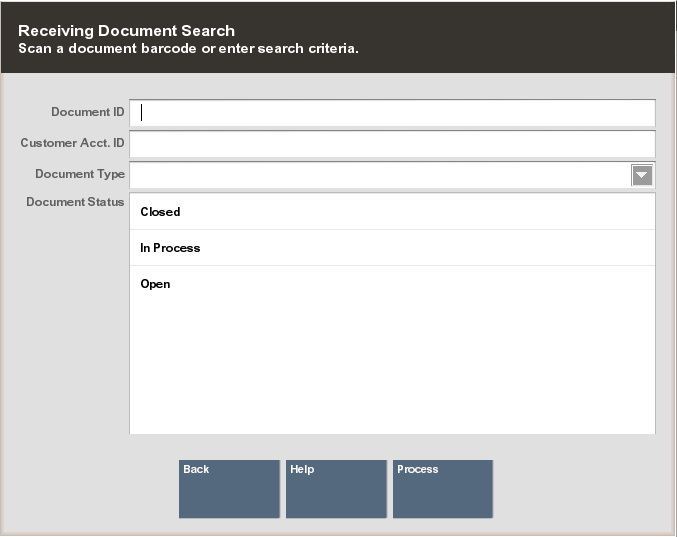
Add Receiving Document: Select this option to print labels for all of the items on a receiving document.
At the Document Search form, scan the barcode for the Receiving Document or enter search criteria to locate the Receiving Document.
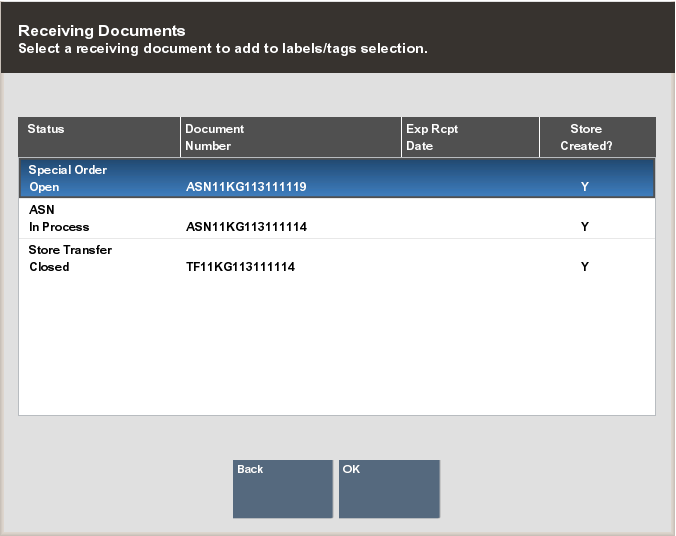
Oracle Retail Xstore Point of Service displays a list of receiving documents that match the criteria you entered. You may need to scroll through the list if multiple documents are displayed.
Select the receiving document that has the items that need labels and choose OK. Oracle Retail Xstore Point of Service adds all of the items on the Receiving Document to the list of item labels to be printed, and displays them in the View Port area of the screen.
|
Note: By default, a label will be printed for each item/quantity in the shipment. Use the Change Quantity option to edit the number of labels to be printed. |
Batch options are only available when using ZPL II. Use this option to assign a name to the current list of items so it can be used again in the future. See To Retrieve a Batch - ZPL II Only below for information about reusing the batch to print labels.
Select Save Batch from the Item/Shelf Labels screen.
When prompted, enter a name for the batch and press Enter.
Xstore saves the batch information and it can be retrieved for printing later.
Use this option to retrieve a list of previously save batches. See To Save a Batch - ZPL II Only above for more information about saving a batch for reuse.
Select Retrieve Batch from the Item/Shelf Labels screen.
When prompted, select a Batch from the list and press Enter.
The items in the batch are shown on the View Port.
Continue with step 2.
Use this option to delete a previously saved batch.
Select Retrieve Batch from the Item/Shelf Labels screen.
When prompted, select a Batch from the saved Batch List and select Delete Batch.
At the confirmation prompt, select Yes to delete the batch. Selecting No returns to the saved Batch List and the selected batch is not deleted.
Xstore returns to the Saved Batch list and the selected batch is removed from the list.