| Oracle® Retail Xstore Point of Service Mobile User Guide Release 20.0 F35714-03 |
|

 Previous |
 Next |
| Oracle® Retail Xstore Point of Service Mobile User Guide Release 20.0 F35714-03 |
|
Previous |
Next |
Layaways are similar to special orders and work orders because they are persistent sales. Generally, this indicates that the sale transaction in which the layaway is created is not the end of the transaction's life-cycle. Persistent sales can have an arbitrary number of transactions in their life-cycles, but non-persistent sales consist of a single transaction (and a possible void of that transaction).The operational rules for layaways may also differ from those for non-persistent sales or even other types of persistent sales. For example, a layaway does not require the customer to pay for the items in full when purchased. Also, layaway items may not be reflected in the store's sales figures until the customer takes the item into possession (at pickup).After a layaway account has been created, the account information is available from the context menu, outside of a sale, with functions to track, update, and maintain layaway accounts.
The following sections are contained in this chapter:
The following reports are available from the Reports menu to help maintain layaway accounts:
Layaway Aging Summary Report
Layaway Aging Detail Report
Layaway Account Activity Summary Report
Layaway Account Activity Detail Report
The Layaway Aging reports show layaway accounts based on a specified aging period. Select the Summary report option to print a condensed version of the Layaway Aging Report and select the Detail report option to print an itemized version of the Layaway Aging Report.
The Layaway Account Activity reports show layaway accounts based on status such as Inactive, Overdue, Delinquent, and so on. Select the Summary report option to print a condensed version of the Layaway Account Activity Report and select the Detail report option to print an itemized version of the Layaway Account Activity Report.
|
Note: Refer to the Oracle Retail Xstore Point of Service Reports Guide for more information about setting up and running these reports. |
From the Main Menu, select Customer.
Select Layaway Maintenance from the Customer menu. See Mobile POS Customer Menu.
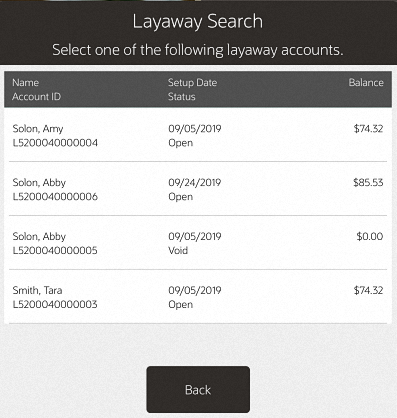
Oracle Retail Xstore Mobile POS displays the Layaway Search form, prompting for search criteria. Enter the criteria you want to use for finding a layaway record and select Process:
If you enter a specific layaway ID and Oracle Retail Xstore Mobile POS finds it, the record is displayed.
If you enter search criteria that results in more than one record being found, or your system is set up to display the accounts list, you must select the record you want from the list.
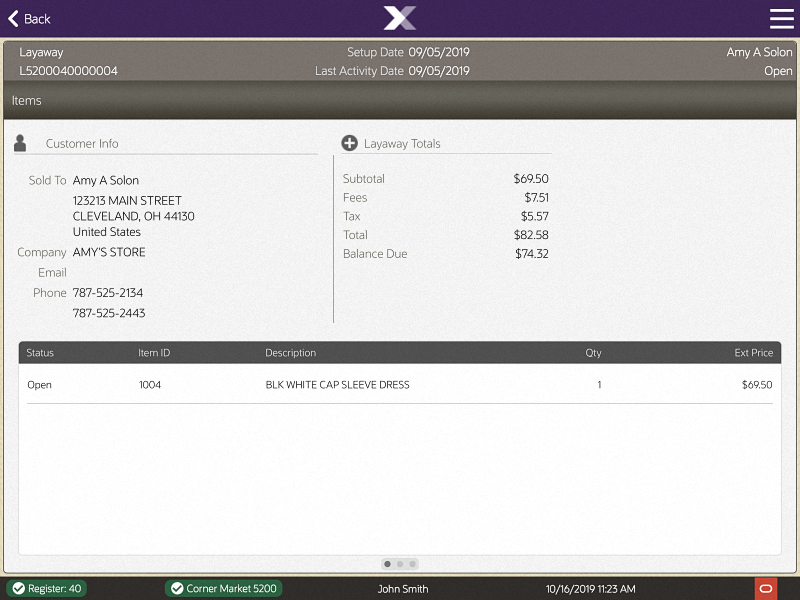
Oracle Retail Xstore Mobile POS displays the Layaway screen for the selected record.
The Layaway screen provides the following information:
The upper panel on the screen shows the summary information for the Layaway account, including its status and customer contact information. This panel is always displayed when viewing any of the tabs on this screen.
The customer information area displays:
Sold To: The purchasing customer's name and address information.
Company: The purchasing customer's company, if applicable.
Email: The purchasing customer's email address.
Phone: The purchasing customer's telephone number(s).
The order totals information displays:
Subtotal: The Layaway subtotal (the shipping fee amount is not included in the subtotal).
Fees: Additional cost associated with the Layaway.
Tax: The tax on the Layaway.
Total: The total for the Layaway (the shipping fee amount is included in the total).
Balance Due: The amount due for the Layaway.
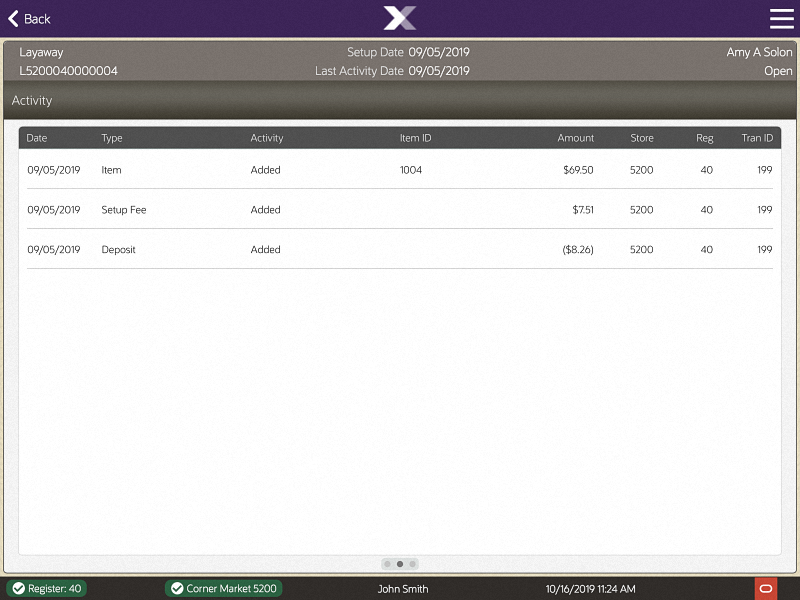
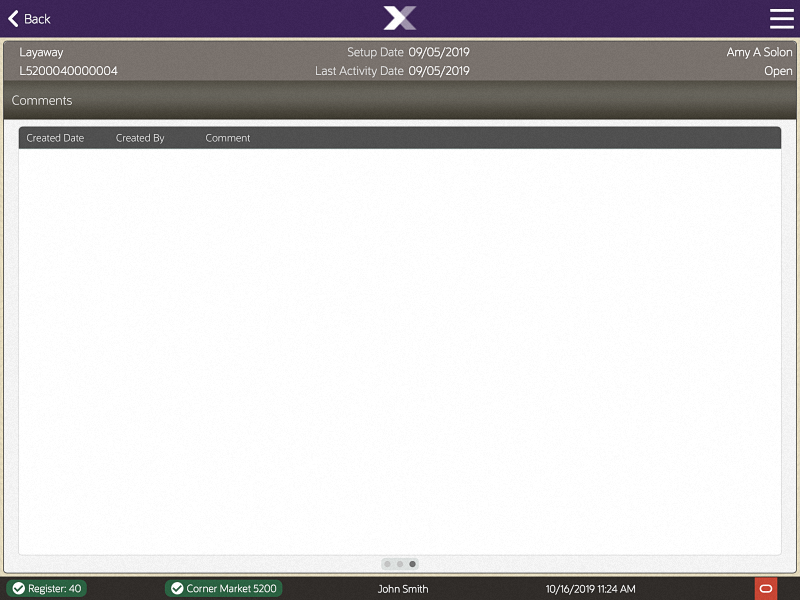
Detailed Layaway information is presented on three tabs; Items, Activity, and Comments. You can navigate between the tab sections by swiping or via the Context Menu. Each tab contains specific information about the customer's Layaway account.
Items Tab: Shows the item information for the Layaway account.
Activity Tab: Shows the activity information for the Layaway account.
Comments Tab: Shows any comments associated with the Layaway account.
The Items tab contains the following information:
Status: The status of the item (Open, Picked Up, Cancelled).
Item ID: The item identifier.
Item Description: The item description.
Quantity: The item quantity.
Ext. Price: The extended price for the item (price x quantity).
The Activity tab contains the following information:
Date: The date the layaway activity took place.
Type: The layaway activity type associated with the amount of the activity.
Activity: The action performed.
Item ID: The item identifier.
Amount: The amount for the associated type of activity on the account.
Store: The identifier of the store where the layaway activity took place.
Reg: The identifier of the register where the layaway activity took place.
Tran ID: The transaction identifier for the layaway activity.
The Comments tab contains the following information:
Created Time: The date this comment was added to this layaway account record.
Comment Created By: The identifier for the employee who created the comment.
Comment: The text that was entered.
|
Note: Use the Add Comment option in the Context Menu to add a comment to the layaway account record.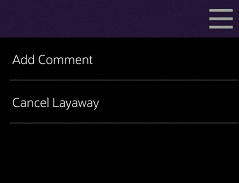 |
The option to cancel a layaway account is available on all three tabs (Item, Activity, and Comments) while you are viewing the account you want to cancel.
Search for the layaway account that you want to cancel.
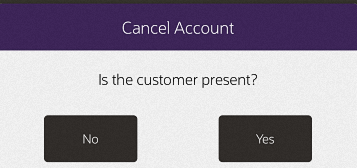
When Oracle Retail Xstore Mobile POS displays the account, select the Cancel Layaway option from the Context Menu.
Oracle Retail Xstore Mobile POS displays a message asking if the customer is present during the cancellation of the layaway account. Select Yes or No.
Customer not present
If you select No, indicating the customer is not present:
The system displays a prompt asking if you are sure you want to cancel the layaway account. Select Yes (responding No returns to the Layaway screen).
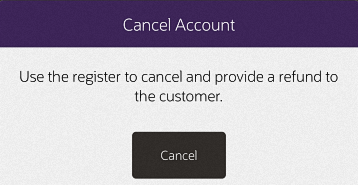
The system displays a prompt indicating that the balance amount due to the customer will be transferred to an escrow account. Press OK to respond to the prompt and continue.
The system returns to the Layaway Search form. You may select Back to return to the Customer Maintenance and Accounts Menu and perform other functions (see Layaway Search Form).
Customer present
If you select Yes, indicating the customer is present, Oracle Retail Xstore Mobile POS displays the following prompt. Press OK and continue with the procedure Cancel Layaway - When the Customer Is Present below.
To cancel a layaway when the customer is present:
Select Start Sale from the Main Menu.
Assign an associate to the transaction, if your system's configuration requires an associate.
The Customer Lookup form displays. Enter search criteria in the form for the customer whose layaway account must be canceled and select Process.
Select the correct customer from the list and choose Select & Continue.
The Sale screen displays and the customer who owns the layaway account is associated with it. Select the Extended Transaction option from the Context Menu.
Select Layaway from the Extended Transaction menu.
Xstore displays a list of Layaway accounts for the selected customer. Select the Layaway account to be canceled to continue.
Select the Cancel Layaway option.