| Oracle® Retail Xstore Point of Service Mobile User Guide Release 20.0 F35714-03 |
|

 Previous |
 Next |
| Oracle® Retail Xstore Point of Service Mobile User Guide Release 20.0 F35714-03 |
|
Previous |
Next |
Till Option functions are primarily related to the movement of money into and out of a till (a cash drawer). Till options include No Sale, and Post Void. Additional options such as Change Float, Paid In and Paid Out transactions and Tender Exchange are available on the Mobile POS.
This section describes the available till options:
Change Float - Select this option to change the amount of cash that remains in each till after the end count is performed. See Changing the Float Amount.
Foreign Currency Maint. - Select this option to update the exchange rate between the local currency and foreign currencies that are acceptable tenders. See Foreign Currency Maintenance.
No Sale - Select this option to perform a no sale transaction to open the cash drawer. See No Sale.
Paid In - Select this option to perform a paid in transaction. This option requires an attached till. See Performing Paid In/Paid Out Transactions.
Paid Out - Select this option to perform a paid out transaction. This option requires an attached till. See Performing Paid In/Paid Out Transactions.
Post Void - Select this option to perform a post void transaction. See Post Voiding Transactions.
Tender Exchange - Select this option to perform a tender exchange transaction, which allows you to exchange one form of tender for another. For example, accept a customer's check for some amount and give them the same amount as cash. See Tender Exchange (Mobile Tablet and Thin Client).
The Float is the total value of cash counted and removed from the till, but not included in the bank deposit. This cash remains in circulation to be used the next time the till is opened. This option can be used whenever you need to change the amount withheld from the bank deposit, and can be adjusted per till. For example, you may want to change the float amount during the December holiday shopping season to plan for increased sale activity.
At the Till menu, select Till Options.
At the Till Options menu, select the Change Float option.
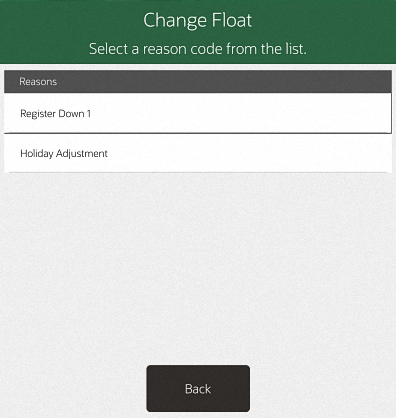
The system prompts for the reason you are changing the float amount. Select a reason from the list.
Depending upon the reason you selected, you may be prompted for additional information/comments. If prompted, enter the information as required and press OK.
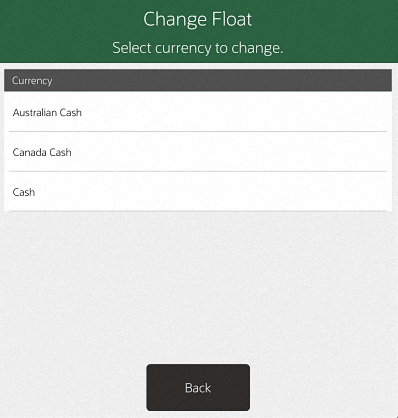
If your store is configured for foreign cash currency tenders to be given as change, select the type of float tender from the list.
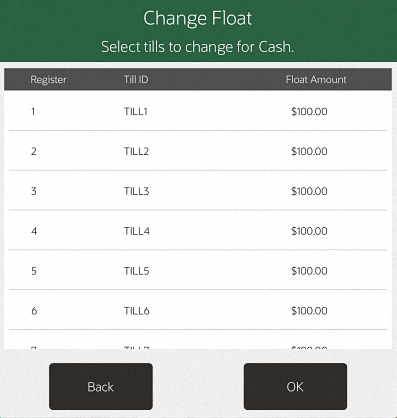
The system displays a list of tills. Select the till(s) you want to change. After you select all of the tills you want to change, press OK.
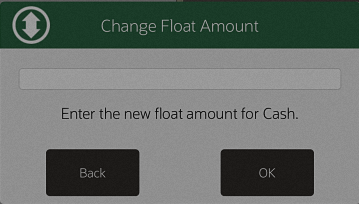
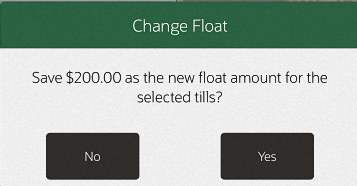
The system prompts for the new float amount for the selected tills. Enter the new float amount for the tills in the list and press OK.
The system prompts to confirm the new float amount for the selected tills. Press Yes to accept the new float amount. The system updates the float amount to the new value for the selected tills and returns to the Main Menu.
You can edit the currency exchange rate for the foreign currencies that are accepted as tenders for sale transactions, if your store policy allows it. Some currency rates fluctuate frequently, so you can edit the exchange rate as often as necessary.
At the Till menu, select Till Options.
From the Till Options menu (Figure 23-2), select the Foreign Currency Maint. option.
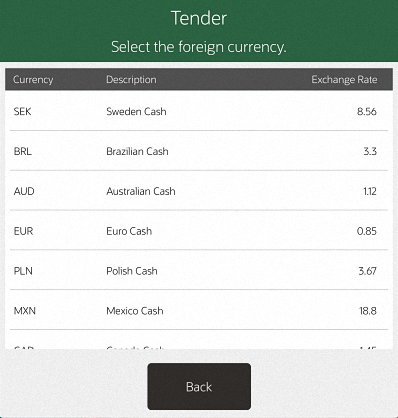
Oracle Retail Xstore Mobile POS displays a list of foreign currencies. Select the currency whose exchange rate you are changing.
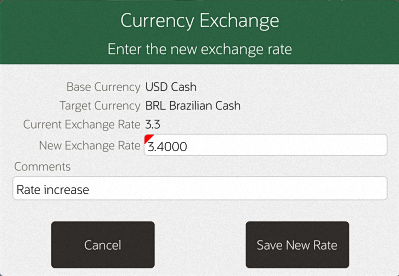
The system displays the current information for the currency you selected. Enter the new exchange rate and a comment, then select Save New Rate.
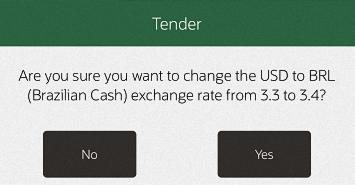
Oracle Retail Xstore Mobile POS prompts whether to change the exchange rate. Select Yes to continue.
The new currency exchange rate is now effective and the system prints a receipt with the new exchange rate. Oracle Retail Xstore Mobile POS returns to the Main Menu.
|
Note: About exchange rate calculations in currency conversions:
|
Use the No Sale option to open the cash drawer for a reason other than a normal sale transaction.
At the Till menu, select Till Options.
From the Till Options menu (Figure 23-2), select the No Sale option.
The system prompts you to select the reason you are opening the cash drawer.
Select a reason from the list.
If necessary, scan the cash drawer on which to perform the no sale.
The system may prompt you to enter a comment about the reason for opening the cash drawer. If it is required, enter the pertinent information in the comment entry form and press OK.
The system prints a No Sale receipt for your records.
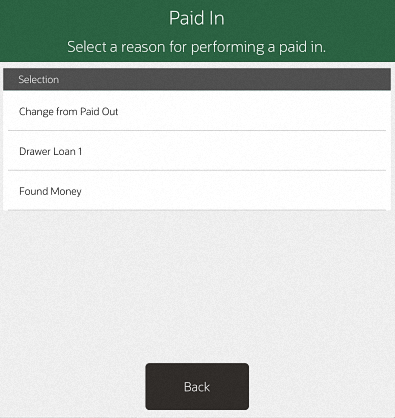
A Paid In transaction allows you to move funds into a till from non-sale sources such as returned check charges, found money, and change from a Paid Out transaction.
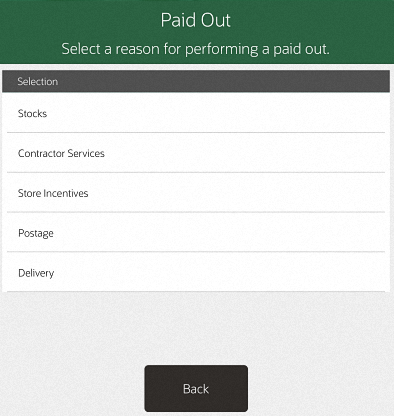
A Paid Out transaction moves funds out of a till for non-refund purposes such as business expenses and office supply purchases.
Store policy controls the list of valid reasons that you can select for performing a Paid In or Paid Out transaction. In addition, store policy controls whether or not receipts are produced by these two transactions.
The Paid In and Paid Out transactions may also be available on the Till Options Menu at the register.
|
Note: A till must be attached to the register to perform Paid In/Paid Out transactions. If a till is not attached and one of those options is selected, a message is displayed indicating that a till must be attached for the transaction to be performed.In an only networked cash drawer environment you are required to scan the cash drawer barcode to link it to the transaction before the drawer pops. In a mixed network/local cash drawer environment, select whether to use a network cash drawer. |
At the Till menu, select Till Options.
From the Till Options menu (Figure 23-2), select the Paid In option.
|
Note: If the register has more than one cash drawer, you may be prompted to select the till to be used for this process. |
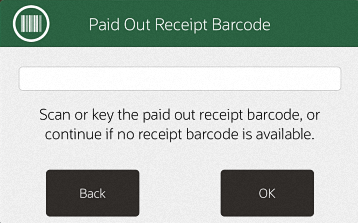
The system prompts you to enter a paid out receipt barcode. If you are now placing funds back into the till from a previous paid out transaction and you have the receipt, scan or enter the barcode and press OK. Otherwise, just press OK to bypass this prompt.
Select a reason for this Paid In transaction and press OK.
|
Note: There may be additional prompts for information (such as a comment) depending upon the specific reason code that you select. |
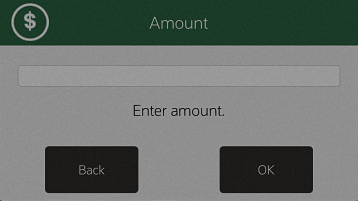
At the Amount prompt, enter the cash amount you are adding to the till and press Enter.
Oracle Retail Xstore Mobile POS prompts you to close the cash drawer (if configured to do so), prints a receipt, and returns to the Main Menu.
|
Note: Note the reference to the original paid out transaction number shown in this example. This information associates the original paid out transaction with the current paid in transaction for accounting purposes. |
At the Till menu, select Till Options.
From the Till Options menu (Figure 23-2), select the Paid Out option.
|
Note: If the register has more than one cash drawer, you may be prompted to select the till to be used for this process. |
Select a reason for this Paid Out transaction and press OK.
|
Note: There may be additional prompts for information (such as a comment) depending upon the specific reason code that you select. |
At the Amount prompt, enter the cash amount you are removing from the till and press Enter.
Oracle Retail Xstore Mobile POS prompts you to close the cash drawer (if configured to do so), prints a receipt, and returns to the Main Menu.
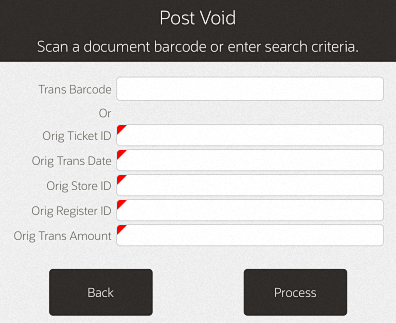
Performing a Post Void transaction changes the status of a sales transaction to Void. Only transactions for the current business date can be post voided.
All records in the system are reset, almost as if they had never occurred during the original transaction, and the transaction record is retained in a voided state.
Certain kinds of sale transactions may involve extended transactions — activities related to the transaction that occur outside of the system. For example, special orders, work orders, and layaways are extended transactions.
Although the system checks for such conditions when a post void is executed, some aspects of the transaction may need to be reversed by an additional transaction such as a return. If the system detects an extended transaction, a prompt to continue or discontinue the post void process displays.
The types of transactions that may be post voided are determined by the home office.
If you scan or enter a barcode for a transaction type that cannot be post voided (such as a timecard transaction), the system displays a message indicating that the transaction type cannot be post voided. Press OK to acknowledge the message and the system returns to the Till menu.
You can post void transactions from the register from the Electric Journal (see Post Voiding a Transaction), or from the Till menu.
At the Till menu, select Till Options.
From the Till Options (Figure 23-2), select the Post Void option.
|
Note: A till must be attached to the register to perform a transaction void. If a till is not attached, this option may be grayed out on the menu (Register Accountability mode), or a message may be displayed if the Post Void menu option is selected (Till Accountability mode). If the register has more than one cash drawer, you may be prompted to select the till to be used for this process.In an only networked cash drawer environment you are required to scan the cash drawer barcode to link it to the transaction before the drawer pops. In a mixed network/local cash drawer environment, select whether to use a network cash drawer. |
At the Post Void prompt, scan or enter the transaction information and select Process to continue.
Oracle Retail Xstore Mobile POS prompts: Are you sure you want to post void the selected transaction? Select Yes to continue with the post void transaction.
The system prompts for the reason you are performing the post void. Select a reason from the list and press OK.
The system may prompt for a comment about the post void. If prompted, type a comment and press OK to continue.
Oracle Retail Xstore Mobile POS post voids the transaction, prints receipts, and returns to the Main Menu.
The Tender Exchange function permits an associate to exchange one form of tender for another. The types of tender that may be exchanged and the threshold exchange amounts are determined by your store policy.
To perform a Tender Exchange:
At the Till menu, select Till Options.
From Till Options (Figure 23-2), select the Tender Exchange option. A Tender Exchange Incoming Tender window opens listing the tenders available such as Check, Gift Card, Mall Certificate, and Foreign Currency.
Select the incoming tender type from the tender exchange list.
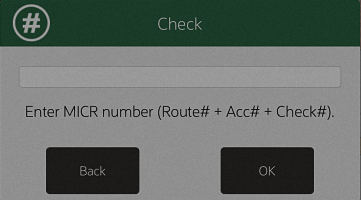
If a check tender was selected in Step 3, enter information about the check:
Enter the check MICR number, then press OK.
Enter the state or province that issued the ID being used to verify the customer's identity, then press OK.
Enter the ID number, then press OK.
Enter the birthdate on the ID, then press OK.
Enter the amount of the incoming tender.
If necessary, select whether to add another incoming tender to the exchange:
Click Yes to add another tender. Return to Step 3.
Click No to continue with the current tenders.
A Tender Exchange Outgoing Tender window opens. Continue with Step 7.
Select the outgoing tender.
Click OK.
Xstore prompts for the amount of the outgoing tender.
|
Note: The default value is equal to the maximum amount that can be redeemed in the selected tender. |
If necessary, change the amount to return to the customer.
Press Enter.
If necessary, scan the cash drawer with which to perform the tender exchange.
If the entered outgoing amount was less than the maximum, a Tender Exchange Outgoing Tender window opens. Return to Step 7.
If the outgoing amount was the maximum amount, Xstore prompts whether the tender exchange is complete. Continue with Step 12.
Indicate whether the tender exchange is complete:
Click Yes to complete the transaction.
Receipts will print.
Click No, and a Tender Exchange Incoming Tender window opens. Return to Step 3.
Indicate whether the tender exchange is complete:
Click Yes to complete the transaction.
Receipts will print.
Click No, and a Tender Exchange Incoming Tender window opens. Return to Step 3.