
Purpose: CWSerenade uses HornetQ to communicate with other applications.
HornetQ is an open source JMS (Java Message Service) provider developed by JBoss to support asynchronous, or JMS, messaging.
HornetQ or WebSphere MQ? You can use HornetQ or IBM WebSphere MQ to perform communication between CWSerenade and other applications when it is necessary to retrieve or place XML data on a server; see JMS (Java Message Service) Providers for CWSerenade for a comparison.
Viewing and working with HornetQ queues and messages: You can use an extensible JMS console, such as HermesJMS, to review and work with the queues and messages processed by HornetQ.
Message log: You can use the CWSerenade MQ Message Log to track XMLs and transactional messages generated or received by CWSerenade.
Configuring HornetQ for CWSerenade

To configure HornetQ for CWSerenade:
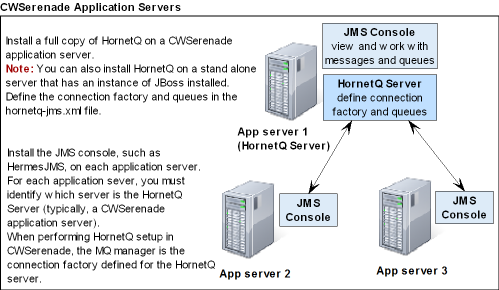
1. Install HornetQ on one of the CWSerenade application servers.The recommended version is hornet-2.0.0.GA, which you need to download from the HornetQ web site: http://hornetq.jboss.org/downloads.html. Note: MICROS recommends you install HornetQ on one of the CWSerenade application servers; however, you can install HornetQ on a separate server.
2. Configure CWSerenade to use HornetQ. See CWSerenade Property Settings for HornetQ, HornetQ Configuration File, and HornetQ Jar Files.
3. Create queues for the CWSerenade processes that send and receive messages with another system via queues; see Creating HornetQ Queues.
4. On each CWSerenade application server, install and configure HermesJMS, or some other extensible JMS console, to allow you to review and work with the messages processed by HornetQ.
5. When performing queue setup in CWSerenade, the MQ manager is the connection factory on the HornetQ server.
HornetQ illustration
If HornetQ fails to deliver a message: If HornetQ fails to deliver a message, the message remains in the queue and HornetQ continues to try to deliver the message. See Troubleshooting HornetQ.
CWSerenade Property Settings for HornetQ

• JMS Properties File Settings for HornetQ
• JNDI Properties File for HornetQ
Location of properties file: Typically, the CWSerenade properties files are saved in the C:\Serenade\server\conf\cwdirectcpproperties folder on the CWSerenade application server, where C: is the root directory of the server.
To edit a properties file: You can use a text editor to edit the file, being careful to only change the settings that are configurable.
Note: If you make a change to a properties file, you must select Change in Refresh System Properties (PROP) or stop and restart the Serenade service (or the application server) before the changes take effect.
JMS Properties File Settings for HornetQ
The following settings are required in the cwdirectcp_jms.properties file to enable HornetQ.
Setting |
Description |
CWMQ_TARGET_ CLIENT |
Enter 0. |
CWMQ_WAIT_TIME |
Enter 0. |
CWMQ_JNDI_LOOKUP_NAME |
Enter /. |
JNDI Properties File for HornetQ
The following settings are required in the cwdirectcp_jndi.properties file to enable HornetQ.
Setting |
Description |
CWMQ_JNDI_INITIAL_ CONTEXT_FACTORY |
Enter org.jnp.interfaces.NamingContextFactory. |
CWMQ_JNDI_PROVIDER_URL |
Enter jnp://ServerName:1199, where ServerName is the name of the server where HornetQ is installed. |
CW_JDBC_PROVIDER |
Enter java:/CWDirectCPDS. |
The HornetQ Configuration file contains configuration settings for HornetQ. In this file, you need to verify that the host setting contains the name of the server where HornetQ is installed and not local host.
Location of file: On the server where you have installed HornetQ, search for a file named hornetq-configuration.xml.
To edit the file: You can use a text editor to edit the file, being careful to only change the settings that are configurable.
Note: If you make a change to this file, you must stop and restart the HornetQ service.
Configuration Setting |
Description |
connector name ="netty" param key="host" |
Verify the value for param key="host" is the name of the server where HornetQ is installed. Example: param key="host" value="SERAPP1" |
acceptor name="netty" param key="host" |
Verify the value for param key="host" is the name of the server where HornetQ is installed. Example: param key="host" value="SERAPP1" |
The following jar files are required for HornetQ:
• hornetq-bootstrap.jar
• hornetq-core.jar
• hornetq-jboss-as-integration.jar
• hornetq-jms.jar
• hornetq-logging.jar
• hornetq-transports.jar
• jboss-jms-api.jar
• jboss-mc.jar
• jnpserver.jar
• netty.jar
Location of jar files: These jar files are located in the hornet-2.0.0.GA.zip file, which you can download from the sourceforge.net web site: http://sourceforge.net/projects/hornetq/files/.
Copy these jar files from the lib folder in the hornet-2.0.0.GA.zip file and paste them to the C:\Serenade\server\custom-lib\ folder on the CWSerenade application server, where C: is the root directory of the server. If you are using multiple application servers, you must copy these jar files to each server.
Use the following steps to create a queue for HornetQ.
Note: You can perform these steps while HornetQ and CWSerenade are running.
1. |
On the server where you have installed HornetQ, search for a file named hornetq-jms.xml. Open this file in a text editor. |
3. |
Locate the <! -- Serenade Queue Setup --> section of the hornetq-jms.xml file. Verify the following: • connection-factory name: the name of the connection factory used by CWSerenade to receive messages and put them into the appropriate queue. MICROS recommends naming the connection factory SERVER-JMS, where SERVER is the name of the server where HornetQ is installed and JMS indicates whether this is a queue manager (WebSphere MQ) or factory connection (HornetQ). Example: If you have installed HornetQ on a server named SERAPP1, the connection factory name would be SERAPP1-FC. • connector-ref connector-name: should be set to netty. • entry name: the name of the connection factory used by CWSerenade to receive messages and put them into the appropriate queue. This entry should match the entry for the connection-factory name setting. |
4. |
Locate the <!-- Queues --> section of the hornetq-jms.xml file. |
5. |
At the end of the <!-- Queues --> section, add a new entry for each queue you wish to create. Each queue entry should contain the following, where: • SERVER is the name of the server where HornetQ is installed, • PROCESS is the name of the process or IJCT job that uses the queue, • DIRECTION indicates the direction of the message (IN = to CWSerenade; OUT = from CWSerenade), and • FC indicates the queue is used by the HornetQ factory connection (MQ = the queue is used by IBM WebSphere MQ).
<queue name="SERVER.PROCESS.DIRECTION.FC"> <entry name="SERVERNAME.PROCESS.DIRECTION.FC"/> </queue>
Example: To create a queue for the Outbound Pick (CWPickOut) message, name the queue SERENADE.PICK_OUT.OUT.FC. |
6. |
Once you have added an entry for each queue you wish to create, save the file. |
7. |
Define the queue for the CWSerenade process that uses it. See XML Messages for a list of messages processed by CWSerenade. Note: In order for the CWSerenade process to start using the new queue, you will need to stop and restart the process. |
If communication errors occur:
• Check the CWSerenade MQ Message Log to confirm the message generated successfully and no error message was logged.
• Check the HornetQ server and boot logs for any errors. When troubleshooting:
• Compare the log that was generated for an unsuccessful load with a log that was generated for a successful load to see if there are any discrepancies.
• In the server log, take note of the last queue registered and verify that the queue is the last queue defined. If the queue is not the last queue defined, review the details of the queue to determine if it is set up correctly or if messages are getting stuck in the queue.
• Verify that the HornetQ service is started. To start the HornetQ service:
• Advance to the Services window by selecting Control Panel > Administrative Tools > Services.
• Highlight the HornetQ service; right-click, and select Start.
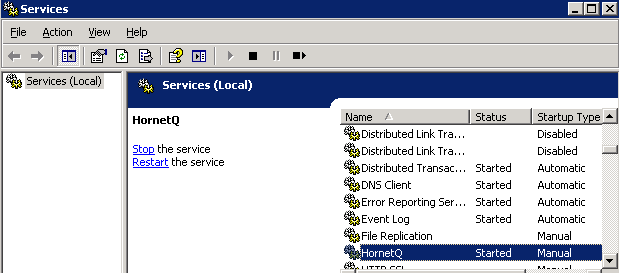
Note: The status of the HornetQ service changes to Started immediately; however, if you have a large number of messages in the queues, the HornetQ server may take a while to start. To verify that the HornetQ server is available, look for a message similar to the following in the server log: HornetQ Server version...started.
• Verify the host settings in the HornetQ Configuration file; see HornetQ Configuration File.
• Verify your connection factory and queue settings in the hornetq-jms.xml file; see Creating HornetQ Queues.
• Verify the configuration settings in the JMS Properties file and JNDI Properties file; see JMS Properties File Settings for HornetQ.
• Verify the jar files required for HornetQ are located in the C:\Serenade\server\custom-lib\ folder on the CWSerenade application server, where C: is the root directory of the server; see HornetQ Jar Files.
• Verify your queue settings for the CWSerenade job that processes the message; see Integration Layer Processes and Web Services.
