Install Oracle Linux 6.7 and 7.2 OS Using PXE Network Boot
This procedure describes how to boot Oracle Linux 6.7 and 7.2 OS from a PXE network environment. It assumes that you are booting the install media from a 6.7 or 7.2 KickStart image (network repository).
KickStart is an automated installation tool. It enables a system administrator to create a single image containing the settings for some or all installation and configuration parameters that are normally provided during a typical Oracle Linux installation. Typically, a KickStart image is placed on a single network server and read by multiple systems for installation.
Before You Begin
Ensure that the following requirements are met prior to performing the Oracle Linux PXE installation:
-
If you are using a KickStart image to perform the installation, you must:
-
Create a KickStart file.
-
Create the boot media with the KickStart file or make the KickStart file available on the network.
-
-
To use PXE to boot the installation media over the network, you must:
-
Configure the network (NFS, FTP, HTTP) server to export the installation tree.
-
Configure the files on the TFTP server necessary for PXE booting.
-
Configure the server's MAC network port address to boot from the PXE configuration.
-
Configure the Dynamic Host Configuration Protocol (DHCP).
-
For more information on KickStart and PXE network installation on Oracle Linux 6, refer to the Oracle Linux Installation Guide at: http://docs.oracle.com/cd/E37670_01/index.html
For more information on KickStart and PXE network installation on Oracle Linux 7, refer to the Oracle Linux 7 Installation Guide at: http://docs.oracle.com/cd/E52668_01/E54695/html/index.html
- Ensure that the PXE network environment is set up properly and the Oracle Linux installation media is available for PXE boot.
-
Reset or power on the server.
For example, to reset the server, do one of the following:
-
From the local server, press the Power button on the front panel of the server (for approximately 1 second) to turn the server off, then press the Power button again to power on the server.
-
From the Oracle ILOM web interface, click Host Management → Power Control, select Reset from the Select Action list box, then click Save.
-
From the Oracle ILOM CLI, type: reset /System
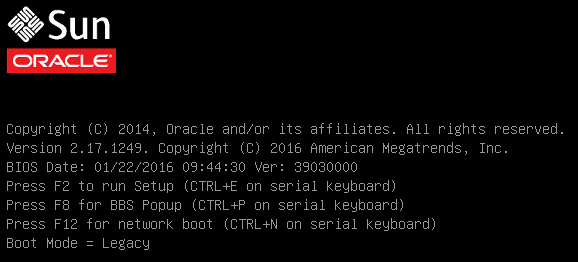
The server begins the boot process and the BIOS screen appears.
Note - The next event occurs very quickly; therefore, be ready to press the F8 key. Watch carefully for messages as they appear on the screen for a brief time. You might want to enlarge the size of your screen to eliminate scroll bars.
-
-
In the BIOS screen, press the F8 key to specify a
temporary boot device for the Linux OS installation.
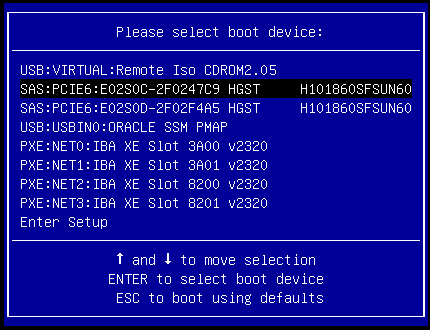
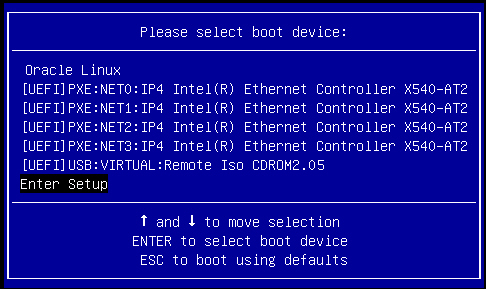
[Boot Pop Up Menu Selected] appears at the bottom of the BIOS screen, and then the Please Select Boot Device menu appears. The screen that appears differs depending on whether you have the UEFI/BIOS Boot Mode configured for Legacy BIOS or UEFI.
-
For Legacy BIOS Boot Mode, the following screen appears:

-
For UEFI Boot Mode, the following screen appears:

Note - The Please Select Boot Device menu that appears in your installation might differ depending on the type of disk controller and other hardware, such as PCIe network cards, installed in your server. -
-
In the Please Select Boot Device menu, select the PXE install boot device
(physical network port) that is configured to communicate with your PXE
network install server, then press Enter.
The network bootloader loads and starts to execute.
- From this point on, the installation procedure is site specific as determined by the site KickStart file.