2 Upgrading to Oracle Exalytics Release 2 (2.0.0.0.el5) on Non-Virtual Deployments
This chapter provides information on upgrading to Oracle Exalytics Release 2 (2.0.0.0.el5) on non-virtual deployments. For information on upgrading to Oracle Exalytics Release 2 on virtual deployments, see Chapter 3, "Upgrading to Oracle Exalytics Release 2 (2.2.0.0.0.ovs-3.2.9) on Virtual Deployments."
Note:
Oracle Exalytics Release 2 can only be applied on an Oracle Exalytics Release 1 Patchset 5 (Oracle Exalytics Base Image 1.0.0.7). If you are on an earlier patchset, you must upgrade to Oracle Exalytics Release 1 Patchset 5 (Oracle Exalytics Base Image 1.0.0.7) before you can upgrade to Oracle Exalytics Release 2.This chapter includes the following sections:
-
Section 2.1, "About Oracle Exalytics Release 2 on Non-Virtual Deployments"
-
Section 2.3, "Upgrading to Oracle Exalytics Release 2 (Base Image 2.0.0.0.el5)"
2.1 About Oracle Exalytics Release 2 on Non-Virtual Deployments
Oracle Exalytics Release 2 for X2-4, X3-4, X4-4, and X5-4 Exalytics Machines on non-virtual deployments, consists of the following system software components:
-
Exalytics Base Image for Linux 5 x86-64 (2.0.0.0.el5)
-
Exalytics Base Image for Linux 6 x86-64 (2.0.0.0.el6)
Oracle Business Intelligence, Oracle Enterprise Performance Management, Oracle TimesTen for Exalytics, Oracle Database In-Memory, and Oracle Endeca software releases are certified on Exalytics Release 2. These software updates may contain new capabilities built for Exalytics only. Customers are advised to update the application software stack with the latest Exalytics certified version.
For detailed information on system components and supported application product components, see Oracle Exalytics Certification Matrix at the following location:
http://www.oracle.com/technetwork/middleware/ias/downloads/fusion-certification-100350.html
2.2 Guidelines for Upgrading to Oracle Exalytics Release 2 (Base Image 2.0.0.0.el5) on Non-Virtual Deployments
Review the following guidelines before upgrading to Oracle Exalytics Release 2:
-
Ensure that you are currently on Oracle Exalytics Release 1 Patchset 5 (Oracle Exalytics Base Image 1.0.0.7).
-
You cannot upgrade a base image installed on a Linux 5 operating system to a base image installed on a Linux 6 operating system. For example, you cannot upgrade Oracle Exalytics Base Image x86-64 (1.0.0.7) installed on a Linux 5 operating system to Exalytics Base Image x86-64 (2.0.0.0.el6) installed on a Linux 6 operating system. To install Exalytics Base Image for Linux 6 (2.0.0.0.el6), you must re-image the server by downloading and configuring the Linux 6 base image. See Chapter 4, "Installing and Configuring Oracle Exalytics Release 2 Non-Virtual Base Images on an Exalytics Machine."
-
Before upgrading, ensure that you back up your current installation, configuration files, and any user-specific artifacts, and stop all applicable services.
-
If you have installed Oracle Enterprise Performance Management components on the Exalytics Machine, stop all Enterprise Performance Management services before upgrading. Also, ensure that you start all services after upgrading. For more information, see "Chapter 12, Starting and Stopping EPM System Products" in Oracle Enterprise Performance Management System Installation and Configuration Guide Release 11.1.2.3 at the following location:
http://docs.oracle.com/cd/E40248_01/epm.1112/epm_install.pdf -
When upgrading from Oracle Exalytics Oracle Exalytics Release 1 Patchset 5, delete aggregates in Oracle TimesTen using the nqcmd utility. For more information, see "Creating and Persisting Aggregates for Oracle BI Server Queries" in Oracle Fusion Middleware Metadata Repository Builder's Guide for Oracle Business Intelligence Enterprise Edition.
-
For late-breaking information, see Oracle Exalytics In-Memory Machine Release Notes for Linux.
2.3 Upgrading to Oracle Exalytics Release 2 (Base Image 2.0.0.0.el5)
This section consists of the following topics:
-
Section 2.3.1, "About Oracle Exalytics Release 2 on Non-Virtual Deployments"
-
Section 2.3.4, "Deinstallation Instructions for the Oracle Exalytics Release 2"
2.3.1 About Oracle Exalytics Release 2 on Non-Virtual Deployments
The Oracle Exalytics Release 2 comprises of updates to the system components that are listed in listed in Table 2-1.
Table 2-1 System Components and Supported Versions in Oracle Exalytics Release 2
| System Component | Version in Release 2 | Kernel Version |
|---|---|---|
|
Oracle Exalytics Base Image for Linux 5 |
2.0.0.0.el5 |
2.6.39-400.248.3.el5uek x86_64 |
|
Oracle Exalytics Base Image for Linux 6 |
2.0.0.0.el6 |
2.6.39-400.248.3.el6uek x86_64 |
For the latest information on the supported Application Software Components, see Oracle Exalytics Certification Matrix at the following location:
http://www.oracle.com/technetwork/middleware/ias/downloads/fusion-certification-100350.html
2.3.2 Upgrading to Oracle Exalytics Release 2 (Base Image 2.0.0.0.el5) on Non-Virtual Deployments
This section contains the following topics:
-
Section 2.3.2.1, "Who Should Upgrade to Oracle Exalytics Release 2?"
-
Section 2.3.2.3, "Upgrading or Patching Application Software Components."
2.3.2.1 Who Should Upgrade to Oracle Exalytics Release 2?
The upgrade is available for all Oracle Exalytics customers who are currently on Oracle Exalytics Release 1 Patchset 5 (Oracle Exalytics Base Image 1.0.0.7).
Note:
If you are on a release prior to Oracle Exalytics Release 1 Patchset 5, you must upgrade to Oracle Exalytics Release 1 Patchset 5 (Base Image 1.0.0.7) before you can upgrade to Release 2. For information on applying Oracle Exalytics Release 1 Patchset 5, see "Chapter 2 Patching" in Oracle Fusion Middleware Installation and Administration Guide for Oracle Exalytics In-Memory Machine available at the following location:2.3.2.2 Upgrading to Oracle Exalytics Release 2
To upgrade to Oracle Exalytics Release 2 from Oracle Exalytics Release 1 Patchset 5, perform the following steps:
-
"Step 1: Run the Oracle Exalytics Base Image Release 2 Upgrade Script"
-
"Step 3: (Optional) Configure Exalytics Host for Enterprise Manager Cloud Control Discovery"
Step 1: Run the Oracle Exalytics Base Image Release 2 Upgrade Script
You run the upgrade script to upgrade Oracle Exalytics base image to 2.0.0.0.el5
Note:
If you are upgrading to Oracle Exalytics Release 2 from Oracle Exalytics Release 1 Patchset 5 (Base Image 1.0.0.7), the script installs new rpms without affecting your existing installation.To run the Oracle Exalytics Base Image 2.0.0.0.el5 Upgrade Script:
-
Stop and backup all Oracle Business Intelligence, Oracle TimesTen, and (if installed) Enterprise Performance Management services.
For information on stopping Oracle Business Intelligence services, see "Starting and Stopping Oracle Business Intelligence" in Oracle Fusion Middleware System Administrator's Guide for Oracle Business Intelligence Enterprise Edition.
For information on starting and stopping Oracle TimesTen services, see "Working with the TimesTen Data Manager Daemon" in Oracle® TimesTen In-Memory Database Operations Guide.
For more information on starting and stopping Enterprise Performance Management services, see "Chapter 12, Starting and Stopping EPM System Products" in Oracle Enterprise Performance Management System Installation and Configuration Guide Release 11.1.2.3 at the following location:
http://docs.oracle.com/cd/E40248_01/epm.1112/epm_install.pdf -
Navigate to My Oracle Support and download patch number 20506584: Patchset Upgrade Utility for Exalytics Base Image 2.0.0.0.el5 for Linux x86-64. The patch contains the p20506584_20000_Linux-x86-64.zip file.
-
Unzip the file into a temporary (/tmp) directory.
-
Navigate to the 20506584/21100117 directory.
The zipped file contains the nodeupdate.sh script.
-
To validate the patch for the Exalytics Machine, enter the following command:
# ./nodeupdate.sh -v -
To apply the patch and upgrade the Oracle Exalytics base image, enter the following command:
# ./nodeupdate.sh -aAfter the patch is successfully applied, restart the Exalytics Machine using Oracle Integrated Lights Out Manager (ILOM).
-
Optional: View the log files at /var/log/exalytics/update-2.0.0.0.log and /var/log/exalytics/exalytics.log.
-
Restart the Oracle Business Intelligence, Oracle TimesTen, and Enterprise Performance Management services.
-
To confirm the base image, enter the following command as a root user:
# /opt/exalytics/bin/exalytics_imageinfoThe output looks similar to the following:
Image version : 2.0.0.0_el5
Creation timestamp : Day Date Month YEAR HOUR:MIN:SEC
Kernel version : 2.6.39-400.248.3.el5uek

RPM versions:
kernel-uek-2.6.39-400.248.3.el5uek
kernel-2.6.18-404.0.0.0.1.el5
exalytics-container-bm-2.0.0.0-2_el5
exalytics-scripts-2.0.0.0-9_el5
exalytics-flash-2.0.0.0-2_el5
exalytics-domain-configure-2.0.0.0-4_el5
exalytics-deps-exact-2.0.0.0-2_el5
exalytics-deps-minimum-2.0.0.0-2_el5
Note:
Even though the build numbers may be different than the ones listed above, ensure that the updated kernel version is the same as the one displayed above.
Step 2: (Optional) Configure ASR
To configure ASR:
-
If you upgrade to Oracle Exalytics Release 2 on a new machine, then configure ASR as follows:
-
Follow instructions detailed in "Installing Auto Service Request (ASR)" in Oracle Exalytics In-Memory Machine Owner's Guide, but change the following steps:
-
Replace Step 5 in "Section 9.3 Before You Begin" with the following steps:
-
Navigate to the /opt/exalytics/asr directory and add the following line to the /etc/inittab file
emh1:345:respawn:/opt/exalytics/asr/bda_mon_hw_asr.pl -server
-
At the command line, enter the following command to initialize and start the bda_mon server
init q
-
-
Replace the commands in Step 2 in "Section 9.7 Configuring Telemetry Sources" with the following commands:
# cd /opt/exalytics/asr# ./setup_asr_ilom.pl -host <hostname OR ip>
-
-
If you upgraded to Oracle Exalytics Release 2 from Oracle Exalytics Release 1 Patchset 5 and ASR is already configured, complete the following step to verify that ASR is running:
-
Execute the
ps -ef | grep bdacommand to ensure that bda_mon_hw_asr_pl is running.For more information, see "Installing Auto Service Request Software" in Oracle Exalytics In-Memory Machine Owner's Guide.
-
Step 3: (Optional) Configure Exalytics Host for Enterprise Manager Cloud Control Discovery
To configure Exalytics Host for Enterprise Manager Cloud Control Discovery:
-
If you installed Oracle Exalytics Release 2 on a new machine with Enterprise Manager Cloud Control (EMCC) deployed, then perform the following steps to configure EMCC to identify the Exalytics host.
-
Confirm that a SP System Identifier is set for the Exalytics Machine by performing the following steps:
-
Log on to Oracle Integrated Lights Out Manager (ILOM).
-
Expand System Information.
-
Select Summary.
Confirm that a SP System Identifier is displayed.
-
-
Log on to ILOM and in the left pane of the ILOM, expand ILOM Administration, then select Identification. Ensure that the SP System Identifier value is populated with a unique value, such as "Oracle Exalytics AK00026925".
-
Log on to the Exalytics Machine.
-
Execute the command
chmod +x exalytics_configure_for_emcc.shto grant execute permissions. -
Execute the following command as a root user to create the file:
./exalytics_configure_for_emcc.sh -
Review the output and ensure that the contents of the /var/exalytics/info/em-context.info file correctly displays the system identifier for the Oracle Exalytics machine. The system identifier should be identical to the system identifier you saw in Step (b) of this procedure.
-
-
If you upgraded to Oracle Exalytics Release 2 from Oracle Exalytics Release 1 Patchset 5 with Enterprise Manager Cloud Control (EMCC) deployed, then complete the following step to verify that EMCC identifies the Exalytics host:
-
Review the contents of the /var/exalytics/info/em-context.info file and ensure that it correctly displays the system identifier for the Oracle Exalytics machine.
The system identifier should be identical to the system identifier displayed in the Oracle Integrated Lights Out Manager (ILOM) in Step (a) above.
-
2.3.2.3 Upgrading or Patching Application Software Components
Depending on your deployment upgrade or patch the newly certified application software components for this release.
Note:
This section is for existing Exalytics customers that are already running application software components. New Exalytics customers, proceed to Chapter 6, "Installing Software on an Exalytics Machine."Before you upgrade or patch the application software components, ensure you are installing the latest Exalytics certified application software versions. See Oracle Exalytics Certification Matrix for the latest certifications. The Oracle Exalytics Certification Matrix is located at:
http://www.oracle.com/technetwork/middleware/ias/downloads/fusion-certification-100350.html
This section includes the following topics:
Download and Install Oracle BI EE 11.1.1.7.x or 11.1.1.9.0
To apply the latest Oracle BI EE 11.1.1.7.x Patchset to Oracle BI EE 11.1.1.7.0 installation, see the instructions in the top-level patch of the Oracle BI EE 11.1.1.7.150120 Patchset.
To upgrade an Oracle BI EE 11.1.1.7.x installation to Oracle BI EE 11.1.1.9.0, see "Chapter 3, Applying the Latest Oracle Fusion Middleware Patch Set" in Oracle Fusion Middleware Patching Guide.
Note:
If you are installing Oracle Exalytics for the first time, you can install Oracle BI EE 11.1.1.9.0. For information, see Chapter 6, "Installing Software on an Exalytics Machine." See also, Oracle Fusion Middleware Installation Guide for Oracle Business Intelligence.If you are running an Oracle BI EE 11.1.1.6.x installation, you must upgrade to an Oracle BI EE 11.1.1.7.0, see Oracle Fusion Middleware Upgrade Guide for Oracle Business Intelligence.
Note:
You cannot use the Exalytics Domain Management Utility to install or manage an Oracle BI EE 11.1.1.6.x installation. You must first upgrade the Oracle BI EE 11.1.1.6.x installation to Oracle BI EE 11.1.1.7.0 and then register the installation as an existing primary domain using the Exalytics Domain Management Utility.Download and Install Oracle Timesten
Before you download and install Oracle TimesTen, ensure you are installing the latest Exalytics certified Oracle TimesTen version. See Oracle Exalytics Certification Matrix for the latest certifications. The Oracle Exalytics Certification Matrix is located at:
http://www.oracle.com/technetwork/middleware/ias/downloads/fusion-certification-100350.html
To download and install Oracle TimesTen:
-
Navigate to My Oracle Support.
-
Search for and download the latest Exalytics certified version of Oracle TimesTen.
Note:
If you are installing Oracle Exalytics for the first time, you can install the latest Oracle TimesTen certified version instead of applying patches to previous Oracle TimesTen versions.During the installation of Oracle TimesTen, answer "Yes" to the question: Would you like to upgrade this instance?
Also, ensure that you do not delete existing files. For example, during the installation, answer "No" to the following questions:
-
Would you also like to remove all files in <installation_directory>/TimesTen/tt1122/network/admin/samples?
-
Would you like to replace the existing cluster.oracle.ini file?
-
Would you like to replace the existing <installation_directory>/TimesTen/tt1122/info/sys.odbc.ini file?
-
Would you also like to remove all files in <installation_directory>/TimesTen/tt1122/info?
For more information, see "Performing an in-place database upgrade" and "Performing an offline upgrade" in Oracle TimesTen In-Memory Database Installation Guide.
Note:
If required, you can install Oracle Database In-Memory for Oracle Exalytics. For instructions on installing Oracle Database In-Memory for Oracle Exalytics, see Section 6.8, "Installing Oracle Database In-Memory for Oracle Exalytics."Download and Install Oracle BI Applications
If deploying Oracle BI Applications, install Oracle BI Applications. For information, see Section 6.5, "Installing and Configuring Oracle BI Applications on an Exalytics Machine."
To ensure you are installing the latest Exalytics certified Oracle BI Applications version, see Oracle Exalytics Certification Matrix for the latest certifications. The Oracle Exalytics Certification Matrix is located at:
http://www.oracle.com/technetwork/middleware/ias/downloads/fusion-certification-100350.html
Download and Install Oracle Endeca
To install Oracle Endeca, see "Oracle Endeca Information Discovery" documentation, the link to which is available from the Oracle Exalytics Documentation Library.
To ensure you are installing the latest Exalytics certified Oracle Endeca version, see Oracle Exalytics Certification Matrix for the latest certifications. The Oracle Exalytics Certification Matrix is located at:
http://www.oracle.com/technetwork/middleware/ias/downloads/fusion-certification-100350.html
2.3.3 Postinstallation Instructions for Upgrading or Patching Oracle Business Intelligence Software
Note:
This section is for existing customers that are upgrading or patching Oracle Business Intelligence software. New customers, proceed to Chapter 6, "Installing Software on an Exalytics Machine."To ensure that Oracle Business Intelligence Enterprise Edition and Oracle TimesTen data type mapping and other optimizations are consistent and can be leveraged, you must complete postinstallation steps for the following Oracle Exalytics components:
2.3.3.1 Oracle TimesTen In-Memory Database
This section contains the following topics:
2.3.3.1.1 Configure Oracle TimesTen Checkpoint Frequency
To ensure Oracle Business Intelligence Enterprise Edition sets the Oracle TimesTen checkpoint frequency, perform the following configuration steps after upgrading Oracle TimesTen In-Memory Database. Failure to perform this configuration may adversely affect Oracle TimesTen performance.
To configure Oracle TimesTen checkpoint frequency:
-
Open the timesten-install-dir/info/sys.odbc.ini file.
-
Find the DSN entry for the schema used for Aggregate Persistence.
-
Do one of the following:
-
If you are loading data in Oracle TimesTen database using aggregate persistence, edit the three parameters as follows:
-
CkptFrequency=-1
-
CkptLogVolume=0
-
CkptRate=0
-
-
If you are loading data in Oracle TimesTen database without using aggregate persistence, use a different server DSN and edit the three parameters as follows:
-
CkptFrequency=30
-
CkptLogVolume=0
-
CkptRate=0
-
-
2.3.3.1.2 Other Postinstallation Steps
To complete other postinstallation steps in Oracle TimesTen:
-
Re-create existing datastores for Oracle TimesTen.
-
If you are installing Oracle Exalytics Release 2 on Oracle Exalytics Release 1 Patchset 5, then rebuild aggregates using the nqcmd utility. For more information, see "Creating and Persisting Aggregates for Oracle BI Server Queries" in Oracle Fusion Middleware Metadata Repository Builder's Guide for Oracle Business Intelligence Enterprise Edition.
2.3.3.2 Oracle Business Intelligence Enterprise Edition
This section contains the following topics:
2.3.3.2.1 Edit the opmn.xml File
For faster aggregation and better performance, Oracle recommends that you edit the opmn.xml file to include the appropriate elements. Ensure that you edit the opmn.xml file on each Exalytics Machine that is configured in a highly available clustered environment.
To edit the opmn.xml file to improve aggregation and performance:
-
Open the opmn.xml file (which is located in MW_HOME/instances/instance1/config/OPMN/opmn).
-
Insert the following child elements under
<ias-component id="coreapplication_obis1" inherit-environment="true"><environment>:-
<variable id="ORACLE_BI_TT_DISABLE_REDO_LOGGING" value="1"/>Creates faster aggregation.
-
<variable id="ORACLE_BI_TT_PARALLEL_INDEX_CREATION" value="1"/>Creates indexes in parallel, thereby creating faster aggregation.
-
<variable id="ORACLE_BI_TT_BACKGROUND_CHECKPOINT_INTERVAL" value="6"/>This BI Server controlled parameter determines the frequency of Oracle TimesTen datastores that are stored to disk (datastore persistence). The default value is every 10 seconds. The smaller the number of the "value", the more often Oracle TimesTen stores datastores to disk.
-
-
Stop and start the Notification Server.
-
Go to the following directory that contains the OPMN command-line tool:
MW_HOME/instances/instance1/bin
-
Enter the following command:
./opmnctl stopallStops OPMN and all Oracle Business Intelligence system components.
-
Enter the following command:
./opmnctl startallStarts OPMN and all Oracle Business Intelligence system components.
-
2.3.3.2.2 Reinstall Oracle Business Intelligence Client Installer
For information about installing Oracle Business Intelligence Client Tools, see "Installing and Uninstalling Oracle Business Intelligence Client Tools" in Oracle Fusion Middleware Installation Guide for Oracle Business Intelligence.
2.3.4 Deinstallation Instructions for the Oracle Exalytics Release 2
If you experience any problems after upgrading, then Oracle recommends that you roll back all Oracle Exalytics component patches. Do not rollback one or two individual component patches. Instructions for rollback are included in the component-specific ReadMe files.
If you encounter any issues while applying the upgrade, then contact Oracle Support.
2.4 Configuring Flash and Replacing a Defective Flash Card on a Non-Virtual Exalytics Machine
This section contains the following topics:
2.4.1 License to Receive Open Source Code
The license for each component is located in the documentation, which may be delivered with the Oracle Linux programs or accessed online at http://oss.oracle.com/linux/legal/oracle-list.html and/or in the component's source code.
For technology in binary form that is licensed under an open source license that gives you the right to receive the source code for that binary, you may be able to obtain a copy of the applicable source code at these site(s):
https://edelivery.oracle.com/linux
If the source code for such technology was not provided to you with the binary, you can also receive a copy of the source code on physical media by submitting a written request to:
Oracle America, Inc.
Attn: Oracle Linux Source Code Requests
Development and Engineering Legal
500 Oracle Parkway, 10th Floor
Redwood Shores, CA 94065
Your request should include:
-
The name of the component or binary file(s) for which you are requesting the source code
-
The name and version number of the Oracle Software
-
The date you received the Oracle Software
-
Your name
-
Your company name (if applicable)
-
Your return mailing address and email
-
A telephone number in the event we need to reach you.
We may charge you a fee to cover the cost of physical media and processing. Your request must be sent (i) within three (3) years of the date you received technology that included the component or binary file(s) that are the subject of your request, or (ii) in the case of code licensed under the GPL v3, for as long as Oracle offers spare parts or customer support for that Software model.
2.4.2 Prerequisites for Configuring Flash
The following prerequisites must be met before configuring Flash on the Exalytics Machine:
-
You are running Exalytics Base Image 2.0.0.0.el5 or 2.0.0.0.el6.
-
Oracle Field Services engineers have installed and configured six Flash cards (on an X2-4 or X3-4 Exalytics Machine) or have configured three Flash cards (on an X4-4 or X5-4 Exalytics Machine).
2.4.3 Configuring Flash
When you upgrade to Oracle Exalytics Release 2, Flash drivers are included in the Oracle Exalytics Base Image 2.0.0.0.el5 or 2.0.0.0.el6. To improve the performance and storage capacity of the Exalytics Machine you must configure Flash.
Note:
The installed Flash drives use software RAID.Oracle supports two types of RAID configurations:
-
RAID10: Is usually referred to as stripe of mirrors and is the most common RAID configuration. RAID10 duplicates and stripes data from one drive on a second drive so that if either drive fails, no data is lost. This is useful when reliability is more important than data storage capacity.
-
RAID05: In RAID05 all drives are combined to work as a single drive. Data is transferred to disks by independent read and write operations. You need at least three disks for a RAID05 array.
This section consists of the following topics:
-
Section 2.4.3.1, "Configuring Flash on an X2-4 or X3-4 Exalytics Machine"
-
Section 2.4.3.2, "Configuring Flash on an X4-4 Exalytics Machine"
-
Section 2.4.3.3, "Configuring Flash on an X5-4 Exalytics Machine"
2.4.3.1 Configuring Flash on an X2-4 or X3-4 Exalytics Machine
Note:
This section is for users who want to configure new Flash, or re-configure existing Flash configuration. If you do not want to re-configure an existing Flash configuration, you can skip this section. Note that reconfiguring Flash will delete all existing data on the Flash cards.An X2-4 or X3-4 Exalytics Machine is configured with six Flash cards. Each Flash card has four 100 GB drives.
Depending on your requirements, you can configure Flash for the following combinations:
-
RAID10
Note:
Oracle recommends that you do not configure RAID05 on an X2-4 or X3-4 Exalytics Machine. -
EXT3 or EXT4 file system
Note:
Oracle recommends you configure Flash on the EXT4 file system.
To configure Flash:
-
Restart the Exalytics Machine using ILOM.
-
Log on to the ILOM web-based interface.
-
In the left pane of the ILOM, expand Host Management, then click Power Control. In the Select Action list, select Power Cycle, then click Save.
The Exalytics Machine restarts.
-
-
Enter the following command as a root user:
# /opt/exalytics/bin/configure_flash.sh --<RAID_TYPE> --<FS_TYPE>For example:
-
To configure Flash for a RAID10 configuration, enter the following command:
# /opt/exalytics/bin/configure_flash.sh --RAID10 --EXT4
Note:
The following procedure assumes configuring Flash for a RAID10 configuration.The following warning, applicable only for software RAID, is displayed: "This flash configuration script will remove any existing RAID arrays, as well as remove any partitions on any flash drives and will create a new RAID array across all these flash drives. This will result in ALL DATA BEING LOST from these drives. Do you still want to proceed with this flash configuration script? (yes/no)"
-
-
Enter Yes at the prompt to continue running the script.
The script performs the following tasks:
-
Erases all existing RAID configuration on the Flash cards.
-
Distributes multiple RAID1 disks so that two parts of the RAID belong to different cards.
-
Stripes all Flash RAID1 drives into a single RAID0.
-
-
To verify that Flash has been configured correctly, enter the following command:
# df -hThe output should look similar to the following:
Filesystem  Size   Used   Avail Use%             Mounted on /dev/mapper/VolGroup00-LogVol00
             718G       4.4G   677G   1%   //dev/sda1
             99M   15M     79M   16%  /boottmpfs
            1010G   0     1010G   0%  /dev/shm/dev/md0
            1.1T  199M    1.1T    1%  /u02
Flash is configured as shown in Figure 2-1.
-
Each Flash card (F1, F2, F3, and so on) has four 100 GB drives. Each drive maps to a device, such as /dev/sdg, /dev/sdh, /dev/sdi, /dev/sdj, and so on.
-
Two Flash drives are configured on RAID1 /dev/md1, two Flash drives are configured on RAID1 /dev/md2, two Flash drives are configured on RAID1 /dev/md3, and so on, for a total of twelve RAID1s.
-
The twelve RAID1s are configured on the parent RAID0 /dev/md0.
Figure 2-1 Flash Configuration on RAID10 for an X2-4 and X3-4 Exalytics Machine

Description of ''Figure 2-1 Flash Configuration on RAID10 for an X2-4 and X3-4 Exalytics Machine''
-
-
To verify the status of Flash cards, enter the following command:
# /opt/exalytics/bin/exalytics_CheckFlash.shThe output for all the six Flash cards should look similar to the following:
Fetching some info on installed flash drives ....
Driver version :   01.250.41.04 (2012.06.04)

Supported number of flash drives detected (6)

Flash card 1 :
Overall health status : GOOD
Size (in MB) : 381468
Capacity (in bytes) : 400000000000
Firmware Version : 108.05.00.00
Devices:  /dev/sdd /dev/sdc /dev/sdf /dev/sde

Flash card 2 :
Overall health status : GOOD
Size (in MB) : 381468
Capacity (in bytes) : 400000000000
Firmware Version : 108.05.00.00
Devices:  /dev/sdg /dev/sdj /dev/sdi /dev/sdh

Flash card 3 :
Overall health status : GOOD
Size (in MB) : 381468
Capacity (in bytes) : 400000000000
Firmware Version : 108.05.00.00
Devices:  /dev/sdm /dev/sdk /dev/sdn /dev/sdl

Flash card 4 :
Overall health status : GOOD
Size (in MB) : 381468
Capacity (in bytes) : 400000000000
Firmware Version : 108.05.00.00
Devices:  /dev/sdp /dev/sdo /dev/sdq /dev/sdr

Flash card 5 :
Overall health status : GOOD
Size (in MB) : 381468
Capacity (in bytes) : 400000000000
Firmware Version : 108.05.00.00
Devices:  /dev/sdu /dev/sdt /dev/sdv /dev/sds

Flash card 6 :
Overall health status : GOOD
Size (in MB) : 381468
Capacity (in bytes) : 400000000000
Firmware Version : 108.05.00.00
Devices:  /dev/sdx /dev/sdw /dev/sdy /dev/sdz
2.4.3.2 Configuring Flash on an X4-4 Exalytics Machine
An X4-4 Exalytics Machine is configured with three Flash cards. Each Flash card has four 200 GB drives.
Depending on your requirements, you can configure Flash for the following combinations:
-
RAID10 or RAID05
-
EXT3 or EXT4 file system
Note:
Oracle recommends you configure Flash on the EXT4 file system.
To configure Flash:
-
Restart the Exalytics Machine using ILOM.
-
Log on to the ILOM web-based interface.
-
In the left pane of the ILOM, expand Host Management, then click Power Control. In the Select Action list, select Power Cycle, then click Save.
The Exalytics Machine restarts.
-
-
Enter the following command as a root user:
# /opt/exalytics/bin/configure_flash.sh--<RAID_TYPE> --<FS_TYPE>For example:
-
To configure Flash for a RAID10 configuration, enter the following command:
# /opt/exalytics/bin/configure_flash.sh --RAID10 --EXT4 -
To configure Flash for a RAID05 configuration, enter the following command:
# /opt/exalytics/bin/configure_flash.sh --RAID05 --EXT4Flash is configured for a RAID05 configuration as shown in Figure 2-3.
Note:
The following procedure assumes configuring Flash for a RAID10 configuration on an X4-4 Exalytics Machine.The following warning, applicable only for software RAID, is displayed: "This flash configuration script will remove any existing RAID arrays, as well as remove any partitions on any flash drives and will create a new RAID array across all these flash drives. This will result in ALL DATA BEING LOST from these drives. Do you still want to proceed with this flash configuration script? (yes/no)"
-
-
Enter Yes at the prompt to continue running the script.
The script performs the following tasks:
-
Erases all existing RAID configuration on the Flash cards.
-
Distributes multiple RAID1 disks so that two parts of the RAID belong to different cards.
-
Stripes all Flash RAID1 drives into a single RAID0.
-
-
To verify that Flash has been configured correctly, enter the following command:
# df -hThe output should look similar to the following:
Filesystem Size  Used Avail Use% Mounted on/dev/mapper/VolGroup00-LogVol00
           989G   23G  915G   3%   //dev/mapper/VolGroup01-LogVol00
           3.2T   13G  3.0T   1%   /u01/dev/sda1
           99M    25M   70M  27%   /boottmpfs
           1010G   0   1010G  0%   /dev/shm/dev/md0
           1.1T  199M  1.1T   1%   /u02
Flash is configured as shown in Figure 2-2.
-
Each Flash card (F1, F2, and F3) has four 200 GB drives. Each drive maps to a device, such as /dev/sdg, /dev/sdh, /dev/sdi, /dev/sdj, and so on.
-
Two Flash drives are configured on RAID1 /dev/md1, two Flash drives are configured on RAID1 /dev/md2, two Flash drives are configured on RAID1 /dev/md3, and so on, for a total of six RAID1s.
-
The six RAID1s are configured on the parent RAID0 /dev/md0.
Figure 2-2 Flash Configuration on RAID10 for an X4-4 Exalytics Machine

Description of ''Figure 2-2 Flash Configuration on RAID10 for an X4-4 Exalytics Machine''
-
-
To verify the status of Flash cards, enter the following command:
# /opt/exalytics/bin/exalytics_CheckFlash.shThe output for all the three Flash cards should look similar to the following:
Checking Exalytics Flash Drive Status

Fetching some info on installed flash drives ....
Driver version :   01.250.41.04 (2012.06.04)

Supported number of flash drives detected (3)

Flash card 1 :
Overall health status : GOOD
Size (in MB) : 762936
Capacity (in bytes) : 800000000000
Firmware Version : 109.05.26.00
Devices:  /dev/sdc /dev/sdd /dev/sde /dev/sdf

Flash card 2 :
Overall health status : GOOD
Size (in MB) : 762936
Capacity (in bytes) : 800000000000
Firmware Version : 109.05.26.00
Devices:  /dev/sdj /dev/sdh /dev/sdg /dev/sdi

Flash card 3 :
Overall health status : GOOD
Size (in MB) : 762936
Capacity (in bytes) : 800000000000
Firmware Version : 109.05.26.00
Devices:  /dev/sdl /dev/sdm /dev/sdk /dev/sdn

Summary:
Healthy flash drives : 3
Broken flash drives  : 0
Pass : Flash card health check passed
You can similarly configure Flash on RAID05. Flash is configured on RAID05 as shown Figure 2-3.
Figure 2-3 Flash Configuration on RAID05 for an X4-4 Exalytics Machine
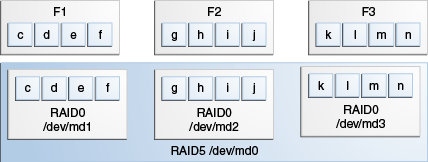
Description of ''Figure 2-3 Flash Configuration on RAID05 for an X4-4 Exalytics Machine''
2.4.3.3 Configuring Flash on an X5-4 Exalytics Machine
An X5-4 Exalytics Machine is configured with three Flash cards. Each Flash card has four 400 GB drives.
Depending on your requirements, you can configure Flash for the following combinations:
-
RAID10 or RAID05
-
EXT3 or EXT4 file system
Note:
Oracle recommends you configure Flash on the EXT4 file system.
To configure Flash:
-
Navigate to My Oracle Support, and download and apply patch number 21258871: Exalytics X5-4 Patch For Bare Metal Base Image 2.0.0.0.
-
Enter the following command as a root user:
# /opt/exalytics/bin/configure_flash.sh--<RAID_TYPE> --<FS_TYPE>For example:
-
To configure Flash for a RAID10 configuration, enter the following command:
# /opt/exalytics/bin/configure_flash.sh --RAID10 --EXT4 -
To configure Flash for a RAID05 configuration, enter the following command:
# /opt/exalytics/bin/configure_flash.sh --RAID05 --EXT4
Note:
The following procedure assumes configuring Flash for a RAID05 configuration on an X5-4 Exalytics Machine.The following warning, applicable only for software RAID, is displayed: "This flash configuration script will remove any existing RAID arrays, as well as remove any partitions on any flash drives and will create a new RAID array across all these flash drives. This will result in ALL DATA BEING LOST from these drives. Do you still want to proceed with this flash configuration script? (yes/no)"
-
-
Enter Yes at the prompt to continue running the script.
The script performs the following tasks:
-
Erases all existing RAID configuration on the Flash cards.
-
Configures RAID05 on the three Flash cards.
-
-
To verify that Flash has been configured correctly, enter the following command:
# df -hFlash is configured as follows:
-
Each Flash card (F1, F2, and F3) has four 400 GB drives. Each drive maps to a device, such as /dev/nvme0n1p1, /dev/nvme0n1p3, /dev/nvme0n1p2, /dev/nvme0n1p4, and so on.
-
Four Flash drives are configured on RAID05 /dev/md1, four Flash drives are configured on RAID05 /dev/md2, and four Flash drives are configured on RAID5 /dev/md3, for a total of three RAID5s.
-
The three RAID5s are configured on the parent RAID0 /dev/md0.
-
-
To verify the status of Flash cards, enter the following command:
# /opt/exalytics/bin/exalytics_CheckFlash.shThe output for all the three Flash cards should look similar to the following:
Checking Exalytics Flash Drive Status

cardindex=0
cIndex=0
cIndex=0
allFlashCardDevices=
Driver version :   01.250.41.04 (2012.06.04)

Supported number of flash drives detected (3)

Flash card 1 :
Slot number: 0
Overall health status : GOOD
Capacity (in bytes) :  3125627568
Firmware Version : SUNW-NVME-1 PCI Vendor ID: 8086 Serial Number: CVMD4215000N1P6DGN Model Number: INTEL SSDPEDME016T4 Firmware Revision: 8DV10054 Number of Name
cardindex=1
cIndex=1
cIndex=1
allFlashCardDevices=nvme0n1p1
Devices:  /dev/nvme0n1p1 /dev/nvme0n1p3 /dev/nvme0n1p2 /dev/nvme0n1p4

Flash card 2 :
Slot number: 0
Overall health status : GOOD
Capacity (in bytes) :   3125627568
Firmware Version : SUNW-NVME-2 PCI Vendor ID: 8086 Serial Number: CVMD421500301P6DGN Model Number: INTEL SSDPEDME016T4 Firmware Revision: 8DV10054 Number of Name
cardindex=2
cIndex=2
cIndex=2
allFlashCardDevices=nvme1n1p2
Devices:  /dev/nvme1n1p2 /dev/nvme1n1p1 /dev/nvme1n1p3 /dev/nvme1n1p4

Flash card 3 :
Slot number: 0
Overall health status : GOOD
Capacity (in bytes) :   3125627568
Firmware Version : SUNW-NVME-3 PCI Vendor ID: 8086 Serial Number: CVMD4302002S1P6DGN Model Number: INTEL SSDPEDME016T4 Firmware Revision: 8DV10054 Number of Name
cardindex=3
cIndex=3
cIndex=3
allFlashCardDevices=nvme2n1p4
Devices:  /dev/nvme2n1p4 /dev/nvme2n1p2 /dev/nvme2n1p3 /dev/nvme2n1p1

Raid Array Info (/dev/md0):
/dev/md0: 2979.58GiB raid5 3 devices, 1 spare. Use mdadm --detail for more detail.

Summary:
Healthy flash drives : 3
Broken flash drives  : 0
Pass : Flash card health check passed
You can similarly configure Flash on RAID10 on an X5-4 Exalytics Machine.
2.4.4 Replacing a Defective Flash Card
This section consists of the following topics:
-
Section 2.4.4.1, "Replacing a Defective Flash Card on an X2-4 or X3-4 Exalytics Machine"
-
Section 2.4.4.2, "Replacing a Defective Flash Card on an X4-4 or X5-4 Exalytics Machine"
2.4.4.1 Replacing a Defective Flash Card on an X2-4 or X3-4 Exalytics Machine
An X2-4 and X3-4 Exalytics Machine is configured with six Flash cards. Each Flash card contains four devices. When one device on a Flash card fails, the entire Flash card becomes defective and has to be replaced. The following procedure assumes you have a defective device (/dev/sdb) mapped to a Flash card which is installed on the parent RAID0 /dev/md0, see Figure 2-1.
To replace a failed or defective Flash card on an X2-4 or X3-4 Exalytics Machine:
-
To verify the status of Flash cards, enter the following command:
# /opt/exalytics/bin/exalytics_CheckFlash.shIf a defective Flash card is detected, the output displays an "Overall Health: ERROR" message, and the summary indicates the defective card and the location of the Peripheral Component Interconnect Express (PCIe) card.
The output should look similar to the following:
Checking Exalytics Flash Drive Status

Fetching some info on installed flash drives ....
Driver version :   01.250.41.04 (2012.06.04)

Supported number of flash drives detected (6)

Flash card 1 :
Slot number: 1
Overall health status : ERROR. Use --detail for more info
Size (in MB) : 286101
Capacity (in bytes) : 300000000000
Firmware Version : 109.05.26.00
Devices:  /dev/sdc /dev/sdd /dev/sda

Flash card 2 :
Slot number: 2
Overall health status : GOOD
Size (in MB) : 381468
Capacity (in bytes) : 400000000000
Firmware Version : 109.05.26.00
Devices:  /dev/sdh /dev/sdg /dev/sdf /dev/sde

Flash card 3 :
Slot number: 3
Overall health status : GOOD
Size (in MB) : 381468
Capacity (in bytes) : 400000000000
Firmware Version : 109.05.26.00
Devices:  /dev/sdl /dev/sdk /dev/sdj /dev/sdi

Flash card 4 :
Slot number: 5
Overall health status : GOOD
Size (in MB) : 381468
Capacity (in bytes) : 400000000000
Firmware Version : 109.05.26.00
Devices:  /dev/sdp /dev/sdn /dev/sdo /dev/sdm

Flash card 5 :
Slot number: 7
Overall health status : GOOD
Size (in MB) : 381468
Capacity (in bytes) : 400000000000
Firmware Version : 109.05.26.00
Devices:  /dev/sdt /dev/sds /dev/sdq /dev/sdr

Flash card 6 :
Slot number: 8
Overall health status : GOOD
Size (in MB) : 381468
Capacity (in bytes) : 400000000000
Firmware Version : 109.05.26.00
Devices:  /dev/sdu /dev/sdx /dev/sdv /dev/sdw

Raid Array Info (/dev/md0):
/dev/md0:  raid0 12 devices, 0 spares. Use mdadm --detail for more detail.

Summary:
Healthy flash drives : 5
Broken flash drives  : 1
Fail : Flash card health check failed. See above for more details.
Note the following:
-
Device /dev/sdb has failed and is no longer seen by Flash card 1. Make a note of the devices assigned to this card so you can check them later against the devices assigned to the replaced Flash card.
-
Slot number is the location of the PCIe card.
Note:
A defective Flash card can also be identified by an amber or red LED. Check the back panel of the Exalytics Machine to confirm the location of the defective Flash card.
-
-
Shut down and unplug the Exalytics Machine.
-
Replace the defective Flash card.
-
Restart the Exalytics Machine.
Note:
You can also start the Exalytics Machine using Integrated Lights Out Manager (ILOM). -
To confirm that all Flash cards are now working and to confirm the RAID configuration, enter the following command:
# /opt/exalytics/bin/exalytics_CheckFlash.shThe output should look similar to the following:
Checking Exalytics Flash Drive Status

Fetching some info on installed flash drives ....
Driver version :   01.250.41.04 (2012.06.04)

Supported number of flash drives detected (6)

Flash card 1 :
Slot number: 1
Overall health status : GOOD
Size (in MB) : 381468
Capacity (in bytes) : 400000000000
Firmware Version : 109.05.26.00
Devices:  /dev/sdd /dev/sda /dev/sdb /dev/sdc

Flash card 2 :
Slot number: 2
Overall health status : GOOD
Size (in MB) : 381468
Capacity (in bytes) : 400000000000
Firmware Version : 109.05.26.00
Devices:  /dev/sdh /dev/sdg /dev/sdf /dev/sde

Flash card 3 :
Slot number: 3
Overall health status : GOOD
Size (in MB) : 381468
Capacity (in bytes) : 400000000000
Firmware Version : 109.05.26.00
Devices:  /dev/sdi /dev/sdk /dev/sdl /dev/sdj

Flash card 4 :
Slot number: 5
Overall health status : GOOD
Size (in MB) : 381468
Capacity (in bytes) : 400000000000
Firmware Version : 109.05.26.00
Devices:  /dev/sdm /dev/sdo /dev/sdp /dev/sdn

Flash card 5 :
Slot number: 7
Overall health status : GOOD
Size (in MB) : 381468
Capacity (in bytes) : 400000000000
Firmware Version : 109.05.26.00
Devices:  /dev/sds /dev/sdt /dev/sdr /dev/sdq

Flash card 6 :
Slot number: 8
Overall health status : GOOD
Size (in MB) : 381468
Capacity (in bytes) : 400000000000
Firmware Version : 109.05.26.00
Devices:  /dev/sdw /dev/sdx /dev/sdv /dev/sdu

Raid Array Info (/dev/md0):
/dev/md0: 1116.08GiB raid0 12 devices, 0 spares. Use mdadm --detail for more detail.

Summary:
Healthy flash drives : 6
Broken flash drives  : 0
Pass : Flash card health check passed
Note the following:
-
New devices mapped to Flash card 1 are displayed.
-
In this example, the same devices (/dev/sdd, /dev/sda, /dev/sdb, /dev/sdc) are mapped to Flash card 1. If different devices are mapped to Flash card 1, you must use the new devices when re-assembling RAID1.
-
Since the replaced Flash card contains four new flash devices, the RAID configuration shows four missing RAID1 devices (one for each flash device on the replaced Flash Card). You must re-assemble RAID1 to enable the RAID1 configuration to recognize the new devices on the replaced Flash card.
Note:
A working Flash card can also be identified by the green LED. Check the back panel of the Exalytics Machine to confirm that LED of the replaced Flash card is green.
-
-
Re-assemble RAID1, by performing the following tasks:
-
To display all devices on the RAID1 configuration, enter the following command:
# cat /proc/mdstatThe output should look similar to the following:
Personalities : [raid1] [raid0]
md0 : active raid0 md12[11] md7[6] md1[0] md8[7] md5[4] md11[10] md10[9] md9[8] md3[2] md6[5] md2[1] md4[3]
      1170296832 blocks super 1.2 512k chunks

md1 : active raid1 sdm[1]
      97590656 blocks super 1.2 [2/1] [_U]

md2 : active raid1 sdo[1]
      97590656 blocks super 1.2 [2/1] [_U]

md4 : active raid1 sdp[1]
      97590656 blocks super 1.2 [2/1] [_U]

md3 : active raid1 sdn[1]
      97590656 blocks super 1.2 [2/1] [_U]

md8 : active raid1 sdq[1] sdh[0]
      97590656 blocks super 1.2 [2/2] [UU]

md12 : active raid1 sdw[1] sdi[0]
      97590656 blocks super 1.2 [2/2] [UU]

md6 : active raid1 sdt[1] sdg[0]
      97590656 blocks super 1.2 [2/2] [UU]

md9 : active raid1 sdx[1] sdk[0]
      97590656 blocks super 1.2 [2/2] [UU]

md10 : active raid1 sdv[1] sdl[0]
      97590656 blocks super 1.2 [2/2] [UU]

md5 : active raid1 sdr[1] sdf[0]
      97590656 blocks super 1.2 [2/2] [UU]

md11 : active raid1 sdu[1] sdj[0]
      97590656 blocks super 1.2 [2/2] [UU]

md7 : active raid1 sds[1] sde[0]
      97590656 blocks super 1.2 [2/2] [UU]

unused devices: <none>
Note the following:
-
Four md devices (md1, md2, md3, and md4) have a single sd device assigned.
-
The second line for these devices ends with a notation similar to [2/1] [_U].
-
-
To check the correct configuration of the md devices, enter the following command:
# cat /etc/mdadm.confThe output should look similar to the following:
ARRAY /dev/md1 level=raid1 num-devices=2 metadata=1.2 name=localhost.localdomain:1 UUID=d1e5378a:80eb2f97:2e7dd315:c08fc304
   devices=/dev/sdc,/dev/sdm
ARRAY /dev/md2 level=raid1 num-devices=2 metadata=1.2 name=localhost.localdomain:2 UUID=8226f5c2:e79dbd57:1976a29b:46a7dce1
   devices=/dev/sdb,/dev/sdo
ARRAY /dev/md3 level=raid1 num-devices=2 metadata=1.2 name=localhost.localdomain:3 UUID=79c16c90:eb67f53b:a1bdc83c:b717ebb7
   devices=/dev/sda,/dev/sdn
ARRAY /dev/md4 level=raid1 num-devices=2 metadata=1.2 name=localhost.localdomain:4 UUID=2b1d05bf:41447b90:40c84863:99c5b4c6
   devices=/dev/sdd,/dev/sdp
ARRAY /dev/md5 level=raid1 num-devices=2 metadata=1.2 name=localhost.localdomain:5 UUID=bbf1ce46:6e494aaa:eebae242:c0a56944
   devices=/dev/sdf,/dev/sdr
ARRAY /dev/md6 level=raid1 num-devices=2 metadata=1.2 name=localhost.localdomain:6 UUID=76257b58:ff74573a:a1ffef2b:12976a80
   devices=/dev/sdg,/dev/sdt
ARRAY /dev/md7 level=raid1 num-devices=2 metadata=1.2 name=localhost.localdomain:7 UUID=fde5cab2:e6ea51bd:2d2bd481:aa834fb9
   devices=/dev/sde,/dev/sds
ARRAY /dev/md8 level=raid1 num-devices=2 metadata=1.2 name=localhost.localdomain:8 UUID=9ed9b987:b8f52cc0:580485fb:105bf381
   devices=/dev/sdh,/dev/sdq
ARRAY /dev/md9 level=raid1 num-devices=2 metadata=1.2 name=localhost.localdomain:9 UUID=2e6ec418:ab1d29f6:4434431d:01ac464f
   devices=/dev/sdk,/dev/sdx
ARRAY /dev/md10 level=raid1 num-devices=2 metadata=1.2 name=localhost.localdomain:10 UUID=01584764:aa8ea502:fd00307a:c897162e
   devices=/dev/sdl,/dev/sdv
ARRAY /dev/md11 level=raid1 num-devices=2 metadata=1.2 name=localhost.localdomain:11 UUID=67fd1bb3:348fd8ce:1a512065:906bc583
   devices=/dev/sdj,/dev/sdu
ARRAY /dev/md12 level=raid1 num-devices=2 metadata=1.2 name=localhost.localdomain:12 UUID=6bb498e0:26aca961:78029fe9:e3c8a546
   devices=/dev/sdi,/dev/sdw
ARRAY /dev/md0 level=raid0 num-devices=12 metadata=1.2 name=localhost.localdomain:0 UUID=7edc1371:e8355571:c7c2f504:8a94a70f devices=/dev/md1,/dev/md10,/dev/md11,/dev/md12,/dev/md2,/dev/md3,/dev/md4,/dev/md5,/dev/md6,/dev/md7,/dev/md8,/dev/md9
Note the correct configuration of the following devices:
-
md1 device contains the /dev/sdc and /dev/sdm sd devices
-
md 2 device contains the /dev/sdb and /dev/sdo sd devices
-
md3 device contains the /dev/sda and /dev/sdn sd devices
-
md4 device contains the /dev/sdd and /dev/sdp sd devices
-
-
To add the missing sd devices (/dev/sdc, /dev/sdb, /dev/sda/, and /dev/sdd) to each of the four md devices (md1, md2, md3, and md4 respectively), enter the following commands:
# mdadm /dev/md1 --add /dev/sdcThe sd device /dev/sdc is added to the md1 device. The output should look similar to the following:
mdadm: added /dev/sdc
# mdadm /dev/md2 --add /dev/sdbThe sd device /dev/sdb is added to the md2 device. The output should look similar to the following:
mdadm: added /dev/sdb
# mdadm /dev/md3 --add /dev/sdaThe sd device /dev/sda is added to the md3 device. The output should look similar to the following:
mdadm: added /dev/sda
# mdadm /dev/md4 --add /dev/sdd
The sd device /dev/sdd is added to the md4 device. The output should look similar to the following:
mdadm: added /dev/sdd
RAID1 starts rebuilding automatically.
-
To check the recovery progress, enter the following command:
# cat /proc/mdstatMonitor the output and confirm that the process completes. The output should look similar to the following:
Personalities : [raid1] [raid0]
md0 : active raid0 md12[11] md7[6] md1[0] md8[7] md5[4] md11[10] md10[9] md9[8] md3[2] md6[5] md2[1] md4[3]
      1170296832 blocks super 1.2 512k chunks

md1 : active raid1 sdc[2] sdm[1]
      97590656 blocks super 1.2 [2/1] [_U]
      [==>..................]  recovery = 10.4% (10244736/97590656) finish=7.0min speed=206250K/sec

md2 : active raid1 sdb[2] sdo[1]
      97590656 blocks super 1.2 [2/1] [_U]
      [=>...................]  recovery =  8.1% (8000000/97590656) finish=7.4min speed=200000K/sec

md4 : active raid1 sdd[2] sdp[1]
      97590656 blocks super 1.2 [2/1] [_U]
      [>....................]  recovery =  2.7% (2665728/97590656) finish=7.7min speed=205056K/sec

md3 : active raid1 sda[2] sdn[1]
      97590656 blocks super 1.2 [2/1] [_U]
      [=>...................]  recovery =  6.3% (6200064/97590656) finish=7.3min speed=206668K/sec

md8 : active raid1 sdq[1] sdh[0]
      97590656 blocks super 1.2 [2/2] [UU]

md12 : active raid1 sdw[1] sdi[0]
      97590656 blocks super 1.2 [2/2] [UU]

md6 : active raid1 sdt[1] sdg[0]
      97590656 blocks super 1.2 [2/2] [UU]

md9 : active raid1 sdx[1] sdk[0]
      97590656 blocks super 1.2 [2/2] [UU]

md10 : active raid1 sdv[1] sdl[0]
      97590656 blocks super 1.2 [2/2] [UU]

md5 : active raid1 sdr[1] sdf[0]
      97590656 blocks super 1.2 [2/2] [UU]

md11 : active raid1 sdu[1] sdj[0]
      97590656 blocks super 1.2 [2/2] [UU]

md7 : active raid1 sds[1] sde[0]
      97590656 blocks super 1.2 [2/2] [UU]

unused devices: <none>
-
2.4.4.2 Replacing a Defective Flash Card on an X4-4 or X5-4 Exalytics Machine
Each X4-4 or X5-4 Exalytics Machine is configured with three Flash cards. Each Flash card contains four devices. When one device on a Flash card fails, the entire Flash card becomes defective and has to be replaced. Depending on the RAID configuration, you can replace a defective Flash card on a RAID10 or RAID5 configuration.
Note:
The following procedure describes how to replace a defective Flash card on an X4-4 Exalytics Machine.This section consists of the following topics:
-
Section 2.4.4.2.1, "Replacing a Defective Flash Card on a RAID10 Configuration"
-
Section 2.4.4.2.2, "Replacing a Defective Flash Card on a RAID05 Configuration"
2.4.4.2.1 Replacing a Defective Flash Card on a RAID10 Configuration
For RAID10 configuration, the following procedure assumes you have a defective device (/dev/sdb) mapped to a Flash card which is installed on the parent RAID0 /dev/md0, see Figure 2-2.
To replace a failed or defective Flash card on a RAID10 configuration:
-
To verify the status of Flash cards, enter the following command:
# /opt/exalytics/bin/exalytics_CheckFlash.shIf a defective Flash card is detected, the output displays an "Overall Health: ERROR" message, and the summary indicates the defective card and the location of the Peripheral Component Interconnect Express (PCIe) card.
The output should look similar to the following:
Checking Exalytics Flash Drive Status

Fetching some info on installed flash drives ....
Driver version :   01.250.41.04 (2012.06.04)

Supported number of flash drives detected (3)

Flash card 1 :
Slot number: 6
Overall health status : ERROR. Use --detail for more info
Size (in MB) : 572202
Capacity (in bytes) : 600000000000
Firmware Version : 109.05.26.00
Devices:  /dev/sde /dev/sdc /dev/sdf

Flash card 2 :
Slot number: 7
Overall health status : GOOD
Size (in MB) : 762936
Capacity (in bytes) : 800000000000
Firmware Version : 109.05.26.00
Devices:  /dev/sdh /dev/sdj /dev/sdg /dev/sdi

Flash card 3 :
Slot number: 10
Overall health status : GOOD
Size (in MB) : 762936
Capacity (in bytes) : 800000000000
Firmware Version : 109.05.26.00
Devices:  /dev/sdn /dev/sdl /dev/sdk /dev/sdm

Raid Array Info (/dev/md0):
/dev/md0: 1116.08GiB raid0 6 devices, 0 spares. Use mdadm --detail for more detail.

Summary:
Healthy flash drives : 2
Broken flash drives  : 1
Fail : Flash card health check failed. See above for more details.
Note the following:
-
Device /dev/sdb has failed and is no longer seen by Flash card 1. Make note of the devices assigned to this card so you can check them later against the devices assigned to the replaced Flash card.
-
Slot number is the location of the PCIe card.
Note:
A defective Flash card can also be identified by an amber or red LED. Check the back panel of the Exalytics Machine to confirm the location of the defective Flash card.
-
-
Shut down and unplug the Exalytics Machine.
-
Replace the defective Flash card.
-
Restart the Exalytics Machine.
Note:
You can also start the Exalytics Machine using Integrated Lights Out Manager (ILOM). -
To confirm that all Flash cards are now working and to confirm the RAID configuration, enter the following command:
# /opt/exalytics/bin/exalytics_CheckFlash.shThe output should look similar to the following:
Checking Exalytics Flash Drive Status

Fetching some info on installed flash drives ....
Driver version :   01.250.41.04 (2012.06.04)

Supported number of flash drives detected (3)

Flash card 1 :
Slot number: 6
Overall health status : GOOD
Size (in MB) : 762936
Capacity (in bytes) : 800000000000
Firmware Version : 109.05.26.00
Devices:  /dev/sdd /dev/sdf /dev/sdc /dev/sde

Flash card 2 :
Slot number: 7
Overall health status : GOOD
Size (in MB) : 762936
Capacity (in bytes) : 800000000000
Firmware Version : 109.05.26.00
Devices:  /dev/sdi /dev/sdj /dev/sdh /dev/sdg

Flash card 3 :
Slot number: 10
Overall health status : GOOD
Size (in MB) : 762936
Capacity (in bytes) : 800000000000
Firmware Version : 109.05.26.00
Devices:  /dev/sdn /dev/sdm /dev/sdl /dev/sdk

Raid Array Info (/dev/md0):
/dev/md0:  raid0 6 devices, 0 spares. Use mdadm --detail for more detail.

Summary:
Healthy flash drives : 3
Broken flash drives  : 0
Pass : Flash card health check passed
Note the following:
-
New devices mapped to the Flash card1 are displayed.
-
The RAID10 configuration shows /dev/md0 as a RAID0 with six devices. See Figure 2-2.
-
In this example, new devices /dev/sdd, /dev/sdf, /dev/sdc, and /dev/sde are mapped to Flash card 1.
-
Since the replaced Flash card contains four new flash devices, the RAID configuration shows four missing devices (one for each flash device on the replaced Flash Card). You must re-assemble RAID1 to enable the RAID configuration to recognize the new devices on the replaced Flash card.
Note:
A working Flash card can also be identified by the green LED. Check the back panel of the Exalytics Machine to confirm that LED of the replaced Flash card is green.
-
-
Re-assemble RAID1, by performing the following tasks:
-
To display all devices on the RAID1 configuration, enter the following command:
# cat /proc/mdstatThe output should look similar to the following:
Personalities : [raid1] [raid0]
md3 : active (auto-read-only) raid1 sdm[1]
      195181376 blocks super 1.2 [2/1] [_U]
      bitmap: 0/2 pages [0KB], 65536KB chunk

md4 : active (auto-read-only) raid1 sdk[1]
      195181376 blocks super 1.2 [2/1] [_U]
      bitmap: 0/2 pages [0KB], 65536KB chunk

md2 : active (auto-read-only) raid1 sdi[1]
      195181376 blocks super 1.2 [2/1] [_U]
      bitmap: 0/2 pages [0KB], 65536KB chunk

md6 : active raid1 sdn[1] sdj[0]
      195181376 blocks super 1.2 [2/2] [UU]
      bitmap: 0/2 pages [0KB], 65536KB chunk

md0 : inactive md6[5] md5[4] md1[0]
      585149952 blocks super 1.2

md1 : active raid1 sdh[1]
      195181376 blocks super 1.2 [2/1] [_U]
      bitmap: 1/2 pages [4KB], 65536KB chunk

md5 : active raid1 sdl[1] sdg[0]
      195181376 blocks super 1.2 [2/2] [UU]
      bitmap: 0/2 pages [0KB], 65536KB chunk

unused devices: <none>
Note the following:
-
Four md devices (md3, md4, md2, and md1) have a single sd device assigned.
-
The second line for these devices ends with a notation similar to [2/1] [_U].
-
-
To check the correct configuration of the md devices, enter the following command:
# cat /etc/mdadm.confThe output should look similar to the following:
ARRAY /dev/md1 level=raid1 num-devices=2 metadata=1.2 name=localhost.localdomain:1 UUID=2022e872:f5beb736:5a2f10a7:27b209fc
   devices=/dev/sdd,/dev/sdh
ARRAY /dev/md2 level=raid1 num-devices=2 metadata=1.2 name=localhost.localdomain:2 UUID=b4aff5bf:18d7ab45:3a9ba04e:a8a56288
   devices=/dev/sde,/dev/sdi
ARRAY /dev/md3 level=raid1 num-devices=2 metadata=1.2 name=localhost.localdomain:3 UUID=4e54d5d1:51314c65:81c00e25:030edd38
   devices=/dev/sdc,/dev/sdm
ARRAY /dev/md4 level=raid1 num-devices=2 metadata=1.2 name=localhost.localdomain:4 UUID=f8a533ed:e195f83a:9dcc86eb:0427a897
   devices=/dev/sdf,/dev/sdk
ARRAY /dev/md5 level=raid1 num-devices=2 metadata=1.2 name=localhost.localdomain:5 UUID=ec7eb621:35b9233f:049a5e1b:987e7d72
   devices=/dev/sdg,/dev/sdl
ARRAY /dev/md6 level=raid1 num-devices=2 metadata=1.2 n
Note the correct configuration of the following devices:
-
md1 device contains the /dev/sdd and /dev/sdh sd devices
-
md 2 device contains the /dev/sde and /dev/sdi sd devices
-
md3 device contains the /dev/sdc and /dev/sdm sd devices
-
md4 device contains the /dev/sdf and /dev/sdk sd devices
-
-
To add the missing sd devices (/dev/sdd, /dev/sde, /dev/sdc/, and /dev/sdf) to each of the four md devices (md1, md2, md3, and md4 respectively), enter the following commands:
# mdadm /dev/md1 --add /dev/sddThe sd device /dev/sdd is added to the md1 device. The output should look similar to the following:
mdadm: added /dev/sdd
# mdadm /dev/md2 --add /dev/sdeThe sd device /dev/sde is added to the md2 device. The output should look similar to the following:
mdadm: added /dev/sde
# mdadm /dev/md3 --add /dev/sdcThe sd device /dev/sdc is added to the md3 device. The output should look similar to the following:
mdadm: added /dev/sdc
# mdadm /dev/md4 --add /dev/sdf
The sd device /dev/sdf is added to the md4 device. The output should look similar to the following:
mdadm: added /dev/sdf
RAID1 starts rebuilding automatically.
-
To check the recovery progress, enter the following command:
# cat /proc/mdstatMonitor the output and confirm that the process completes. The output should look similar to the following:
Personalities : [raid1] [raid0]
md3 : active raid1 sdc[2] sdm[1]
      195181376 blocks super 1.2 [2/1] [_U]
      [>....................]  recovery =  1.8% (3656256/195181376) finish=15.7min speed=203125K/sec
      bitmap: 0/2 pages [0KB], 65536KB chunk

md4 : active raid1 sdf[2] sdk[1]
      195181376 blocks super 1.2 [2/1] [_U]
      [>....................]  recovery =  1.2% (2400000/195181376) finish=16.0min speed=200000K/sec
      bitmap: 0/2 pages [0KB], 65536KB chunk

md2 : active raid1 sde[2] sdi[1]
      195181376 blocks super 1.2 [2/1] [_U]
      [>....................]  recovery =  3.4% (6796736/195181376) finish=15.2min speed=205961K/sec
      bitmap: 0/2 pages [0KB], 65536KB chunk

md6 : active raid1 sdn[1] sdj[0]
      195181376 blocks super 1.2 [2/2] [UU]
      bitmap: 0/2 pages [0KB], 65536KB chunk

md0 : inactive md6[5] md5[4] md1[0]
      585149952 blocks super 1.2

md1 : active raid1 sdd[2] sdh[1]
      195181376 blocks super 1.2 [2/1] [_U]
      [>....................]  recovery =  4.4% (8739456/195181376) finish=15.0min speed=206062K/sec
      bitmap: 1/2 pages [4KB], 65536KB chunk

md5 : active raid1 sdl[1] sdg[0]
      195181376 blocks super 1.2 [2/2] [UU]
      bitmap: 0/2 pages [0KB], 65536KB chunk

unused devices: <none>
-
2.4.4.2.2 Replacing a Defective Flash Card on a RAID05 Configuration
For RAID05 configuration, the following procedure assumes you have a defective device (/dev/sdb) mapped to a Flash card which is installed on the parent RAID5 /dev/md0, see Figure 2-3.
-
To verify the status of Flash cards, enter the following command:
# /opt/exalytics/bin/exalytics_CheckFlash.shIf a defective Flash card is detected, the output displays an "Overall Health: ERROR" message, and the summary indicates the defective card and the location of the Peripheral Component Interconnect Express (PCIe) card.
The output should look similar to the following:
Checking Exalytics Flash Drive Status

Fetching some info on installed flash drives ....
Driver version :   01.250.41.04 (2012.06.04)

Supported number of flash drives detected (3)

Flash card 1 :
Slot number: 6
Overall health status : ERROR. Use --detail for more info
Size (in MB) : 572202
Capacity (in bytes) : 600000000000
Firmware Version : 109.05.26.00
Devices:  /dev/sdf /dev/sdc /dev/sde

Flash card 2 :
Slot number: 7
Overall health status : GOOD
Size (in MB) : 762936
Capacity (in bytes) : 800000000000
Firmware Version : 109.05.26.00
Devices:  /dev/sdh /dev/sdj /dev/sdi /dev/sdg

Flash card 3 :
Slot number: 10
Overall health status : GOOD
Size (in MB) : 762936
Capacity (in bytes) : 800000000000
Firmware Version : 109.05.26.00
Devices:  /dev/sdn /dev/sdk /dev/sdm /dev/sdl

Raid Array Info (/dev/md0):
/dev/md0: 1488.86GiB raid5 3 devices, 0 spares. Use mdadm --detail for more detail.

Summary:
Healthy flash drives : 2
Broken flash drives  : 1
Fail : Flash card health check failed. See above for more details.
Note the following:
-
Device /dev/sdb has failed and is no longer seen by Flash card 1. Make note of the devices assigned to this card so you can check them later against the devices assigned to the replaced Flash card.
-
Slot number is the location of the PCIe card.
Note:
A defective Flash card can also be identified by an amber or red LED. Check the back panel of the Exalytics Machine to confirm the location of the defective Flash card.
-
-
Shut down and unplug the Exalytics Machine.
-
Replace the defective Flash card.
-
Restart the Exalytics Machine.
Note:
You can also start the Exalytics Machine using Integrated Lights Out Manager (ILOM). -
To confirm that all Flash cards are now working and to confirm the RAID configuration, enter the following command:
# /opt/exalytics/bin/exalytics_CheckFlash.shThe output should look similar to the following:
Checking Exalytics Flash Drive Status

Fetching some info on installed flash drives ....
Driver version :   01.250.41.04 (2012.06.04)

Supported number of flash drives detected (3)

Flash card 1 :
Slot number: 6
Overall health status : GOOD
Size (in MB) : 762936
Capacity (in bytes) : 800000000000
Firmware Version : 109.05.26.00
Devices:  /dev/sdd /dev/sdf /dev/sdc /dev/sde

Flash card 2 :
Slot number: 7
Overall health status : GOOD
Size (in MB) : 762936
Capacity (in bytes) : 800000000000
Firmware Version : 109.05.26.00
Devices:  /dev/sdg /dev/sdi /dev/sdh /dev/sdj

Flash card 3 :
Slot number: 10
Overall health status : GOOD
Size (in MB) : 762936
Capacity (in bytes) : 800000000000
Firmware Version : 109.05.26.00
Devices:  /dev/sdl /dev/sdk /dev/sdn /dev/sdm

Raid Array Info (/dev/md0):
/dev/md0: 1488.86GiB raid5 3 devices, 1 spare. Use mdadm --detail for more detail.

Summary:
Healthy flash drives : 3
Broken flash drives  : 0
Pass : Flash card health check passed
Note the following:
-
New devices mapped to the Flash card1 are displayed.
-
The RAID05 configuration shows /dev/md0 as a RAID5 with 3 devices. See Figure 2-3.
-
In this example, new devices /dev/sdd, /dev/sdf, /dev/sdc, and /dev/sde are mapped to Flash card 1.
-
Since the replaced Flash card contains four new flash devices, the RAID configuration shows four missing devices (one for each flash device on the replaced Flash Card). You must re-assemble RAID05 to enable the RAID configuration to recognize the new devices on the replaced Flash card.
Note:
A working Flash card can also be identified by the green LED. Check the back panel of the Exalytics Machine to confirm that LED of the replaced Flash card is green.
-
-
Re-assemble RAID05, by performing the following steps:
-
To check the RAID05 configuration, enter the following command:
# cat /proc/mdstatThe output should look similar to the following:
Personalities : [raid0] [raid6] [raid5] [raid4]
md3 : active raid0 sdn[2] sdk[1] sdm[3] sdl[0]
      780724224 blocks super 1.2 512k chunks

md0 : active raid5 md3[3] md2[1]
      1561186304 blocks super 1.2 level 5, 512k chunk, algorithm 2 [3/2] [_UU]
      bitmap: 6/6 pages [24KB], 65536KB chunk

md2 : active raid0 sdi[1] sdh[2] sdj[3] sdg[0]
      780724224 blocks super 1.2 512k chunks

unused devices: <none>
Note the following:
-
Since the replaced Flash card contains four new flash devices on RAID0 /dev/md1, the configuration shows RAID5 /dev/md0 as missing md1.
-
The second line of the RAID5 configuration ends with a notation similar to [3/2] [_UU].
-
To enable RAID5 to recognize md1, you need to recreate md1.
-
-
To recreate md1, enter the following command:
# mdadm /dev/md1 --create --raid-devices=4 --level=0 /dev/sdf /dev/sde /dev/sdc /dev/sddThe output should look similar to the following:
mdadm: array /dev/md1 started.
-
After confirming that md1 created successfully, you add the newly created md1 to RAID5.
-
To add md1 to RAID5, enter the following command:
# mdadm /dev/md0 --add /dev/md1The output should look similar to the following:
mdadm: added /dev/md1
RAID5 starts rebuilding automatically.
-
To check the recovery progress, enter the following command:
# cat /proc/mdstatMonitor the output and confirm that the process completes. The output should look similar to the following:
Personalities : [raid0] [raid6] [raid5] [raid4] md1 : active raid0 sdd[3] sdc[2] sde[1] sdf[0] 780724224 blocks super 1.2 512k chunks md3 : active raid0 sdn[2] sdk[1] sdm[3] sdl[0] 780724224 blocks super 1.2 512k chunks md0 : active raid5 md1[4] md3[3] md2[1] 1561186304 blocks super 1.2 level 5, 512k chunk, algorithm 2 [3/2] [_UU] [>....................] recovery = 0.5% (4200064/780593152) finish=64.6min speed=200003K/sec bitmap: 6/6 pages [24KB], 65536KB chunk md2 : active raid0 sdi[1] sdh[2] sdj[3] sdg[0] 780724224 blocks super 1.2 512k chunks unused devices: <none> -
To recreate the mdadm.conf configuration file, which ensures that RAID5 details are maintained when you restart the Exalytics Machine, enter the following command:
# mdadm --detail --scan --verbose > /etc/mdadm.confTo confirm that the file is recreated correctly, enter the following command:
# cat /etc/mdadm.confMonitor the output and confirm that the process completes. The output should look similar to the following:
ARRAY /dev/md2 level=raid0 num-devices=4 metadata=1.2 name=localhost.localdomain:2 UUID=d7a213a4:d3eab6de:b62bb539:7f8025f4
   devices=/dev/sdg,/dev/sdh,/dev/sdi,/dev/sdj
ARRAY /dev/md3 level=raid0 num-devices=4 metadata=1.2 name=localhost.localdomain:3 UUID=b6e6a4d9:fb740b73:370eb061:bb9ded07
   devices=/dev/sdk,/dev/sdl,/dev/sdm,/dev/sdn
ARRAY /dev/md1 level=raid0 num-devices=4 metadata=1.2 name=localhost.localdomain:1 UUID=185b52fc:ca539982:3c4af30c:5578cdfe
   devices=/dev/sdc,/dev/sdd,/dev/sde,/dev/sdf
ARRAY /dev/md0 level=raid5 num-devices=3 metadata=1.2 spares=1 name=localhost.localdomain:0 UUID=655b4442:94160b2f:0d40b860:e9eef70f
   devices=/dev/md1,/dev/md2,/dev/md3
Note:
If you have other customizations in the mdadm.conf configuration file (such as updating the list of devices that are mapped to each RAID), you must manually edit the file.
-