36 Managing the Rack
The following information is included in this chapter:
36.1 Getting Started with Rack Management
Target management is the process through which Enterprise Manager begins to manage and monitor your targets including server hardware, chassis, racks, power distribution unit, network equipment, operating systems, virtualization software, and clustering software. Discovering and managing your targets is a prerequisite for almost every action in the software. The discovery feature makes adding targets quick and easy. You can discover power distribution units and racks using the guided process.
36.2 Location of Rack Information in the User Interface
Table 36-1 shows where to find information.
Table 36-1 Location of Rack Information in the BUI
| Object | Location |
|---|---|
|
Rack |
In the Enterprise Manager user interface, under Targets, click All Targets. In the Refine Search section, under Target type, click Servers, Storage, and Network. Click Systems Infrastructure Rack, then select a rack from the displayed list. |
|
Physical View of Rack |
In the Enterprise Manager user interface, under Targets, click All Targets. In the Refine Search section, under Target type, click Servers, Storage, and Network. Click Systems Infrastructure Rack, then select a rack from the displayed list. Click the Dashboard tab. Select Photorealistic View radio button on the right side viewing option. |
36.3 Actions for Rack
You can perform the following actions, depending on the requirements.
-
Create a rack
-
View the rack
-
Place a target to the rack
-
Edit a target in the rack
-
Remove a target from the rack
-
Delete a rack
36.4 Target Navigation for Rack Management
The target navigation tree displays the rack and all targets in the rack in a tree structure. Click on any of the targets to navigate to the landing page of the selected target.
Note:
The target navigation tree is active only if the rack is populated with targets.Figure 36-1 Target Navigation for Rack Management
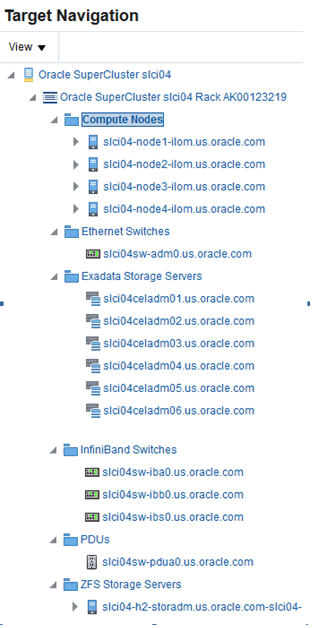
Description of ''Figure 36-1 Target Navigation for Rack Management''
36.5 Creating a Rack
A rack target serves as a container for other hardware targets that are managed by Enterprise Controller. To create a rack, perform the following steps:
-
Log in to Enterprise Manager.
-
Under Setup, click Add Target, then click Add Targets Manually.
-
In the Overview section, click Add Targets using Guided Process.
-
In the Add Using Guided Process screen, scroll down to Systems Infrastructure Rack, then click Add.
-
In the Systems Infrastructure Rack Discovery screen, enter the required information.
-
In the Target Name field, enter a name for the rack.
-
In the Type field, select the type of rack and additional information if required.
-
(Optional) You can also set additional information, such as Location, in the Global Properties section.
-
-
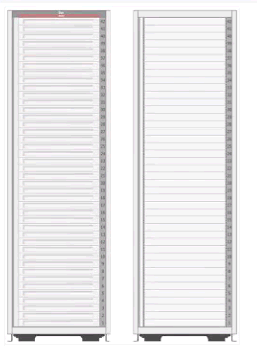
Click Add in the top right corner of the screen. Once the job is successfully run, an empty rack is created. You can now navigate to the rack landing screen and add hardware targets to the rack. The following figure is an image of an empty rack.
36.5.1 Creating a Rack Using Command Line Interface
You can create a rack using the command line interface.
Perform the following steps to create a rack using CLI:
-
Open the command line interface on the host where OMS is running.
-
Log in to emcli using the following command:
emcli login –username=<your user name> -
Type the password when prompted.
-
Execute emcli_sync.
-
Add a new rack using the following command:
emcli add_target \
-name="Name of your Rack" \
-type=oracle_si_rack \
-subseparator=properties='=' \
-separator=properties=';' \
-properties='EngineeredSystemId=SomeID;RackType=SomeType;RackSubtype=SomeSubtype;TotalSlots=42'
-
Set the following in the emcli add_target command:
-
Replace Name of your Rack with name of your Rack
-
Set values for properties
-
36.5.1.1 Properties of Rack
Rack has four properties, namely, EngineeredSystemId, RackType, RackSubtype, and TotalSlots. See Table 36-2, "Properties Description" for description of the properties.
Table 36-2 Properties Description
| Property | Description | Allowed Values | Mandatory | Note |
|---|---|---|---|---|
|
EngineeredSystemId |
Unique identifier of an Engineered System |
Arbitrary string |
No |
Does not have to be provided if Rack is standalone not belonging to some Engineered System |
|
RackType |
Rack Type (Generic 42U Cabinet or well-known type e.g. Oracle Exalogic, SPARC SuperCluster) |
|
Yes |
Provide GENERIC if Rack is standalone not belonging to some Engineered System |
|
RackSubtype |
Optional specification of the RackType size according to Rack Type. For example, Full, Quarter etc. This property is applicable only for Engineered Systems racks. |
|
No |
NA |
|
TotalSlots |
Total count of slots in the rack. |
42 |
Yes |
Rack with 42 slots only is supported. |
Following is a sample command to create a generic rack:
emcli add_target \
-name="Name of your Rack" \
-type=oracle_si_rack \
-subseparator=properties='=' \
-separator=properties=';' \
-properties=RackType=GENERIC;TotalSlots=42'
36.6 Viewing the Rack Information
The rack information screen is divided into two parts. The top region consists of dashlets that provide you a general overview of the system. The main region displays more detailed information of the rack.
The dashlets are grouped by three into one or more series that can be switched using navigation buttons.
The first dashlet in the first series displays the summary of the rack, including the serial number of the rack, total number, and number of occupied slots. It also displays the location of the rack if the information is available.
The second dashlet in the first series displays number of open incidents relayed on the rack and all the targets in the rack. Click on one of the displayed numbers to view the list of the incidents of a given severity.
The third dashlet in the first series displays the current (in Ampere) usage per phase of the rack.
The first dashlet in the second series displays the number of targets that are online, offline, and aggregated number of targets in any other status.
The second dashlet in the second series displays the occupancy of the rack. It displays the slot occupancy and PDU occupancy of the rack in a graphical representation.
The third dashlet in the second series displays the last configuration changes made to the rack.
Note:
Click the Second dashlet series icon (displayed below the dashlets) to view more dashlets. Click the First dashlet series icon to view the first set of dashlets.36.6.1 Physical View of the Rack
Click the first tab in the main section of the rack landing page for a physical view of the rack. Photorealistic view of the rack displays the rack and it's content providing an overview of how the targets are placed into the rack. You can click on any of the targets in the rack to view more detailed information about the selected targets. Click on the rack to view the information about the rack itself. You can switch between several representations of the physical view.
-
Photorealistic view provides a realistic picture of the system with detailed graphics of all the components.
-
Schematic view is data oriented and displays the most important information such as locator light, status, temperature, and host name. Each component in the view has its color based on the type for easy identification of the component. Click Show Temperature option on the right side to view the temperature of targets that provide that information. To place targets into the empty slots, check the Empty Slot option below the Temperature toggle. If unchecked, the empty slots are not active.
-
Table view is a tabular representation of the physical view, providing a list of displayed components with the most important information.
Figure 36-3 Photorealistic View of the Rack
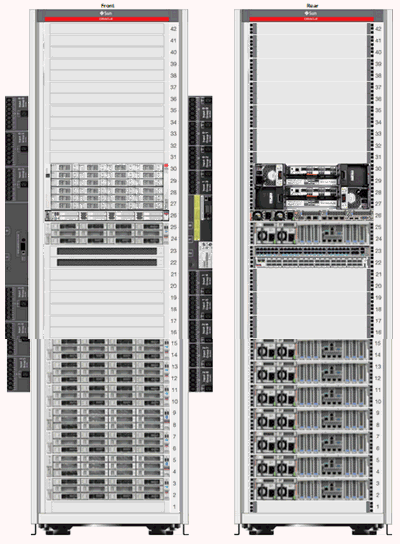
Description of ''Figure 36-3 Photorealistic View of the Rack''
36.6.2 Firmware View
Click the second tab in the main section of the rack landing page to display the Firmware view. Firmware View displays a tabular view of all the firmware of targets placed in the rack. It displays the Target Name, Target Type, Firmware Type, and Firmware Version in a tabular format. The search option is available on the top of the table header for all columns such as Target Name, Target Type, Firmware Type, and Firmware Version. In the Target Type search field, select the type of target from the drop-down list.You can enter a firmware type in the firmware search field to view targets with the selected firmware type only.
36.7 Placing Targets in the Rack
After the rack is created, you can place (add) hardware targets in the rack. A photorealistic image of the empty rack is displayed with front and rear views. There are two types of slots in the rack, rack slot and PDU slot. In the rack slot, you can place switches, servers, ZFS appliances, storage cells, and other targets that can be placed into a rack. In the PDU slots, you can place the PDU.
You can invoke the action menu by right clicking on the empty or occupied rack or the PDU slot.
36.7.1 Place a Target in the Rack
To place a target in the rack, perform the following steps:
-
Right click on an empty slot in the rack and click Place Target. The Place Target into Rack wizard opens.
-
In the Selected Target field, click the search icon to find the target that you want to add.
-
In the Target Type field, select the check box against the type of target that you want to add. The discovered targets are listed.
-
Select a target from the list, then click Select.
-
-
In the Position field, the value is automatically filled from the slot position you clicked. If you want to place the target in a different slot, enter the position of the empty slot where you want the target to be placed.
-
In the Height field, specify the height of the target. The suggested height displayed is based on the type of the target that you selected.
-
In the Facing field, specify the orientation of that target such as Full, Front, or Rear. (Some targets might occupy only half of the slot, for example, switches).
-
In the Horizontal position field, specify whether Full, Left, or Right. This is based on the occupancy of that target. Some targets might occupy the full slot, some might occupy either the left or right side of the slot.
-
Click OK. The target is placed into the rack.
36.7.2 Edit Target Placement in the Rack
You can edit the target position in the rack and place it to a different slot if needed.
To edit a target position, perform the following steps:
-
Right click on the target, then select Edit Target.
-
Edit the corresponding values and click OK.
36.7.3 Remove a Target from the Rack
You can delete targets placed in the rack.
Perform the following steps to remove a target from the rack.
-
Navigate to Physical View of the Rack.
-
Right click on the target that you want to delete, then click Remove Target.
-
Click OK to confirm. The target is removed from the rack.
Note:
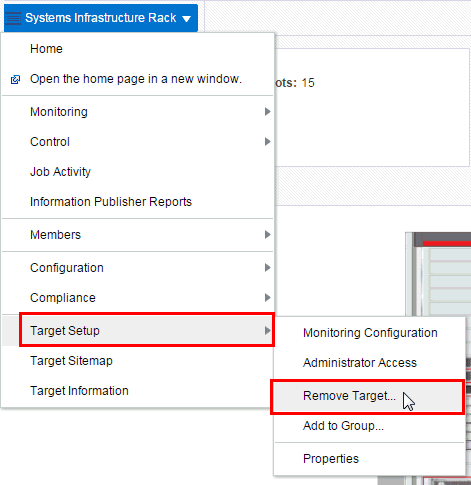
Though the target is removed from the rack, Enterprise Manager continues to monitor the target.36.7.4 Delete a Rack
The rack can be removed as any target in Enterprise Manager. If the rack target is deleted and the rack contains targets placed in it, the targets are not deleted from the Enterprise Manager and can be still accessed in the All Targets view.
Perform the following steps to delete a rack:
-
In the rack landing page, click the Target menu drop-down list.
-
Click Target Setup, then click Remove Target.
-
Click Yes to confirm. The rack is deleted.
36.8 Related Resources for Rack Management
See the following for more information: