11 Setting Up the PaaS Infrastructure
This chapter covers the common operations that need to be performed to enable Platform as a Service (PaaS), which encompasses different service families such as Database as a Service (DBaaS) using Oracle Single Instance, and RAC or Middleware as a Service (MWaaS) using WebLogic Server, SOA Infrastructure, and Oracle Service Bus.
The PaaS model allows users to create platforms onto which consumers can deploy their own applications. A platform resource is typically comprised of a host, operating system, and application server, and may be virtualized. The platform may also include a database and even multiple hosts in a cluster. This chapter contains the following sections:
11.1 About Service Families
A service family can be classified as a group of services that provide a solution for a specific domain. For example, a Database Service provides RDBMS solutions and a WebLogic service provides the Java solutions for J2EE based application development and hosting.
Each service family can contain one or more service types. A service type provides a specialized service within a service family. For example, a database service can contain service types such as database service, schema service, or pluggable database service. A middleware service type can contain WebLogic service, OSB service, or SOA service. Each service type has certain fixed attributes, actions, configurations, metrics, and other properties.
A service instance is a cloud resource that is requested and managed by the self service user. For example, single instance database service instance, WebLogic service instance, and so on.
11.2 Common Setup Tasks
This section helps you get started by providing an overview of the common steps that must be performed before you set up a service family.
Table 11-1 Setting Up the Service Family
| Step | Task | Role |
|---|---|---|
|
1 |
Configure the Software Library. See Setting Up the Software Library section for details. |
Cloud Administrator |
|
2 |
Deploy the necessary plug-ins. See Section 3.2, "Deploying the Required Plug-ins" |
Cloud Administrator |
|
3 |
Define roles for administrators and self service users. See Section 3.3, "Defining Roles and Assigning Users". |
Super Administrator |
|
4 |
Install the Management Agent on unmanaged hosts so that they can be monitored by Enterprise Manager. See Section 11.2.1, "Adding Hosts". |
Cloud Administrator |
|
5 |
Create one or more resource providers. See Section 11.2.2, "Creating the Resource Providers". |
Self Service Administrator |
|
6 |
Configure the request settings. See Section 11.2.3, "Configuring Request Settings". |
Self Service Administrator |
|
7 |
Set up quotas for self service users. See Section 11.2.4, "Setting Up Quotas". |
Self Service Administrator |
11.2.1 Adding Hosts
Oracle Management Agent (Management Agent) is one of the core components of Enterprise Manager Cloud Control. It works in conjunction with the plug-ins to monitor the targets running on a managed host. You must install Oracle Management Agents on your unmanaged hosts to monitor them in Enterprise Manager. See http://docs.oracle.com/cd/E24628_01/install.121/e22624/install_agent.htm#EMBSC187 for details.
11.2.2 Creating the Resource Providers
A resource provider is a target that represents the type of resources required to provision a service instance of a specific service type. A PaaS Infrastructure zone is a resource provider which contains one or more hosts. A Software Pool is another resource provider that can contain resources such as Oracle Home targets, Oracle database targets, and so on. Resource providers such as the Database Pool or Middleware Pool are dependent on the PaaS Infrastructure Zone.
Resources can be grouped under a resource provider for easier administration and management. Resource providers allow administrators to enforce policies for service provisioning and capacity planning.
To create a resource provider, follow these steps:
-
Login as a user with the appropriate role. To create a PaaS Infrastructure Zone, you must login as a user with the
EM_CLOUD_ADMINISTRATORrole. To create all other resource providers such as database pools, schema pools, and so on, you must login as a user with theEM_SSA_ADMINISTRATORrole. -
From the Enterprise menu, select Cloud, then select Cloud Home. The Cloud Home page appears.
-
From the Oracle Cloud menu, select Resource Providers, then click Create. The Create Resource Provider window appears.
-
Select the type of resource provider you want to create. This can be:
-
PaaS Infrastructure Zone. See Section 11.2.2.1, "Creating a PaaS Infrastructure Zone".
-
PaaS Pool. See Section 11.2.2.2, "Creating a PaaS Pool"
-
-
Click Create and follow the steps in the wizard to create the selected resource provider.
11.2.2.1 Creating a PaaS Infrastructure Zone
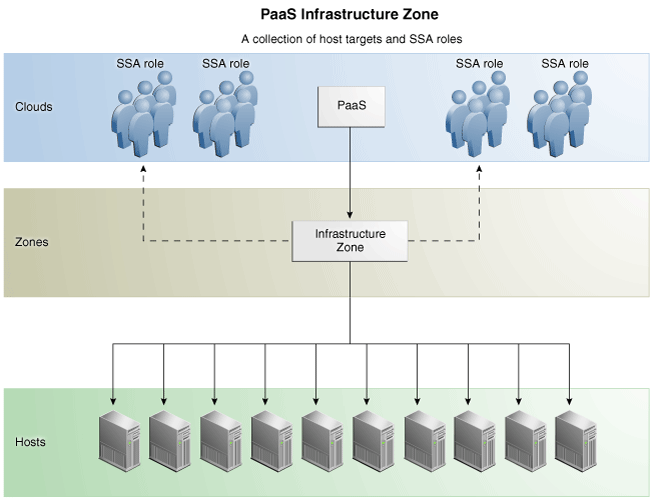
A PaaS Infrastructure Zone can contain a group of hosts. Each zone can contain homogeneous resources of only one type. Each resource in a zone represents a location at which a service instance is to be deployed.
The first step in building a PaaS cloud is to create at least one PaaS Infrastructure Zone, which is done by selecting one more Enterprise Manager host targets and identifying the SSA enabled roles that users will need to in order to request resources in this zone.
Before you create a PaaS Infrastructure Zone, you must ensure that the following prerequisites are met:
-
The
EM_CLOUD_ADMINISTRATOR,EM_SSA_ADMINISTRATOR, andEM_SSA_USERroles must have been created. See Section 3.3, "Defining Roles and Assigning Users" for details. -
Note:
If you are using an OMS Shared System location in the Software Library, the credentials owner must grant privileges to theCLOUD_ENGINE_USER. Since theCLOUD_ENGINE_USERis a hidden user account, the owner of the named credential cannot grant View privileges from the Enterprise Manager Console. To address this issue, (especially on a Windows host where OMS Agent Filesystem is the recommended approach for setting up Software Library) you need to run the following EMCLI commands:emcli login -username=<username> -password =<password>emcli grant_privs -name=CLOUD_ENGINE_USER -privileges="GET_CREDENTIAL; CRED_NAME=<namedcred>:CRED_OWNER=<loginusername>" -
You must log in as a user with
EM_CLOUD_ADMINISTRATORprivileges to create a PaaS Infrastructure Zone.
To create a PaaS Infrastructure Zone, follow these steps:
-
From the Enterprise menu, select Cloud, then select Cloud Home. The Cloud Home page appears.
-
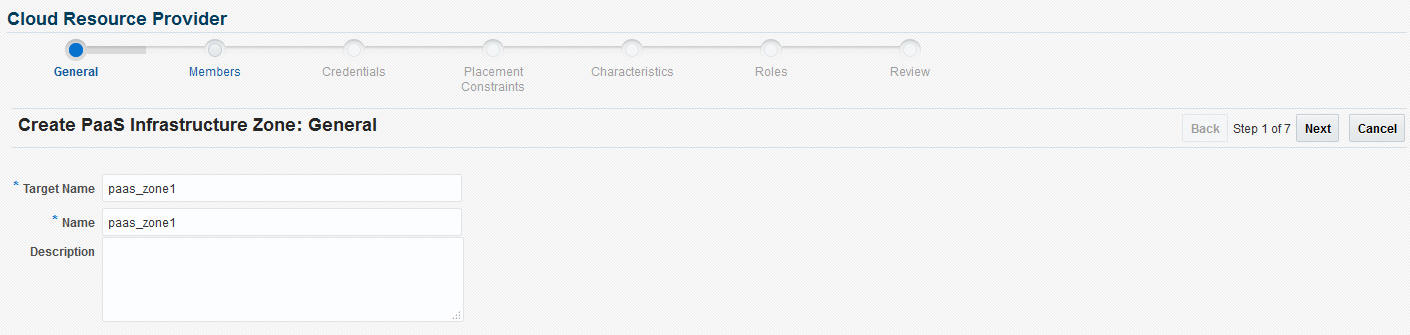
From the Cloud Home menu, select Resource Providers, then select Create. In the Create Resource Provider window, select PaaS Infrastructure Zone, then click Create. The Create PaaS Infrastructure Zone: General page appears.
-
Enter the target name, name, and description for the zone. Click Next.
-
Click Add to add one or more host members to the zone. The hosts that you select cannot be present in more than one PaaS Infrastructure Zone. Click Next.
-
In the Create PaaS Infrastructure Zone: Credentials page, specify the host credentials that are to be used for provisioning all targets in this zone. The credentials provided should be of global credential type (valid across the members in the zone) and owned by the current user. Click Next.
Note:
To create new named credentials, from the Setup menu, select Security, then select Named Credentials. You can create user or password named credentials here. Other types of credentials such as SSH must be created from the Security menu and can be used here. -
Specify appropriate values for the placement policy constraints based on the resources available to the host members. The placement policy constraints are used to set maximum ceilings for any host in the zone. Placement policy values are used during deployment to filter out hosts that are overburdened. You can define the following placement policy constraints for each host:
-
Maximum CPU Utilization: The average CPU utilization percentage for the past 7 days.
-
Maximum Memory Allocation: The average memory allocation for the past 7 days.
Hosts exceeding these thresholds will not be considered for provisioning operations.
-
-
Click Next. In the Create PaaS Infrastructure Zone: Characteristics page, specify the target properties such as cost center, lifecycle status, location, and so on
-
Click Next. The Create PaaS Infrastructure Zone: Roles page appears. A PaaS Infrastructure Zone can be made available to a restricted set of self service users with the EM_SSA_USER role. Click Add to add and select the roles that can access this PaaS Infrastructure Zone.
-
Click Next. The Create PaaS Infrastructure Zone: Review page appears. Review the details of the zone being created and click Submit to create the zone. You will return to the Database and Cloud Home page.
Note:
You can use EMCLI commands (see Section 46.13.1.1, "Creating a PaaS Zone") or REST APIs (see Section 43.3.1.3.3, "Creating a PaaS Zone") to create a PaaS Infrastructure Zone.
11.2.2.1.1 Editing a PaaS Infrastructure Zone
To edit a PaaS Infrastructure Zone, follow these steps:
-
From the Enterprise menu, select Cloud, then select Cloud Home. The Cloud Home page appears.
-
From the Cloud Home menu, select Resource Providers. The Resource Providers page appears.
-
Select a PaaS Infrastructure Zone from the list and click Edit.
Note:
If you do not have access to or own the Named Credentials that have been defined for the PaaS Infrastructure Zone, you must specify new credentials. -
Follow the steps in the wizard to edit the necessary parameters and click Submit to accept the changes.
11.2.2.1.2 Deleting a PaaS Infrastructure Zone
To delete a PaaS Infrastructure Zone, follow these steps:
-
From the Enterprise menu, select Cloud, then select Cloud Home. The Cloud Home page appears.
-
From the Cloud Home menu, select Resource Providers. The Resource Providers page appears.
-
Select a PaaS Infrastructure Zone from the list and click Delete.
-
A confirmation message is displayed. Click Delete PaaS Infrastructure Zone to delete the zone.
11.2.2.2 Creating a PaaS Pool
The second step in building a PaaS cloud is to create software pools (for example, database or middleware Oracle Homes that exist on hosts within the PaaS Infrastructure Zone, or database instances for schema as a service). The figure below shows an example of a PaaS pool.
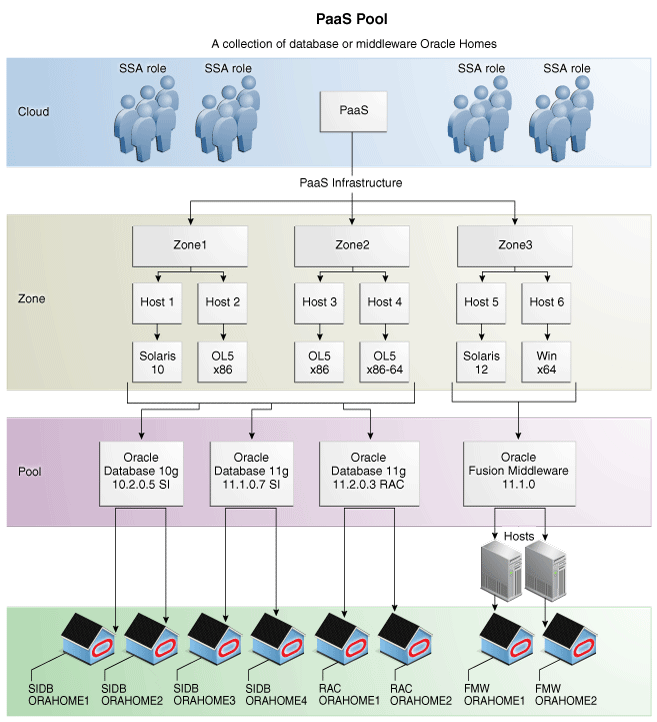
A PaaS pool must be a homogeneous collection of Oracle Homes of the same platform, type, and version. For example, Solaris 10 Oracle Database single instance version 10.2.0.5 or Oracle Enterprise Linux 5 x86-64 WebLogic Server version 10.3.6. You can create a Database Pool or a Middleware Pool.
-
To create a Database Pool, see Section 11.2.2.2.1, "Creating a Database Pool".
-
To create a Middleware Pool, see Section 11.2.2.2.2, "Creating a Middleware Pool".
11.2.2.2.1 Creating a Database Pool
A Database Pool contains a set of resources that can be used to provision a database instance within a PaaS Infrastructure Zone. A database pool is a collection of homogenous targets such as servers or clusters with database software installed. For more details, see Section 11.2.2.2, "Creating a PaaS Pool".
Depending on the type of database service you are setting up, you can do one of the following:
11.2.2.2.2 Creating a Middleware Pool
A Middleware Pool contains a set of resources that can be used to provision a service instance within a PaaS Infrastructure Zone. For more details on creating the middleware pool, see Section 24.2, "Creating a Middleware Pool".
11.2.3 Configuring Request Settings
You can configure the request settings by specifying when a request can be made, its duration, and so on. To configure request settings, follow these steps:
-
Log into Enterprise Manager as a user with the
EM_SSA_ADMINISTRATORrole. -
From the Enterprise menu, select Cloud, then select Cloud Home. The Cloud Home page appears. From the Oracle Cloud menu, select Setup, then select Request Settings.
-
You can specify the following settings:
-
Future Reservation: How far in advance can a request be made.
-
Request Archive Retention: Period for which archived requests are stored before they are automatically deleted by the system.
-
Request Duration: Maximum duration for which requests can be made.
-
Service Instance Share Settings: You can choose to share the service instance with other users or roles by selecting either of the following checkboxes.
-
Enable SSA User to share service instances with other Users
-
Enable SSA User to share service instances with Roles
Note: By default, service instances are not shared with users or roles.
-
-
-
Click Apply.

Request settings can be defined for all services or a specific service family, service type or role. The most restrictive value of request settings is taken from all matched values. "No Restriction" on a level means the setting is not applied at this level and will not be considered in evaluating final value.For example, if a user requests a schema service and the Request Duration settings are as follows: All Services 30 Days, Database family 10 days, Schema service type (Global) 5 days, and Schema service type (SSAUser1 Role) 3 days. Then the most restrictive setting, 3 days from the Schema service type (SSAUser1 Role) setting, will be applied.
Share Service Instance Settings are taken from the highest enabled level. For example, if sharing is enabled for All Services, then sharing is allowed for all users regardless of any lower level settings. To turn off sharing for the Middleware family, you must first disable sharing at the All Services level, then disable sharing for the Middleware family and enable sharing for the other families.Any modified settings must be saved before making another selection. Any changes not yet applied will be discarded.
11.2.4 Setting Up Quotas
Quota is the aggregate amount of resources that can be granted to each self service user belonging to a certain role. This quota applies only to the databases provisioned through the Database Cloud Self Service Portal. To set up quotas, follow these steps:
-
Log into Enterprise Manager as a user with the
EM_SSA_ADMINISTRATORrole. -
From the Cloud menu, select Cloud Home. The Cloud Home page appears. From the Oracle Cloud menu, select Quotas.
-
Click the Databases link on the left hand side. The quota definition page appears. Click Create.
Note:
Quota validation ensures that a request is executed only if the user's current usage is within the limits specified for the roles to which the user belongs. Only the direct roles are considered for the quota determination, and not nested ones. -
In the Create New Quota window, select the Role Name for which the quota is to be granted. Only roles that have the
EM_SSA_USERprivileges are displayed in the Select Roles dialog box. After you have selected the role, enter the following details:-
Memory: Total allocated memory that can be assigned for all the databases owned by a specific user. This should be the total memory used by all:
-
Databases
-
Schemas requested
-
Pluggable Databases
-
-
Storage: Total allocated storage that can be assigned for all the databases owned by a user. This should be total storage used by all:
-
Databases
-
Schemas requested
-
Pluggable Databases
Note:
Storage used for backups is not included here.
-
-
Number of Database Requests: The number of databases that can be requested by a user at any point in time. The standby databases created as part of database requests will not be included in this quota. But the storage and memory values for the standby databases will be added to the total allocated storage and memory.
-
Number of Schema Service Requests: The number of database services that can be requested by the user.
-
Number of Pluggable Database Service Requests: The number of PDBs that can be requested by the user.
For example, if a user has 3 roles with quota setup for each role as shown in the table below:
Role Name Attribute Value Dev Role Memory 30 GB Storage 40 GB DB Requests 10 Schema Requests 2 PDB Requests 3 Test Role Memory 40 GB Storage 60 GB DB Requests 12 Schema Requests 3 PDB Requests 5 PM Role Memory Quota not set Storage Quota not set DB Requests Quota not set Schema Requests Quota not set PDB Requests Quota not set The quota limits for each of the attributes would be determined based on all the roles to which a user directly belongs. The quota is calculated as the absolute maximum across the roles for each attribute value. For the user who belongs to the Dev, Test, and PM Role, the Quota is calculated as:
Value for Memory = MAX (Dev, Test, PM) = MAX (2, 5, NA) = 5 GBValue for Storage = MAX (Dev, Test, PM) = MAX (15, 10, NA) = 15 GBValue for DB Requests = MAX (Dev, Test, PM) = MAX (10, 12, NA) = 12 DatabasesValue for Schema Requests = MAX (Dev, Test, PM) = MAX (2, 3, NA) = 5 Database ServicesValue for PDB Requests = MAX (Dev, Test, PM) = MAX (3, 5, NA) = 8 PDB ServicesA sample quota validation log generated by the user request follows:
Quota validation: ================================================================== Quota Details ================================================================== Total resources avaialble Memory: 15 Storage: 20 Number of Database Instances: 5 Number of Schema Services: 5 Number of Pluggable Databases: 10 ================================================================== Current Usage ================================================================== Memory: 0.0 Storage: 0.0 Number of Database Instances: 0.0 Number of Database Services: 0.0 ================================================================== Requested Resource ================================================================== Memory: 0.681640625 Number Of Databases: 1 Storage: 0.681640625 ----------------------------------------------------------- Quota validation for 'Memory' ----------------------------------------------------------- Allocated Resource: 15.0 Current Usage: 0.0 Requested: 0.681640625 ------------------ Remaining Resource After Allocation: 14.318359375 ------------------- Result: Passed ----------------------------------------------------------- Quota validation for 'Storage' ----------------------------------------------------------- Allocated Resource: 20.0 Current Usage: 0.0 Requested: 0.681640625 ------------------ Remaining Resource After Allocation: 19.318359375 ------------------- Result: Passed ---------------------------------------------------------- Quota validation for 'Number of Database Instances' ---------------------------------------------------------- Allocated Resource: 5.0 Current Usage: 0.0 Requested: 1.0 ------------------ Remaining Resource After Allocation: 4.0 ------------------- -