2 Initial DIVAdirector Configuration
You must continue to configure Oracle DIVAdirector after the Oracle Delivery and Installation Team has completed the initial installation. You typically complete the initial configuration tasks in this chapter one time unless there are major system or network changes (for example if IP addressing changes, port numbers change, and so on).
Change the Administrative Password
The Oracle Installation Technician installs DIVAdirector using a default administrative login and password, both of which are admin (all lowercase).
Note:
You must immediately change the DIVAdirector administrative password to fully secure the DIVAdirector Server host computer.Unauthorized users can gain full access to the DIVAdirector software and server host computer if you leave the default administrator password unchanged and do not secure the Windows operating system.
-
Log in to the DIVAdirector GUI.
-
Navigate to Admin, and then Personal Settings in the navigation tree on the left.
-
Enter the existing default password (
admin) in the Password field. -
Enter the new password in the New Password field (passwords are case-sensitive). You must use a secure password.
-
Enter the new password in the Confirm Password field.
-
Click Save on the top right of the screen to save the new password.
Log out of the system and then log back in to confirm that the new password was accepted by the system.
Configure DIVAdirector Server Connectivity
DIVAdirector connectivity to DIVArchive requires setting proper values for the communication parameters. The Installation Team set the initial connection parameters during installation. Confirm that the values are correct before proceeding.
Accessing the Configuration Screens
You use both the DIVAdirector GUI and the DIVAdirector Configuration Mode to confirm and (if necessary) reset the communication parameters. The proper interface for each parameter is identified in the following steps:Use the following procedure to confirm (or reset) the preset system connection parameters in the DIVAdirector GUI:
-
Open your web browser.
-
Enter the server host's IP address in the URL Address field.
-
Press Enter to open the DIVAdirector GUI.
-
Log in to DIVAdirector. Use your DIVAdirector Administrator login and password.
-
Navigate to Admin, and then System in the navigation tree on the left of the screen.
Use the following procedure to confirm (or reset) the preset connection parameters restart the DIVAdirector server in Configuration Mode:
-
From the Windows Start menu select All Programs, FPDI DIVAdirector 5, and then Stop DIVAdirector Server.
-
From the Windows Start menu select All Programs, FPDI DIVAdirector 5, and then DIVAdirector Server Configuration.
-
Click the DIVAdirector tray icon to open the Status screen.
-
Right-click the Status screen.
-
From the Status screen select Configure Settings on the displayed context menu - the full configuration screen will be displayed.
Confirm DIVAdirector Server Network Connections
Select the DIVAdirector Server network connection values in the DIVAdirector GUI on the Server Settings screen.
-
Navigate to Admin, System, and then DIVAdirector Server Settings in the navigation tree on the left of the screen.
-
Confirm the DIVAdirector Server IP Address. If the IP address does not match the server host's address enter the correct address.
The IP address identifies the DIVAdirector Server host computer and is typically the same computer where the web server resides. You can use
localhostas the IP address when all DIVAdirector software is on the same host computer. -
Confirm the DIVAdirector Server Port Number. If the port number does not match the server host's port number enter the correct value.
-
In the top right corner of the screen, click Save to save your changes.
-
Stop the server, and then restart it in Configuration Mode.
Next you are confirming the DIVAdirector Database connectivity.
Confirm DIVAdirector Database Connectivity
WARNING:
Do not change any database parameters unless instructed to do so by Oracle Support.
The DIVAdirector database synchronizes periodically with the DIVArchive database according to a predetermined schedule. If DIVAdirector Server cannot communicate with the database, users will have no content to work with in the GUI.
-
On the top right of the DIVAdirector Server Configuration screen confirm that the DIVAdirector Database parameter values are correct.
-
Confirm that the User ID value is either
SYSTEMorpostgres. -
The Password was set by the Oracle Installation Team and only displays asterisks in the field.
-
Confirm that the DSN value is either
DIVAdirectororDIVAdirectorPG. -
If any value is incorrect, or DIVAdirector cannot connect to the database, notify the Installation Technician (if they are still on site), or contact Oracle Support.
Next you are confirming the TCP Connection Port, Oracle SAMMAsolo Support, and the DIVArchive API release level.
Confirm TCP Connection Port
The DIVAdirector Server listens on TCP port number 7680 for user interface commands. Do not modify the default port number unless it conflicts with other software installed on the system (for example if another web server uses this port number).
-
On the top left of the DIVAdirector Server Configuration screen confirm that the TCP connection port parameter value is 7680.
-
If the port number is incorrect change the value to port 7680 (unless this port number will cause a conflict).
-
A warning dialog box appears reminding you to restart the server for the change to take effect.
-
Click OK in the dialog box.
-
Restart the server in Configuration Mode.
Next you are confirming the SAMMAsolo Support.
Confirm SAMMAsolo Support
DIVAdirector has support for communicating with SAMMAsolo. Check with your manager if you are uncertain whether your organization uses SAMMAsolo.
-
Locate the Solo Support check box immediately below the TCP connection port parameter on the Configuration Mode settings screen.
Selecting the check box adds
SoloSupport=1setting to the[Settings]parameter group in thecmgserver.inifile. Any setting changes will not take effect until the server is restarted. -
If SAMMAsolo is not in use, deselecting the check box to disable the feature.
-
If you made any changes restart the server in Configuration Mode.
Confirm DIVArchive Application Programming Interface (API) Release
DIVArchive uses an API for interaction with external third party and custom applications. You must tell DIVAdirector which DIVArchive API release to use between DIVAdirector and any third party or custom applications in use within your organization. Check with your manager if you are uncertain whether any third party or custom applications are in use.
Use the steps below only if the selected API release is not correct for your DIVArchive system's existing configuration; otherwise skip this procedure and continue to the following section. The selected API release level should be the same release the third party and custom applications are using.
-
Locate the DIVA API GL list immediately below the Solo Support check box on the Configuration Mode settings screen.
-
Click the button showing the currently configured API release number.
-
A dialog box appears with a warning that any API changes will not take effect until DIVAdirector is restarted.
-
Select the required API release number from the Stored setting list.
-
Click OK to save the changes.
-
If you made any changes restart the server.
Next you are going to confirm the DIVArchive Manager communications.
Configure Oracle DIVArchive Manager Connectivity
The Oracle DIVArchive Manager is the main operator for the DIVArchive system. All operation requests go through the Manager. The Manager queues requests according to the request priority set by the user when the request was initiated. The Manager forwards the requests (highest priority first) to the Oracle DIVArchive Actor. The Actor carries out the requests and reports the results back to the Manager. The Manager displays the results in the DIVArchive GUI, and forwards the results to DIVAdirector for users to review the outcome.
Confirm correct values for the Manager's IP address and listening port number to insure communication between DIVAdirector and the DIVArchive Manager.
-
Locate the DIVArchive Manager area immediately below the General area on the left of the Configuration Mode settings screen.
-
Confirm that the manager's IP address is correct. If incorrect, enter the correct IP address in the Address field.
-
Confirm that the listening port number is correct - typically port number 9500. If incorrect, enter the correct port number in the Port field.
-
Normally you would select the Re-connect automatically check box to have DIVAdirector automatically attempt to reconnect to the DIVArchive Manager if the link goes offline.
-
If the network or the DIVArchive Manager is down, deselect the Re-connect automatically check box until connectivity is restored.
You will have to reconnect to the manager manually using the Connect to DIVArchive Manager context menu item when this option is disabled. Right-click the DIVAdirector Server Configuration Settings screen to open the context menu.
Next you will configure the DIVAdirector User Interface (UI).
Configure DIVAdirector User Interface (UI)
Now that all of the network and system connectivity has been configured you must configure the internal system parameters that affect how users interact with DIVAdirector and DIVArchive. To configure the DIVAdirector user interface navigate to the Admin, and then System in the navigation tree on the left of the GUI screen.
First configure the system settings.
System Settings
The Defaults screen has two sections where you configure different options such as resolution, search result limits, date and time display, and so on. These options are located in the Default Settings area at the top of the screen. You configure options for deleting data and files related to local restore and local partial file restore, DIVArchive status, audit trails, and scheduled backups in the Number of Days to Delete area on the bottom of the screen.
-
Navigate to Admin, System, and then Defaults in the navigation tree on the left of the screen.
-
Enter the appropriate values for each option that are optimal for your organization and users.
As the System Administrator you can identify most of these values according to existing organizational policies and your physical location, such as calendar display format, time display format, number of days to retain system backups, number of days to retain audit trails, and so on. You may need to consult with your users (or their managers) to identify options such as proxy resolution width and height, SAMMA thumbnail count, capture frame offset, and so on.
The following fields are configurable in the Default Settings area of the screen:
- Search Results Limit
-
Identifies the number of search results to be displayed simultaneously.
- Default Results Sort Order
-
Defines a metadata column that is used as the primary source for sorting.
- Capture Frame Offset
-
Defines the count of frames which must be skipped from the beginning of a proxy while extracting key frames from the dropped proxy file.
- SAMMA Thumbnail Count
-
Defines the number of thumbnails to use within a SAMMA thumbnail control.
- Key Frame Count
-
Defines the number of key frames that will be extracted from a dropped proxy file.
- Proxy Resolution Width
-
Defines the resolution width in pixels.
- Proxy Resolution Height
-
Defines the resolution height in pixels. This parameter maintains an aspect ratio with the Proxy Resolution Width if 0 is entered for the value.
- Date Display Format
-
Defines the format used for all date-type fields in DIVAdirector.
The list includes three format options.
-
American -
mm/dd/yyyy -
European -
dd/mm/yyyy -
Custom - This option does not support any codes except
dd,mm,yy, andyyyy. The order of the codes is arbitrary and can be whatever the administrator defines. This can be defined in a relatively free-style format, for exampleyyyy.dd.mm.The allowed separator symbols are a space, period, comma, underscore, hyphen, colon, slash (/), and backward slash (\).
-
- Time Display Format
-
Defines whether the time is displayed in 12-hour or 24-hour format.
- Calendar Display Format
-
Defines the first day of the week in the calendar.
- Max Metadata Label Length in Tooltip
-
Defines the maximum number of characters to display in the Tooltips label. If the metadata field title exceeds this setting it will be truncated with three dots at the end.
- Max Metadata Value Length in Tooltip
-
Defines the maximum number of characters to display in Tooltips content. If the metadata field value exceeds this setting it will be truncated with three dots at the end.
The following fields are configurable in the Number of Days to Delete area of the screen:
- Local Restore and Local Partial Restore Files
-
Defines the number of days to keep the files that have been restored to the DIVAdirector Server host computer through a local restore or local partial restore operation.
- DIVArchive Status
-
Defines the number of days to keep the DIVArchive status information on the Assets/Operation Status screen.
- Audit Trail
-
Defines the number of days to keep audit trail information.
- Scheduled Backups
-
Defines the number of days to keep backup files created by scheduled backups.
Next you will configure the System Policies.
System Policies
The system policy parameters define the system level update interactions between DIVAdirector and DIVArchive such as discovery of new data (assets), user request status updates, whether to delete a file entry from the database, and so on.
-
Navigate to Admin, System, and then Policies in the navigation tree on the left of the GUI.
-
Enter the appropriate values for each option that are optimal for your organization and users. You should consult with your manager and your user's manager to determine the most effective and safest (for your data) configuration.
The following fields are configurable on the Policies screen:
- Asset Discovery
-
Defines the automatic synchronization schedule. The first list defines the frequency and the second list defines the start time.
- Update Request Status
-
Defines how often the DIVAdirector Server requests the DIVArchive operational status from DIVArchive.
- Delete from DB
-
Responsible for deleting objects that were not found during database synchronization from the DIVAdirector database. When the check box is selected the objects that were not found will be deleted. When the check box is deselected the objects will not be removed.
- Delete Proxy
-
Responsible for deleting the proxy files and the corresponding registration in the DIVAdirector database for the proxy files not located during database synchronization. When the check box is selected the files that were not found will be deleted. When the check box is deselected the files will not be removed.
- Log License Operations
-
Responsible for logging of the license operations to a file.
Next you will configure the Database Synchronization Filtering.
Database Synchronization Filtering
The DIVAdirector system is populated automatically from a scheduled synchronization process performed periodically according to the Asset Discovery value on the Policies screen (refer to the previous section). You configure the database synchronization filters on the Discover screen.Synchronization filters define which objects are processed during synchronization. Each synchronization filter represents a combination of an object's parameters such as object name, object category and media name, and has its own time of last synchronization. Parameters can be defined as masks with a wildcard (an asterisk). By default the asterisk will be set for fields that are empty. Filters with an asterisk in all three fields are invalid and cannot be added to the filter list.If you add a new filter after all objects corresponding to existing filters were synchronized and then click Discover New, the object corresponding to the new filter will also be synchronized.The next discovery cycle can be initiated immediately using one of two buttons:
-
The Discover All button initiates the synchronization of all objects in the DIVArchive database based on the entire DIVArchive history. This option can take a long time if there are a lot of objects to be discovered. All objects currently known to DIVAdirector are marked as foreign. After synchronization is complete, all objects unknown to DIVArchive retain their foreign mark and are removed because they remained foreign.
-
The Discover New button initiates the synchronization of all objects added or removed since the last database synchronization was performed.
Use the following procedure to add a new synchronization filter:
-
Navigate to Admin, System, and then Discover in the navigation tree on the left of the GUI.
-
Click Add on the top right of the screen to add a new filter.
-
Enter the Object Name, Object Category and (if known and desired) Media Name fields. At least one of these fields must be entered to be added to the filters list.
-
Select the Enable check box to enable the filter.
-
Click the Check Mark to save the filter to the list or the X to cancel the operation.
Test the configuration by dropping a new file into one of the storage locations on DIVArchive and click Discover New. The file should be found and registered in the DIVAdirector database. You can validate the database registration by running a search for the file from DIVAdirector using the Quick Search field on the top right of the screen.
Next you will configure the Keyboard Shortcuts.
Configure Keyboard Shortcuts
Keyboard shortcuts save you, and your users, time performing common, routine procedures during your daily work tasks. DIVAdirector has hot key combinations that are predefined and configured automatically during installation.The Proxy Player can be run in two different modes; Shotlist Mode and Proxy Player Mode. There are two corresponding subsections in the System, Shortcuts navigation tree - one for each mode. Each subsection defines the keyboard bindings for the player in that specific mode. You should assign keyboard shortcuts for the Proxy Player in each mode.The following hot key combinations are predefined in the DIVAdirector system:
- Ctrl + E
-
Edit
- Shift + 1
-
Rewind x4
- Shift + 2
-
Rewind x8
- Shift + 3
-
Fast Forward x4
- Shift + 4
-
Fast Forward x8
- Shift + A
-
Add
- Shift + B
-
Frame Back
- Shift + D
-
Decrease Volume
- Shift + F
-
Forward
- Shift + I
-
Mark In
- Shift + L
-
Loop
- Shift + M
-
Mute
- Shift + N
-
Frame Forward
- Shift + O
-
Mark Out
- Shift + P
-
Play / Pause
- Shift + R
-
Rewind
- Shift + S
-
Stop
- Shift + T
-
Switch Time Format
- Shift + U
-
Increase Volume
- Shift + X
-
Mark Out and Add
WARNING:
It is necessary to be careful during configuration of keyboard shortcuts because they may coincide with hot keys of internet browsers or other software, causing users to get unexpected results.
Use the following procedure to change the shortcut key combinations for either sub-section:
-
Navigate to Admin, System, Shortcuts, Shotlist Shortcuts, or to System, Shortcuts, Player Shortcuts in the navigation tree as applicable.
-
Click the Pencil icon to edit the desired hot key combination.
-
Select the required combination of Control+Shift+[key].
-
Click the Check Mark to save the changes.
-
Test all of the configured hot keys, one at a time, to ensure there are no conflicts with other applications installed on the system.
Shotlist Shortcuts
You configure hot keys used to perform routine functions with the Proxy Player in Shotlist Mode on the Shotlist Shortcuts screen in the Shortcuts navigation tree on the left of the screen. Click the Pencil icon to edit existing shortcut combinations.
Proxy Player Shortcuts
The Proxy Player is the default player mode. You configure hot keys used to perform functions with the Proxy Player in the default Play mode on the Player Shortcuts screen in the Shortcuts menu tree on the left of the screen. Click the Pencil icon to edit existing shortcut combinations.
Next you will add your organization's logo.
Style
If required (or desired), you can quickly customize the interface style with an organizational logo that appears on all GUI screens in the top right corner of the screen. Use the following procedure to add a logo:
-
Navigate to Admin, System, Style in the navigation tree on the left of the GUI.
-
Click Browse and navigate to the desired image file in the browse dialog box that appears.
-
Select the desired file and click OK.
-
Click Save on the top right of the screen to apply the changes.
-
Refresh the browser screen to view the changes.
Next you will configure the DIVAdirector Web Server.
Configure DIVAdirector Web Server
DIVAdirector uses Microsoft Internet Information Server (IIS) 7 as the web server engine, and it should be operational before the Installation Team arrives.The DIVAdirector Web Server is fully configured by the installation application. Unless specific web server parameters require modification, there is no need to adjust the configuration. The default Listening Port is port 80 and will bind to the first network adapter in the system device list. Contact Oracle Support for assistance to bind the server to a different network adapter.
First configure the Listening Port.
Listening Port Configuration
WARNING:
Under normal conditions the web server port number does not need to be changed. However, on a DIVAdirector 4 to DIVAdirector 5 upgrade where you want to maintain operations with DIVAdirector 4, the port must be changed to avoid conflicts with the Apache Web Server used in DIVAdirector 4.
The default Listening Port value is 80. This is the standard internet HTTP port for web servers. This value may be any port number not being used in the system and should be changed if port 80 is unavailable. DIVAdirector Server must be restarted to apply a change to a new port number.
Note:
After changing the server port number, DIVAdirector users may be required to explicitly specify the port number in the web address similar to:http://dd5server:8080
If changes are made to the Listening Port, you should test the web server configuration by opening your web browser and entering the DIVAdirector IP address (and port number if required) in the URL Address field.
Next you will configure the IIS Service Account.
Storage Location Configuration
In DIVArchive and DIVAdirector, a single storage location can be used as both a source of data and a destination for data. The difference is in the actions being performed. For example, Tape Storage-A can be defined as a source for file restore, or partial file restore operations. However, Tape Storage-A can also be designated as a destination for archive and copy operations. You configure the storage locations and identify them as a source, a destination, or both in DIVArchive. DIVAdirector will use the storage locations as they are identified in DIVArchive.
Next you will configure Drop Folders.
Drop Folder Configuration
Drop Folders are directories on a storage location where users place (drop) files and actions are performed on the files. Drop Folders make your (and your users) work tasks much easier because you simply drop objects in the folder and the folder executes the action specifically configured for that folder.
DIVAdirector monitors the Drop Folders for new additions and other file changes and updates the database information accordingly. Each Drop Folder has its own configuration file, and can execute a single action (proxy, metadata, analysis, archive, restore, copy, or purge). Explanations of these actions and the associated parameters are in the following sections.There are two main categories of Drop Folders: Proxy File Folders and Import File Folders. The system monitors Proxy Drop Folders for immediate file-drop processing. All Proxy Drop Folders are automatically processed by a timer with a one minute interval. The system monitors Import Drop Folders either for immediate file-drop processing or for processing according to a schedule of events.For more detailed information about Drop Folders see to the Oracle DIVArchive DFM User's Guide.
Import Drop Folders
An Import Drop Folder can be monitored either for immediate file-drop processing or for processing based on scheduled events. The full folder scan is performed on any type of event (immediate or scheduled), and each discovered file (except files with special names) is processed according to the folder's configuration. You must understand the configuration options set for the Drop Folders to configure them effectively.
Files with Special Names
There are two types of files considered to have special names.
-
The Drop Folder's XML configuration file has a file name that includes the folder name plus a
.xmlextension. This file is never processed by the system and specifies the configuration for the folder. You can open this file in any Unicode text editor to view or edit the configuration as necessary. -
Temporary files, or files you want to keep in the folder, have file names that begin with two leading tilde (~~) symbols. These files are never processed by the system.
Files dropped into Import Drop Folders will trigger ACTION data. The parameters mentioned here are discussed in "Drop Folder Configuration.". The dropped files are processed as follows:
-
According to the folder FORMAT configured value, the file is either processed as a flat file (similar to the Comma Separated Values (CSV) format) or as an XML file.
-
According to the HEADER_ROW configured value, the first non-empty line is either skipped or processed.
-
Each following line is then parsed for fields and the set of fields is used for a single import action.
-
When the end of the file is reached, the original file is either deleted or left in the folder depending upon the DELETE_AFTER_PROCESS configured value.
-
Each import action is logged in a way that corresponds to the folder settings.
Annotation Import
Annotation import is a case requiring specific folders and specific file formatting to be successful. Pay particular attention to the following instructions if you are going to be importing annotation files.
The Drop Folder configuration file is located at C:\Program Files (x86)\DIVAdirector 5\Tools\DDServices\DIVADirectorServices.exe.config. Use the following procedure to confirm proper configuration for importing annotation files:
-
Navigate to
C:\Program Files (x86)\DIVAdirector 5\Tools\DDServices. -
Open the
DIVADirectorServices.exe.configfile with a plain text editor. -
Locate the line in the file with the following text:
<annotationImport fileFilters="*.csv" watchPath="C:\Program Files (x86)\DIVAdirector 5\Tools\DDServices\watch" errorPath="C:\Program Files (x86)\DIVAdirector 5\Tools\DDServices\error" backupPath="C:\Program Files (x86)\DIVAdirector 5\Tools\DDServices\backup" />
The following three folders (identified on the line in the configuration file) must exist on the system:
-
C:\Program Files (x86)\DIVAdirector 5\Tools\DDServices\watch
-
C:\Program Files (x86)\DIVAdirector 5\Tools\DDServices\error
-
C:\Program Files (x86)\DIVAdirector 5\Tools\DDServices\backup
-
-
Check the local system to confirm that the folders listed do exist. If they do not exist you must create them.
Any files placed into the Drop Folder must be formatted exactly as follows:
Header
"objectname","category","","time_in","time_out","comment"
The import will not work if the Header or the blank space between "category" and "time" do not exist.
Proxy Drop Folders
Proxy Drop Folders are special-purpose Drop Folders used to import DIVAdirector proxy files (media files using Windows Media 9.0 audio and video format). The import is executed by monitoring the Windows File Change notifications, if the folder's INTERVAL parameter is configured for IMMEDIATELY. The system also re-scans every Proxy Drop Folder at a one minute interval to automatically process the files that have not yet been handled.The Transcoding Engine typically writes the proxy file directly into the Proxy Drop Folder. The Proxy Drop Folder is then processed on each file system notification event and when the file write operation finishes, the file is processed according to the DIVAdirector system default setting as follows:
-
The file name is parsed for object name, category and language.
You configure the file name format in the folder's
.xmlfile using the NAME_FORMAT parameter. The NAME_FORMAT can either be OBJECT NAME ONLY or OBJECT NAME + OBJECT CATEGORY. In the latter case, the last underscore character separates the object category from the object name.You configure the language format in the folder's.xmlfile using the LANGUAGE parameter, which can either be FROM NAME or FROM WM9 METADATA. In the former case, the last underscore symbol separates the language name from the object name (+Category), and the category is defined by the previous rule.In the latter case, the language name value is retrieved from within the media file and the internal Windows Media 9 format language tag is used.Note:
The language name has literal language meaning only in cases of the embedded language. In other cases, it may have any informative value denoting, for example, director's commentary, sound effects channels, and so on. This allows the ability to distinguish between several alternative audio tracks related to the same video material. -
The DIVArchive object is searched by parsed name and category values.
-
If the object is present in the DIVAdirector database, the proxy is registered to this object.
-
If the object is not present in the DIVAdirector database but appears to be known to DIVArchive, the new object is inserted into the DIVAdirector database and the proxy is registered.
This situation may occur when the proxy is dropped before the DIVAdirector database's next synchronization cycle. If the object is not present in the DIVAdirector database and there is no active connection to DIVArchive, the proxy file remains intact in the Drop Folder (the file gets frozen). It will then be processed the next time another proxy arrives in the folder.
-
A proxy that was not frozen in a Drop Folder is moved to one of the storage locations (destination).
-
The registered proxy is moved into a random subfolder of a proxy folder. The subfolders are named 0 to 500.
-
The unregistered proxy is moved to a predefined Orphan folder. You must check Orphan folders at least on a daily basis and decide what to do with orphaned objects.
Metadata Drop Folders
The Metadata Drop Folder provides a list-based metadata processing feature to import metadata into DIVAdirector from any input file. The metadata processing feature allows an XML file to define field mapping between the metadata fields in the input file and the metadata fields in the DIVAdirector database.The main mechanism used by the Metadata Drop Folder is the metadata Column-To-Field mapping. Therefore, a flat file record's fields, depending on their order number, are mapped to the corresponding field definitions.The Drop Folder field collection may not contain all the metadata column's definitions. The field collection must have a mandatory mapping to the object name and an unambiguous object category; resolving either by explicit column mapping or by the general OBJECT_CATEGORY Drop Folder parameter.The flat file records are split by the characters identified as the folder's separator value and each field is interpreted according to the mapped metadata column type. For example, a column of INTEGER type cannot accept non-numeric data and produces a run time error.The DATE/TIME column type has additional configuration regarding textual date and time value interpreting. The DTMASK parameter defines the field's format pattern and only the following format patterns are allowed:
-
MM= month -
DD= day of the month -
YYYY= year -
hh= hours -
mm= minutes -
ss= seconds -
ff= fractions of a second
Field values can be processed based on the character case and removal of white-space characters before putting these values into the DIVAdirector database.Not found objects are controlled by the MATCHING_OBJECT_NOT_FOUND Drop Folder parameter. For the CREATE_VIRTUAL_OBJECT value, if the object is not present in the DIVAdirector database the new virtual object is inserted into the DIVAdirector database.
Annotation Drop Folders
Annotation Drop folders allow CSV files to be placed into the folder for importing locator metadata for the objects specified in the file.The following conditions apply to the CSV file:
-
The file must be in Unicode, UTF-8 encoding.
-
The file must contain a header row.
-
The file must contain six columns as follows:
- Object Name
-
This column is limited to two hundred characters and should match the object name in DIVArchive.
- Category Name
-
This column is limited to two hundred characters and should match the object category name in DIVArchive.
- Object Identifier
-
A show name or other object-specific identifier.
- Start Time Code
-
Start time of the locator in the format
hh:mm:ss:ff. - End Time code
-
End time of the locator in the format
hh:mm:ss:ff. This field is not mandatory and if empty, the locator is considered a marker (description of a single frame). - Description
-
This column is limited to two thousand characters and is a text description of the locator (marker).
Next you will add a new Import Drop Folder.
Adding New Import Drop Folders
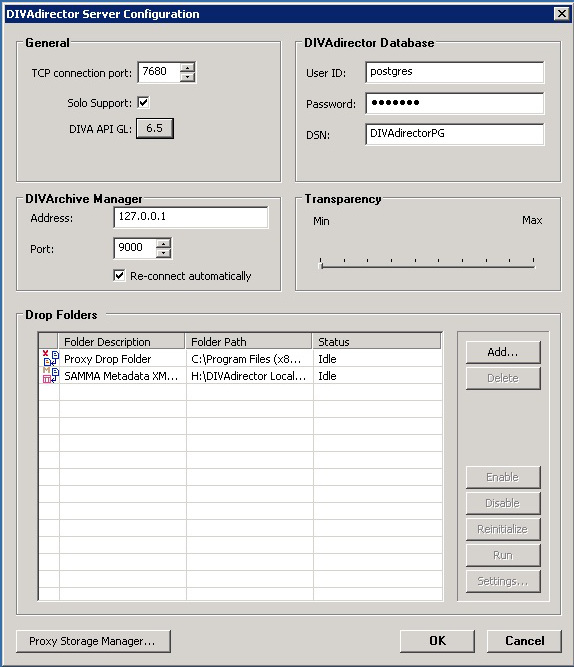
You must create and configure Drop Folders for use in DIVAdirector, they are not added during installation. The Drop Folder area is located at the bottom of the DIVAdirector Configuration Mode Settings screen. To perform operations on any listed Drop Folder, select the folder from the list and click the button associated with the desired action. The buttons are located within the Drop Folders area on the right of the screen and include the following actions:
- Add
-
Adds a new Drop Folder to the list of available Drop Folders.
- Delete
-
Deletes the Drop Folder selected in the Drop Folders List.
- Enable
-
Existing Drop Folders are either enabled or disabled. Once enabled, a disabled Drop Folder becomes ready to process future Drop Folder events. Enabling a Drop Folder does not trigger its immediate processing, even if the currently enabled folder is not empty. The folder will only be processed during the next event it is configured to run (unless you click Run).
- Disable
-
A disabled Drop Folder does not provide any file processing, but remains in the configured Drop Folders list and retains its previously set configuration.
- Reinitialize
-
This will reinitialize a Drop Folder after manual configuration changes have been made directly in the configuration file (rather than through the XML Wizard).
- Run
-
This will cause the selected Drop Folder to process all configured actions immediately.
- Settings
-
Users can reconfigure any Drop Folder at run-time if the preset configuration does not suite their current needs. This operation does not require the DIVAdirector Server to be restarted. To change the Drop Folder configuration using the XML Wizard, select the folder in the list and click Settings.
You use the following procedure to add a new Drop Folder to the system. Once the folder is added you will need to configure it either using the XML Wizard or editing the folder's XML configuration file directly with any Unicode-compatible editor.
Use the following procedure to add a new folder to the Drop Folder list:
-
Click Add on the top right of the Drop Folder section.
-
Locate and select (single mouse click to highlight the folder) the folder intended for use as a DIVAdirector Drop Folder in the Browse for Folders dialog box that appears.
-
Click OK on the bottom of the dialog box.
-
If the folder does not already contain an XML configuration file, a prompt to configure the folder using the XML Wizard will be displayed.
-
Proceed through the XML Wizard (if applicable) and click Run when finished to trigger immediate Drop Folder processing.
If you prefer editing the configuration file directly, you can do so using any Unicode-compatible text editor (like Notepad). Do not use programs like Microsoft Word to edit the configuration file because it adds extra characters to the file and will corrupt the configuration.
-
If you edited the configuration file directly, save the file as Unicode (plain text) and reinitialize the Drop Folder using the Reinitialize button on the right of the Drop Folder area.
-
Test the new folder's operation by dropping a file in the folder as a non-administrative user, and confirm that the configured action was executed correctly. For example, if you dropped a file into an ARCHIVE action Drop Folder, and the folder is configured to archive files to Storage-A, check Storage-A for the presence of the file you dropped into the folder.
Next you will add a new Proxy Drop Folder.
Adding New Proxy Drop Folders
All proxies registered in the DIVAdirector system are kept on Proxy Storage Disks. The DIVAdirector Server allows configuration and management of multiple proxy storage locations. You use the Proxy Storage Manager to manage and configure proxy storage locations. Access the Proxy Storage Manager by clicking Proxy Storage Manager on the bottom left of the DIVAdirector Configuration Mode Settings screen.The Proxy Storage Location is defined by the path to the folder on the file system (either a local location or network share). By default, one proxy location is added during DIVAdirector installation. The default location will be the C:\Program Files\DIVAdirector\proxies folder for a default installation. During a custom installation the location will be a folder selected by you and the installer.Each location has limited usable space on the storage device - the limit can either be relative or fixed. A relative limit is set as a percentage relative to the capacity of the storage device while a fixed limit is set in megabytes.
The Proxy Storage Manager allows users to view the following information about each proxy location on the Proxy Locations tab:
- Status Icon
-
An icon in the first column of the display that reflects the current state of the proxy location.
- Path
-
The path to the proxy location folder.
- Capacity
-
The total amount of space on the storage device where the proxy is located.
- Used
-
The space used in the proxy location, that is, the occupied space by all files in the folder at the moment.
- Used %
-
The percentage of used space relative to the limit.
- Available
-
The space available in the proxy location.
- Available %
-
The percentage of available space relative to the limit.
- Files
-
The number of files in the proxy location. It is not necessary for the proxies themselves to be registered in DIVAdirector - they are still residing on the storage location and using space.
- Limit
-
The amount of space which can be used on the storage device.
- Limit %
-
The percentage of limit space relative to the capacity of the storage device.
Use the following procedures to add a new Proxy Storage Location. First map the storage location to Windows and set the folder permissions.
Map the Storage Location to Windows and Set Folder Permissions
-
Map the storage location so that it is visible in Windows. A Universal Naming Convention (UNC) location must be mapped to a drive letter and folder before proceeding.
-
If the folder is a network drive, make sure it is set to auto-connect on Windows startup.
-
In the Windows explorer, right-click the folder and select Properties from the menu.
-
In the middle of the Security tab screen click Edit.
-
Click Add in the middle of the screen to add a new user to the folder's permissions.
-
When the Select Users or Groups dialog box appears, enter the IIS Web Server account (the default is
dd5-user) used during DIVAdirector installation in the Object Name text area (on the bottom of the screen) and click Check Names (to the right of the text area) to verify that the entered name is valid. -
When the user is verified click OK to add the user.
-
Repeat steps 5, 6, and 7 for Authenticated Users. Both users should now be added to the folder permissions and set correctly for the DIVAdirector Web Server.
Next you will add the Proxy Folder to the DIVAdirector Web Server.
Add the Proxy Folder to the DIVAdirector Web Server in IIS
-
Clicking the Windows Start button.
-
Enter
inetmgrin the search box - the search will begin automatically. -
When the
inetmgrprogram is displayed in the search results, double-click the program name to start the application. -
On the left of the IIS Manager screen click the host computer's computer name and then locate DIVAdirector 5 under the Sites menu.
-
Right-click DIVAdirector 5 and select Add Virtual Directory from the resulting context menu.
-
Enter the Alias and Physical path of the new proxy storage location.
-
Click OK to complete the process.
Next you will add the Proxy Location to the DIVAdirector Server.
Add the Proxy Location to DIVAdirector Server
For users to access the proxy location created in the previous steps, the location must be added to the DIVAdirector Server configuration.
-
Start DIVAdirector in Configuration Mode and open the settings screen.
-
Click Proxy Storage Manager on the bottom of the DIVAdirector Configuration Mode settings screen.
-
On the Proxy Storage Manager's Proxy Locations tab (opened by default) click New (two-thirds of the way down on the right of the screen).
-
Locate and select (single mouse click to highlight the folder) the folder where registered proxies will be stored in the Browse for Folders dialog box that appears.
Note:
The Proxy Location Path cannot be changed after it has been added. -
Click OK to add the selected folder to the list of proxy locations.
-
On the Proxy Storage Manager screen navigate to the Proxy URL Search List tab and click Add on the right of the screen.
-
Enter the Virtual Directory Name (this is the Alias Name entered into IIS) in the field located in the middle of the screen and click Set.
Next you will configure the storage size for the location you just added.
Configure the Proxy Location's Storage Size
-
In the Proxy Storage Manager, navigate to the Proxy Locations tab and select the proxy location you just added from the Proxy Storage Manager list. The options for the location become active at the bottom of the screen.
-
Select the type of limit (percentage or megabytes) desired using the Limit list.
-
Enter the limit size or percentage in the Limit field.
-
Click Apply Limit to apply the new limit and recalculate the used and available space of the selected proxy location.
Next you will configure the location filling strategy.
Configure the Proxy Location Filling Strategy
The filling strategy defines how the proxy storages are filled with files. You can select one of two strategies. The strategy chosen will depend upon the amount of storage available, number of storage locations available, internal organizational policies, and so on. The two available strategies are as follows:
- Waterfall
-
The proxy file always goes to the first storage location on the chain that has enough free space. The order of locations can be changed using Up or Down.
- Share Alike
-
The proxy file always goes to the less occupied storage location. This strategy spreads proxy files equally among storage locations.
If all registered storage locations have a status other than Open, the proxy file remains in the Proxy Drop Folder until another location is open and has enough free space to accept the file.
-
Select the appropriate Filling Strategy on the lower left of the Proxy Locations tab screen.
-
Use the Up or Down buttons to change the priority of the location.
-
On the bottom right of the screen click Close.
The addition and configuration of the new location is now complete. Test the new location by dropping a proxy file into the folder as a non-administrative user and then open the file with the Proxy Player.
The next section describes the operational state of proxy locations.
Proxy Location Operational States
Proxy locations can be in one of five possible operational states. Each state has its own Status Icon to graphically represent the current state of the location. Proxy locations can be in one of the following five states:
- Open
-
The Open state Status Icon is a green filled-in cylinder with no additional markings. This indicates that the limit value has not been reached for this proxy location. Open locations can accept new files, can be explicitly transitioned to the Closed state only, and can participate in migration tasks.
- Closed
-
The Closed state Status Icon is a yellow cylinder with a red X on top of it. This indicates that this proxy location does not accept new files. A closed location can be explicitly transitioned to the Open state only and can participate in migration tasks as the source but not as the destination.
- Overflown
-
The Overflown state Status Icon is a red cylinder with an exclamation mark on top of it. This indicates that the limit value has been reached for this proxy location. Overflown locations do not accept new files and cannot be transitioned to another state; however they can participate in migration tasks as the source but not as the destination. The filling strategy of the Proxy Storage Manager does not allow the overflowing of a location. Only external manipulations of the environment can result in this state of the storage location.
- Migration
-
The Migration state Status Icon is a pink cylinder with a double-headed arrow underneath it. This indicates that the proxy location is in the process of migration. The migration location does not accept new files and cannot be transitioned to another state until the migration process has completed.
- Unreachable
-
The Unreachable state Status Icon is a greyed out cylinder with a question mark on top of it. This indicates that the proxy location is not currently detected in the environment (the path is not found). An unreachable location cannot be transitioned to another state, migrated, or removed.
Now that you have added both Import and Proxy Drop Folders, configure the folders to perform the desired actions when a user drops a file into the folder.
Drop Folder Configuration
There are parameters that are common to all Drop Folders. The common parameters are interpreted identically for all Drop Folders, but they are configured separately for each Drop Folder. The following subsections describe the common parameters.
DESCRIPTION Parameter
You include a logical description for the function of a particular Drop Folder using the DESCRIPTION parameter. The description appears in the DIVAdirector Server configuration screen's Drop Folder section for easy reference and identification. You should make the Drop Folder description vivid enough for you and your users to know exactly what action is executed when a file is dropped into the folder.
ACTION Parameters
You identify the action to be performed on the files located within the Drop Folder using one of the ACTION parameters. Each Drop Folder can have only one action configured in the folder's XML configuration file. Each ACTION value has a distinct status icon associated with it. The ACTION setting can have the following possible values:
- METADATA (default)
-
The METADATA action icon consists of two files with an M in the top left corner of the icon. This action results in adding, updating, or deleting file metadata. This action does not affect the DIVArchive system content.
- PURGE
-
The PURGE action icon consists of a file with a trash can below it and a P in the top left corner. This action results in the deletion of a file or one of its instances in the DIVArchive system.
- RESTORE
-
The RESTORE action icon consists of a file on the top right with a drive at the bottom, and a red R on the top left. This action results in restoring a DIVArchive file on one of its destinations.
- COPY
-
The COPY action icon consists of two drives and a green C in the top left corner. This action results in copying a DIVArchive file instance, or instances, from one media to another.
- ARCHIVE
-
The ARCHIVE action icon consists of a file on the top right with a drive at the bottom, and a red A on the top left. This action results in archiving a set of files in the DIVArchive system and creation of a DIVArchive object (file container).
- PROXY
-
The PROXY action icon consists of two files and a red X on the top left. This action results in registering a DIVArchive proxy file in the DIVAdirector system. This action does not affect the DIVArchive system content.
- ANALYSIS
-
The ANALYSIS action icon consists of a file on the top right with a red container at the bottom and a green Q on the top left. This action results in adding, updating, or deleting summary metadata and analysis results. This action does not affect the DIVArchive system content.
- SAMMA METADATA
-
The SAMMA METADATA action icon consists of a file on the top right with a red container at the bottom and a green Q on the top left. This action results in moving SAMMAsolo generated metadata into the DIVAdirector's SAMMA metadata location.
PROXY Action
The PROXY action has specific values that can be applied for this action only. Users typically cannot access proxy storage directly because of security settings. The only way to play proxies is by logging into the DIVAdirector system as a user authorized to play proxies. The following list identifies each PROXY action-specific parameter, what it does, and how you should configure it.
- PATH
-
The PATH folder setting defines the root proxies folder used as proxy storage. Every proxy file is placed into randomly selected subfolders named 0 to 500. The path may be a fully qualified folder path; either network-shared or local to the DIVAdirector host. A network path must be specified in UNC format and mapped drive paths are not supported.
- URL
-
The URL folder setting defines the URL path relative to a DIVAdirector Web Server root path. This setting is used in DIVAdirector internally although it is already obsolete in reference to its actual definition. Therefore, it is safe to always set it to
/proxiesfor any Proxy Drop Folder. - ORPHAN
-
The ORPHAN folder setting is applied to the PROXY action and defines the full path where the unrecognized proxy files are placed. If a proxy is dropped and the file name is not lost, it is moved to the Orphan folder. This requires the administrator to periodically check the folder and decide what to do with any files located in the folder.
- OBJECT_CATEGORY
-
The OBJECT_CATEGORY setting defines which category should be associated with the dropped proxy. This setting is disabled if OBJECT NAME + OBJECT CATEGORY is selected in the NAME_FORMAT setting.
The OBJECT_CATEGORY setting can have one of the following values:
- Blank
-
This is the default setting. A file dropped in a Drop Folder with
filename.wmvas the file name will be matched with the first file found in the database with a matching object_name regardless of its category. - Single Object Category
-
This setting defines which category the matching file should be in for the association.
- Asterisk (*)
-
This setting causes a file dropped into a Drop Folder with
filename.wmvto be matched with all files found in the database with a matching object_name regardless of its category.
If the SoloSupport option is enabled, the system uses following process (in order) to determine how items are found:
-
The matching files will be found as is (case sensitive mode).
-
If no file was found, files will be found with a matching upper case object_name (the object_category remains as is).
-
If no file was found in Step 2, then files will be found with a matching upper case object_name and an upper case object_category.
- NAME_FORMAT
-
The NAME_FORMAT setting defines the proxy file name format to be used. The proxy file must be dropped into the Proxy Drop Folder to be correctly registered in DIVAdirector.
The NAME_FORMAT setting can have one of the following values:
- OBJECT NAME + OBJECT CATEGORY
-
DIVAdirector obtains the object name and object category from the file name. The object name and category must be separated by an underscore character - that is
objectname_objectcategory.wmv. - OBJECT NAME ONLY
-
DIVAdirector only gets the object name from the file name - that is
filename.wmv
- LANGUAGE
-
The LANGUAGE setting is responsible for how DIVAdirector defines the language in the audio proxy files. The LANGUAGE setting can have one of the following values:
- From Name
-
DIVAdirector gets the language from the
.wmafile name. The name must be formatted as follows to be successfully registered in the DIVAdirector database:-
OBJECT NAME + OBJECT CATEGORY
objectname_objectcategory.wmvobjectname_objectcategory_language.wma -
OBJECT NAME ONLY
objectname.wmvobjectname_language.wma
-
- From WM9 Metadata
-
DIVAdirector gets the language from the
.wmafile settings.-
OBJECT NAME + OBJECT CATEGORY
objectname_objectcategory.wmvobjectname_objectcategory.wma -
OBJECT NAME ONLY
objectname.wmvobjectname.wma
-
METADATA Action
Metadata is used for searching and locating objects in DIVAdirector. The METADATA action maps object names, categories, dates, times, and so on from the dropped object's metadata fields to the DIVAdirector database fields. The METADATA action has specific values only applicable to this action. The following list identifies each METADATA action-specific parameter, what it does, and how you should configure it.
- FIELD (Metadata Mapping)
-
The FIELD setting identifies how the metadata columns are interpreted and details the mapping between the fields in the input file and the required fields in the DIVAdirector system. For example, the mapping setting defines which field in the input file contains the OBJECT_NAME for the requested Drop Folder action. This particular mapping is mandatory for all supported actions and others may or may not be required depending upon the action.
If a field mapping is defined to a metadata field that does not exist within the DIVAdirector system (not defined or has been misspelled), the system will skip only the non-existent field mapping and continue processing the remainder of the record. An error is logged indicating that an incorrect mapping has been identified.
The metadata column name defined in DIVAdirector (on the Admin/Metadata screen) is the reference used when defining the Metadata Mapping in the XML configuration file and is defined once for a specific flat file format. You should verify proper mapping of the input fields to the correct metadata fields to reduce the potential for contamination of data within DIVAdirector.
The following example shows mapping definitions, including advanced data scrubbing and formatting settings configurable on a field by field basis.
<FIELD>
<ORDINAL>7</ORDINAL>
<MAPS_TO>embargo_date</MAPS_TO>
<DTMASK>DD.MM.YYYY</DTMASK>
</FIELD>

<FIELD>
<ORDINAL>18</ORDINAL>
<MAPS_TO>start_time</MAPS_TO>
<DTMASK>hh:mm:ss.ff</DTMASK>
</FIELD>
Mapped columns ignore the
<DTMASK>line except for the date and time fields.The ORDINAL setting indicates which field number in the input file is being referred to. The first field in the input file record is
ORDINAL="1", the second field in the input file record isORDINAL="2", and so on. In the previous example the input file field numbers are 7 and 18 respectively.Note:
It is important to understand that the field definition's order may not follow the ORDINAL numbering and the order may be arbitrary.The MAPS_TO setting indicates which field in DIVAdirector the particular metadata contained in the ORDINAL field should be mapped to. The MAPS_TO setting must exactly match the metadata fields configured in the metadata section of DIVAdirector. Additional metadata scrubbing and formatting settings include the following:
- DTMASK
-
The date and time mask.
- CASE
-
Converts the case of the text to force uppercase, lowercase, or leading case.
- SPACE_REMOVAL
-
Trims the leading or trailing spaces from a field.
Fields that are not included in the XML configuration file mapping are simply ignored by the DIVAdirector system.
- OBJECT_CATEGORY
-
The OBJECT_CATEGORY setting specifies the default object category value. This value combined with the OBJECT_NAME value in each record of the input file locates data in the database who's metadata will be updated.
The input file's OBJECT_CATEGORY value is used for searching within objects (data containers) - unless the field mapping in the XML configuration file for the Drop Folder includes a mapping for OBJECT_CATEGORY. The OBJECT_CATEGORY setting must contain a value, or a valid mapping for the OBJECT_CATEGORY must exist.If an asterisk was entered in the OBJECT_CATEGORY field the metadata will be updated for all objects found in the database with a matching OBJECT_NAME regardless of its category.If the SoloSupport option is turned on, the following process is used (in order) to determine how objects are found:
-
The matching objects will be found as is using case sensitive mode.
-
If no object was found, objects will be found with a matching OBJECT_NAME in upper case (OBJECT_CATEGORY remains as is).
-
If no object was found in Step 2, the objects will be searched by matching an OBJECT_NAME and OBJECT_CATEGORY in upper case.
-
- METADATA_ACTION
-
This setting specifies how the DIVAdirector Server should process metadata contained in the input file. This setting is only applicable when the ACTION is defined as METADATA. The metadata can either be present or missing, and the METADATA_ACTION setting specifies the action for the Drop Folder in either scenario.The METADATA_ACTION setting can have one of the following values:
- OVERWRITE
-
This is the default setting and forces overwriting for all configured, mapped fields. For a given column, the value in the dropped file is replaced with the value from the DIVArchive database.
- BLANK ONLY
-
This setting updates metadata only for blank fields in DIVAdirector. If the same value is saved, it is written only if no information for the given column is specified.
- METADATA_PROCESS
-
The METADATA_PROCESS setting specifies how the DIVAdirector Server should treat null fields in the input file. This setting is only applicable when the action is defined as METADATA.The METADATA_PROCESS setting can contain one of the following values:
- NORMAL
-
This (default) setting skips processing of the null input fields.
- DELETE NULL
-
This setting nullifies the associated field in DIVAdirector for each null field and the value is then resolved from the database.
- MATCHING_OBJECT_NOT_FOUND
-
The MATCHING_OBJECT_NOT_FOUND setting specifies what DIVAdirector Server should do with objects not found in the database. This setting is only applicable when the action is defined as METADATA.The MATCHING_OBJECT_NOT_FOUND setting can contain one of the following values:
- SKIP
-
This (default) setting returns an error in the resultant file.
- CREATE VIRTUAL OBJECT
-
This setting creates a virtual object.
ANALYSIS Action
The ANALYSIS action has specific values only applicable to this action. The ANALYSIS action checks dropped objects for proper formatting, encapsulation values and unrecognized (in the database) objects. If a dropped object is not formatted properly, has different encapsulation than configured for the folder, or does not exist in the database, the system identifies it as unrecognized and moves the object to a special Orphan folder. You must set a daily routine to check for orphaned objects and decide what to do with them - this is discussed in "Check for Orphaned Files.". The following list identifies each METADATA action-specific parameter, what it does, and how you should configure it.
- ORPHAN
-
The ORPHAN folder setting is applied to the ANALYSIS action and defines the full path where unrecognized input files are placed. If the input file is placed into a Drop Folder and its format is incorrect, or the object is not found in the DIVAdirector system, it is moved to the Orphan Folder.
- ENCAPSULATION
-
The default value for the ENCAPSULATION setting is a double quotation mark.
- RESULTANT_FILE
-
The default value for the RESULTANT_FILE setting is DISABLED.
ARCHIVE Action
The ARCHIVE action has specific values applicable to this action. Objects dropped into an ARCHIVE action folder are sent to storage locations designated in the folder's configuration as archiving storage. You should create an ARCHIVE Action Drop Folder for each designated archive storage location. The following list identifies each ARCHIVE action-specific parameter, what it does, and how you should configure it.
- COMMENTS
-
The COMMENTS setting specifies the default COMMENTS value for the ARCHIVE action.
- DELETE_ON_SOURCE
-
This setting instructs DIVArchive to delete the original set of files on the source after tape migration is complete.The DELETE_ON_SOURCE setting can have the values YES or NO. NO is the default value.
- FIELD (Record Field Mapping)
-
The meaning of this FIELD mapping differs from the metadata mapping previously described in "FIELD (Metadata Mapping).". This FIELD mapping introduces a set of variables embedded into the FILE_NAME_LIST and FILE_PATH_ROOT settings. The example below shows the configuration, but the variables must be expanded (replaced with the actual record field values) at the action's run-time.
<FIELD>
<ORDINAL>1</ORDINAL>
<MAPS_TO>[variableName1]</MAPS_TO>
</FIELD>

<FIELD>
<ORDINAL>7</ORDINAL>
<MAPS_TO>[variableName7]</MAPS_TO>
</FIELD>
- FILE_NAME_LIST
-
The FILE_NAME_LIST setting specifies the default file name list for the ARCHIVE action. DIVAdirector has the functionality for users to compose complex lists with expandable substitutions from the FIELD and MAPS_TO Drop Folder settings. The FILE_NAME_LIST value contains possible variable fields (symbolic names enclosed by dollar signs) which are substituted with values from the corresponding input fields. Each variable is expected to be mapped to the field name (MAPS_TO). Otherwise, the variable is left in the FILE_PATH_ROOT as is.Only the OBJECT_NAME and OBJECT_CATEGORY are predefined mappings - any other mappings can be arbitrary names.
- FILE_PATH_ROOT
-
The FILE_PATH_ROOT specifies the default file path root folder for the ARCHIVE and RESTORE actions. To gain a full understanding of the FILE_PATH_ROOT, the user must know the file structure on the Source/Destination.Specifically for the ARCHIVE action this setting can contain variables (symbolic names enclosed by dollar signs). The variables whose names are found in a FIELD mapping are expanded with the actual field value at run-time; otherwise the variables are left in the FILE_PATH_ROOT as they are.
- MEDIA_NAME
-
The MEDIA_NAME setting specifies the default media name for the RESTORE, ARCHIVE, and COPY actions used to properly form the necessary DIVArchive API Archive command. The MEDIA_NAME must match the name in DIVArchive.Similar to the OBJECT_CATEGORY setting, the MEDIA_NAME value is necessary to form the API commands unless the field mapping in the XML configuration file for the Drop Folder includes a mapping for res_media_name. The value included in each record of the input file supersedes the value (if any) in the MEDIA_NAME setting.
- SOURCE_DESTINATION
-
The SOURCE_DESTINATION setting specifies the configured DIVArchive sources and destinations used for the ARCHIVE and RESTORE actions. It is important that the values configured must match the setting in DIVArchive exactly as they will be used to transparently complete the necessary Archive and Restore API commands.The SOURCE_DESTINATION configuration settings are mandatory for the ARCHIVE and RESTORE actions, and are ignored for the METADATA and PURGE actions. The ARCHIVE action configuration should list only one source, but the RESTORE action list can have up to ten maximum destinations.The Source/Destinations are identified by symbolic names but could represent video servers, FTP server locations, editing systems, and so on.It is not necessary for the source and destination values to be configured in DIVAdirector for Drop Folder processing to successfully execute the archive or restore operations.
RESTORE Action
The RESTORE action has specific values applicable to this action. Objects dropped into a RESTORE action folder are sent to the storage location designated in the folder's configuration as restore storage. You create a RESTORE Action Drop Folder for each designated restore storage location. The following list identifies each RESTORE action-specific parameter, what it does, and how you should configure it.
- FILE_PATH_ROOT
-
The FILE_PATH_ROOT specifies the default file path root for the ARCHIVE and RESTORE actions. The user must know the file structure on the source or destination to gain a full understanding of the FILE_PATH_ROOT.
For the RESTORE action this setting can contain variables (symbolic names enclosed by dollar signs). The variables whose names are found in a FIELD mapping are expanded with the actual field value at run-time; otherwise the variables are left in the FILE_PATH_ROOT as they are.
- MEDIA_NAME
-
The MEDIA_NAME setting specifies the default media name used to properly form the necessary DIVArchive API command for the RESTORE, ARCHIVE, and COPY actions. The MEDIA_NAME must match the name that is in DIVArchive.
Similar to the OBJECT_CATEGORY setting, the MEDIA_NAME value is necessary to form the API commands unless the field mapping in the XML configuration file for the particular Drop Folder includes a mapping for res_media_name. The value included in each record of the input file supersedes the value in the MEDIA_NAME setting.
- INSTANCE
-
Because multiple instances of a single object can be present within the DIVArchive system, the INSTANCE setting specifies which instances of the file to perform the RESTORE, COPY, and PURGE actions on. This parameter is optional for all of these actions, but you can specifically instruct the DIVArchive system to use a particular instance of the object to complete a request. The value for this setting can be any integer.
- SOURCE_DESTINATION
-
The SOURCE_DESTINATION setting identifies the configured DIVArchive sources and destinations used for the ARCHIVE and RESTORE actions. It is important to note that the values configured must match the setting in DIVArchive exactly as they will be used to transparently complete the necessary Archive and Restore API commands.The SOURCE_DESTINATION configuration settings are mandatory for the ARCHIVE and RESTORE actions, and are ignored for the METADATA and PURGE actions. The ARCHIVE action configuration should list only one source, but the RESTORE action list can have up to ten maximum destinations.The Source/Destinations are identified by symbolic names but could represent video servers, FTP server locations, editing systems, and so on.It is not necessary for the source and destination values to be configured in DIVAdirector for Drop Folder processing to successfully execute the Archive or Restore operations.
COPY Action
The COPY action has specific values applicable to this action. Objects dropped into a COPY action folder are copied to storage location designated in the folder's configuration as a storage destination. You create a COPY Action Drop Folder for each designated storage destination location. The following list identifies each COPY action-specific parameter, what it does, and how you should configure it.
- INSTANCE
-
Because multiple instances of a single object can be present within the DIVArchive system, the INSTANCE setting specifies which instances of the file to perform the RESTORE, COPY, and PURGE operations on. This parameter is optional for all of these actions, but you can specifically instruct the DIVArchive system to use a particular instance of the object to complete a request. The value for this setting can be any integer.
PURGE Action
The PURGE action has specific values applicable to this action. Objects dropped into a PURGE action folder are deleted from a storage location designated in the folder's configuration. You create a PURGE Action Drop Folder for each designated storage location where objects may need deletion. The following list identifies each PURGE action-specific parameter, what it does, and how you should configure it.
- INSTANCE
-
Because multiple instances of a single object can be present within the DIVArchive system, the INSTANCE setting specifies which instances of the file to perform the RESTORE, COPY, and PURGE operations on. This parameter is optional for all of these actions, but you can specifically instruct the DIVArchive system to use a particular instance of the object to complete a request. The value for this setting can be any integer.
Next you will go through the XML Wizard used for configuring Drop Folders.
Using the XML Wizard
The Import Drop Folder Configuration dialog box (also known as the XML Wizard) is a Windows wizard-style tool for you to create and edit Drop Folder configuration XML files. You may configure and edited directly the XML files as discussed in the following section, but the wizard makes these tasks easier and quicker. It visualizes the process of creating the Drop Folder configuration file, and assists in configuration validation and consistency.
To invoke the wizard, add a new Drop Folder or select an existing one in the DIVAdirector Server Configuration dialog box and click Settings.
ACTION Screen
The Action screen is the first screen in the wizard. You select the Drop Folder ACTION and add a Drop Folder DESCRIPTION string on this screen.
-
Select the Drop Folder's action from the ACTION list.
-
Enter a description in the DESCRIPTION field. Descriptions should be vivid enough for you and your users to determine exactly what the folder does when a file is dropped into it.
-
Click Next to advance to the next screen.
Settings Screen (Next or Final)
The Settings screen is the first screen where all Drop Folder parameter values (except field mappings) are specified.
For Import Drop Folders you will click Next to continue to the Field Mappings screen before completing the wizard.
Since there are no field mapping values needed for a Proxy Drop Folder, this screen is the final screen. After entering the necessary values, click Finish to complete the wizard.
The following points are significant during the configuration process:
-
After selecting an INTERVAL item from the list, make sure you replace all
XXorXXXplaceholders with the actual values required. -
The RECORDS_TO_PROCESS value does not affect Metadata Drop Folders.
-
The FILE_CODE_PAGE values that are currently supported include 1252 (Windows Latin-I, Western European) and 1255 (Windows Hebrew). If the dropped files contain any characters that do not correspond to an available code page, Unicode (little-endian) must be used with files for importing.
-
To make a SOURCE_DESTINATION list of several items, use the Plus or Minus button to correspondingly add or remove currently displayed items.
-
PRIORITY values cannot be entered other than the ones present in the list. Edit the configuration file manually to enter a numeric value between 0 and 100.
-
FILE_PATH_LIST and FILE_PATH_ROOT values can be set regardless of whether the corresponding mappings were added on the wizard's next Field Mappings screen. The variable names are not verified in any way for matching with field mappings intended for use.
-
Use the lists to select each parameter's value.
-
Enter the values into the fields as necessary.
-
Click either Finish (for Proxy Drop Folders) or Next (for Import Drop Folders).
The Settings screen has the following parameters specifically for the PROXY action:
- ORPHAN
-
The ORPHAN folder setting is applied to the PROXY action and defines the full path where the unrecognized proxy files are placed. If a proxy is dropped and the file name is not lost, it is moved to the Orphan Folder. This requires you to periodically check the folder and decide what to do with any files located in the folder.
- OBJECT_CATEGORY
-
The OBJECT_CATEGORY setting defines which category should be associated with the dropped proxy. This setting is disabled if OBJECT NAME + OBJECT CATEGORY is selected in the NAME_FORMAT setting.
- NAME_FORMAT
-
The NAME_FORMAT setting defines the proxy file name format to be used. The proxy file must be dropped into the Proxy Drop Folder to be correctly registered in DIVAdirector.
- LANGUAGE
-
The LANGUAGE setting is responsible for how DIVAdirector defines the language in the audio proxy files. Use the LANGUAGE list to select the appropriate format.
Field Mapping Screen (Final)
The XML Wizard starts this page with a blank list. You must add and configure all field mappings required to have them available during import operations.
The following points are significant during the field mapping process:
-
After adding a new mapping template, its ORDINAL value is set to zero. A zero ORDINAL value is not allowed in the field mappings and therefore it must be modified.
-
In the case of the ARCHIVE action (specifically), the MAPS_TO setting may be filled with the variable name to be used in the FILE_PATH_LIST and the FILE_PATH_ROOT settings. Make sure the value is entered correctly, independent of the variable definition or usage.
-
Click Add on the bottom left of the screen to add a new field mapping.
-
Select the necessary field mapping parameter and click OK. You will be returned to the Field Mapping screen.
-
Enter the value for the new parameter.
-
Repeat these steps for each field mapping required.
-
Click Finish to save the changes.
If one or more invalid values were entered during the configuration process you will receive one of two error messages. Each message contains either the name of the parameter where the error was detected or a Drop Folder logic violation description.
The first type of error message includes the error found and the parameter causing the error. The second type of error message includes only the logic error description, but the parameter value causing the error is included in the description.
If either one (or both) of these messages is received, return back to the corresponding wizard page and fix the value causing the error - then click Finish to complete the wizard.
The following section discusses editing XML configuration files directly.
Direct Editing of XML Configuration Files
The XML configuration file defines the configuration parameters for the Drop Folder. Several generic rules apply to the XML tags including:
-
If the XML tag's setting is omitted the default value is applied.
-
Meaningless settings in the current action context are ignored even if present in the XML configuration file.
-
All settings values are not case sensitive.
When you are editing an XML configuration file directly (rather than using the XML Wizard), only edit the file using a plain-text Unicode editor. Use of word processing programs (such as Microsoft Word) adds extra hidden formatting codes into the files when they are saved. These codes will corrupt the Drop Folder's XML file. You should only use an editor like Notepad or Notepad ++ and save the file as Unicode.
The Drop Folder XML configuration file can include the following configuration parameters:
- ACTION
-
The action to be performed on the files located within the Drop Folder; such as ARCHIVE, COPY, RESTORE, and PURGE.
- CLEAN_UP_INTERVAL
-
Specifies how long an import file may stay in a Drop Folder.
- COMMENTS
-
Specifies the default COMMENTS value for the ARCHIVE action.
- DATABASE_CHECK
-
Specifies whether the DIVAdirector system should verify the existence of the particular object name in each record of the input file for RESTORE, ARCHIVE, and PURGE actions before issuing the appropriate DIVArchive command.
- DD_REQUEST_SET_SIZE
-
Specifies the size of a set of requests sent to DIVArchive that cannot be interrupted by getting the DIVArchive Request Queue Size.
- DD_SLEEP_INTERVAL
-
The interval that must elapse between sending sets of requests to DIVArchive.
- DELETE_AFTER_PROCESS
-
Specifies whether DIVAdirector should delete the input file once processing has completed or leave the input file as is for subsequent processing. This is useful for situations with a large input file metadata for many objects which, over time, will be ingested and archived to DIVArchive. The file remains in the Drop Folder until processing is successful.
- DELETE_ON_SOURCE
-
Instructs DIVArchive to delete the original set of files on the source after Tape Migration completion.
- DESCRIPTION
-
You should include a logical description for the function of each Drop Folder so it is easily identifiable to you and your users. This description will appear in the DIVAdirector Server GUI for easy reference.
- DIVA_MAX_QUEUE_SIZE
-
Specifies the maximum allowable DIVArchive request queue size.
- ENCAPSULATION
-
Specifies the encapsulating character used to enclose each value contained within the input file, such as a single quotation mark, double quotation mark, or no encapsulation.
- FILE_CODE_PAGE
-
Defines the rule on how a non-Unicode import file must be interpreted.
- FILE_NAME_LIST
-
Specifies the default file name list for the Archive operation. DIVAdirector functionality gives users the ability to compose complex lists with expandable substitutions retrieved from the FIELD and MAPS_TO Drop Folder settings.
- FILE_PATH_ROOT
-
Specifies the default File Path Root for archive and restore operations.
- FORMAT
-
Defines the expected format of the input files. Currently, the system supports only the Flat File format. Depending upon the option selected for this setting, only files in the specified format should be placed into the Drop Folder.
- HEADER_ROW
-
The section header that implies an XML tag and contains the possible configuration setting values.
- INSTANCE
-
Used to specify which instances of the file to perform the RESTORE, COPY, and PURGE actions on.
- INTERVAL
-
Defines how often and when to process files in the Drop Folder.
- LANGUAGE
-
Specifies from where DIVAdirector should extract the language of an audio proxy file.
- MATCHING_OBJECT_NOT_FOUND
-
Specifies what DIVAdirector should do with objects not found in the database. This will either be to return an error or to create a virtual object.
- MEDIA_NAME
-
Specifies the default media name for the RESTORE, ARCHIVE, and COPY actions used to properly form the necessary DIVArchive API Archive command.
- METADATA_ACTION
-
Specifies how DIVAdirector should process metadata contained in the input file.
- METADATA_MAPPING
-
This setting specifies how the metadata columns are interpreted. It details the field mapping between the fields in the input file and the necessary fields in the DIVAdirector and DIVArchive systems.
- METADATA_PROCESS
-
Specifies how DIVAdirector should treat null fields in the input file.
- NAME_FORMAT
-
Specifies how DIVAdirector should extract the name and category from the proxy file name.
- OBJECT_CATEGORY
-
Specifies the default object category for specific actions such as PURGE, ARCHIVE, RESTORE, and COPY. The object category value is used in combination with the object name found in each record of the input file to properly form the necessary DIVArchive API commands.
- OPTIONS
-
Specifies the default options for the ARCHIVE and RESTORE actions and contains the login and password parameters for the available sources and destinations.
- ORPHAN
-
Applied to the PROXY action and defines the full path where the unrecognized proxy files are placed. If the proxy connection is dropped and the file name is not lost, then it is moved to the Orphan Folder. This requires you to periodically check the Orphan Folder and decide what to do with the files.
- PATH
-
Defines the Root Proxies Folder used as proxy storage. Every individual proxy file is placed into a randomly selected subfolder named 0 to 500. Users typically cannot access proxy storage directly because of the security settings. The only way for users to play proxies is by logging into the DIVAdirector system as a user authorized to play proxies
- PRIORITY
-
Specifies the default priority level for the ARCHIVE, RESTORE, COPY, and PURGE actions.
- QUALITY_OF_SERVICE
-
Specifies the default Quality of Service for the ARCHIVE and RESTORE operations.
- RECORDS_TO_PROCESS
-
Specifies the maximum number of records to process in the particular input file. This allows some level of control over the number of requests which could potentially flood the DIVArchive system.
- RESULTANT_FILE
-
This setting defines whether the DIVAdirector system creates a single or multiple resultant files following the processing of an input file.
- RESULTANT_FILE_PATH
-
Specifies the path where DIVAdirector should place the processed files with the results of the processing operation.
- SEPARATOR
-
Specifies how the values within each line of the input file must be separated for the Drop Folder.
- SOURCE_DESTINATION
-
Specifies the path where DIVAdirector should place the processed files with the results of the processing operation.
- SPACE_REMOVAL
-
Specifies whether DIVAdirector should trim leading spaces, trailing spaces, or both for data contained in each of the input field values.
- URL
-
Defines the URL Path relative to a DIVAdirector web server Root Path. It is always safe to set it to
/proxiesfor any Proxy Drop Folder.
Next you will configure parameters specific to DIVArchive operations.
Import Drop Folder DIVArchive Specific Configuration
The RESTORE, ARCHIVE, COPY, and PURGE DIVArchive operations for the Import Drop Folders have specific parameters that can be applied only for these types of actions. The following common parameters are available for all four types of actions:
- DATABASE_CHECK
-
The DATABASE_CHECK setting specifies whether the DIVAdirector system should verify the existence of the particular OBJECT_NAME in each record of the input file for the RESTORE, ARCHIVE, COPY, and PURGE actions before issuing the appropriate DIVArchive command.
Whether a file is present in the DIVAdirector database, the file is always selected within DIVArchive. Files can also have double registration (that is, instances in both DIVAdirector and DIVArchive).
The DATABASE_CHECK setting can contain the following values:
- YES
-
This is the default setting and checks the database for the existence of the object.
- NO
-
No database check is performed.
- DD_SLEEP_INTERVAL
-
The DD_SLEEP_INTERVAL setting is an interval that must elapse between sending sets of requests to DIVArchive. The default value for this setting is 60 seconds.
- DD_REQUEST_SET_SIZE
-
The DD_REQUEST_SET_SIZE setting specifies the size of a set of requests sent to DIVArchive that cannot be interrupted by getting the DIVArchive Request Queue Size. The default value for this setting is 10.
- DIVA_MAX_QUEUE)_SIZE
-
The DIVA_MAX_QUEUE_SIZE setting specifies the maximum DIVArchive request queue size allowed. The default value for this setting is 150.
This setting limits the load on the DIVArchive system because DIVArchive Drop Folders can easily flood the system with automatically generated requests.
Before issuing the next set of requests, DIVAdirector Server receives the current queue size. If it is greater than the corresponding Drop Folder setting value, the server ceases requesting for the DD_SLEEP_INTERVAL time.
- PRIORITY
-
The PRIORITY setting specifies the default priority level for the ARCHIVE, RESTORE, COPY, and PURGE actions. You cna use any integer number between 0 and 99 to specifically identify a priority value for processing files in that Drop Folder.
The PRIORITY setting can have one of the following values:
- NORMAL
-
50 (default)
- MIN
-
0
- LOW
-
25
- HIGH
-
75
- MAX
-
99
- RECORDS_TO_PROCESS
-
The RECORDS_TO_PROCESS setting specifies the maximum number of records to process in a particular input file. This allows some level of control over the number of requests which could potentially flood the DIVArchive system. The DIVAdirector system processes the first set of records in the input file as defined by this setting. It is assumed that the number of all records is less than one hundred.
The RECORDS_TO_PROCESS setting can have the following values:
- 100
-
This is the default setting and processes a maximum of 100 records.
- 0
-
This setting processes all records in the input file and is the most commonly used.
- NNN
-
This can be an integer (NNN) number of records to process in the input file. The value is specified by the administrator.
- QUALITY_OF_SERVICE
-
The QUALITY_OF_SERVICE setting specifies the default Quality of Service for ARCHIVE and RESTORE actions.
The QUALITY_OF_SERVICE setting can have one of the following values:
- Default
-
The default setting is configured by the DIVArchive System Administrator.
- Cache Only
-
This setting uses only objects that have been cached.
- Direct Only
-
This setting uses only objects that are directly accessed.
- Cache and Direct
-
This setting uses both cached and direct objects and the cached objects have precedence.
- Direct and Cache
-
This setting uses both direct and cached objects and the direct objects have precedence.
ARCHIVE Action Parameters
The ARCHIVE Drop Folder operation provides a list-based content archive feature allowing objects to be automatically moved into DIVArchive based on the contents of a file. The ARCHIVE Drop Folder operation is based on the following configuration parameters:
-
The XML configuration file defines which fields in the flat file contain the OBJECT_NAME and OBJECT_CATEGORY to be processed, and which DIVArchive source is used for the Archive API command.
-
Only a single DIVArchive storage location can be identified in the XML file.
-
DIVAdirector processes the flat file, record by record, and issues the DIVArchive Archive command for each OBJECT_NAME found in the flat file for the storage location configured in the XML configuration file.
-
All records in the objects are processed because the files may or may not exist in DIVArchive at the time of processing. Therefore, the DATABASE_CHECK setting is not applicable to this action type.
COPY Action Parameters
The COPY Drop Folder operation provides a list-based copy feature for DIVAdirector to create new instances of objects within the DIVArchive system for operations, for example content pre-staging to a managed disk. The COPY Drop Folder operation is based on the following configuration parameters:
-
The XML configuration file defines which fields in the input file contain the OBJECT_NAME and OBJECT_CATEGORY whereby a new instance will be created, and which DIVArchive media names are the targets of the copy operation.
-
The defined media names must exist in DIVArchive.
-
Because of the nature of the copy operations, multiple media names can be defined in each Drop Folder's XML configuration file. DIVAdirector issues a separate copy request for the object found in each input file record for each of the media names in the XML configuration file.
-
Objects that are located in the input file but not found in DIVAdirector are either skipped and logged to the Results File, or processed blindly based on the XML configuration file's DATABASE_CHECK value.
-
The priority for the COPY action is defined in the XML configuration file for the particular folder.
-
Each record in the input file can also contain the OBJECT_CATEGORY corresponding to the particular OBJECT_NAME, or the OBJECT_CATEGORY can be globally defined in the XML configuration file for all input files placed in the Drop Folder.
-
The OBJECT_CATEGORY in each input file record supersedes any globally configured in the XML configuration file only if the OBJECT_CATEGORY parameter is configured as one of the mapped fields in that Drop Folder.
RESTORE Action Parameters
The RESTORE Drop Folder operation provides a list-based restore feature for DIVAdirector to copy objects and files to a set of identified storage locations. The RESTORE Drop Folder operation is based on the following configuration parameters:
-
The XML configuration file defines which fields in the input file contain the OBJECT_NAME and OBJECT_CATEGORY to be processed, and which DIVArchive storage locations are the targets of the restore operation.
-
The defined storage locations must exist in DIVArchive, but may or may not be configured in DIVAdirector.
-
Because of the nature of the restore operation, multiple destinations may be defined in each Drop Folder's XML configuration file. DIVAdirector will issue a separate restore request for the OBJECT_NAME found in each input file record for each of the storage locations in the XML configuration file.
-
Objects that are located in the input file but not found in DIVAdirector are either skipped and logged to the Results File, or processed blindly based on the XML configuration file's DATABASE_CHECK value.
-
The priority for the RESTORE action is defined in the XML configuration file for the particular folder.
-
Each record in the input file can also contain the OBJECT_CATEGORY corresponding to the particular OBJECT_NAME, or the OBJECT_CATEGORY can be globally defined in the XML configuration file for all input files placed in the Drop Folder.
-
The OBJECT_CATEGORY in each input file record supersedes any globally configured OBJECT_CATEGORY setting in the XML configuration file only if the OBJECT_CATEGORY is configured as one of the mapped fields in the Drop Folder.
PURGE Action Parameters
The PURGE Drop Folder operation provides a list-based content purging feature for DIVAdirector to remove objects and files from DIVArchive based on the contents of a file.
WARNING:
You should be very careful when defining a Drop Folder to perform the PURGE action as files will be processed blindly and any matching objects will be removed from the DIVArchive system. There is currently no function available to undo the purge operation once an object has been deleted.
The PURGE Drop Folder operation is based on the following configuration parameters:
-
The XML configuration file defines which fields in the flat file contain the OBJECT_NAME and OBJECT_CATEGORY to be processed.
-
DIVAdirector processes the flat file record by record and issues DIVArchive delete commands for each OBJECT_NAME found in the file.
-
Objects that are located in the input file but not found in DIVAdirector are either skipped and logged to the Results File, or processed blindly based on the XML configuration file's DATABASE_CHECK value.
-
The priority for the PURGE action is defined in the XML configuration file for that particular folder in addition to any other necessary parameters.
-
Each record in the input file may also contain the OBJECT_CATEGORY corresponding to the particular OBJECT_NAME, or the OBJECT_CATEGORY can be globally defined in the XML configuration file for all input files placed in the Drop Folder.
-
The OBJECT_CATEGORY in each input file record supersedes any globally configured in the XML configuration file only if OBJECT_CATEGORY is configured as one of the mapped fields in the Drop Folder.
Next you will configure the logging system for the DIVAdirector system and Drop Folders.
Logging Configuration
Now that the storage is configured for the system, you must configure the log files. There are two sets of log files used in DIVAdirector.
- DIVAdirector Server Log Files
-
DIVAdirector Server has a generic logging system that produces log files related to all server tasks except Drop Folder processing.
- Drop Folder Log Files
-
Drop Folder Logs contain common information regarding the general Drop Folder operation mechanisms and possible general error state processing in the DIVAdirector Server.
DIVAdirector Server Logging Configuration
The DIVAdirector Server logs contain common information regarding the various server operations and possible operation processing error information.
The logging system is intended for server troubleshooting activities and is completely disabled by default. Custom log levels (described in the following section) are configurable to obtain various amounts of information. If a custom log level setting is not defined, level 0 is applied by default.
The log settings are applied during DIVAdirector Server startup. The settings can be changed during server operation, but a server restart is required for the system to recognize and apply the new setting.
Log Levels
The server logging function has several different custom levels. Each level identifies a specific amount of information to be logged during server operation.
Edit the[Startup] section of the DIVAdirector_HOME\cmg-server\cmgserver.ini to set a custom log level.
[Startup]
LogLevel=[custom log level]
The available custom log levels are as follows:
- 0
-
Logging disabled.
- 1
-
Server errors - this level will only log server-based errors.
- 2
-
Warning messages - this level will log both server errors and warning messages. This is the recommended log level setting.
- 3
-
Informational messages - this level will log server errors, warning messages, and informational messages. Setting the log level to Level 3 can cause large log files to be created and is not recommended unless instructed to do so by Oracle Support.
- 4
-
Debug level - Avoid setting this value because of the amount of log records generated. When requesting Oracle Support assistance, you may asked to set the logging level to 4 for troubleshooting purposes.
Log File Name
The server log file name may be specified in a fully qualified or relative form. If this parameter is omitted, the default log file name _cmgserver.log is applied. Since the default name is a relative path, the log file is created in the folder from where the DIVAdirector Server is started.
Edit the [Startup] section of the DIVAdirector_HOME\cmg-server\cmgserver.ini file to set a custom log file name
[Startup]
LogFileName=[custom log file name]
Log File Size and Cycling
WARNING:
Currently, there is no automated log file cleanup mechanism in the DIVAdirector Server. Be careful of outdated log files that are accumulated during server operation.
You should create a batch file to remove out of date log files periodically and use the Windows Task Scheduler to create a task to run the batch file daily during non-production hours.
The server log grows during normal DIVAdirector Server operation. To prevent uncontrolled file growth, the log file is verified for a size limit during each log operation. If the file size exceeds the limit, it is closed and renamed according to the following template:
original-log-file-name_timestamp.original-file-extension
Where timestamp is the time the file was renamed. The timestamp string format is YYYYMMDD-hhmmss and designated as follows:
YYYY = yearMM = monthDD = day of monthhh = hours (0 - 23)mm = minutes (0 - 59)ss = seconds (0 - 59)If the Server Log File Size Limit is not specified, the default 4 MB value is applied. To set a custom Server Log File Size Limit, edit the [Startup] section of the DIVAdirector_HOME\cmg-server\cmgserver.ini file.
[Startup]
LogFileSize=[custom file size limit in bytes]
Drop Folder Logging Configuration
The Drop Folder logging system is designed to always be enabled. You cannot disable the Drop Folder Log but you can reduce the bulk of log records by setting a lower Log Level.
Log Levels
Drop Folder Log Level settings are intended to provide flexible event logging depending upon your current needs. The setting is applied when DIVAdirector Server is started. The level can be changed during server operation, but a server restart is required for the system to recognize and apply the new setting. If this setting is omitted log level 0 is applied by default.
The available log levels are:
- 0
-
Messages of the highest priority, including the general logging system events (for example, initialization and shutdown) and operational results.
- 1
-
Drop Folder initialization errors only.
- 2
-
Drop Folder configuration file parsing errors and initialization errors.
- 3
-
Generic Drop Folder action errors, file parsing errors, and initialization errors.
- 4
-
Other types of Drop Folder errors.
- Greater than 4
-
The levels above level 4 are intended for Drop Folder troubleshooting purposes only. It is highly recommended to generally avoid setting these higher values unless instructed to do so by Oracle Support because of the amount of log records generated.
Edit the [Startup] section of the DIVAdirector_HOME\cmg-server\cmgserver.ini file to set a custom Drop Folder log level.
[Startup]
DropFoldersLogLevel=[custom log level]
Log File Name
The Drop Folder log file name can be specified using a fully qualified path and file name, or a relative form (file name only). If this setting is omitted, the default log file name DropFolders.log is applied. Since this default name is a relative path, the log file is created in the folder from where DIVAdirector Server starts.
Edit the [Startup] section of the DIVAdirector_HOME\cmg-server\cmgserver.ini file to set a custom Drop Folder log file name.
[Startup]
DropFoldersLogFilename=[custom log file name]
Log File Size and Cycling
WARNING:
Currently there is no automated log file clean-up mechanism in DIVAdirector Server. You must manually take care of the outdated log files that are accumulated during server operation.
It is recommended that System Administrators create a batch file to remove out of date log files periodically and use the Windows Task Scheduler to create a task to run the batch file daily during non-production hours.
The Drop Folder log grows during normal DIVAdirector Server operation. To prevent uncontrolled file growth, the log file is verified for a size limit during each log operation. If the file exceeds the limit, it is closed and renamed according to the following template:
OriginalLogFilename_Timestamp.OriginalFileExtension
Where Timestamp is the time the file was renamed. The timestamp string format is YYYYMMDD-hhmmss and designated as follows:
YYYY = yearMM = monthDD = day of the monthhh = hours (0 - 24)mm = minutes (0 - 59)ss = seconds (0 - 59)
If the log file size limit is not specified, the default 4 MB value is applied. Edit the [Startup] section of the DIVAdirector_HOME\cmg-server\cmgserver.ini file to set a custom Drop Folder Log File Size Limit.
[Startup]
DropFoldersLogFileSize=[custom file size limit in bytes]
Next you will add new organizations, groups and users.
Account Configuration
DIVAdirector is a permission-based system that allows a limited number (approximately forty to fifty depending on system resources) of simultaneously logged in users. Any user accessing the system must be validated through the login procedure. To be authorized to access the system, the user must enter a valid login email address and password specific to the user account. You can log in with the user name admin for the email address and your administrative password.
There are three categories (or levels) of user accounts (other than the Administrator) in DIVAdirector structured as follows:
-
Organizations - this is the top level account for different internal departments. Organizations are comprised of Groups.
-
Groups - this is the second level account for different groups within an organization. Groups are comprised of Users.
-
Users - this is the third level account for individual system users. Users are members of Groups.
First you will configure a new organization.
Adding a New Organization
Organizations are comprised of a set of groups. Organizations allow restricting access to information from users outside of the organization or group who do not require access to the data. For example, a company may not want to make its data viewable to other companies, or a department within a company may not want its data to be viewable by other departments within the same company. In these two scenarios the entire company, or the specific department, desiring restricted access can be represented by an Organization in DIVAdirector.
Use the following procedure to create an organization:
-
Navigate to Admin, Users, and then Organizations in the navigation tree on the left of the screen.
-
Click the + next to the Users tree item to expand the tree.
-
Select New Organization in the Organization list.
-
Enter the Organization Name in the Organization Name field.
-
Enter the LDAP Setting if an LDAP login is required.
-
In the Permissions area enter any Objects, Categories and Sites - multiple entries are separated by a semicolon. Use an asterisk to denote wildcards (for example ABC*, AB*D, and so on). The Site permissions are extremely important because they allow the organization to access objects on specific sites that match the filter.
-
Identify the Metadata Access fields that will be accessible by the organization by selecting the check box to the right of the metadata name. If the check box is deselected the organization will not have access to that metadata field. Groups within an organization may refine their authorized selections further.
-
Click Save on the top right of the screen to save the information.
Next you will add a new group.
Adding a New Group
Groups are collections of users and part of an organization. Each group is assigned a set of permissions to grant users of the group access to specific system features and functions. Groups are customizable and configurable to fit organizational security requirements. By default, the system is installed with two user groups - SuperAdmin and admins.The SuperAdmin group is the most powerful group in the system because it contains the admin (root) user. Users who are members of the SuperAdmin group are the only users who have complete access to all permissions, configuration parameters, queries, work bins, and shotlists for every other user in the system.
When creating a new group you give the new group a unique name. Group names should be descriptive and unambiguous to make further system administration and maintenance simple and clear. Group names must not exceed 32 characters.
Use the following procedure to create a group and set the group's permissions:
-
Navigate to Admin, Users, and then Groups in the navigation tree. The screen will initially display with the Profile tab selected.
-
Select the New Group option from the Group list.
-
Enter the new group name in the Group Name field.
-
Select the group's organization from the Organization list.
-
Click Save on the top right of the screen to create the new group.
Group Roles
Now that the group has been created and associated with the correct organization, you must identify the roles for the group.
All users, regardless of their group's roles, always have access to the Operation Status, Change Password and Logout functions. Only the SuperAdmin has access to the DIVAdirector Server screen, Shortcuts screens, and Public Resources and Synchronization Filters on the Discover screen.
The set of roles a user currently has is passed to the application only once during user log in. Any changes you make to user permissions will take effect on the user's next session login.
Only logging out of the system ends a session. A user session timeout (one hour) does not result in a terminated session and renewing the session retains the user's permissions from before any changes were made.
- View Queries and Save Advanced Searches
-
Allows users to perform advanced searches and persists history of queries performed. If a user does not have this permission, then the Query Results and Create/Display Query panels will not appear on the Search screen.
- Create and View Work Bins
-
Allows users to create personal and public work bins and perform actions within them.
- Modify Asset Metadata
-
Allows users to modify the object metadata within the Search and Shot List screens. If this permission is disabled the metadata is displayed to the user in a read-only format.
- Create Shot Lists
-
Allows users to access the Shot List screen, add objects and segments of proxies, and perform file management and editing operations. If the user does not have this permission, Edit (and the icons) will not be displayed on the Query Results and Work Bin panels, and the Shot List menu item will not be displayed.
- Publish Shot Lists
-
Allows users to create their own public Shot Lists. If this permission is disabled, Make Public will not be displayed on the Shot List panel.
- View Asset Proxies
-
Allows users to view the proxy and also enables Play.
- Download Proxies
-
Allows users to download proxy videos to their local system.
- Modify Annotations
-
Allows users to have the ability to add, edit, and delete annotation metadata.
- Archive from Source
-
Allows users to archive new data to DIVArchive long-term storage.
- Delete
-
Allows users to delete object instances from DIVArchive long-term storage.
- Restore
-
Allows users to restore objects from DIVArchive long-term storage, making them available for immediate access on the specified destination (for example, an ftp destination or a video server).
- Partial Restore
-
Allows users to perform partial file restore operations on the selected file in the Shot List.
- Local Archive
-
Allows users to perform archive operations on files stored on the client computer.
- Local Restore
-
Allows users to restore files to the DIVAdirector Server and to be able to download the restored files.
- Local Partial Restore
-
Allows users to partially restore files to the DIVAdirector Server and to be able to download the restored files.
- Create Virtual Assets
-
Allows users to create virtual objects.
- Local Proxies
-
Allows users to drop proxy files in the Proxy Drop Folder after uploading them from the client computer.
- Local Metadata
-
Allows users to drop metadata in the Metadata Drop Folder after uploading it from the client computer.
- Discover Objects and Manage Requests
-
Grants users access to administrative functionality for discovering objects within DIVArchive and managing system requests. You access the discovery functionality by navigating to the Admin/System/Discover screen and allows users to perform ad hoc discoveries. Request management is performed on the Operation Status screen and allows users with this permission to manage the request priority or cancel requests in the system.
- User Management
-
Allows users to access the Admin/Users/User screen and manage Groups, Users, and Permissions. If the user does not have this permission, the User menu under the Admin navigation tree is not displayed.
- Modify Metadata Schema
-
Allows users to access the Admin/Metadata screen to manage Asset Metadata fields by viewing, editing, adding, and deleting metadata columns.
- Modify Interface Style
-
Allows users to access the Admin/Systems/Style screen and to upload a new banner logo image. The banner logo image is used for customizing the look and feel of DIVAdirector by adding an organization's logo on the top right corner of all pages.
- Modify Policies and Settings
-
Allows users to edit system policies (located on the System/Policies screen) and edit the default settings (located on the System/Defaults screen).
- Administer Database Backups
-
Allows users to access the Perform Database Backup Operations area located on the Admin/Backup screen. Backup operations include viewing the last operation, scheduling an automatic backup, and performing a manual backup or restore.
- Display Site Information
-
Allows the site information to be viewable.
- Allow Audit Trail
-
Enables or disables the audit trail. The audit trail is located on the System/Audit Trail screen.
- Session Management
-
Enables or disables session management. The session management is located on the System/Session Management screen.
Use the following procedure to set the group member's roles:
-
Navigate to Admin, Users, and then Groups in the navigation tree.
-
Click the Permissions tab.
-
Configure the appropriate roles for the group using the check boxes in the Privileges area. A selected check box indicates that the group has been granted permission to that function. A deselected check box indicates that the group has been denied permission to the function.
-
Click Save on the top right of the screen to save the new group and associated permissions.
Next you will setup the content filters.
Content Filters
Group-based filters are configured on the Permissions screen. Any changes made and saved in the filters are applied immediately for all currently logged in users associated with the group.The Content Filter allows users to see only data complying with a set of Include and Exclude filters for Object Name, Object Category, and Sites. The Content Filter is a table with six fields at the bottom of the Permissions screen. All of the fields in the table are initially blank. A blank Exclude field means exclude nothing, and blank Include field means include everything. The content filters are applied to both queries and work bins, but do not affect Shot Lists and the Status screen.
The three Include fields define what objects, categories and sites can be discovered by the user, and the three Exclude fields define what objects, categories and sites cannot be discovered by the user.
Each field can have multiple filters separated by semicolons. Use an asterisk as a wildcard symbol if desired. The filter can also be blank or have white space indicating that no filtering is required; white spaces between filters are ignored.
Next you will configure DIVArchive Operational Parameters.
DIVArchive Operations
The parameter values for the following DIVArchive operations are configured on the DIVArchive Settings tab on the Admin/Users/Groups screen. Not all parameters are applicable to all operations. Valid operational parameters are as follows:
- Archive
-
Valid parameters are Source, Media, Storage Plan, QoS, Priority, and Category.
- Local Archive
-
Valid parameters are Source, Media, Storage Plan, QoS, Priority, and Category.
- Restore
-
Valid parameters are Destination, QoS, and Priority.
- Local Restore
-
Valid parameters are QoS, and Priority.
- Partial File Restore (PFR)
-
Valid parameters are Destination, QoS, Priority, File Format, and PFR Name Format.
- Delete
-
Valid parameter is Priority.
The valid parameters for each operation are applied according to the following descriptions:
- Source
-
The Source parameter defines a list of DIVArchive source storage locations for DIVArchive operations. Users only see the selected sources in the list. Whichever DIVArchive source is chosen to be the default will appear as the default item in the user's list.
- Destination
-
The Destination parameter defines a list of DIVArchive destination storage locations for DIVArchive operations. Users only see the selected destinations in the list. Whichever DIVArchive destination is chosen to be default will appear as the default item in the user's list.
- Media
-
The Media parameter defines a list of DIVArchive media for DIVArchive operations. Users only see the selected media in the list. Whichever DIVArchive media is chosen to be the default will appear as the default item in the user's list.
- Storage Plan
-
The Storage Plan parameter defines a list of DIVArchive storage plans for DIVArchive operations. Users only see the selected storage plans in the list. Whichever DIVArchive storage plan is chosen to be the default will appear as the default item in the user's list.
- Quality of Service (QoS)
-
The QoS parameter defines the Quality of Service for DIVArchive operations. The available choices are Default, Cache, Direct, Cache and Direct and Direct and Cache. If the Force Default Value check box is selected, the chosen option cannot be changed by the user before executing an operation.
- Priority
-
The Priority parameter defines the execution priority of DIVArchive operations. This parameter has a minimum value of 0 and maximum value of 100 - where 100 is the highest priority. If the Force Default Value check box is selected, the chosen option cannot be changed by the user before executing an operation.
- Category
-
The Category parameter defines a list of object categories for DIVArchive operations. Only the selected categories will be included in the user's list. The list will be initially empty; clicking + allows new categories to be added.
- File Format
-
The File Format parameter defines the format of the high-resolution files stored in DIVArchive for partial file restore operations.
- PFR Name Format
-
The PFR Name Format parameter defines the file name format for files displayed in the partial file restore operation results. The first list contains the types of separators used in the name format (underline, dash, or period). The second list contains additional name construction types as follows:
-
none: the object name is used as the file name; additional construction is not used.
-
1: one digit of the segment number in the Shot List is added to the file name with the separator (for example,
objectname_1.gxf). -
2: two digits of the segment number in the Shot List are added to the file name with the separator (for example,
objectname_01.gxf). -
3: three digits of the segment number in the Shot List are added to the file name with the separator (for example,
objectname_001.gxf). -
4: four digits of the segment number in the Shot List are added to the file name with the separator (for example,
objectname_0001.gxf). -
SOM-EOM: time codes are used in the file name (for example:
[objectname_start-timecode-of-segment]-[end-timecode-of-segment]).
-
The Use Relative TC check box determines whether relative or absolute timecodes are used in the PFR file name construction and the partial file restore operation.
Next you will configure Virtual Asset Categories.
Virtual Asset Categories
You configure a list of categories for creating virtual objects on the Virtual Asset Settings tab. Users only see the selected categories in the list. The list will initially be empty and you must populate it.
Use the following procedure to add a virtual object category:
-
Click + and enter the Category Name in the Category Name field.
-
Select the check box to the right of the category name to set it as the default. Whichever category is chosen to be the default appears as the default item in the user's list.
-
Repeat Step 1 for each category required.
-
Click Save on the top right of the screen to save the entries.
Next you will configure Data Export Roles.
Data Export
You choose the data export settings for the group from three lists on the Export Settings tab. The lists are as follows:
- Default Shot List Export Video Format
-
This list determines the video format in an EDL export file. Select either NTSC or PAL from the list.
- Default Shot List Export Format
-
This list determines the Shot List export format. Select from either Final Cut Pro or Avid ALE.
- Default Metadata Export Format
-
This list determines the metadata export format. Select from either CSV or XML.
Next you will configure Account Visibility parameters.
Account Visibility
You configure organization and group visibility to allow an organization access to view the groups of other organizations, or one group can be given access to all other groups within the same organization.
These roles are configured on the Admin/User/Groups screen on the Visibility tab.
Use the following procedure to configure the visibility permissions for the group:
-
Select the group from the Group list at the top of the screen.
-
Select or deselect the check boxes next to each option to configure the group's visibility parameters. You can use different combinations of these parameters to customize the allowance or denial of visibility. For example, deselecting Can see organizations, selecting Can see groups, and deselecting Can see other users will give the group permission to only see other groups within their own organization, but not other organizations nor any users in any group.
- Can see organizations
-
Selecting this check box will allow the group to see organizations that are identified in the list just below the option. The group will only have permission to see organizations that have the Access check box to the right of the organization's name selected. Organizations whose check box is deselected will not be visible to the group.
- Can see groups
-
Selecting this check box will allow the group to see other groups within their organization and groups in organizations that they have been granted permission to see. Deselecting this option will also deselect the check box for Can see organizations.
- Can see other users
-
Selecting this check box will allow users of the group to see other users within their group, organization and other organizations they have permission to view. Deselecting this option will deselect the previous two options.
-
Click Save on the top right of the screen to save the configured visibility permissions.
Next you will add a new user.
Adding a New User
All users are members of a group and inherit the roles and accesses assigned to the group. You add new users to the system using the following procedure:
-
Navigate to Admin, Users, and then User in the navigation tree.
-
From the User list select new user.
-
The following information is mandatory and entered in the Account Information area. All other fields are optional and may be left blank if desired.
- Group
-
Select the organizational group to which the user will belong from the Group list.
-
Enter the email address to be used for logging into the system. This is not case sensitive.
- User Name
-
Enter the user's real name.
- Password
-
Enter an initial password to be used for logging into the system for the first time. Passwords are case sensitive and it is highly recommended that users change their password immediately after their first login to the system. You should also encourage users to change their passwords every sixty to ninety days for security.
- Confirm Password
-
Re-enter the user's password to confirm it is correct. This must match the Password field exactly.
Note:
The Password and Confirm Password fields display only asterisks for security purposes rather than clear text. -
Click Save on the top right of the screen to create the new user.
Next you will configure Lightweight Access Directory Protocol (LDAP) login capability. If your company does not support LDAP, you can skip this section and continue with "Search Configuration."
Lightweight Access Directory Protocol (LDAP) Logins
If your organization uses Lightweight Directory Access Protocol (LDAP), you can configure DIVAdirector users so they log in to the system using LDAP. Your administrative account should never be configured to use LDAP login because if the LDAP server address is incorrect, or the LDAP servers become unavailable, nobody (including you) will be able to log in. You are only able to log in using DIVAdirector's email and password login mechanism, and can reset the LDAP settings if the servers become unavailable, the settings have changed, or the settings had been incorrectly specified.
Use the following process to switch from the email and password login method to LDAP login:
-
Navigate to Admin, Users, and then Organizations in the navigation tree.
-
Select the Enable LDAP Login check box.
-
Enter the IP address of the LDAP server in the Primary LDAP IP Address field. A port number may be specified by suffixing the IP address with the
:portoption. The port is the port number for DIVAdirector to listen for LDAP connections. If no port is specified, the default LDAP Port (port 389) is used. -
An optional secondary LDAP server address (and port number if required) may be specified for authentication in the event the primary server fails or is unreachable. Enter the secondary LDAP server information in the Secondary LDAP IP Address field.
-
Click Save on the top right of the screen to apply the changes.
Next you will configure search parameters for groups and users.
Search Configuration
The following sections include detailed information for managing metadata. Metadata is used in systemwide searches on the DIVAdirector and DIVArchive systems to locate a specific file, category of files, objects, or video clips. These roles are set for the group and apply to all members of the group.
Object Metadata
Object metadata is a set of search terms that belong to an object. Each object has its own predefined set of metadata.
-
Metadata imported from DIVArchive (OBJECT_NAME, OBJECT_CATEGORY, ARCHIVE_DATE, and so on).
-
Proxy metadata imported from dropped proxies.
The Object Metadata screen is accessible from the Admin/Users/Metadata screen. The following functions are available from the Object Metadata screen.
-
Add new metadata for objects in DIVAdirector by clicking Add on the top right of the screen.
-
Delete an existing metadata type by selecting the type to be deleted in the list and then click Delete on the top right of the screen.
-
Edit a metadata type by clicking on the Pencil icon at the beginning of the row for the metadata to be edited.
Data Types
DIVAdirector supports various data types for metadata field definitions and associated presentation controls. When a specific data type is selected, additional parameters are presented to the user.
The following are the valid metadata types:
- CHAR
-
Any character string; restricted to 1 - 2000 characters in length. The CHAR data type can be represented using an EditBox, TextBox, or SelectBox control (refer to "DIVAdirector Presentation Controls").
- INT
-
Any integer numeric value. The INTEGER data type can be represented using an EditBox, TextBox, or SelectBox control.
- FLOAT
-
Any numeric value - including decimals. The FLOAT data type can be represented using an EditBox, TextBox, or SelectBox control.
- DATE
-
The DATE field can be represented using an EditBox, SelectBox, or Calendar control.
- TIME
-
The TIME field can be represented using an EditBox or a SelectBox control.
- BINARY
-
A fixed representation file of arbitrary internal format which is represented using a FileSelect control.
- SAMMA_GRAPH
-
A graphical representation of metadata that originated from Oracle SAMMAsolo. The graph can represent the entire object or just a portion of the object.
- SAMMA_THUMBNAIL
-
A representation of thumbnails of frames that match the portion of the object represented by the SAMMA_GRAPH.
- QC_REPORT
-
Used for Quality Control reporting options including:
-
Report Type
-
Selected (selected or deselected)
-
Data file extension
-
Report file extension
-
DIVAdirector Presentation Controls
Most metadata field data types have multiple ways of displaying data and some are restricted to using particular controls. The following are descriptions of the controls used to display the metadata fields:
- EditBox
-
A single line text entry control that allows users to edit its value.
- TextBox
-
A general multi-line text editing control.
- Select
-
Allows users to select (or deselect) a value from the supplied list of unique values.
- CheckBox
-
Allows users to select an option by selecting the appropriate check box.
- Calendar
-
Allows users to browse through a graphical calendar and select the appropriate date; this format is used only for the DATE data type.
- FileSelect
-
A special composite control comprised of an Upload button and a link to an existing binary file; this format is used only for the BINARY data type.
- SammaGraph
-
This control is only used for the SAMMA_GRAPH data type and shows a graphical representation of SAMMAsolo-generated metadata.
- SammaThumbnail
-
This is only used for the SAMMA_THUMBNAIL data type to provide thumbnail representations of frames that match the portion of the objects represented by a SammaGraph control.
Predefined Metadata Display Columns
The metadata display screen is arranged in a tabular format. The columns in the table are predefined and described as follows:
- ID
-
DIVAdirector-defined unique identifier for the object.
- Name
-
DIVArchive system-defined object name that is used as a unique identifier with the category.
- Category
-
DIVArchive system-defined object category that is used with the name.
- Date
-
The date when the object was archived to the DIVArchive system.
- Comments
-
A text field that contains comments added during the object's creation.
- Source
-
The original source of the file from which the object was created.
- Active
-
The current object status that determines whether the object exists.
- Virtual
-
The flag defining whether the object is virtual (YES or NO).
- SOM (P)
-
Start timecode of the object's proxy extracted from the proxy placed in a Proxy Drop Folder.
- Duration (P)
-
Duration of the object's proxy extracted from the proxy placed in a Proxy Drop Folder.
- EOM (P)
-
End timecode of the object's proxy extracted from the proxy placed in a Proxy Drop Folder.
First you will add new metadata entries.
Adding a New Metadata Entry
WARNING:
In some cases the DIVAdirector system requires rebuilding of the text search index (for example when you delete the local CHAR type metadata from a non-empty USER_META database table). This process may take a long time depending on the size of the database. Some operations, such as deleting or adding an entry from the USER_META table or changing metadata values cannot be executed until the rebuilding of the index has completed. You can see the text message within the column information panel while the index rebuilding is in progress.
Use the following procedure to add a new metadata entry to the Metadata Manager:
-
Click Add on the top right of the screen.
-
Enter the information in the resulting dialog box.
-
Click the Check Mark icon on the lower left of the screen to add the new entry or click the X icon on the lower left of the screen to cancel the addition.
-
Repeat these steps for each metadata entry to be added to the system.
When a metadata type is selected from the list, additional parameter fields will be displayed that are specific to the type selected. Each metadata entry has the following parameters:
- Title
-
The Title field is the Metadata Column name displayed in the user interface. The title can be any unicode text with maximum length of thirty-two characters.
- Type
-
The Type field determines the entry's data type and is defined automatically when selected from the Type list. For example, if the type of the Metadata Column is DATETIME in the database, then one of the two types can be selected from the list: DATE or TIME.
- Format
-
The type of the presentation control used.
- File Mask
-
If the BINARY type is selected the edit field will be displayed instead of the column length. Only files with this mask can be selected to be uploaded using the Object Metadata area of the Shot List screen. Multiple masks can be set, separated by a semicolon, for example:
*.txt; *.log(Spaces will be removed when saved in this case) - Date Mask
-
If the DATE type is selected for summary columns the edit field will be displayed instead of the column length. Only data corresponding to this mask can be saved in the database through the Analysis Drop Folder. The mask can be set using traditional date characters (
dd,mm,yyoryyyy) and separators. - Time Mask
-
If the TIME type is selected for summary columns the edit field will be displayed instead of the column length. Only data corresponding to this mask can be saved in the database through the Analysis Drop Folder. The mask can be set using the traditional time characters (
HH:MM:SS) and a colon separator. - Description
-
The description of the column displayed in the Tooltip when the user hovers over the column title in the Query Results, the Work Bin tables on the Search screen, and the Asset Metadata area on the Shot List screen. The description can be any unicode text and has a maximum length of 240 characters.
- Display Options (Flags)
-
One or more of the following as previously described:
-
Hidden
-
Read Only
-
Display in Search Results
-
Display in Tooltips
-
In addition to the above, a SAMMA_GRAPH metadata column type requires the following parameters:
- Y Axis Label
-
This specifies the name of the Y Axis for the SAMMA Graph.
- Graph Tags
-
Specifies the type of information to be displayed on the SAMMA Graph. Click + on the Field Tag button to add each tag and specify a color. Pre-defined tags are available in the Choose Type list or by clicking on the default type displayed under the Field Tag. For example, using the Choose Type list and selecting the type as Video results in three field tags being created automatically:
-
Luminance Average
-
Chroma U Average
-
Chroma V Average
Next you will configure Quality Control Report Metadata.
-
Add New Quality Control Metadata
You add Quality Control Report Metadata to the system's search functions using the following procedure:
-
Open the Metadata Column Manager on the Admin/Metadata screen.
-
Click Add on the top right of the screen.
-
Enter a name for the metadata in the Title field.
-
Select qc report from the Type list.
-
Select QC Report from the Format list.
-
Select which reports should be visible using the check boxes next to each type of report.
-
Enter the data file extension (usually
.xml) for each visible report in the Data Extension field. -
Enter the report file extension (
.xmlor.pdf) in the Report File Extension field.If an XML file for data and PDF file for viewing are both available, set the Report File Extension to PDF. In most cases, it can remain set to the default value: xml.
-
Enter a description in the Description field.
-
Select the Hidden (Hid) check box if you want the report hidden from users, otherwise leave it deselected.
-
Click the Check Mark icon on the lower left of the screen to save the new report column, or click the red X icon to cancel the addition.
Next you will configure Metadata Access for the group.
Metadata Filters
Metadata filters authorize and restrict user access to various metadata fields. You configure the filters on a per-group (not per-user) basis on the Permissions (Metadata) tab on the Groups screen. Users can only view the metadata fields that follow the configured Include Filters and any fields configured in the Exclude Filters list will be hidden from users of the group.
The metadata filters are applied only within Queries, Edit Metadata and Shot List screens. Each field can be made accessible, inaccessible, and available or unavailable for publishing (refer to the Oracle DIVAdirector User's Guide for more information on publishing).
Next you will configure Metadata Publishing Settings.
Metadata Publish Settings
DIVAdirector can publish restored video clips to Oracle DIVApublish. A destination configured in DIVArchive must point to the DIVApublish location that is receiving the restored video clips and their metadata to use the publishing functions. This setting must be selected as the location for publishing in the DIVArchive Destination list on the Metadata Publish Settings tab on the Groups screen.
The FTP network protocol is used for DIVAdirector's Publish Metadata feature and must be configured in the FTP area of the screen. Publishing clips to DIVApublish requires sending the video clip's metadata as an XML file.
Metadata fields to be included in the XML file are selectable in the Metadata area of the screen. The available fields are determined by the settings configured in the Metadata Permissions Filter.
-
Select the available metadata fields to include in the XML file using the check box on the right of each field. A selected check box will include the field in the XML file and a deselected check box will not be included.
-
Enter the FTP server's Host name, Username, Password and Port number in the designated fields. The port number can be entered manually or the up and down arrows to the right of the port field to raise or lower the selected number. The default FTP port (21) will be used if the port field is left empty.
-
Select the destination from the DIVArchive Destination list.
-
Click Save on the top right of the screen to save the settings.
Next you will configure Quality Control Reports.
Quality Control (QC) Report Configuration
DIVAdirector supports integration with QC Reports from Venera Rapid, Venera Pulsar, Tektronix Cerify, and Interra Baton. Report files should be placed in the path under the IIS DIVAdirector 5 root folder:
DIVAdirector QC Report\[Report Name]\[Category]\[Object Name]\[Object Name].xml
For example:
DIVAdirector QC Report\Venera Rapid\WMV\AUTO_20120615_031030\AUTO_20120615_031030.xml
First you will create a folder for the QC Reports, and then you will place all reports in the folder you create.
QC Report File Placement
Use the following procedure to create a folder for the QC Reports. Place completed reports in the appropriate folder.
-
Open IIS and navigate to the DIVAdirector QC Report virtual directory under the DIVAdirector 5 menu item.
-
Right-click the DIVAdirector QC Report folder and select Explore from the context menu.
-
Create a new folder with a specific category (for example, Venera Rapid or Venera Pulsar) for the files under the report type folder.
-
Create a new folder using the report name (for example,
AUTO_20120615_031030). -
Place the QC Report XML files in the newly created folder. Other report files (for example, PDF) can be placed in the same location.
Next you will configure Automated System Backups.
Automated Backup Configuration
You configure automated backup operations by identifying your desired schedule and selecting the check box to make the scheduled task active. The schedule can be set to run on a weekly or monthly basis.
Use the following procedure to setup your automated backups:
-
Navigate to the Admin/Backup/Schedule screen.
-
Either enter the time to begin the backup directly in the Start Time field, or use the Clock icon to the right of the Start Time field to display a selectable time menu called the Time Picker.
The Start Time field denotes the time when the backup should start and must be in 24-hour format using standard
hh:mmnotation where:-
hh= hours (0 - 23) -
mm= minutes (0 - 59)
-
-
Use the Occurrence list to select either a Weekly or Monthly backup frequency.
If the Occurrence is set to Weekly, you can assign the days of the week when the backup should be performed by selecting the check box to the left of each day desired.
If the Occurrence is set to Monthly, you can set a day of the month (by date) when the backup should be performed by selecting the day of the month from the Days list.
-
Select the destination folder for the backup snapshot files in the Directory field.
The root location is mapped to the virtual folder named
DIVAdirector Database Backup Storage. Select the backup destination using the navigation provided in (or above) the Directory area on the right of the screen. -
Click Save on the top right of the screen to apply the settings. A confirmation message is displayed when the changes are saved successfully.
The DIVAdirector scheduled backup task that was created is now available in the Windows Task Scheduler. You can verify the task was scheduled correctly in the Windows Task Scheduler. Additional backup tasks will be number sequentially (for example, At2, At3, At4, and so on).
Important: Although you can delete scheduled tasks in the Windows Explorer, do not use this method to remove the task. If the task was accidentally deleted in the Scheduled Tasks, the Windows registry key named HKEY_LOCAL_MACHINE\SOFTWARE\Wow6432Node\Front Porch Digital Inc.\DIVAdirector\DB\Backup must be removed. After the key is removed, DIVAdirector can continue to configure further scheduled backups correctly. If you require assistance or are not comfortable editing the Windows registry contact Oracle Support.
Your initial configuration of DIVAdirector is now complete. In the next chapter you will find daily tasks that you use to keep DIVAdirector running.