2 入门
本章介绍以下主题:
-
通过服务处理器访问 KMA-Embedded Lights Out Manager (ELOM) 和 Integrated Lights Out Manager (ILOM) 提供到控制台的远程连接(请参见"通过服务处理器访问 KMA")
注:
可以在附录 D, "服务处理器过程" 中找到其他服务处理器过程。 -
运行 QuickStart 程序-QuickStart 是客户(安全官或合格代表)可用于配置新 KMA 的实用程序(请参见"运行 QuickStart 程序")。
注:
服务代表也可以运行 QuickStart,但是,因为此程序建立关键安全参数,所以客户可能希望自己运行该程序,从而符合公司安全策略。
通过服务处理器访问 KMA
Embedded Lights Out Manager (ELOM) 和 Integrated Lights Out Manager (ILOM) 包含来自主服务器的独立服务处理器。这些服务处理器提供到 KMA 的远程连接,从而您可以执行服务器功能,例如 QuickStart 程序。
注:
如果 KMA 是 Sun Fire X2100 M2 或 X2200 M2 服务器,其使用 ELOM 作为服务器处理器,如果 KMA 是 Sun Fire X4170 M2 服务器,其使用 ILOM 作为服务处理器。有关配置信息,请参阅《嵌入式无人职守管理器管理指南》或《Integrated Lights Out Manager Web 界面过程指南》。
通过 ELOM/ILOM 连接到 KMA
使用以下任一方式通过 ELOM 或 ILOM 连接到 KMA:
-
网络连接、LAN 1 NET MGT ELOM 或 ILOM 接口(建议),或者
-
与 KMA 连接的键盘和监视器。
注:
弹出窗口阻止程序在以下过程中会阻止窗口弹出。请在开始之前禁用弹出窗口阻止程序。如果显示窗口,但是不显示控制台窗口,则 Web 浏览器或者 Java 版本与服务处理器不兼容。请升级到最新版本的浏览器和 Java。有关兼容版本的列表,请参见表 2-1。
表 2-1 支持的 ELOM 兼容 Web 浏览器和 Java 版本
| 客户机操作系统 |
支持以下 Web 浏览器 | Java 运行时环境(包括 Java Web Start) |
|---|---|---|
|
|
JRE 1.5 (Java 5.0 Update 7 或更高版本) |
|
|
|
|
|
|
|
可以在以下位置下载 Java 1.5 运行时环境: ELOM 指南的当前版本位于:
|
||
表 2-2 支持的 ILOM 兼容 Web 浏览器和 Java 版本
|
客户机操作系统 |
支持以下 Web 浏览器 |
Java 运行时环境(包括 Java Web Start) |
|
|
JRE 1.5 (Java 5.0 Update 7 或更高版本) |
|
|
|
|
|
|
|
可以在以下位置下载 Java 1.5 运行时环境: ILOM 指南的当前版本位于: |
||
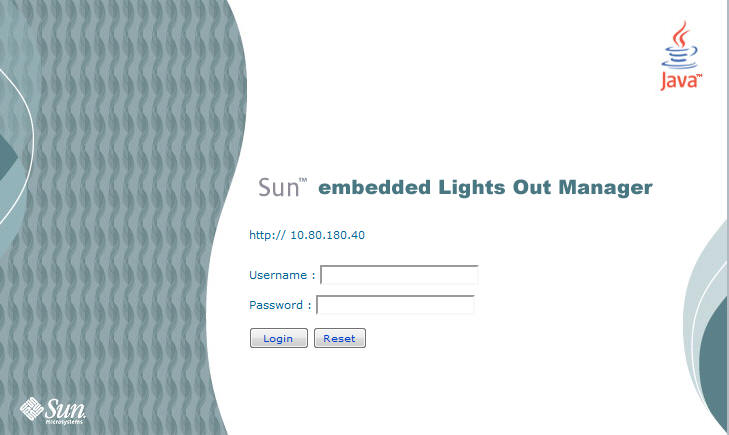
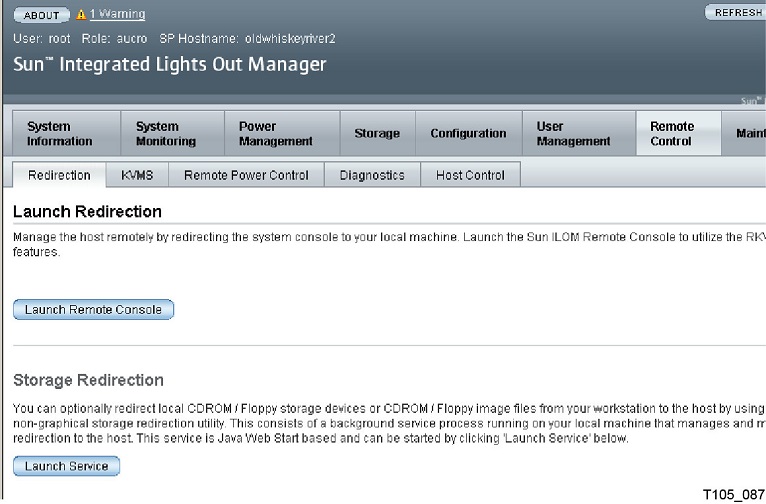
使用网络连接-ELOM
-
使用网络上的另一个工作站启动 Web 浏览器。
-
使用 LAN 1 (NET MGT) 的 IP 地址或主机名(其是刚刚配置的地址)连接到 KMA ELOM。
注:
因为 ELOM 中的证书与分配的名称或 IP 不匹配,您将收到来自 Web 浏览器的一条或多条警告。 -
单击 OK 或 Yes 跳过警告。
跳过警告后,您将收到 ELOM 登录提示。
-
使用以下信息登录:
Userid =
rootPassword =
changeme下一个屏幕是 "Manager Screen"。如果服务器刚刚连接到电源并且其尚未通电,则其未完成系统引导。
KMA 配置为在最初通电时自动引导,并且应在通电的几分钟内引导到 QuickStart 提示。
-
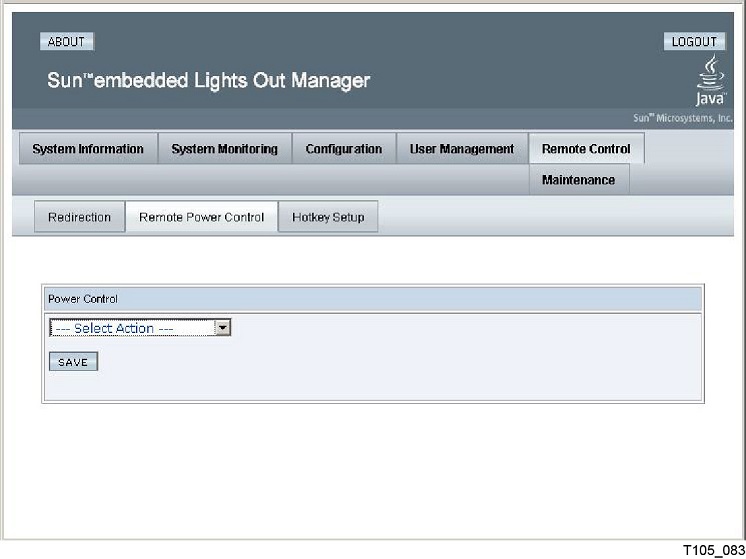
通过单击 System Monitoring 选项卡检查电源状态。
如果 "Power Status" 显示 ”power off”,请单击上面选项卡行中最右侧的 Remote Control 选项卡。
-
单击第二行选项卡中的 Remote Power Control 选项卡。
-
在 "Select Action" 下拉列表中,选择 Power On 并单击 Save 按钮。
-
KMA 开始通电。这需要花费几分钟;但是,您可以继续进行 KMA 配置。
-
单击第一行选项卡中的 Remote Control 选项卡。
-
单击第二行选项卡中的 Redirection 选项卡。
-
单击 Launch Redirection 按钮。
在启动远程控制台窗口之前将下载 java applet。
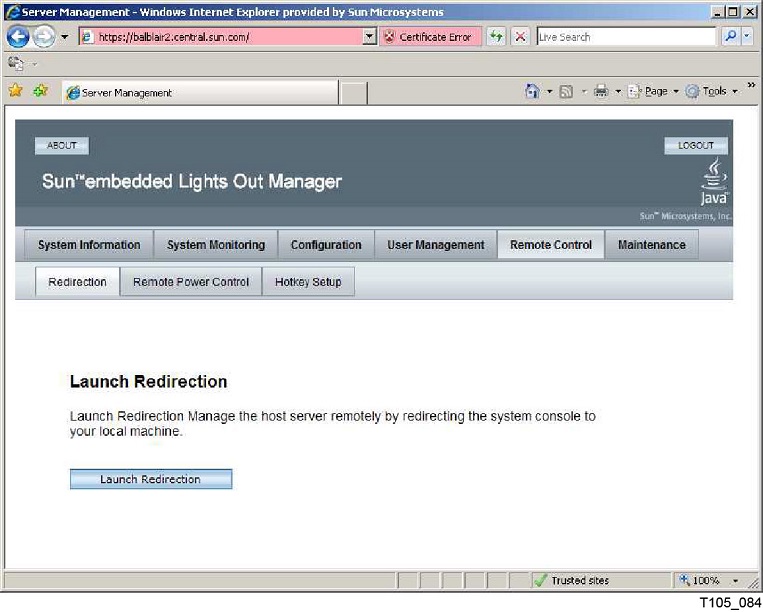
这将在新的窗口中启动远程控制台屏幕。
-
根据要求保存 javaRKVM.jnlp 文件,然后打开该文件来启动远程控制台。单击跳过可能显示的任何警告。
-
有关该过程的后续步骤,请转至"启动 OKM 控制台"。
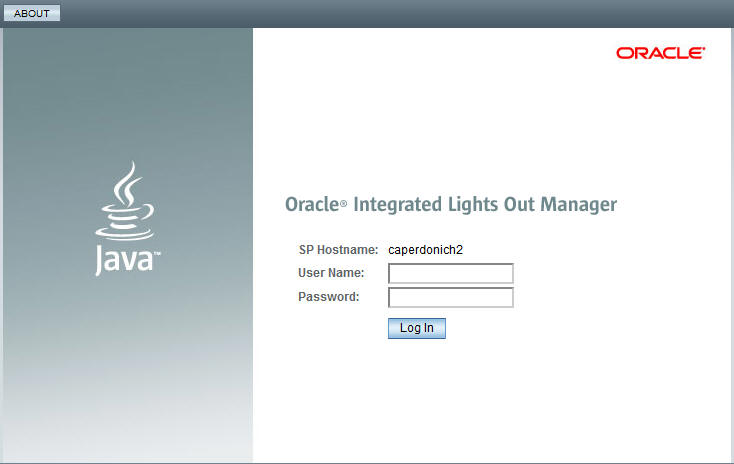
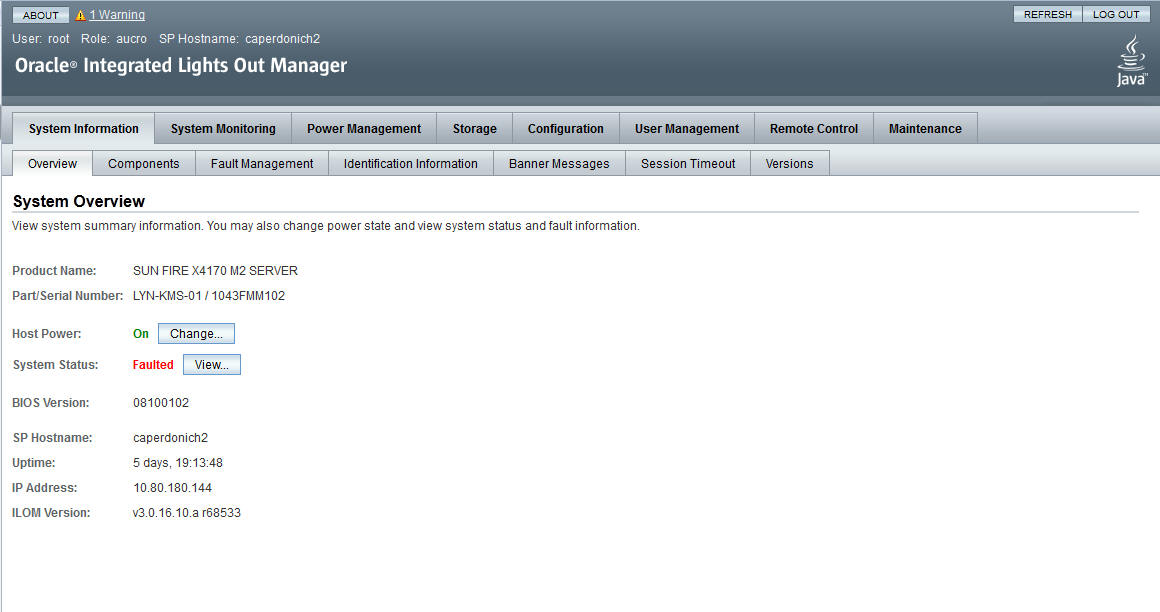
使用网络连接-ILOM
-
使用网络上的另一个工作站启动 Web 浏览器。
-
使用 LAN 1 (NET MGT) 的 IP 地址或主机名(其是刚刚配置的地址)连接到 KMA ILOM。
注:
因为 ILOM 中的证书与分配的名称或 IP 不匹配,您将收到来自 Web 浏览器的一条或多条警告。 -
单击 OK 或 Yes 跳过警告。
跳过警告后,您将收到 ILOM 登录提示。
-
使用以下信息登录:
Userid =
rootPassword =
changeme下一个屏幕是 "Manager Screen"。如果服务器刚刚连接到电源并且其尚未通电,则其未完成系统引导。
KMA 配置为在最初通电时自动引导,并且应在通电的几分钟内引导到 QuickStart 提示。
-
检查 "Host Power" 旁边显示的电源状态。
-
如果 "Host Power" 显示电源关闭,请单击 Change 下拉列表。
-
在 "Select Action" 下拉列表中,选择 Power On 并单击 Save 按钮。
KMA 开始通电。这需要花费几分钟;但是,您可以继续进行 KMA 配置。
-
单击第一行选项卡中的 Remote Control 选项卡。
-
单击第二行选项卡中的 "Redirection" 选项卡。
-
单击 Launch Remote Console 按钮。
在启动远程控制台窗口之前将下载 java applet。这将在新的窗口中启动远程控制台屏幕。
-
根据要求保存 javaRKVM.jnlp 文件,然后打开该文件来启动远程控制台。单击跳过可能显示的任何警告。
-
有关该过程的后续步骤,请转至"启动 OKM 控制台"。
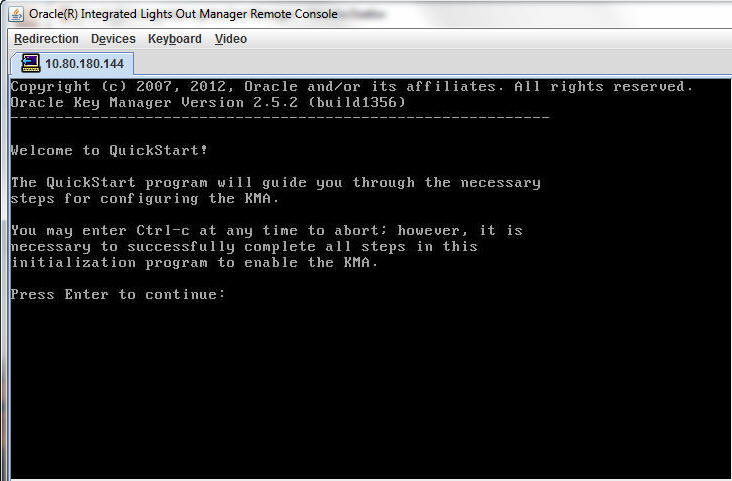
启动 OKM 控制台
-
按任意键并按 <Enter> 键继续。KMA 检查 SCA 6000 卡并报告其状态。
在重新引导、重置或初始安装后,如果 SCA 6000 卡正在进行初始化或者正在升级其固件,将显示一条新消息。控制台将被禁用,直到其完成。
Console unavailable while KMA Maintenance is in progress...
-
按 <Enter> 键。
现在可以如"启动 QuickStart"中所述继续执行 QuickStart 程序。
运行 QuickStart 程序
打开处于出厂默认状态的 KMA 的电源时,将自动执行名为 QuickStart 的 KMA 配置菜单的特殊模式。QuickStart 收集初始化 KMA 所需的最少配置信息。成功完成 QuickStart 程序后,无法重新执行该程序。再次访问 QuickStart 程序的唯一方式是将 KMA 重置为其出厂默认状态(请参阅"将 KMA 重置为出厂默认值"。)
注:
在下面的屏幕示例中,粗体条目表示您响应的区域。启动 QuickStart
要运行 QuickStart 程序:
-
打开 KMA 的电源。第一次打开 KMA 的电源时,将执行 QuickStart,并显示 "Welcome to QuickStart!" 屏幕。
KMA 在第一次引导后执行初始配置步骤。完成这些步骤需要几分钟时间。KMA 显示消息来指示正在进行初始配置。
如果按 Ctrl-c 组合键,将重置 QuickStart 程序并再次显示 "Welcome to QuickStart!" 屏幕。
Copyright (c) 2007, 2013, Oracle and/or its affiliates. All rights reserved.
Oracle Key Manager Version 3.0.0 (build2020) SO on Strathclyde
----------------------------------------------------------
Welcome to QuickStart!

Authorized users only. All activity may be monitored and reported.

Performing initial configuration of this KMA - Please waitInitial configuration of this KMA completed

The QuickStart program will guide you through
the necessary steps for configuring the KMA.
You may enter Ctrl-c at any time to abort; however, it is necessary to successfully complete all steps in this
initialization program to enable the KMA.

Press Enter to continue:

Set Keyboard Layout
__________________________________________________________

Press Ctrl-c to abort.

You may change the keyboard layout here.

Available keyboard layouts:

( 1) Arabic             ( 2) Belgian           ( 3) Brazilian
( 4) Canadian-Bilingual ( 5) Canadian-French   ( 6) Danish
( 7) Dutch              ( 8) Dvorak            ( 9) Finnish
(10) French             (11) German            (12) Italian
(13) Japanese-type6     (14) Japanese          (15) Korean
(16) Latin-American     (17) Norwegian         (18) Portuguese
(19) Russian            (20) Spanish           (21) Swedish
(22) Swiss-French       (23) Swiss-German      (24) Traditional-Chinese
(25) TurkishQ           (26) UK-English        (27) US-English

The current layout is US-English
Please enter the number for the keyboard layout [27] :
The keyboard layout has been applied successfully.
Press Enter to continue
指定网络配置
使用以下过程可以建立网络配置。
设置 KMA 管理 IP 地址
要设置 KMA 管理 IP 地址:
-
按 <Enter> 键继续。将显示以下信息。
Set KMA Management IP Addresses
-------------------------------------------------------
Press Ctrl-c to abort.
An IP Address configuration must be defined in order for the
KMA to communicate with other KMAs or Users in your system.
Do you want to configure the Management Network interface to have an IPv6 address? [y/n]:
Do you want to use DHCP to configure the Management Network IPv4 interface? [y/n]:
Please enter the Management Network IP Address [10.172.180.39]:
Please enter the Management Network Subnet Mask [255.255.254.0]:
-
在主菜单的
Please enter your choice:提示下,键入 3 并按 <Enter> 键。 -
在
Do you want to configure the Management Network interface to have an IPv6 address提示下,键入 n 或 y。 -
在
Do you want to use DHCP to configure the Management Network IPv4 interface提示下,键入 n 或 y。如果键入 n,则转至步骤 5。如果键入 y,将转至过程"设置 KMA 服务 IP 地址"。注:
如果选择使用 DHCP,将忽略 DHCP 服务器提供的任何主机名信息。DHCP 服务器提供的任何 DNS 信息都位于"指定 DNS 设置"中。 -
在提示下,键入管理网络 IP 地址并按 <Enter> 键。
-
在
Please enter the Management Network Subnet Mask:提示下,键入子网掩码地址(例如 255.255.254.0)并按 <Enter> 键。
启用技术支持帐户
要启用技术支持帐户:
-
按 <Enter> 键继续。将显示以下信息。
To assist in troubleshooting your network configuration,
you might want to enable the technical support account for the
network configuration steps of the QuickStart process.
Do you want to enable this support account for the network
configuration steps of the QuickStart process? [y/n]: y
Press Enter to continue:
-
如果要在 QuickStart 中启用技术支持帐户,请在
Do you want to enable this support account for the network configuration steps of the QuickStart process?提示下键入 y。否则,键入 n,将继续执行步骤 3。 -
按 <Enter> 键继续。
如果启用了技术支持帐户,在您完成"指定 DNS 设置"过程后 QuickStart 会禁用该帐户。此时会显示以下屏幕。
The support account is now being disabled.
Technical Support configuration changes have been completed.
Press Enter to continue:
设置 KMA 服务 IP 地址
要设置 KMA 服务 IP 地址:
-
按 <Enter> 键继续。将显示以下信息。
Set KMA Service IP Addresses
-------------------------------------------------------
Press Ctrl-c to abort.
An IP Address configuration must be defined in order for the
KMA to communicate with other Agents in your system.
Do you want to configure the Service Network interface to have an IPv6 address?
[y/n]: y
Do you want to use DHCP to configure the Service Network IPv4 interface? [y/n]: n
Please enter the Service Network IP Address [192.168.1.39]:
Please enter the Service Network Subnet Mask [255.255.255.0]:
-
在主菜单的
Please enter your choice:提示下,键入 4 并按 <Enter> 键。 -
在
Do you want to configure the Service Network interface to have an IPv6 address提示下,键入 n 或 y。 -
在
Do you want to use DHCP to configure the Service Network IPv4 interface提示下,键入 n 或 y。如果键入 n,则转至步骤 5。如果键入 y,将转至过程"查看/添加/删除网关"。 -
在提示下,键入服务网络 IP 地址并按 <Enter> 键。
-
在
Please enter the Service Network Subnet Mask:提示下,键入子网掩码地址(例如 255.255.255.0)并按 <Enter> 键。
查看/添加/删除网关
此菜单选项显示管理 (M) 和服务 (S) 界面上的当前网关设置(一页五个)。
-
按 <Enter> 键继续。将显示以下信息,指示您可以添加网关、删除网关或接受当前网关配置。
Modify Gateway Settings
------------------------------------------------------------
Press Ctrl-c to abort.
Gateways that are configured automatically are not modifiable, and are
indicated with an asterisk (*). Management routes are indicated with an 'M',
and service routes with an 'S'.
   # Destination       Gateway          Netmask            IF
---- ----------------- ---------------- -------------------- --
   1 default           10.172.181.254   0.0.0.0             M
   2 default           10.172.181.21    0.0.0.0             M
   3 default           192.168.1.119    0.0.0.0             S
   4 10.0.0.0          10.172.180.25    255.255.254.0       M
*  5 10.172.180.0      10.172.180.39    255.255.254.0       M
Press Enter to continue:
Modify Gateway Settings
------------------------------------------------------------
Press Ctrl-c to abort.
Gateways that are configured automatically are not modifiable, and are
indicated with an asterisk (*). Management routes are indicated with an 'M',
and service routes with an 'S'.
 #   Destination          Gateway          Netmask         IF
---- -------------------- ----------------- ---------------- --
*  6 192.168.1.0          192.168.1.39     255.255.255.0    S
   7 192.168.25.0         10.172.180.25    255.255.255.0    M
   8 192.168.26.0         10.172.180.25    255.255.255.0    M
*  9 127.0.0.1            127.0.0.1        255.255.255.255
* 10 fe80::               2001:db8::/32    10               M
(1) Continue
(2) Back
 1


Modify Gateway Settings
------------------------------------------------------------
Press Ctrl-c to abort.
Gateways that are configured automatically are not modifiable, and are
indicated with an asterisk (*). Management routes are indicated with an 'M',and
service routes with an 'S'.
   # Destination  Gateway                   Netmask       IF
---- ------------ ------------------------  ------------- --

* 11 fe80::       fe80::216:36ff:feca:15b9  10          S
You can add a route, delete a route, or exit the gateway configuration.
Please choose one of the following:
(1)  Add a gateway
(2)  Remove a configured gateway (only if modifiable)
(3)  Exit gateway configuration
(4)  Display again
3
-
在主菜单的
Please enter your choice:提示下,键入 5 并按 <Enter> 键。 -
在
(1) Continue (2) Back提示下,键入 1 可以显示下一个网关设置,键入 2 可以返回到上一个网关设置。 -
在
Please choose one of the following:提示下,键入 1、2、3 或 4 并按 <Enter> 键。注:
您在任何时间按 Ctrl+c 组合键,都将不保存更改并返回到主菜单。
指定 DNS 设置
此菜单选项显示 DNS 设置,并提示您提供新的 DNS 域(如果您希望配置一个域)和 DNS 服务器 IP 地址。
注:
如果在"设置 KMA 管理 IP 地址"中选择了在管理网络上使用 DHCP,则 KMA 会显示来自管理网络上的 DHCP 服务器的任何 DNS 设置。您可以输入信息来覆盖这些 DNS 设置。-
按 <Enter> 键继续。将显示以下信息。
Set DNS Configuration
-------------------------------------------------------
Press Ctrl-c to abort.
DNS configuration is optional, but necessary if this KMA will be configured using hostnames instead of IP addresses.

Current DNS configuration:
Domain:
Nameservers:

Please enter the DNS Domain (blank to unconfigure DNS): example.com

Up to 3 DNS Name Servers can be entered. Enter each name server separately, and enter a blank name to finish.
Please enter DNS Server IP Address #1: 10.172.0.5
Please enter DNS Server IP Address #2:
-
在主菜单的
Please enter your choice:提示下,键入 6 并按 <Enter> 键。 -
在
Please enter the DNS Domain (blank to unconfigure DNS):提示下输入 DNS 域名。 -
在
Please enter DNS Server IP address提示下输入 DNS 服务器 IP 地址。至多可以输入三个 IP 地址。 -
按
<Enter>键完成,而不指定 IP 地址。
初始化 KMA
-
按 <Enter> 键继续。将显示以下信息。
The KMA Name is a unique identifier for your KMA. This name should not be
the same as the KMA Name for any other KMA in your cluster. It also should
not be the same as any User Names or Agent IDs in your system.

Please enter the KMA Name: KMA-1
Press Enter to continue:
-
在提示下,键入 KMA 的唯一标识符。
注:
一旦使用 QuickStart 程序设置了 KMA 名称,则无法对其进行更改。只能通过将 KMA 重置为出厂默认值并再次运行 QuickStart 来更改该项。此 KMA 名称用作 KMA 的主机名。
配置群集
-
在提示下,按 <Enter> 键。将显示以下信息,指示您可以使用此 KMA 创建新群集、加入现有群集或从此 KMA 的备份恢复群集。
You can now use this KMA to create a new Cluster, or you can have this KMA join an existing Cluster. You can also restore a backup to this KMA or change the KMA version. Please choose one of the following: (1) Create New Cluster (2) Join Existing Cluster (3) Restore Cluster from Backup Please enter your choice: 1 Create New Cluster -
在提示下,键入 1、2 或 3 并按 <Enter> 键。
如果键入 1,则转至"输入密钥拆分凭证"。
如果键入 2,则转至"加入现有群集"。
如果键入 3,则转至"从备份恢复群集"。
输入密钥拆分凭证
密钥拆分凭证用户 ID 和口令短语应该由拥有该用户 ID 和口令短语的人员输入。用一个人员收集和输入此信息违背了具有密钥拆分凭证的目的。
如果让密钥拆分凭证的所有成员在此时输入此信息不切实际,则现在输入一组简单凭证,然后在 OKM Manager 中输入全部凭证。
但是,这样做会导致安全性风险。如果使用简单密钥拆分凭证创建核心安全性备份,则可以使用该备份来恢复备份。
-
在
Please enter your choice:提示下,键入 1。将显示以下信息。The Key Split credentials are used to wrap splits of the Core Security Key Material which protects Data Unit Keys. When Autonomous Unlocking is not enabled, a quorum of Key Splits must be entered in order to unlock the KMA and allow access to Data Unit Keys. A Key Split credential, consisting of a unique User Name and Passphrase, is required for each Key Split. The Key Split Size is the total number of splits that will be generated. This number must be greater than 0 and can be at most 10. Please enter the Key Split Size: 2 The Key Split Threshold is the number of Key Splits required to obtain a quorum. Please enter the Key Split Threshold: 1 Please enter the Key Split User Name #1: user1 Passphrases must be at least 8 characters and at most 64 characters in length. Passphrases must not contain the User's User Name. Passphrases must contain characters from 3 of 4 character classes (uppercase, lowercase, numeric, other). Please enter Key Split Passphrase #1: ******** Please re-enter Key Split Passphrase #1: ******** Press Enter to continue: Press Ctrl-c to abort.
注:
可以使用"修改密钥拆分配置"更改密钥拆分大小和密钥拆分阈值。密钥拆分阈值必须小于或等于密钥拆分大小。用户 ID 和口令短语应该由授权用户输入以保持其安全。这些项也可以在运行 QuickStart 程序后进行更改。
-
在
Please enter the Key Split Size:提示下,键入要生成的密钥拆分数量并按 <Enter> 键。 -
在
Please enter the Key Split Threshold:提示下,键入获取法定信息所需的密钥拆分数量并按 <Enter> 键。 -
在
Please enter the Key Split User Name #1:提示下,键入第一个密钥拆分用户的用户名并按 <Enter> 键。 -
在
Please enter Key Split Passphrase #1:提示下,键入第一个密钥拆分用户的口令短语并按 <Enter> 键。 -
在
Please re-enter Key Split Passphrase #1:提示下,键入先前输入的同一口令短语并按 <Enter> 键。 -
重复步骤 4 至 6,直到为所选密钥拆分大小输入了所有用户名和口令短语。
注:
密钥拆分用户名和口令短语独立于为 KMA 管理而建立的其他用户帐户。Oracle 建议密钥拆分用户名应该与 KMA 用户名不同。
输入初始安全官用户凭证
-
在
Press Enter to continue:提示下,按 <Enter> 键。将显示以下信息。The initial Security Officer User is the first User that can connect to the KMA via the Oracle Key Manager GUI. This User can subsequently create additional Users and administer the system. Please enter a Security Officer User Name: SecOfficer A Passphrase is used to authenticate to the KMA when a connection is made via the Oracle Key Manager GUI. Passphrases must be at least 8 characters and at most 64 characters in length. Passphrases must not contain the User's User Name. Passphrases must contain characters from 3 of 4 character classes (uppercase, lowercase, numeric, other). Please enter the Security Officer Passphrase: ******** Please re-enter the Security Officer Passphrase: ******** Press Enter to continue: Press Ctrl-c to abort.
注:
此初始安全官用户帐户用于使用 OKM Manager 登录到 KMA。 -
在提示下,键入安全官的用户名并按 <Enter> 键。将显示以下信息。
-
在提示下,键入安全官的口令短语并按 <Enter> 键。
-
在 "Please re-enter the Security Officer Passphrase:" 提示下,重新键入同一口令短语并按 <Enter> 键。
重要提示-所有 KMA 具有其自己的口令短语,该口令短语独立于分配给用户和代理的口令短语。将为群集中的第一个 KMA 分配一个随机口令短语。如果此 KMA 的证书过期,并且您希望从群集中的另一个 KMA 检索该 KMA 的实体证书,您需要使用 OKM Manager 将口令短语设置为已知值。有关过程,请参阅"设置 KMA 口令短语"。
指定自治解锁首选项
注意:
虽然启用自治解锁会更便利并且提高了 OKM 群集的可用性,但也会导致安全性风险。启用自治解锁后,电源关闭的 KMA 必须保留足够信息才能完全引导并开始对存储的密钥进行解密。这意味着被盗的 KMA 可以通电,并且攻击者可以开始提取 KMA 的密钥。虽然提取密钥并不容易,但是知识渊博的攻击者仍能够从 KMA 转储所有密钥。不需要加密攻击。
如果禁用自治解锁,则需要加密攻击来从被盗 KMA 提取密钥。
在选择启用自治解锁之前,应认真考虑潜在攻击和安全问题。
-
在
Press Enter to continue:提示下,按 <Enter> 键。将显示以下信息。When Autonomous Unlocking is DISABLED, it is necessary to UNLOCK the KMA using a quorum of Key Split Credentials EACH TIME the KMA starts before normal operation of the system can continue. Agents may NOT register Data Units with or retrieve Data Unit Keys from a locked KMA. When Autonomous Unlocking is ENABLED, the KMA will automatically enter the UNLOCKED state each time the KMA starts, allowing it to immediately service Agent requests. Do you wish to enable Autonomous Unlocking? [y/n]: y
注:
通过自治解锁功能,KMA 可以在硬复位或软复位后进入完全操作状态,而无需使用 OKM Manager 输入法定数目的口令短语。稍后可以从 OKM Manager 更改此选项。 -
在提示下,键入 y 或 n 并按 <Enter> 键。
设置密钥池大小
-
在
Press Enter to continue:提示下,按 <Enter> 键。将显示以下信息。Enter Key Pool Size ------------------------------------------------------- Press Ctrl-c to abort. Each KMA pre-generates and maintains a pool of keys. These pre-operational keys must be backed up or replicated before a KMA will provide them to an Agent for use in protecting data. This helps to ensure that a key will never be permanently lost, even in disaster scenarios. A smaller key pool size prevents unnecessary initial database (and backup) size, but requires frequent backups or a reliable network to ensure that activation-ready keys are always available. Conversely, a large key pool size is more tolerant of infrequent backups or unreliable network connections between KMAs, but the large number of pre-generated keys causes the database (and backups) to be quite large. Please select the key pool size (1000 - 200000):
-
在提示下,输入密钥池大小。输入的值可以确定新 KMA 生成和维护的初始大小。
同步 KMA 时间
群集中的 KMA 必须将其时钟保持同步。在内部,所有 KMA 使用 UTC 时间(Coordinated Universal Time,国际协调时间)。
还可以使用 OKM Manager 将日期和时间设置调整为本地时间。
KMAs in a Cluster must keep their clocks synchronized. Specify an NTP server if
one is available in your network. Otherwise, specify the date and time to which
the local clock should be set.

Please enter the NTP Server Hostname or IP Address (optional): ntp.example.com

Press Enter to continue:

Initializing new cluster...

New cluster has been created.

Press Enter to continue:
Oracle Key Manager Version 3.0.0 (Build2020)
__________________________________________________________
KMA initialization complete!
You may now connect to the KMA via the Oracle Key Manager GUI in order to continue with Cluster configuration.

Press Enter to exit:

Copyright (c) 2007, 2013, Oracle and/or its futilities. All rights reserved.
Oracle Key Manager Version 3.0.0 (Build2020)
__________________________________________________________

Please enter your User Name:
-
如果网络环境有 NTP 服务器,在
Please enter the NTP Server Hostname or IP Address (optional):提示下,输入该 NTP 服务器主机名或 IP 地址。注:
可以为 NTP 服务器提供 IPv6 地址。此 IPv6 地址不能包括方括号或前缀长度。 -
如果没有 NTP 服务器,则按 <Enter> 键。然后,在
Please enter the date and time for this KMA提示下,使用指定的一种格式输入日期和时间,或按 <Enter> 键使用显示的日期和时间。 -
在提示下,按 <Enter> 键。KMA 初始化完成。
-
按 <Enter> 键退出。QuickStart 程序终止并且显示登录提示(请参阅"登录 KMA")。现在,KMA 具有与 OKM Manager 通信所需的最低系统配。
-
下一步是使用 OKM Manager 连接到群集。有关过程,请参阅"连接到群集"。
加入现有群集
重要提示
-
执行此任务之前,安全官必须首先使用 OKM Manager 登录到 OKM 群集并创建 KMA。
请参见"创建 KMA"。KMA 初始化过程中指定的 KMA 名称(请参见"初始化 KMA")必须与您创建该 KMA 时输入的 KMA 名称匹配。
-
向现有 OKM 群集添加新 KMA 时,该 OKM 群集开始将群集信息传播到该新 KMA。群集将此信息传播到新的 KMA 需要一些时间来完成,因此,该群集在此时间段会变得忙碌。
在指示灯装入期间向群集添加 KMA,从而此传播活动不会影响正常操作。为避免代理在同步期间尝试使用新 KMA 而导致的问题,该 KMA 在添加到群集后保持锁定。等待直到该 KMA 已同步(即,直到它已经“追上”群集中的其他 KMA),然后再将其解锁。
-
在早期 KMS 发行版中,如果在新 KMA 上运行的发行版与群集中的现有 KMA 不同,在该新 KMA 加入群集时会将其自动升级或降级到现有 KMA 的发行版。对于 OKM 2.3 及更高版本,如果新 KMA 运行 OKM 2.3 及更高版本,而现有 KMA 运行早期 KMS 发行版,则该新 KMA 可以加入群集,无需降级到该早期发行版。
-
如果您运行的是 OKM 2.3 或更高版本,在将 KMA 添加到群集之前,必须将复制版本设置为群集中的所有 KMA 都支持的最高值。请参阅"切换复制版本"。
要将新 KMA 加入到现有群集:
-
完后 KMA 初始化过程(请参见"初始化 KMA")后,在提示下,按 <Enter> 键。
将显示以下信息,指示您可以使用此 KMA 创建新群集、加入现有群集或从此 KMA 的备份恢复群集。
You can now use this KMA to create a new Cluster, or you can have this KMA join
an existing Cluster.  You can also restore a backup to this KMA or change the
KMA Version.

Please choose one of the following:
(1)  Create New Cluster
(2)  Join Existing Cluster
(3)  Restore Cluster from Backup
Please enter your choice: 2
Join Existing Cluster
-
在
Please enter your choice:提示下,键入 2。将显示以下信息。Join Existing Cluster ------------------------------------------------------- Press Ctrl-c to abort. In order to join a Cluster, the KMA must contact another KMA which is already in the Cluster. Please enter the Management Network IP Address or Host Name of an existing KMA in the cluster: 10.172.60.172 Please enter this KMA’s Passphrase:******** Press Enter to continue: This command requires authorization by a quorum of Key Split Users. Enter sufficient Key Split credentials to form a quorum. Enter a blank name to finish. Press Ctrl-c to abort. Please enter Key Split User Name #1: user1 Please enter Key Split Passphrase #1: ******** Press Enter to continue: Joining cluster... This KMA has joined the Cluster. Press Enter to continue: Oracle Key Manager Version 2.3 (Build1036) ------------------------------------------------------- KMA initialization complete! You may now connect to the KMA via the Oracle Key Manager GUI in order to continue with Cluster configuration. Press Enter to exit:
注:
在此新 KMA 与群集中的现有 KMA 通信之前,您必须使用 OKM Manager 在现有 KMA 的数据库中为此新 KMA 创建一个条目。有关过程,请参阅"创建 KMA"。 -
在提示下,键入现有群集中一个 KMA 的网络地址并按 <Enter> 键。
-
在提示下,键入该 KMA 的口令短语并按 <Enter> 键。
-
输入第一个 KMA 的第一个密钥拆分用户名。
-
键入密钥拆分用户的口令短语,然后按 <Enter> 键。
重要提示-认真输入密钥拆分用户名和口令短语。任何错误都会导致此过程失败,并且错误消息不具体。为限制显示给攻击者的信息,不提供关于哪些密钥拆分用户名或口令短语不正确的反馈。
-
在下面的
Please enter Key Split User Name提示下,按 <Enter> 键。输入空白名称以完成。初始化完成。
在成功的 "Join Cluster" 会话结束时,如果群集的复制版本至少为 12,QuickStart 显示以下提示。
It might take some time for this KMA to be updated with information from other
KMAs in the Cluster.  This amount of time can be greater in Clusters that have
more KMAs or when the KMAs have been online for a long time.
To accelerate these initial updates (that is, to catch up now), you can choose
now to download a backup from another KMA in the Cluster and then restore from
it.  There will not be an opportunity to accelerate these updates later.
Catch up now? [y/n]:
-
键入 y 可以加速初始更新。否则,键入 n 转至步骤 10。
注:
在上面的提示下键入 y 之前,在将群集的复制版本切换到 12 之后在对等 KMA 上创建备份。此外,确保在其上创建了备份的对等 KMA 当前在网络上正进行响应。这些步骤可以帮助新 KMA 找到要下载和应用的高速缓存备份。您指定的 KMA 标识此群集中具有最大高速缓存备份的其他 KMA、下载该备份,然后将该备份应用于其本地数据库。此过程等效于复制数据,但是速度快得多。在此过程中会显示信息性消息。
例如:
Waiting 10 seconds for the join to propagate to Peer KMAs...
Querying Peer KMAs to find the active ones...
Querying active Peer KMAs to find cached backup sizes...
Peer KMA at IP Address 10.172.180.39 has a cached backup size of 729136 bytes.
Downloading the cached backup from this Peer KMA...
Downloaded the cached backup from this Peer KMA.
Initialized the Key Store.
Performed maintenance on the Key Store.
Applying the cached backup to the local database...
.......................................................
.......................................................
.......................................................
.......................................................
.......................................................
.......................................................
.......................................................
Applied the cached backup to the local database.
Successfully accelerated initial updates on this KMA.
稍后,新加入的 KMA 会自动复制备份中没有的任何数据。
如果此过程中发生错误,QuickStart 会再次显示以上提示(以防该错误是由于临时条件造成)。如果 KMA 找不到具有高速缓存备份的对等 KMA,QuickStart 也会再次显示上面的提示。
但是,如果自从第一次显示上面的提示已过去了 5 分钟,则 QuickStart 显示以下消息并且不再显示以上提示:
Failed to accelerate initial updates on this KMA after 300 seconds.
This KMA will gradually be updated with information from other KMAs.
不论您在步骤 9 中键入了 y 还是 n,或者即使该过程超时,都将显示以下消息:
This KMA has joined the Cluster.
Press Enter to continue:
-
按 <Enter> 键退出。QuickStart 程序终止并且显示登录提示(请参阅"登录 KMA")。现在,KMA 具有与 OKM Manager 通信所需的最低系统配。
-
下一步是使用 OKM Manager 连接到群集。有关过程,请参阅"连接到群集"。
-
OKM 群集开始将信息传播给新添加的 KMA。这将导致该新 KMA 非常忙碌,直到已经追上群集中的现有 KMA。其他 KMA 也非常忙碌。可以通过如"查看 KMA"中所述查看 KMA 来从 OKM Manager 观察此活动。
-
观察新 KMA 的 "Replication Lag Size" 值。最初,此值较高。通过下拉 "View" 菜单并选择 "Refresh" 或通过按 F5 键来定期刷新此面板中显示的信息。一旦此 KMA 的 "Replication Lag Size" 值下降到群集中其他 KMA 的相似值,则可以如"解锁 KMA"中所述将此 KMA 解锁。
从备份恢复群集
使用此选项,可以创建安全官帐户,该帐户可用于使用 OKM Manager 将备份映像恢复到 KMA。在 KMA 遇到故障(例如,硬盘损坏)时,可以使用备份恢复 KMA 的配置。但是,通常不需要这样,因为恢复为出厂默认状态的 KMA 可以容易地加入现有群集,并通过从群集对等项接收复制更新来构建其数据库。当群集中的所有 KMA 都失败时,从备份恢复 KMA 仍旧非常有用。
注:
首先必须创建一个备份。有关使用 OKM Manager 创建备份的过程,请参阅"创建备份"。Oracle 建议指定新的安全官姓名,该姓名在执行上一个备份时不存在于 OKM 群集中。
如果指定现有安全官姓名并提供不同的口令短语,将覆盖旧口令短语。如果指定现有安全官姓名并且在执行上一个备份之前向该用户添加了其他角色,则不再向该用户分配这些角色。
要恢复备份映像:
-
完后 KMA 初始化过程(请参见"初始化 KMA")后,在提示下,按 <Enter> 键。
将显示以下信息,指示您可以使用此 KMA 创建新群集、加入现有群集或从此 KMA 的备份恢复群集。
You can now use this KMA to create a new Cluster, or you can have this KMA join
an existing Cluster.  You can also restore a backup to this KMA or change the
KMA Version.
Please choose one of the following:
(1)  Create New Cluster
(2)  Join Existing Cluster
(3)  Restore Cluster from Backup
Please enter your choice: 3
Restore Cluster from Backup
-
在
Please enter your choice:提示下,键入 3。将显示以下信息。Initial Restore Cluster From Backup Enter Initial Security Officer User Credentials ------------------------------------------------------- Press Ctrl-c to abort. The initial Security Officer User is the first User that can connect to the KMA via the Oracle Key Manager GUI. This User can subsequently create additional Users and administer the system.Please enter a Security Officer User ID: SO1A Passphrase is used to authenticate to the KMA when a connection is made via the KMS Manager. Passphrases must be at least 8 characters and at most 64 characters in length.
-
在提示下,键入安全官的用户名并按 <Enter> 键。
最佳做法:输入临时恢复安全官用户 ID(例如 RestoreSO),而不是输入在该恢复之前存在的安全官用户 ID。
-
在提示下,键入安全官的口令短语并按 <Enter> 键。
如果选择在 QuickStart 中定义初始法定用户凭证,可以在此时输入法定登录名和口令短语,从而暂挂从 OKM Manager GUI(步骤 13)进行的恢复操作。
稍后,法定成员可以使用此登录名和口令短语登录到 OKM Manager GUI 并输入其凭证来批准恢复(请参见"恢复备份")。
如果不在此处输入法定登录用户 ID,则 QuickStart 结束时存在的唯一用户就是在步骤 3 中创建的安全官。在这种情况下,必须一次输入所有密钥拆分凭证才能执行恢复 ()。
将显示以下信息:
Enter Initial Quorum Login User Credentials ------------------------------------------------------- Press Ctrl-c to abort. The initial Quorum Login User is an optional user that will allow the restore operation to be pended until quorum members can connect to the KMA via the Oracle Key Manager GUI and enter their credentials. If this user is not created here, then a quorum of credentials must be entered at the time the restore operation is requested. Please enter a Quorum Login User ID (optional): Q Passphrases must be at least 8 characters and at most 64 characters in length. Passphrases must not contain the User's User ID. Passphrases must contain characters from 3 of 4 character classes (uppercase, lowercase, numeric, other). Please enter the Quorum Login Passphrase: Please re-enter the Quorum Login Passphrase: -
在提示下,按 <Enter> 键或键入法定登录用户 ID 并按 <Enter> 键。
-
在提示下,按 <Enter> 键或键入法定登录口令短语并按 <Enter> 键。
-
在 "Please re-enter the Quorum Login Passphrase:" 提示下,按 <Enter> 键或重新键入同一口令短语并按 <Enter> 键。
-
在
Please re-enter the Security Officer’s Passphrase:提示下,重新键入在步骤 4 中输入的口令短语并按 <Enter> 键。Set Time Information ------------------------------------------------------- Press Ctrl-c to abort. KMAs in a Cluster must keep their clocks synchronized. Specify an NTP server if one is available in your network. Otherwise, specify the date and time to which the local clock should be set. Please enter the NTP Server Hostname or IP Address (optional): The date and time for this KMA must be specified in ISO 8601 format including a time zone. Here are some valid ISO 8601 format patterns: YYYY-MM-DDThh:mm:ssZ YYYY-MM-DD hh:mm:ssZ YYYY-MM-DDThh:mm:ss-0600 YYYY-MM-DD hh:mm:ss-0600 YYYY-MM-DDThh:mm:ss+02:00 YYYY-MM-DD hh:mm:ss+02:00 Please enter the date and time for this KMA [2007-09-17 22:32:53.698Z]: 2007-09-17 22:33:00-0600 Press Enter to continue: The KMA is now ready to be restored. Press Enter to continue: -
如果网络环境有 NTP 服务器,在
Please enter the NTP Server Hostname or IP Address (optional):提示下,输入该 NTP 服务器主机名或 IP 地址。 -
如果没有 NTP 服务器,则按 <Enter> 键。然后,在
Please enter the date and time for this KMA提示下,使用指定的一种格式输入日期和时间,或按 <Enter> 键使用显示的日期和时间。确保日期和时间准确。密钥生命周期基于时间间隔,密钥的原始创建时间包含在备份中。替换 KMA 上的时间设置必须准确以保持预期的密钥生命周期。
-
在提示下,按 <Enter> 键。将显示以下信息,指示初始化完成。
Oracle Key Manager Version 3.0.0 (build2020) -- SO on Strathclyde
Serial Number 1251BD0E48

OpenBoot PROM Version OBP 4.34.3 2013/02/06 11:46
-------------------------------------------------------
KMA initialization complete!
You may now connect to the KMA via the Oracle Key Manager GUI in order to continue with Cluster configuration.
Press Enter to exit:
-
按 <Enter> 键退出。QuickStart 程序终止并且显示登录提示。
最佳做法:使用在步骤 3 中建立的临时恢复安全官用户 ID 登录到 OKM Manager GUI。
-
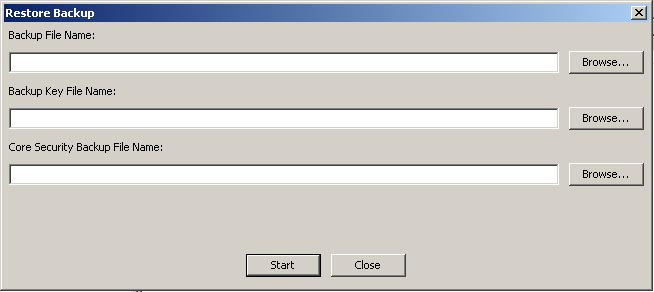
在 OKM Manager 上以安全官身份登录并选择 Backup List。在 "Backup List" 屏幕中,单击 Restore 按钮将备份上载并恢复到 KMA。
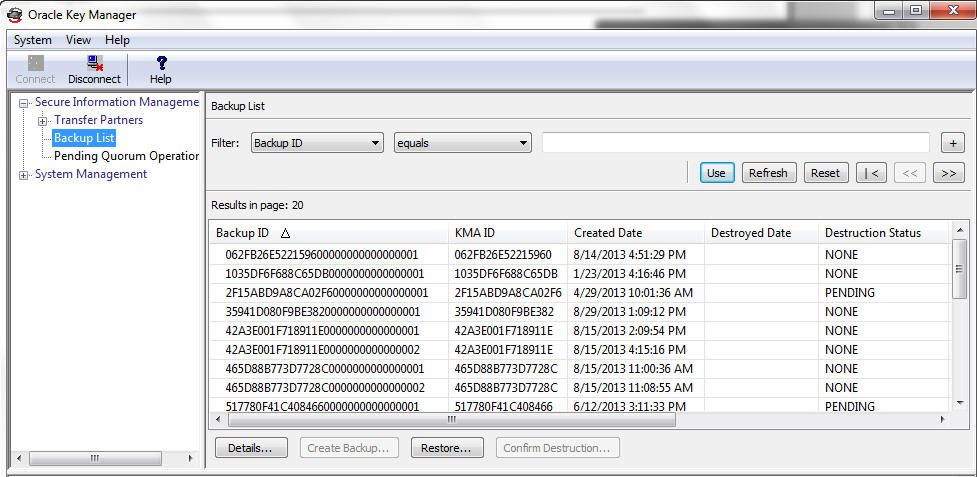
-
为完成恢复操作,OKM Manager 会提示您提供与备份密钥文件对应的备份文件、备份密钥文件以及核心安全性备份文件。
备份密钥文件和备份文件必须匹配,但可以使用任何核心安全性备份文件。
-
然后,OKM Manager 会提示提供法定数目的密钥拆分用户。他们必须是执行核心安全性备份时处于有效状态的密钥拆分凭证用户。
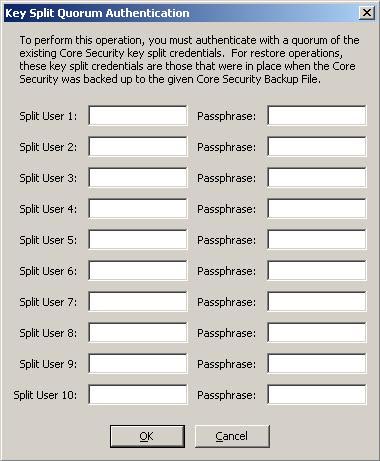
恢复完成后,将恢复备份(不是核心安全性备份)完成时处于有效状态的密钥拆分凭证。
重要提示-认真输入密钥拆分用户名和口令短语。任何错误都会导致此过程失败,并且错误消息不具体。为限制显示给攻击者的信息,不提供关于哪些密钥拆分用户名或口令短语不正确的反馈。
-
恢复过程完成时,将创建新群集。
最佳做法:使用原始安全官用户 ID(在恢复之前存在的用户 ID)登录到 OKM Manager GUI,然后删除临时恢复安全官用户 ID(作为清除步骤)。请参阅"删除用户"。
添加代理并注册磁带机
设置 KMA 后,可以添加代理并注册磁带机来使用该 KMA:
-
以操作员身份登录 OKM Manager GUI 并创建代理(请参阅"创建代理")。
-
使用虚拟操作面板 (Virtual Operator Panel, VOP) 执行以下操作。如果您不知道如何连接和使用 VOP,请参阅 VOP 文档。
-
请服务代表对磁带机授予许可(请参阅《OKM Installation and Service Manual》的第 3 章中的 "License the Tape Drives")。使用虚拟操作面板 (Virtual Operator Panel, VOP) 执行此功能。
-
在服务代表的指导下注册磁带机(请参阅《OKM Installation and Service Manual》的第 3 章中的 "Enroll the Tape Drives")。
必须提供以下信息:
-
磁带机是否将使用永久加密磁带机?
-
设备的代理 ID、口令短语和 OKM IP 地址是什么?
-
-
以合规官身份登录 OKM Manager GUI,创建至少一个密钥组(请参阅"创建密钥组"),然后将磁带机(代理)分配到该密钥组(请参阅"将密钥组分配到代理"和《OKM Installation and Service Manual》中的 "Enroll the Tape Drives")。
必须将此密钥组分配为默认值,否则磁带机无法写入。如果您没有指定默认值,则对于分配的组,磁带机处于只读状态。