Keyboard program "KeyBoard V2.1"
NOTE!
This document describes the functions of the external program "Keyboard
V2.1". This program can be ordered from Berlin and can run on the
Windows-95/98/ME and Windows-NT/2000 operating software. The MICROS Retail TopKey
keyboard can be programmed After installation of the program
"KeyBoard" from MICROS Retail Deutschland GmbH. In addition to
descriptors, colours and print of layout or descriptor sheets the program also
supports programming of the key content and transfer to TopKey.
A keyboard of type "TopKey" can be programmed via the PS2 port with external program "Keyboard 2.1". Reprogramming of keyboard "TopKey" becomes necessary when this keyboard is to be used as a replacement for the standard PC MF keyboard to allow entries to be made at the administration desk or if this keyboard is to be used to operate the user menu of the operating system environment.
General:
TopKey is available as a keyboard with 60, 120, 180 and 98 keys. The 60-key keyboard is based on a matrix of 6 x 10 positions. The 120- and 180-key keyboards have a matrix of 10 x 12 or 10 x 18 keys and are made up of two or three 60-key modules. The 98-key keyboard is based on a matrix of 7 x 14.
NOTE:
On the 120- and 180-key keyboard it must be ensured that the programming of multi-position keys doe not exceed the limitations of the 60-key module as keys such as this cannot be installed from a mechanical point of view. The module limitations lie in the 6th and 7th column and between the 12th and 13th column.
4 options are possible for the start dialog:
- 6 x 10
- 7 x 14
- 10 x 12
- 10 x 18
Click on one of the 4 options ( 6 x 10 or 7 x 14 or 10 x 12 or 10 x 18) to select the basic structure of a new keyboard.
Click on "OK" to display the basic structure of the keyboard in the main window or click on "Abort" if no new keyboard is to be programmed.
When "Start dialog" is confirmed with "OK" the basic structure of the selected keyboard size appears in a new window (work sheet). The line and column no. are shown in the key positions. If the keyboard does not fit on the work sheet window it can be adjusted to the required size with the horizontal and vertical arrows.
After the program has been installed with the help of the set up program it can be called up with Start -> Program. The following describes the functioning of this program and provides detailed information on individual menu items.
The following menus are available for processing:
| The main window | The menu
"File" | The menu "Process"
|
| Menu "View" | The
menu "Window" | The menu "?" |
The main window
The top line of the window is the title bar. The program name "Keyboard" and the name of the file being processed are shown here. The keyboard name "[No name]".appears here for a keyboard which has been generated but not yet saved.
The second line from the top is the menu bar which is used to open the menus required for keyboard processing. The third line is optional and the standard version is normally the tool bar. It can be activated or deactivated in menu "View".
The next field is the working area. The keyboard is shown as a work sheet in the keyboard window for generation of a new keyboard for loading an existing keyboard processing file. Several keyboards can be loaded simultaneously. The functions of the menu and tool bar always refer to the active keyboard window (the title bar has a blue background).
Click on the title bar to activate a keyboard window. Each keyboard window can be moved around and the size can be changed. The picture can be moved around the screen with the arrows. The user can switch from a full picture, part picture and system in each keyboard window.
The lower line is the status bar. It consists of 4 fields which are only visible when the full picture is presented. The present conditions and the programming for the active keyboard window are shown here.
If no key is marked:
![]()
- Field: keyboard size and file name
- Field: operation type set
- Field: programmed header and trailer
- Field: --
If a key is marked:
![]()
- Field: = key programming standard level (level 0)
- Field: = key programming level 1
- Field: = key programming level 2
- Field:= key cons.no.
NOTE:
The key cons.no. corresponds to the mode used in *.TXT file which is generated when a code is created. Abbreviations are used in the status fields to save space as only a restricted number of characters will be shown during longer programming operations.
The menu "File"
The following functions can be called up in menu "File":
New
Click on "New" if a new keyboard is to be generated. The symbol of the empty page on the outer left of the tool bar can also be used. Further help is provided after clicking on "Help" in window "Start dialog".
Open
Click on "Open" or on the symbol of the opened file in the tool bar if a stored keyboard file is to be re-opened. Window "Open" appears. Select "Keyboard-Files[*.kbd]" in selection line "File type:" to find a keyboard file. Click on "Open" to load the selected file in the main window. Further help is provided from click on "?" followed by a click on the object for which information is required.
Close
A keyboard file is closed by clicking on "Close" or on "X" to the extreme right in the title bar of the keyboard window.
If the keyboard file has not already been stored, the system issues a warning: "Save change in ...?" Click on "Yes" to store the file. Click on "No" if finalisation without saving is required or click on "Abort" to return to the keyboard file.
Save
A keyboard file is saved by clicking on "Save" or on the disk symbol in the tool bar. The changes will overwrite the existing data if the file already exists.
If a file does not exist, "Save" acts like menu function "Save as".
Save as
Click on "Save as" when a new keyboard has been created. The dialog window "Save under" is opened.
Select where the keyboard layout is to be stored in dialog "Save under". (It is advisable to select the same file as all other program files for this version of KeyBoard). Enter a name for the layout in entry field "File name". Select the setting "Keyboard-Files[*.kbd]" in field "File type" and click on "Save".
Click on "Abort" if it is not to be stored.
Generate code
Generation of the loadable code for TopKey is started with menu function "Generate code" and transmission to TopKey starts.
The keyboard file being processed must be saved before this menu function is used. Further help can be found under "Generate code".
Click on "Print" or on the printer symbol in the tool bar to open window "Print dialog". The pages to be printed are defined in the printer dialog.
Further help can be found after activation of "Help" in dialog window "Print dialog".
Printer setup
Click on "Printer setup" to open dialog window "Printer setup". The printer installed on your PC, the printer-specific characteristics, the paper size and the direction the page is to be printed can then be set. Further help can be obtained after depression of "?" and clicking on the object for which help is required.
Print preview
Click on "Print preview" to open window "Print dialog". This window corresponds to the print dialog which can be opened via the menu function "Print". The print dialog allows the user to define how the print preview is to be shown.
Further help can be found under "Settings for print and print preview".
End
Click on "End" or on "X" on the right-hand side of the title bar of the program to finalise work with this program.
If the current keyboard file (work sheet) has not been saved, a warning: "Save changes in ....?" appears. Click on "Yes" to save the file. Click on "No" to finalise the program without saving or click on "Abort" to return to the keyboard file.
The menu "Process"
The menu "Process" includes all functions required to process a keyboard layout. The following functions can be called up at various stages of processing:
- Mode: Define keys
- Definition of keys
- Processing defined keys
- Delete key
- Program key
- Key texts
- Define preset key
- Copy data
- Add data
- Group marking
- Global keyboard attributes
- Types of operation
- Define header/trailer
- Level information
Mode: Define key (T)
This menu function is always accessible and is used to select the operation mode for key definition.
Click on "Mode: Define key" or on the "T" symbol in the tool bar to select the type of operation in which the keys of various sizes can be defined.
This type of operation can also be set by clicking with the right-hand mouse key on a key which has not been defined. The right-hand mouse key can also be used to deactivate this.
Define keys:
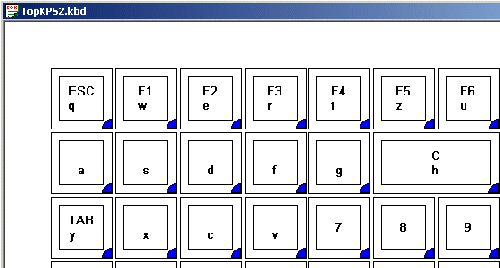
Undefined (free) keys are shown as a square with a green circle in the middle. The line and the column nos. are shown to the lower right of the square.
 Undefined
key
Undefined
key
Click on a free key with the mouse to define this as a single key.
The circle in the middle is exchanged for a rectangle. The lower right-hand corner is then marked red. This implies that no content has been assigned to this key.
 Defined
key without content
Defined
key without content
A larger key (multi-position key) can be defined by clicking on a free key field and pulling the mouse cursor to the right. This defines a horizontal multiple position key. Square multiple position keys are defined by pulling the mouse cursor diagonally from top left to lower right over several free keys.
The maximum size of a key covers 3 single fields in horizontal or vertical direction.
NOTE:
Single, double and quadruple keys are possible at present on TopKey.
With multiple position keys the red mark in the corner indicates where the key has a contact. The data to be linked to this key is programmed in this position. At present, the switch contact of rectangular multiple position keys is always on the right-hand side (vertical version) or at the bottom (horizontal version) or lower right with square multiple position keys.
Processing defined keys
Click on "Define key size" to continue with processing of defined keys. The tick before the menu item disappears or switch the function off with the T symbol in the tool bar.
Mark a defined key by clicking on it with the mouse. The key then shows a dotted line around the inside.

The key can also be marked with the right-hand mouse key. The menu with the processing function is then opened simultaneously.
The 4 processing functions "Delete key", "Program key", "Key text" and "Define preset key" can be called up in 2 ways:
Click on the marked key with the right-hand mouse key and select the required function from the opened menu or select the function from menu "Process".
If a key has already been marked the user can activate functions "Copy" and "Add" by clicking on the right-hand mouse key, by clicking on the symbols in the tool bar or also with the key combinations "Cntrl + C" and "Cntrl + V".
Delete key
A defined and marked key can be deleted by clicking on the right-hand mouse menu or on "Delete key" in menu "Process". This function can also be used for group-marked keys (see "Group marking" below).
Program key
Click on "Program key" in the right-hand mouse menu or in menu "Process" to open the dialog window "Key programming". Further help is available with the "Help" key.
Key text
Click on "Key text" in the right-hand mouse menu or in menu "Process" to open dialog window "Key attributes". This window is also opened from a double click on the key to be given a descriptor. Further details about the key descriptors can be found under "Key attributes".
Define preset key
Click on "Define preset key" in the right-hand mouse menu in menu "Process" to open dialog window "Definition preset keys". Further help can be obtained after activating "?".
Copy data
If a key has been marked, click on the "Copy data" in the right-hand mouse menu, click on the copy symbol in the tool bar or use key combination "Cntrl + C" to store the data temporarily in Clipboard.
The marking and the programming of a key are taken into consideration during copying.
Add data
If the target key is marked, click on "Add data" in the right-hand mouse menu, click on the insert symbol in the tool bar or use key combination "Cntrl + V" to store the data from the clipboard in the target key.
Any existing text or programming in the target key will be overwritten from "Add data".
Group marking
Mark the group of defined keys by holding down Cntrl and clicking on the keys with the mouse key.
NOTE:
After click on menu function "Key text" the mutual key attributes (i.e. colour, font, etc.) can be re-assigned to group marked keys. Key groups can also be deleted with menu function "Delete".
Global keyboard attributes
Global attributes for key colour, lettering , font, letter size, presentation and direction on the descriptor field can be set for the keyboard. All keys defined after this operation will be programmed with these basic settings. Defined keys will not be affected by future changes in the global attributes. Globally set descriptor attributes can be changed separately. Click on Keyboard attributes for further help.
Types of operation
Various types of operation can be set in TopKey with
four soft jumpers. The dialog field "Types of operation" is opened
after clicking on "Types of operation" in menu "Process".
Further help on settings for types of operation can be found in the
documentation listed below.
Define header/trailer
The data for the external peripheral equipment header and/or trailer can be programmed to identify their source. Definition of whether a CRC character is to be calculated or not for the peripherals data for transfer safety is possible in conjunction with header programming. Further help is available after a click on the Help key in the assistant window of the header and trailer programming.
Level information
Information can be programmed for each of the 3 TopKey levels. This level information is transferred from TopKey to the PC when "firm preset keys" are depressed. An application program running on the PC can use this information to display the appropriate level of TopKey. A programmed level information remains invalid as long as only temporary preset keys or no preset keys have been defined.
Information on programming of keyboard levels can be found under "Programming of level information".
Menu "View"
The optional tool and status bars can be switched on and off in menu "View".
- Tool bar
- Status bar
The menu "Window"
The menu "Window" includes some functions for assigning several keyboard windows on the work sheet of the main window and the option of calling up an overall view of the keyboard being processed.
New window
Click on "New window" if the whole of the keyboard under review is to be viewed. This is a viewing window and no processing is possible as the title line behind the window name indicates. As it is coupled to the working window under revision, the window has the same dimensions as this one and can be expanded or reduced in the same way.
Update
Changes in the current keyboard window can be assessed in the overall view by clicking on "Update" in menu "Window". The viewing window then shows the changes in the overall view.
Close the viewing window by clicking on "X" in the title bar. (Use menu function "Close" from menu "File" because this closes the viewing window and the linked current work window).
Arrange all
This menu function activates the reduced window size which can be reached via the button with the double window symbol in the title bar of the window. If several processing windows are opened within the main window these will be cascaded, i.e. shown one behind the other.
Divide
When this function is activated in the main window where several work windows are open, the work window will be divided horizontally, so that two windows are shown under one another. If there is only one work window in the main window, the activation of "Divide" means that the window appears on the whole screen and this can be reached via the one window symbol in the title bar of the window.
The menu "?"
This help window is opened with "Help". The same function is achieved by clicking on "?" in the tool bar.
Am Stadtholz 39
D-10587 Berlin Germany