5 Using In-Memory Analytics
This chapter provides examples using In-Memory Analytics (also referred to as Property Graph In-Memory Analytics, and often abbreviated as PGX in the Javadoc, command line, path descriptions, error messages, and examples). It contains the following major topics:
5.1 Reading a Graph into Memory
This topic provides an example of reading graph interactively into memory using the shell interface. These are the major steps:
-
Using the Shell Help (as needed)
5.1.1 Starting the In-Memory Analytics Shell
To start the In-Memory Analytics shell:
-
Open a terminal session on the system where property graph support is installed.
-
Set the GROOVY_HOME environment variable.
The In-Memory Analytics Groovy shell requires the Groovy 2.4.0 be installed and that GROOVY_HOME be defined correctly. For example
setenv GROOVY_HOME /<your-directory>/groovy-2.4.0/ -
Change to the In-Memory Analytics home directory, and run the
pgxcommand:cd $PGX_HOME ./bin/pgx
If the In-Memory Analytics software is installed correctly, you will see an engine-running log message and the In-Memory Analytics shell prompt (pgx:000>):
pgx:000> :load /opt/oracle/oracle-spatial-graph/property_graph/pgx/conf/pgx.profile 11:48:45,172 [main] INFO Ctrl - >>> PGX engine running. pgx:000>
The shell started a local instance because the pgx command did not specify a remote URL.
5.1.2 Using the Shell Help
The In-Memory Analytics shell provides a help system, which you access using the :help command.
For example, type :help :loadGraph to see how to use the :loadGraph command:
pgx:000> :help :loadGraph
usage: :loadGraph <Path to graph config file> <Graph name>
Load a graph specified by a graph config file path into memory.
5.1.3 Providing Graph Metadata in a Configuration File
An example graph is included in the installation directory, under /opt/oracle/oracle-spatial-graph/property_graph/examples/pgx/graphs/. It uses a configuration file that describes how In-Memory Analytics reads the graph.
pgx:000> :cat /opt/oracle/oracle-spatial-graph/property_graph/examples/pgx/graphs/sample.adj.json
===> {
"uri": "sample.adj",
"format": "adj_list",
"node_props": [{
"name": "prop",
"type": "integer"
}],
"edge_props": [{
"name": "cost",
"type": "double"
}],
"separator": " "
}
The uri field provides the location of the graph data. This path resolves relative to the parent directory of the configuration file. When In-Memory Analytics loads the graph, it searches the examples/graphs directory for a file named sample.adj.
The other fields indicate that the graph data is provided in adjacency list format, and consists of one node property of type integer and one edge property of type double.
This is the graph data in adjacency list format:
pgx:000> :cat /opt/oracle/oracle-spatial-graph/property_graph/examples/pgx/graphs/sample.adj
===> 128 10 1908 27.03 99 8.51
99 2 333 338.0
1908 889
333 6 128 51.09
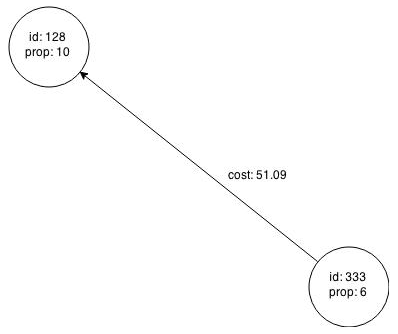
Figure 5-1 shows a property graph created from the data:
Figure 5-1 Property Graph Rendered by sample.adj Data

Description of "Figure 5-1 Property Graph Rendered by sample.adj Data"
5.1.4 Reading Graph Data into Memory
To read a graph into memory, you must pass the following information:
-
The path to the graph configuration file that specifies the graph metadata
-
A unique alphanumeric name that you can use to reference the graph
An error results if you previously loaded a different graph with the same name.
Example: Using the Shell to Read a Graph
:loadGraph /opt/oracle/oracle-spatial-graph/property_graph/examples/pgx/graphs/sample.adj.json sample
===> {
"graphName" : "sample",
[... rest of output omitted for brevity ...]
}
Example: Using Java to Read a Graph
import oracle.pgx.api.LoadingResult;
import oracle.pgx.config.GraphConfig;
import oracle.pgx.config.GraphConfigFactory;
GraphConfig graphConfig = GraphConfigFactory.forAnyFormat().fromPath("/opt/oracle/oracle-spatial-graph/property_graph/examples/pgx/graphs/sample.adj.json");
LoadingResult lr = core.loadGraphWithProperties(sessionId, graphConfig).get();
String graphName = lr.getGraphName()
The following topics contain additional examples of reading a property graph into memory:
5.1.4.1 Read a Graph Stored in Apache HBase into Memory
To read a property graph stored in Apache HBase, you can create a JSON based configuration file as follows. Note that the quorum, client port, graph name, and other information must be customized for your own setup.
% cat /tmp/my_graph_hbase.json
{
"format": "pg",
"db_engine": "hbase",
"zk_quorum": "scaj31bda07,scaj31bda08,scaj31bda09",
"zk_client_port": 2181,
"name": "connections",
"node_props": [{
"name": "country",
"type": "string"
}],
"load_edge_label": true,
"edge_props": [{
"name": "label",
"type": "string"
}, {
"name": "weight",
"type": "float"
}]
}
EOF
With a single :loadGraph command, the property graph connections will be read into memory:
pgx:000> :loadGraph /tmp/my_graph_hbase.json connections
The output might look like the following:
===> {
"graphName" : "connections",
"metaData" : {
"primitives" : {
"NUM_EDGES" : 164,
"MEMORY_MB" : 0,
"CREATION_TS" : 1429219094588,
"NUM_NODES" : 78,
"CREATION_REQUEST_TS" : 1429219088740,
"DATA_SOURCE_VERSION" : 1448548982
},
"graphConfig" : {
"format" : "pg",
"zk_quorum" : "scaj31bda07,scaj31bda08,scaj31bda09",
"node_props" : [ {
"name" : "country",
"type" : "string"
} ],
"zk_client_port" : 2181,
"db_engine" : "HBASE",
"name" : "connections",
"load_edge_label" : true,
"edge_props" : [ {
"name" : "label",
"type" : "string"
}, {
"name" : "weight",
"type" : "float"
} ]
}
},
"nodeProperties" : {
"country" : "string"
},
"edgeProperties" : {
"weight" : "float",
"label" : "string"
}
}
pgx:000>
Note that when dealing with a large graph, it may become necessary to tune parameters like number of IO workers, number of workers for analysis, task timeout, and others. You can find and change those parameters in the following directory (assume the installation home is /opt/oracle/oracle-spatial-graph).
/opt/oracle/oracle-spatial-graph/property_graph/pgx/conf
5.1.4.2 Read a Graph Stored in Oracle NoSQL Database into Memory
To read a property graph stored in Oracle NoSQL Database, you can create a JSON based configuration file as follows. Note that the hosts, store name, graph name, and other information must be customized for your own setup.
% cat /tmp/my_graph_nosql.json
{
"format": "pg",
"db_engine": "nosql",
"hosts": [
"zathras01:5000"
],
"store_name": "kvstore",
"name": "connections",
"node_props": [{
"name": "country",
"type": "string"
}],
"load_edge_label": true,
"edge_props": [{
"name": "label",
"type": "string"
}, {
"name": "weight",
"type": "float"
}]
}
Then, read the configuration file into memory. The following example snippet read the file into memory, generates an undirected graph (named U) from the original data, and counts the number of triangles.
pgx:000> :loadGraph /tmp/my_graph_nosql.json connections
pgx:000> :undirectGraph connections U
pgx:000> :countTriangles U
5.1.4.3 Read a Graph Stored in the Local File System into Memory
The following command uses the configuration file from "Providing Graph Metadata in a Configuration File" and the name my-graph:
pgx:000> :loadGraph /opt/oracle/oracle-spatial-graph/property_graph/examples/pgx/graphs/sample.adj.json my-graph
===> {
"graphName" : "my-graph",
"metaData" : {
"primitives" : {
"NUM_EDGES" : 4,
"DATA_SOURCE_VERSION" : 1422390352000,
"NUM_NODES" : 4,
"CREATION_TS" : 1429637170234,
"MEMORY_MB" : 0,
"CREATION_REQUEST_TS" : 1429637170130
},
"graphConfig" : {
"format" : "adj_list",
"separator" : " ",
"edge_props" : [ {
"type" : "double",
"name" : "cost"
} ],
"node_props" : [ {
"type" : "integer",
"name" : "prop"
} ],
"uri" :
"/opt/oracle/oracle-spatial-graph/property_graph/examples/pgx/graphs/sample.adj"
}
},
"edgeProperties" : {
"cost" : "double"
},
"nodeProperties" : {
"prop" : "integer"
}
}
The :loadGraph command returns a LoadingResult object, which holds the properties and some basic statistics about the graph, such as the number of loaded nodes. A string representation of the object is returned by LoadingResult#toString(), and is JSON-formatted for easy reading.
You can verify the type of returned objects by using the Groovy programming language's _ variable, which holds the last result object:
pgx:000> _.getClass()
===> class oracle.pgx.api.LoadingResult
To save objects for later use, you can assign _ to a variable after executing the command that generates the object. This example saves my-graph in a variable named result, and then retrieves the graph name:
pgx:000> :loadGraph /opt/oracle/oracle-spatial-graph/property_graph/examples/pgx/graphs/sample.adj.json my-graph ===> ... // _ holds the loading result pgx:000> result = _ ===> ... pgx:000> result.getGraphName() ===> my-graph
5.2 Reading Custom Graph Data
You can read your own custom graph data. This example creates a graph, alters it, and shows how to read it properly. This graph uses the adjacency list format, but In-Memory Analytics supports several graph formats.
The main steps are:
5.2.1 Creating a Simple Graph File
This example creates a small, simple graph in adjacency list format with no node or edge properties. Each line contains the node ID, followed by the node IDs its outgoing edges point to:
1 2 2 3 4 3 4 4 2
In this list, a single space separates the individual tokens. In-Memory Analytics supports other separators, which you can specify in the graph configuration file.
Figure 5-2 shows the data rendered as a property graph with 4 nodes and 5 edges. The edge from vertex 2 to vertex 4 points in both directions.
Reading a graph into In-Memory Analytics requires a graph configuration. You can provide the graph configuration using either of these methods:
-
Write the configuration settings in JSON format into a file
-
Using a Java
GraphConfigBuilderobject.
This example shows both methods.
{
"uri": "graph.adj",
"format":"adj_list",
"separator":" "
}
import oracle.pgx.config.FileGraphConfig;
import oracle.pgx.config.Format;
import oracle.pgx.config.GraphConfigBuilder;
FileGraphConfig config = GraphConfigBuilder
.forFileFormat(Format.ADJ_LIST)
.setUri("graph.adj")
.setSeparator(" ")
.build();
5.2.2 Adding a Vertex Property
The graph in "Creating a Simple Graph File" consists of vertices and edges, without vertex or edge properties. Vertex properties are positioned directly after the source vertex ID in each line. The graph data looks like this after a double node property is added to the graph:
1 0.1 2 2 2.0 3 4 3 0.3 4 4 4.56789 2
Note:
In-Memory Analytics supports only homogeneous graphs, in which all vertices have the same number and type of properties.For In-Memory Analytics to read the modified data file, you must add a node property in the configuration file or the builder code. The following examples provide a descriptive name for the property and set the type to double.
{
"uri": "graph.adj",
"format":"adj_list",
"separator":" ",
"node_props":[{
"name":"double-prop",
"type":"double"
}]
}
import oracle.pgx.common.types.PropertyType;
import oracle.pgx.config.FileGraphConfig;
import oracle.pgx.config.Format;
import oracle.pgx.config.GraphConfigBuilder;
FileGraphConfig config = GraphConfigBuilder.forFileFormat(Format.ADJ_LIST)
.setUri("graph.adj")
.setSeparator(" ")
.addNodeProperty("double-prop", PropertyType.DOUBLE)
.build();
5.2.3 Using Strings as Node Identifiers
The previous examples used integer node IDs. The default in In-Memory Analytics is integer node IDs, but you can define a graph to use string node IDs instead.
This data file uses "node 1", "node 2", and so forth instead of just the digit:
"node 1" 0.1 "node 2" "node 2" 2.0 "node 3" "node 4" "node 3" 0.3 "node 4" "node 4" 4.56789 "node 2"
Again, you must modify the graph configuration to match the data file:
{
"uri": "graph.adj",
"format":"adj_list",
"separator":" ",
"node_props":[{
"name":"double-prop",
"type":"double"
}],
"node_id_type":"string"
}
import oracle.pgx.common.types.IdType;
import oracle.pgx.common.types.PropertyType;
import oracle.pgx.config.FileGraphConfig;
import oracle.pgx.config.Format;
import oracle.pgx.config.GraphConfigBuilder;
FileGraphConfig config = GraphConfigBuilder.forFileFormat(Format.ADJ_LIST)
.setUri("graph.adj")
.setSeparator(" ")
.addNodeProperty("double-prop", PropertyType.DOUBLE)
.setNodeIdType(IdType.STRING)
.build();
Note:
string node IDs consume much more memory than integer node IDs.
Any single or double quotes inside the string must be escaped with a backslash (\).
Newlines (\n) inside strings are not supported.
5.2.4 Adding an Edge Property
This example adds an edge property of type string to the graph. The edge properties are positioned after the destination node id.
"node1" 0.1 "node2" "edge_prop_1_2" "node2" 2.0 "node3" "edge_prop_2_3" "node4" "edge_prop_2_4" "node3" 0.3 "node4" "edge_prop_3_4" "node4" 4.56789 "node2" "edge_prop_4_2"
The graph configuration must match the data file:
{
"uri": "graph.adj",
"format":"adj_list",
"separator":" ",
"node_props":[{
"name":"double-prop",
"type":"double"
}],
"node_id_type":"string",
"edge_props":[{
"name":"edge-prop",
"type":"string"
}]
}
import oracle.pgx.common.types.IdType;
import oracle.pgx.common.types.PropertyType;
import oracle.pgx.config.FileGraphConfig;
import oracle.pgx.config.Format;
import oracle.pgx.config.GraphConfigBuilder;
FileGraphConfig config = GraphConfigBuilder.forFileFormat(Format.ADJ_LIST)
.setUri("graph.adj")
.setSeparator(" ")
.addNodeProperty("double-prop", PropertyType.DOUBLE)
.setNodeIdType(IdType.STRING)
.addEdgeProperty("edge-prop", PropertyType.STRING)
.build();
5.3 Storing Graph Data on Disk
After reading a graph into memory using either Java or the Shell, you can store it on disk in different formats. You can then use the stored graph data as input to In-Memory Analytics at a later time.
Storing graphs over HTTP/REST is currently not supported.
The options include:
5.3.1 Storing the Results of Analysis in a Node Property
This example reads a graph into memory and analyzes it using the Pagerank algorithm. This analysis requires a new node property to store the PageRank values. The following examples add a node property named prop.
Using the Shell to Add a Node Property
:loadGraph /opt/oracle/oracle-spatial-graph/property_graph/examples/pgx/graphs/sample.adj.json sample
===> {
"graphName" : "sample",
[... rest of output omitted for brevity ...]
}
:createNodeProperty sample DOUBLE rank
===> rank
:pagerank sample 0.001 0.85 100 rank
Using Java to Add a Node Property
import oracle.pgx.api.LoadingResult;
import oracle.pgx.api.Pgx;
import oracle.pgx.common.types.PropertyType;
import oracle.pgx.config.GraphConfig;
import oracle.pgx.config.GraphConfigFactory;
GraphConfig config = GraphConfigFactory.forAnyFormat().fromPath("/opt/oracle/oracle-spatial-graph/property_graph/examples/pgx/graphs/sample.adj.json");
Core core = Pgx.getCore();
LoadingResult lr = core.loadGraphWithProperties(sessionId, config).get();
String graphName = lr.getGraphName();
core.createNodeProperty(sessionId, graphName, PropertyType.DOUBLE, "rank").get();
Pgx.getBuiltinAlgorithms().pagerank(sessionId, graphName, 0.001, 0.85, 100, "rank").get();
5.3.2 Storing a Graph in Edge-List Format on Disk
This example stores the graph, the result of the Pagerank analysis, and all original edge properties as a file in edge-list format on disk.
To store a graph, you must specify:
-
The graph format
-
A path where the file will be stored
-
The properties to be stored. Specify
ALLto store all properties orNONEto store no properties. To specify individual properties, specify the property names as a list of strings. -
A flag that indicates whether to overwrite an existing file with the same name
The following examples store the graph data in /tmp/sample_pagerank.elist, with the /tmp/sample_pagerank.elist.json configuration file. The return value is the graph configuration stored in the file. You can use it to read the graph again.
Using the Shell to Store a Graph
:storeGraph sample EDGE_LIST /tmp/sample_pagerank.elist !["rank"] ALL false
===> {"format" : "edge_list", "node_props" : [{"name":"rank","type":"double"}], "edge_props" : [{"name":"cost","type":"double"}], "uri":"/tmp/sample_pagerank.elist", "node_id_type":"integer"}
import java.util.Arrays; import java.util.List; import oracle.pgx.api.Properties; import oracle.pgx.config.Format; List<String> nodeProperties = Arrays.asList(rankName)); core.storeGraphWithProperties(sessionId, graphName, Format.EDGE_LIST, "/tmp/sample_pagerank.elist", nodeProperties, Properties.ALL, false).get();
5.4 Executing Built-in Algorithms
In-Memory Analytics contains a set of built-in algorithms that are available as Java APIs. This section describes the use of the in-memory analytics using Triangle Counting and Pagerank analytics as examples.
5.4.1 About In-Memory Analytics
In-Memory Analytics contains a set of built-in algorithms that are available as Java APIs.
In-Memory Analytics manages all data structures, including graphs, properties, and collections. After you create a data structure, you can refer to it by its string identifier. For example, after reading a graph into memory, you can refer to it by its graph name. Thus, the Java APIs replace non-primitive types, like graphs and properties in a procedure declaration, with identifier strings.
For example, this is the Pagerank procedure signature:
procedure pagerank(G: graph, e,d: double, max: int; rank: nodeProp<double>)
In contrast, the following are the APIs for Pagerank:
PgxFuture<Void> pagerank(String sessionId, String graphName, double e, double d, int max, String rankName);
pgx:000> :h :pagerank usage: :pagerank <String graphName> <double e> <double d> <int max> <String rankName> Classic pagerank algorithm. Time complexity: O(E * K) with E = number of edges, K is a given constant (max iterations) Arguments: graphName - graph name e - maximum error for terminating the iteration d - damping factor max - maximum number of iterations rankName - (output) name of double node property to store result
5.4.2 About the Analyst Interface
In-Memory Analytics also provides a convenience layer on top of the BuiltinAlgorithms API named Analyst, which is both graph- and session-bound. It also wraps the result of the build-in algorithms into a PropertyProxy and returns it. In In-Memory Analytics, proxies can be used to conveniently access the values of data structures managed by the instance:
PgxFuture<PropertyProxy<Double>> pagerank(double e, double d, int max);
The In-Memory Analytics Shell does not provide commands for Analyst methods. However, an :analyst command returns an Analyst instance for a graph and the current shell session. See "Using the Java API Inside the In-Memory Analytics Shell".
5.4.3 Reading the Graph
To read a graph, you must first open a session, as shown in the following examples. (The In-Memory Analytics shell automatically starts the session.)
Using the Shell to Read a Graph
cd $PGX_HOME
./bin/pgx
// starting the shell will create an implicit session
:loadGraph /opt/oracle/oracle-spatial-graph/property_graph/examples/pgx/graphs/sample.adj.json G
===> {
"graphName" : "sample",
[... rest of output omitted for brevity ...]
import java.io.File;
import oracle.pgx.api.*;
import oracle.pgx.api.algorithms.*;
import oracle.pgx.config.*;
import org.apache.commons.io.FileUtils;

...

Core core = Pgx.getCore();
String sessionId = core.createSession("test").get();

GraphConfig graphConfig = GraphConfigFactory.forAnyFormat().fromPath("/opt/oracle/oracle-spatial-graph/property_graph/examples/pgx/graphs/sample.adj.json");
LoadingResult lr = core.loadGraphWithProperties(sessionId, graphConfig).get();
String graphName = lr.getGraphName();
5.4.4 Running the Triangle Counting Algorithm
Triangle Counting is defined on undirected graphs only. In In-Memory Analytics however, graphs are always directed by default after loading. Therefore, you must create an undirected copy of a graph before running Triangle Counting.
The undirectGraph procedure returns a list of names. The first one is always the name of the new graph, followed by the names of the transformed properties.
Using the Shell to Run Triangle Counting
:undirectGraph G U

:countTriangles U
===> 1
Using Java to Run Triangle Counting
import java.util.List;
import oracle.pgx.api.Pgx;
import oracle.pgx.api.algorithms.BuiltinAlgorithms;

List<String> result = core.createUndirectedGraph(sessionId, graphName).get();
String uGraphName = result.get(0);

BuiltinAlgorithms algorithms = Pgx.getBuiltinAlgorithms();
long triangles = algorithms.countTriangles(sessionId, uGraphName).get();
The algorithm finds one triangle in the sample graph.
Tip:
When using the In-Memory Analytics Shell, you can increase the amount of log output during execution by changing the logging level. See information about the:loglevel command with :h :loglevel.5.4.5 Running the Pagerank Algorithm
Pagerank computes a rank value between 0 and 1 for each node in the graph and stores the values in a double property. The algorithm therefore takes a node property of type double for the output.
In In-Memory Analytics, there are two types of node and edge properties:
-
Persistent Properties: Properties that are loaded with the graph from a data source are fixed, in-memory copies of the data on disk, and are therefore persistent. Persistent properties are read-only, immutable and shared between sessions.
-
Transient Properties: Values can only be written to transient properties, which are session private. You can create transient properties by creating or copying properties using the In-Memory Analytics Core API.
This example obtains the top three nodes with the highest Pagerank values. It uses a transient node property of type double to hold the computed Pagerank values. The Pagerank algorithm uses a maximum error of 0.001, a damping factor of 0.85, and a maximum number of 100 iterations.
To access the values of the computed rank property, you must wrap it in a PropertyProxy object. Proxies are utility classes for read-only access to data structures managed by In-Memory Analytics.
Using the Shell to Run Pagerank
:createNodeProperty G DOUBLE rank

:pagerank G 0.001 0.85 100 rank

:propProxy G rank
proxy = _

proxy.getTopKValues(3)
===> [128=0.1402019732468347, 333=0.12002296283541904, 99=0.09708583862990475]
This example passes a DOUBLE as the second Shell command parameter, although typically this parameter is a PropertyType object. However, PropertyType is an enum, and the Shell automatically performs a type coercion.
This example uses the Groovy _ variable to retrieve the last returned object and store it in a variable named proxy.
You can skip the PropertyProxy indirection by using the two convenience commands printTopKValues and printBottomKValues to quickly print the extremes in JSON format without first creating a PropertyProxy instance:
:printTopK G rank 3
===> {
  "128" : 0.1402019732468347,
  "333" : 0.12002296283541904,
  "99" : 0.09708583862990475
}
:printBottomK G rank 2
===> {
  "99" : 0.09708583862990475,
  "1908" : 0.09708583862990475
}
import java.util.List;
import java.util.Map;

import oracle.pgx.api.Pgx;
import oracle.pgx.api.algorithms.BuiltinAlgorithms;
import oracle.pgx.api.analyst.PropertyProxy;
import oracle.pgx.common.types.PropertyType;

String rankName = core.createNodeProperty(sessionId, graphName, PropertyType.DOUBLE).get();

String rankName = algorithms.pagerank(sessionId, graphName, 0.001 0.85 100, rankName).get();

PropertyProxy<Double> proxy = core.<Double> getPropertyProxy(sessionId, graphName, rankName).get();
for (Map.Entry<Object, Double> entry : proxy.getTopKValues(3)) {
  System.out.println(entry.getKey() + "=" + entry.getValue());
}
5.5 Creating Subgraphs
You can create subgraphs based on a loaded graph. You can use filter expressions or create bipartite subgraphs based on a node collection that specifies the left set of the bipartite graph.
For information about reading a graph into memory, see Reading Graph Data into Memory.
5.5.1 About Filter Expressions
Filter expressions are expressions that are evaluated for each edge. The expression can define predicates that an edge must fulfil to be contained in the result, in this case a subgraph.
Consider the graph in Figure 5-1, which consists of four nodes and four edges. For an edge to match the filter expression src.prop == 10, the source node prop property must equal 10. Two edges match that filter expression, as shown in Figure 5-3.
Figure 5-4 shows the graph that results when the filter is applied. The filter excludes the edges associated with vertex 333, and the vertex itself.
Figure 5-4 Graph Created by the Simple Filter
Description of "Figure 5-4 Graph Created by the Simple Filter"
Using filter expressions to select a single node or a set of nodes is difficult. For example, selecting only the node with the property value 10 is impossible, because the only way to match the node is to match an edge where 10 is either the source or destination property value. However, when you match an edge you automatically include the source node, destination node, and the edge itself in the result.
5.5.2 Using a Simple Filter to Create a Subgraph
The following examples create the subgraph described in "About Filter Expressions".
Using the Shell to Create a Subgraph
:createSubgraphFromFilter sample "src.prop == 10" sample_filtered
===> [sample_filtered, prop, cost]
// return value: [<graph name>, <node property 1>, ..., <node property n>, <edge property 1>, ..., <edge property n>]
Using Java to Create a Subgraph
import java.util.Arrays;
import java.util.List;

List<String> nodePropNames = Arrays.asList("prop");
List<String> edgePropNames = Arrays.asList("cost");

String filterExpression = "src.prop == 10";

// return value: [<graph name>, <node property 1>, ..., <node property n>, <edge property 1>, ..., <edge property n>]
List<String> result = core.createSubgraphFromFilter(sessionId, graphName, nodePropNames, edgePropNames, filterExpression, "sample_filtered").get();
String subgraphName = result.get(0);
5.5.3 Using a Complex Filter to Create a Subgraph
This example uses a slightly more complex filter. It uses the outDegree function, which calculates the number of outgoing edges for an identifier (source src or destination dst). The following filter expression matches all edges with a cost property value greater than 50 and a destination node with an outDegree greater than 1.
dst.outDegree() > 1 && edge.cost > 50
One edge in the sample graph matches this filter expression, as shown in Figure 5-5.
Figure 5-5 Edges Matching the outDegree Filter
Description of "Figure 5-5 Edges Matching the outDegree Filter"
Figure 5-6 shows the graph that results when the filter is applied. The filter excludes the edges associated with nodes 99 and 1908, and so excludes those nodes also.
Figure 5-6 Graph Created by the outDegree Filter
Description of "Figure 5-6 Graph Created by the outDegree Filter"
5.5.4 Using a Node List to Create a Bipartite Subgraph
You can create a bipartite subgraph by specifying a set of nodes, which are used as the left side. A bipartite subgraph has edges only between the left set of nodes and the right set of nodes. There are no edges within those sets, such as between two nodes on the left side. In In-Memory Analytics, nodes that are isolated because all incoming and outgoing edges were deleted are not part of the bipartite subgraph.
The following figure shows a bipartite subgraph. No properties are shown.
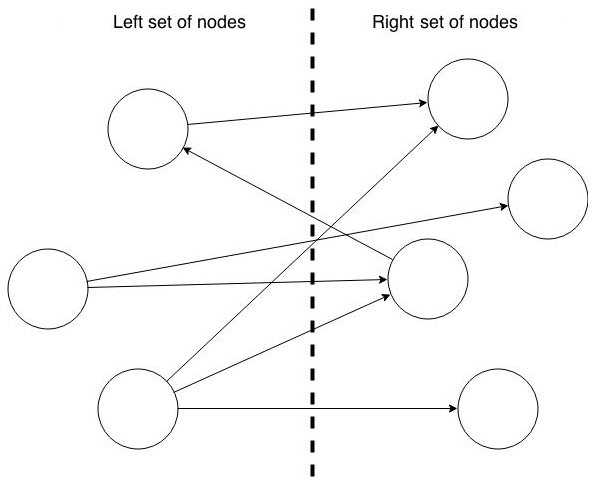
Description of the illustration pgx_bipartite_graph.png
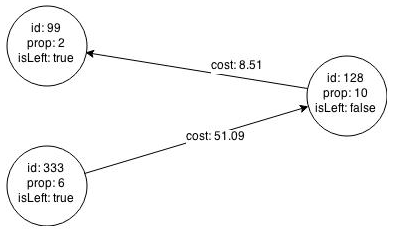
The following examples create a bipartite subgraph from the simple graph created in Figure 5-1. They create a node collection and fill it with the nodes for the left side.
Using the Shell to Create a Bipartite Subgraph
:createCollection sample SET NODE nodeset
===> nodeset
:addAll nodeset ![333, 99]
===> nodeset

:createBipartiteSubgraphFromLeftSet2 sample !["prop"] NONE nodeset sample_bipartite isLeft
===> [sample_bipartite, isLeft, prop]
Using Java to Create a Bipartite Subgraph
import oracle.pgx.common.types.CollectionType;
import oracle.pgx.common.types.EntityType;
import oracle.pgx.api.Properties;
...
List<String> nodePropNames = Arrays.asList("prop");
String nodeSetName = core.createCollection(sessionId, graphName, CollectionType.SET, EntityType.NODE, "nodeSet").get();
List<Integer> leftSetNodes = Arrays.asList(333, 99);
core.addAllToCollection(sessionId, nodeSetName, leftSetNodes).get();
// Note: Edge properties are not currently supported in bipartite subgraphs
List<String> result = core.createBipartiteSubgraphFromLeftSet(sessionId, graphName, nodePropNames, Properties.NONE, nodeSetName, "sample_bipartite", "isLeft").get();
String subgraphName = result[0];
When you create a subgraph, In-Memory Analytics automatically creates a Boolean node property that indicates whether the node is on the left side. You can specify a unique name for the property.
The resulting bipartite subgraph looks like this:
Description of the illustration pgx_bipartite_subgraph.png
Node 1908 is excluded from the bipartite subgraph. The only edge that connected that node extended from 128 to 1908. The edge was removed, because it violated the bipartite properties of the subgraph. Node 1908 had no other edges, and so was removed also.
5.6 Deploying to Jetty
You can deploy In-Memory Analytics to Eclipse Jetty, Apache Tomcat, or Oracle WebLogic. This example shows how to deploy In-Memory Analytics as a web application with Eclipse Jetty.
-
Copy the In-Memory Analytics web application archive (WAR) file into the Jetty
webappsdirectory:cd $PGX_HOME cp $PGX_HOME/webapp/pgx-webapp-1.0.0-for-cdh5.2.1.war $JETTY_HOME/webapps/pgx.war
-
Set up a security realm within Jetty that specifies where it can find the user names and passwords. To add the most basic security realm, which reads the credentials from a file, add this snippet to
$JETTY_HOME/etc/jetty.xml:<Call name="addBean"> <Arg> <New class="org.eclipse.jetty.security.HashLoginService"> <Set name="name">PGX-Realm</Set> <Set name="config"> etc/realm.properties </Set> <Set name="refreshInterval">0</Set> </New> </Arg> </Call>This snippet instructs Jetty to use the simplest, in-memory login service it supports, the
HashLoginService. This service uses a configuration file that stores the user names, passwords, and roles. -
Add the users to
$JETTY_HOME/etc/realm.propertiesin the following format:username: password, roleFor example, this line adds user
SCOTT, with passwordTIGERand theUSERrole.scott: tiger, USER
-
Ensure that port 8080 is not already in use, and then start Jetty:
cd $JETTY_HOME
java -jar start.jar
-
Verify that Jetty is working, using the appropriate credentials for your installation:
cd $PGX_HOME
./bin/pgx --base_url http://scott:tiger@localhost:8080/pgx
-
(Optional) Modify the In-Memory Analytics configuration files.
The configuration file (
pgx.conf) and the logging parameters (log4j.xml) for the In-Memory Analytics engine are in the WAR file underWEB-INF/classes. Restart the server to enable the changes.
See Also:
The Jetty documentation for configuration and use at5.6.1 About the Authentication Mechanism
The In-Memory Analytics web deployment uses BASIC Auth by default. You should change to a more secure authentication mechanism for a production deployment.
To change the authentication mechanism, modify the security-constraint element of the web.xml deployment descriptor in the web application archive (WAR) file.
5.7 Deploying to Apache Tomcat
You can deploy In-Memory Analytics to Eclipse Jetty, Apache Tomcat, or Oracle WebLogic. This example shows how to deploy In-Memory Analytics as a web application with Apache Tomcat.
In-Memory Analytics ships with BASIC Auth enabled, which requires a security realm. Tomcat supports many different types of realms. This example configures the simplest one, MemoryRealm. See the Tomcat Realm Configuration How-to for information about the other types.
-
Copy the In-Memory Analytics WAR file into the Tomcat
webappsdirectory. For example:cd $PGX_HOME cp $PGX_HOME/webapp/pgx-webapp-1.0.0-for-cdh5.2.1.war $CATALINA_HOME/webapps/pgx.war
-
Open
$CATALINA_HOME/conf/server.xmlin an editor and add the following realm class declaration under the<Engine>element:<Realm className="org.apache.catalina.realm.MemoryRealm" />
-
Open
CATALINA_HOME/conf/tomcat-users.xmlin an editor and define a user for theUSERrole. Replacescottandtigerin this example with an appropriate user name and password:<role rolename="USER" /> <user username="scott" password="tiger" roles="USER" />
-
Ensure that port 8080 is not already in use.
-
Start Tomcat:
cd $CATALINA_HOME
./bin/startup.sh
-
Verify that Tomcat is working:
cd $PGX_HOME
./bin/pgx --base_url http://scott:tiger@localhost:8080/pgx
Note:
Oracle recommendsBASIC Auth only for testing. Use stronger authentication mechanisms for all other types of deployments.See Also:
The Tomcat documentation at5.8 Deploying to Oracle WebLogic Server
You can deploy In-Memory Analytics to Eclipse Jetty, Apache Tomcat, or Oracle WebLogic Server. This example shows how to deploy In-Memory Analytics as a web application with Oracle WebLogic Server.
5.8.1 Installing Oracle WebLogic Server
To download and install the latest version of Oracle WebLogic Server, see
http://www.oracle.com/technetwork/middleware/weblogic/documentation/index.html
5.8.2 Deploying In-Memory Analytics
To deploy In-Memory Analytics to Oracle WebLogic, use commands like the following. Substitute your administrative credentials and WAR file for the values shown in this example:
cd $MW_HOME/user_projects/domains/mydomain
. bin/setDomainEnv.sh
java weblogic.Deployer -adminurl http://localhost:7001 -username username -password password -deploy -upload $PGX_HOME/lib/server/pgx-webapp-0.9.0.war
If the script runs successfully, you will see a message like this one:
Target state: deploy completed on Server myserver
5.9 Connecting to the In-Memory Analytics Server
After property graph in-memory analytics is installed in a Hadoop cluster -- or on a client system without Hadoop as a web application on Eclipse Jetty, Apache Tomcat, or Oracle WebLogic -- you can connect to the in-memory analytics server.
5.9.1 Connecting with the In-Memory Analytics Shell
The simplest way to connect to an In-Memory Analytics instance is to specify the base URL of the server. The following base URL can connect the SCOTT user to the local instance listening on port 8080:
http://scott:tiger@localhost:8080/pgx
To start the In-Memory Analytics shell with this base URL, you use the --base_url command line argument
cd $PGX_HOME
./bin/pgx --base_url http://scott:tiger@localhost:8080/pgx
You can connect to a remote instance the same way. However, In-Memory Analytics currently does not provide remote support for the Control API.
5.9.1.1 About Logging HTTP Requests
The In-Memory Analytics shell suppresses all debugging messages by default. To see which HTTP requests are executed, set the log level for oracle.pgx to DEBUG, as shown in this example:
pgx:000> :loglevel oracle.pgx DEBUG
===> log level of oracle.pgx logger set to DEBUG
pgx:000> :loadGraph sample_http.adj.json sample
10:24:25,056 [main] DEBUG RemoteUtils - Requesting POST http://scott:tiger@localhost:8080/pgx/core/session/session-shell-6nqg5dd/graph HTTP/1.1 with payload {"graphName":"sample","graphConfig":{"uri":"http://path.to.some.server/pgx/sample.adj","separator":" ","edge_props":[{"type":"double","name":"cost"}],"node_props":[{"type":"integer","name":"prop"}],"format":"adj_list"}}
10:24:25,088 [main] DEBUG RemoteUtils - received HTTP status 201
10:24:25,089 [main] DEBUG RemoteUtils - {"futureId":"87d54bed-bdf9-4601-98b7-ef632ce31463"}
10:24:25,091 [pool-1-thread-3] DEBUG PgxRemoteFuture$1 - Requesting GET http://scott:tiger@localhost:8080/pgx/future/session/session-shell-6nqg5dd/result/87d54bed-bdf9-4601-98b7-ef632ce31463 HTTP/1.1
10:24:25,300 [pool-1-thread-3] DEBUG RemoteUtils - received HTTP status 200
10:24:25,301 [pool-1-thread-3] DEBUG RemoteUtils - {"stats":{"loadingTimeMillis":0,"estimatedMemoryMegabytes":0,"numEdges":4,"numNodes":4},"graphName":"sample","nodeProperties":{"prop":"integer"},"edgeProperties":{"cost":"double"}}
===> {
  "nodeProperties" : {
    "prop" : "integer"
  },
  "edgeProperties" : {
    "cost" : "double"
  },
  "stats" : {
    "numNodes" : 4,
    "numEdges" : 4,
    "loadingTimeMillis" : 0,
    "estimatedMemoryMegabytes" : 0
  },
  "graphName" : "sample"
}
This example requires that the graph URI points to a file that the In-Memory Analytics server can access using HTTP or HDFS.
5.9.2 Connecting with Java
You can specify the base URL when you initialize In-Memory Analytics using Java. An example is as follows. A URL to an In-Memory Analytics server is provided to the getInMemAnalyst API call.
import oracle.pg.nosql.*;
PgNosqlGraphConfig cfg = GraphConfigBuilder.forNosql().setName("mygraph").setHosts(...).build();
OraclePropertyGraph opg = OraclePropertyGraph.getInstance(cfg);
Analyst analyst = opg.getInMemAnalyst("http://scott:tiger@hostname:port/pgx");
5.9.3 Connecting with an HTTP Request
The In-Memory Analytics shell uses HTTP requests to communicate with the In-Memory Analytics server. You can use the same HTTP endpoints directly or use them to write your own client library.
This example uses HTTP to call create session:
HTTP POST 'http://scott:tiger@localhost:8080/pgx/core/session' with payload '{"source":"shell"}'
Response: {"sessionId":"session-shell-42v3b9n7"}
The call to create session returns a session identifier. Most HTTP calls return an In-Memory Analytics UUID, which identifies the resource that holds the result of the request. Many In-Memory Analytics requests take a while to complete, but you can obtain a handle to the result immediately. Using that handle, an HTTP GET call to a special endpoint provides the result of the request (or block, if the request is not complete).
Most interactions with In-Memory Analytics with HTTP look like this example:
// any request, with some payload
HTTP POST 'http://scott:tiger@localhost:8080/pgx/core/session/session-shell-42v3b9n7/graph' with payload '{"graphName":"sample","graphConfig":{"edge_props":[{"type":"double","name":"cost"}],"format":"adj_list","separator":" ","node_props":[{"type":"integer","name":"prop"}],"uri":"http://path.to.some.server/pgx/sample.adj"}}'
Response: {"futureId":"15fc72e9-42e9-4527-9a31-bd20eb0adafb"}

// get the result using the In-Memory Analytics future UUID.
HTTP GET 'http://scott:tiger@localhost:8080/pgx/future/session/session-shell-42v3b9n7/result/15fc72e9-42e9-4527-9a31-bd20eb0adafb'
Response: {"stats":{"loadingTimeMillis":0,"estimatedMemoryMegabytes":0,"numNodes":4,"numEdges":4},"graphName":"sample","nodeProperties":{"prop":"integer"},"edgeProperties":{"cost":"double"}}
5.10 Reading and Storing Data in HDFS
In-Memory Analytics supports the Hadoop Distributed File System (HDFS). This example shows how to read and access graph data in HDFS using In-Memory Analytics APIs.
Graph configuration files are parsed on the client side. The graph data and configuration files must be stored in HDFS. You must install a Hadoop client on the same computer as In-Memory Analytics. See Oracle Big Data Appliance Software User's Guide.
Note:
The Parallel In-Memory Analytics engine runs in memory on one node of the Hadoop cluster only.5.10.1 Loading Data from HDFS
This example copies the sample.adj graph data and its configuration file into HDFS, and then loads it into memory.
-
Copy the graph data into HDFS:
cd $PGX_HOME
hadoop fs -mkdir -p /user/pgx
hadoop fs -copyFromLocal examples/graphs/sample.adj /user/pgx
-
Edit the
urifield of the graph configuration file to point to an HDFS resource:{ "uri": "hdfs:/user/pgx/sample.adj", "format": "adj_list", "node_props": [{ "name": "prop", "type": "integer" }], "edge_props": [{ "name": "cost", "type": "double" }], "separator": " " } -
Copy the configuration file into HDFS:
cd $PGX_HOME
hadoop fs -copyFromLocal examples/graphs/sample.adj.json /user/pgx
-
Load the sample graph from HDFS into In-Memory Analytics, as shown in the following examples.
Using the Shell to Load the Graph from HDFS
:loadGraph hdfs:/user/pgx/sample.adj.json G
===> {
  "graphName" : "G",
  "nodeProperties" : {
    "prop" : "integer"
  },
  "edgeProperties" : {
    "cost" : "double"
  },
  "stats" : {
    "loadingTimeMillis" : 628,
    "estimatedMemoryMegabytes" : 0,
    "numNodes" : 4,
    "numEdges" : 4
  }
}
Using Java to Load the Graph from HDFS
import oracle.pgx.api.*;
import oracle.pgx.config.*;
     .
     .
     .
GraphConfig graphConfig = GraphConfigFactory.forAnyFormat().fromHdfs("/user/pgx/sample.adj.json");
LoadingResult lr = Pgx.getCore().loadGraphWithProperties(sessionId, graphConfig).get();
String graphName = lr.getGraphName();
5.10.2 Storing Graph Snapshots in HDFS
The In-Memory Analytics binary format (.pgb) is a proprietary binary graph format for In-Memory Analytics. Fundamentally, a .pgb file is a binary dump of a graph and its property data, and it is efficient for In-Memory Analytics operations. You can use this format to quickly serialize a graph snapshot to disk and later read it back into memory.
You should not alter an existing .pgb file.
The following examples store the sample graph, currently in memory, in PGB format in HDFS.
Using the Shell to Store a Graph in HDFS
:storeGraph G PGB hdfs:/user/pgx/sample.pgb ALL ALL true
Using Java to Store a Graph in HDFS
import oracle.pgx.api.Pgx;
import oracle.pgx.config.Format;
import oracle.pgx.config.GraphConfig;

GraphConfig pgbGraphConfig = Pgx.getCore().storeGraphWithProperties(sessionId, graphName,
    Format.PGB, "hdfs:/user/pgx/sample.pgb", true).get();
To verify that the PGB file was created, list the files in the /user/pgx HDFS directory:
hadoop fs -ls /user/pgx
5.10.3 Compiling and Running a Java Application in Hadoop
The following is the HdfsExample Java class for the previous examples:
import oracle.pgx.api.*;
import oracle.pgx.config.*;

public class HdfsExample {

  public static void main(String[] mainArgs) throws Exception {
    Core core = Pgx.getCore();

    String sessionId = core.createSession("test").get();
    GraphConfig graphConfig = GraphConfigFactory.forAnyFormat().fromHdfs("/user/pgx/sample.adj.json");
    LoadingResult lr = Pgx.getCore().loadGraphWithProperties(sessionId, graphConfig).get();
    String graphName = lr.getGraphName();

    GraphConfig pgbGraphConfig = Pgx.getCore().storeGraphWithProperties(sessionId, graphName,
        Format.PGB, "hdfs:/user/pgx/sample.pgb", true).get();

    // load PGB graph
    Pgx.getCore().loadGraphWithProperties(sessionId, pgbGraphConfig).get();
  }
}
These commands compile the HdfsExample class:
cd $PGX_HOME
mkdir classes
javac -cp lib/common/*:lib/embedded/*:third-party/* HdfsExample.java -d classes
This command runs the HdfsExample class:
java -cp lib/common/*:lib/embedded/*:third-party/*:classes:$HADOOP_HOME/etc/hadoop \
    -Dlog4j.configuration=file:conf/log4j.xml HdfsExample
5.11 Running In-Memory Analytics as a YARN Application
In this example you will learn how to start, stop and monitor In-Memory Analytics servers on a Hadoop cluster via Hadoop NextGen MapReduce (YARN) scheduling.
5.11.1 Starting and Stopping In-Memory Analytics Services
Before you can start In-Memory Analytics as a YARN application, you must configure the In-Memory Analytics YARN client.
5.11.1.1 Configuring the In-Memory Analytics YARN Client
The In-Memory Analytics distribution contains an example YARN client configuration file in $PGX_HOME/conf/yarn.conf.
Ensure that all the required fields are set properly. The specified paths must exist in HDFS, and zookeeper_connect_string must point to a running ZooKeeper port of the CDH cluster.
5.11.1.2 Starting a New In-Memory Analytics Service
To start a new In-Memory Analytics service on the Hadoop cluster, use the following command:
yarn jar $PGX_HOME/yarn/pgx-yarn-1.0.0-for-cdh5.2.1.jar
To use a YARN client configuration file other than $PGX_HOME/conf/yarn.conf, provide the file path:
yarn jar $PGX_HOME/yarn/pgx-yarn-1.0.0-for-cdh5.2.1.jar /path/to/different/yarn.conf
When the service starts, the host name and port of the Hadoop node where the In-Memory Analytics service launched are displayed.
5.11.1.3 About Long-Running In-Memory Analytics Services
In-Memory Analytics YARN applications are configured by default to time out after a specified period. If you disable the time out by setting pgx_server_timeout_secs to 0, the In-Memory Analytics server keeps running until you or Hadoop explicitly stop it.
5.11.2 Connecting to In-Memory Analytics Services
You can connect to In-Memory Analytics services in YARN the same way you connect to any In-Memory Analytics server. For example, to connect the Shell interface with the In-Memory Analytics service, use a command like this one:
$PGX_HOME/bin/pgx --base_url username:password@hostname:port
In this syntax, username and password match those specified in the YARN configuration.
5.12 Using the Java API Inside the In-Memory Analytics Shell
The In-Memory Analytics Shell is built on groovysh from the Groovy package. The Shell is thus not limited to In-Memory Analytics commands, because most Java syntax is also valid Groovy syntax. You can use all Java APIs provided by In-Memory Analytics to write complex Shell scripts.
The following example uses the In-Memory Analytics Analyst Java API in the shell to run PageRank on a graph and print the results. The shell loads most of the necessary imports by default, so your script does not need to import them explicitly.
pgx:000> config = GraphConfigFactory.forAnyFormat().fromPath("/opt/oracle/oracle-spatial-graph/property_graph/examples/pgx/graphs/sample.adj.json")
==> {"edge_props":[{"name":"cost","type":"double"}],"node_props":[{"name":"prop","type":"integer"}],"uri":"PGX_HOME/examples/graphs/sample.adj","format":"adj_list","separator":" "}
pgx:000> analyst = Pgx.createAnalyst(config).get()
==> oracle.pgx.api.analyst.Analyst@7d8f73c9
pgx:000> e = 0.001
==> 0.001
pgx:000> d = 0.85
==> 0.85
pgx:000> max = 100
==> 100
pgx:000> rank = analyst.pagerank(e, d, max).get()
==> oracle.pgx.engine.instance.PropertyProxyImpl@7eb61363
pgx:000> for(x in rank.getValues())
pgx:001>    println x.getKey() + ": " + x.getValue()
128: 0.1402019732468347
1908: 0.09708583862990475
99: 0.09708583862990475
333: 0.12002296283541904
==> null
pgx:000> analyst.close()
==> null