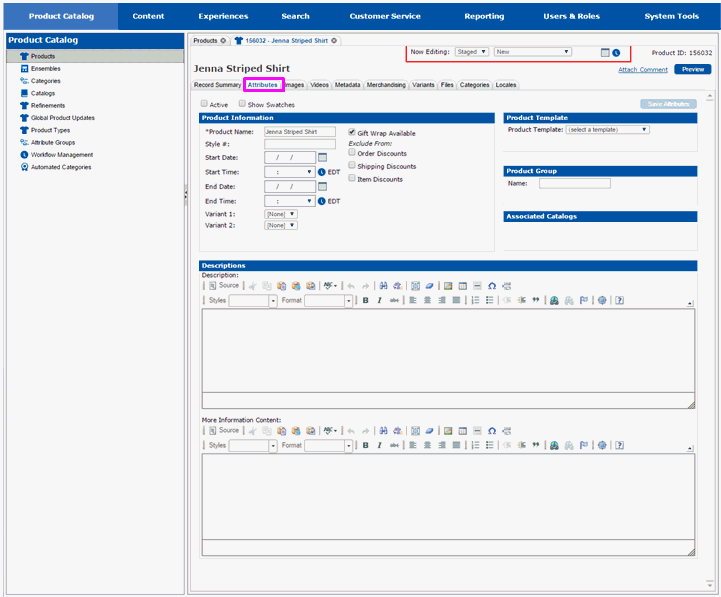
The Attributes pane contains entry fields for most of the information that is displayed when the product is shown on the website. This information gathered in this pane affects the appearance of the product on the website more than any of the other panes.
Select the Attributes tab.
Product Name will already be filled in for you. Fill in the rest of the fields as follows:
If the product should be considered active immediately, select the Active checkbox. Inactive products will not appear on the website.
If color swatches should appear on the product page, select the Show Swatches checkbox.
Enter your style number for the product in the Style # field. Style number is an optional field.
If there is a brand name for the product, enter it in the Brand Name field.
If your product should not become active until a particular date, select the calendar icon for Start Date to choose a start date for the product. Products with blank start dates will be considered available to start immediately.
If you do not want your product to become active until a particular time on the start date of your product, select the clock icon for Start Time to choose the time. You may also enter the time directly into the text field.
If your product has a specific date when it will no longer be available, select the calendar icon for End Date to choose an end date for the product. Products with blank end dates will be considered available forever and will need to be manually deactivated if they become unavailable.
If you want your product to remain active until a particular time on the end date of your product, select the clock icon for the End Time to choose the time. You may also enter the time directly into the text field.
If the product will have variants, use the Variant 1 list box to select the first variant for the product. This determines what the first choice or option will be when the product is being purchased.
If the product will have a second variant, use the Variant 2 list box to select the second variant for the product. This determines what the second choice or option will be when the product is being purchased.
If the product can be gift wrapped, select the Gift Wrap Available checkbox. If gift wrapping is unavailable for the product, do not select the checkbox.
If the product cannot be included in discounts that apply to an order, select the Order Discounts checkbox.
If the product cannot be included in shipping discounts, select the Shipping Discounts checkbox.
If the product cannot be discounted, select the Item Discounts checkbox.
Use the Product Template drop-down list box to alter the way the details page of the product will appear on the site. If a template is selected, the product details page will be rendered according to the page layout defined in the template. If a template is not selected, the product details page will be rendered according to the page layout defined for the category the product will be included in, or according to the page layout defined for the site, if the category does not have its own layout.
If the product will be part of a product group, enter the name of the group in the Name text field. Product groups can be used in Experience Management for experiences that take into consideration the product(s) a visitor to the website interacts with.
Enter a description for the product in the Description entry field. The description is the text that will appear when the product is displayed on the website. Use the formatting options to format the description as desired.
Enter any additional information for the product in the More Information Content entry field. This text will be displayed separately from the product description text when the product is displayed on the website. This text is generally used for additional product detail that supplements the product description. Use the formatting options to format the additional information as desired.
Select Save Attributes when you have entered all the information that is pertinent to your product.

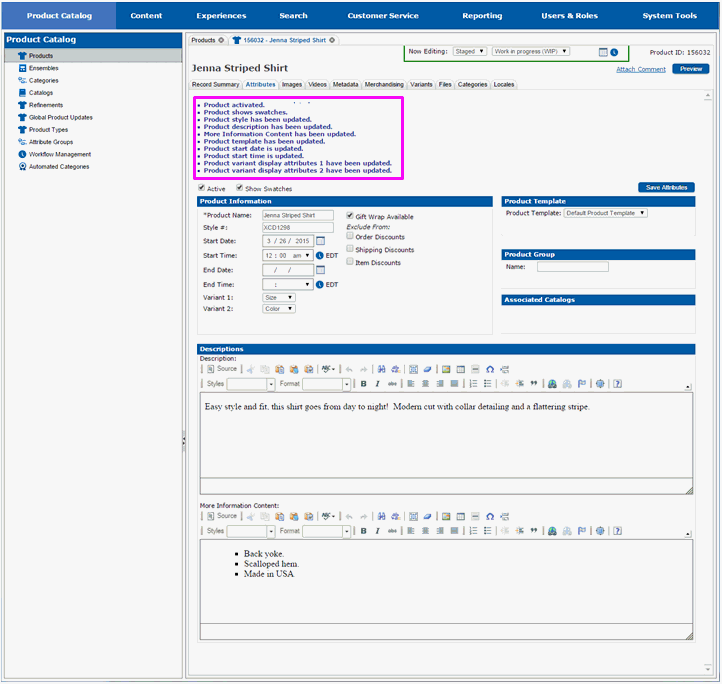
The information you entered will be saved with the product. The page will redraw and you will see messages indicating what was saved. The messages you see may be different than the messages displayed below.
Assigning Images and Alternate Text
Assigning Search Engine Data and Search Keywords
Assigning Cross Sells and Upsells
Optional - Assigning the Product to a Category