3 Configuring Oracle Communications Targets
This chapter discusses configuring new and existing Oracle Communications targets in Oracle Enterprise Manager Cloud Control for use with Oracle Application Management Pack for Oracle Communications.
Understanding Oracle Communications Targets
You provision, configure, and monitor Oracle Communications applications on hosts setup as managed targets in Enterprise Manager Cloud Control. Enterprise Manager Cloud Control also manages non-host targets. Managed non-host targets consist of applications and their components, and infrastructure such as Oracle Enterprise Databases and Oracle WebLogic domains.
An Oracle Management Agent runs on each host where one or more targets exist. The Enterprise Manager Cloud Control Management Server communicates with the management agent performing operations including application provisioning, configuration, and monitoring. You must install the management agent on any host you plan on using with Application Management Pack for Oracle Communications.
For more information about managed targets see the chapter on discovering and monitoring targets in Oracle Enterprise Manager Cloud Control Administrator's Guide available at:
http://docs.oracle.com/cd/E24628_01/doc.121/e24473/discovery.htm
Setting Up Host Preferred Credentials
Application Management Pack for Oracle Communications uses preferred credentials for authentication between the management server and managed host targets. You set either default credentials for target types or target-specific credentials that are stored in the Enterprise Manager Cloud Control repository. Executing procedures and administrative tasks on host targets from the management server, such as provisioning applications and starting Oracle WebLogic domains, uses preferred credentials.
To set up host preferred credentials:
-
Log in to the Enterprise Manager Cloud Control administration console.
-
Click Setup, then Security, and then Preferred Credentials.
-
Select Host under Target Type in the table.
-
Click Manage Preferred Credentials.
-
To set preferred credentials, do one of the following:
-
To set default preferred credentials, click Set under Default Preferred Credentials.
-
To use target preferred credentials, click Set under Target Preferred Credentials.
-
You can also set up target preferred credentials when adding a new managed host.
See the discussion on preferred credentials in Oracle Enterprise Manager Cloud Control Administrator's Guide for more information on preferred credentials.
Ensuring Correct Preferred Credentials Permissions on Host Targets
Remote procedures and administrative tasks launched from the management server execute on target hosts. You must set the necessary file and directory permissions on target hosts for the preferred credential used to perform actions on a target host. This ensures that commands and scripts execute properly on target hosts.
For example, a WebLogic domain on a target host may be deployed in a mounted file share physically located on a third host. The preferred credential used to start this domain must exist on the third host and have execute permissions in the mounted file share to run the start scripts.
Ensure that the preferred credentials you create for the managed hosts in your environment exist on accessed hosts and have the needed permissions in the file locations where your applications may be installed.
Adding Host Targets Manually and Installing the Management Agent
To manually add a host to Enterprise Manager Cloud Control and install the management agent on the new host:
-
Log in to the Enterprise Manager Cloud Control administration console.
-
Expand the Setup menu, then select Add Target, and then Add Targets Manually.
-
Select Add Host Targets.
-
Click Add Host....
-
Click Add in the Add Host Targets: Host and Platform wizard.
-
In the Host field, enter the new target's host name.
-
From the Platform menu, select the correct operating system platform.
-
Click Next.
-
In the Installation Base Directory field, enter an installation base directory for the new target. This specifies the directory on the target host where you want the software binaries, security files, and inventory files of the management agent to be copied.
-
In the Instance Directory field, enter an instance directory on the new target. This specifies the directory on the target host where management agent configuration files are stored.
-
Select a Named Credential for management agent installation on the new target. See "Setting Up Host Preferred Credentials" for more information on setting up host credentials.
-
Confirm the Privileged Delegation Setting and Port, as well as any Optional Details needed in your installation.
-
Click Next.
-
Confirm the value in the Host Information field and click Deploy Agent.
-
Confirm that the management agent is properly installed and the new target is now visible in the administration console.
For detailed information on installing the management agent, see Oracle Enterprise Manager Cloud Control Basic Installation Guide at:
http://docs.oracle.com/cd/E24628_01/install.121/e22624/install_agent.htm
Adding Oracle Communications Targets
Oracle Communication targets must be added after their hosts obtain managed status and receive a management agent. You must also deploy the Application Management Pack for Oracle Communications plug-in to each management agent before performing discovery.
You can add non-host targets manually using guided discovery. Application Management Pack for Oracle Communications also supports automatic discovery for Oracle Communications Elastic Charging Engine and Oracle Communications Network Charging and Control applications.
Use the following methods for adding non-host Oracle Communications targets to your Enterprise Manager Cloud Control management server:
Discovering Targets Using Guided Discovery
Application Management Pack for Oracle Communications provides a guided discovery module for discovering existing targets on managed hosts for the following Oracle Communications applications:
-
Oracle Communications Billing and Revenue Management
-
Oracle Communications Order and Service Management
-
Oracle Communications Unified Inventory Management
-
Oracle Communications ASAP
To discover and promote existing Oracle Communications application targets:
-
Backup existing Oracle Communications applications configurations files such as pin.conf and pin_ctl.conf on Billing and Revenue Management systems.
-
For Billing and Revenue Management, confirm the variables listed in Table 3-1 are correctly set in the pin_ctl.conf file for your environment. This file is located in the brm_home/bin directory on your Billing and Revenue Management server, where brm_home is the directory where you installed Billing and Revenue Management.
See the section on customizing the pin_ctl utility environment variables in Oracle Communications Billing and Revenue Management System Administrator's Guide for more information on setting the required variables.
Table 3-1 Required pin_ctl.conf Variables for Guided Discovery
Variable Description NLS_LANG
The database language used in the Billing and Revenue Management database.
ORACLE_HOME
The home directory of the Oracle database used by Billing and Revenue Management.
TNS_ADMIN
The directory where the tnsnames.ora file referencing the database used by Billing and Revenue Management is located.
PIN_LOG_DIR
The Billing and Revenue Management directory where logs are stored. Set PIN_LOG_DIR to:
PIN_HOME/varwhere PIN_HOME is the Billing and Revenue Management installation directory.
LD_LIBRARY_PATH
Set LD_LIBRARY_PATH to:
Oracle_Home/lib64:Oracle_Home/lib:Database_Home/lib: Database_Home/rdbms/lib:$LD_LIBRARY_PATH
where Oracle_Home is the Oracle home directory and Database_Home is the database home directory.
LD_LIBRARY_PATH_64
Set LD_LIBRARY_PATH_64 to:
Oracle_Home/lib64:Oracle_Home/lib:Database_Home/lib: Database_Home/rdbms/lib:$LD_LIBRARY_PATH
where Oracle_Home is the Oracle home directory and Database_Home is the database home directory.
PATH
Set PATH to:
Oracle_Home/bin:$PATHwhere Oracle_Home is the Oracle home directory.
-
Ensure that the Application Management Pack for Oracle Communications plug-in is deployed on the application host.
-
Log in to the Enterprise Manager Cloud Control administration console.
-
Expand the Setup menu, then select Add Target, and then Add Targets Manually as shown in Figure 3-1.
Figure 3-1 Add Targets Manually Setup Menu
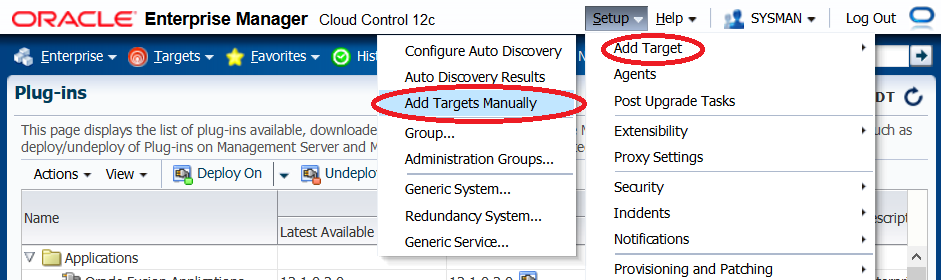
Description of "Figure 3-1 Add Targets Manually Setup Menu"
-
Select Add Targets Using Guided Process (Also Adds Related Targets).
-
From Target Types, select Oracle Communications Applications Discovery.
-
Click Add Using Guided Discovery....
-
In the Choose Targets wizard, click Add.
-
Select the host on which the existing application is installed, and then click Select.
-
Select the check box for the application to discover and promote:
-
OSS - Order and Service Management, Unified Inventory Management and ASAP
-
BRM - Billing and Revenue Management
-
-
Enter the information for the existing environment in the Domain Configuration and Application Information fields. Table 3-2 describes the Billing and Revenue Management discovery input parameters.
Obtain the information about existing Oracle Communications application instances from your system administrator.
Table 3-2 Billing and Revenue Management Discovery Input Parameters
Parameter Description InstallLocation
The Billing and Revenue Management installation home folder.
ThirdPartyLocation
The Billing and Revenue Management Third Party package installation folder.
DatabaseHome
The Oracle Enterprise Database client package directory located on your Billing and Revenue Management server.
TNS_ADMIN
The folder on your Billing and Revenue Management host where the tnsnames.ora file pointing to your database.
BRM Pin User
The Billing and Revenue Management host user.
BRM Pin Password
The Billing and Revenue Management host password.
RegistryFile
For Pipeline targets:
-
Select ALL for adding both Pipeline and RealtimePipeline on a target.
-
Select Pipeline, if the target is a batch rating pipeline.
-
Select RealtimePipeline if the target is a real time discounting pipeline.
When discovering Billing and Revenue Management pipeline targets, you must set the InstallLocation parameter to the IFW_HOME directory on your host, where IFW_HOME is the pipeline installation home directory.
-
-
Click Submit.
-
Confirm that the existing application installation is added and the new targets are now visible in the Enterprise Manager Cloud Control administration console. Some applications result in a single target addition while others may include more than one target.
See "Monitoring Oracle Communications Application Targets" for information on how to view newly discovered targets.
For general information about discovering existing hosts and promoting targets see the section on automatically discovering and monitoring targets in Oracle Enterprise Manager Cloud Control Administrator's Guide available at:
http://docs.oracle.com/cd/E24628_01/doc.121/e24473/discovery.htm#BABGGHJG
Adding Unified Inventory Management Database Parameter Values
You must add the database password value for discovered Unified Inventory Management targets found using guided discovery.
To specify the Unified Inventory Manager database password:
-
Log in to the Enterprise Manager Cloud Control administration console as a privileged user.
-
Click Targets, and then All Targets.
-
In the list of targets, click the discovered Unified Inventory Management target.
-
Under the system_name, expand the system type menu.
-
Click Target Setup, and then Monitoring Configuration.
-
Enter the required database SID and password parameters.
-
Click OK.
Discovering Targets Automatically
Enterprise Manager Cloud Control can automatically discover unmanaged hosts on your network using IP scanning or discovery modules. Once unmanaged hosts are discovered, you can promote these hosts to managed status. Promoting a host to managed status installs a management agent on the host, allowing Enterprise Manager Cloud Control to perform additional functions on the new target including automatic discovery of applications.
Application Management Pack for Oracle Communications provides discovery modules used for automatically discovering Elastic Charging Engine targets running on Oracle Coherence and Network Charging Control targets. Use the discovery modules to automatically discover and promote Elastic Charging Engine and Network Charging and Control targets.
See the following sections for information on configuring each automatic discovery module:
Discovering Elastic Charging Engine Targets Automatically
Before configuring auto discovery for Elastic Charging Engine targets you must discover and promote the Coherence clusters on which Elastic Charging Engine is running. See the discussion on discovering Coherence targets in the Getting Started with Management Pack for Oracle Coherence chapter in Oracle Enterprise Manager Cloud Control Getting Started with Oracle Fusion Middleware Management for more information on adding existing Elastic Charging Engine Coherence clusters to Enterprise Manager Cloud Control at:
http://docs.oracle.com/cd/E24628_01/install.121/e24215/coherence_getstarted.htm
After adding your Elastic Charging Engine Coherence clusters to Enterprise Manager Cloud Control, you must enable the Coherence Management Pack and complete Elastic Charging Engine automatic discovery using the following procedures:
Enabling the Coherence Management Pack
To enable the Coherence Management Pack:
-
Log in to the Enterprise Manager Cloud Control administration console.
-
Expand the Setup menu, then select Management Packs, and then Management Packs Access as shown in Figure 3-2.
Figure 3-2 Enabling Coherence Management Pack Setup Menu
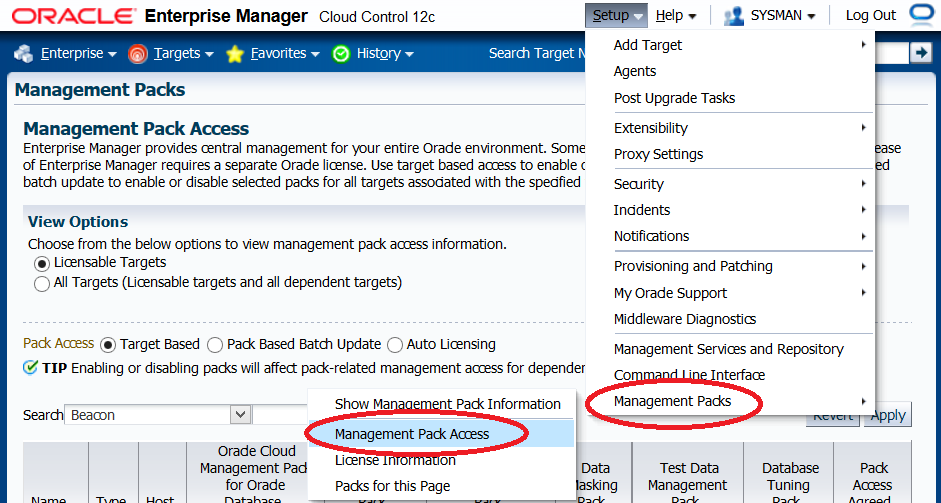
Description of "Figure 3-2 Enabling Coherence Management Pack Setup Menu"
-
Under View Options, select All Targets.
-
In Pack Access, select Pack Based Batch Update.
-
Enable the Management Pack for Oracle Coherence if needed by selecting on the pack and moving it to the Selected Packs window.
-
Click Apply.
Configuring Elastic Charging Engine Auto Discovery
To configure managed hosts to run automatic discovery:
-
Log in to the Enterprise Manager Cloud Control administration console.
-
Expand the Setup menu, then select Add Target, and then Configure Auto Discovery as shown in Figure 3-3.
Figure 3-3 Configure Auto Discovery Setup Menu
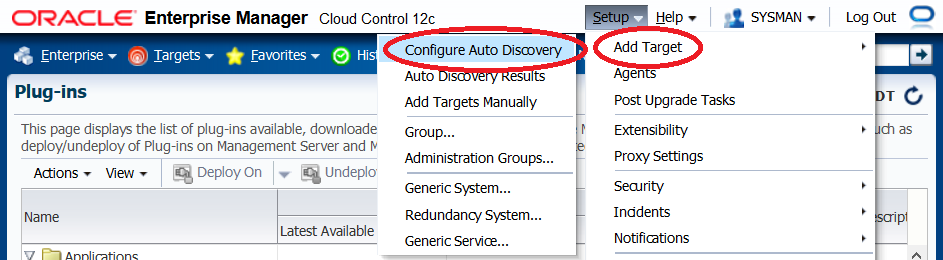
Description of "Figure 3-3 Configure Auto Discovery Setup Menu"
-
Click the ECE Cluster Discovery module link.
-
Under Configure Target Discovery for Target Types, click Add Host.
-
Select and highlight the managed Coherence target hosts on which to perform automatic Elastic Charging Engine discovery.
-
Click Select.
-
Select and highlight the added hosts.
-
Click Edit Parameters.
-
Enter the required Elastic Charging Engine parameters in the following list:
-
In the ECE_SERVICE_NAME field, enter the service name for the Elastic Charging Engine management node.
-
In the ECE_HOME field, enter the Elastic Charging Engine installation home directory on the target host.
-
In the AGENT_URL field, enter the management agent main URL on the target host.
-
In the ECE_JMX_PORT field, enter the Elastic Charging Engine management node JMX port number.
-
In the ECE_MGMT_HOST field, enter the Elastic Charging Engine management node host name.
Automatic discovery does not validate these parameters. The discovery module uses the values to contact the management agent on the specified host when attempting to add the Elastic Charging Engine target.
-
-
Click OK in the parameters window.
-
Click OK.
View newly discovered Elastic Charging Engine targets in the Auto Discovery Results page found in the menu accessed from step 5.
The Enterprise Manager Cloud Control administration console does not display Elastic Charging Engine automatic discovery errors. You must check the management agent log on the Elastic Charging Engine host for errors when automatic discovery fails.
Running Automatic Discovery On Demand
To run automatic discovery immediately after configuration:
-
Log in to the Enterprise Manager Cloud Control administration console.
-
Expand the Setup menu, then select Add Target, and then Configure Auto Discovery.
-
Click the All Discovery Modules link.
-
Select an Agent Host Name row from the list of Elastic Charging Engine Coherence managed host targets on which to change or run automatic discovery.
-
Click Run Discovery Now.
By default, automatic target discovery runs once daily. You can configure an interval for automatic discovery better suited to your environment. See Oracle Enterprise Manager Cloud Control Administrator's Guide for more information on setting the discovery interval.
Promoting Discovered Elastic Charging Engine Targets
You must promote each Elastic Charging Engine cluster and node found by automatic discovery.
To promote each cluster and node:
-
Log in to the Enterprise Manager Cloud Control administration console.
-
Expand the Setup menu, then select Add Target, and then Auto Discovery Results as shown in Figure 3-4.
Figure 3-4 Auto Discovery Results Setup Menu
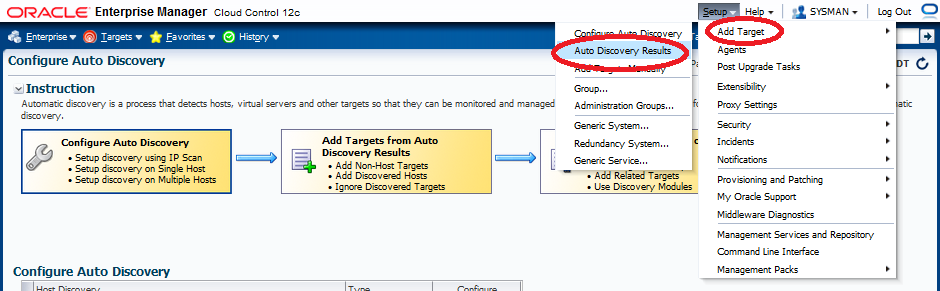
Description of "Figure 3-4 Auto Discovery Results Setup Menu"
-
In Auto Discovery Results, select the Non-Host Targets tab.
-
Select the auto discovered Elastic Charging Engine targets:
-
For Elastic Charging Engine cluster targets, select the rows with the BRM target name and a target type of Oracle ECE Cluster.
-
For Elastic Charging Engine node targets, select the rows with the host and node name as target name and a target type of Oracle ECE Node.
-
-
Click Promote.
-
Enter the following credentials and properties for the cluster or node under Promote Unmanaged Target. Automatic discovery does not pre-populate the property values required for promotion. You must provide a value for each property before promoting discovered Elastic Charging Engine targets.
ECE Cluster Management Server Credentials:
-
Monitoring Username: The Elastic Charging Engine monitoring username.
-
Monitoring Password: The monitoring user's password.
Properties:
-
Bulk Operations MBean: The name of the bulk operations MBean.
-
Cluster Name: The name of the Elastic Charging Engine cluster.
-
Communication Protocol: The cluster communications protocol.
-
ECE Installation Directory: The Elastic Charging Engine install directory.
-
ECE Version: The Elastic Charging Engine version.
-
JMX Remote Port: The Elastic Charging Engine target's JMX remote port.
-
Machine Name: The host where the Elastic Charging Engine target runs.
-
Service Name: The service used for calling remote management.
-
Service URL: The service URL used for remote management.
-
-
Click Promote.
Discovering Network Charging and Control Targets Automatically
Before configuring auto discovery for Network Charging and Control you must discover and promote any hosts on which Network Charging and Control runs to managed status in Enterprise Manager Cloud Control. Complete the Network Charging and Control automatic discovery using the following procedures:
Configuring Network Charging and Control Discovery
To configure Network Charging and Control host targets on which to run automatic discover:
-
Log in to the Enterprise Manager Cloud Control administration console.
-
Expand the Setup menu, then select Add Target, and then Configure Auto Discovery.
-
Click the Oracle Communications NCC Discovery module link.
-
Under Configure Target Discovery for Target Types, click Add Host.
-
Search for managed host targets on which Network Charging and Control is installed.
-
Select and highlight the managed Network Charging and Control target hosts on which to perform automatic discovery.
-
Click Select.
-
Select and highlight the added hosts.
-
Click OK.
Running Automatic Discovery On Demand
To run automatic discovery immediately after configuration:
-
Log in to the Enterprise Manager Cloud Control administration console.
-
Expand the Setup menu, then select Add Target, and then Configure Auto Discovery.
-
Click the All Discovery Modules link.
-
Select an Agent Host Name row from the list of Network Charging and Control managed host targets on which to change or run automatic discovery.
-
Click Run Discovery Now.
By default, automatic target discovery runs once daily. You can configure an interval for automatic discovery better suited to your environment. See Oracle Enterprise Manager Cloud Control Administrator's Guide for more information on setting the discovery interval.
Promoting Discovered Network Charging and Control Targets
You must promote each discovered Network Charging and Control targets found by automatic discovery.
To promote each Network Charging and Control target found:
-
Log in to the Enterprise Manager Cloud Control administration console.
-
Expand the Setup menu, then select Add Target, and then Auto Discovery Results as shown in Figure 3-5.
Figure 3-5 Auto Discovery Results Setup Menu
Description of "Figure 3-5 Auto Discovery Results Setup Menu"
-
In Auto Discovery Results, select the Non-Host Targets tab.
-
Select the auto discovered Network Charging and Control targets:
-
Click Promote.
Adding Existing Oracle Communications Applications Using Monitoring Properties
You can manually add existing installations of supported versions of Oracle Communications applications or components as managed non-host targets by specifying the target host type and monitoring properties.
The plug-in supports the following Oracle Communications application target types for property monitoring:
-
ASAP Target
-
NCC SLC Target
-
NCC SMP Target
-
NCC VWS Target
-
OSM Target
-
Oracle BRM Account Sync Tool
-
Oracle BRM Batchcontroller Process
-
Oracle BRM Connection Manager
-
Oracle BRM Connection Manager Master Process
-
Oracle BRM Connection Manager Proxy
-
Oracle BRM DM AQ
-
Oracle BRM DM Invoice
-
Oracle BRM DM LDAP
-
Oracle BRM DM Prov Telco
-
Oracle BRM DM-EAI
-
Oracle BRM DM-EMAIL
-
Oracle BRM DM-FUSA
-
Oracle BRM DM-TAXWARE
-
Oracle BRM DM-VERTEX
-
Oracle BRM DMO
-
Oracle BRM DMTT
-
Oracle BRM Diameter Gateway
-
Oracle BRM EAI JS Component
-
Oracle BRM Formatter Process
-
Oracle BRM Pipeline
-
Oracle BRM REL
-
Oracle BRM RTP
-
Oracle BRM SNMP Process
-
Oracle BRM UEL
-
Oracle ECE Cluster
-
Oracle ECE Node
-
UIM Target
To manually add existing Oracle Communications applications or processes:
-
Add the server host of each application or process instance as a managed host and install the management agent. See "Adding Host Targets Manually and Installing the Management Agent" for more information.
-
Deploy the Application Management Pack for Oracle Communications plug-in to the management agent. See "Deploying the Application Management Pack for Oracle Communications Plug-In" for more information.
-
Log in to the Enterprise Manager Cloud Control administration console.
-
Expand the Setup menu, then select Add Target, and then Add Targets Manually.
-
Select Add Targets by Specifying Target Monitoring Properties.
-
From Target Types, select the Oracle Communications application or process.
-
Click the magnifying glass to search for the monitoring agent running on the host where the Oracle Communications application or process is running. The Search and Select: Targets window is displayed.
-
Select the management agent running on the Oracle Communications application or process host.
-
Click Select.
-
Click Add Manually....
-
Provide the required parameters for the target type. Obtain these values from the installed Oracle Communications application or component environment. See the documentation for the application or component for more information.
-
Click OK to add the new target.
-
Confirm that the new target is now visible in the Enterprise Manager Cloud Control administration console.
Preparing New Hosts for Application Provisioning
This section describes the steps needed to prepare a new host for Oracle Communications application provisioning. You must prepare a host for an Oracle Communications application before initiating provisioning from Enterprise Manager Cloud Control. This involves the following steps:
Ensuring Proper Application System Requirements
The managed host must meet the application's hardware and software requirements. See the product's installation guide for more information.
Hardware and Software requirements vary depending on the type of installation you are performing. For example, development and testing systems require lower minimum technical requirements compared to production systems. However, all managed hosts must meet the minimum requirements.
Installing Required Software
Most Oracle Communications applications require foundational software before installation. Required software can exist on the same host you are provisioning an Oracle Communications application on or on a remote host. Consult the installation guides for these requirements. Foundational software configuration details, such as host names, credentials, and port numbers may be required for provisioning.
You can install foundational software on any host, then use discovery to promote the hosts to managed target status. This enables monitoring components such as Enterprise Database and WebLogic domains in Enterprise Manager Cloud Control along side Oracle Communications applications.
Adding a Host to Enterprise Manager Cloud Control
Add the new host to Enterprise Manager Cloud Control and install a management agent on the host either manually or with discovery. See "Adding Oracle Communications Targets" for more information.
Downloading Oracle Communications Application Installers
You must download supported versions of Oracle Communications applications before installing on managed hosts in Enterprise Manager Cloud Control. The Communications Suite Installation procedure copies the installers onto the target host during the installation process.
Obtain the installer packages for supported products from the Oracle Software Delivery Cloud at:
See "Supported Applications" for a list of supported Oracle Communications applications and versions.
Place the installers in a shared network location accessible by the Enterprise Manager Cloud Control host and the managed targets on which Oracle Communications applications will be installed.
For Billing and Revenue Management, you must upload the installers into the BRMComponents folder in the Software Library. See "Creating the Billing and Revenue Management Source Components" for more information on uploading Billing and Revenue Management components.
WARNING:
Do not change names of the Billing and Revenue Management installation packages. The provisioning procedure does not support custom file names for the installation packages.
See "Provisioning Applications" for more information on the installation procedure.