2 Installing Application Management Pack for Oracle Communications
This chapter describes how to install, deploy, update, and remove Oracle Application Management Pack for Oracle Communications.
The following topics are covered:
-
Installing the Application Management Pack for Oracle Communications Plug-in
-
Deploying the Application Management Pack for Oracle Communications Plug-In
-
Upgrading the Application Management Pack for Oracle Communications Plug-In
-
Uninstalling the Application Management Pack for Oracle Communications Plug-In
-
Creating the Oracle Communications Folders for BRM Installers
-
Enabling Application Management Pack for Oracle Communications Logging
System Requirements
You install Application Management Pack for Oracle Communications as a plug-in on an existing Oracle Enterprise Manager Cloud Control instance. The plug-in is supported on Enterprise Manager Cloud Control version 12c Release 3.
For more information on Enterprise Manager Cloud Control system requirements and installation procedures, see the documentation at:
http://docs.oracle.com/cd/E24628_01/index.htm.
Enterprise Manager Cloud Control requires an Oracle Enterprise Database for installation. For information on installing and configuring Oracle Enterprise Database, see: http://www.oracle.com/technetwork/database/enterprise-edition/documentation/index.html
This guide assumes a properly configured Enterprise Manager Cloud Control and Enterprise Database environment.
Supported Oracle Communications Applications
Managed application targets must meet the system requirements listed in the application's documentation. For more information, see the Oracle Communications application documentation available on the Oracle Software Delivery Cloud and Oracle Technology Network at:
See "Supported Applications" for a list of supported Oracle Communications applications and versions.
Installing the Application Management Pack for Oracle Communications Plug-in
Install the plug-in using one of the following methods:
Installing the Plug-in from the Enterprise Manager Self Update Store
You install the Application Management Pack for Oracle Communications plug-in from the Enterprise Manager Self Update Store in the Enterprise Manager Cloud Control administration console.
To install the plug-in from the Enterprise Manager Store:
-
Ensure Enterprise Manager Cloud Control can access the internet.
-
Log in to the Enterprise Manager Cloud Control administration console as a privileged user.
-
From the Setup menu, select Extensibility, and then Self Update.
-
Select the Plug-in row and click Open.
-
Select Oracle Communications.
-
Click Download.
The plug-in becomes deployable after the download completes. See "Deploying the Application Management Pack for Oracle Communications Plug-In" for information on deploying the plug-in.
Installing the Plug-in Using an OPAR File
You can download the Oracle Plug-in Archive (OPAR) version of the plug-in from the Oracle Software Delivery Cloud and install the OPAR using the Enterprise Manager Command-Line Utility (EMCLI).
For information on OPAR files, see the Enterprise Manager Cloud Control documentation at:
http://docs.oracle.com/cd/E24628_01/doc.121/e25159/plugin_lifecycle.htm
For information on EMCLI, see the Enterprise Manager Cloud Control documentation at:
http://docs.oracle.com/cd/E24628_01/em.121/e17786/toc.htm
To install the plug-in using EMCLI:
-
Download the Application Management Suite for Communications plug-in from the Oracle Software Delivery Cloud at
https://edelivery.oracle.com. -
Copy the 12.1.0.1.0_oracle.cgbu.ocom_2000_0.opar file to the Enterprise Manager Cloud Control host.
-
In a terminal session, navigate to the oms/bin directory of your Enterprise Manager Cloud Control installation.
-
Configure the EM CLI connection to the Enterprise Manager Cloud Control host using the following command:
./emcli setup -url=https://host:port/em -username=sysman -password=password -trustall
where host and port are the connection values for the Enterprise Manager Cloud Control server and password is the password for the sysman user.
-
Import the Application Management Suite for Communications .opar file using the following command:
./emcli import_update -file=filepath/12.1.0.1.0_oracle.cgbu.ocom_2000_0.opar -omslocalwhere filepath is the absolute path to the location where the 12.1.0.1.0_ oracle.cgbu.ocom_2000_0.opar file is located.
-
Verify the successful plug-in import by selecting Setup, then Extensibility, then Plug-ins in the Enterprise Manager Cloud Control Console. You should see an Oracle Communications listing in the Applications folder.
See "Deploying the Application Management Pack for Oracle Communications Plug-In" for information on deploying the plug-in.
Deploying the Application Management Pack for Oracle Communications Plug-In
After the plug-in has been imported, deploy it on the Enterprise Manager Cloud Control Management Server and target host agents.
To deploy the plug-in on the management server:
-
Set up preferred credentials for the target host. See "Setting Up Host Preferred Credentials" for more information.
-
From the Setup menu, select Extensibility, and then select Plug-ins as shown in Figure 2-1.
Figure 2-1 Location of Plug-Ins Setup Menu
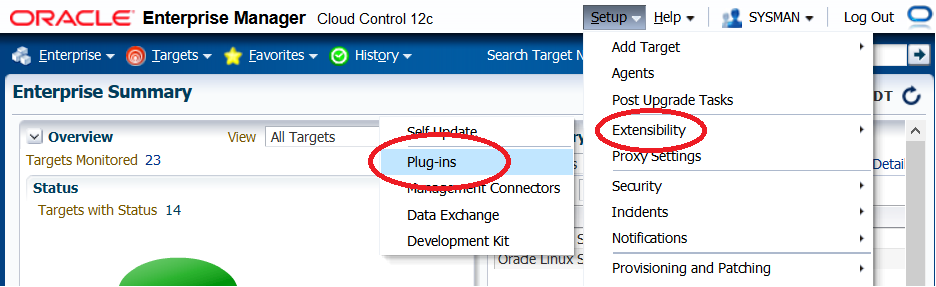
Description of "Figure 2-1 Location of Plug-Ins Setup Menu"
-
From the Applications folder, select the Oracle Communications.
-
From the Deploy On menu, select Management Servers.
The Deploy Plugin on Management Servers dialog appears.
-
In the Password field, enter the password for the sys user and click Continue.
-
Complete the remaining steps in the dialog box.
-
Click Deploy.
-
Monitor the status to ensure successful deployment.
-
Install the default configuration template files. See "Installing the Default Configuration Template Files" for more information.
The plug-in must also be deployed to each management agent on host targets running Oracle Communications applications. Before deploying the plug-in to a management agent you must first add the host target to your Enterprise Manager Cloud Control instance. See "Adding Host Targets Manually and Installing the Management Agent" for information on adding host targets.
To deploy the plug-in to an Oracle Communications host target management agent:
-
Log in to the Enterprise Manager Cloud Control administration console.
-
Expand the Setup menu, then select Extensibility, and then Plug-ins.
-
Expand Applications.
-
Right-Click Oracle Communications.
-
Select Deploy On, and then Management Agent.
The Deploy Plug-in on Management Agent window appears.
-
Click Continue.
-
Select the targets on which to deploy the plug-in.
-
Click Continue.
-
Confirm there are no errors indicated by the pre-requisite check.
-
Click Next.
-
Click Deploy.
-
Confirm that the Application Management Pack for Oracle Communication plug-in deploys successfully.
-
Repeat steps 1 through 12 for all Oracle Communications host targets.
For additional information on the Plug-In Manager, see Oracle Enterprise Manager Cloud Control Administrator's Guide at:
http://docs.oracle.com/cd/E24628_01/doc.121/e24473/plugin_mngr.htm#CJGCHGIH
Upgrading the Application Management Pack for Oracle Communications Plug-In
The plug-in can be upgraded when a new version is released using the Self Update feature in Enterprise Manager Cloud Control. You must deploy the updated plug-in to the management server and agents.
For more information, see the chapter on Updating Cloud Control in Oracle Enterprise Manager Cloud Control Administrator's Guide at:
http://docs.oracle.com/cd/E24628_01/doc.121/e24473/self_update.htm
To run Enterprise Manager Cloud Control Self Update:
-
Log in to the Enterprise Manager Cloud Control administration console.
-
Click Setup, then Extensibility, and then Plug-ins.
-
In the Applications folder, select Oracle Communications.
-
Click Actions, and then Check Updates.
Uninstalling the Application Management Pack for Oracle Communications Plug-In
To remove Application Management Pack for Oracle Communications:
-
Log in to the Enterprise Manager Cloud Control administration console.
-
Click Setup, then Extensibility, and then Plug-ins.
-
In the Applications folder, select Oracle Communications.
-
Click Undeploy From and undeploy the plug-in from all Management Agents.
-
Click Undeploy From and undeploy the plug-in from all Management Servers.
For additional information on the Plug-In Manager, see Oracle Enterprise Manager Cloud Control Administrator's Guide at:
http://docs.oracle.com/cd/E24628_01/doc.121/e24473/plugin_mngr.htm#CJGCHGIH
Installing the Default Configuration Template Files
Application Management Pack for Oracle Communications provides parameter template files used by Enterprise Manager Cloud Control to install and configure supported Oracle Communications applications. You must install the default configuration template files provided to the Enterprise Manager Cloud Control domain.
To install the configuration templates:
-
Log in to the Enterprise Manager Cloud Control host on which you have installed and deployed the Application Management Pack for Oracle Communications plug-in.
-
Create the following directory structure in your Enterprise Manager Cloud Control instance:
middleware_home/../gc_inst/user_projects/domains/GCDomain/default_xml/platform
where middleware_home is the directory where you installed Enterprise Manager Cloud Control.
-
Copy the middleware_home/plugins/oracle.cgbu.ocom.oms.plugin_12.1.0.1.0/metadata/swlib/platform/components/default_xml.zip to middleware_home/../gc_inst/user_projects/domains/GCDomain/default_xml/platform.
-
Unzip default_xml.zip into the platform directory.
About Provisioning Variables
The default_xml.zip archive includes the platform_suite_default.xml file. This file contains the parameters used by the Communications Suite Installation Procedure for each supported application. See the supported application installation guides for specific information on these values and their role in application installation.
Editing platform_suite_default.xml allows the definition of commonly used or static environmental values, such as user names and port values, in your environment. The provisioning procedure pre-populates the values used in this configuration file.
The following example shows the configurable db_name value parameter for a Billing and Revenue Management database SID in the platform_suite_default.xml file:
<parameter mandatory="true" name="DATABASE_SID" value="db_name" category="orclocom_brm" basic="true" type="DBRegister">
      <label locale="en" value="Database SID"/>
</parameter>
Make a copy of the edited platform_suite_default.xml file and save it in a secure location.
Creating the Oracle Communications Folders for BRM Installers
If you are provisioning Billing and Revenue Management, you must create the CommSuiteProvisioning and BRMComponents folders in the Enterprise Manager Cloud Control Software Library to store installers used during the provisioning procedure.
To create the folders:
-
Log in to the Enterprise Manager Cloud Control administration console on your management server as a privileged user.
-
Click Enterprise, then Provisioning and Patching, and then Software Library.
-
Click Actions, and then Create Folder.
-
In the Name field, enter CommsSuiteProvisioning.
-
Select the CommsSuiteProvisioning folder.
-
Click Actions, and then Create Folder.
-
In the Name field, enter BRMComponents.
-
Click OK.
Enabling Application Management Pack for Oracle Communications Logging
Enable java logging for Application Management Pack for Oracle Communications in Enterprise Manager Cloud Control by updating the logging.xml file located in the following directory on your Enterprise Manager Cloud Control management server host:
middleware_home/gc_inst/user_projects/domains/GCDomain/config/fmwconfig/servers/EMGC_OMS1
where middleware_home is the directory where you installed Enterprise Manager Cloud Control.
To enable logging:
-
Log in to the management server host as a user with permissions to modify the Enterprise Manager Cloud Control configuration.
-
Change directory to middleware_home/gc_inst/user_projects/domains/GCDomain/config/fmwconfig/servers/EMGC_OMS1.
-
Open the logging.xml file with a text editor.
-
Add a new entry for the Application Management Pack for Oracle Communications log handler. Use the following example as a guide:
<log_handler name='comms-ams-handler' class='oracle.core.ojdl.logging.ODLHandlerFactory' filter='oracle.dfw.incident.IncidentDetectionLogFilter'> <property name='path' value='${domain.home}/servers/${weblogic.Name}/sysman/log/comms-ams.log'/> <property name='maxFileSize' value='10485760'/> <property name='maxLogSize' value='104857600'/> <property name='encoding' value='UTF-8'/> <property name='useThreadName' value='true'/> <property name='supplementalAttributes' value='J2EE_APP.name,J2EE_MODULE.name,WEBSERVICE.name,WEBSERVICE_PORT.name,composite_instance_id,component_instance_id,composite_name,component_name'/> </log_handler> -
Add a new entry for a logger referring to the log handler created in step 4. Use the following example as a guide:
<logger name='oracle.communications.platform.em' level='NOTIFICATION' useParentHandlers='false'>
   <handler name='comms-ams-handler'/>
  </logger>
Set the logging level by editing the level value in the logger entry. For example, the following logger entry provides trace logging of all messages:
<logger name='oracle.communications.platform.em' level='TRACE:32' useParentHandlers='false'>
   <handler name='comms-ams-handler'/>
  </logger>
Setting the logging level to TRACE:32 produces large amounts of logging data and should only be used for resolving issues with your Application Management Pack for Oracle Communications environment. See the chapter on logging in Oracle Enterprise Manager System Administrator's Guide for more information on setting logging levels.
-
Save the changes made to logging.xml and exit the editor.
Restarting the Enterprise Manager Cloud Control management server is not required for activating changes to logging configuration.