| Siebel CRM Configuring Siebel Open UI Siebel Innovation Pack 2016, Rev. A E52417-01 |
|


 Previous |
 Next |
View PDF |
| Siebel CRM Configuring Siebel Open UI Siebel Innovation Pack 2016, Rev. A E52417-01 |
|
Previous |
Next |
View PDF |
This task is a step in "Roadmap for Customizing Siebel Open UI".
To customize the presentation model, do the following tasks:
"Customizing the Presentation Model to Identify the Records to Delete"
"Customizing the Presentation Model to Handle Notifications"
"Customizing Methods in the Presentation Model to Store Field Values"
"Customizing the Presentation Model to Call the Siebel Server and Delete a Record"
This task is a step in "Process of Customizing the Presentation Model".
The presentation model uses the Init method to configure the properties, methods, and bindings of the presentation model, and the Setup method to extract the values that a property set contains. For more information about these methods, see "Life Cycle of User Interface Elements".
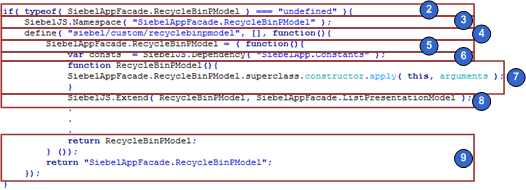
Figure 4-1 illustrates the code you use to create the presentation model. Each number in this figure identifies the corresponding step number in the numbered task list that this book includes immediately after this figure.
To create the presentation model
Create the custom presentation model file:
Download a copy of the recyclebinpmodel.js file to the following folder:
INSTALL_DIR\eappweb\PUBLIC\scripts\siebel\custom
This topic describes how to modify code that resides in the recyclebinpmodel.js file. It is recommended that you get a copy of this file to assist in your understanding of how to implement the example that this topic describes. This file includes all the code that this example uses. It also includes more comments that describe code functionality. To get a copy of this file, see Article ID 1494998.1 on My Oracle Support.
For more information about the folders you can use to store your customizations, see "Organizing Files That You Customize". For more information about the language_code, see "Languages That Siebel Open UI Supports".
Use a JavaScript editor to open the recyclebinpmodel.js file that you downloaded in Step a.
Make sure the RecycleBinPModel class does not exist and that you do not configure Siebel Open UI to override this class. You add the following code:
if(typeof(SiebelAppFacade.RecycleBinPModel) === "undefined"){
Make sure a namespace exists that Siebel Open UI can use to prevent conflicts:
SiebelJS.Namespace("SiebelAppFacade.RecycleBinPModel");
Use the Define method to identify the presentation model file:
define("siebel/custom/recyclebinpmodel", [], function(){
You must use the Define method to make sure Siebel Open UI can identify the constructor. You must include the relative path and the name of the presentation model file without the file name extension. For more information, see "Define Method".
Define the class:
SiebelAppFacade.RecycleBinPModel = (function(){
Load the SiebelApp.Constants namespace that defines the constants that Siebel Open UI uses:
var consts = SiebelJS.Dependency("SiebelApp.Constants");
Define the class constructor:
function RecycleBinPModel(){
  SiebelAppFacade.RecycleBinPModel.superclass.constructor.apply(this, arguments);
}
Set up the injected dependency:
SiebelJS.Extend(RecycleBinPModel, SiebelAppFacade.ListPresentationModel);
For more information about injected dependency, see "About Dependency Injection".
Return the constructor:
    return RecycleBinPModel;
  } ());
  return "SiebelAppFacade.RecycleBinPModel";
});
Save the recyclebinpmodel.js file.
This task is a step in "Process of Customizing the Presentation Model".
In this topic, you customize the setup logic of the presentation model so that it adds the Selected list column to an applet. You add the control that you configure for this example to the ListColumns list that resides in the client.
Figure 4-2 illustrates the code you use to customize the setup logic of the presentation model. Each number in this figure identifies the corresponding step number in the numbered task list that this book includes immediately after this figure.
To customize the setup logic of the presentation model
In the recyclebinpmodel.js file, identify the property or method of the object that you must modify.
To do this identification, you can examine the JavaScript API methods to identify the method that most closely matches the behavior that your example requires. For more information about this JavaScript API, see Appendix A, "Application Programming Interface."
You can use the following list as a guide to get you started, depending on the area of the Siebel application that your customization must modify:
Application methods. For more information, see "Application Model Class".
Applet methods. For more information, see "Presentation Model Class for Applets".
List applet methods. For more information, see"Presentation Model Class for List Applets".
Applet control methods. For more information, see "Applet Control Class".
Menu methods. For more information, see "Presentation Model Class for Menus".
Siebel business service methods. For more information, see "Business Service Class".
In this example, you can examine the presentation model that Siebel Open UI uses for list applets to identify the property or method that the object you must modify uses. To identify this property, see "Properties of the Presentation Model That Siebel Open UI Uses for Applets".
After examining these properties, assume that you determine that Siebel Open UI uses the GetListOfColumns method that the presentation model references. In general, when you examine a property or method in a list applet, it is recommended that you first examine the list presentation model that a list uses, and then the applet presentation model that a form applet uses.
You must add the Selected list column to a list applet. The Selected list column is a control that Siebel Open UI displays in the client. So, you add it to the list of listOfColumns that Siebel Open UI already uses.
Specify the method that the presentation model runs as part of the Setup life cycle:
RecycleBinPModel.prototype.Setup = function(propSet){
In this example, you configure Siebel Open UI to create a control that it displays only in the client, and then insert it into the GetListOfColumns property of the applet. You add this code in the Setup life cycle method of the presentation model because this logic is related to the work that Siebel Open UI does to create the applet. Siebel Open UI must create the applet first, and then insert the control. For more information, see "Summary of Presentation Model Methods".
Create a new instance of the AppletControl object:
var mycontrol = SiebelApp.S_App.GetAppletControlInstance
This example requires Siebel Open UI to create a new listOfColumns and to add it to the GetListOfColumns array. You can use the GetAppletControlInstance method to create a new instance of the AppletControl object. For more information, see "GetAppletControlInstance Method".
Name the instance:
"Client_Select",
You must specify a unique name for the instance. This example uses Client_Select, which is a unique value that Siebel Open UI can use to determine the operation that it must perform.
Specify the control type:
consts.get("SWE_CTRL_CHECKBOX"),
"Select",
"Select",
"50");
this.Get("GetListOfColumns")["SelectionBox"] = mycontrol;
SiebelAppFacade.RecycleBinPModel.superclass.Setup.call(this, propSet);
};
where:
consts.get("SWE_CTRL_CHECKBOX") specifies the control as a checkbox.
Select specifies the display name. You can specify any display name.
50 specifies the width of the column.
For more information about control types, see "Applet Control Class".
Save the recyclebinpmodel.js file.
This task is a step in "Process of Customizing the Presentation Model".
In this topic, you modify the list column control that you created in Step 3. This control uses a check box, so you must make sure that Siebel Open UI stores the value of this check box when the user toggles it.
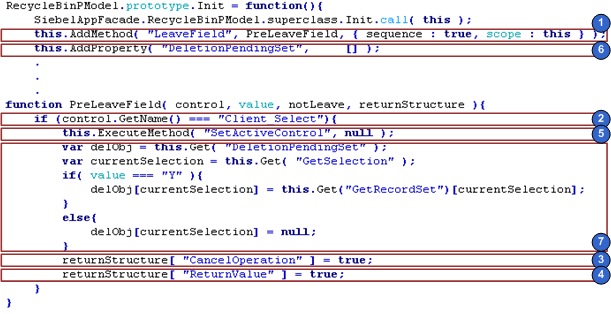
Figure 4-3 illustrates the code that you use to customize the presentation model logic to identify the records to delete. Each number in this figure identifies the corresponding step number in the numbered task list that this book includes immediately after this figure.
To customize the presentation model to identify the records to delete
In the recyclebinpmodel.js file, add the method that Siebel Open UI must call:
this.AddMethod("LeaveField", PreLeaveField, {sequence:true, scope:this});
where:
AddMethod adds the LeaveField method. To identify the method that you must add when you do your own customization work, you can examine the life cycles that Siebel Open UI uses that most closely meets your business requirement. To view these life cycles, see "Life Cycle Flows of User Interface Elements".
In this example, the business requirement is to save the value in a control. Siebel Open UI saves the value of a control when the user navigates away from the control, so it calls the LeaveField method to handle this requirement. For more information, see "LeaveField Method" and "Flow That Handles Focus Changes in List Applets".
PreLeaveField, {sequence : true, scope : this} configures Siebel Open UI to call your custom LeaveField method before it calls the predefined LeaveField method. It does this during the Init life cycle when it runs the AddMethod method. It is recommended that you set up the presentation model methods at the beginning of the Init life cycle call that contains most of the properties and dependency injections, including predefined and custom methods. For more information about Init, see "Life Cycle of User Interface Elements". For more information, see "About Dependency Injection".
It is recommended that you use a named method to specify the Prexxx customization method, such as PreLeaveField. This configuration makes sure that Siebel Open UI uses the same method for all presentation model instances. It is not recommended that you specify the Prexxx customization method as an anonymous method in the AddMethod call because Siebel Open UI creates this anonymous method for every presentation model instance that resides in memory, possibly for more than one applet in the same view. Defining an anonymous method in this situation might cause a conflict.
Create the condition:
if (ctrl.GetName() === "Client_Select"){
The Setup method uses the GetName method with a literal return value of Client_Select. It identifies the method that Siebel Open UI uses for your custom control. For more information, see "GetName Method for Applet Controls".
Make sure Siebel Open UI returns your custom logic after it sets the CancelOperation part of the return value to true:
returnStructure[ "CancelOperation" ] = true;
This configuration overrides the predefined code when Siebel Open UI calls LeaveField for your new list column. In this example, you must implement LeaveField for the control, so it is not desirable to call the predefined code for this control after Siebel Open UI finishes running your customization of the LeaveField method. For more information about using ReturnStructure when you modify a method, see "AddMethod Method".
Configure Siebel Open UI to return a value of true after it sets the CancelOperation part of returnStructure to true:
returnStructure[ "ReturnValue" ] = true;
The LeaveField method returns a value of true to indicate success in this example, so you must make sure Siebel Open UI uses the same logic after your customization finishes running and returns a value. This configuration makes sure the Init life cycle continues on the success path after the custom LeaveField method runs. You can use ReturnValue to make sure Siebel Open UI sets the return value of your custom implementation to the required value. In this example, you set this value to true.
Disable the processing that Siebel Open UI does for the control that is in focus:
this.ExecuteMethod("SetActiveControl", null);
This code sets the active control to null. For more information, see "Disabling Automatic Updates" and "SetActiveControl Method".
Add the property that Siebel Open UI uses to store the set of records that are pending deletion:
this.AddProperty("DeletionPendingSet", []);
The set of records that are pending deletion represent the state of your custom presentation model, so you add the DeletionPendingSet property to store the field values for this set of records.
Identify the records that Siebel Open UI must delete:
var delObj = this.Get("DeletionPendingSet");
var currentSelection = this.Get("GetSelection");
if(value === "Y"){
  delObj[currentSelection] = this.Get("GetRecordSet")[currentSelection];
}
else{
  delObj[currentSelection] = null;
}
Siebel Open UI must identify the records that the user chooses to delete so that it can populate a value into the DeletionPendingSet property. To identify this property, you can examine the properties that the presentation model uses for the applet. This work is similar to the work you do in Step 1 to identify the property in the presentation model that Siebel Open UI uses for lists, except in this topic you examine the properties described in "Properties of the Presentation Model That Siebel Open UI Uses for Applets".
After examining these properties, assume you determine that Siebel Open UI uses the GetSelection property to get the index of the record that the user has chosen from among all the records that Siebel Open UI displays. You also determine that you can use the GetRecordSet property to get this full set of records.
Save the recyclebinpmodel.js file.
Dependency injection is a software development technique that Siebel Open UI uses to create a dependency between a presentation model and a physical renderer. If Siebel Open UI modifies a method or property that resides in the presentation model, then it also modifies a method or property that resides in the physical renderer. It allows Siebel Open UI to implement logic at run time rather than during a compile. These dependency injections allow it to use an injected dependency chain, which is a series of two or more dependency injections.
You can modify Siebel Open UI to make this chaining depend on conditions that Siebel Open UI modifies at run time. It can use all the methods that the Init method references in "Summary of Presentation Model Methods" for dependency injection. For an example that uses dependency injection, see "Customizing the Physical Renderer to Refresh the Carousel".
Siebel Open UI sends updated field values to the Siebel Server for any fields that the user has modified in the client. In this example, you must disable this update functionality for the current control. You can reference the documentation for the predefined applet to identify the presentation model property that you must modify. In this situation, the documentation indicates that you can configure Siebel Open UI to use the SetActiveControl property of the active control on the applet and set it to null. For more information, see "Disabling Automatic Updates", "SetProperty Method", and "SetActiveControl Method".
ExecuteMethod calls a method that the presentation model references. It makes sure that Siebel Open UI runs all injected dependency chains that the method requires when it runs. You must use ExecuteMethod to call any predefined or custom method that a presentation model references. For more information, see "About Dependency Injection" and "ExecuteMethod Method".
This task is a step in "Process of Customizing the Presentation Model".
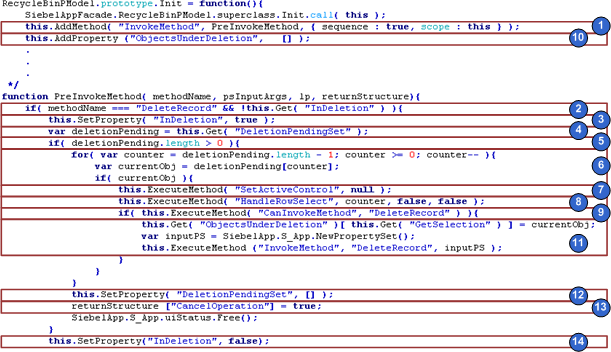
Figure 4-4 illustrates the code you use to configure the presentation model to delete records. In this topic, you configure Siebel Open UI to customize and conditionally override the InvokeMethod method. Each number in this figure identifies the corresponding step number in the numbered task list that this book includes immediately after this figure.
To customize the presentation model to delete records
In the recyclebinpmodel.js file, add the method that Siebel Open UI uses to delete a record:
this.AddMethod("InvokeMethod", PreInvokeMethod, {sequence:true, scope:this});
You must identify the method that Siebel Open UI uses when the user clicks Delete. To do this identification, it is recommended that you examine the flowchart that Siebel Open UI uses during a typical life cycle when it calls methods that reside on the Siebel Server. For this example, the life cycle flowchart indicates that Siebel Open UI calls the DeleteRecord method when it calls the InvokeMethod method. You add this code in the Init method. For more information, see "Life Cycle Flows That Create New Records in List Applets" and "DeleteRecord Method".
This configuration is similar to the configuration you added in Step1 that includes the AddMethod method and the sequence statement.
Call the custom logic only if Siebel Open UI calls the DeleteRecord method:
if ((methodName === "DeleteRecord") && !this.Get("InDeletion")){
This code examines the value of the InDeletion property that you set up in Step 3.
Set the InDeletion property to true only if Siebel Open UI starts the deletion process:
this.SetProperty("InDeletion", true);
This code determines whether or not Siebel Open UI is already running an instance of your custom delete process, and then makes sure that no more than one of these instances runs at the same time. The InDeletion property determines whether or not the deletion process is currently running.
You could use the following code in the Init method to add this property:
this.AddProperty("inDeletion", false)
This example demonstrates how you can use SetProperty to use a property temporarily so that it is similar to a conditional flag. This example uses SetProperty to create this property only when necessary. If Siebel Open UI calls the Get method before it calls the SetProperty method, then the JavaScript returns a value of undefined, which is the default value that JavaScript assigns to any variable that is not defined.
Get the set of records where the Selected value of each of these records includes a check mark:
var deletionPending = this.Get("DeletionPendingSet");
This code gets the state of the set of records before the user clicks Delete. Siebel Open UI stores this information in the DeletionPendingSet property in the LeaveField customization that you added in Step 6 .
Determine whether or not the user has chosen at least one record for deletion:
if (deletionPending.length > 0){
This code represents this condition as > 0, where 0 indicates the number of records chosen.
Iterate through all the records that the user has chosen to delete:
for (var counter = deletionPending.length - 1; counter >= 0; counter--){
  var currentObj = deletionPending[counter];
  if (currentObj){
  }
}
Disable the processing that Siebel Open UI does for the control that is in focus:
this.ExecuteMethod("SetActiveControl", null);
For more information, see "Disabling Automatic Updates" and "SetActiveControl Method".
Modify the application state so that Siebel Open UI references the record that it must delete:
this.ExecuteMethod ("HandleRowSelect", counter, false, false);
To identify this code when you customize Siebel Open UI, it is recommended that you examine "Flow That Handles Navigation to Another Row in List Applets". In this example, this flow indicates that you must use the HandleRowSelect method. The presentation model that Siebel Open UI uses for list applets references HandleRowSelect, so you can configure Siebel Open UI to use ExecuteMethod to call it. For more information, see "HandleRowSelect Method".
Make sure that Siebel Open UI can call the DeleteRecord method:
if(this.ExecuteMethod("CanInvokeMethod", "DeleteRecord")){
It is recommended that you configure Siebel Open UI to call CanInvoke before it calls another method to make sure that it can call this other method in the context of the object that is currently in scope. Siebel Open UI can use the CanInvoke method to model complex logic for any record that exists in the Siebel Database that resides on the Siebel Server. This logic can determine whether or not Siebel Open UI can call an operation according to the scope that it applies to the current object, such as a record that is in scope. In this example, it determines whether or not it can call the DeleteRecord method.
You can use the method descriptions in Appendix A, "Application Programming Interface," to identify the method that you must use in your customization work.
For more information about the method that this example uses, see "CanInvokeMethod Method for Presentation Models".
Add a property that Siebel Open UI can use to store information about the records that it sends to the Siebel Server for deletion:
this.AddProperty("ObjectsUnderDeletion", []);
Delete the record:
this.Get("ObjectsUnderDeletion")[this.Get("GetSelection")] = currentObj;
var inputPS = SiebelApp.S_App.NewPropertySet();
this.ExecuteMethod ("InvokeMethod", "DeleteRecord", inputPS);
where:
ObjectsUnderDeletion inserts the record into a backed up record set, and if this insert occurs at an index location that is equal to the index of the selected row, then Siebel Open UI can reference the selected row to identify the correct index to use when processing the NotifyDeleteNotification reply. The Siebel Server sends this reply. Siebel Open UI must identify the record where it set the notification when it handles the NotifyDeleteNotifications notification. You can configure Siebel Open UI to call HandleRowSelect to select the row before it sends the request to delete the record.
GetSelection is a property of the applet presentation model that includes an index that identifies the chosen record. This record resides in the record set that resides in the client. When you develop your own customization, you can reference the documentation to identify the property that your customization requires. For more information, see "Properties of the Presentation Model That Siebel Open UI Uses for Applets".
InvokeMethod is a method that resides in the presentation model that Siebel Open UI uses for a list applet. You can use ExecuteMethod to call it.
false configures Siebel Open UI to make a synchronous request to the Siebel Server. A synchronous request makes sure that Siebel Open UI sends all DeleteRecord requests to the server before it exits the loop. If it exits the loop during a synchronous request, then it sends all DeleteRecord requests sequentially. In this situation, it sends the requests to the server so that the server can process a reply for the previous request, including the delete completion notifications. The server does this processing during a synchronous request before it sends the next DeleteRecord request.
Set the DeletionPendingSet property to zero:
this.SetProperty("DeletionPendingSet", []);
This code sets the DeletionPendingSet property to zero after Siebel Open UI finishes running all the DeleteRecord calls on the Siebel Server.
Set the CancelOperation member of the returnStructure to true:
returnStructure ["CancelOperation"] = true;
You configure Siebel Open UI to set this member before it exits the outer loop that processes the deletionPending records. You do this so that Siebel Open UI does not use the DeleteRecord argument to make another call to the predefined InvokeMethod method. For more information about ReturnStructure, see "AddMethod Method".
Set the InDeletion flag to false:
this.SetProperty("InDeletion", false);
You configure Siebel Open UI to set this property before it exits the conditional block that does the InvokeMethod processing for the DeleteRecord method.
Save the recyclebinpmodel.js file.
A synchronous request is a type of request that Siebel Open UI sends to the Siebel Server, and then waits for a reply to this request before it continues any other processing.
The GetSelection request is synchronous, so Siebel Open UI cannot send another request to move the selection to a different record before the Siebel Server sends a reply notification that indicates a successful deletion. When processing this notification, the intended row is the same row that Siebel Open UI most recently selected. Siebel Open UI can use the selected row as a common index that it can use to reference the record.
This task is a step in "Process of Customizing the Presentation Model".
If Siebel Open UI calls the GetFormattedFieldValue method for a control that it only displays in the Siebel Open UI client, then this client cannot not find the field in the list of fields that it uses, and the client creates an error. To avoid this situation, in this topic you customize Siebel Open UI to override the predefined GetFormattedFieldValue method so that it does not create an error when it calls GetFormattedValue for your new list column. For more information, see "GetFormattedFieldValue Method".
To override predefined methods in presentation models
Use the flowcharts to identify the method that you must modify.
Siebel Open UI displays values for applet controls and list columns after it gets these values from the client. It caches these values in the client after it downloads them from the Siebel Server. To identify the method that handles these values, you can examine the flowchart that describes how Siebel Open UI creates a new record in a list applet, and then updates the client. In this example, the flowchart indicates that it calls the GetFormattedFieldValue method. If the physical renderer requires the ShowControlValue method, then it calls the presentation model to run the GetFormattedFieldValue method. For more information, see "Flow That Creates New Records in List Applets, Updating the User Interface".
In the recyclebinpmodel.js file, configure Siebel Open UI to conditionally override and customize the method:
RecycleBinPModel.prototype.Init = function(){
  SiebelAppFacade.RecycleBinPModel.superclass.Init.call(this);
  this.AddMethod("GetFormattedFieldValue", PreGetFormattedFieldValue, {sequence:true,scope:this});
  .
  .
  .
function PreGetFormattedFieldValue(control, bUseWS, recIndex, returnStructure){
  if (control.GetName() === "Client_Select"){
    returnStructure["CancelOperation"] = true;
    returnStructure["ReturnValue"] = "";
  }
}
where:
this.AddMethod adds the PreGetFormattedFieldValue method in the Init life cycle and specifies PreGetFormattedFieldValue as the customization.
sequence: true specifies to call the custom PreGetFormattedFieldValue before it calls the predefined GetFormattedFieldValue method.
The following code in the custom method determines whether or not the control that Siebel Open UI is currently examining is the client-only control:
if (control.GetName() === "Client_Select")
If it is, then Siebel Open UI sets the CancelOperation member of the returnStructure to true and the ReturnValue to null. For more information about returnStructure, see "AddMethod Method".
Save the recyclebinpmodel.js file.
This task is a step in "Process of Customizing the Presentation Model".
The Siebel Server sends a record deletion confirmation when it receives the InvokeMethod request for the DeleteRecord method. You can write a handler for the NotifyDeleteRecord notification to process this confirmation in the client. For more information, see "DeleteRecord Method".
Siebel Open UI packages the notification that it gets from the Siebel Server in the business component layer as part of a reply property set. This property set includes information about server state modifications or replies to requests for state information. For example, if Siebel Open UI deletes a record that resides on the server, then the following work occurs:
Siebel Open UI sends a NotifyDeleteRecord notification to the client.
The client sends a request to the server.
The server processes the request.
Siebel Open UI examines the relevant modifications that exist on the server, and then collects and packages notifications that are ready to communicate to the client.
If the client sends an InvokeMethod call for the DeleteRecord method to the server, then the Siebel Web Engine sends a NotifyDeleteRecord notification from the business component layer to the client.
For more information about the business component layer, see Configuring Siebel Business Applications.
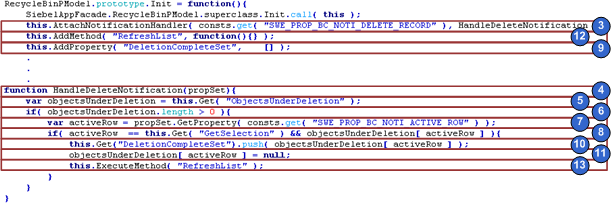
Figure 4-5 illustrates the code you use to customize the presentation model to handle notifications. Each number in this figure identifies the corresponding step number in the numbered task list that this book includes immediately after this figure.
To customize the presentation model to handle notifications
Identify the notification type that Siebel Open UI must handle.
Examine the notification types in the "Notifications That Siebel Open UI Supports" topic. Look for a notification type that indicates it might include the information that your customization requires. For this example, the notification type for the NotifyDeleteRecord notification is SWE_PROP_BC_NOTI_DELETE_RECORD.
Examine the methods that the presentation model references that indicate they might be useful for your customization.
The AttachNotificationHandler method is the appropriate method to use for this example. For more information, see "AttachNotificationHandler Method".
In the recyclebinpmodel.js file, add the AttachNotificationHandler to the Init method of the presentation model:
this.AttachNotificationHandler(consts.get("SWE_PROP_BC_NOTI_DELETE_RECORD"), HandleDeleteNotification);
Add the custom method that Siebel Open UI uses to handle replies from NotifyDeleteRecord and to populate the recycle bin:
function HandleDeleteNotification(propSet){
Get the property that you use to identify the objects that Siebel Open UI has flagged for deletion:
var objectsUnderDeletion = this.Get("ObjectsUnderDeletion");
You configured this property in Step 10 to back up the records that Siebel Open UI is in the process of deleting.
Determine whether or not any records exist in the In Progress list:
if(objectsUnderDeletion.length > 0){
Siebel Open UI must process these records, and then move them to the recycle bin. In this step and in several subsequent steps, you do more than one examination to make sure the notification instance that Siebel Open UI is handling is the instance that it requires for the notification handler. Some repeating notifications might exist that you must process to avoid duplication.
Identify the row that is involved with the NotifyDeleteRecord notification:
var activeRow = propSet.GetProperty(consts.get("SWE_PROP_BC_NOTI_ACTIVE_ROW"));
In this example, you use the SWE_PROP_BC_NOTI_ACTIVE_ROW property. For more information about this property, see "Summary of Notifications That Siebel Open UI Supports".
Make sure that this notification confirms the deletion, and make sure that this notification is not a duplicate:
if(activeRow == this.Get("GetSelection") && objectsUnderDeletion[activeRow]){
where:
The following code determines whether or not the record that the NotifyDeleteRecord method references is the currently selected record:
activeRow == this.Get("GetSelection")
This example uses a synchronous request, so Siebel Open UI selects the record that the DeleteRecord method references in the context of PreInvokeMethod. It selects no other record after it makes this initial selection while the Siebel Server sends the delete confirmation notification to the client. For more information, see "About Synchronous Requests".
The following code makes sure that this notification is not a duplicate:
objectsUnderDeletion[ activeRow ]
It determines whether or not Siebel Open UI has already removed the record that it is examining in a previous instance of handling the same notification for the same record.
Add a property that Siebel Open UI can use to store the list of records that the user deletes but might retrieve from the recycle bin:
this.AddProperty("DeletionCompleteSet", []);
Store the deleted record:
this.Get("DeletionCompleteSet").push(objectsUnderDeletion[activeRow]);
The conditional block where this code resides determines that this notification is not a duplicate NotifyDeleteRecord notification for the record that the DeleteRecord method requests deletion. So, this push statement pushes the deleted record into the DeletionCompletedSet property that you defined in Step 9.
Remove the record from the Deletion in Progress list:
objectsUnderDeletion[ activeRow ] = null;
Add the RefreshList method:
this.AddMethod("RefreshList", function(){});
Siebel Open UI must refresh the recycle bin after Step 11 adds a record to this recycle bin. You can use dependency injection through the AttachPMBinding method to inform the physical renderer that the recycle bin requires a refresh. For more information, see "About Dependency Injection". For more information, see "How Siebel Open UI Uses Nondetailed Data to Indicate Modifications That Occur in Detailed Data".
Run the RefreshList method:
this.ExecuteMethod("RefreshList");
Save the recyclebinpmodel.js file.
Siebel Open UI uses the dependency that exists between the presentation model and the physical renderer to indicate a high-level modification in a property or method, such as a modifying the list of records that it must display. This dependency configures Siebel Open UI to run a high-level renderer method, such as a method that repopulates the entire physical markup of columns and data in the grid container. The renderer method then gets the detailed presentation model attributes, such as columns and data, through properties or methods that the presentation model contains.
This example uses the RefreshList method as an indicator that Siebel Open UI modified something in the DeletionCompletedSet property. When you configure the physical renderer in "Customizing the Physical Renderer to Refresh the Carousel", you configure Siebel Open UI to use the AttachPMBinding method to bind a physical renderer method to the RefreshList method. You also configure it to use this physical renderer method to get the detailed data that the DeletionCompletedSet method references. Siebel Open UI gets this data from the presentation model so that the physical renderer can render it. For more information, see "AttachPMBinding Method".
This task is a step in "Process of Customizing the Presentation Model".
At this point in this example, you have set up and customized the presentation model to choose records to delete, to delete them, and then to move them to the recycle bin. In this topic, you modify the presentation model to allow the user to click an item in the carousel, and then click the plus sign (+) to restore the record.
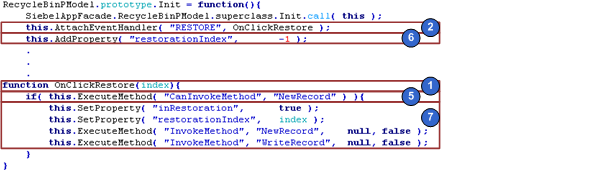
Figure 4-6 illustrates the code you use to attach an event handler to a presentation model. Each number in this figure identifies the corresponding step number in the numbered task list that this book includes immediately after this figure.
To attach an event handler to a presentation model
In the recyclebinpmodel.js file, add the method that handles the event:
function OnClickRestore(index){
The name of an event handler typically starts with the following prefix:
On
Siebel Open UI calls this method when the user clicks the plus sign (+).
Bind the OnClickRestore method to the RESTORE custom event:
this.AttachEventHandler("RESTORE", OnClickRestore);
This code adds the RESTORE custom event. The physical renderer sends this event to the presentation model, and then this presentation model runs OnClickRestore. The AttachEventHandler method sets up a dependency injection, so you add it in the Init method. For more information, see "AttachEventHandler Method" and "About Dependency Injection".
Identify the method that Siebel Open UI uses when a user creates a record.
Examine the "Flow That Creates New Records in List Applets, Calling the Siebel Server". Note that Siebel Open UI uses the NewRecord method, and then uses the WriteRecord method as an input argument for the InvokeMethod method when it runs InvokeMethod in the presentation model. For more information, see "NewRecord Method".
Determine how Siebel Open UI stores the field values of a new record that a user creates.
Examine "Flow That Handles Focus Changes in List Applets". This flow describes the process that occurs between the initial NewRecord call and the WriteRecord call when Siebel Open UI creates a record in the client. It stores the field values in the client while the user enters these values and navigates from one field to another field. For more information, see "WriteRecord Method".
Siebel Open UI can do the following to create a record that it restores through the OnClickRestore event handler:
Run the InvokeMethod method for the NewRecord.
Store values that the user enters in each field, and use values from the records that Siebel Open UI stores in the recycle bin.
Run the InvokeMethod method for WriteRecord with the client already configured to include the field values for the record.
Make sure Siebel Open UI can use the NewRecord method in the applet:
if(this.ExecuteMethod("CanInvokeMethod", "NewRecord")){
If Siebel Open UI cannot run the NewRecord method, then it exits this conditional statement.
Add the property that Siebel Open UI uses to store the index that identifies the record it must restore:
this.AddProperty("restorationIndex", -1);
The physical renderer must specify the record to restore. To do this, it uses the DeletionCompletedSet property to get the restorationIndex of this record from the client and store it. It then sends this index to the presentation model as part of a request to restore the record. The restorationIndex is an index that resides in the DeletionCompletedSet property of the record.
Siebel Open UI sends this value from the recycle bin record that the user chooses to restore. The OnClickRestore method receives this property, and then Siebel Open UI stores this value in the restorationIndex property of the presentation model.
Configure the OnClickRestore method:
this.SetProperty("inRestoration", true);
this.SetProperty("restorationIndex", index);
this.ExecuteMethod("InvokeMethod", "NewRecord", null, false);
this.ExecuteMethod("InvokeMethod", "WriteRecord", null, false);
where:
NewRecord and WriteRecord are input arguments to the InvokeMethod method. In 3 you determined that Siebel Open UI uses the NewRecord method or the WriteRecord method as an input argument for the InvokeMethod, so you specify these methods in this code.
Siebel Open UI stores the field values of a record in the WriteRecord request before it sends this request to the Siebel Server. It stores these values differently depending on whether it creates a record from the recycle bin or whether the user creates a new record. The physical user interface layer does not store these values if the user attempts to restore a record from the recycle bin. It stores these values only if the user creates a new record. You write this customization in the next topic in this example, "Customizing Methods in the Presentation Model to Store Field Values".
This customization runs only while WriteRecord is running to restore a record from the recycle bin. It does not run when the user creates a new record and Siebel Open UI calls WriteRecord. When you start this restoration logic in the OnClickRestore method, you set a presentation model property that serves as a flag that indicates that a recycle bin restoration is in progress. An explicit AddProperty call does not exist for this property, so Siebel Open UI creates this property only if the user uses the recycle bin.
Save the recyclebinpmodel.js file.
This task is a step in "Process of Customizing the Presentation Model".
In this topic, you use the ExecuteMethod method to store the values of the record that the user is attempting to restore from the recycle bin.
Figure 4-7 illustrates the code you use to customize a method in the presentation model to store the field values of records. Each number in this figure identifies the corresponding step number in the numbered task list that this book includes immediately after this figure.
To customize methods in the presentation model to store field values
In the recyclebinpmodel.js file, add a condition that makes sure Siebel Open UI runs the customization logic only if the user is restoring a record from the recycle bin, and not adding a new record:
else if(methodName === "WriteRecord" && this.Get("inRestoration")){
This if statement examines the value of the methodName in the WriteRecord argument and the value of the inRestoration property. For more information, see "WriteRecord Method".
Get the set of records for the recycle bin:
var recordSet = this.Get("DeletionCompleteSet");
In Step10 , you configured the DeletionCompletedSet property of the presentation model to store each record that the user adds to the recycle bin.
Get the back up copy of the record that the physical renderer requests to restore:
var record = recordSet[this.Get("restorationIndex")];
To get this value, you access the restorationIndex property that you added in Step 6 .
Identify the method that Siebel Open UI uses to indicate that the user navigated away from an applet.
To do this, you can examine "Flow That Handles Focus Changes in List Applets". Note that Siebel Open UI calls the LeaveField method as the last step in the flow. This method determines whether or not Siebel Open UI removed the focus from a field in an applet, so Siebel Open UI uses this step in the flow as a flag to signal that it must store the field values. To get information about the methods that the flowcharts describe when you develop your own customization, you can use the descriptions in Appendix A, "Application Programming Interface."
Get the list of columns that the list applet contains. This list is identical to the list of columns that the DeletionCompleteSet property contains:
var listOfColumns = this.Get("ListOfColumns");
Get the list of controls that the list applets contains:
var controls = this.Get("GetControls");
For more information about the GetControls property, see "Properties of the Presentation Model That Siebel Open UI Uses for Applets".
Store the field values:
for(var i = 0, len = listOfColumns.length; i < len; i++){
  var control = controls[listOfColumns[i].name];
  if(control){
    this.ExecuteMethod("LeaveField", control, record[control.GetFieldName()],
    true);}
  }
}
where:
The following code iterates through the applet controls that correspond to the list columns of that the record that the DeletionCompleteSet property identifies:
for(var i = 0, len = listOfColumns.length; i < len; i++)
this.ExecuteMethod calls the LeaveField method that you identified in Step 4. It calls this method one time for each iteration. It sends the field value from the corresponding control of the record that DeletionCompleteSet identifies. It sends this value to an argument. When this code iterates, it runs the LeaveField method for every control that Siebel Open UI must populate in the new record that it is using to restore the deleted record from the recycle bin.
Siebel Open UI must send the LeaveField method as a control and store a value for this control. In this example, it iterates through each control that the list applet contains, and sends the value of the corresponding list column that it uses for the control from the record that the DeletionCompleteSet property gets in Step 2.
For a description of the arguments that LeaveField uses, "Summary of Methods That You Can Use with the Presentation Model That Siebel Open UI Uses for List Applets".
record stores the field value of the record that Siebel Open UI is restoring. The subsequent WriteRecord call packages and sends these values to the Siebel Server.
Siebel Open UI stores these values when it runs the LeaveField method. For more information about this flow, see "Flow That Handles Focus Changes in List Applets".
Save the recyclebinpmodel.js file.
This task is a step in "Process of Customizing the Presentation Model".
In this topic, you configure the presentation model to remove the record from the recycling bin. You use a dependency injection to call a method on the Siebel Server after the stack that Siebel Open UI uses to call the server has finished processing. For more information, see "About Dependency Injection" and "Customizing Events".
To customize the presentation model to call the Siebel Server and delete a record
In the recyclebinpmodel.js file, add the following code to the Init method:
this.AttachPostProxyExecuteBinding("WriteRecord", PostWriteRecord);
You use the Init method to send a WriteRecord call to the Siebel Server. For more information, see "WriteRecord Method" and "AttachPostProxyExecuteBinding Method".
Add the following code anywhere in the recyclebinpmodel.js file:
function PostWriteRecord(methodName, inputPS, outputPS){
  if(this.Get("inRestoration")){
    this.Get("DeletionCompleteSet")[this.Get("restorationIndex")] = null;
    this.ExecuteMethod("RefreshList");
    this.SetProperty("inRestoration", false);
}
where:
PostWriteRecord does the following work:
Removes the record that Siebel Open UI restored in Step 7. It removes this record from the DeletionCompleteSet property.
Calls the RefreshList method to start another round of binding to the physical renderer. In the next topic in this example, you configure Siebel Open UI to call the HandleDeleteNotification method to refresh the list and to remove the record from the recycle bin in the client.
Sets the inRestoration property of the presentation model to false. You set this property to true in Step 7 to indicate that Siebel Open UI is restoring a record. The restoration is now finished, so you can configure Siebel Open UI to set inRestoration to false.
Save the recyclebinpmodel.js file.