| Siebel CRM Configuring Siebel Open UI Siebel Innovation Pack 2016, Rev. A E52417-01 |
|


 Previous |
 Next |
View PDF |
| Siebel CRM Configuring Siebel Open UI Siebel Innovation Pack 2016, Rev. A E52417-01 |
|
Previous |
Next |
View PDF |
This task is a step in "Roadmap for Customizing Siebel Open UI".
To customize the physical renderer, do the following tasks:
In this topic, you customize the JQGridRenderer physical renderer that Siebel Open UI uses with a presentation model for a typical Siebel list applet so that it renders this applet as a grid. You add the rendering capabilities for the carousel that Siebel Open UI uses to render the recycle bin. You also modify the grid style to accommodate the carousel control. You use methods in the physical renderer to do this work. For a description of these methods, including the sequence you use to configure them, see "Life Cycle of a Physical Renderer".
This task is a step in "Process of Customizing the Physical Renderer".
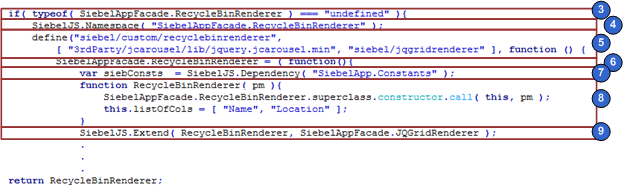
Figure 4-8 illustrates the code that you use to set up the physical renderer. Each number in this figure identifies the corresponding step number in the numbered task list that this book includes immediately after this figure.
To set up the physical renderer
Download a copy of the recyclebinrenderer.js file to the following folder:
INSTALL_DIR\eappweb\PUBLIC\scripts\siebel\custom
It is recommended that you get a copy of this file to assist in your understanding of how to implement the example that this topic describes. This file includes all the code that this example uses. It also includes more comments that describe code functionality. To get a copy of this file, see Article ID 1494998.1 on My Oracle Support.
For more information about the folders you can use to store your customizations, see "Organizing Files That You Customize". For more information about the language_code, see "Languages That Siebel Open UI Supports".
Use a JavaScript editor to open the recyclebinpmodel.js file that you downloaded in Step 1.
Verify that the RecycleBinRenderer class does not exist, and that you do not configure Siebel Open UI to override this class:
if(typeof(SiebelAppFacade.RecycleBinRenderer) === "undefined"){
To prevent potential conflicts, create a namespace that Siebel Open UI can use:
SiebelJS.Namespace("SiebelAppFacade.RecycleBinRenderer");
Use the Define method to identify the physical renderer file:
define("siebel/custom/recyclebinrenderer", ["3rdParty/jcarousel/lib/jquery.jcarousel.min", "siebel/jqgridrenderer"], function () {
You must use the Define method to make sure Siebel Open UI can identify the constructor. You must include the relative path and the name of the presentation model file without the file name extension. For more information, see "Define Method".
Define the class:
SiebelAppFacade.RecycleBinRenderer = (function(){
Declare the variables that Siebel Open UI uses throughout the physical renderer code:
var siebConsts = SiebelJS.Dependency("SiebelApp.Constants");
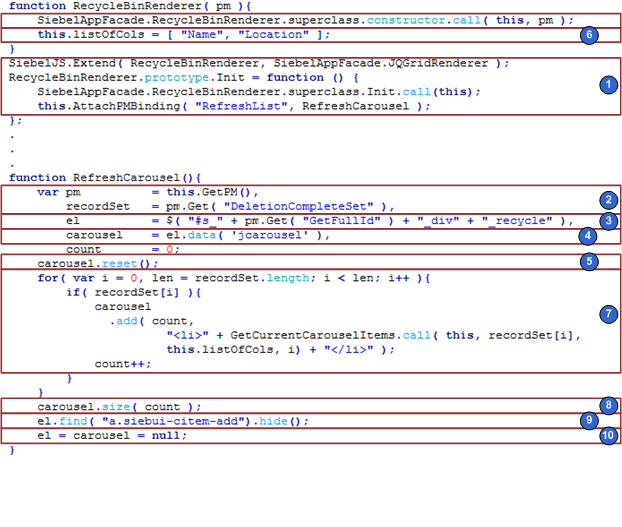
Create the class constructor:
function RecycleBinRenderer(pm){
  SiebelAppFacade.RecycleBinRenderer.superclass.constructor.call(this, pm);
  this.listOfCols = ["Name", "Location"];
}
Define the inheritance:
SiebelJS.Extend(RecycleBinRenderer, SiebelAppFacade.JQGridRenderer);
For more information about inheritance, see "About Dependency Injection".
Save the recyclebinrenderer.js file.
This task is a step in "Process of Customizing the Physical Renderer".
The ShowUI method of the JQGridRenderer physical renderer renders a list applet in the JQGrid control. This method places the third-party JCarousel control next to the grid. For more information, see "ShowUI Method".
Figure 4-9 illustrates the code you use to customize the physical renderer to render a list applet. Each number in this figure identifies the corresponding step number in the numbered task list that this book includes immediately after this figure.
To customize the physical renderer to render list applets
In the recyclebinrenderer.js file, call the ShowUI method of the physical renderer:
SiebelAppFacade.RecycleBinRenderer.superclass.ShowUI.call(this);
If you customize a physical renderer, then it is recommended that you call each life cycle method of the predefined renderer before you run any custom logic.
Get the presentation model instance:
var pm = this.GetPM();
For more information, see "GetPM Method for Physical Renderers".
Calculate the placeholder ID of the HTML node that Siebel Open UI uses as the container for the predefined applet:
var placeHolder = "s_" + pm.Get("GetFullId") + "_div";
You use this ID to modify the HTML Document Object Model (DOM). For example, to position the carousel in the recycle bin. The GetFullId property gets the unique ID of each applet that is in scope in a view. It is uses the following format:
s_FullID_div
where:
FullId in this example is S_A1. The entire ID in this example is s_S_A1_div. FullId is not a complete ID. It is a part of the ID string template named s_FullId_div.
For more information, see "Properties of the Presentation Model That Siebel Open UI Uses for Applets".
Build the HTML for the third-party carousel plug-in:
var carouselHtml = "<div class='siebui-jcarousel-wrapper'> " +
"<div class='siebui-jcarousel' id=\"" + placeHolder + "_recycle\"> " +
"<ul class='siebui-list-carousel' >" +
"<li></li>" +
"</ul>" +
"</div>" +
"<a href='#' class='siebui-jcarousel-prev'>‹</a> " +
"<a href='#' class='siebui-jcarousel-next'>›</a>" +
"</div>";
Add a CSS class:
.addClass("siebui-list-recyclebin")
Add the constructed HTML for the carousel after the carousel container:
.after(carouselHtml)
Modify the existing jcarousel div container, to make it a carousel:
Locate the jcarousel div container in the first child of the parent container. The container will look similar to the following:
.eq(0)
.hide()
.children( "div.siebui-jcarousel" )
Make a carousel out of the jcarousel that you located in Step a:
.jcarousel({
});
Save the recyclebinrenderer.js file.
This task is a step in "Process of Customizing the Physical Renderer".
In this topic, you add the following functionality to the carousel:
If the user hovers the mouse over a record in the carousel, then display a restore button as a plus sign (+).
If the user removes the hover, then hide the restore button.
If the user clicks the plus sign (+), then call the presentation model to restore the record.
To the HTML node that Siebel Open UI uses for the restore button.
Styling changes that affect the appearance of the carousel based on user actions.
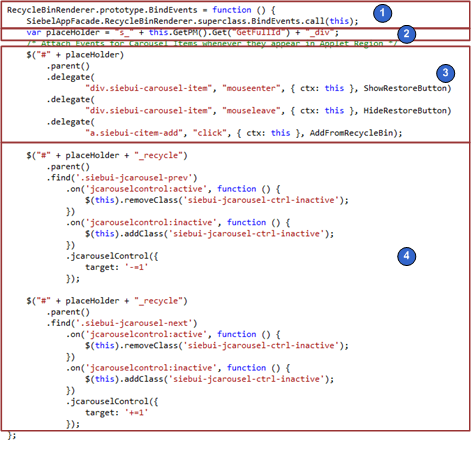
Figure 4-10 illustrates the code you use to customize the physical renderer to bind events to the carousel. Each number in this figure identifies the corresponding step number in the numbered task list that this book includes immediately after this figure.
To add this functionality, you must customize Siebel Open UI to attach an event handler to each of the following items:
The carousel item, for every hover activity.
The HTML node that Siebel Open UI uses for the Restore button.
The Next and Previous icons in the carousel.
To customize the physical renderer to bind events
In the recyclebinrenderer.js file, call the BindEvents method of the physical renderer:
SiebelAppFacade.RecycleBinRenderer.superclass.BindEvents.call(this);
For more information, see "BindEvents Method".
Identify the placeholder:
var placeHolder = "s_" + this.GetPM().Get("GetFullId") + "_div";
Attach three event handlers for hover and click:
$("#" + placeHolder)
 .parent()
 .delegate("div.siebui-carousel-item", "mouseenter", { ctx: this }, ShowRestoreButton)
 .delegate("div.siebui-carousel-item", "mouseleave", { ctx: this }, HideRestoreButton)
 .delegate("a.siebui-citem-add", "click", { ctx: this }, AddFromRecycleBin);
ShowRestoreButton is called when a user hovers on a carousel item, and HideRestoreButton is called when the hovering ends. If the user clicks the Add button, then AddFromRecycleBin is called.
Attach styling events to the Previous and Next buttons of the carousel:
$("#" + placeHolder + "_recycle")
 .parent()
 .find('.siebui-jcarousel-prev')
  .on('jcarouselcontrol:active', function () {
   $(this).removeClass('siebui-jcarousel-ctrl-inactive');
  })
  .on('jcarouselcontrol:inactive', function () {
   $(this).addClass('siebui-jcarousel-ctrl-inactive');
  })
  .jcarouselControl({
   target: '-=1'
  });

$("#" + placeHolder + "_recycle")
 .parent()
 .find('.siebui-jcarousel-next')
  .on('jcarouselcontrol:active', function () {
   $(this).removeClass('siebui-jcarousel-ctrl-inactive');
  })
  .on('jcarouselcontrol:inactive', function () {
   $(this).addClass('siebui-jcarousel-ctrl-inactive');
  })
  .jcarouselControl({
   target: '+=1'
  });
In the above example, the first part of the code is finding the Previous button in the carousel container, and then attaching jcarousel:active and jcarousel:inactive events to it. When these events are triggered by the third-party plug-in, we call methods that set and unset styling classes on the buttons. Similarly, the styling classes are attached and removed for the Next button.
Define the handler methods:
Use the following code to find the child for the add button and show it:
function ShowRestoreButton(evt) {
 if (evt && evt.currentTarget) {
  $(evt.currentTarget).children("a.siebui-citem-add").show();
 }
}
Use the following code to find the child for the add button and hide it:
function HideRestoreButton(evt) {
 if (evt && evt.currentTarget) {
  $(evt.currentTarget).children("a.siebui-citem-add").hide();
 }
}
Use the following code to call the Restore method on the PM with the relevant index parameter
function AddFromRecycleBin(evt) {
 var pm = evt.data.ctx.GetPM();
 if (evt && evt.currentTarget) {
  pm.OnControlEvent("RESTORE", $(evt.currentTarget).parent().data("index"));
 }
}
Save the recyclebinrenderer.js file.
This task is a step in "Process of Customizing the Physical Renderer".
The carousel in this example does not render data. Siebel Open UI only renders data in this example if it adds a record to or deletes a record from the recycle bin.
To customize the physical renderer to bind data
In the recyclebinrenderer.js file, add the following code to SiebelAppFacade.RecycleBinRenderer = (function(){:
RecycleBinRenderer.prototype.BindData = function(){
  SiebelAppFacade.RecycleBinRenderer.superclass.BindData.apply(this, arguments);
};
For more information, see "BindData Method".
Save the recyclebinrenderer.js file.
This task is a step in "Process of Customizing the Physical Renderer".
At this point in this example, you have configured the ShowUI, BindData, and BindEvents methods of the physical renderer, and this renderer displays the carousel with no records. To display deleted records in the carousel, you customize Siebel Open UI to bind the data from these deleted records to the carousel control. To do this, you use dependency injection through the AttachPMBinding method. For more information, see "About Dependency Injection" and "AttachPMBinding Method".
Siebel Open UI includes the AttachPMBinding method in the presentation model, but it is recommended that you configure Siebel Open UI to call it from the physical renderer so that the presentation model remains independent of methods that you declare in the physical renderer. AttachPMBinding adds a dependency from a physical renderer method to a presentation model method or property. If Siebel Open UI modifies a property value or runs a method in the presentation model, then it uses this dependency to call a method that resides in the physical renderer.
Figure 4-11 illustrates the code you use to customize the physical renderer to refresh the carousel. Each number in this figure identifies the corresponding step number in the numbered task list that this book includes immediately after this figure.
To customize the physical renderer to refresh the recycle bin
In the recyclebinrenderer.js file, bind the RefreshCarousel method that the physical renderer contains to the RefreshList method that the presentation model contains:
this.AttachPMBinding("RefreshList", RefreshCarousel);
In this example, you implemented the RefreshList method in the presentation model in Step 12 . This presentation model calls the RefreshList method when the user adds a record or removes a record from the recycle bin. AttachPMBinding configures Siebel Open UI to call RefreshCarousel when the presentation model runs the RefreshList method. You must configure your custom physical renderer to call the AttachPMBinding method so that it overrides the Init function. You must make sure you configure Siebel Open UI to call the Init function of the superclass before it creates or attaches a modification in your custom physical renderer.
You must specify all AttachPMBinding calls in the Init function in the physical renderer.
Configure the RefreshCarousel to read the value of the DeletionCompleteSet property in the physical renderer:
var pm = this.GetPM(),
  placeHolder = "s_" + pm.Get("GetFullId") + "_div",
  recordSet = pm.Get("DeletionCompleteSet"),
Calculate the container in the HTML DOM that hosts the carousel:
el = $("#" + placeHolder + "_recycle"),
Construct the new mark-up:
for (var i = 0, len = recordSet.length; i < len; i++) {
 if (recordSet[i]) {
  markUp += "<li>" + GetCurrentCarouselItems.call(this, recordSet[i], this.listOfCols, i) + "</li>";
  count++;
 }
}
This code does the following work:
Loops through the set of records that the DeletionCompleteSet property contains.
Adds the records and the separate items.
Sends the index of the record that resides in the DeletionCompleteSet property to the GetCurrentCarouselItems method.
Uses the GetCurrentCarouselItems method to create the markup for each carousel item.
Uses GetCurrentCarouselItems to add the index to the markup for the individual item. This configuration makes sure the item is available if the user chooses to restore the record.
Determine the space that should be occupied by the grid, based on whether the carousel contains any records:
if (count > 0) {
 $("#" + placeHolder).addClass("siebui-span-md-10");
 el.parent().show().addClass("siebui-span-md-2");
}
else {
 $("#" + placeHolder).removeClass("siebui-span-md-10");
 el.parent().hide().removeClass("siebui-span-md-2");
}
This step adds classes that decide the width of the original grid, effectively creating a fluid grid.
Add the newly constructed markup in Step 4, to the appropriate container:
el.children("ul.siebui-list-carousel").html(markUp);
Indicate to the plug-in that the content requires a reload:
el.jcarousel('reload');
Hide the restore button in the carousel:
el.find("a.siebui-citem-add").hide();
Remove the DOM references:
el = null;
It is recommended that you remove any DOM references that you create.
Save the recyclebinrenderer.js file.
This task is a step in "Process of Customizing the Physical Renderer".
In this topic, you modify the CSS files so that they support the CSS classes that the physical renderer uses.
To modify CSS files to support the physical renderer
Open the CSS file, add the following code, and then save your changes:
.siebui-list-recyclebin {
 margin : 0px;
}

.siebui-jcarousel-wrapper {
 position: relative;
 height: 450px;
}

.siebui-jcarousel {
 position: relative;
 overflow: hidden;
 height: 100% !important;
 margin: 5px;
 width : 80%;
 border: 10px solid #fff;
 -webkit-border-radius: 5px;
 -moz-border-radius: 5px;
 border-radius: 5px;
 -webkit-box-shadow: 0 0 2px #999;
 -moz-box-shadow: 0 0 2px #999;
 box-shadow: 0 0 2px #999;
}

.siebui-jcarousel ul {
 width: 98%;
 position: relative;
 list-style: none;
 margin: 0;
 padding: 0;
}

.siebui-jcarousel ul li {
 margin-bottom : 5px;
}

.siebui-jcarousel-prev,
.siebui-jcarousel-next {
 transform: rotate(90deg);
  transform-origin: left top 0;
 float : left;
 position: absolute;
 width: 30px;
 height: 30px;
 text-align: center;
 background: #4E443C;
 color: #fff;
 text-decoration: none;
 text-shadow: 0 0 1px #000;
 font: 24px/27px Arial, sans-serif;
 -webkit-border-radius: 30px;
 -moz-border-radius: 30px;
 border-radius: 30px;
 -webkit-box-shadow: 0 0 2px #999;
 -moz-box-shadow: 0 0 2px #999;
 box-shadow: 0 0 2px #999;
}

.siebui-jcarousel-prev {
 top : 0px;
 left : 45%;
}

.siebui-jcarousel-next {
 top : 450px;
 left: 45%;
}

.siebui-jcarousel-prev:hover span,
.siebui-jcarousel-next:hover span {
 display: block;
}

.siebui-jcarousel-prev.inactive,
.siebui-jcarousel-next.inactive {
 opacity: .5;
 cursor: default;
}

div.siebui-carousel-col{
 display : block;
}
div.siebui-carousel-item{
 height : 75px;
 padding : 5px;
 border : 1px solid #acacac;
 text-align : center;
 padding-top: 20px;
 word-wrap : break-word;
 -webkit-border-radius: 5px;
 -moz-border-radius: 5px;
 border-radius: 5px;
}

a.siebui-citem-add{
 display : block;
 top : 2px;
 right : 2px;
 float : right;
 width : 16px;
 height : 16px;
 background: url(../images/plus.png) no-repeat center center;
}
Add the CSS files that the third-party uses:
In Windows Explorer, navigate to the following folder:
INSTALL_DIR\eappweb\PUBLIC\scripts\3rdParty
Add the following subfolder hierarchy to the 3rdParty folder:
\jcarousel\skins\tango\
Save the following files to the tango folder that you added in Step b:
next-horizontal.png
next-vertical.png
prev-horizontal.png
prev-vertical.png
skin.css
To get a copy of these files, see Article ID 1494998.1 on My Oracle Support. For more information about the CSS files and renderers that Siebel Open UI uses to render a list applet as a carousel, see "Customizing List Applets to Render as Carousels".
Save the jquery.jcarousel.js file to the following folder:
INSTALL_DIR\eappweb\PUBLIC\scripts\3rdParty
Siebel Open UI uses this file to render a carousel. To get a copy of this file, see Article ID 1494998.1 on My Oracle Support.