2.1 Oracle ORAchk Scope and Supported Environments
Review the scope and supported environments for Oracle ORAchk.
- Oracle ORAchk Scope of Oracle Stack Supported
Oracle ORAchk performs health checks for the entire range of Oracle products from hardware, to Oracle Database, middleware, and applications. Oracle ORAchk proactively scans for top known problems (based on prioritization of reported issues) within an Oracle system. - Oracle ORAchk Supported Platforms
Review the list of Oracle ORAchk supported platforms. - Oracle ORAchk Supported Database Releases
Review the list of supported database releases for Oracle ORAchk. - Cygwin Requirements
Install Cygwin to use Oracle ORAchk on Microsoft Windows operating system.
2.1.1 Oracle ORAchk Scope of Oracle Stack Supported
Oracle ORAchk performs health checks for the entire range of Oracle products from hardware, to Oracle Database, middleware, and applications. Oracle ORAchk proactively scans for top known problems (based on prioritization of reported issues) within an Oracle system.
The scope of Oracle ORAchk increases with new releases. Review the following list for the current scope of ORAchk.
Oracle Database
-
Single-instance Oracle Database
-
Oracle Grid Infrastructure and Oracle RAC
-
Maximum Availability Architecture (MAA) validation
-
Upgrade Readiness validation
-
Oracle GoldenGate
-
Application Continuity
Enterprise Manager Cloud Control (12c only)
-
Management Repository
-
Management Agents
-
Oracle Management Service (OMS), version 12.1.0.1 and later on Linux only
E-Business Suite
-
Oracle Payables (R12 only)
-
Oracle Workflow
-
Oracle Purchasing (R12 only)
-
Oracle Order Management (R12 only)
-
Oracle Process Manufacturing (R12 only)
-
Oracle Fixed Assets (R12 only)
-
Oracle Human Resources (R12 only)
-
Oracle Receivables (R12 only)
-
Oracle Customer Relationship Management
-
Oracle Project Billing
Oracle Identity and Access Management
-
Oracle Identity Manager (11.1.2.2.x and 11.1.2.3.x)
-
Oracle Access Manager (11.1.2.2.x and 11.1.2.3.x)
-
Oracle Unified Directory (11.1.2.2.x and 11.1.2.3.x)
Oracle Hardware Systems
-
Oracle Solaris
-
Oracle Solaris Cluster
-
Oracle Systems configuration for Oracle Middleware and Oracle Applications
-
Oracle ZFS Storage Appliance
-
Oracle Virtual Networking
Oracle Siebel
-
Oracle Siebel verification of the database configuration for stability, best practices and performance optimization (Siebel 8.1.1.11 connecting to Oracle Database 11.2.0.4.)
Oracle PeopleSoft
-
Oracle PeopleSoft verification of database best practices
2.1.2 Oracle ORAchk Supported Platforms
Review the list of Oracle ORAchk supported platforms.
Oracle ORAchk is supported on the following platforms:
-
Intel Linux* (Oracle Linux/RedHat 5, 6, 7 and SuSE 9,10, 11, 12)
-
Linux on System Z (RedHat 6, 7 and SuSE 12)
-
Oracle Solaris SPARC (Solaris 10 and 11)
-
Oracle Solaris x86-64 (Solaris 10 and 11)
-
AIX **
-
HPUX**
-
Microsoft Windows (2008 and 2012)***
Note:
*No planned support for Linux Itanium.
*Only 32-bit platforms are supported for 32-bit EBS environments using the command ./orachk -ebs32bit
** Requires BASH Shell 3.2 or later to be installed on the systems
*** Requires Cygwin to be installed.
Related Topics
2.1.3 Oracle ORAchk Supported Database Releases
Review the list of supported database releases for Oracle ORAchk.
Oracle ORAchk is supported on the following database releases:
-
Oracle Database 10g Release 2 or later
-
Oracle Database 11g Release 1 or later
-
Oracle Database 11g Release 2 or later
-
Oracle Database 12c Release 1 or later
2.1.4 Cygwin Requirements
Install Cygwin to use Oracle ORAchk on Microsoft Windows operating system.
Cygwin is a free utility that provides a POSIX compliant Linux-like environment on a Microsoft Windows host. Technically, it is a DLL (cygwin1.dll) that acts as a Linux API layer providing substantial Linux API functionality.
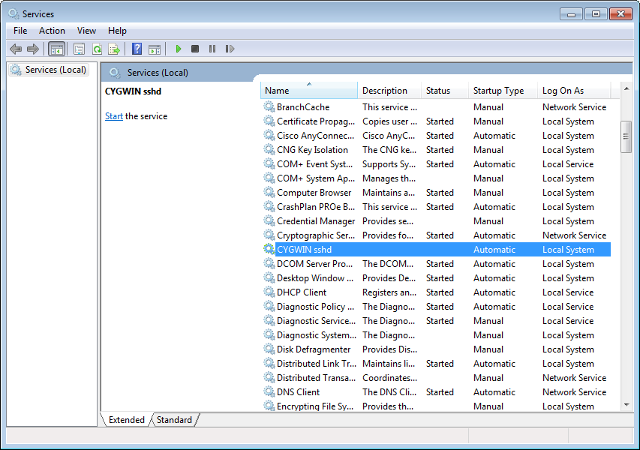
Cygwin provides a bash scripting shell environment that is compatible with Oracle ORAchk. After installing Cygwin, configure the SSH daemon on the host. SSH daemon is needed only for Oracle RAC installations.
Oracle ORAchk includes hundreds of database and application checks that run on Microsoft Windows.
- How to Install Cygwin on Microsoft Windows Hosts
To use Oracle ORAchk on Microsoft Windows, you must install Cygwin on the Microsoft Windows servers. - Configuring SSH
Configure SSH and test your Cygwin setup.
2.1.4.1 How to Install Cygwin on Microsoft Windows Hosts
To use Oracle ORAchk on Microsoft Windows, you must install Cygwin on the Microsoft Windows servers.
Note:
Some Cygwin mirror download sites do not include all the packages. If you find the necessary packages are not available, then try a different mirror site.
Note:
SSH configuration is required for cluster-wide runs, and required for single-instance Oracle Database and Oracle Restart environments.
2.1.4.2 Configuring SSH
Configure SSH and test your Cygwin setup.
Note:
-
SSH Configuration is needed only for cluster-wide runs and required for single-instance Oracle Database and Oracle Restart environments.
-
While configuring SSH, run
cygwin.batas an Administrator user on Microsoft Windows Server 2012 or later release, or Windows 7 or later release. -
If MKSNT is installed and running, then remove the path of
mksntfrom the environment and stop the SSH server.
See Also:
-
Cygwin FAQ, if you experience a process fork failure, memory leak error, or a file access error after configuring SSH, which is available at the following URL:
-
Cygwin community, if you are unable to find a workaround for your problem, which available at the following URL:
