| Oracle® Retail Predictive Application Server Cloud Edition User Guide Release 19.0 F24877-28 |
|

 Previous |
 Next |
| Oracle® Retail Predictive Application Server Cloud Edition User Guide Release 19.0 F24877-28 |
|
Previous |
Next |
Position Filtering is a convenient way to filter a large set of data in a view down to a subset of data that you want to focus on. With Position Filtering, a set of selected data cells in one view can be used to filter the positions shown in another view.
For example if one view shows a summary of targets by subclass, cluster (locations), and calendar and a second view shows a detailed breakdown of the assortment plan by style/color, cluster, and calendar you can use position filtering to quickly narrow your focus on the detail view to only those style/colors in a particular subclass to see how the style/color plan is comparing to the subclass target. Position filtering can be used similar to a drill-in workflow where you would move from a high-level view into more details, however with position filtering you choose the view to ’drill-into' instead of it being prescribed for you.
Position filtering is extremely flexible
When applied to the current view it acts as a rapid show/hide, hiding all unselected cells.
When using selections in the current view to filter a second view, all dimensions that are common in the second view will be filtered.
In Figure 15-1, a set of positions is selected in a single view. When position filtering is applied, the cells displayed in the view are reduced to those specified by the selected positions.
Figure 15-1 Position Filtering in a Single View
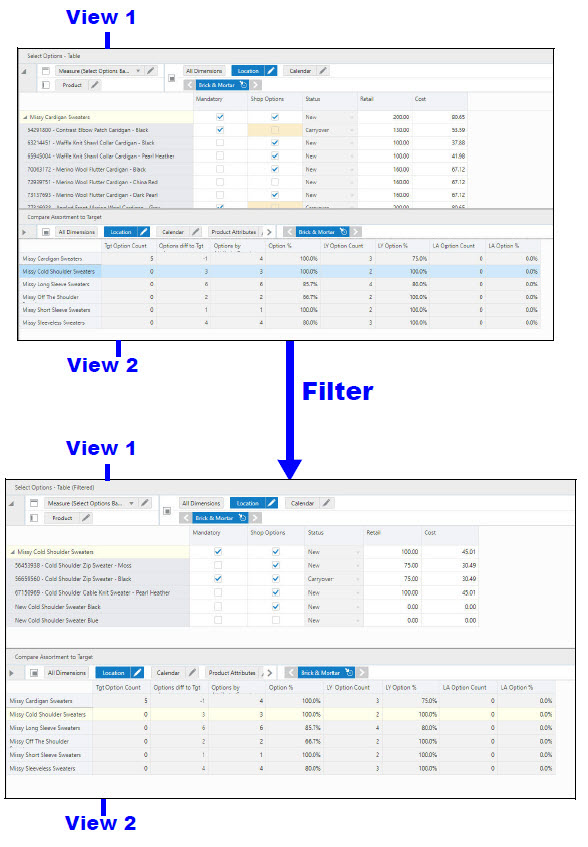
In Figure 15-2, a set of positions is selected in View 2 (blue highlighted line). When the position filter is applied the positions in View 1 are filtered to match those selected by the position filter in View 2.
Position filtering can be applied to multiple views. For example, provided the workbook has been configured to contain those views, position filters can be applied progressively.
It is possible to create these position filters in multiple steps. You can apply a position filter in first view to the second view and then apply a position filter to a third view.
Figure 15-2 Position Filtering in Two Views
This section describes the basics of working with position filters.
The position filtering option is available from the menu when you right- click on a position from the selected rows or columns or a specified set of cells. Note that the position filter cannot be applied to the Measure dimension; as a result, the Apply Position Filter context menu is not available for measures.
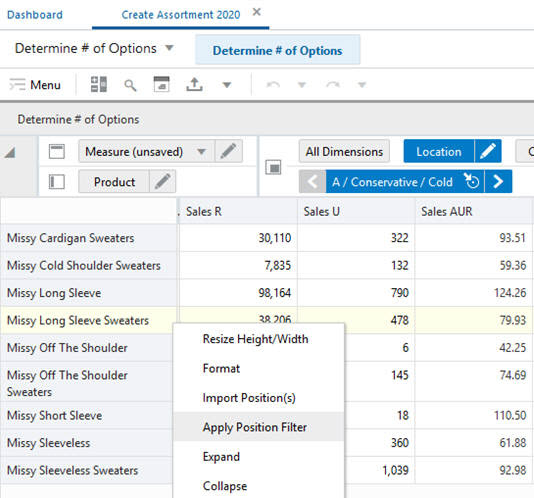
Position filtering can also be initiated by selecting rows or columns. The right- click menu can be used to initiate position filtering, as shown in Figure 15-3. It can be applied to the current view or to other views in the worksheet.
Figure 15-3 Position Filtering from Row or Column
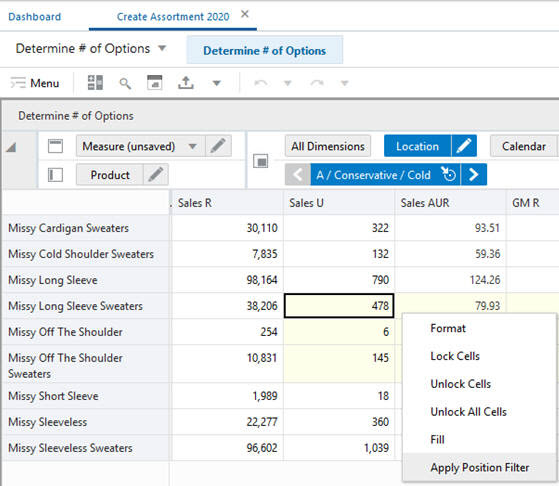
Position filtering can also be initiated by selecting one or more cells using the right- click menu, as shown in Figure 15-4. It can be applied to the current view or to other views in the worksheet.
Figure 15-4 Selecting Position Filtering from Cells
Position filters can be applied to all views in the current workbook.
You can filter the current view. The current view will be filtered to show only those rows and columns selected in the filter. This is equivalent to using the Show and Hide options in the Edit View window for any dimension.
You can filter another view in the workbook. For this to be effective, the workbook template must be configured with two or more views. There must also be one dimension hierarchy in common with both the views or a filter cannot be applied.
If the worksheet template is only configured to show a single view, only the Current View option will be available in the Apply Position Filtering window.
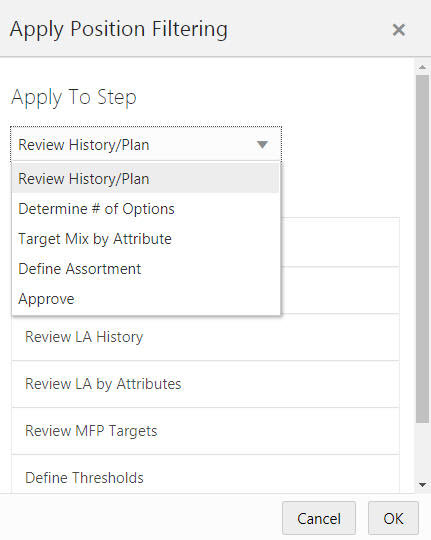
In Figure 15-5 and Figure 15-6, a worksheet has been opened for the Curve by Assortment step. The available views are the Current View: 1. Approve and 2. View Assort Period. The previous task (Define Curves) also has three views available: 1. Define Parameters, 2. Define Curves, and 3. View Sales Source.
If you select one of the other views in the current step (Approve or View Assort Period), the selected view will be filtered to show only the specified data.
If you select a view in the Define Curves step, the views will switch to the Define Curves step views and the specified view will be filtered to show only the specified data.
Once the filter has been applied, the view to which the filters have been applied becomes the current view.
Figure 15-5 Applying Position Filter on a View in Current Step
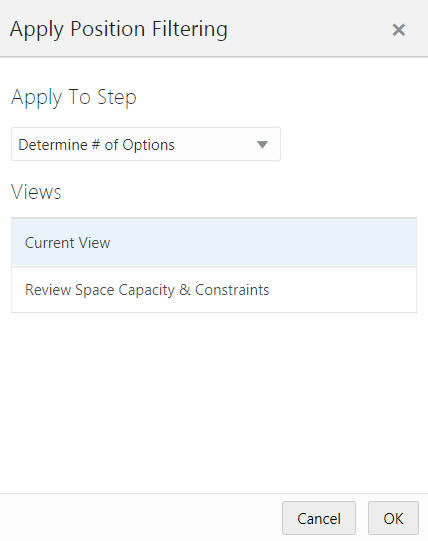
Figure 15-6 Applying Position Filter on a View in Different Step
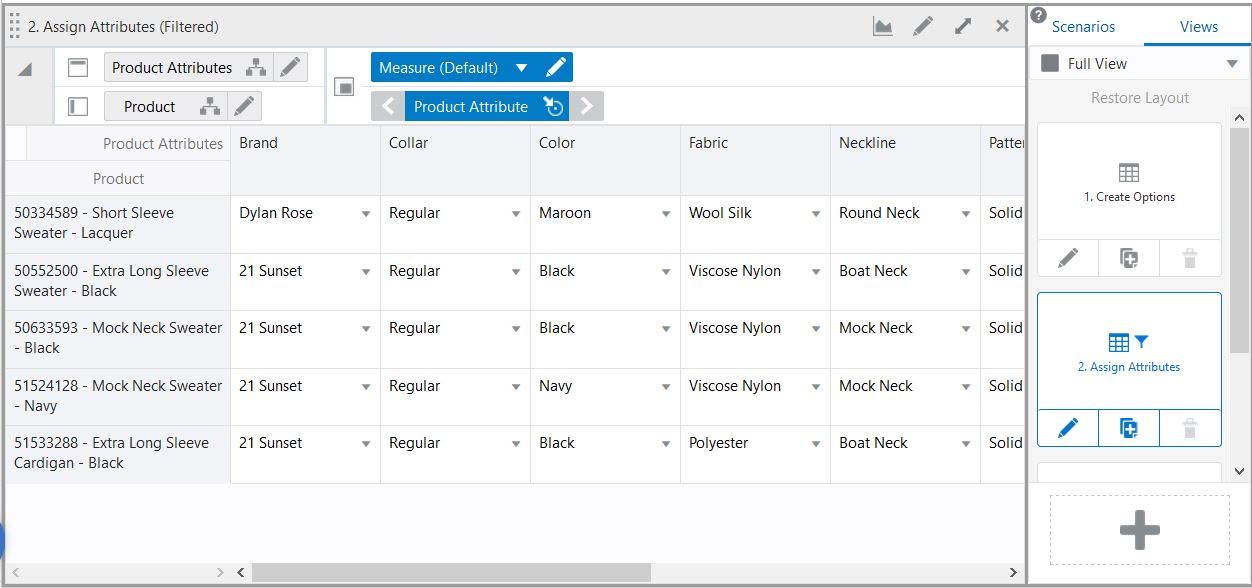
After the filter is applied, you will receive a snack bar notification. The view title will be appended with (Filtered) text and a funnel (filter) icon will be shown in the view tile in Manage Views, as shown in Figure 15-7.
Figure 15-7 Position Filtering Icon and Filtered View
One way of working with position filters is to tile the views. This can be done from the Manage Views menu on the Quick Access Toolbar. In this way, two or more views can be shown simultaneously. The filter can then be applied to one of the views, leaving the filtered data displayed in another view, as shown in Figure 15-8.
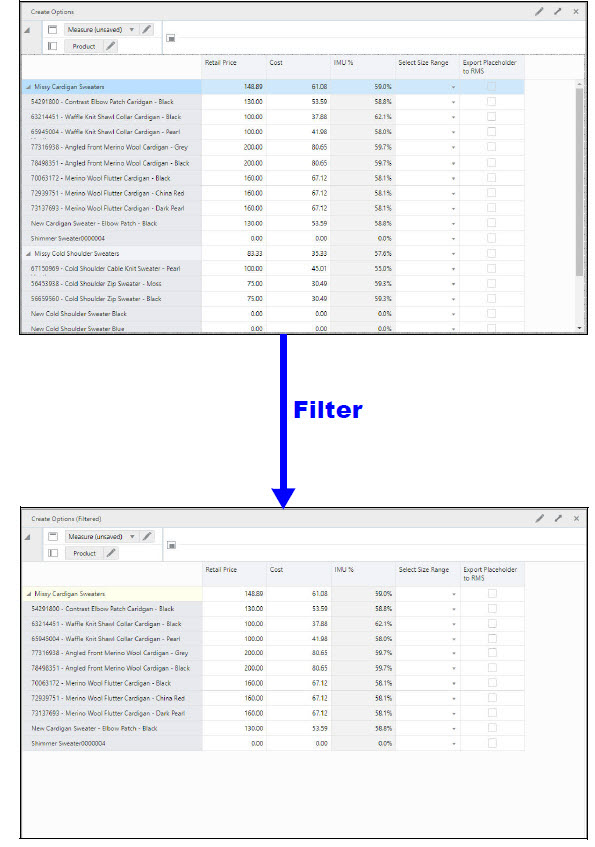
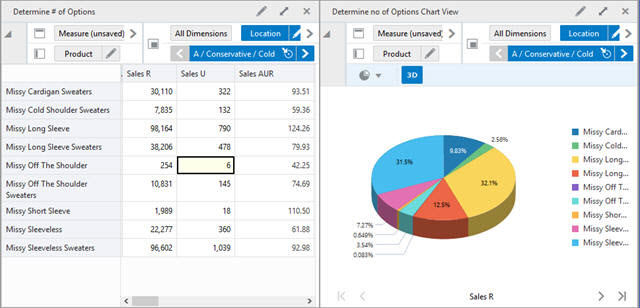
In the example shown in Figure 15-9 and Figure 15-10, two views are open. A set of positions are selected in the left hand view and the right hand view is selected from the Position Filtering option using the right- click menu.
Figure 15-9 Position Filtering: Stage 1 Example
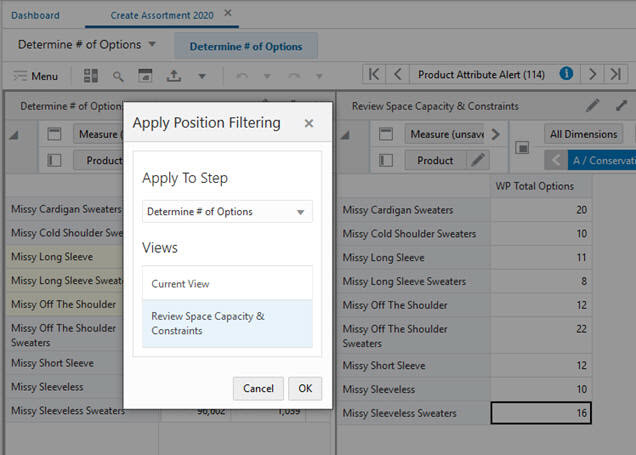
The positions selected for position filtering are highlighted during the selection process. They remain highlighted after the position filtering operation so that the user can see which rows are in use for position filtering.
Figure 15-10 Position Filtering: Stage 2 Example
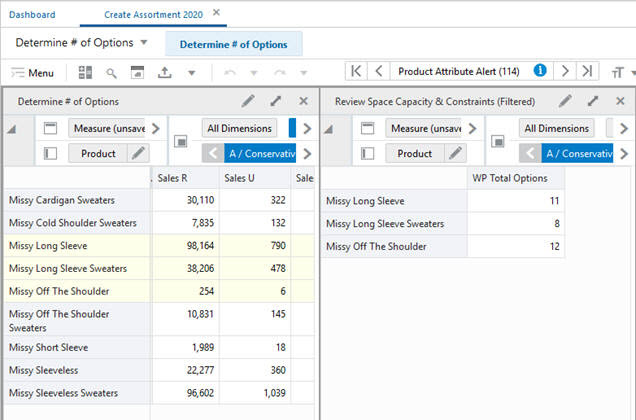
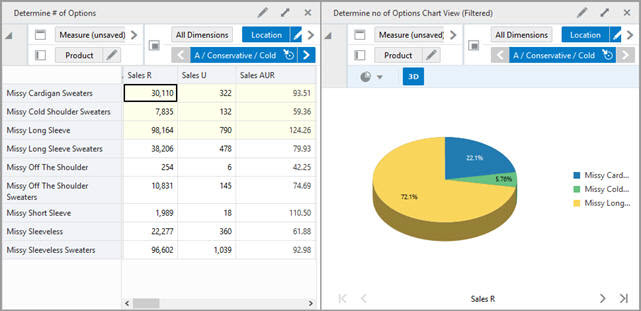
When the position filter is applied, the right hand view is restricted to those positions selected with the position filter in the left hand view. Filtering is based on all dimensions found in the row, column, and page (x, y and z) axes.
In the example shown in Figure 15-9 and Figure 15-10, the position filter has been used in the left hand view to select a subset of items from the total range available. The right hand view now only contains data restricted to this items.
For example, you may want to isolate data restricted to a range of items covering a promotional campaign for those particular products. As the promotional campaign may increase the quantities sold over the duration of the promotion, position filtering can make it easier for you to focus on the data pertinent to an advertising campaign.
This is an effective way to open a workbook with a large amount of data and then use position filters to isolate a subset of the data to edit.
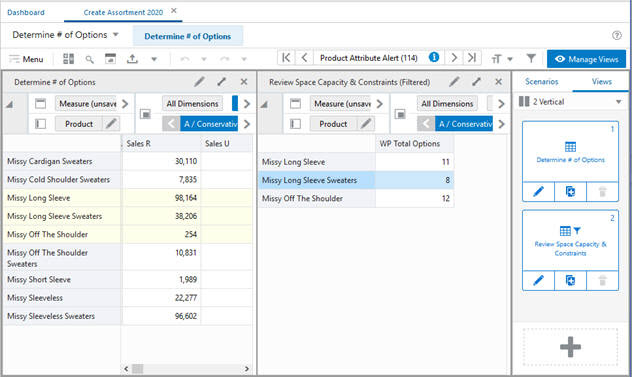
When a position filter is applied, the information in the page edge is also filtered. If the Synchronize Page Edge option has been selected, synchronized page edge navigation may not always be possible if a position filter has been applied.
Figure 15-11 Position Filtering: Page Edge Synchronization
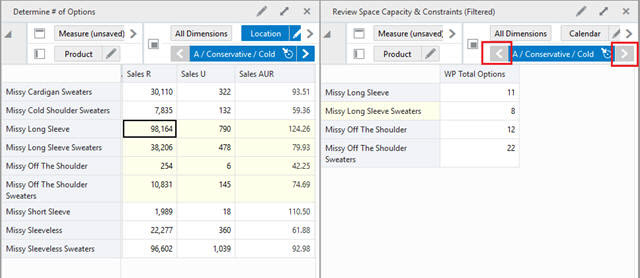
In Figure 15-11, a position filter has been applied to View 2. Review Space Capacity & Constraints. This results in a single position, A/Cold/Conservative. If you now go to View 1. Determine # of Options and use the page edge controls to scroll through the available locations, View 2 cannot synchronize because it only has a single location position. This situation will persist until more locations are made visible when another position filter is applied (or the Show and Hide option is used).
Position filtering updates charts. Where positions are hidden by the position filter, the graph is updated to reflect the changed data. In Figure 15-12, the pie chart is showing data for all stores in the district of France.
Figure 15-12 Chart Before Position Filter is Applied
A position filter is then applied. As a result, the district of France is filtered so that only three stores are visible. The pie chart is updated accordingly, as shown in Figure 15-13.
Figure 15-13 Chart After Position Filter is Applied
Other RPASCE functionality can affect the use of position filters.
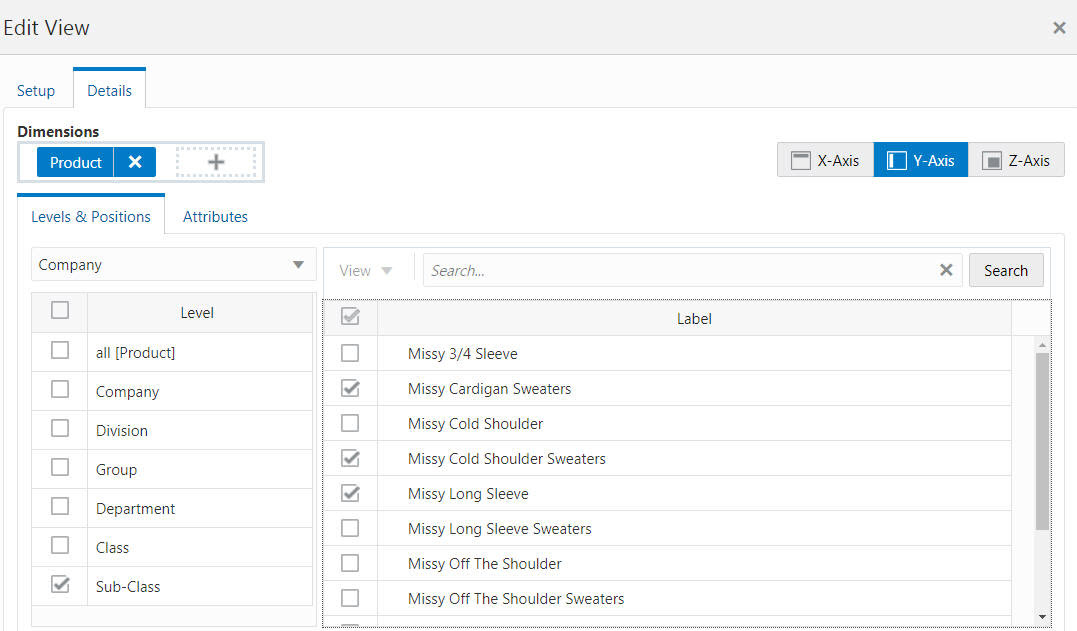
Position filtering only operates on visible measures. In addition, if the measures are hidden when the filter is applied, they will remain hidden after the filter has been applied. In order to see which measures are hidden, open Edit View for the required dimension. The Details Tab shows which measures are visible and which are hidden, as shown in Figure 15-14.
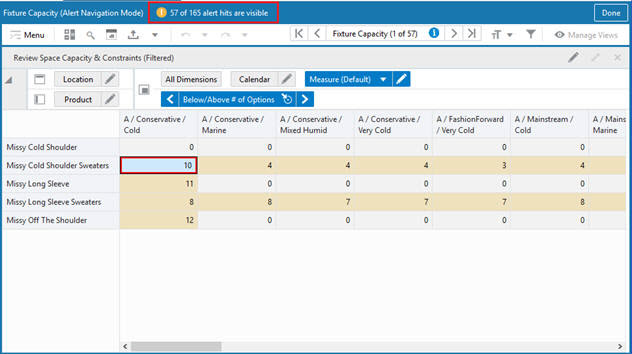
If Position Filtering is applied to a view, then Real Time Alerts Navigation will only show alerts that are currently visible in the view. Remove the position filter using the context menu Remove Filter option or the Edit View window to show and hide positions. If a position filter is applied, then you will not see the Filtered text appended with the title of the View in Alert Navigation mode.
Figure 15-15 Before Applying Position Filtering: All Alert Hits Visible
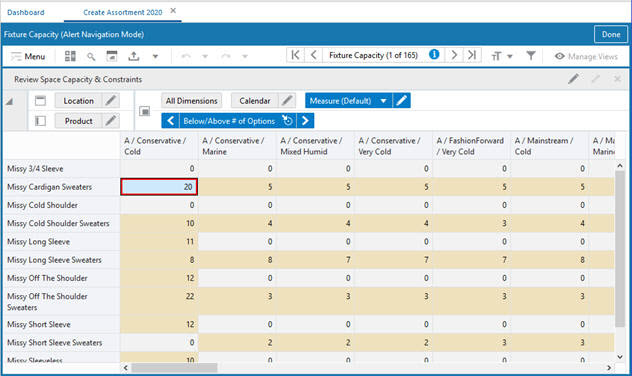
Figure 15-16 After Applying Position Filtering: Only Some Alert Hits are Visible
Apply the position filter to the Container view using one of the Pivot table type views in a Visual Planning supported workspace. The applied position filter can be removed by clicking the Remove Filter button available in the Dimension Filters bar.
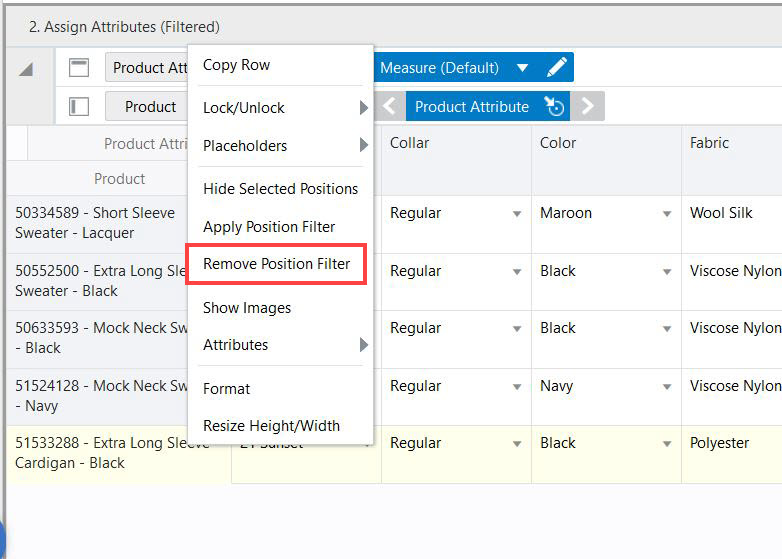
Once applied, position filters can be removed using the Remove Filter option available from the right- click menu, as shown in Figure 15-17. This option is not available until a position filter has been applied.
If show or hide is applied from edit view over position filter results, then you cannot see the Remove position filter option.
Figure 15-17 Remove Position Filter Option Enabled
When workbooks are copied or saved with position filtering applied, the following applies:
If a workbook view is copied, any position filters are copied as well. This means that the copied view will be identical to the original. You can remove the position filter in the copied view to show all positions.
When the workbook is closed and reopened, it will open in the same state it was closed in. The applied position filter is retained. In addition, the Position Filter icon on the view tile and the (filtered) text appended to the view title is visible.
Figure 15-18 Worksheet State after Position Filter is Applied

Figure 15-19 Worksheet State after Reopening the Workbook