| Oracle® Retail Predictive Application Server Cloud Edition User Guide Release 19.0 F24877-28 |
|

 Previous |
 Next |
| Oracle® Retail Predictive Application Server Cloud Edition User Guide Release 19.0 F24877-28 |
|
Previous |
Next |
Real time alerts are interactive alerts that are displayed when you open a workspace or view. They can then be manually updated by users. Data outside of specified parameters is highlighted. After you have modified the data to a suitable value, click Calculate to clear the alert. This lets you systematically work through and clear a particular set of problems. The alerts are then updated each time you edit data and click Calculate.
Real time alerts are configured in the RPASCE Configuration Module, which is normally only accessible by Administrators. This section gives a brief overview of how these alerts are configured. It is intended to give some background information for users with access to the RPASCE User Interface only.
Real time alerts are configured in workspace templates and appear in the workspace built using those templates. An alert definition specifies a number of conditions, each with styles and a message, that the alert can detect and display. Alert hits are determined by a designated alert measure, which uses a rule to calculate a condition identifier representing each hit at a designated alert intersection. These hits are then displayed in the cells of a designated target measure at that same intersection. The alert definition also contains a priority that is used when multiple alerts are raised on the same target measure cells.
|
Note: If you define two or more alerts with the same alert measure and target measure, you will only be able to see the alert formatting for one of them. |
The alert measure is calculated by a rule that detects the conditions for the alert. For example, an alert measure FcstAlert may be computed by the following rule:FcstAlert = if(FcstQty <=300, "tooLow", if(FcstQty >=600, "tooHigh",""))In this example, tooLow and tooHigh are condition identifiers, which the alert definition associates with a style and a message. The alert measure does not have to be visible in any views.
The alert definition specifies a target measure in which the hits appear. This may be a measure used in the alert measure's rule, for example, FcstQty above, but does not have to be. When an alert measure computes a condition for a cell, the corresponding target measure cell represents the alert hit and is formatted. and navigated to, accordingly.The target measure cells will be visible even if the measure is hidden in the primary view. You can see real time alerts and navigate to the respective alerts even if the target measure is hidden or placed on the z-axis with lower levels than the alert definition. The target measure can be the same as the alert measure, if desired. The same measure may be used as the target for a number of different alerts. In the case of colliding hits, the alert's priority is used to determine which alert formats the cell, but the cell will be navigated to for any of the alerts present.
When you open a workspace, the real time alert hits are calculated and displayed. They are refreshed every time you click Calculate or invoke operations such as Custom Menu Executions or as part of the Commit process.
The toolbar contains an exception list that shows all the available alerts. Users can choose either all exceptions or the exceptions that are priority for resolution. The number beside the icon shows the number of hits for the currently active real time alert for the entire workbook.
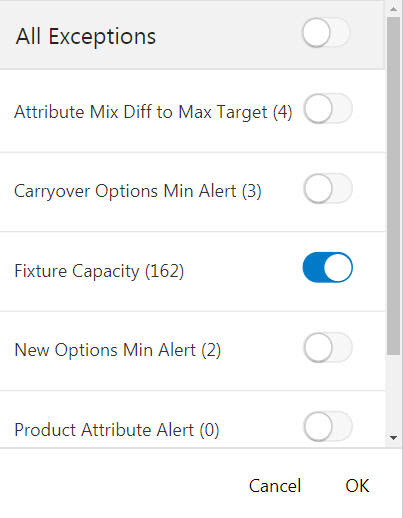
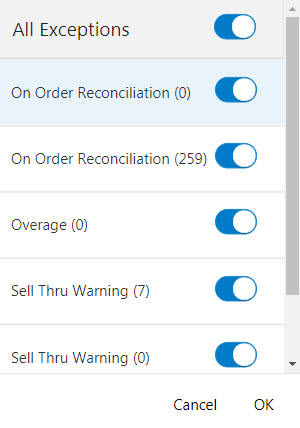
Click All Exceptions and then OK to select all the exceptions for alert navigation.
Figure 14-2 Select All Exceptions for Alerts
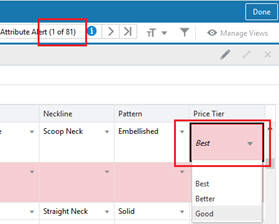
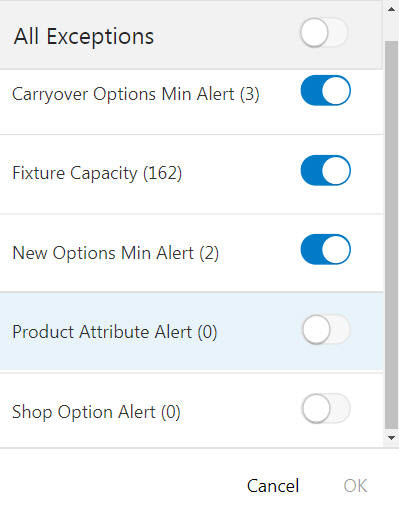
You can select the exceptions to be displayed using the sliders. You can display multiple exceptions or all exceptions. Note that the active alert is highlighted in blue. In Figure 14-3, the active alert is Product Attribute Alert. You must select the active alert for display before you can click OK.
When you select alerts for display, the alert formatting will be shown in the cells and you can navigate the active alert using the navigation arrows.
Figure 14-3 Select Multiple Exceptions for Alerts
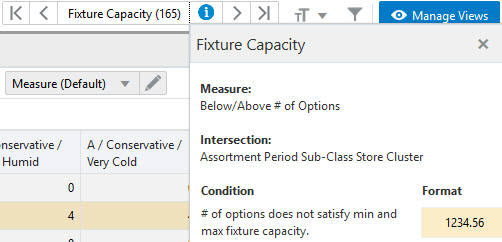
Click on the information icon to launch the alert summary of the currently selected alert. It displays the alerted measure, intersection, alerted condition, and format that was chosen to highlight the alerted cells. This summary also contains the configured condition message for each condition in the alert.
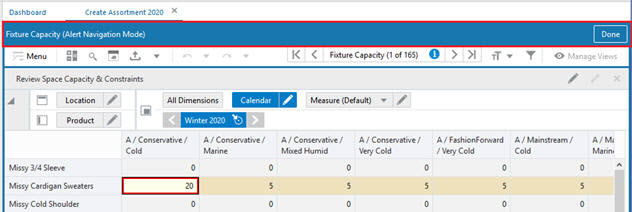
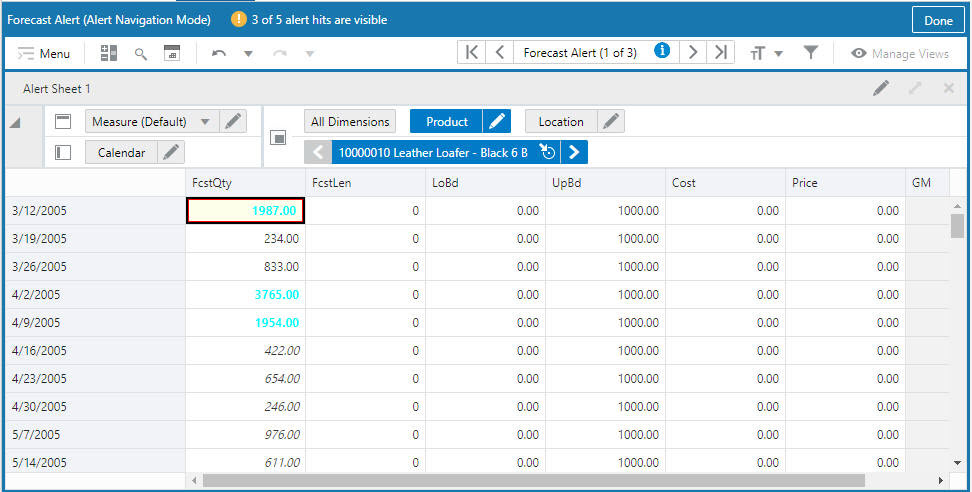
Clicking on the first, left, right, or last arrow launches the alert navigation mode. Use this to navigate between the various alerted intersections present in the specified view.
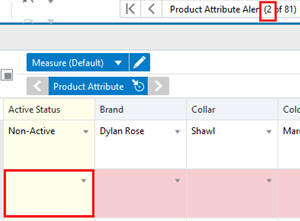
You can see that now you are in alert navigation mode, as highlighted in Figure 14-7. The alerted cell is highlighted in red, and the selected cell is highlighted in black.
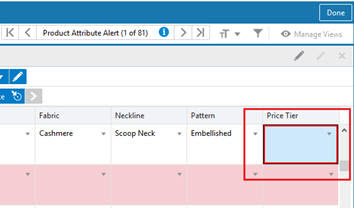
When you start alert navigation, some of the alerted cells may be hidden from the view. When this happens, you will see a message indicating how many of the total count are visible; you can only navigate through those that are visible. This can occur when positions of the alerted cells are hidden (probably most common), or if the alert's Target Measure is hidden. Use Edit View to make these visible.This can also happen when the alert intersection is not visible, but starting navigation will make those levels visible.Figure 14-8 shows the message that appears. In this case, February 2005's weeks, which contains two hits, are hidden.
Once the alerted intersections are highlighted in the required intersections as specified in alert summary, you can resolve them one by one.
Click Next to move to the next selected alert until you resolve all the alerted positions.
Figure 14-11 Moving Between Alerts During Resolution
In alert navigation mode, you see the view or views that are configured for the alert. You cannot change which views are used, but you can edit what is shown in each view using Edit View.
You cannot change the view layout or switch to different view in the alert navigation mode.
The system remembers the expand – collapse state for any navigation when the user revisits the same alert navigation. When a user exits the alert navigation and later returns, the alert navigation cursor maintains its previous state, this helps users to start alert navigation where they left off.
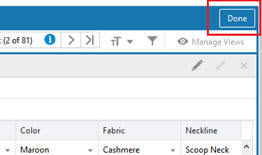
To exit the alert navigation mode, click Done. To hide the alerts, deselect the Alert in the Exception list. When you re-enter the alert navigation mode, you are taken to the same alerted position that you exited from.
An alert is configured to go to a specific step or tab in the taskflow. After you exit the Alert Navigation mode, you are left in that specific step or tab, but it is restored to its previous layout (View Layout and which views appear in what position). The initial default layout for the step or tab is Full View, using the first configured view in the step or tab.
|
Note: To maintain the last or previous state of alert navigation, always remember to exit the alert navigation mode. If the session times out, the alert navigation will not maintain its previous state. |
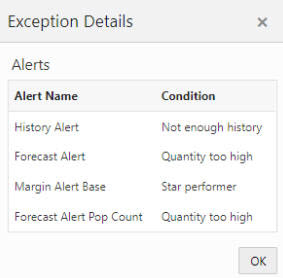
Cells with alert hits display the formatting of the highest priority alert on the cell that is enabled for display. You can right-click on the cell and select Exception Details in the context menu for a single cell selection. This brings up the Exception Details pop-up window, shown in Figure 14-13, which lists each alert hit on the cell in priority order, using the configured Alert Label and Condition Message of the hit. Only the alerts selected for display (the slide toggle in the alert selector) are included in this list. The condition name is displayed as a number for rollup cells.
Figure 14-13 Example Exception Details Context Menu
Note that if a rollup alert is configured, you will see a badge in rollup cells that displays the count of how many cells at the alert intersection have that alert. Figure 14-14 shows a rollup badge with alerts at Week rolling up to a count on Month.
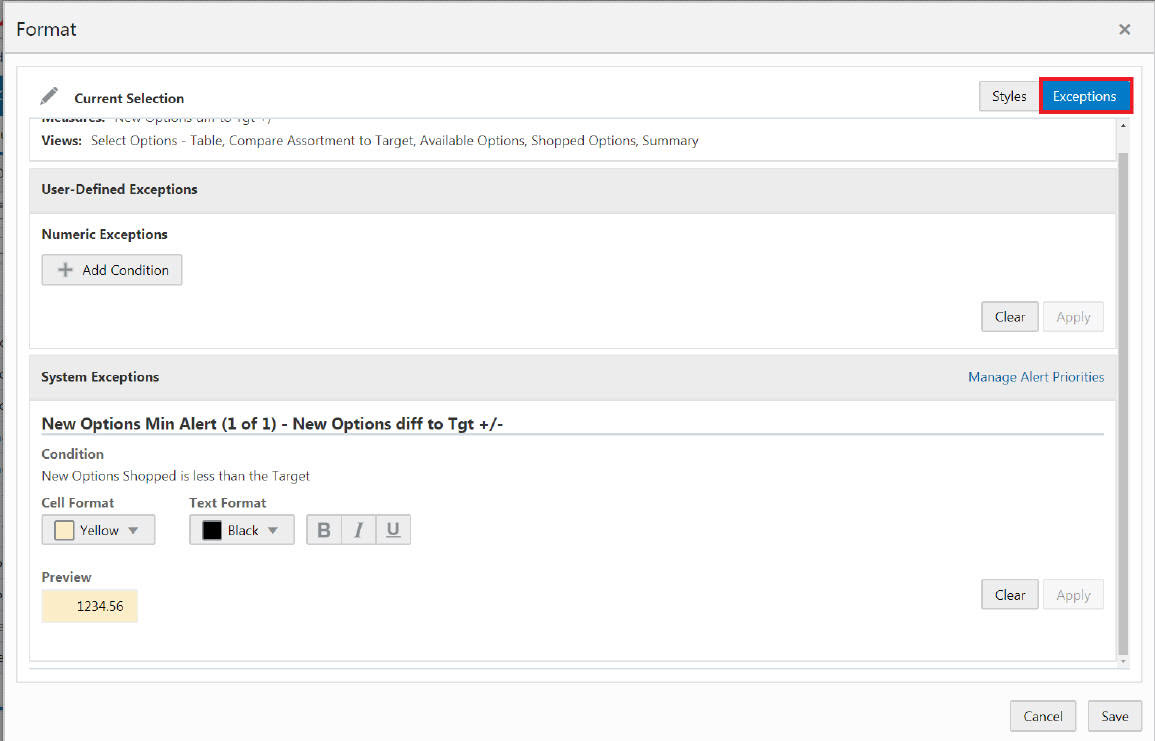
Click Format to edit styles and exceptions. The current format applied to the active alert, along with a summary of the calculation for the conditions, can be edited. You cannot add any system exceptions, as they are added in the RPASCE configuration. You can add any user-defined exceptions and specify the preferred format used to notify you and prioritize the condition over the system alert. The alert priority can be specified in the alert definition when multiple alerts are raised on the same target measure cells. You can prioritize the user-defined exception over the system exception also. You can also save or delete the Alert styles for you or your group.
After editing the data to address problems associated with a number of alerts, you can use the Calculate option. Once the results are recalculated, some real time alerts are cleared. In addition, other real time alerts may be generated.
Real time alerts in the workspace are shown by highlighted cells. The highlighting consists of a combination of text color, background color, and font style.
Where a view has large numbers of alerts, you can filter the alerts to choose specific exceptions instead of all exceptions.
You can then systematically work to clear the real time alerts in the view by:
Navigating to a specific real time alert and identifying its nature from its summary in the alert summary.
Editing the value of any cell referenced by the rule to calculate the alert.
Clicking Calculate to update the view.
When you click calculate, if an appropriate value has been entered into the cell, the alert should clear.
You can then periodically commit the changes to save them back to the multidimensional database.