| Oracle® Retail Predictive Application Server Cloud Edition Administration Guide Release 22.2.401.0 F72005-01 |
|

 Previous |
 Next |
| Oracle® Retail Predictive Application Server Cloud Edition Administration Guide Release 22.2.401.0 F72005-01 |
|
Previous |
Next |
The RPASCE Online Administration interface allows the application administrator to manage back-end operations on a application from the RPASCE Client. The Online Administration interface consists of two parts. The first part is a set of activities in the taskflow that authorized users access in order to launch and manage back-end processes from the Client. The second part is a dashboard that an administrator uses to monitor the status of all the administration tasks after they have been submitted.
This chapter contains the following sections:
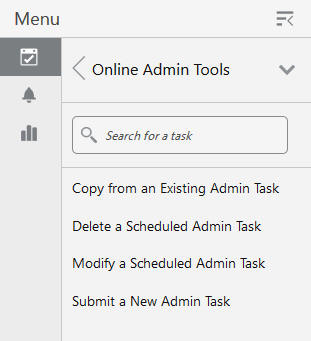
Several wizard-only workbook templates are available that the RPASCE administrator can use to manage RPASCE administration tasks on the RPASCE server. These templates are located in the workbook template group called Online Admin Tools, which is available from the task flow menu under Administration.
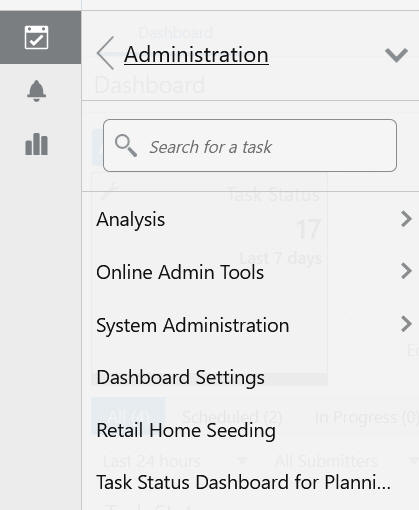
Use the following menu to access the administration tools.
This template allows the administrator to copy a scheduled or completed administration task. The first wizard page provides a drop-down list for the user to select a task. Subsequent wizard pages are similar to those in the Submit a New Admin Task template, but with the argument selections populated with the values of the existing task.
A new label for the task must be entered.
This template allows the user to delete an active task that has been scheduled but not yet started. The list only included scheduled tasks.
This template allows the user to modify a scheduled administration task. The first wizard page provides a drop-down list for the user to select a task. Subsequent wizard pages are similar to those in the Submit a New Admin Task template, but with the argument selections populated with the values of the existing task.
A new label for the task must be entered.
The Submit an Administration Task template is a multiple-page template in which the contents of each page are dependent upon the selection of the previous page.
The first wizard page prompts the user to choose one of the task lists available in the application.
The second wizard page is used for selecting one of the pre-defined tasks.
A job label is required that identifies the submitted task. A meaning label is recommended since it is the identifier of the task when its status is displayed. The uniqueness of the job label is not checked. It is the user's responsibility to ensure that the name is recognizable.
From the third wizard page, the user selects or enters the command line arguments for the selected task.A job label is required that identifies the submitted task. A meaningful label is recommended since it is the identifier of the task when its status is displayed. The uniqueness of the job label is not checked. It is the user's responsibility to ensure that the name is recognizable.
If the argument list contains argument branches, another wizard page will be generated based on the user's selection of the branches. This is done recursively until all argument branches are exhausted. After all arguments are specified, the next and final wizard page, which is used for scheduling options, is displayed.
The user sees the Confirm Action page. Verify the options on this page and click Finish to submit this task for execution.
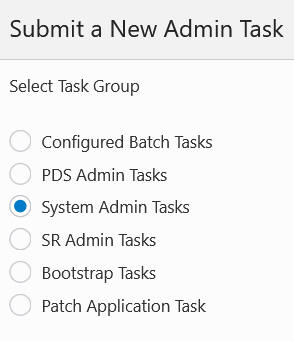
All task submissions follow a common workflow.
The first step is to select the group to which the intended task belongs. Common groups are System Administration Tasks and Configured Batch Tasks.
Figure 5-2 Task Groups in the Online Admin Group
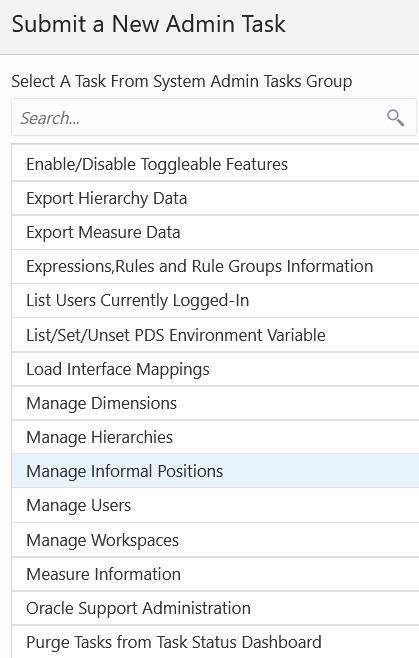
Click Next. The wizard shown in Figure 5-3 provides a list of available tasks within the group.
Figure 5-3 Tasks in System Administration Task Group
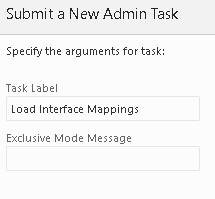
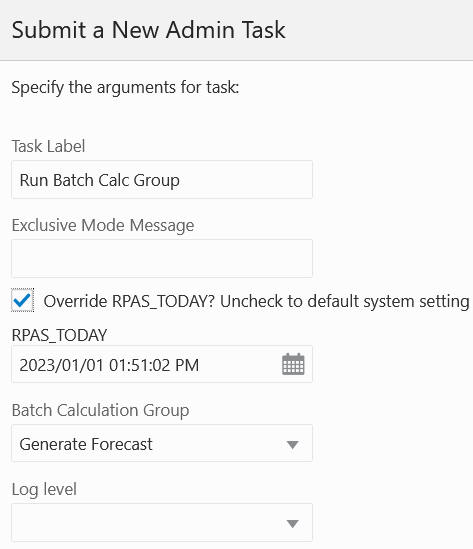
Once you select a task, you must set the parameters using the wizard, as shown in Figure 5-14. Common parameters are:
Task Label - This is the label that is used to identify the task in the Task Dashboard, Copy Admin Task, Delete Admin Task, and Modify Admin Task.
Exclusive Mode Message - The task is defined as an offline or exclusive task. The user can provide this optional message to be shown to other users while the task is executing. The system is performing offline operation and the capability of the user session is limited.
RPAS_TODAY Override - If the task supports the RPAS_TODAY override, then a check box and date/time control are available for the user to specify an RPAS_TODAY override value. Control is not visible if the override check box is unchecked.
Depending on the task selected, and the parameter provided in each wizard page, additional parameter pages may be added for the user to complete the selection of all parameters.
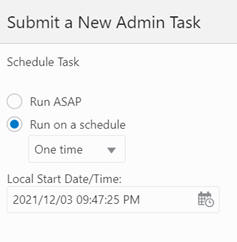
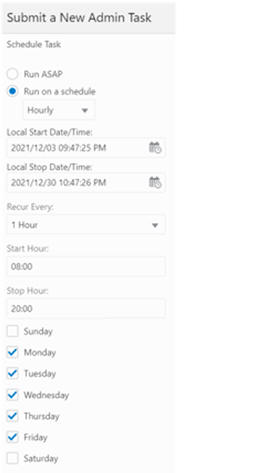
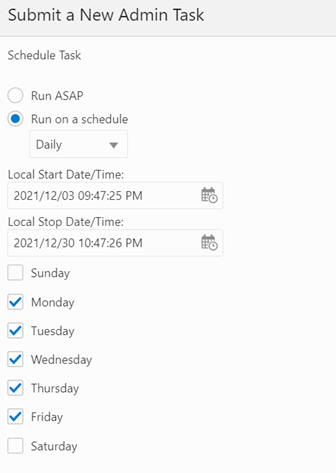
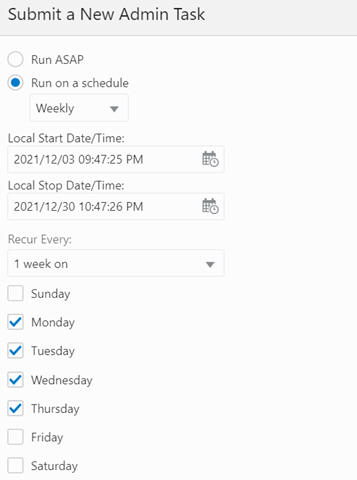
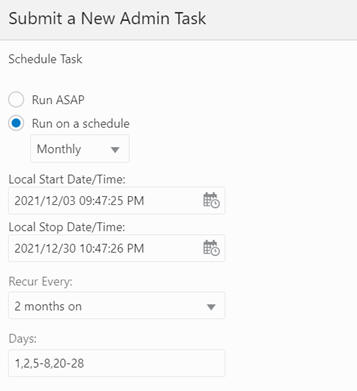
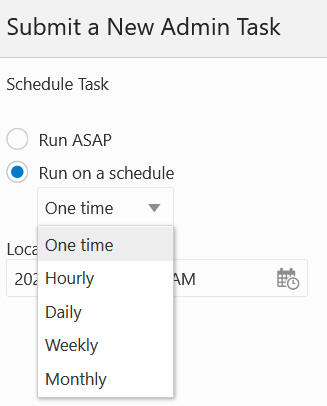
Schedule Task is available with the options One Time, Hourly, Daily, Weekly, Monthly scheduling as shown in Figure 5-4 through Figure 5-13.
Click Next. You see the confirmation.
Figure 5-5 One time Schedule Confirmation
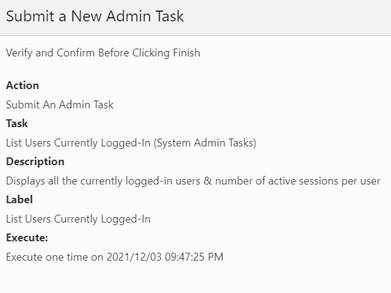
Click Finish to complete the task.
Figure 5-11 Weekly Schedule Confirmation
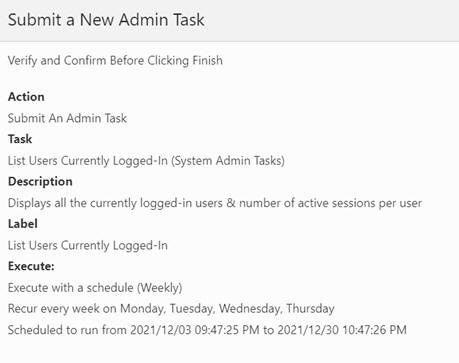
Figure 5-13 Monthly Schedule Confirmation
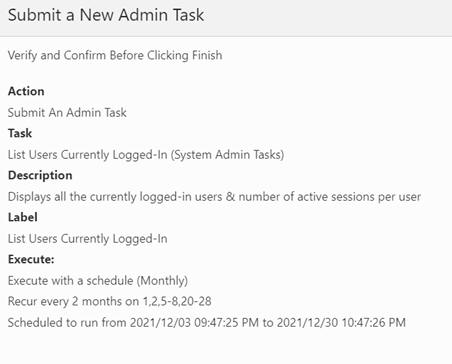
Figure 5-14 Sample Wizard Page - Accepting Parameter Input
RPAS_TODAY Use Case
A customer wants to run one of the time-intensive tasks on Friday night. On the subsequent Monday morning, the customer checks the task status and finds it failed (due to either a mistake made in the input or an error in the batch script). After fixing the issue, the customer can re-run the batch using the date of last Friday to ensure any date-depending calculation will have the correct values.
|
Note: This option is to set the RPAS_TODAY for, and only for, a particular task without changing the RPAS_TODAY on a systemwide basis. If a systemwide change is desired, the user must use the List/Set/Unset Environment Variable OAT task to change the value of RPAS_TODAY. The user is required to log out and re-log in to have his/her user session updated. Any tasks started after the ENV value is changed will have the new RPAS_TODAY set. Note that RPAS_TODAY is a static value. For example, if the value 20200201 is set today, tasks that are scheduled to run tomorrow will continue to have RPAS_TODAY=20200201. |
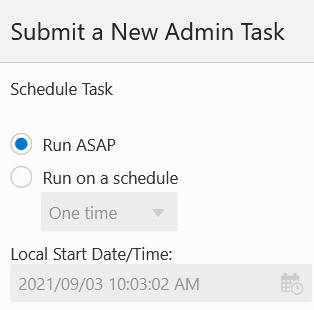
After all the parameters are set, use the next wizard page to set when the task will execute, as shown in Figure 5-15 and Figure 5-16.
ASAP - as soon as the system is available to execute.
On a schedule:
One time - specify a time in the future for the task to execute.
Hourly, Daily, Weekly, Monthly - specify a recurring setting for the task to execute.
Start Date/Time - This is the time the task will execute for the first time. Note the first time execution. The recurring schedule will only be considered after the first run.
Stop Date/Time - For recurring tasks, specify the time the schedule ends.
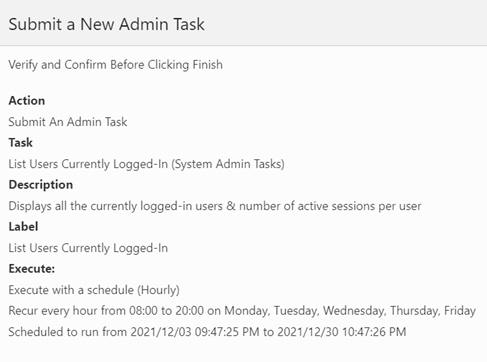
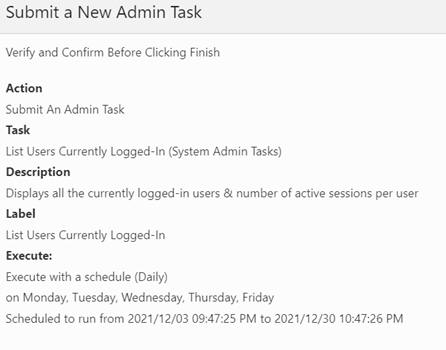
After you are finished setting the parameters, you see the confirmation page, as shown in Figure 5-17. It lists out all the parameter settings and schedule settings. If everything is correct, click Finish to submit the task to the system. If the task supports RPAS_TODAY and the user overrides the value, the new value is also displayed on this page.
Figure 5-17 Confirmation for Task with Pending Submission

To check the status of the task, use the Task Status Dashboard template under the Administration, as shown in Figure 5-18.
Figure 5-18 Access to Task Status Dashboard
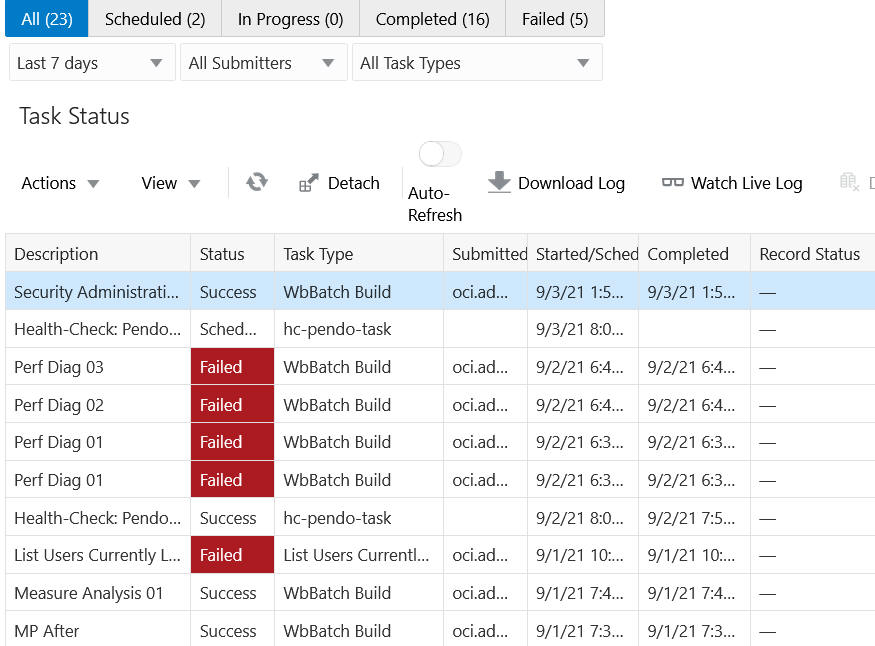
It displays a dashboard, shown in Figure 5-19, that lists all the tasks and their status. The list can be filtered based on the date/time of the execution, the submitter/owner of the tasks, the type of the tasks, or the status of the tasks.
For any completed task, the user can download the log by selecting the row and clicking Watch Live Log or Download Log to fetch the log for the task. See "Task Status Dashboard.".
You can configure an email notification for each OAT task so that, when an OAT task ends, an email notification is sent the registered email addresses of the status of the task. Each OAT task and its success or failed status can be individually assigned one or more email addresses. This can be done through the Notification Administration interface of Retail Home.
Complete the following steps to configure email notifications.
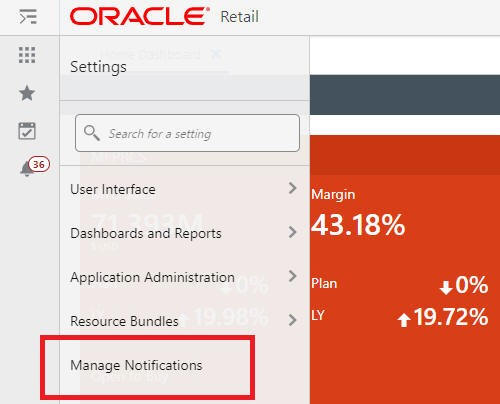
Click the Gear icon on the bottom left corner of the page.
Figure 5-20 Access to Notifications Menu
From the Settings menu, select Manage Notifications, as shown in Figure 5-21.
Select the desired application from the drop-down list, as shown in Figure 5-22.
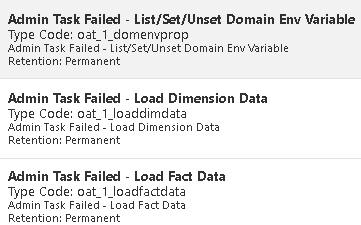
Select the notification for which you want to send email. Each OAT task has two corresponding notification types with the prefix Admin Task Failed - or Admin Task Success -, along with the task label for each.
Select the notification type for which you want to receive email.
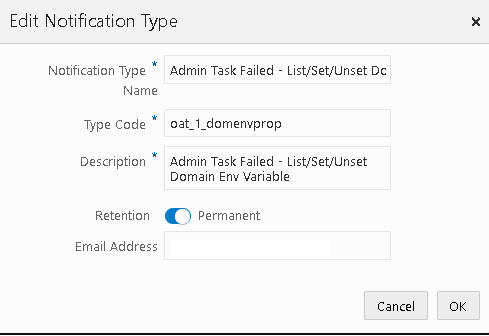
Select the Pencil icon to edit the notification type, as shown in Figure 5-24.
In the Edit Notification Type dialog box shown in Figure 5-24, enter the email address where the notification will be sent.
You can add one or more email addresses using the Edit Notification Type dialog box. Each address must be separated by either a space or a comma.
Do not modify the type code of the notification type.
Note that the generic Admin Task Complete and Admin Task Failed that does not have a task label suffix cannot be configured for email notification.
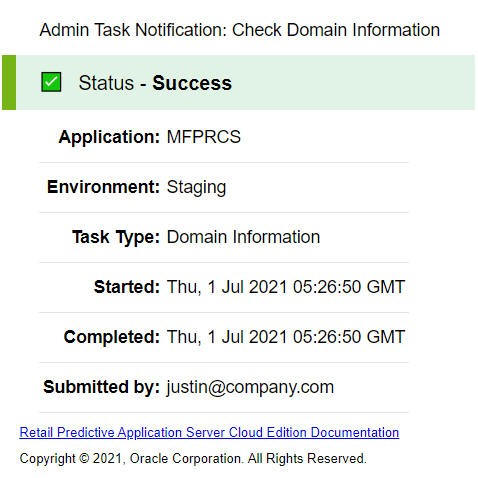
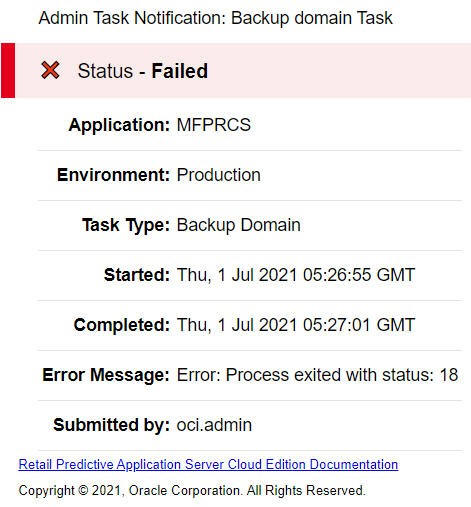
Sample email notifications for a status of success and failed are shown in Figure 5-26 and Figure 5-27.
Table 5-1 lists the system administration tasks available for the RPASCE platform.
Table 5-1 System Administration Tasks
| Administration Task Name | Administration Task Label | Description | RPAS_TODAY Available |
|---|---|---|---|
|
dimensionMgr |
Manage Dimensions |
Display properties for the selected dimension. |
|
|
exportHier |
Export Hierarchy Data |
Export all the positions in a hierarchy, including their roll-up relations. |
|
|
exportMeasure |
Export Measure Data |
Export application/workbook (single/multiple) measure data to a CSV or a fixed-width file format. |
|
|
hierarchyMgr |
Manage Hierarchies |
Display all the hierarchies in an application and their properties. |
|
|
informalPositionMgr |
Manage Informal Positions |
Maintain informal positions for DPM-enabled dimension in an application. |
|
|
listActiveUsers |
List Users Currently Logged-In |
Display all the currently logged-in users and number of active sessions per user. |
|
|
mace |
Expressions, Rules and Rule Groups Information |
Display information about expressions, rules, and rule groups. |
|
|
pdsProperties |
View and Manage PDS Properties |
Display, reset, and update different properties of an application. |
|
|
pdsProperties |
List/Set/Unset PDS Env Variable |
List, Set, or Unset the application environment variable. |
|
|
printMeasure |
Measure Information |
Display measure information. |
|
|
purgeOatQueues |
Purge Tasks from Task Status Dashboard |
The purgeOatQueues task in older versions of RPAS has been replaced with Purge Tasks from Task Status Dashboard Task. It is not possible to migrate or upgrade previously scheduled purgeOatQueues tasks automatically. You must reschedule using Purge Tasks from Task Status Dashboard Task instead. |
|
|
renamePositions |
Rename Positions |
Change the name of one or more positions. |
|
|
scheduledashboard |
Schedule Dashboard Build |
Schedule creation of a dashboard workbook for single user/all users/all users of a group. |
X |
|
sqlldr and transferFiles |
Load Interface Mappings |
Load interface mappings between RDX and PDS. |
|
|
updateFeatureToggles |
Enable/Disable Toggleable Features |
Enable/disable toggleable business features. |
|
|
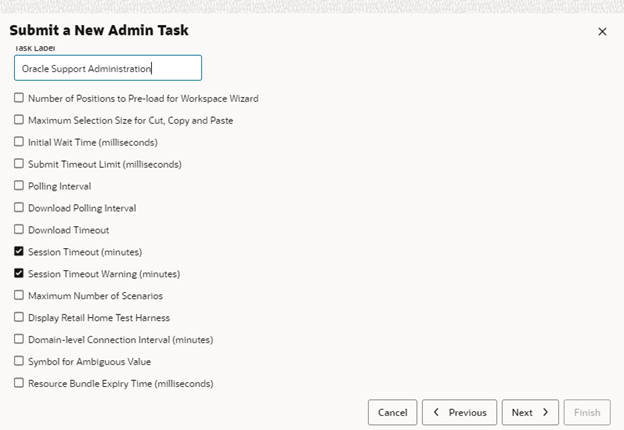
updateOptionalUIProperties |
Oracle Support Administration |
Enable optional UI properties for use in UI settings. |
|
|
usermgr |
Manage Users |
Manage user/group (add/remove/print/import/export/lock/unlock). |
|
|
wbbatch |
Segment/Workspace Batch Operation |
Manage segment/workspace batch operations. |
X |
|
wbmgr |
Manage Workspaces |
Inspect or remove existing workbooks. |
The Manage Dimensions task is used for displaying dimension properties.
Here is the list of properties that this argument returns:
Dimension label
Associated hierarchy of the dimension
Width of the dimension
Label width of the dimension
DPM enabled
Image enabled
Attribute measure
User-defined
Used positions
Translation enabled
Spreads or aggs (that is, where the dimension fits in the rollup)
If the dimension is at the base level of an indicated hierarchy
Virtual dimension
Select Dimension
This is the drop-down list of dimensions. This task returns properties about the selected dimension. These properties can be used to check if DPM and translation are enabled for the dimension, if the dimension is image-enabled, and so on.
The Oracle Support Administration task enables additional UI settings for use in the System Configuration menu. Do not run this task unless instructed to do so by Oracle Support personnel.
See the Oracle Retail Predictive Application Server Cloud Edition User Guide for more details about this task.
Figure 5-28 Oracle Support Administration Task
This task is used to update integration options that are applied when moving data from Retail Insights or Retail Science Platform to Planning solutions or vice versa. Options are provided to list all the available integration variables and set or unset integration variables one at a time. For more information about these variables, see the Implementation Guides for the respective applications.
Figure 5-30 List/Set/Unset PDS Integration Variables
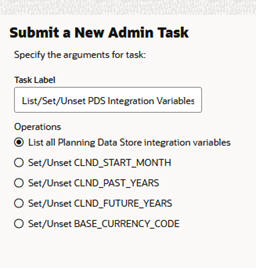
Set/Unset CLND_START_MONTH
CLND_START_MONTH refers to the month that maps to the month ID received from RMF CS. For example, if CLND_START_MONTH is set to 2, then the month ID 1 received from RMS refers to February.
Set/Unset CLND_PAST_YEARS
CLND_ PAST_YEARS refers to the number of years in the history before the current year.
Set/Unset CLND_FUTURE_YEAR
CLND_FUTURE_YEAR refers to the number of years in the future period after current year. For example, if CLND_PAST_YEAR is set to 2 and CLND_FUTURE_YEAR set to 2 then there are five full years including the current year.
Set/Unset BASE_CURRENCY_CODE
The base currency code is set by default as USD to obtain the conversion rates for other currencies. This option is used to change the base currency code.
The Load Interface Mappings task is used to load interface mappings between RDX and PDS. Each interface can have a configuration specification defined as interface mapping that provides details about the mapping of source table columns to destination table columns. It can be provided by the customer admin user as a configuration file named interface.cfg. It must be uploaded to the incoming area of the Object Storage before running this task. This interface mapping file is parsed and loaded into an internal interface mapping table and can be used by generic importers/exporter packages to transfer data.
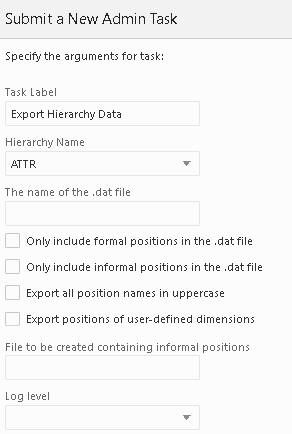
The Export Hierarchy Data task is used to export all the positions in a hierarchy, including their rollup relations. The task exports all hierarchy positions by default. However, options are available to include only formal or informal positions.
Hierarchy Name
This is the drop-down list of available hierarchies for export.
The Name of the Output Data File
Only the file name must be specified. This is the output file containing the hierarchy positions.
Only Include Formal Positions in the Output
If this is specified, all informal positions will be skipped.
Only Include Informal Positions in the Output
If this is specified, all formal positions will be skipped.
Export All Position Names in Uppercase
If this is specified, all position names will be exported in all uppercase.
Export Positions of User-Defined Dimensions
By default, positions rollups for user-defined dimensions are not part of the export. This option will include those dimensions and can only be used in conjunction with the Only Include Formal or the Only Include Informal options.
File to be Created Containing Informal Positions
This creates a file containing all informal positions in a format that can be used with the Manage Informal Positions task.
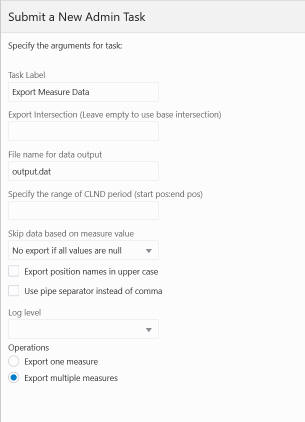
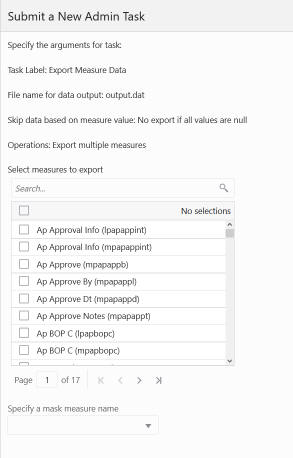
The Export Measure Data task is used to export application or workbook measure data from RPASCE to either a CSV or a fixed-width file format. A single measure or multiple measures can be exported, based on a specified intersection.
If the measure's base intersection is not the same as the export intersection, the measure's default aggregation method will be used to aggregate data to an intersection higher than base, or replication will be used to spread the measure data if the data is required at an intersection lower than base. This utility supports the export of data in a user-specified range, which can be a single mask measure, in a range specified in the calendar dimension or in a combination of the two.
Task Label
Enter a descriptive and identifiable label for this task. This label is displayed on the Task Status Dashboard.
Export Intersection
This specifies the intersection at which to export measures. If the measure's base intersection is higher than the export intersection, replication is used to spread the measure down to the export intersection. If the measure's base intersection is lower than the export intersection, the measure's default method (defagg) is used for aggregation. The export intersection must be either at, above, or below the base intersection of the measure. The export intersection cannot have some dimensions above the dimension in the base intersection of the measure and some below. The RPASCE dimension names in an intersection must be four characters in length. If an RPASCE dimension name is less than four characters long, then an underscore character ("_") must be used as a filler at the end of a dimension name. This argument is optional.
File Name for Data Output
This specifies the data output file name. If the export intersection is not specified, all measures must be at the same intersection.
Export Position Names in Uppercase
If this option is selected, all position names will be converted to uppercase in the output file; if this option is not selected, all position names will be in lowercase, since they are stored as lowercase in the PDS.
Optionally, the output file can use the pipe (|) character as a field separator instead of a comma (,).
Optionally, specifies a range of positions along the innermost dimension. Only values in the range are considered for export. To have the correct ordering, use only for the CLND level.
Operations
Choose to export single or multiple measures. For a single measure, select one from the drop-down list; for multiple measures, enter a comma-separated list of measure names.
Note the following:
Select the measure or measures to be exported. This depends on the operation selected in the first wizard.
Optionally, specify a mask measure to be used to filter the export. It must be a valid Boolean measure.
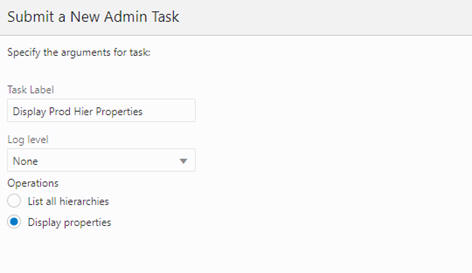
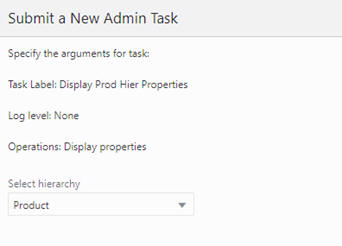
The Manage Hierarchies task is used to list all the hierarchies in the PDS and their properties.
Figure 5-35 Display Product Hierarchy Properties
List All Hierarchies in the PDS
All hierarchies in the application are listed.
Display Properties of the Hierarchy
Displays the detailed properties for a specific hierarchy. When the user selects this and clicks Next, the window to enter additional arguments for the operation is displayed.
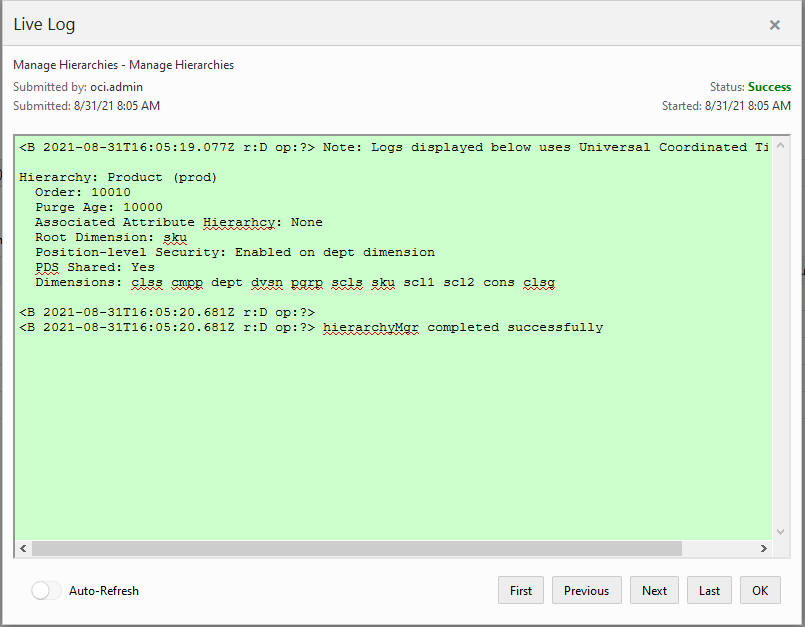
Figure 5-36 Display Product Hierarchy Properties Log
Click Next. Select Run ASAP on the Scheduling page and click Finish. In the OAT dashboard, select the recently completed task to view the details of the hierarchy.
Figure 5-37 Sample Live Log Output for Manage Hierarchies Task
Mace is used to evaluate rule groups or expressions in order to manipulate measures.
Figure 5-38 Expressions, Rules, and Rule Groups Information
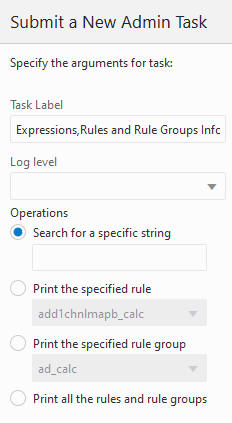
Search for a Specific String
Searches all expressions for the specified printing of all the rules and rule groups that have these expressions.
Print the Specified Rule
Select from the drop-down list for the specific rule to print.
Print the Specified Rule Group
Select from the drop-down list for the specific group to print.
Print All the Rules and Rule Groups
All rules and rule groups are printed.
This task maintains informal positions for DPM-enabled dimensions in an application. It can convert positions from informal to formal, remove informal positions, create informal positions in bulk, and copy data slices between positions in measures.
Figure 5-39 Manage Informal Positions Task
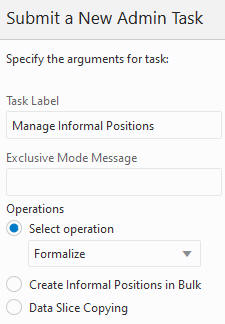
Select Operation
You can use only one of these operations.
Formalize. The data file, [hierName].formalize, is required. The data file is in CSV format with two columns: level name and position name. All matching positions are converted to formal status and all positions that these positions roll up to in the hierarchy will also be converted to formal positions. For example, if one of the informal SCLS positions is specified to become a formal position, then its corresponding CLSS, DEPT, and so on, positions will also be converted to formal positions if they are informal.
Load. Loads informal positions from an input file. The input file must be a CSV file with the name [hierName].informal.csv.dat. It must have the same format pattern/restriction as the data file for the Load Dimension Data task (PDS Admin Tasks group). All new positions are treated as informal and are loaded into the current application.
Remove. Removes informal positions for the specific hierarchy. The data file, [hierName].remove, is fetched from Object Storage before processing. The data file is in CSV format with two columns: level name and position name.
The data listed above is fetched from the Object Storage before processing. These operations also require an additional parameter. Select hierarchy, which is shown when the user clicks Next.
Figure 5-40 Manage Informal Positions Sub-Task
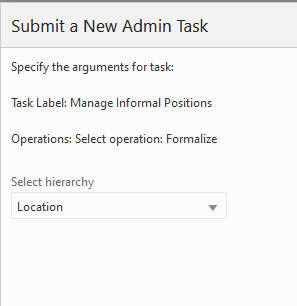
Select Hierarchy
Specify the hierarchy on which to operate.
This feature allows the user to create a number of informal positions on any DPM-enabled dimension. These positions are automatically named and labeled. However, the user must provide the applicable rollup and spread information so that these new positions can be properly placed in the hierarchy.
Figure 5-41 Create Informal Positions in Bulk

Select Dimension
Specify the dimension on which to operate.
Number of Positions to Create on Specified Dimension
Enter the number of positions to create on the specified dimension.
Specify the Rollup Positions for the Auto-Generated Positions
This specifies the rollup positions for the auto-generated positions. You must include the direct rollups for the new positions and the rollups for the descendents of these new positions on alternate branches, if applicable. The format is: dimA:countA,dimB:countB,...
Specify the Spread Counts for the Auto-Generated Positions
This specifies the spread counts for the auto-generated positions. This is optional. It defaults to a value of 1 if not specified. The format is dimA:countA,dimB:countB,...
This feature is used to copy data slices from one position to another. The XML file that contains the instructions for the operations must be placed in the input folder under the Object Storage. It must be named informal_copy.xml.
XML Input File Schema in XSD Format File
<?xml version="1.0" encoding="UTF-8"?>
<xsd:schema attributeFormDefault=unqualified" elementFormDefault="qualified" version="1.0" xmlns:xsd=http://www.w3.org/2001/XMLSSchema">
   <xsd:element name="rpas" type="rpasType" />
   <xsd:complexType name="rpasType">
      <xsd:sequence>
         <xsd:element name="copy" type="copyType" />
      </xsd:sequence>
   </xsd:complexType>
   <xsd:complexType name="copyType">
      <xsd:sequence>
         <xsd:element name="measure" type="measuresType" />
         <xsd:element name="positionMap" type="positionMapType" />
      <xsd:sequence>
      <xsd:attribute name="removesource" type="xsd:boolean" />
   </xsd:complexType>
   <xsd:complexType name="positionMapType">
      <xsd:sequence>
         <xsd:element maxOccurs="unbounded" name="positions" type="xsd:string" />
      </xsd:sequence>
      <xsd:attribute name="dim" type="xsd:string" />
   </xsd:complexType>
   <xsd:complexType name="measuresType">
      <xsd:attribute name="option" type="xsd:string" />
   <xsd:complexType>
</xsd:schema>
Sample XML Input File
<?xml version="1.0" encoding="UTF-8"?>
<rpas>
   <copy removeSource="true">
      <measures option="include">
         r_ex_demoa, r_ex_demob, r_ex_democ
      </measures>
      <positionMap dim="sku">
         <positions>sku_10000010, sku_10000008</positions>
         <positions>sku_22200001, sku_22200002</positions>
      </positionMap>
   </copy>
</rpas>
Table 5-2 XML Input File Settings
| Section | Attribute | Description | Required | Format |
|---|---|---|---|---|
|
copy |
Settings for copying operation. |
Yes |
||
|
copy |
removeSource |
Removes source data slices after copying. |
Yes |
True or False |
|
measures |
A list of measures. |
No |
Comma-delimited measure names |
|
|
measures |
option |
The measure list is inclusive or exclusive. |
Yes, if the measures section exists. |
Include or Exclude |
|
positionMap |
Position mapping for the copying operation. |
Yes |
||
|
positionMap |
dim |
The dimension of the mapped positions. |
Yes |
Dimension name |
|
positions |
Two positions. The first one is the position to copy from. The second one is the position to copy to. |
Yes |
Comma-delimited |
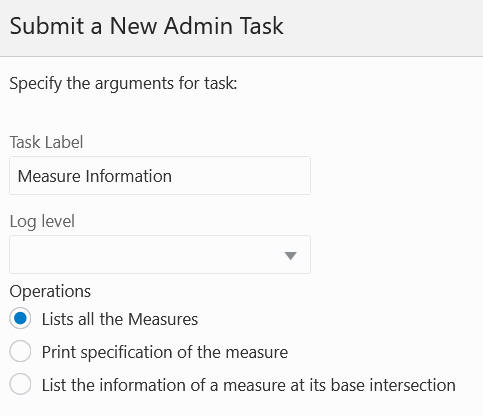
The Measure Information task is used to print measure information on the measure to log.
List All the Measures
This returns a list of all registered measures in the application.
Print Specification of the Measure
When the user selects this and clicks Next, the wizard page used to specify the measure to print is displayed.
List the Information of a Measure at its Base Intersection
This lists the number of dimensions, logical size, populated size, and density of a measure at its base intersection. When the user selects this and clicks Next, the wizard page used to enter additional arguments is displayed.
This task can be used to purge the completed OAT tasks from the Task Status Dashboard.
Figure 5-43 Purge Tasks from Task Status Dashboard
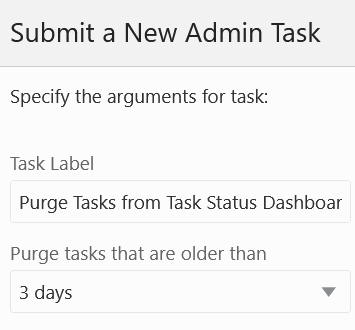
Purge Tasks That are Older Than
This option is used to specify the age at which to purge tasks. It can remove all or remove only those older than 3, 5, or 7 days.
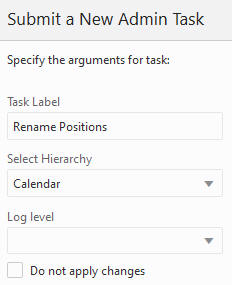
The Rename Positions task is used to change the name of one or more positions. Positions that are to be renamed must be included in a hierarchy data file. After the hierarchy data files have been updated and placed in the designated location, an administrator must run the Rename Positions utility.
Hierarchy Name
This indicates the hierarchy for which positions are being renamed.
Do Not Apply Changes
This reports which changes are applied, but it does not apply the changes. A dry run still generates a log file.
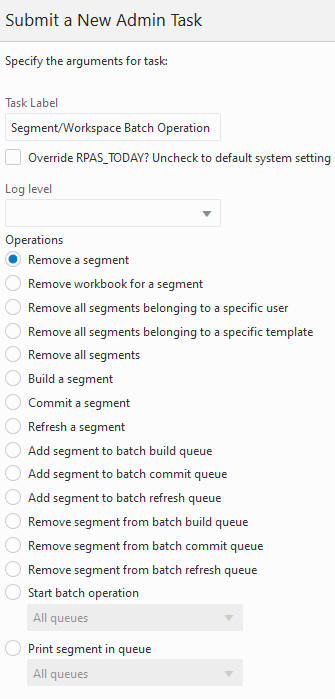
The Segment/Workspace Batch Operation task is used by the administrator to perform the following operations:
Remove a segment
Remove the workbook for a segment
Remove all segments belonging to a specific user
Remove all segments belonging to a specific template
Remove all segments
Build a Segment
Commit a segment
Refresh a segment
Add a segment to the batch build queue
Add a segment to the batch commit queue
Add a segment to the batch refresh queue
Remove a segment from the batch build queue
Remove a segment from the batch commit queue
Remove a segment from the batch refresh queue
Start a batch operation
Print a segment in a queue
Figure 5-45 Segment/Workspace Batch Operation Task
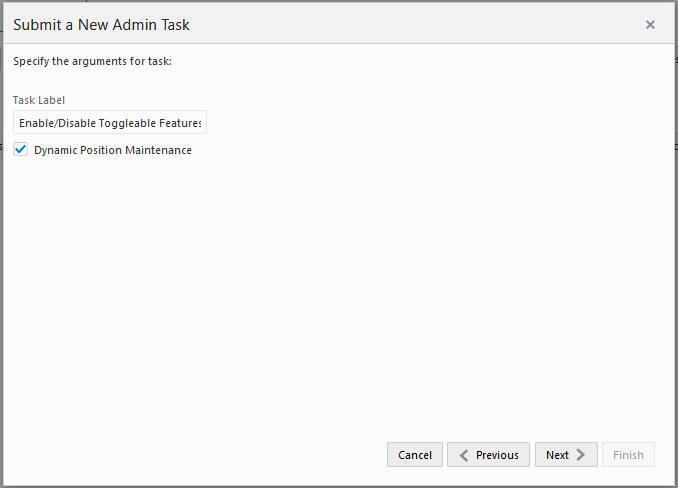
This task can be used to enable or disable certain RPASCE features. The current state of these features can be determined from the state of the check boxes on the screen. For example, the feature dynamic position maintenance (DPM) is enabled by default for most applications. Users can disable this feature and later re-enable it by using the check box next to the feature name and submitting this OAT task.
Dynamic Position Maintenance
Use this feature to create hierarchy positions from workspaces in the UI. The workspace template must be configured correctly to use DPM for this feature to work. For more information, see Oracle Retail Predictive Application Server Configuration Tools User Guide.
Atomic User Management
This feature is not reversible and cannot be disabled.
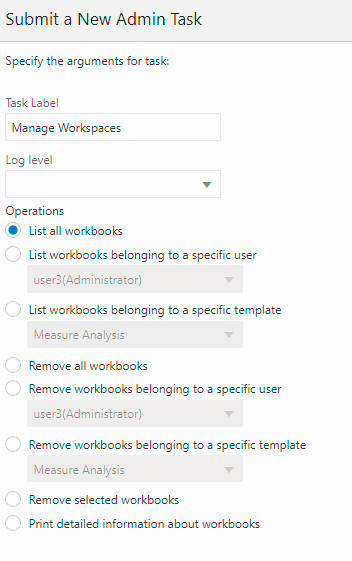
The Manage Workspaces task is use to inspect and remove existing workbooks.
Task Label
This is the label for the task.
Log Level
This is the log level for the task.
List All Workbooks
This lists workbooks in the application. This also has an option to show segment labels.
List Workbooks Belonging to a Specific User
This lists workbooks in the application belonging to a specific user. This also has an option to show segment labels.
List Workbooks Belonging to a Specific Template
This lists all workbooks in the application belonging to a specific template. This option can also be filtered based on users. This also has an option to show segment labels.
Remove All Workbooks
This removes all workbooks in the application. This also has an option to remove the segment. If this check box is selected, in addition to the workspace, the associated segment will also be removed.
Remove Workbooks Belonging to a Specific User
This removes workbooks from the application belonging to a specific user. This also has an option to remove the segment. If this check box is selected, in addition to the workspace, the associated segment will also be removed.
Remove Workbooks Belonging to a Specific Template
This removes all workbooks from the application belonging to a specific template. This option can also filter based on users. This also has an option to remove the segment. If this check box is selected, in addition to the workspace, the associated segment will also be removed.
Remove Selected Workbooks
This argument removes only the workbooks selected from the list. This argument also has an option to remove segments.
Print Detailed Information about Workbooks
This prints detailed information about workbooks selected from the list.
|
Note: Removing the workbook from the application will always report success in OAT. If any workbook is open, it skips that workbook deletion and continues to delete the other workbooks. This functionality prevents the task from failing on the first failure to delete the workbook. Be sure to always check the log files after the task is completed. |
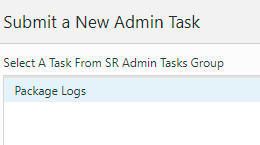
This section lists the tasks for the task group called "SR Admin Tasks." This task group covers all the diagnostic tasks and the operations and arguments specific to them. These tasks are based on the existing RPASCE utilities. The output from these tasks are used for diagnostic purposes.
These operations are supported as part of diagnostic tasks:
Package Logs
Figure 5-48 Service Request Administration Tasks
The Package Logs task create packages at a predetermined location on the back-end server that is identified by the application property, r_oat_sr_dest. This path must already exist and sufficient permissions granted to RPASCE Daemon for create/update/delete operations. This path must be outside of the RPASCE application and preferably on a separate mount. This path is used exclusively for this SR operation.
Table 5-3 Service Request Administration Task
| Administration Task Name | Administration Task Type | Description |
|---|---|---|
|
copyLogsTask |
Package Logs |
Used to copy the user sessions and OAT task logs and package them into a zip file |
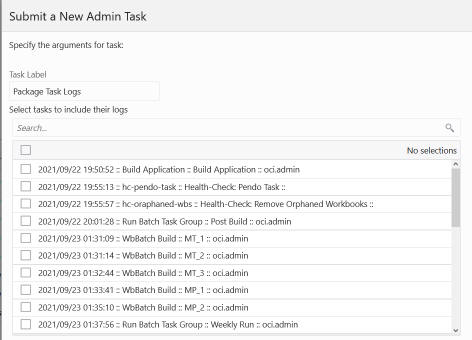
The Package Logs task is used to copy the OAT task logs and package them into a .tar.gzfile. The output package is named as logpackage_task_<timestamp>.tar.gz for OAT tasks logs. Note that the existing package file will be overwritten.
Task Label
This is the label for the task.
Select tasks to include their logs
Logs of the selected tasks are packaged.
|
Note: The log format is logpackage_tasks_<timestamp>.zip. |
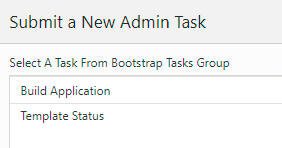
This section lists the tasks for the Bootstrap task group. This task group covers all the tasks that are required to build an application from the configuration. It is also possible to rebuild an existing application using the bootstrap tasks.
Applications override the base RPASCE version of the bootstrap task group with application specific bootstrap tasks. For complete details regarding the setup required for using the base bootstrap tasks that is not application specific, refer to the RPASCE Enterprise Edition Implementation guide. For application-specific bootstrap tasks, refer to the application's documentation. This section briefly describes the RPASCE Enterprise Edition bootstrap tasks and their parameters for quick reference.
Start by selecting the Submit a New Admin Task template that is attached to the bootstrap application. This opens up the screen shown in Figure 5-50. These are the bootstrap tasks that are available.
This task is used to build a new application. An empty application called the bootstrap application is used for building any new applications. Once this bootstrap task is executed, the logs can be found in the task dashboard of the bootstrap application or in the logs folder in the outgoing Object Storage location.
Prior to using this task, make sure the following prerequisites are met:
The configuration has been uploaded to the config folder of the incoming Object Storage location.
Input files have been uploaded to the input folder of the incoming Object Storage location.
Batch control files have been uploaded to the batch_control folder of the incoming Object Storage location.
Java special expression jar files, if required, must be located in the jse area of the Object Storage incoming location.
Figure 5-51 Build Application Task Arguments
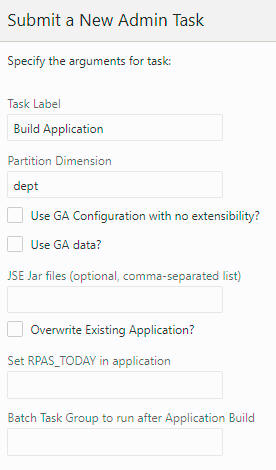
Task Label
This is the label for the task; it can be any string. It is used to identify the task after it is submitted.
Partition Dimension
The dimension on which the application will be partitioned. If it is not provided, dept is the default.
Use GA Configuration with no Extensibility?
If this option is selected, the GA template configuration (no extensibility) will be used.
Use GA Data?
If this option is selected, the GA input data will be used.
JSE jar files (Optional, Comma-Separated)
If any Java Special Expression .jar files are used by the application configuration, they must be indicated here with the .jar file name only. If you are including multiple .jar files, provide a comma-separated list of .jar file names. This field is optional and must be left blank if JSE extensions are not used. If listed, the .jar files named here must be present under jse in the incoming Object Storage location. If the named .jar file(s) are not present, the application build process will halt with an error.
Overwrite Existing Application?
Overwrite the existing application if the application has already been built once. The implementer must rebuild the application from scratch (perhaps because a non-patchable change has been made to the configuration). This option must be selected. If it not selected, then the application build process will halt and report an error, rather than overwrite the existing application.
Set RPAS_TODAY in Application
This option is used to set the PDS property rpas_today.
Batch Task Group to Run After Application Build
Once an application has been built successfully, a named group of batch operations may be specified (typically including measure data loads and mace calculations). This operation sequence must be one batch_type entry in the Batch Exec control file, batch_ exec_list.txt. (For details, see the Oracle Retail Predictive Application Server Cloud Edition Implementation Guide.)
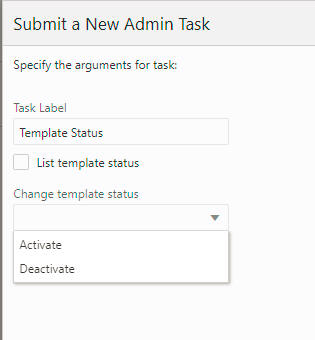
This task is used to switch the application from template to EE or vice versa and perform the actions that must be done upon switching.
Task Label
This is the label for the task.
List Template Status
This option displays the current template status: activated or deactivated.
Change Template Status
This option is used to change the template status. If Activate is selected, the extensible template will be used. If Deactivate is selected, EE will be used.
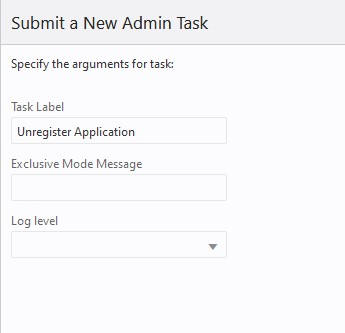
The Unregister Application task is used to undo the steps completed by the Build Application task and take the system back to a bootstrap state. From the bootstrap state, the application can then be built again. If multiple applications are registered, then only one of the applications can be unregistered. This will push only the unregistered application into the bootstrap state, and it can be built again.The other applications will stay in the built state. The bootstrap state is a state that contains only the foundation for building applications.
Task Label
This is the label for the task; it can be any string. It is used to identify the task after it is submitted.
Exclusive Mode Message
Since this task requires offline level access to the application, the message entered here is shown when non-administration users try to log in or when administration users try to interact with the application.
Log Level
The drop-down list in this option is used to indicate the level of detail in the logs.
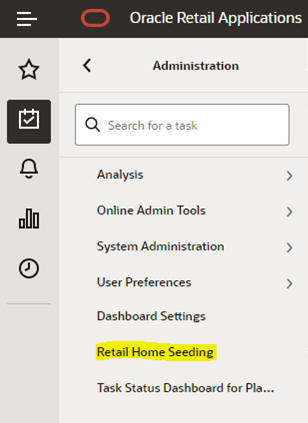
The Retail Home Seeding task is used to create custom Retail Home content for EE solutions. GA RPASCE solutions provide a default configuration for Retail Home content. However, EE solutions will often require custom configuration to support that solution's content in Retail Home.
This task consists of the following two steps:
Create a Retail Home configuration to define what content must be displayed within Retail Home.
Upload the Retail Home configuration and apply its content to the Retail Home system.
The process of creating the Retail Home configuration is similar to the creation of the RPASCE Dashboard configuration. The task is performed within the Configuration Tools and results in the creation of two files: RetailHomeConfig.json, which contains the configuration settings, and RHResources.properties, which contains the keys required to localize the strings displayed in the Retail Home content for the solution.
For information on the process of creating a Retail Home configuration file using the Configuration Tools, see the "Deployment Tool - Retail Home Dashboard Settings" and "Retail Home Translation Resources" sections in Chapter 11 of the Oracle Retail Predictive Application Server Cloud Edition Configuration Tools User Guide.
The process of applying custom Retail Home content is performed from the Admin Tasks of the application. The process for updating Retail Home with configured content consists of the following two steps:
Upload both the RetailHomeConfig.json and the RHResources.properties file to Object Storage under prefix planning/<SubNamespace>/incoming/config
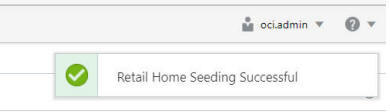
Run Retail Home Seeding as shown in Figure 5-54 and Figure 5-55. This task does not require any arguments. A message indicating success or failure will be returned upon completion of task.
Figure 5-55 Retail Home Confirmation Message
Optionally, one or more sets of required application-specific administration tasks can be set up. These tasks are outside the scope of this document and are covered in the application-specific administration guides.
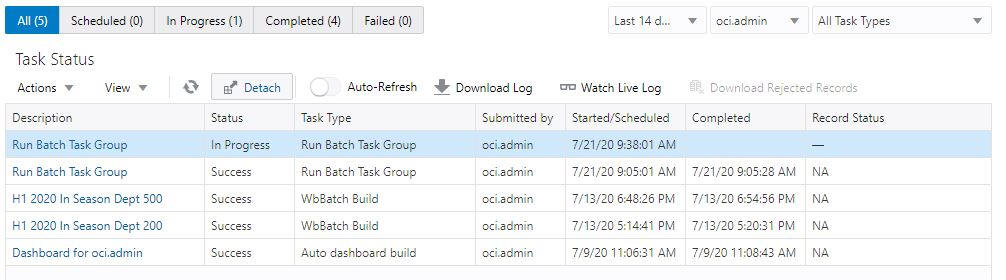
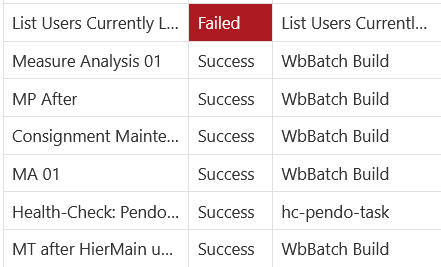
The Task Status Dashboard provides an interface that can be used to monitor the status of the tasks and download the log file when a task is completed. It allows the user to filter the submitted tasks by type, owner, or time. The status tiles show the percentage of tasks in that status and also act as a filter if the user clicks on them. The job name will become a hyperlink to the log file once the task is completed.
Figure 5-56 Accessing Task Status Dashboard
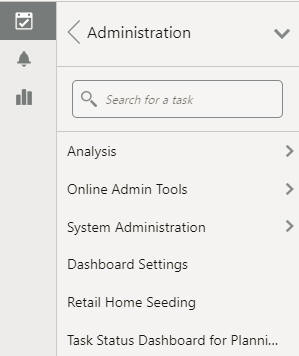
It can be accessed from the menu by clicking Administration -> Task Status Dashboard for Planning Data Store.
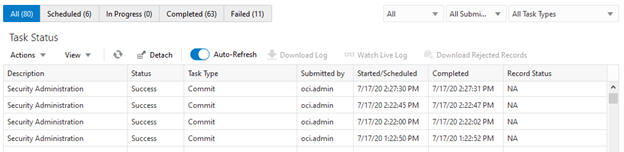
The Status Dashboard displays the details of all or some administration tasks, based on the filters that are applied. Logs are available for each task.
The following data is displayed in the dashboard.
Description
This represents the task label provided by the user. You can use this field to differentiate between the various jobs that have been submitted or scheduled. For example, application Information is a task in the Online Administration Tool. You can schedule this task to run daily and assign the task label Information Daily to it. At the same time, you can schedule the same task to run weekly and assign the task label application Information Weekly to it.
Status
This represents the status of the task. The possible status values are Success, Failure, In Progress, Scheduled, and Pending. If the task fails, a message link is also provided that shows the failure message when you hover over the status field.
Task Type
This represents the name of the task. The name is unique for the task type. All labels are pre-defined and cannot be changed by the user.
Submitted by
This represents the login name of the user who submitted the task.
Started/Scheduled
This represents the time when the submitted started. The time displayed is in the time zone of the browser.
Completed
This represents the time when the task was completed or ended. If the status of a task is either In Progress or Scheduled, then this field is left blank. The time displayed is in the time zone of the browser.
Record Status
This represents the count of rejected records. If any batch steps have records that were rejected due to a validation error, the user will be able to see the count of the rejected records. This field is used only by the tasks that load dimension or fact data. The rejected records are visible at the child level and the sub-child level. The user can select the level in the UI and click the download Rejected Record button to download the set of rejected records for that level.
This section describes other dashboard options.
Sorting
The task list can be sorted by any column, with the exception of the Output column, by using the Sort Ascending and Sort Descending arrows that are visible when you hover over the column header.
Filtering
The task list can be filtered by type, owner, or time, using the icons shown in Figure 5-58.
The status tiles in Figure 5-59are also filters that when clicked will cause the task list to only show tasks of that status.
Accessing Logs
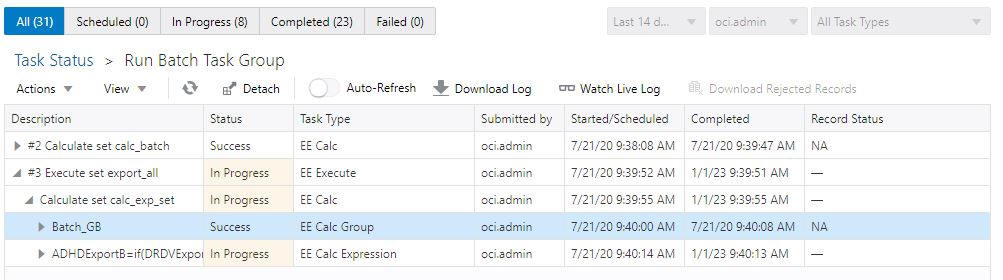
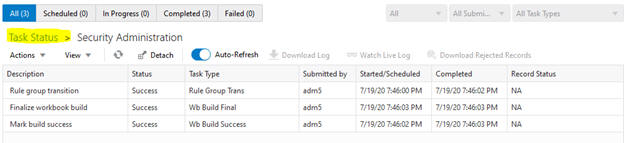
If a task contains subtasks, the description column will contain a hyperlink. Click the hyperlink to open up a new view, which contains only details about that task and it subtasks, as shown in Figure 5-60.
Any subtask of a given task can contain its own subtasks; these are by default collapsed in this view. Click the arrow icon in front of a subtask to expand that subtask and show the next level of subtasks. To collapse the view, click the arrow icon again.
If the task does not have any subtasks when it executed, the Description column will not have a hyperlink, as shown in Figure 5-61.
You can also use the right click menu to access options to expand and collapse subtasks.
Select the task or subtask whose log you want to view. Click Watch live log (highlighted in Figure 5-62) to see the logs in a pop-up window that has navigation buttons. This button can be used even after the task has finished executing.
Optionally, you can download the log by clicking Download Log (highlighted in Figure 5-63). This downloads all the logs of main task and its nested subtasks, if any, in either .zip format or .txt format.
Select a task or subtask and click Download Rejected Records to download rejected records. This button is active for the tasks that have a rejected record count under the Record Status column.
You can use the Auto-Refresh toggle button, shown in Figure 5-64, to automatically refresh the Administration Dashboard.
To return to the task dashboard that has information on all the tasks, click Task Status (highlighted in Figure 5-65).
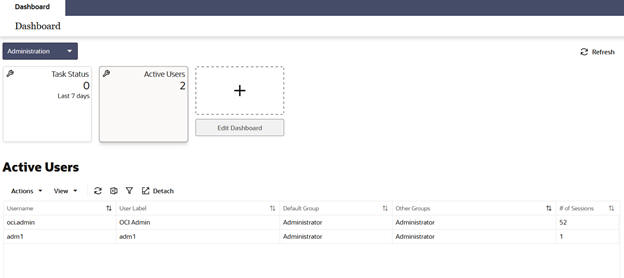
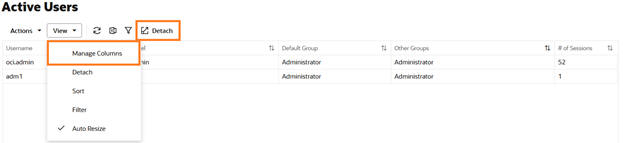
The Active Users dashboard tile, shown in Figure 5-66, provides information on all users currently accessing the application. This information can be used to determine who is currently in the system; an administrator can use this information when notifying users to log out prior to running an administrative task.
The Active Users profile lists all users currently logged into the application. For each active user, the following information is provided.
Logged-in user's name
Logged-in user's label
Logged-in user's default group label
Logged-in user's other groups label
Number of active sessions for the user
The following Active User options are available.
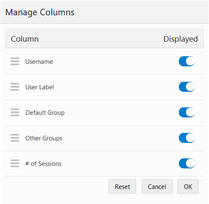
Manage Columns
The Active Users table columns can be managed by using the View menu -> Manage Columns option or from the column header context menu -> Manage Columns option. Administrators can use Manage Columns, shown in Figure 5-67, to hide unwanted columns in the Active Users table.
Detach
The Active Users table can be detached using the toolbar Detach action, using the View menu -> Detach option, or from the column header/row context menu -> Detach option, as shown in Figure 5-68.
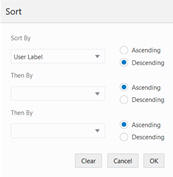
Sorting
The Active Users table can be sorted by any column by using the Sort Ascending and Sort Descending arrows that are visible when you hover over the column header, as shown in Figure 5-69. The Active Users list can also be sorted by using the View menu -> Sort option or from the column header context menu -> Sort option.
Filtering
The Active Users table can be filtered by any columns. The user can also use the View menu -> Filter option or the column header/row context menu -> Filter option to obtain filtered results, as shown in Figure 5-70.
Select All
All of the Active Users table rows can be selected using the Action menu -> Select All option or using the row context menu -> Select All option, as shown in Figure 5-71.
Refresh
The Active Users table data can be reloaded using the refresh toolbar action, from the Action menu -> Refresh option, or from the column header context menu -> Refresh option, as shown in Figure 5-72.
Download Active Users
The user can download the active users' details in the format of an Excel spreadsheet using either the toolbar Download Active Users action or from the Action menu -> Download Active Users option, as shown in Figure 5-73.