| Oracle® Healthcare Precision Medicine Administrator's Guide Release 1.0 E76044-01 |
|
|
PDF · Mobi · ePub |
| Oracle® Healthcare Precision Medicine Administrator's Guide Release 1.0 E76044-01 |
|
|
PDF · Mobi · ePub |
This section describes EMR configuration. It contains the following topics:
You must configure OHPM to successfully integrate with EPIC EMR so that genomic reports can be published to EMR from OHPM. This section describes how to configure EMR.
Multiple EMR integration configurations can be created and maintained in OHPM. However, at any given point in time, only one configuration will remain in the active status. If not, the genomic report will not be published to EMR from OHPM.
Perform the following steps to configure OHPM for EPIC EMR:
Note:
Steps 1 to 4 in the following list should be performed only if EMR configuration was not done during installation.Note down the host name and the TCP/IP or TLS port number where EPIC EMR listens for incoming lab result message.
This TCP/IP or TLS port typically is the EPIC Interconnect HL7 V2 interface that can handle base64 encoded attachments. Although both TCP/IP and TLS are supported in this integration, Oracle strongly recommends that you use TLS since it is more secure.
Get the Certificate Authority (CA) Certificate of the CA that signed the digital certificates used by EPIC TLS.
CA certificates are generally from standard public CAs like Verisign. If EPIC was configured to use a self-signed certificate, then use the local CA certificate employed to sign the certificate request.
Load the CA Certificate into OHPM WebLogic Server's Oracle Platform Security Services (OPSS) keystore. You can do this either:
Grant permission to read the keystore.
Use the EMR Integration Configuration REST service available as part of the OHPM application to configure details required to publish a report to the EMR using the TLS keystore created in the previous step.
The service end point of the EMR Integration Configuration REST service and definition of its payload are as follows:
| HTTP Method | URL | Description |
|---|---|---|
|
GET/DELETE |
http://<host>:<port>/trc/opmemrintegration/resources/opm/api/v1.0/emrconfigservice/emrconfig/{emrId} |
Retrieve or Delete EMR integration configuration for a given EMR ID |
|
GET |
http://<host>:<port>/trc/opmemrintegration/resources/opm/api/v1.0/emrconfigservice/emrconfig/status/{status} |
Retrieve EMR integration configuration for a given status. Status is active A or Inactive I. |
|
POST/PUT |
http://<host>:<port>/trc/opmemrintegration/resources/opm/api/v1.0/emrconfigservice/emrconfig |
Create or Update using the EMRIntegrationConfig payload |
Table 1-2 Definition of Payload
| Field (XML/JSON) | Description | Valid Value Set | Example |
|---|---|---|---|
|
emrIntegrationConfig |
Root Element |
- |
- |
|
createdById |
Created by user ID (automatically populated) |
- |
- |
|
createdOnDt |
Date when record was created (automatically populated) |
- |
- |
|
description |
Description of the EMR |
User defined |
EPIC EMR |
|
emrId |
A unique ID for the configuration. Used to update. |
User defined |
Epic_1 |
|
emrType |
Type of the EMR |
EPIC |
EPIC |
|
integrationHost |
Host name or IP of the remote EMR system for TCP/TLS communication, otherwise NULL |
Remote host name/IP |
remotehost.com |
|
integrationPort |
Port number for TCP/TLS communication, otherwise NULL |
Valid remote host port number |
8088 |
|
integrationUrl |
SOAP/REST URL for SOAP/REST end point, otherwise NULL |
Valid URL |
https://host:7002/epic/fhir/svc |
|
integrationAuthMethod |
Authentication method for calling remote service |
HTTP-BASIC, WS-SECURITY |
HTTP-BASIC |
|
integrationAuthUsername |
Username for HTTB-BASIC and WS-SECURITY. Credentials must be available in OPSS/JPS configuration |
User defined |
testuser |
|
integrationSslKeystore |
OPSS/JPS keystore name in stripe OPMApp. Mandatory when the integration URL starts with https. |
User defined |
castore |
|
messageFormat |
The format of the EMR message to be generated |
HL7V2 |
HL7V2 |
|
messageTemplateLoc |
Location of the template. The default location for EPIC is templates/EPIC_HL7V2.template |
Valid file location |
templates/EPIC_HL7V2.template |
|
receivingApplication |
The name of the application receiving the HL7V2 message. |
User defined |
EPIC |
|
receivingFacility |
The name of the facility receiving the HL7V2 message. |
User defined |
EPIC-LAB |
|
reportTestName |
Test name (code) to represent genomic test result, based on what EMR accepts |
User defined |
GENEîGENOMIC EXAM |
|
rowWid |
Internally generated surrogate primary key |
- |
- |
|
sendingApplication |
The name of the application sending the HL7V2 message. |
User defined |
ORACLE-MI |
|
sendingFacility |
The name of the facility sending the HL7V2 message. |
User defined |
GENETIC-LAB |
|
status |
Status of the configuration record |
A (active), I (inactive) |
A |
|
transportProtocol |
Transport protocol supported by this EMR |
TCP, TLS, SOAP1, SOAP2, REST |
TLS |
Following is a sample XML payload for the REST service to create a TLS connection configuration to EPIC:
<?xml version="1.0" encoding="UTF-8"?>
<emrIntegrationConfig>
   <description>EPIC EMR Configuration</description>
   <emrId>Epic_Id1</emrId>
   <emrType>EPIC</emrType>
   <integrationHost>localhost</integrationHost>
   <integrationPort>8081</integrationPort>
   <integrationSslKeystore>emrtruststore</integrationSslKeystore>
   <messageFormat>HL7V2</messageFormat>
   <messageTemplateLoc>templates/EPIC_HL7V2.template</messageTemplateLoc>
   <receivingApplication>EPIC</receivingApplication>
   <receivingFacility>EPC</receivingFacility>
   <reportTestName>GENOMICîREPORT</reportTestName>
   <sendingApplication>ORACLE-PM</sendingApplication>
   <sendingFacility>ORACLE-PM</sendingFacility>
   <status>A</status>
   <transportProtocol>TLS</transportProtocol>
</emrIntegrationConfig>
Enable publishing the report to EMR. For details, see Section 2.4, "Enabling or Disabling Features Related to External Systems".
You can configure the OPSS keystore using either of the following methods.
This involves the following steps:
Log into WebLogic Enterprise Manager Fusion Middleware Control.
Navigate to WebLogic Domain > Security > Keystore.

Click Create Stripe to create a new stripe named OPMApp.
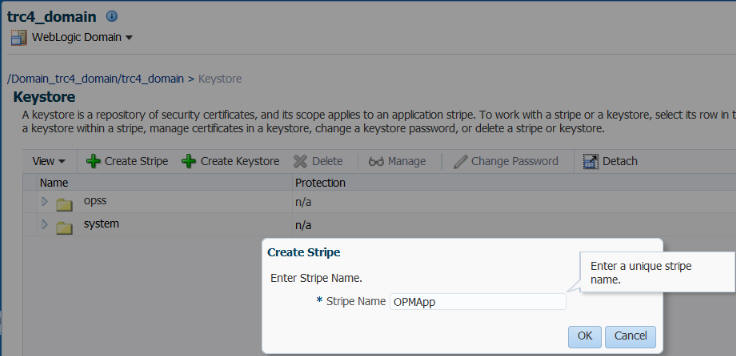
Click OK.
Click Create Keystore.
Create a new keystore that will be used in the EMR integration configuration. For example, emrtruststore.
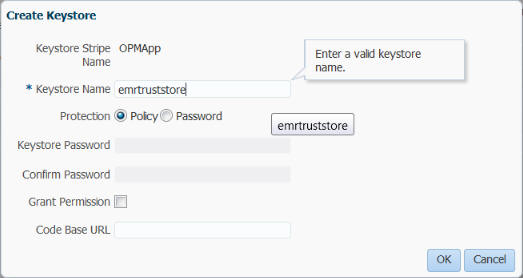
Ensure that Policy is selected for Protection.
Deselect Grant Permission.
Click OK.
For details on creating a keystore, see the section on Creating a Keystore with Fusion Middleware Control in the Oracle® Fusion Middleware Securing Applications with Oracle Platform Security Services available at the following location
https://docs.oracle.com/middleware/1213/idm/app-security/kssadm.htm#CACHHHCH
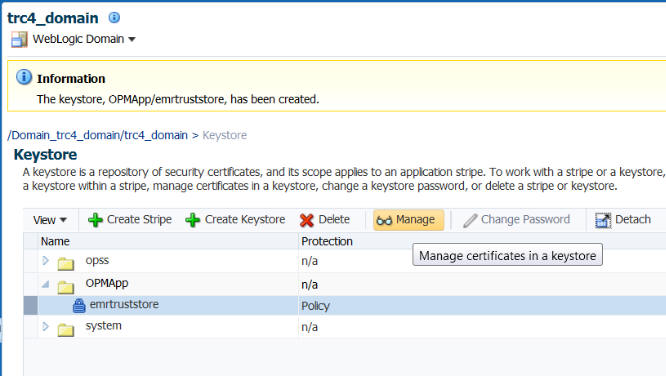
Select the keystore created in the previous step and click Manage.
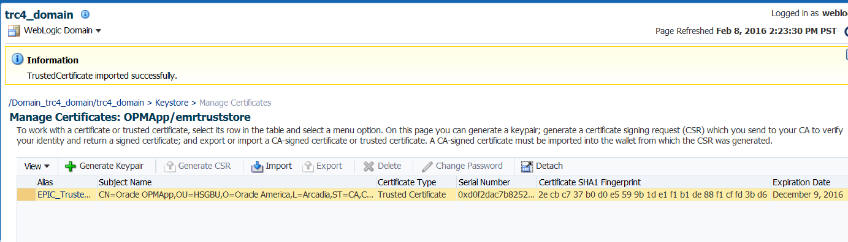
Click Import.
Select the Certificate Type as Trusted Certificate.
Enter an Alias.
You can either browse and select the CA certificate file or copy the certificate content into the text field provided.
Click OK. The CA trusted certificate is successfully added to the keystore.
For details on creating a keystore, see the section on Importing a Certificate or Trusted Certificate with Fusion Middleware Control in the Oracle® Fusion Middleware Securing Applications with Oracle Platform Security Services available at the following location
https://docs.oracle.com/middleware/1213/idm/app-security/kssadm.htm#CACDEAJH
Perform the following steps to configure the OPSS keystore using WLST.
Load the CA Certificate into Oracle Platform Security Services (OPSS) using the WebLogic Scripting Tool (WLST). Use the following commands:
$ cd $MIDDLEWARE_HOME/wlserver/common/bin
$ ./wlst.sh
wls:/offline> connect()
Please enter your username: '<weblogic admin user>'
Please enter your password:'<weblogic admin user password>'
Please enter your server URL [t3://localhost:7001]: '<weblogic admin url>')
wls:/ohpm_domain/serverConfig> svc = getOpssService(name='KeyStoreService')
wls:/ohpm_domain/serverConfig> svc.createKeyStore(appStripe='OPMApp', name='emrtruststore', password='', permission=true)
wls:/ohpm_domain/serverConfig> svc.importKeyStoreCertificate(appStripe='OPMApp', name='emrtruststore', password='', alias='EPIC_Trusted_Cert', keypassword='', type='TrustedCertificate', filepath='<full path to the CA certificate file>')
Perform the following steps to grant permission to use the keystore created in OPSS using WLST.
Connect to weblogic admin server using wlst. Refer above steps for example.
Execute the following wlst command:
grantPermission(appStripe="OPMApp", codeBaseURL='file:${oracle.deployed.app.dir}/OHF-Opm-App${oracle.deployed.app.ext}', permClass="oracle.security.jps.service.keystore.KeyStoreAccessPermission", permTarget="stripeName=OPMApp,keystoreName=emrtruststore,alias=*", permActions="read")
|
Copyright © 2016, Oracle and/or its affiliates. All rights reserved. Legal Notices |
|