| Oracle® Retail Invoice Matching User Guide Release 14.1 E57810-02 |
|

 Previous |
 Next |
Invoices can be loaded through Electronic Data Interchange (EDI), group entry, or single invoice entry. In the Group Entry window, you can manually enter merchandise invoices, non-merchandise invoices, and credit notes.
When you enter document groups, you can define default criteria that apply to multiple invoices. Alternatively, you can enter invoices without applying default information. After you have entered all the invoices in the group, the control quantity should match the calculated quantity, and the control cost should match the calculated cost of the documents you have entered. When the totals match, you can submit the group for approval. After the group is approved, you can begin matching the invoices.
This section includes the following document group instructions:
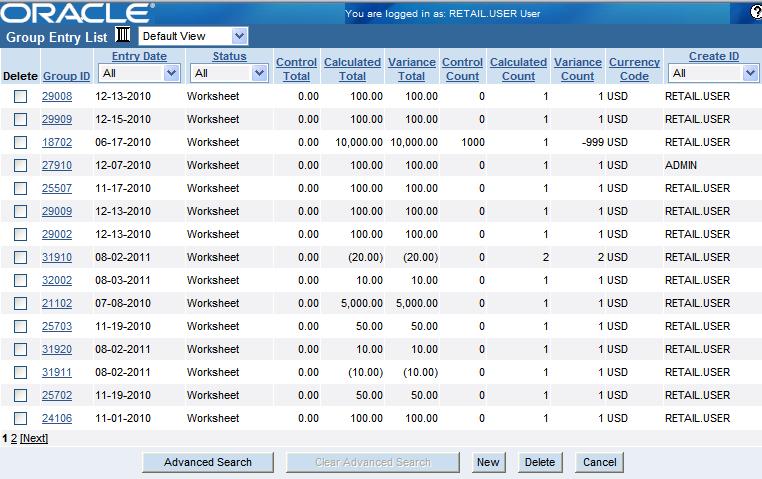
Navigate: In the Document Entry tab, click Group Entry. The Group Entry List window opens.
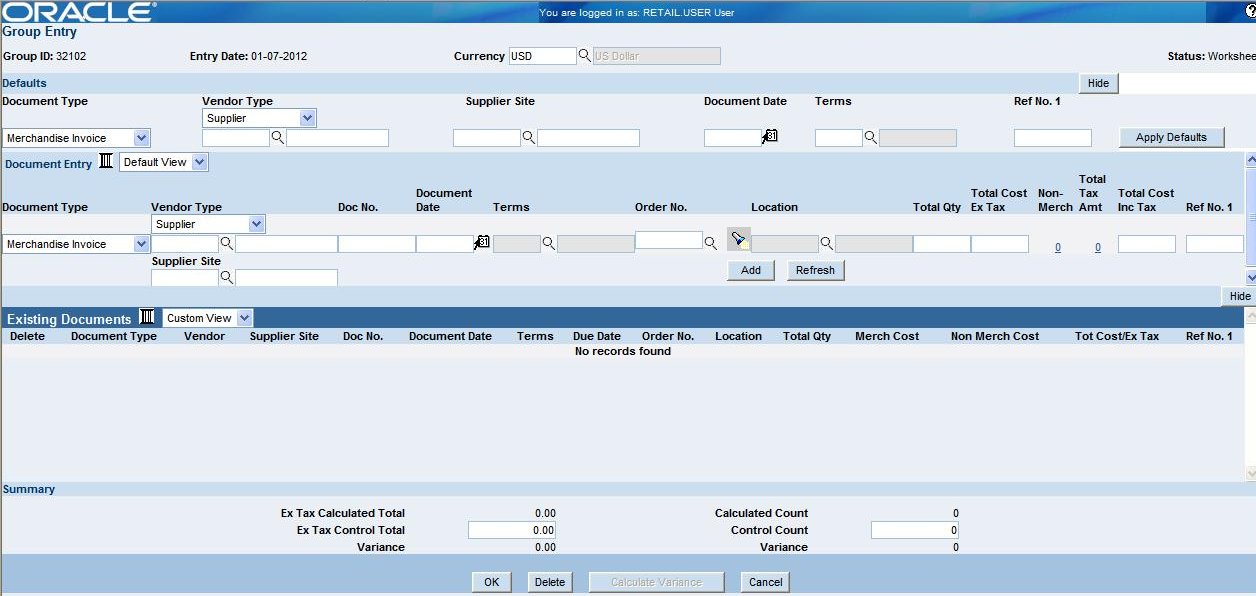
Click New. The Group Entry window opens.
In the Summary area, enter the Control Total and the Control Count for the group you are entering.
|
Note: Click Show to display the available fields in the Defaults area. |
In the Vendor Type field, select the type of vendor that sent you the document.
Enter the vendor ID, or click the LOV button and select the vendor.
In the Document Type field, select the type of document that is being added to the group.
In the Document Date field, enter the date the document was created, or click the calendar button and select the date.
In the Terms field, enter the terms code, or click the LOV button and select the terms.
In the Defaults area click Apply Defaults. The information is added to the Document Entry area.
In the Doc No. field, enter the document ID.
In the Order No. field, enter the purchase order number that is associated with the document.
|
Note: You can search for a purchase order by receipt and location information. |
In the Location field, enter the location ID, or click the LOV button and select a location ID.
In the Total Qty field, enter the total number of items on the document.
In the Total Cost Ex Tax field, enter the total cost on the document.
Complete the document group.
In the Vendor Type field, select the type of vendor that sent you the document.
In the Document Type field, select the type of document that is being added to the group.
Under the Vendor Type field, enter the vendor ID, or click the LOV button and select the vendor.
In the Doc No. field, enter the document ID.
In the Document Date field, enter the date the document was created, or click the calendar button and select the date.
In the Terms field, enter the terms code, or click the LOV button and select the terms.
In the Order No. field, enter the purchase order number that is associated with the document.
In the Location field, enter the location ID, or click the LOV button and select a location ID.
In the Total Qty field, enter the total number of items on the document.
In the Total Cost Ex Tax field, enter the total cost on the document.
Complete the document group.
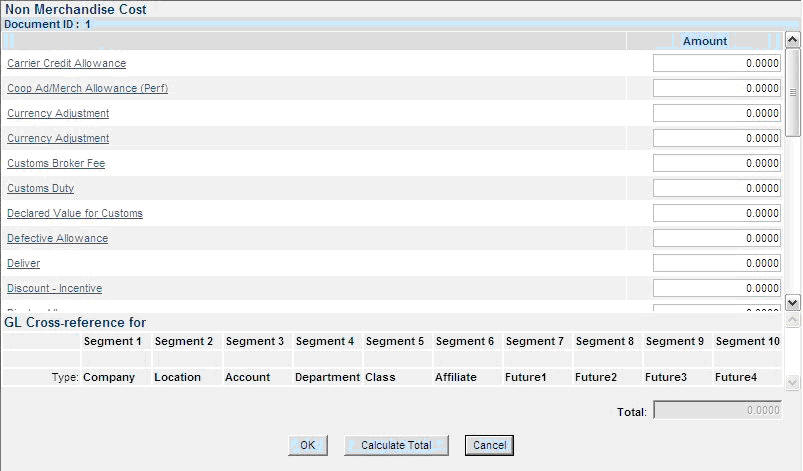
Add non-merchandise costs as necessary.
In the Document Entry area, click the amount in the Non-Merch field. The Non-Merchandise Cost window opens.
In the non merchandise fields, enter the appropriate charges.
In the Tax Code - Rate field, select the appropriate tax information for the non-merchandise charge.
Click Calculate Total. The sum of the non-merchandise costs appears in the Total field.
Click OK to save your changes and close the window.
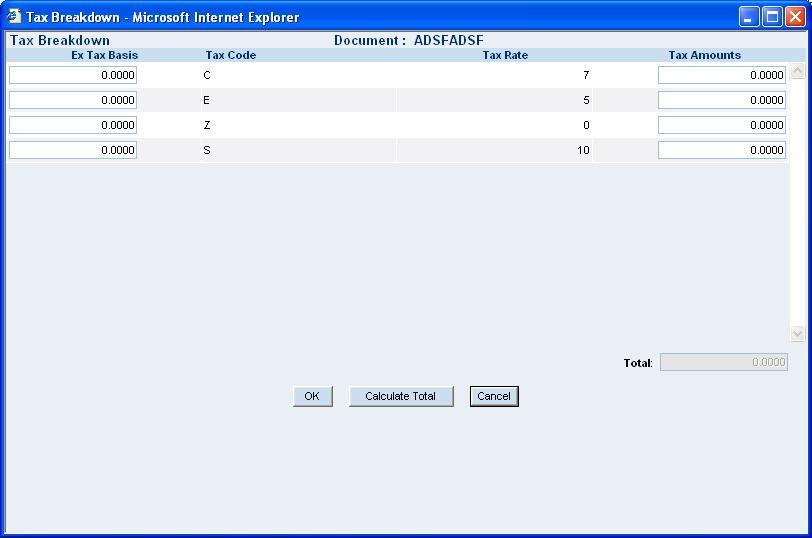
Add the invoice tax cost.
In the Document Entry area, click the amount in the Total Tax Amt field. The Tax Breakdown window opens.
Enter either of the following:
In the Ex Tax Basis column, enter the amount on the invoice that is subject to Tax. The Tax Amount is calculated.
In the Tax Amounts column, enter the tax amount. The Ex Tax Basis is calculated.
Click Calculate Total. The amount of Tax appears in the total field.
Click Add. The document is added to the Existing Documents area.
Click Calculate Variance. The remaining variance appears.
Continue adding documents until the totals and counts have no variance.
Click OK to submit the group for matching. You return to the Group Entry List window.
Navigate: In the Document Entry tab, click Group Entry. The Group Entry List window opens.
To search for a document group:
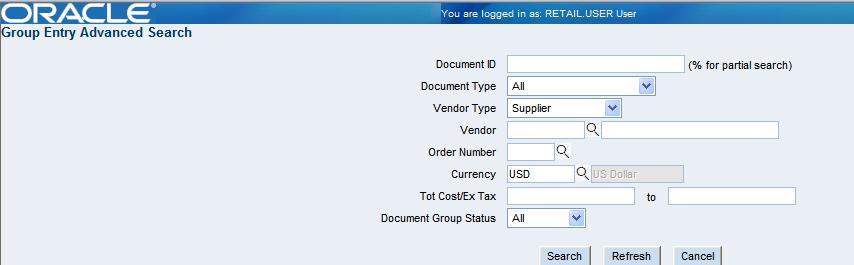
Click Advanced Search. The Group Entry Advanced Search window opens.
Enter the criteria to restrict your search.
Click Search. The Group Entry List window opens.
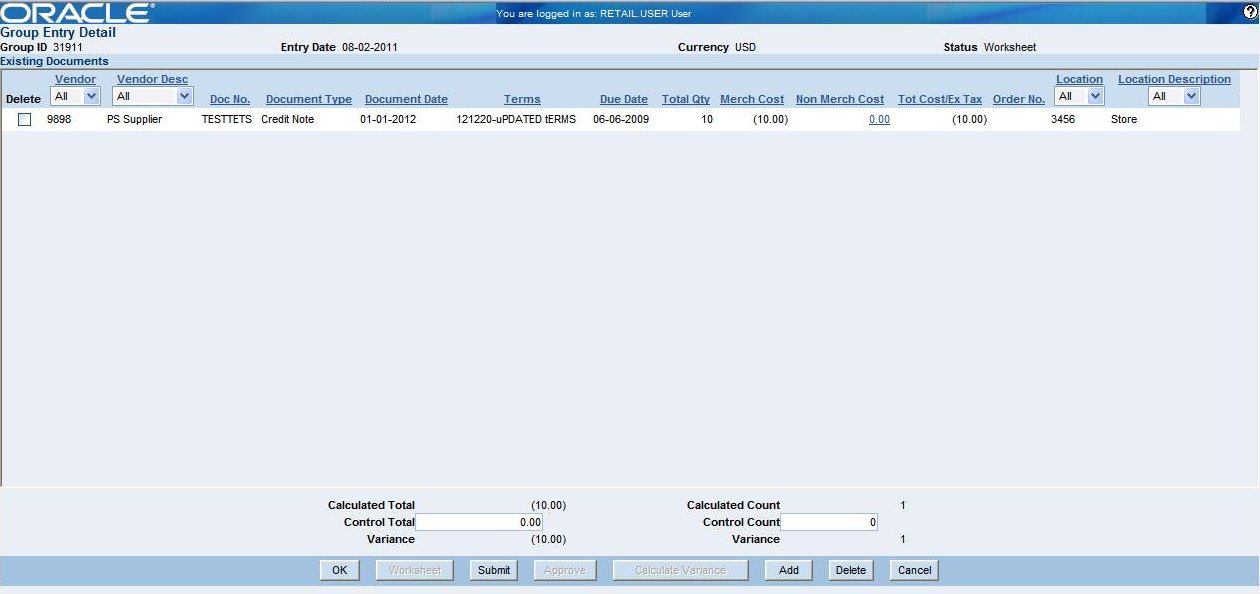
In the Group ID column, click a group ID. The Group Entry Detail window opens.
To make changes to the document group, click Worksheet. You are prompted to confirm the status change.
Click OK. The document group status is changed to worksheet.
Click Add. The Group Entry window opens.
Add documents as necessary.
Delete documents from the document group as necessary:
In the Delete column, select the invoice you are deleting.
Click Delete. You are prompted to confirm the deletion.
Click OK. The invoice is deleted from the system.
Click OK to submit the group for matching. The Group Entry List window opens.
Navigate: In the Document Entry tab, click Group Entry. The Group Entry Detail window opens.
In the Delete column, select the document group you want to delete.
Click Delete. You are prompted to confirm the deletion.
Click OK. The document group is deleted from the system.
Click Cancel to close the window and save your changes.
Navigate: In the Document Entry tab, click Group Entry. The Group Entry List window opens.
|
Note: Note: Once you have approved a document group, you can no longer make changes to it. |
In the Group ID column, click the group ID of a document group that has a status of Submitted. The Group Entry Detail window opens.
Click Approve. You are prompted to confirm the document group's approval.
Click OK. You are returned to the Group Entry List window.
Click Cancel to close the window and save your changes.
An invoice or document can be entered into ReIM through EDI, manually, or group entry. A purchase order (PO) number is required for all invoices. In some cases, vendors do not record purchase order numbers on their invoices. To enter a purchase order for an invoice, you can search for a purchase order number.
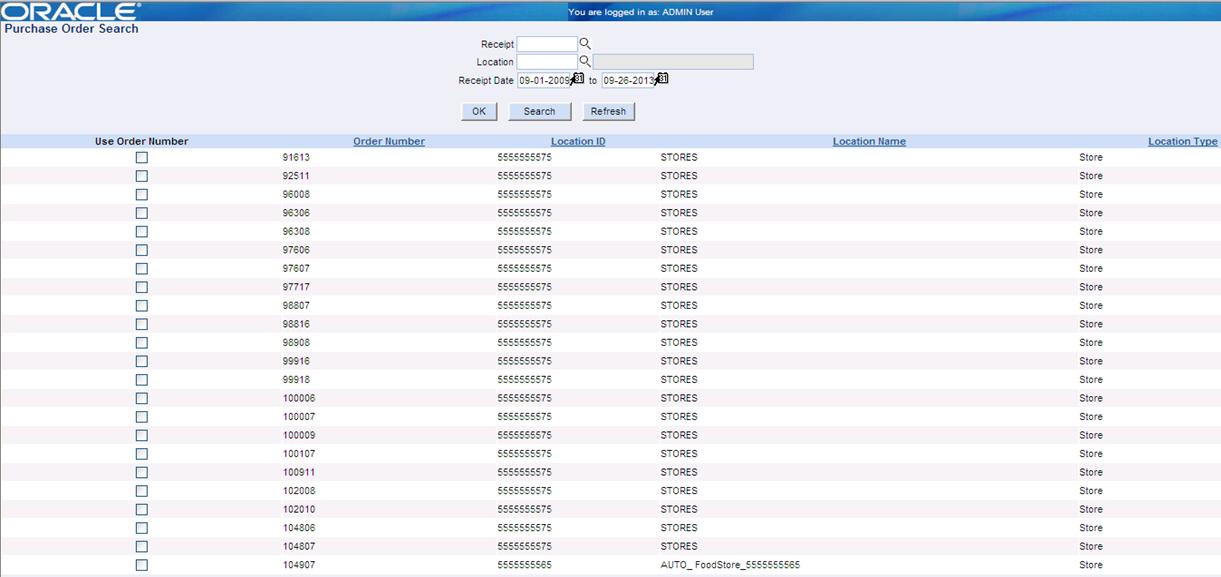
Click Search. The Purchase Order Search window opens.
|
Note: You must use at least one search criterion, but you do not have to use all three criteria. |
In the Receipt field, enter the receipt order with which the purchase order is associated, or click the LOV button and select a receipt.
In the Location field, enter the location ID of the location with which the purchase order is associated, or click the LOV button and select a location.
In the date fields, enter the dates for which receipts were received against the purchase order, or click the calendar button and select dates.
Receipt Date: Enter a Receipt Date to search for receipts containing a receipt date that is greater than or equal to the date entered.
To Date: Enter a To Date value to search for receipts with a receipt date that is less than or equal to the date entered.
Receipt Date and To Date: Enter a Receipt Date and a To Date to limit the search to receipts containing a receipt date that is greater than or equal to the receipt date and less than or equal to the to date.
Click Search. Purchase orders that match the criteria are displayed in the table.
In the Use Order Number field, select the check box of the order you want to use.
Click OK. The purchase order is displayed in the appropriate field.
Invoices can be loaded through Electronic Data Interchange (EDI), group entry, and single invoice entry. The majority of invoices are sent to Invoice Matching through EDI. When the data on the invoices can be verified, the invoices are ready to match. If the data cannot be verified, you must manually correct the inaccurate data on each invoice.
In the EDI Maintenance window, you can update invoice data for invoices that were uploaded with inaccurate data. You can correct the invoices one at a time, or you can correct the order number or item number on multiple invoices. If you correct the order number or item number for all invoices, all invoices with the old value are updated with the new value.
This section includes the following EDI instructions:
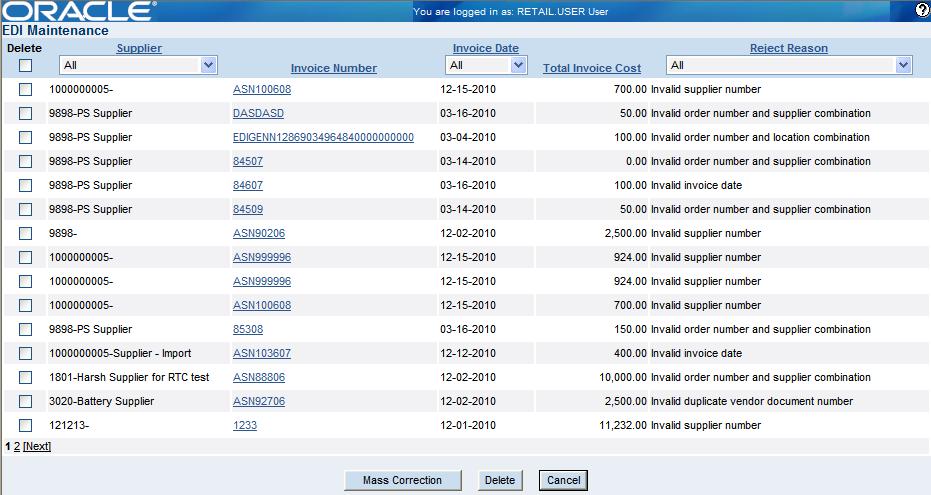
Navigate: In the Document Entry tab, click EDI Maintenance. The EDI Maintenance window opens.
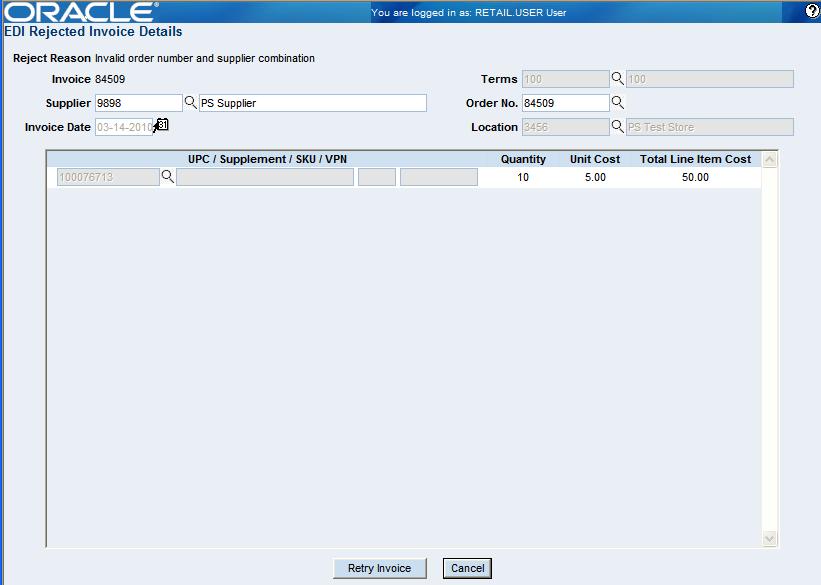
In the Invoice Number column, click an invoice number. The EDI Rejected Invoice Details window opens.
The fields that must be edited are enabled.
To select a different supplier, in the Supplier field, enter the correct supplier ID, or click the LOV button and select a supplier.
To select a different invoice date, in the Invoice Date field, enter the correct invoice date, or click the calendar button and select an invoice date.
To select different terms, in the Terms field, enter the correct term ID, or click the LOV button and select a term.
To select a different order number, in the Order No. field, enter the correct order number, or click the LOV button and select an order number.
To select a different location, in the Location field, enter the correct location, or click the LOV button and select a location.
To select a different UPC, on the table in the UPC/Supplement/SKU field, enter the correct UPC, or click the LOV button and select a UPC.
Click Retry Invoice. You are returned to the EDI Maintenance window.
|
Note: If there are still errors in the invoice, you must repeat the procedure until clicking Retry Invoice returns you to the EDI Maintenance window. |
Click Cancel to save your changes and close the window.
Navigate: In the Document Entry tab, click EDI Maintenance. The EDI Maintenance window opens.
In the Delete column, select the check box to the left of the invoice you are deleting.
|
Note: To select all of the invoices, select the check box in the header area. |
Click Delete. You are prompted to confirm the deletion.
Click OK. The invoice is deleted.
Click Cancel to close the window and save your changes.
Navigate: In the Document Entry tab, click EDI Maintenance. The EDI Maintenance window opens.
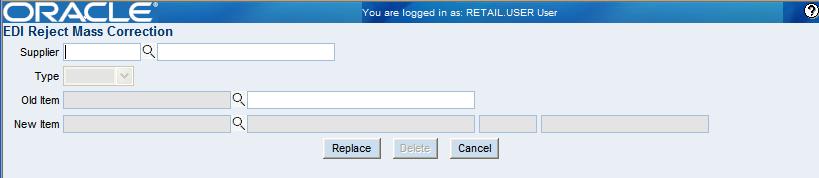
Click Mass Correction. The EDI Reject Mass Correction window opens.
In the Supplier field, enter the supplier ID, or click the LOV button and select a supplier.
In the Type field, select the type of change you are making (item ID or an order ID).
In the Old field, enter the ID of the order or item that is being replaced.
In the New field, enter the ID of the order or item you are replacing.
Click Replace to save your changes and close the window.
Navigate: In the Document Entry tab, click EDI Maintenance. The EDI Maintenance window opens.
Click Mass Correction. The EDI Reject Mass Correction window opens.
In the Supplier field, enter the supplier ID, or click the LOV button and select a supplier.
In the Type field, select Order.
|
Note: You can only delete orders. |
In the Old Order field, enter the order ID, or click the LOV button and select the order that is being deleted.
Click Delete. You are prompted to complete the deletion.
Click OK. You return to the EDI Maintenance window.
Click Cancel to return to the main menu.
The parent invoice windows allow you take an invoice with multiple locations and simplify the invoice by splitting it into multiple invoices, each for a single location. An invoice with multiple locations (a parent invoice) cannot begin any matching process until it is split out into the single locations (child invoices). When you are splitting an invoice with multiple locations, you must assign the total cost and total quantity to the single locations before you can save your changes.
This section includes the following invoice splitting instructions:
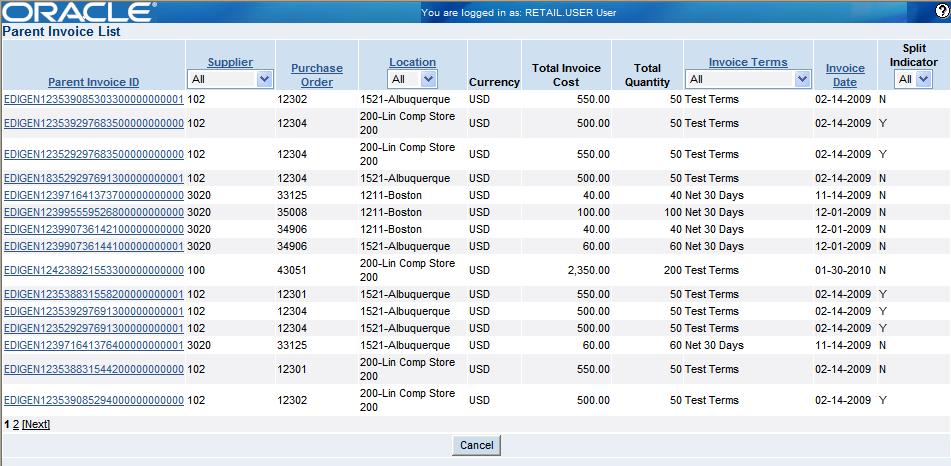
Navigate: In the Document Entry tab, click Parent Invoice List. The Parent Invoice List window opens.
In the Parent Invoice ID column, click an invoice number. The Parent Invoice Header window opens.
|
Note: To begin splitting an invoice, select an invoice that has an N in the Split Indicator column. |
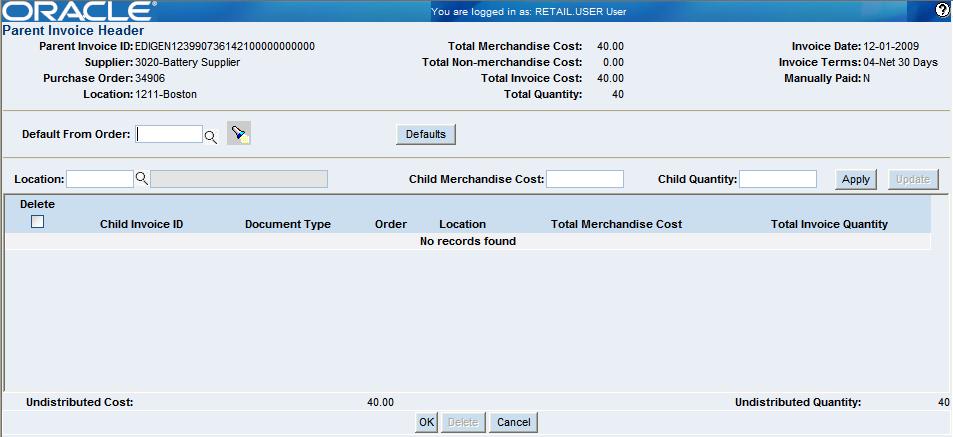
In the Location field, enter the location ID, or click the LOV button and select the location.
In the Child Merchandise Cost field, enter the monetary amount that should be allocated to the child invoice.
In the Child Quantity field, enter the number of items that should be allocated to the child invoice.
Click Apply. The results are displayed in the table.
In the table, double-click a child invoice. The editable fields above the table are enabled.
Update the enabled fields as necessary.
Click Update.
Navigate: In the Document Entry tab, click Parent Invoice List. The Parent Invoice List window opens.
In the Parent Invoice ID column, click an invoice number. The Parent Invoice Header window opens.
|
Note: To begin splitting an invoice into single locations, select an invoice that has a N in the Split Indicator column. |
In the Default From Order field, enter the purchase order number, or click the LOV button and select a purchase order.
|
Note: You can search for a purchase order by receipt and location information. |
Click Defaults. The location, merchandise cost, and quantity as assigned on the purchase order are displayed in the table.
Add, edit, and delete child invoices as necessary.
Complete the distribution.
Navigate: In the Document Entry tab, click Parent Invoice List. The Parent Invoice List window opens.
In the Parent Invoice ID column, click an invoice number. The Parent Invoice Header window opens.
|
Note: To begin splitting an invoice into single locations, select an invoice that has a N in the Split Indicator column. |
Add all child invoices to the parent invoice header.
|
Note: You must completely distribute the total cost and total quantity of a parent invoice before you add details to the child invoice. |
In the Child Invoice ID field, click the child invoice ID. The Child Invoice Detail window opens.
In the Item field, enter the item ID, or click the LOV button and select an item ID.
In the Invoice Qty field, enter the number of units on the invoice.
In the Unit Cost field, enter the cost of one unit of the item.
In the Tax Code - Rate field, select the tax rate that is applied for this invoice
Click Add Item. The item is added to the invoice.
In the table, double-click an item. The editable fields above the table are enabled.
Update the enabled fields as necessary.
Click Update Item.