| Oracle® Retail Invoice Matching User Guide Release 14.1 E57810-02 |
|

 Previous |
 Next |
There are three ways invoices are loaded into the system: EDI, group entry, and single invoice entry. An invoice is the bill for goods or services received from a supplier or partner. A merchandise invoice is a document that a supplier sends to a retailer for merchandise items. A merchandise invoice can also contain additional non-merchandise costs. Because a merchandise invoice must involve items, only suppliers can send merchandise invoices.
In addition, deal bill backs will be available for automatic invoicing sent to the ReIM from the merchandising system. Any non-merchandise invoices resulting from a deal will be created in either Submitted or Approved status, depending on the system setting selected in the merchandising system.
This section includes the following merchandise invoice instructions:
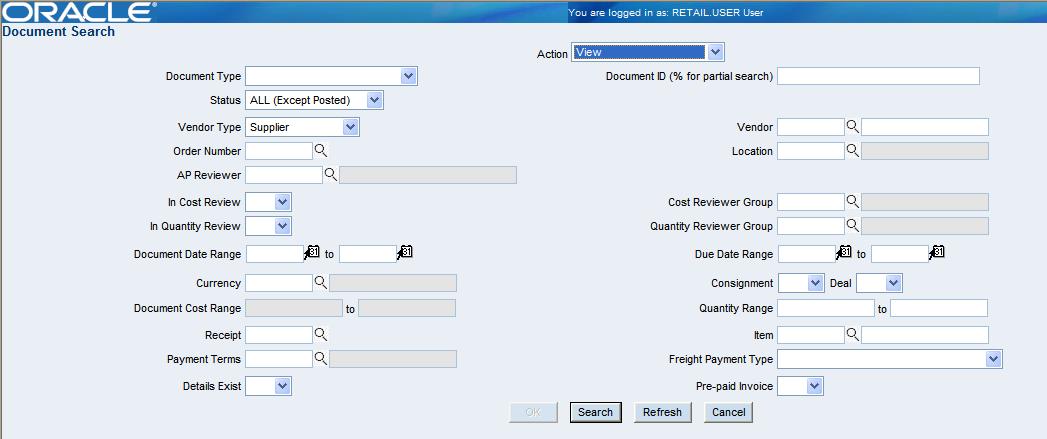
Navigate: In the Document Maintenance tab, click Document Search. The Document Search window opens.
In the Action field, select New.
In the Document Type field, select Merchandise Invoice.
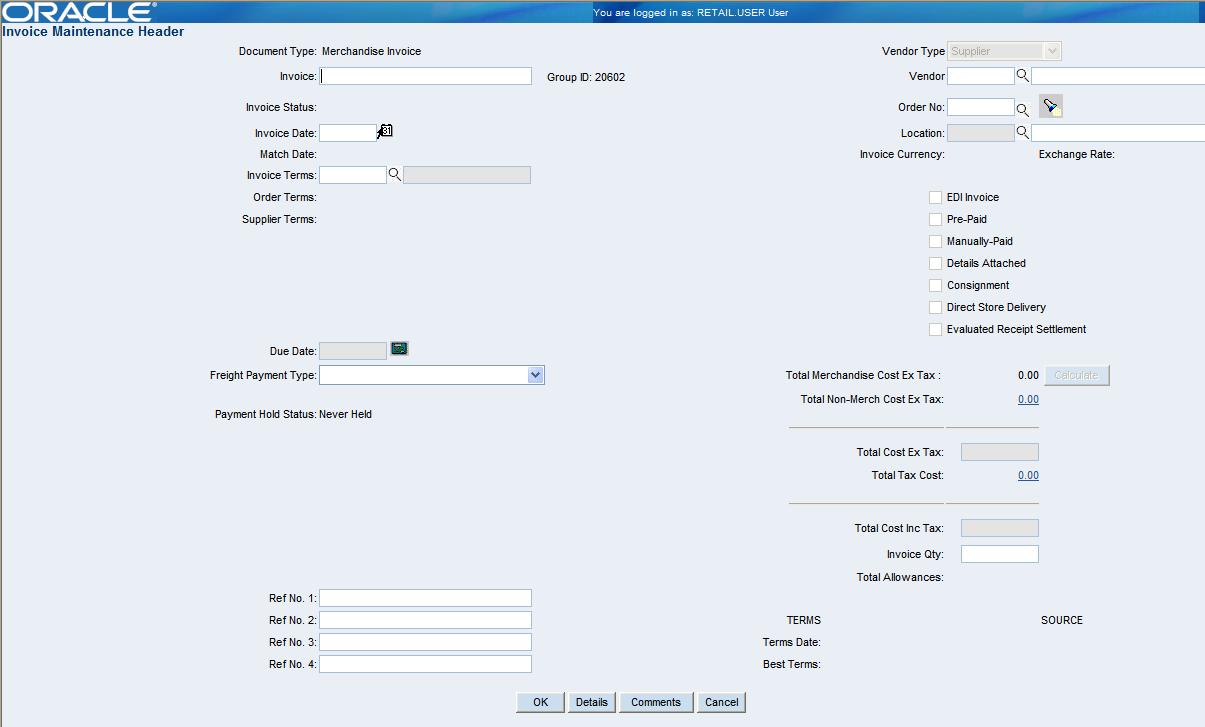
Click OK. The Invoice Maintenance Header window opens.
In the Invoice field, enter the number of the invoice.
In the Vendor field, enter the supplier ID, or click the LOV button and select a supplier. The supplier site field is disabled.
In the Supplier Site field, enter the supplier site ID, or click the LOV button and select a supplier site. The vendor details are populated in the vendor field.
In the Order No. field, enter the purchase order number associated with the invoice, or click the LOV button and select a purchase order.
|
Note: You can search for a purchase order by receipt, receipt date, and location information. |
In the Invoice Date field, enter the date the invoice was created, or click the calendar button and select a date.
In the Location field, enter the location ID, or click the LOV button and select a location.
|
Note: If the Order Number is related to the legal entity, the location LOV will contain the importer ID of the corresponding order. |
To calculate the payment due date, click the calculator button that is to the right of the Due Date field.
In the Total Cost Ex Tax field, enter the total amount of the merchandise and non-merchandise costs of the invoice before tax is applied.
In the Total Cost Inc Tax, enter the total amount of the merchandise and non-merchandise costs of the invoice after tax is applied.
Click Calculate to calculate the total merchandise cost of the invoice.
In the Invoice Qty field, enter the number of items on the invoice.
Add the invoice Tax cost.
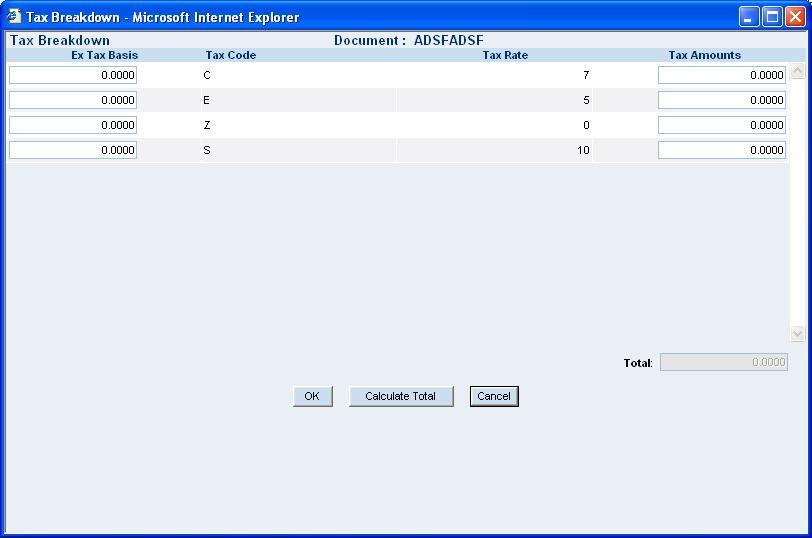
In the Total Tax Cost field, click the amount. The Tax Breakdown window opens.
Enter either of the following:
In the Ex Tax Basis column, enter the amount on the invoice that is subject to Tax. The Tax Amount is calculated.
In the Tax Amounts column, enter the tax amount. The Ex Tax Basis is calculated.
Click Calculate Total. The amount of tax appears in the total field.
Click OK to close the window.
Add non-merchandise costs as necessary.
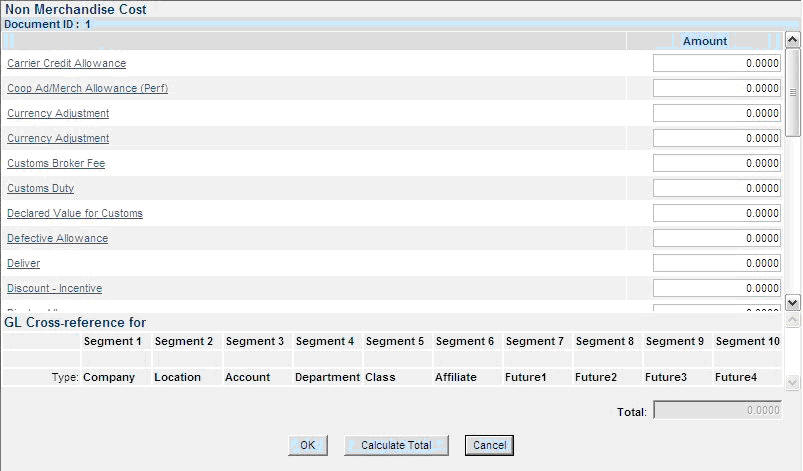
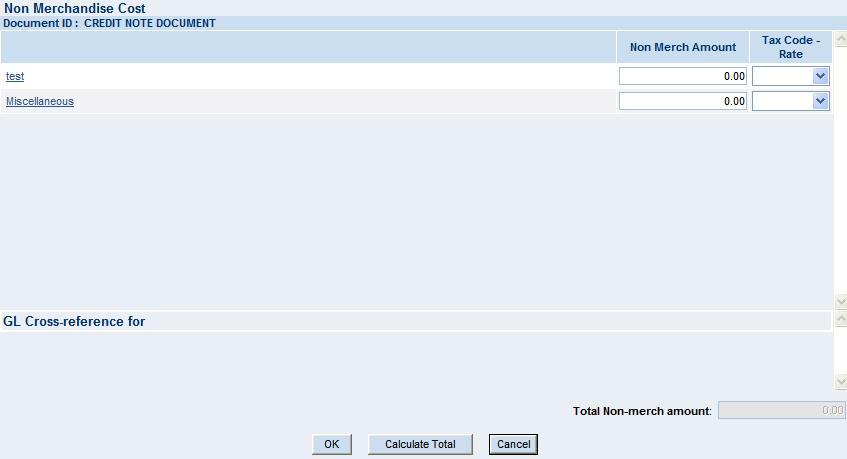
In the Total Non-Merch Cost field, click the amount. The Non-Merchandise Cost window opens.
In the Amount field, enter the appropriate non-merchandise charges.
In the Tax Code - Rate field, select the tax code and rate that is appropriate for each non-merchandise charge.
Click Calculate Total. The sum of the non-merchandise costs appears in the Total field.
Click OK to save your changes and close the window.
Add comments as necessary.
Enter additional information in the enabled fields as necessary.
Navigate: In the Document Maintenance tab, click Document Search. The Document Search window opens.
Create the merchandise invoice header.
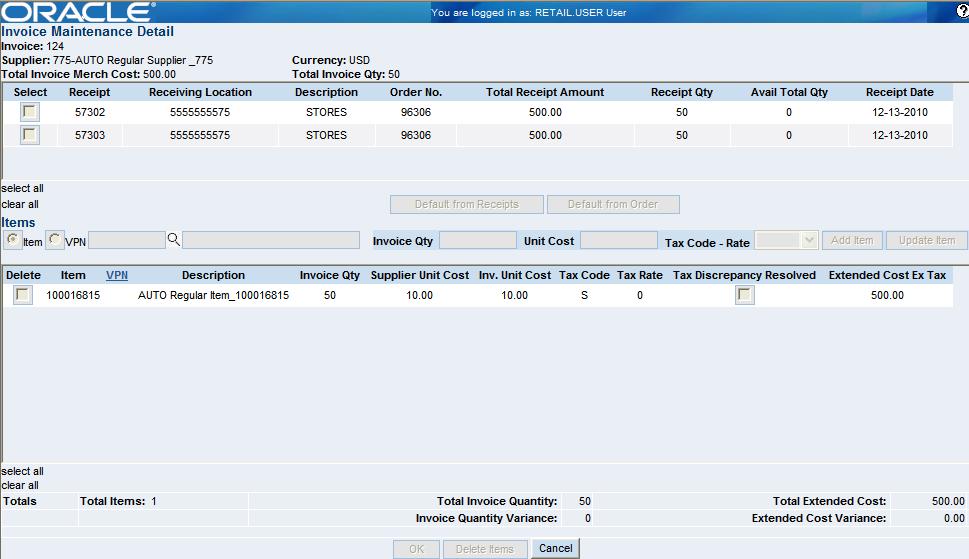
Click Details. The Invoice Maintenance Detail window opens.
Click to select Item, enter the item ID or click on the LOV button and select an item ID. You can also select VPN and enter the VPN number or click on the LOV button and select the VPN number.
In the Invoice Qty field, enter the number of units on the invoice.
In the Unit Cost field, enter the cost of one unit of the item.
Click Add Item. The item is added to the invoice.
In the table, double-click an item. The editable fields above the table are enabled.
Update the enabled fields as necessary.
Click Update Item. The table is updated with the new information.
In the Delete column, select the item you are deleting.
|
Note: To delete all items on the Invoice Maintenance Detail window, click select all. |
Click Delete Items. You are prompted to confirm the deletion.
Click OK. The item is deleted.
Click OK to save the changes and close the Invoice Maintenance Detail window.
Click OK to save the changes and close the Invoice Header Maintenance window.
Navigate: In the Document Maintenance tab, click Document Search. The Document Search window opens.
Create the merchandise invoice header.
Click Details. The Invoice Maintenance Detail window opens.
Click to select VPN and enter the VPN number or click on the LOV button and select the VPN number. The LOV window opens.
Select the required VPN and click on OK to close the LOV window.
Click OK to save the changes and close the Invoice Maintenance Detail window.
Navigate: In the Document Maintenance tab, click Document Search. The Document Search window opens.
Create the merchandise invoice header.
Click Details. The Invoice Maintenance Details window opens.
To default item details from a purchase order, click Default from Order. The item details from the purchase order you assigned to the invoice are displayed in the table.
To default item details from a receipt, click Default from Receipts. The available item details from the receipts you assigned to the invoice are displayed in the table.
Add, edit, and delete items as necessary.
Complete the invoice.
A non-merchandise invoice is a document for non-merchandise costs only. It can be created by a supplier or a partner. Non-merchandise invoices cannot contain a bill for merchandise items.
Navigate: In the Document Maintenance tab, click Document Search. The Document Search window opens.
In the Action field, select New.
In the Document Type field, select Non-Merchandise Invoice.
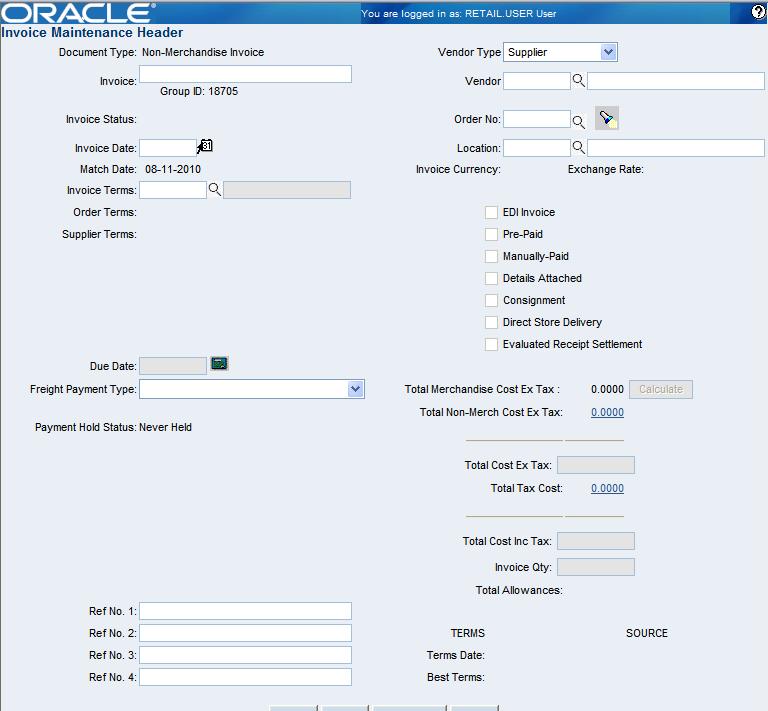
Click OK. The Invoice Maintenance Header window opens.
In the Invoice field, enter the number of the invoice.
In the Vendor Type field, select the type of vendor from whom you are receiving the invoice.
In the Vendor field, enter the vendor ID, or click the LOV button and select a vendor.
In the Location field, enter the location ID, or click the LOV button and select a location
In the Invoice Date field, enter the date the invoice was created, or click the calendar button and select a date.
To calculate the payment due date, click the calculator button found to the right of the Due Date field.
Enter additional information in the enabled fields as necessary.
Add the invoice tax cost.
In the Total Tax Cost field, click the amount. The Tax Breakdown window opens.
Enter either of the following:
In the Ex Tax Basis column, enter the amount on the invoice that is subject to Tax. The Tax Amount is calculated.
In the Tax Amounts column, enter the tax amount. The Ex Tax Basis is calculated.
Click Calculate Total. The tax amount appears in the total field.
Click OK to close the window.
Add non-merchandise costs as necessary.
In the Total Non-Merch Cost field, click the amount. The Non-Merchandise Cost window opens.
In the Amount field, enter the appropriate non-merchandise charges.
In the Tax Code - Rate field, select the tax code and rate that is appropriate for each non-merchandise charge.
Click Calculate Total. The sum of the non-merchandise costs appears in the Total field.
Click OK to save your changes and close the window.
Add comments as necessary.
Click OK to save the changes and close the window.
In the document maintenance window, you can search for an invoice, edit a merchandise invoice, pay an unmatched invoice, or view the details of all documents.
A credit note or a debit memo that is based on a return to vendor (RTV) can be sent from the Merchandising System to Invoice Matching in approved status. If this is the case, the RTV Chargeback indicator is selected, and the RTV number appears on the Document Maintenance Header window.
This section includes the following document maintenance instructions:
Navigate: In the Document Maintenance tab, click Document Search. The Document Search window opens.
In the Action field, select either Edit or View.
|
Note: You can edit only merchandise invoices. |
Enter additional criteria as needed to make the search more restrictive.
Click Search. The Document Find window displays the documents that match the search criteria.
In the Doc ID column, click a document number. Depending on the type of document you select, the Invoice or Document Maintenance Header window opens. The Merchandise invoice details are displayed.
Click OK to save.
Click Details to view the complete details of the selected invoice.
Click Comments to add new comments to the invoice. You can also update the existing comments.
Click Drill To Finance to view the financial transactions posted for the document in the financial system.
|
Note: The Drill To Finance button is enabled only if the Drill Forward functionality is supported by the Financial Application system. |
Click Drill to Payables to view the financial transactions posted for the document in the financial system.
|
Note: The Drill To Payables button is enabled only if the Drill Forward functionality is supported by the Financial Application system. |
Click Cancel to close the window without saving any changes.
|
Note: When the invoice is posted to accounts payable, the Drill to Payables option is exercised.In case of a pre-paid invoice, the Drill to Payables option is exercised before the invoice is matched. In case of a pre-paid invoice, the Drill to Finance option is exercised after the invoice has been matched and posting done. |
Navigate: In the Document Maintenance tab, click Document Search. The Document Search window opens.
Search for and retrieve an invoice. Depending on the type of document you select, the Invoice or Document Maintenance Header window opens.
|
Note: If the RTV Chargeback Ind is selected, you cannot make any changes to the document. An RTV chargeback is created in the merchandising system and sent to invoice matching as an approved credit note request or debit memo. |
The Invoice or Document Maintenance Header window opens.
Edit the enabled fields as necessary.
|
Note: The Release Hold button is visible only if you want to edit the document, which implies that the invoice is on hold and you will be able to remove the hold. Otherwise the button will not be displayed at all. |
Click OK to save your changes and close the window.
Navigate: In the Document Maintenance tab, click Document Search. The Document Search window opens.
Search for and retrieve an invoice in Edit mode. Depending on the type of document you select, the Invoice or Document Maintenance Header window opens.
Click Details. Depending on the type of document you select, the Invoice or Document Maintenance Detail window opens.
Add items to the document as necessary.
In the Item field, enter the item ID, or click the LOV button and select an item.
In the Invoice Quantity field, enter the number of units on the invoice.
In the Unit Cost field, enter the cost of one unit of the item.
Click Add Item. The item is added to the invoice.
Click OK to save your changes and close the window.
Delete items from the document as necessary.
In the Delete column, select the item you want to delete.
|
Note: To select all of the items, click the select all link in the Items area. |
Click Delete Items. You are prompted to confirm the deletion.
Click OK. The item is deleted.
Click OK to save your changes and close the window.
Navigate: In the Document Maintenance tab, click Document Search. The Document Search window opens.
Search for a merchandise invoice in Edit mode. The Document Find window opens.
In the Select column, click the check box to the left of the invoice you want to pay.
Click Pay Invoice. You are prompted to confirm the payment.
Click OK. The invoice is sent to the financials system for payment.
Click Cancel to close the window.
Navigate: In the Document Maintenance tab, click Document Search. The Document Search window opens.
Search for a document in View mode. The Document Find window opens.
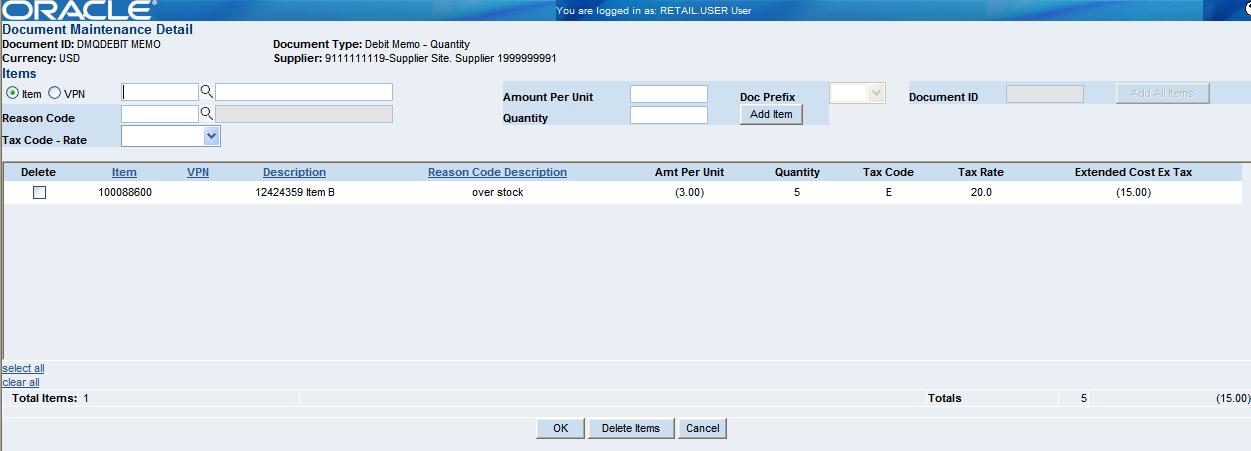
To view the detail of a document, click Details. The Document Maintenance Detail window opens.
To view comments associated with the document, click Comments.
If you are working with a debit memo or credit note request, click Create Credit Note to create a credit note associated with the debit memo or credit note request.
Click Cancel to close the window.