| Oracle® Retail Invoice Matching User Guide Release 14.1 E57810-02 |
|

 Previous |
In the System Options window, you can define system-wide parameters that affect the functions of Oracle Retail Invoice Matching. You indicate how long the system maintains various documents, and you can enter the unique codes that ReIM uses to identify document types.
Updated settings are available for all users who log on after the changes are made. To see the changes reflected in Oracle Retail Invoice Matching, you must log out and log in again.
This section includes the following system options instructions:
Navigate: In the Administration tab, click System Options. The System Options window opens.
Table 6-1 System Options
| Field | Description |
|---|---|
|
Document History Days |
The number of days documents stay in the Invoice Matching system before they are purged. |
|
Post Dated Document Days |
The number of days old a document can be when entered into the system. |
|
Debit Memo Send Days: |
The number of days prior to the invoice due date that a debit memo is created and sent to the supplier if a credit note has not yet been received. This applies only to suppliers where the Send Debit Memo option is set to Only when credit Memo is Late. |
|
Max Tolerance % |
The maximum tolerance allowed for any invoice throughout the system. |
|
Default Pay Now Terms |
This is the terms code used as a default value when manually adding debit memo, credit memo, or credit notes via document maintenance. |
|
Close Open Receipt Days |
The number of days that a shipment can remain in Ready for Match status before it is automatically closed. |
|
Cost Resolution Due Days |
The number of days in which a reviewer must resolve a cost discrepancy. |
|
Qty Resolution Due Days |
The number of days in which the buyer must resolve a quantity discrepancy (also seen as Qty Resolution Due Days). |
|
Days Before Due Date |
The number of days before the invoice due date that the system will automatically route unresolved discrepancies. |
|
Number of Allowed Taxes |
The number of taxes allowed on an item. Valid settings are: None – taxes are turned off. |
|
Tax Validation Source |
Source that the system uses to calculate and validate taxes. |
|
Tax Validation Type |
The method to use when matching tax amounts. Valid values are: |
|
Post Based On Doc Header |
If selected, ensures that the posted amount is equal to total cost in header of an invoice |
|
Default Header Tax From Details |
Whether header level tax information must be entered before invoice details can be entered. Set this to Yes to be able to proceed to the details screen without entering tax information. Set this to No to require tax information in the header before invoice details can be entered. |
|
Calc Tolerance |
The percentage or amount by which header and detail amounts can differ and still be considered equal. This is used to account for insignificant errors in rounding between header and detail level totals. For example, a header may show an invoice total as $1025.31, while the detail area may show it as $1025.308. If the percentage difference is less than the Calc Tolerance % value, the amounts will be considered equal. |
|
Tax resolution Due Days |
The number of days by which tax discrepancies should be resolved. |
|
Tax Document Creation Level |
Whether tax debit memos and tax credit note requests are created at the Item or Full Invoice level. |
|
Debit Memo Prefix-Cost |
The prefix that indicates that a document is a debit memo due to cost. |
|
Debit Memo Prefix-Qty |
The prefix that indicates that a document is a debit memo due to quantity. |
|
Credit Note Request Prefix-Cost |
The prefix that indicates that a document is a credit note request due to cost. |
|
Credit Note Request Prefix-Qty |
The prefix that indicates that a document is a credit note request due to quantity. |
|
Credit Memo Prefix-Cost |
The prefix that indicates a document is a credit memo due to cost. |
|
Credit Memo Prefix-Qty |
The prefix that indicates that a document is a credit memo due to quantity. |
|
Debit Memo Prefix-Tax |
The prefix that indicates that a document is a debit memo due to tax. |
|
Credit Note Request Prefix-Tax |
The prefix that indicates that a document is a credit note request due to tax. |
|
Allow lookup items by VPN |
Enable or disable items lookup via VPN. |
|
Auto-resolution Reason Code For Credit Note Request-Cost |
The business reason code used for credit note matching when a cost discrepancy is matched automatically with the generation of a Credit Note Request-Cost. If this field is empty, automatic cost discrepancy resolution using credit note requests is not performed. |
|
Auto-resolution Reason Code For Credit Note Request-Qty |
The business reason code used for credit note matching when a cost discrepancy is matched automatically with the generation of a Credit Note Request-Qty. If this field is empty, automatic cost discrepancy resolution using credit note requests is not performed. |
|
Auto-resolution Reason Code For Credit Memo-Cost |
The business reason code used for credit note matching when a cost discrepancy is matched automatically with the generation of a Credit Memo-Cost. If this field is empty, automatic cost discrepancy resolution using credit memos is not performed. |
|
Auto-resolution Reason Code For Credit Memo-Qty |
The business reason code used for credit note matching when a cost discrepancy is matched automatically with the generation of a Credit Memo-Qty. If this field is empty, automatic cost discrepancy resolution using credit memos is not performed. |
|
Match Using Reference 3 Field |
Indicates whether reference field 3 will be used for matching by Credit Note Automatch batch. If Yes is selected, reference field 3 will be populated with Credit Note Request ID on CNR and CN documents. |
|
Match Using Reference 4 Field |
Indicates whether reference field 4 will be used for matching by Credit Note Automatch batch. If Yes is selected, reference field 4 will be populated with the invoice ID on CNR and CN documents. |
|
Receipt Write Off # of days |
Number of days for which the system will maintain history of receipts that have been written off. |
On the upper part of the screen, edit the enabled fields as necessary.
Click OK to save your changes and close the window.
|
Note: Changes are available to users who log in after you have completed the changes. To see the changes reflected, you must log out and log in again. |
Navigate: In the Administration tab, click System Options. The System Options window opens.
In the lower part of the screen, edit the enabled fields as necessary.
Click OK to save your changes and close the window.
|
Note: Changes are available only when you log in after completing the changes. To see the changes reflected, you must log out and log in again. |
The general ledger accounts is used to maintain the parameters that determine the accounts to which the invoices are exported in the financial system. You must create the accounts to which the invoices are assigned.
In the GL Option window, you can create a template for the general ledger account that your business uses. You can also assign dynamic segments to accounts, so that invoices post to accounts based on company, department, class, or location. After the general ledger account format has been assigned, it cannot be changed.
This section includes the following general ledger accounts instructions:
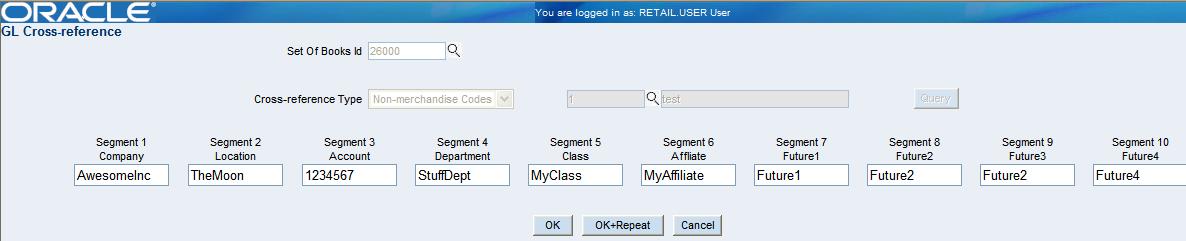
Navigate: In the Administration tab, click GL Cross Reference. The GL Cross-Reference window opens.
In the Set of Books ID field, enter the identifier that applies to this cross reference.
|
Note: The Set of Books ID field appears only if your system uses multiple sets of books. Multiple sets of books is enabled or disabled by a system option set by the system administrator. |
In the Cross Reference Type field, select the account category.
In the next field, enter the ID of the type of account you are creating, or click the LOV button to select an account type.
Click Query. The account segment fields are enabled.
In the Segment fields, enter the account segments.
|
Note: If a segment has been marked dynamic, you can leave the field blank. |
Click OK. The GL Cross- Reference Details window opens.
Click OK to save your changes and close the window.
Navigate: In the Administration tab, click GL Options. The GL Options window opens.
In the Set of Books ID field, click on the LOV button to select the Set of Book.
Click on the Query button to view the corresponding GL Options. The GL Options Details window opens.
Click OK to save your changes and close the window.
In the Supplier Options window, you can indicate how invoices from each supplier should be matched. You can associate a specific accounts payable reviewer to a supplier, and you can create linked suppliers.
This section includes the following supplier options instructions:
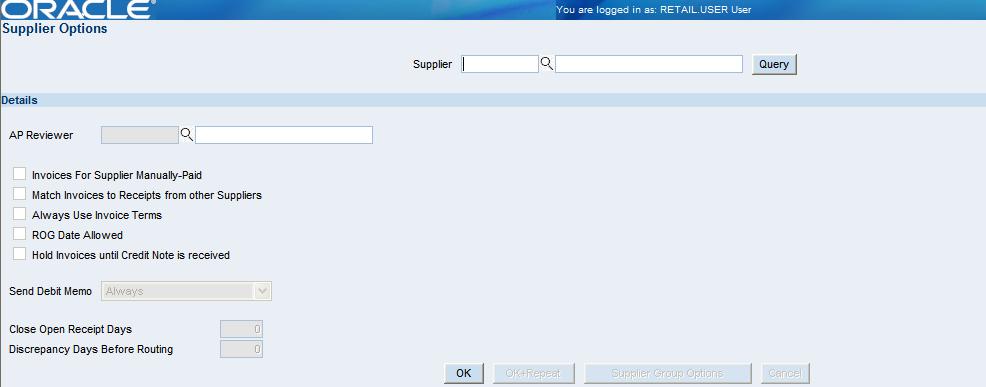
Navigate: In the Administration tab, click Supplier Options. The Supplier Options window opens.
In the Supplier field, enter the supplier ID, or click the LOV button to select a supplier.
Click Query. The supplier details are displayed.
In the AP Reviewer field, enter the ID of an accounts payable reviewer, or click the LOV button to select the reviewer that you want to associate with the supplier.
Edit the enabled fields as necessary:
Invoices for Supplier Manually Paid: Select the check box to indicate that invoices from this supplier should be paid manually.
Match Invoices to Receipts from Other Suppliers: Select the check box to indicate that the retailer can pay suppliers other than the one listed for the invoice.
Always Use Invoice Terms: Select the check box to indicate that the terms date on the invoice is always used to pay an invoice.
ROG Date Allowed: Select the check box to use the receipt of goods date to determine the due date of an invoice.
Send Debit Memo: Select the frequency to indicate when to send a debit memo.
Possible values are:
Always - Indicates Debit Memo will be sent.
Never - Indicates a Credit Note Request will be sent.
Only when Credit Note is late - Indicates a Credit Note Request will be sent, but later if the Credit Note does not come in on time, a Debit Memo is then generated.
When this setting is either Never or Only when the Credit Note is Late, an additional option called Hold Invoice is allowed. You can check or uncheck it.
|
Note: If Hold Invoice is checked, matched invoices will not post to the Financial System until all Credit Note Requests associated with the invoice are matched to Credit Notes. However, this option holds true only if ReIM is integrated with the Financial Application System. |
Close Open Receipt Days: Enter the number of days that a receipt remains in the system without an invoice. After the number of days has passed, the receipt is posted for payment.
Discrepancy Days Before Routing: Enter the number of days that quantity discrepancies should be held before routing for resolution.
Click OK to save your changes and close the window.
|
Note: Any changes you make to one supplier in a group applies to all suppliers in the group. |
Navigate: In the Administration tab, click Supplier Options. The Supplier Options window opens.
In the Supplier field, enter the supplier ID, or click the LOV button to select a supplier.
Click Query. The supplier details are displayed.
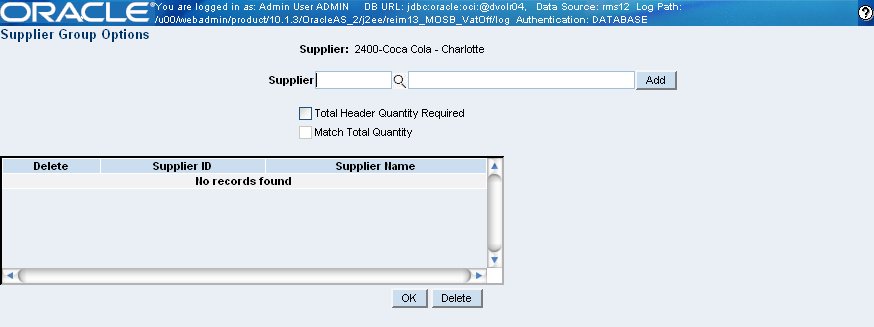
Click Supplier Group Options. The Supplier Group Options window opens.
In the Supplier field, enter the supplier ID, or click the LOV button to select a supplier.
Click Add.
Select the enabled options as necessary:
Total Header Quantity Required: Select the check box to indicate that each invoice requires a total quantity be entered.
Match Total Quantity: Select the check box to indicate that the total quantity must be matched for the invoice and the receipt.
Click OK to save your changes and close the window.
Navigate: In the Administration tab, click Supplier Options. The Supplier Options window opens.
In the Supplier field, enter the supplier ID, or click the LOV button and select a supplier.
Click Query. The supplier details are displayed.
Click Supplier Group Options. The Supplier Group Options window opens.
On the list of suppliers that are linked to the original supplier, select the check box next to the supplier you want to delete.
Click Delete.
You are prompted to confirm the deletion. Click OK.
Click OK to save your changes and close the window.
Using the Reason Code Maintenance window, you can set up and maintain reason codes. Reason codes are used to resolve discrepancies between receipts and invoices. A discrepancy originates when the price or quantity variance exceeds acceptable tolerance levels. After you create the reason code, you must associate it with an action that helps you resolve the discrepancies.
This section includes the following reason code instructions:
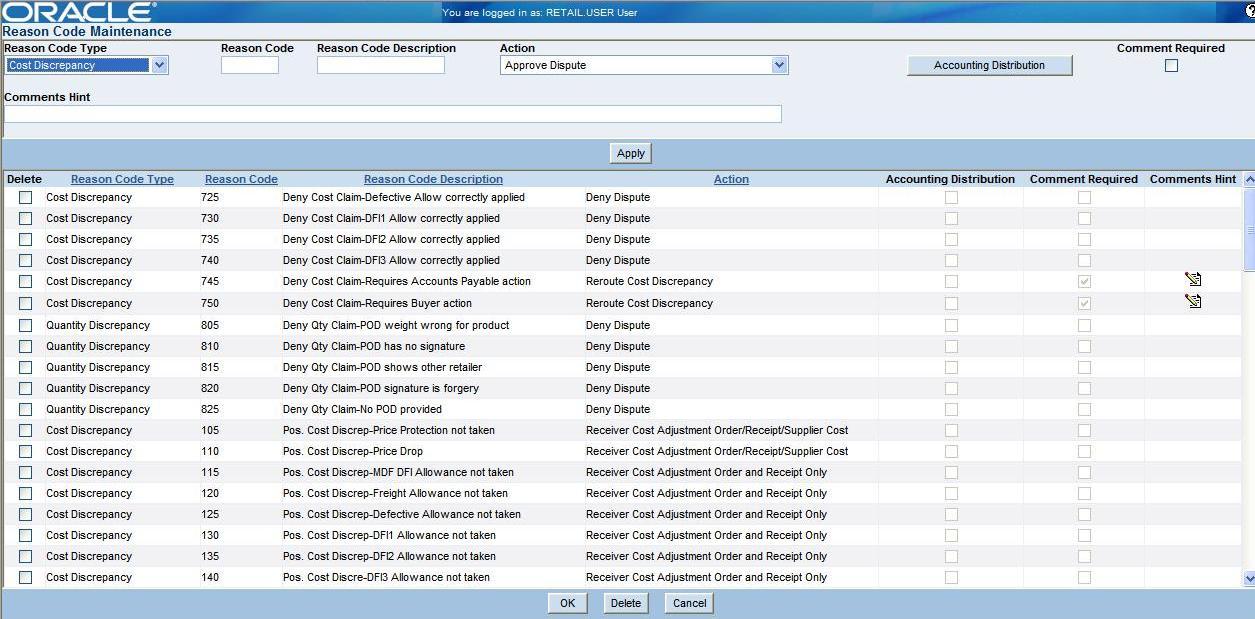
Navigate: In the Administration tab, click Reason Code Maintenance. The Reason Code Maintenance window opens.
In the Reason Code Type field, select the type of discrepancy for which you are creating a reason code.
In the Reason Code field, enter an ID for the reason code.
In the Reason Code Description field, enter the description of the reason code.
In the Action field, select the action to resolve the discrepancy.
In the Comments Hint field, enter additional information that may be needed to resolve the discrepancy.
If a comment is required when a reviewer is resolving the discrepancy, select the Comments Required check box.
Navigate: In the Administration tab, click Reason Code Maintenance. The Reason Code Maintenance window opens.
On the list of reason codes, select the check box next to the reason code you want to delete.
Click Delete.
You are prompted to confirm the deletion. Click OK.
Click OK to save your changes and close the window.
Navigate: In the Administration tab, click Reason Code Maintenance. The Reason Code Maintenance window opens.
In the table, double-click the reason code you want to edit.
Update the enabled fields as necessary.
Click Apply. The reason code is updated.
Click OK to save your changes and close the window.
Reason code actions are resolutions assigned at the discrepancy line level. Fixed actions are used to resolve a line item discrepancy; the specific results depend on the action, and are detailed below.
Multiple actions may be assigned to a single line item. This assignment is done in the cost and quantity discrepancy resolution screens (detailed in Retail Invoice Matching (ReIM) Online Cost Discrepancy Resolution and ReIM Online Quantity Discrepancy Resolution). It is assumed that the resolution screens have limited the users to fully resolving a line item and that the detail discrepancies should be deleted, and the quantity or cost matched status for the line should be set to true.
For quantity discrepancies the receipt line quantity will be updated or created in the database, and the receipt record in Retail Merchandising System (RMS) will be updated to matched when all receipt items are completely matched. Each reason code action is also saved to a table for future posting (data saved: reason code, action code, invoice ID, item ID, quantity, amount, comments, create date, create ID).
For cost resolutions the extended cost will be stored to be used in the created memo. For quantity resolutions the adjusted quantity only will be stored for use in the created memo (this allows the extended cost to be generated against a potentially adjusted cost in another resolution).
The Reason Code Action Rollup batch process sweeps the action staging table and creates debit and credit memos as needed. Only a single debit or credit memo will be created per invoice, with line details from all related actions. This process does not delete these records when completed; they are deleted after posting. There is a separate, client-created batch process to sweep the receiver adjustment table. The action staging table is used during posting to post the reason code actions to the financial staging table.
Reason code actions are associated with business roles. Reason code actions are used to act on invoice cost and quantity discrepancies. The following reason code actions are utilized in ReIM:
Charge Back Cost (CBC) – When a cost discrepancy is marked for resolution with a Charge Back Cost, either a debit memo cost or credit note request cost (depending on the im_supplier_options.send_debit_memo indicator) is created. If the supplier option is set to Yes, a debit memo cost will be sent. If the supplier option is No, a credit note request is sent.
Charge Back Quantity (CBQ) – When a cost discrepancy is marked for resolution with a Charge Back Quantity, either a debit memo quantity or credit note request quantity (depending on the im_supplier_options.send_debit_memo indicator) is created and sent to the supplier. If the supplier option is set to Yes, a debit memo quantity is sent. If the supplier option is No, a credit note request quantity is sent.
Credit Memo Cost (CMC) – When a cost discrepancy is marked for resolution with a Credit Memo Cost, a credit memo cost containing the discrepant item is sent to the supplier.
Credit Memo Quantity (CMQ) – When a quantity discrepancy is marked for resolution with a Credit Memo Quantity. A credit memo quantity containing the discrepant item is sent to the supplier.
Reroute Cost Discrepancy (RCD) – When a cost discrepancy is rerouted, the system prompts the user to choose a person to reroute the discrepancy to.
Reroute Quantity Discrepancy (RQD) – When a quantity discrepancy is rerouted, the system prompts the user to choose a person to reroute the discrepancy to.
Receiver Cost Adjustment – PO and receipt only (RCA) – This action creates a record based on the adjusted cost of the receiver and the associated PO (for all locations with same item cost) to match the invoice cost or to another value. This action calls a trigger which invokes an API which does the Receiver Cost Adjustment in RMS.
Receiver Cost Adjustment – PO, receipt and supplier cost (RCAS) – This action is identical to the in addition to the 'Receiver Cost Adjustment - PO and receipt only' except that the supplier cost file in RMS is updated as well.
Receiver Unit Adjustment (RUA) – This action creates a record from the unit adjustment to match the receiver with associated invoice lines. This action calls a trigger which invokes an API which does the Receiver Unit Adjustment in RMS.
Discrepancy Write-Off (DWO) – This action allows the user to stop any further matching activity, export the invoice for payment, and create an entry for the unresolved difference (no document data is created; any discrepancies are written-off).
Deny Dispute (DD) – When the action type is Deny Dispute, Oracle Retail Invoice Matching creates a document that disputes there is a discrepancy.
Split Receipt (SR) – This action allows the user to split the invoice into multiple receipts. The user may then match the invoice to the newly created 'sub-receipt' (extract of the original receipt). The remaining sub-receipt(s) are in unmatched status and available for matching through the auto-match and manual match processes.
Match to Receipt (MR) – This action allows the reviewer to directly match the invoice with the newly created receipt, resolving or partially resolving the discrepancy.
Approve Credit in Disputed Status (ACDS) – This action updates the line status on a credit memo from 'disputed' to 'approved'. There is no document (the user may create a document from the record posted to the table). Approved credit memo lines post to the financial system once each line has been resolved from 'disputed' status.
If system taxes are selected as correct, the user then selects a reason code with an associated action for how to proceed. Selecting the system as correct means that the invoice is incorrect, and the retailer's recourse at this point is to ask for a corrected invoice. This is done either by sending out a Debit Memo or a Credit Note Request for the incorrect entry. There can be two types of Debit Memos and two types of Credit Note Requests generated, based on the resolution action. The four action types are:
Debit Memo Vat Full (DMVF) – Reason codes with this action will generate a Debit Memo for the 'full' amount of the invoice. All items on the invoice and the invoice itself will be flagged as matched
Debit Memo Vat Item (DMVI) – Reason codes with this action will generate a Debit Memo for just the individual item with the Tax discrepancy. The item will be flagged as matched. If there are no other unmatched items on the invoice, the invoice will also be flagged as matched.
Credit Note Request Vat Full (CNRVF) – Reason codes with this action will generated a Credit Note Request for the full amount of the invoice (see footnote for Debit Memo Vat Full). All items on the invoice and the invoice itself will be flagged as matched.
Credit Not Request VAT Item (CNRVI) – Reason codes with this action will generate a Credit Note Request for just the individual item with the Tax discrepancy. The item will be flagged as matched. If there are no other unmatched items on the invoice, the invoice will also be flagged as matched.
|
Note: If a Credit Note Request is sent out, the retailer needs to receive both a Credit Note to 'reverse' the incorrect invoice, and a new invoice with the corrected taxes. |
In the user group windows, you can define the level of access that each user has to Oracle Retail Invoice Matching. You can assign the same level of access to a group of people. After you create a role, you can further limit a user to specific locations, departments/classes, or reason codes.
This section includes the following user group instructions:
Navigate: In the Administration tab, click User Group Maintenance. The User Groups window opens.
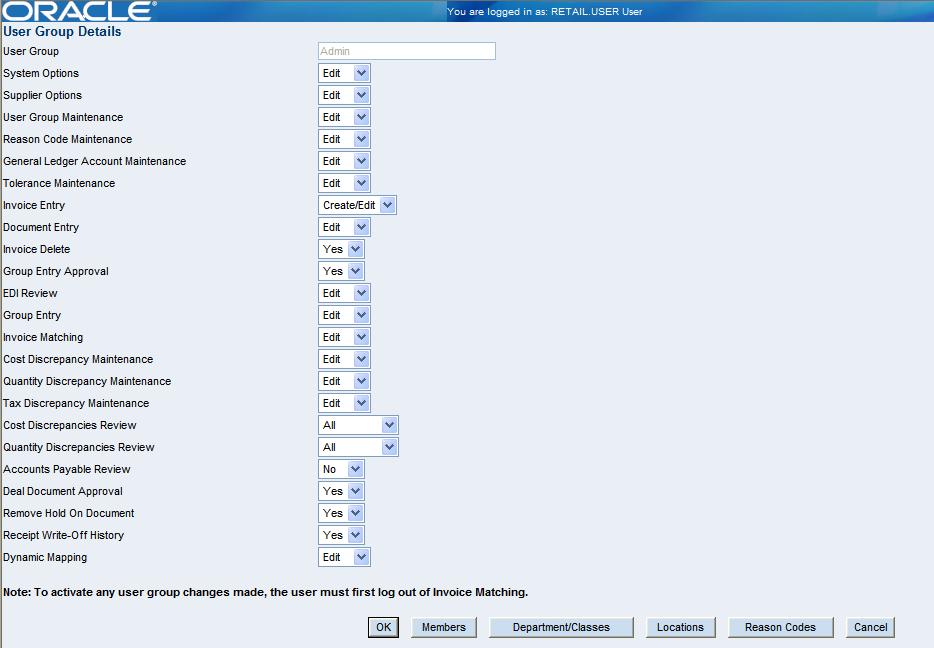
Click New. The User Group Details window opens.
In the User Group field, enter the name of the user group.
In the remaining fields, select the type of permissions a member of the user group will have:
Edit: User group members can add to and update the areas they are assigned to.
View: User group members can access the designated areas, but they cannot make any changes.
None: User group members cannot edit or view the designated areas.
Yes: User group members can perform the designated task.
No: User group members cannot perform the designated task.
All: All user group members can perform the designated function.
Users Only: Only designated users within the group can perform the designated function.
Click OK to save any changes and close the window.
Navigate: In the Administration tab, click User Group Maintenance. The User Groups window opens.
Select a user group.
Click Delete.
You are prompted to confirm the deletion. Click OK.
Click OK to save any changes and close the window.
Navigate: In the Administration tab, click User Group Maintenance. The User Groups window opens.
Select a user group.
Click Edit. The User Group Details window opens.
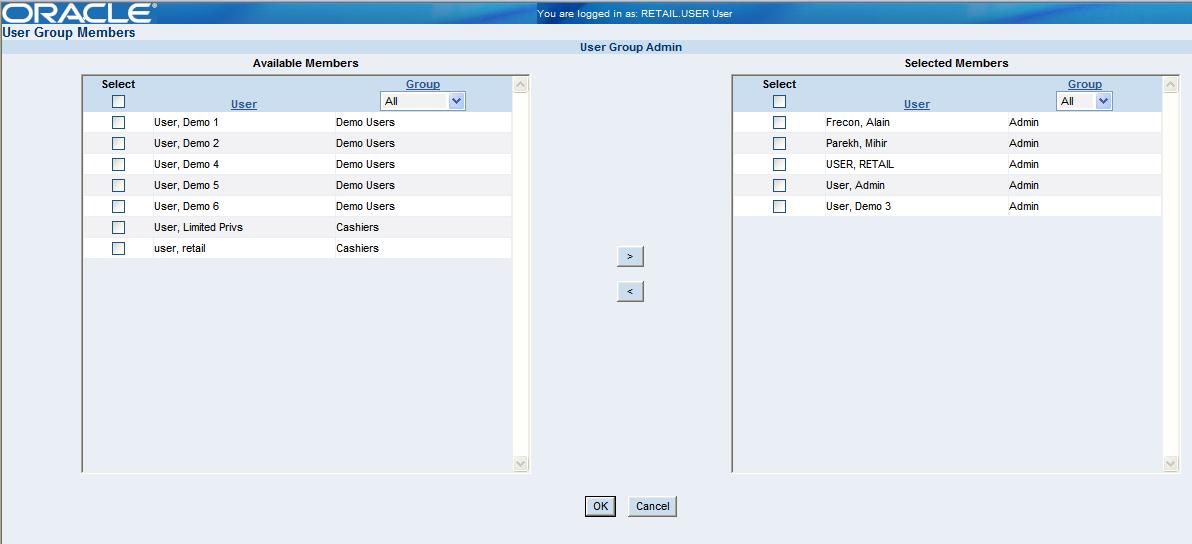
Click Members. The User Group Members window opens.
In the Available Members column, select the check box in the Select column next to each user you want to add to the user group.
|
Note: To select all members, select the check box in the header area. |
Click the right arrow button to move the users into the Selected Members column.
Click OK to save any changes and close the window.
Navigate: In the Administration tab, click User Group Maintenance. The User Groups window opens.
Select a user group.
Click Edit. The User Group Details window opens.
Click any user group that you want to edit — Members OR Department/Classes OR Locations OR Reason Codes. The respective window opens.
In the Available Reason Codes column, select the check box in the Select column next to each reason code you want to add to the user group.
|
Note: To select all reason codes, select the check box in the header area. |
Click the right arrow button to move the Available Members to the Selected Members column.
Click OK to save any changes and close the window.
Navigate: In the Administration tab, click User Group Maintenance. The User Groups window opens.
Select a user group.
Click Edit. The User Group Details window opens.
Click any user group that you want to delete — Members OR Department/Classes OR Locations OR Reason Codes. The respective window opens.
In the Selected Members column, select the check box in the Select column next to each user you want to remove from the user group.
|
Note: To select all members, select the check box in the header area. |
Click the left arrow button to move the users into the Available Members column.
Click OK to save any changes and close the window.
Navigate: In the Administration tab, click User Group Maintenance. The User Groups window opens.
Select a user group.
Click Edit. The User Group Details window opens.
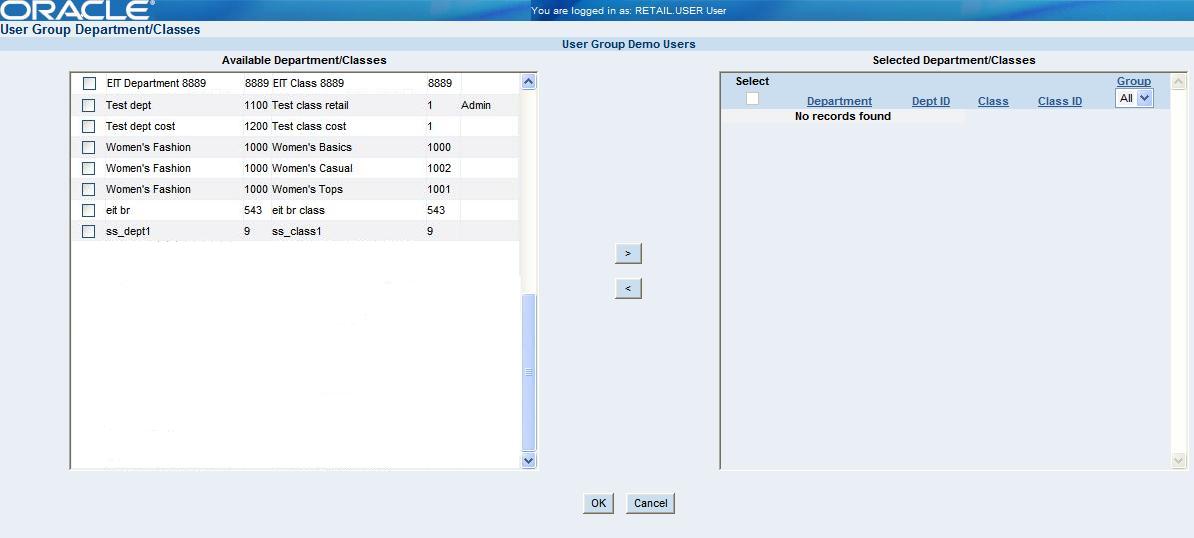
Click Department/Classes. The User Group Department/Classes window opens.
In the Available Department/Classes column, select the check box in the Select column next to each department/class you want to add to the user group.
|
Note: To select all department/classes, select the check box in the header area. |
Click the right arrow button to move the department/classes into the Selected Department/Classes column.
Click OK to save any changes and close the window.
Navigate: In the Administration tab, click User Group Maintenance. The User Groups window opens.
Select a user group.
Click Edit. The User Group Details window opens.
Click Department/Classes. The User Group Department/Classes window opens.
Click Department/Classes. The User Group Department/Classes window opens.
In the Selected Department/Classes column, select the check box in the Select column next to each department/class you want to remove from the user group.
|
Note: To select all department/classes, select the check box in the header area. |
Click the left arrow button to move the department/classes into the Available Department/Classes column.
Click OK to save any changes and close the window.
Navigate: In the Administration tab, click User Group Maintenance. The User Groups window opens.
Select a user group.
Click Edit. The User Group Details window opens.
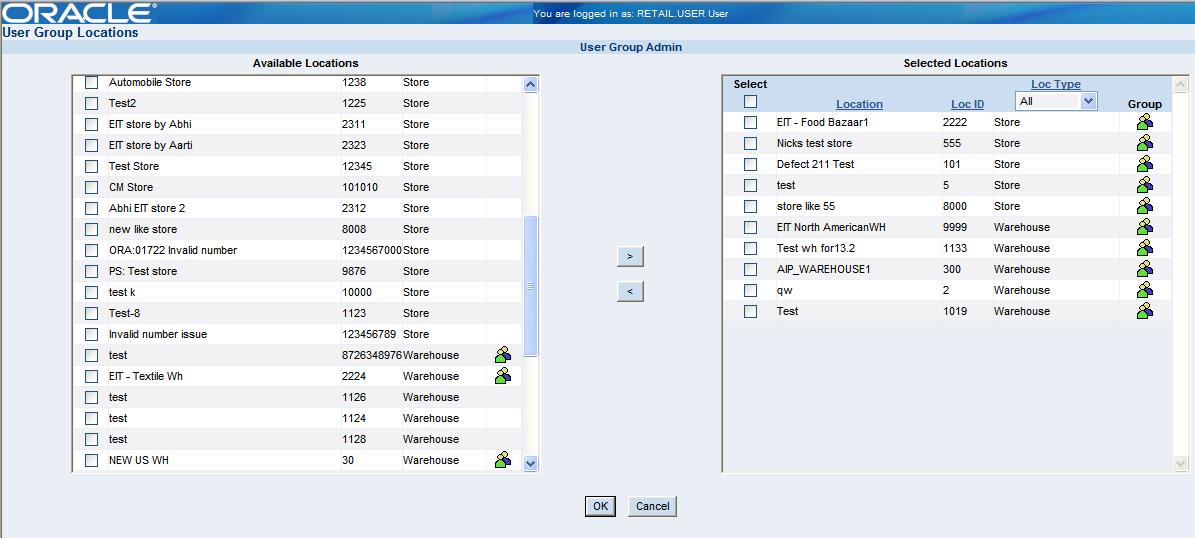
Click Locations. The User Group Locations window opens.
In the Available Locations column, select the check box in the Select column next to the each location you want to add to the user group.
|
Note: To select all locations, select the check box in the header area. |
Click the right arrow button to move the locations into the Selected Locations column.
Click OK to save any changes and close the window.
Navigate: In the Administration tab, click User Group Maintenance. The User Groups window opens.
Select a user group.
Click Edit. The User Group Details window opens.
Click Locations. The User Group Locations window opens.
In the Selected Locations column, select the check box in the Select column next to each location you want to remove from the user group.
|
Note: To select all locations, select the check box in the header area. |
Click the left arrow button to move the users into the Available Locations column.
Click OK to save any changes and close the window.
Navigate: In the Administration tab, click User Group Maintenance. The User Groups window opens.
Select a user group.
Click Edit. The User Group Details window opens.
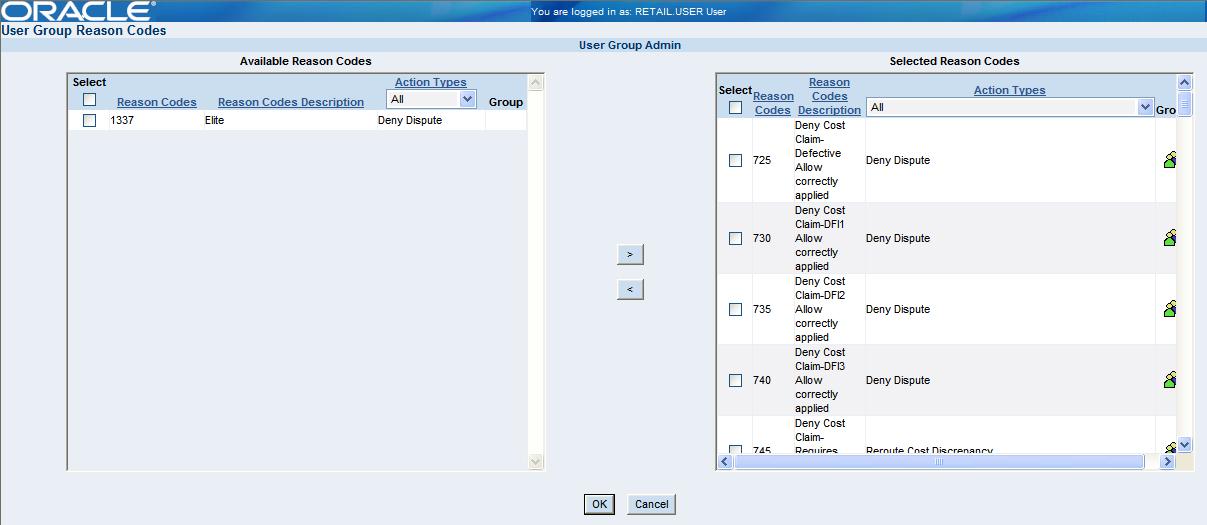
Click Reason Codes. The User Group Reason Codes window opens.
In the Available Reason Codes column, select the check box in the Select column next to each reason code you want to add to the user group.
|
Note: To select all reason codes, select the check box in the header area. |
Click the right arrow button to move the reason codes into the Selected Reason Codes column.
Click OK to save any changes and close the window.
Navigate: In the Administration tab, click User Group Maintenance. The User Groups window opens.
Select a user group.
Click Edit. The User Group Details window opens.
Click Reason Codes. The User Group Reason Codes window opens.
In the Selected Reason Codes column, select the check box in the Select column next to each reason codes you want to remove from the user group.
|
Note: To select all reason codes, select the check box in the header area. |
Click the left arrow button to move the users into the Available Reason Codes column.
Click OK to save any changes and close the window.
In the tolerance windows, you can define the amount of variance allowed between an invoice and a receipt. If the variance is within the defined tolerances, the invoice can be considered a match. You can define the following types of tolerances at the system level, supplier level, supplier trait level, or department level:
Invoice/document summary cost
Invoice/document summary quantity
Invoice/document line item cost
Invoice/document line item quantity
You can define a tolerance only to the maximum percentage of system tolerance. When you define a tolerance, the lower tolerance is included when calculating variance, while the upper tolerance is excluded.
This section includes the following tolerance level instructions:
Define the Tolerance Level for a Supplier, Supplier Trait, or Department
Delete a Tolerance Level for a Supplier, Supplier Trait, or Department
Set Default Tolerance Level for a Supplier, Supplier Trait, or Department
Navigate: In the Administration tab, click Tolerance Maintenance. The Tolerance Maintenance window opens.
In the Tolerance Level column, select System.
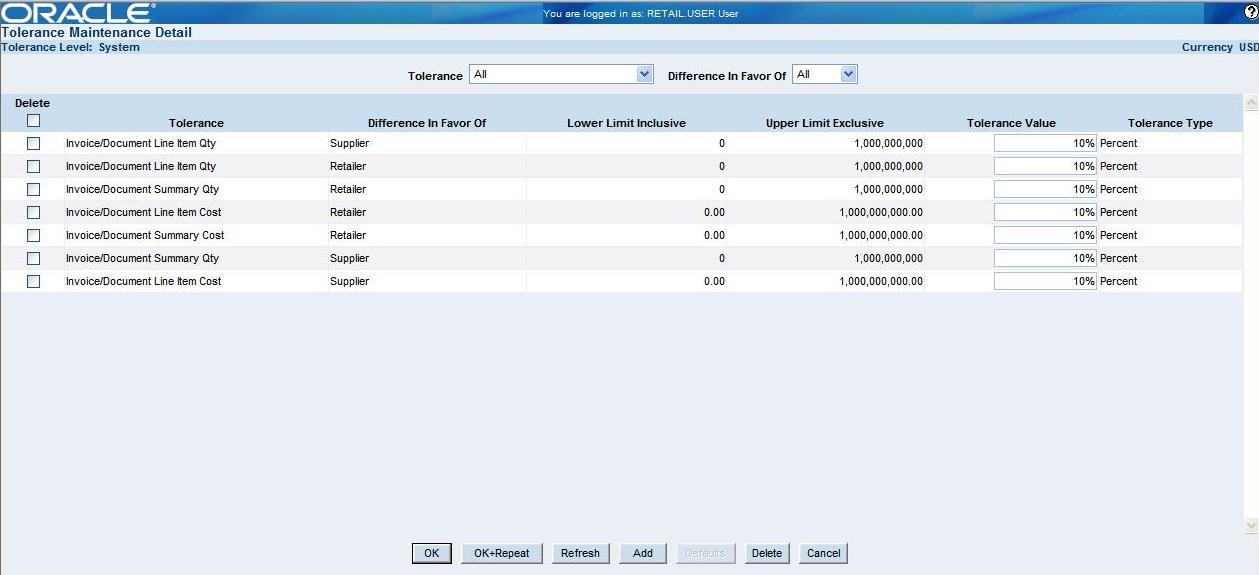
Click Next. The Tolerance Maintenance Detail window opens.
In the Tolerance field, select the type of tolerance you are creating.
In the Difference in Favor field, indicate in whose favor the tolerance should be.
Click Add. The next available line is enabled.
In the Lower Limit Inclusive and Upper Limit Exclusive fields, enter the tolerance values.
In the Tolerance Value field, indicate the total amount allowed for the variance.
In the Tolerance Type field, indicate how the variance should be measured.
Click OK to save your changes and close the window.
Navigate: In the Administration tab, click Tolerance Maintenance. The Tolerance Maintenance window opens.
In the Tolerance Level column, select System.
Click Next. The Tolerance Maintenance Detail window opens.
In the Delete column, select the type of tolerance you want to delete.
|
Note: To select all tolerances, select the check box in the header area. |
Click Delete. You are prompted to confirm the deletion.
Click OK.
Click OK to close the window and save your changes.
Navigate: In the Administration tab, click Tolerance Maintenance. The Tolerance Maintenance window opens.
In the Tolerance Level column:
Select Supplier to create a supplier tolerance level. In the Supplier field, enter the supplier ID, or click the LOV button to select a supplier.
Select Supplier Trait to create a supplier trait tolerance level. In the Supplier Trait field, enter the supplier trait ID, or click the LOV button to select a supplier trait.
Select Department to create a department tolerance level. In the Department field, enter the department ID, or click the LOV button to select a department.
Click Next. The Tolerance Maintenance Detail window opens.
In the Tolerance field, select the type of tolerance you are creating.
In the Difference in Favor field, indicate in whose favor the tolerance should be.
Click Add. The next available line is enabled.
In the Lower Limit Inclusive and Upper Limit Exclusive fields, enter the tolerance values.
In the Tolerance Value field, indicate the total amount allowed for the variance.
In the Tolerance Type field, indicate how the variance should be measured.
Click OK to save your changes and close the window.
Navigate: In the Administration tab, click Tolerance Maintenance. The Tolerance Maintenance window opens.
In the Tolerance Level column:
Select Supplier to create a supplier tolerance level. In the Supplier field, enter the supplier ID, or click the LOV button to select a supplier.
Select Supplier Trait to create a supplier trait tolerance level. In the Supplier Trait field, enter the supplier trait ID, or click the LOV button to select a supplier trait.
Select Department to create a department tolerance level. In the Department field, enter the department ID, or click the LOV button to select a department.
Click Next. The Tolerance Maintenance Detail window opens.
In the Delete column, select the type of tolerance you are deleting.
|
Note: To select all tolerances, select the check box in the header area. |
Click Delete. You are prompted to confirm the deletion.
Click OK.
Click OK to close the window and save your changes.
Navigate: In the Administration tab, click Tolerance Maintenance. The Tolerance Maintenance window opens.
In the Tolerance Level column:
Select Supplier to create a supplier tolerance level. In the Supplier field, enter the supplier ID, or click the LOV button to select a supplier.
Select Supplier Trait to create a supplier trait tolerance level. In the Supplier Trait field, enter the supplier trait ID, or click the LOV button to select a supplier trait.
Select Department to create a department tolerance level. In the Department field, enter the department ID, or click the LOV button to select a department.
Click Next. The Tolerance Maintenance Detail window opens.
Click Defaults. You are prompted to confirm the restoration.
Click OK. The system defaults are displayed.
Click OK to save your changes and close the window.
A receipt is usually followed by an invoice. There is a possibility that some receipts do not receive invoices even after the stipulated period. These receipts are written off and posted to the financial system.
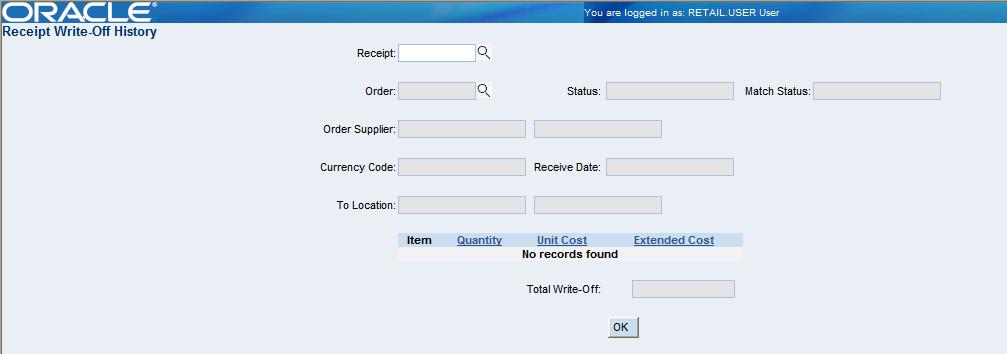
In the Receipt Write-Off History window, you can view a list of receipts that have been written off.
Navigate: In the Administration tab, click Receipt Write-Off History. The Receipt Write-Off History window opens.
In the Receipt field, enter the receipt number, or click the LOV button and select a receipt.
The receipt write off history details are displayed.
Click Drill To Finance. The Financial Application System opens up in a new window.
|
Note: The Drill To Finance button will be enabled only if the application is integrated with the Financial Application System. |
You will be prompted for a User ID and Password to log into the Financial Application System. Once logged in, you will be directed to the Journal Entries screen corresponding to the selected receipt.
Click OK to go back to the main screen.
In ReIM, four of the general ledger segments are allowed to be dynamic. Segments 1 and 2 are dynamic segments for the company and location, which vary based on the location column of the document within ReIM. Segments 4 and 5 are dynamic segments for department and class based on the department and class of the items associated with an invoice.
This section includes the following dynamic mappings:
Navigate: In the Administration tab, go to Dynamic Mapping > Dynamic Mapping for Department and Class. The Dynamic Mapping for Department and Class window opens.
In the Set Of Books ID field, enter the ID, or click the LOV button and select the set of books.
In the Department field, enter the department ID, or click the LOV button and select the department.
In the Class field, enter the class ID, or click the LOV button and select the class.
Click OK to update the segment values for department and class.
Click Add to create new segments for department and class.
Click Delete to delete the selected segments of the department and class.
Click Cancel to go back to the main screen.
Navigate: In the Administration tab, go to Dynamic Mapping > Dynamic Mapping for Location. The Dynamic Mapping for Location window opens.
In the Location field, enter the location number, or click the LOV button and select the location.
The company segment and location segment details are displayed.
Click OK to update the segment values for the location.
Click Add to create new segments for the location.
Click Delete to delete the selected segments of the location.
Click Cancel to go back to the main screen.