| Oracle® Retail Advanced Inventory Planning Order Management User Guide Release 14.1 |
|

 Previous |
 Next |
| Oracle® Retail Advanced Inventory Planning Order Management User Guide Release 14.1 |
|
Previous |
Next |
This chapter provides general information about using Order Management.
Order management allows you to create, edit, and view orders from suppliers and warehouses. An order can be a purchase order or a transfer.
Purchase orders are orders sourced directly from suppliers.
Transfers are orders sourced directly from a warehouse.
Orders exist in Order Management as a result of the following processes.
You can manually create a purchase order in order management.
Orders are automatically generated by AIP.
When you create or edit an order, there are several rules that apply to the quantity you enter:
The quantity must be greater than zero.
You must order a full case or SKU-pack-size.
If you use eaches as your order quantity, you must order multiples of a full SKU-pack-size.
|
Note: As best practice, Oracle Retail recommends ordering in quantities that complete the pallet/order multiple. If you order a quantity that is not a valid pallet/order multiple, you will receive a warning. |
The Order Creation window allows you to manually create into-store and into-warehouse purchase orders. When you create purchase orders, you can enter quantities as cases or eaches.
After you create a purchase order, the purchase order is displayed on the table in green until it is saved.
Once you save a purchase order, it is:
Validated against the destination's order cycle.
Validated for the destination's ability to receive.
Verified for valid release dates.
Released immediately to the merchandising system.
The following conditions must be met before you can create a purchase order for a warehouse:
The source of the order must be a supplier.
The warehouse selected for the purchase order has a chamber in either release or closing down status and the warehouse is ranged for the SKU type.
Navigate: Log in to Order Management. Select the Order Creation tab.
In the Delivery Date field, select the date you want the order delivered.
In the Supplier field, enter a supplier ID, or click the LOV button and select the supplier.
In the Destination field, enter the destination ID, or click the LOV button and select a destination from the list.
|
Note: All destinations with ranged or on-supply SKU pack-sizes from the supplier are displayed. |
In the SKU Pack-size field, enter the SKU pack-size you want to order, or click the LOV button and select a SKU pack-size from the list.
In the Unit of Measure area, select how you want to enter the order quantity for this purchase order.
Click Create. This populates the table with the purchase order information.
|
Note: An unsaved order with the same supplier, destination, SKU-pack, and delivery date cannot be duplicated. |
In the Quantity field, double-click the column to enter the quantity for the purchase order.
|
Note: If you are ordering by eaches, you must enter multiples of the pack-size. |
To delete an unsaved purchase order:
Select the order.
Click Delete. The purchase order is removed from the table.
Click Save. You are prompted to confirm your decision.
Click OK. An order number is assigned to your purchase order.
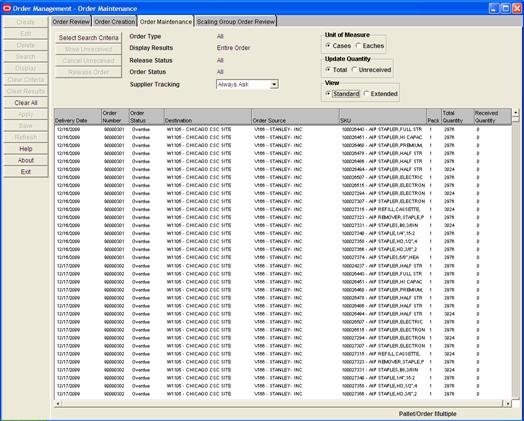
The Order Maintenance window allows you to maintain, cancel, and release purchase orders for:
Into-store orders
Into-warehouse orders
Into-store and into-warehouse orders are displayed in Order Management if they are created manually or are automatically generated by AIP. The orders can be purchase orders or transfers, with received or un-received quantities. On the Order Maintenance window, the pallet/order multiple for the order is displayed in the lower right corner of the window when you select an order.
Any purchase orders with unsaved changes are displayed in green. Once you save a purchase order, your changes are immediately communicated to the merchandising system.
The AIP Online system can be configured to limit the functions a user can perform from the Order Maintenance tab. Based on the AIP configuration implemented at your location, the following functions may not be allowed or may be limited:
The ability to move un-received quantities of an order.
The ability to move un-received order quantities if the line item has an open order status and either:
the received quantity is less than the total quantity
or
the received quantity is zero.
The ability to change the order destination when moving order quantities.
The ability to input or require a new order number when moving an order. If a new order number is not required, users are allowed to choose whether to retain the existing order number or generate a new one when moving un-received order quantities.
The ability to cancel un-received order quantities.
The ability to release unreleased orders.
The ability to edit the quantities or purchase orders.
The ability to view all orders. The screen may only display purchase orders, only transfers, or both purchase orders and transfers.
This section provides the procedures to perform all tasks available through the Order Maintenance tab, but the tasks you can perform or the options displayed on your system may vary based on your system configuration.
When you edit an open or overdue order, you can move the un-received quantity on a purchase order, so that the un-received quantity arrives on a new date or to a new destination. Alternatively, you can edit any un-received quantity on the purchase order. You cannot move a purchase order that has been completely received.
To cancel un-received quantities, your purchase order must be open or overdue. Additionally, the purchase order cannot be fully received.
You can manually release purchase orders that are forecasted. Once you release a purchase order, it is:
Verified that the warehouse selected for the purchase order has a chamber in release or closing down status and the warehouse is ranged for the SKU type.
|
Note: This verification occurs only for warehouse destination types. |
Assigned an order number.
Released immediately to the merchandising system.
The following conditions must be met when you move a purchase order with a warehouse destination type:
The new warehouse selected for the purchase order has a chamber in release or closing down status and the warehouse is ranged for the SKU type.
When you are working with purchase orders, to retain a purchase order number you must select the entire order. To do so, in your search criteria you must:
Select the Entire Order, and Tree view. On the results table, select the folder.
Select the Entire Order and Grid. To retain purchase orders at this level, your system settings must be set up to define order numbers at the order source, destination, SKU-pack, and delivery date.
Select the Matching Line Item and Grid. To retain purchase orders at this level, your system settings must be set up to define order numbers at the order source, destination, SKU-pack, and delivery date.
The status of a purchase order can provide you with various types of information. Purchase orders can exist in several statuses:
Open: The order has been released.
Overdue: The order has received less than the total order quantity and the delivery date has passed.
Closed: The merchandising system has set the status to Closed.
Transfers can only be viewed from the Order Maintenance window. You cannot edit, release, or move the dates or destinations of a transfer.
Allocations are similar to a transfer, however they are always linked to an inbound order. The linking is shown in the source transaction ID. Allocations can only be viewed from the Order Maintenance window.
Cross-docked orders represents a complete set of inventory movements (PO or transfers, and allocations) from a source to a destination. You can view the cross-docked order from the originating source to final destination. The details of the individual node-to-node movements can be also be viewed in a detail pop-up window but are not searchable.
Navigate: Log in to Order Management. Select the Order Maintenance Tab.
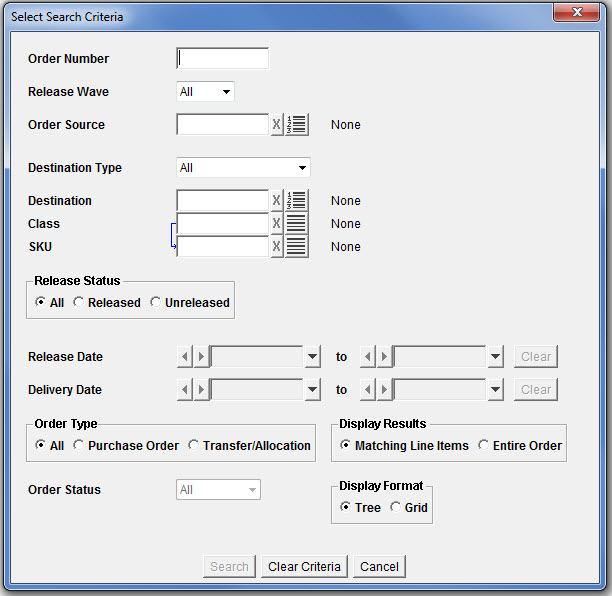
Click Select Search Criteria. The Select Search Criteria Window opens.
Enter your search criteria as necessary, choosing from the following options:
Order Number. No other criteria required.
Select one option from each column in Table 3-1.
Table 3-1 Select Search Criteria Fields
| Select One Option in this Column: | And Select One Option in this Column: |
|---|---|
|
Order Source and Destination |
Release Dates Note: Available dates are limited by the order purging period and release status selections. |
|
Order Source and Destination Type (Make any selection except All) |
Delivery Dates Note: Available dates are limited by the order purging period and release status selections. |
|
SKU |
Order Status Note: This field is available only if you have selected Released in the Release Status area. |
|
Release Wave (Make any selection except All) |
You may select additional information to limit your search:
Display Results: Select how you want to view the results:
Matching Line Items returns line items that meet the search criteria.
Entire Order returns orders that contain the line items that meet the search criteria.
Display Format: Select how you want to view the results:
Tree to display the line items under the common order number.
Grid to display the line items in a table format.
Click Search.
Navigate: Log in to Order Management. Select the Order Maintenance tab.
Search for and retrieve a purchase order.
|
Note: If you are working in a tree structure, double-click the folder to display the line items contained in the purchase order. Cross-docked orders originating from a supplier cannot be edited. |
In the Quantity field, double-click the quantity number to enter the quantity for the order.
|
Note: The Quantity column is determined by the view selected in the Update Quantity area. For more information, see the Change display setting of orders procedure. |
Save your purchase order.
Navigate: Log in to Order Management. Select the Order Maintenance tab.
Search for and retrieve a purchase order.
|
Note: If you are working in a tree structure, double-click the folder to display the line items contained in the order. |
In the grid view of the search table you can sort the results:
To sort the list, click any column heading. Hatch marks indicate the column that is currently sorted as well as the order: ascending or descending.
To reverse the current sort order, click the same column heading again.
To lock the column that has been filtered, right-click the header. It turns red.
|
Note: Once you lock a column, you can sort additional column by clicking on the appropriate column header. |
To unlock the column, right-click it again.
In the Unit of Measure area select:
Cases displays the order quantity in cases.
Eaches displays the order quantity in eaches.
In the Update Quantity area, select:
Total displays the total order quantity and enables you to edit the total quantity.
Un-received displays the un-received quantity and enables you to edit the un-received quantity.
In the View area, select the view you want to use to display the following columns:
| Standard | Extended |
|---|---|
| Delivery Date
Order Number Order Status Cross-docked Destination Order Source SKU Pack Quantity (Total/Un-received) Received Quantity |
Delivery Date
Order Number Order Status Cross-docked Destination Order Source Class SKU Pack Source Transaction Number Pre-scaled Quantity Quantity (Total/Un-received) Received Quantity Supplier Tracking Release Date |
If you are working in tree view, select the Expand All check box to view all line items in all orders.
Navigate: Log in to Order Management. Select the Order Maintenance tab.
Search for and retrieve a cross-docked order.
|
Note: If you are working in a tree structure, double-click the folder to display the line items contained in the order. |
Double-click on the row you want to view, the pop-up opens.
Navigate: Log in to Order Management. Select the Order Maintenance tab.
Search for and retrieve a purchase order.
|
Note: If you are working in a tree structure, double-click the folder to display the line items contained in the order. |
Select what you want to move:
Select the line items of an order you want to move.
Select the entire purchase order.
|
Note: All line items must meet the receive criteria in order to move the purchase order. |
Click Move Un-received. The Supplier Tracking window opens.
|
Note: This window opens only when Always Ask is selected in the Supplier Tracking field in the Order Maintenance window. |
Enter Supplier Tracking selection.
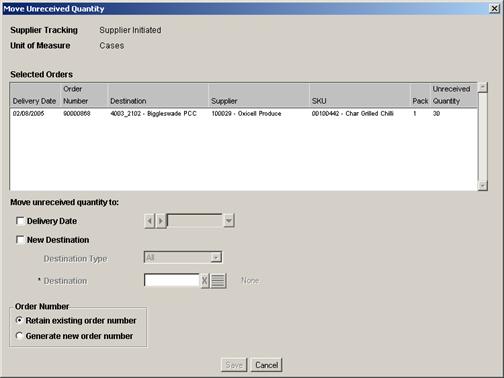
Click OK. The Move Un-received Quantity window opens.
To change the delivery date of the un-received quantity:
Select the Delivery Date check box.
In the next field, select the new date using the calendar button.
To change the destination of the un-received quantity:
Select the New Destination check box.
In the Destination Type field, select the type of location receiving the quantity.
In the Destination field, enter the Destination ID, or click the Destination LOV and select a destination.
In the Order Number area select:
Retain existing order number to use the same order number for the new order.
|
Note: This option is only available if the entire purchase order was selected in the Order Maintenance window. |
Generate new order number to create a new order number.
Click Save. You are prompted to confirm your decision.
Click OK. Your order is saved.
|
Note: Once you confirm your decision to save, the original purchase order or line item is closed and can no longer be updated. |
Navigate: Log in to Order Management. Select the Order Maintenance tab.
Search for and retrieve a purchase order.
|
Note: If you are working in a tree structure, double-click the folder to display the line items contained in the purchase order. |
Select the line items or orders that you want to cancel.
|
Note: All line items must meet the receive criteria in order to move the purchase order. |
Click Cancel Un-received. You are prompted to confirm your decision.
Click OK. Your order is displayed in green and must be saved.
Navigate: Log in to Order Management. Select the Order Maintenance tab.
Search for and retrieve an unreleased purchase order with Forecast in the Order Number field.
|
Note: If you are working in a tree structure, double-click the folder to display the line items contained in the purchase order. |
Select the line items or purchase orders that you want to release.
|
Note: All line items must meet the receive criteria in order to move the purchase order. |
Click Release Order. You are prompted to confirm your decision.
Click OK. Your order is displayed in green and must be saved.
Navigate: Log in to Order Management. Select the Order Maintenance tab.
Search for and retrieve a purchase order.
Complete your work with the purchase order.
Click Save.
|
Note: If you have modified a released order and selected Always Ask, the Supplier Tracking window opens |
In the Supplier Tracking field select:
Supplier Initiated indicates that order changes were caused by the supplier.
Business Initiated indicates that order changes were caused by the retailer.
|
Note: This window opens if you have not already specified supplier tracking in the Order Maintenance window. |
Click OK.
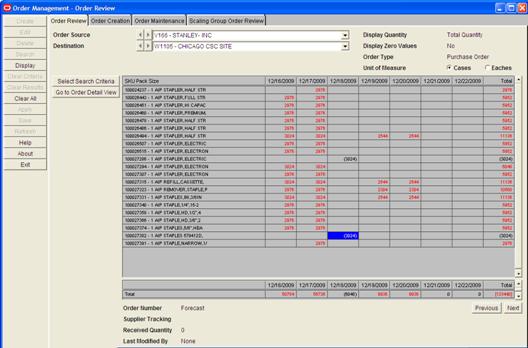
The Order Review tab allows you to review released and unreleased into-store and into-warehouse orders. Orders are available for review until they are a specified number of days past their release or delivery date. Your system administrator specifies the number of days that orders remain available.
Visual clues will help you understand the order status:
Quantities in parenthesis: The purchase order is unreleased. If multiple orders are represented, the quantity displayed is the unreleased amount across purchase orders.
Quantities in brackets: For multiple orders, indicates that released and unreleased quantities exist across purchase orders.
Quantities in red: The purchase order is overdue.
You can review existing orders in Order Management through the Order Review window. The window displays time from left to right across the window. The time periods displayed are determined by your selection in the Select Search Criteria window. You can change the data displayed in the table by updating the information selected in the dynamic fields located in the upper left corner of the window. When you select a cell, information about the order is displayed below the table. Quantities displayed may apply to a single order or multiple orders.
Search results are displayed in numeric order as a result of your selection in the Display in Rows field on the Search Criteria window. The table rows provide a view to the destination, order source, or the SKU-pack-size on the order over the period of time you select.
After you search, you may focus your search by selecting a cell and redefining your search by date. This allows you to perfect your search and examine the orders at an appropriate level.
|
Note: The AIP Online system can be configured to limit the type of orders user can view. Based on your system configuration, the screen may only display purchase orders, only transfers and allocations, or both purchase orders, transfers and allocations. This section provides the procedures to perform all tasks available through the Order Review tab, but the tasks you can perform or the options displayed on your system may vary based on your system configuration. |
Navigate: Log in to Order Management. Select the Order Review tab.
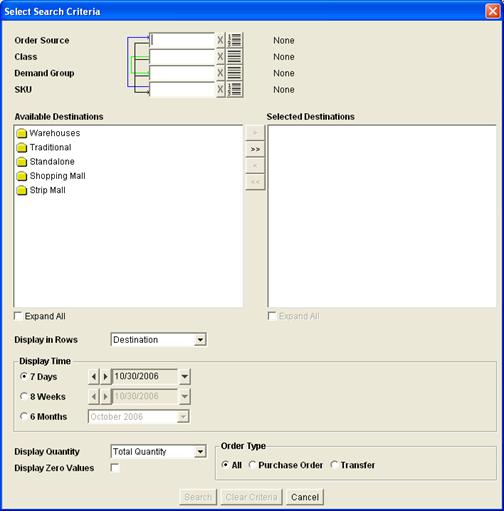
Click Select Search Criteria. The Select Search Criteria window opens.
Enter criteria as necessary to retrieve orders.
| Field | Description |
|---|---|
| Order Source | Select the origin of the items on the order. |
| Class | Select the type of SKUs on the order. |
| Demand Group | Select the demand group you want to search by. |
| SKU | Select the SKU on the order. |
|
Note: You must select criteria in one of the previously listed fields and at least one destination. |
In the Available Destination area:
Select the destinations you want to view orders and transfers for:
Click the move right button to move the destination to the Selected Destinations area.
Click the move all right arrow button to move all destinations to the Selected Destinations area.
|
Note: If you do not want a location that is in the Selected Destinations area, use the move left button or move all left button. |
In the Display in Rows field, select the information you want displayed in the rows of the table:
Destination: The warehouse or store the order arrives to.
Order Source: The origin of the order.
SKU Pack-size: The item on the order.
In the Display Time area, select the time period you want displayed for the orders.
In the field to the right of the display time select the date or month you want the time period to start from.
In the Display Quantity field, select the type of quantity you want displayed in the quantity field.
Select the Display Zero Values check box to view zero quantities.
|
Note: For easier viewing, you may choose not to view zero quantities. |
In the Order Type area, select what you want to view:
All: Both orders, transfers and allocations are displayed.
Orders: Only orders that have a supplier as a source are displayed.
Transfers/Allocations: Only orders that have a warehouse as a source are displayed.
Click Search to display the orders that match the initial results.
Navigate: Log in to Order Management. Select the Order Review tab.
Search for orders, transfers, and allocations.
Select an order quantity on the table.
Click Select Search Criteria. The Select Search Criteria window opens.
Refine your search results as necessary. Information displayed in the date fields is determined by the cell selected in the table.
Click Search to display the new orders that match the initial results.
Navigate: Log in to Order Management. Select the Order Review tab.
Search for orders, transfers, and allocations.
In the dynamic fields, use the arrows or drop-down arrow to select the supplier you want to view orders for.
|
Note: The fields contain Destinations, Order Sources, or SKU-pack-sizes, depending on your selection in the Display in Rows field on the Select Search Criteria window. |
Click Display to view matching order information.
To view additional dates:
Click Next to view dates after the dates currently displayed.
Click Previous to view dates before the dates currently displayed.
In the Unit of Measure field, select the appropriate measure to view the quantities.
To view order details for multiple orders:
Select an order quantity with multiple orders.
Double-click the order quantity. The Multiple Orders window opens.
Click Close to return to the search results.
Navigate: Log in to Order Management. Select the Order Review tab.
Search for orders, transfers, and allocations.
Select an order/transfer/allocation quantity.
Click Go to Order Detail View. The Order Maintenance tab opens with your order displayed.
|
Note: You must have security permissions to edit or view an order on the Order Maintenance window. |
Edit or view the order as necessary.
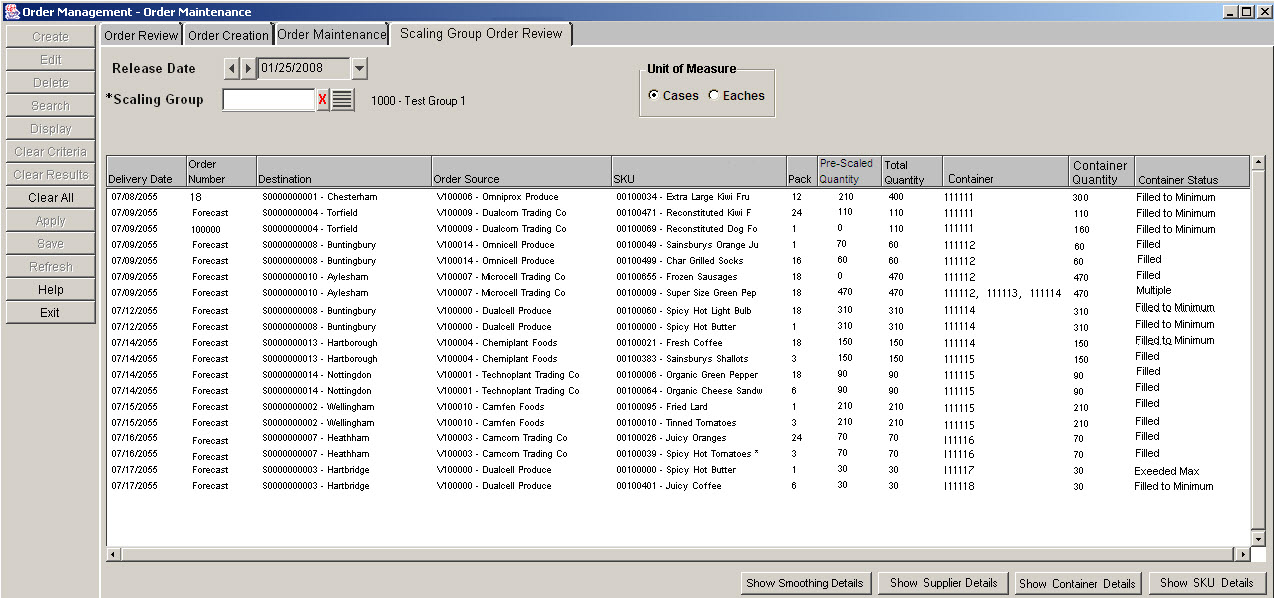
The Scaling Group Order Review tab allows you to:
View orders for a particular Scaling Group and Order date
Show pre- and post-scaling totals
View the SKU details used for scaling
The Scaling Group Order Review tab assists you in viewing and resolving Alerted scaling group/release days that either haven't met the minimums or have not been scaled at all due to missing SKU details.
When Container Scaling is run, the provided container information always reflects the information resulting from the batch. User order modifications are reflected in the order itself but not the container, container quantities, and status.
To view today's Scaling Group Assignments with a specific release date, perform the following instructions.
Navigate: Log in to Order Management. Select the Scaling Group Order Review tab.
Enter the desired Release Date if different than the default.
Use the LOV button to select a scaling group or enter a number in the Scaling Group field.
Select a Unit of Measure, either Cases or Eaches.
Click Search.
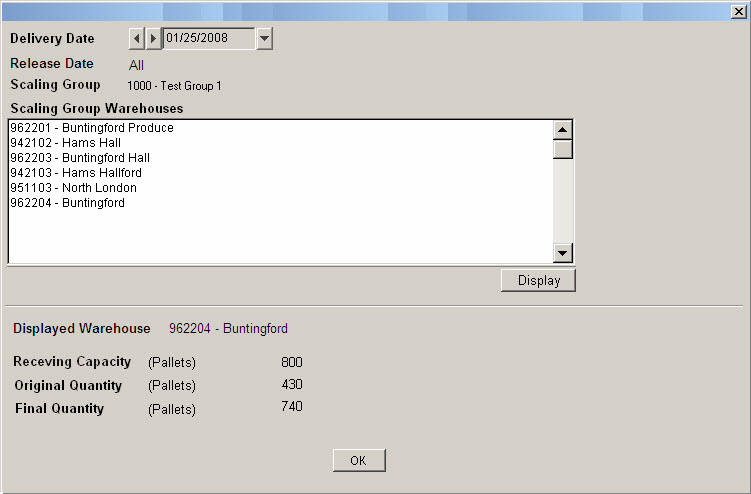
The Smoothing Details pop-up is accessed through the Order Management Scaling Group Order Review window and allows you to review the original and final order totals for a warehouse in the scaling group.
Navigate: From Order Management click the Scaling Group Order Review tab. Enter a Scaling Group ID or select one from the List of Values. Click Smoothing Details. The Smoothing Details pop-up appears.
This section describes the functions of the Smoothing Details pop-up.
When the Display button and Delivery Date are disabled, smoothing is not enabled for the selected Scaling Group. A message appears stating that smoothing is not performed for the scaling group.
Click OK to close the window.
When the Display button and Delivery Date are enabled, you can make the following changes.
| To… | Then… |
|---|---|
| Clear the displayed capacity, capacity UOM, original and final order quantities. | Change the delivery date. |
| Enable Display. | Select a single warehouse and populate the delivery date. |
| Populate the displayed warehouse label, warehouse receiving capacity and order totals for the selected delivery date and scaling group. | Click Display. |
The original quantity is a total of the original order quantities for delivery on the selected delivery date for the scaling group before any smoothing or scaling. The quantity is converted to the capacity type UOM or cases if no capacity is specified.
The original quantity rounded is a total of the original order quantities for delivery on the selected delivery date for the scaling group before any smoothing or scaling. If the warehouse receiving capacity quantity UOM is pallets, the pallet total of each order line item is rounded up to an integer before it is added to the total consumed capacity.
|
Note: The number of cases on the order is not increased. It is simply that a pallet is considered to consume the same amount of space regardless of the number of cases on it. Therefore the pallet representation of the case order quantity is rounded up to an integer. |
The final quantity is the total of the order quantities for delivery on the selected delivery date for the selected scaling group after all smoothing and scaling are complete. The quantity is converted to the capacity type UOM.
The final quantity rounded is the total rounded pallet representation of the order quantities for delivery on the selected delivery date for the scaling group after all smoothing or scaling. If the warehouse receiving capacity quantity UOM is pallets, the pallet total of each order line item is rounded up to an integer before it is added to the total consumed capacity.
|
Note: The number of cases on the order is not increased. It is simply that a pallet is considered to consume the same amount of space regardless of the number of cases on it. Therefore the pallet representation of the case order quantity is rounded up to an integer. |
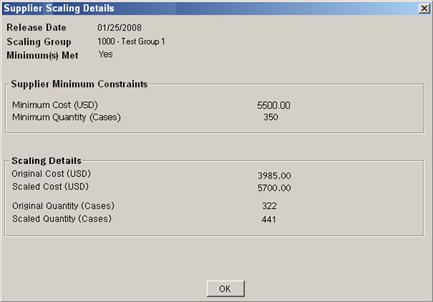
Using the Supplier Scaling Details window, you can view the supplier minimum constraints, compared to the original order totals and the post-scaling totals. This view assists you in resolving alerted scaling group/release days.
|
Note: This view is most useful when only supplier minimums are defined and not container constraints. |
Navigate: Log in to Order Management. Select the Scaling Group Order Review tab and follow the instructions for Viewing Orders. Click Show Supplier Details.
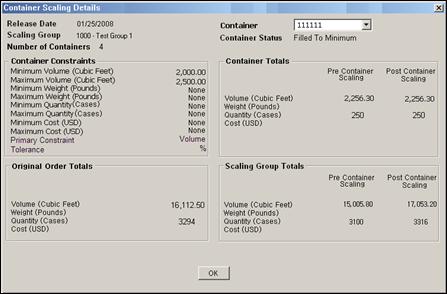
Using the Container Scaling Details window, you can view the Container Constraints, compared to the original order totals and the post-scaling totals. This view assists you in resolving alerted scaling group/release days.
Navigate: Log in to Order Management. Select the Scaling Group Order Review tab and follow the instructions for Viewing Orders. Click Show Container Details.
The Container list has all of the container numbers associated with Scaling Group/Release Date.
To change the container number, select an available number from the Container drop-down list and click OK.
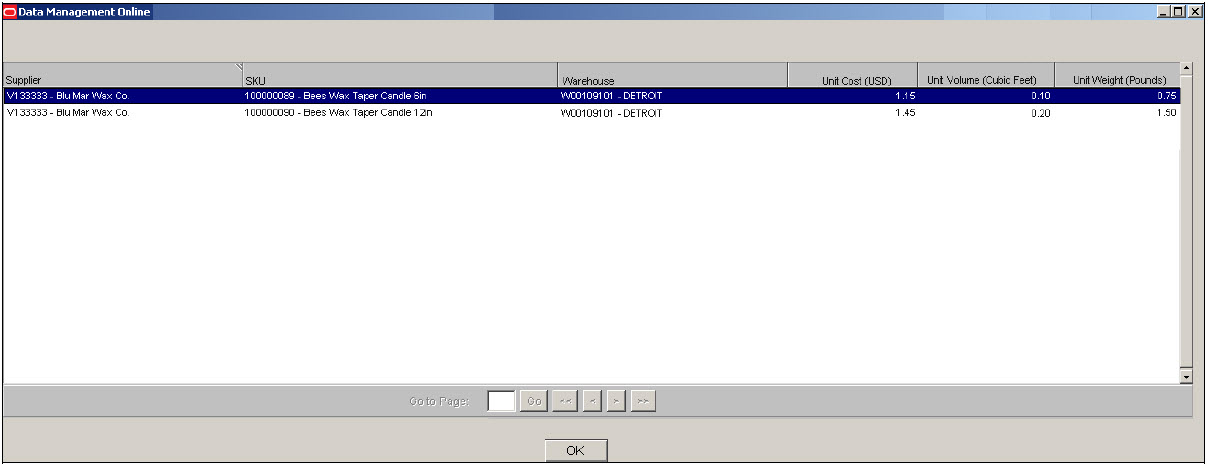
Using the Show SKU Details window, you can view the unit cost, volume, and weight that are used for scaling.
Navigate: Log in to Order Management. Select the Scaling Group Order Review tab and follow the instructions for Viewing Orders. Click Show SKU Details.