| Oracle® Retail Merchandising Cloud Services Administration Guide Release 16.0.027 E96476-02 |
|

 Previous |
 Next |
| Oracle® Retail Merchandising Cloud Services Administration Guide Release 16.0.027 E96476-02 |
|
Previous |
Next |
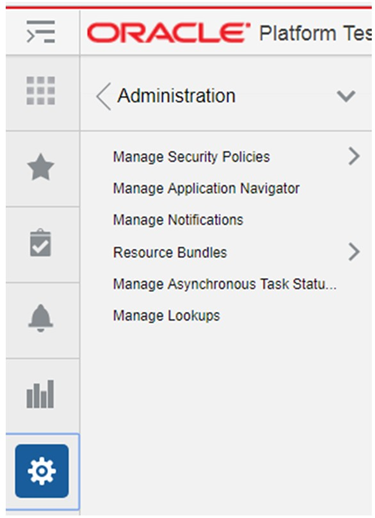
As part of the Oracle Retail application security set up, default enterprise roles and their mappings to application roles are provided with every application. These enterprise roles/groups may not map one-to-one to retailers' security groups. The Manage Security Policies option in the Administration menu, accessed through the Settings icon on the task bar, provides a way for retailers to modify the default enterprise roles so they map to their security groups. It also provides a way for the retailers to change the mappings of the enterprise roles/groups to the application roles.
|
Note: Merchandising maintains various policy stripes in the OPSS schema. The policy stripes are maintained to ensure that the changes done by the retailer on the application security setup are preserved on the subsequent patch installs. A policy patching screen is also provided where the retailers can merge the changes introduced in a patch with the changes done in the application policy setup. |
Access to this functionality is available only for users with the following job roles:
Table 2-1 RAAC Security Privileges
| Role | Duty | Privilege |
|---|---|---|
|
ReIM Application Administrator |
Admin Duty |
Application Navigator Privilege |
|
Role Manager Privilege |
||
|
Notification Manage Privilege |
||
|
Resource Customization Privilege |
||
|
Allocation Application Administrator |
Admin Duty |
Application Navigator Privilege |
|
Role Manager Privilege |
||
|
Notification Manage Privilege |
||
|
Resource Customization Privilege |
||
|
Pricing Application Administrator |
Admin Duty |
Application Navigator Privilege |
|
Role Manager Privilege |
||
|
Notification Manage Privilege |
||
|
Resource Customization Privilege |
||
|
ReSA Application Administrator |
Admin Duty |
Role Manager Privilege |
|
Application Navigator Privilege |
||
|
Notification Manage Privilege |
||
|
Resource Customization Privilege |
||
|
RMS Application Administrator |
Admin Duty |
Role Manager Privilege |
|
Application Navigator Privilege |
||
|
Notification Manage Privilege |
||
|
Resource Customization Privilege |
RAAC is accessed through either the links in the Administration menu of the Settings menu or through the RAAC link in the administrator's user menu on the Global (top) bar of the screen.
Click the RAAC application link in the user menu.
A new tab window or browser window is launched (depending on your browser settings).
From the Retail applications' login screen (for non-single sign-on), enter your username and password.
The following is an explanation of Enterprise (or Job) Roles and Application (or Duty and Privilege) roles:
Job roles are called as such because they closely map to the jobs commonly found in most retailer organizations.
Naming Convention: All retail Job role names end with' _JOB'.
Example: ALLOCATOR_JOB.
Duties are tasks or responsibilities one must do on a job.
Duty roles are roles that are associated with a specific duty or a logical grouping of tasks. Generally, the list of duties for a job is a good indicator of what duty roles should be defined.
Duties that you create should be self-contained and pluggable into any existing or new job role.
Naming Convention: All retail duty role names end with' _DUTY'.
Example: ALC_ALLOC_POLICY_MAINTENANCE_MANAGEMENT_DUTY.
RAAC uses ADF security to implement functional security. The enforcement of functional security is delegated to the Fusion Middleware.
RAAC allows retailers to tailor Oracle Retail applications' default security models to their enterprise business model. This tool also helps retailers manage their Retail applications' security metadata. RAAC provides:
The ability to create new Application Roles (DUTY) through the Manage Roles Mapping task.
The ability for a retailer to change the default roles mapping based on its business needs.
The ability for clients to backup the roles mapping to a file in their local file system.
The ability for a retailer to preserve the changes done to the default application polices beyond patch installs and merge the policy changes introduced in a patch with the policy changes done by the retailer.
The ability for a retailer to backup the roles mapping to a backup OPSS Stripe. The backup stripe can be used to download the backup policies at any time or to restore the application policies using the backup policies.
|
Note: The Roles mapping changes in RAAC will only change the launching application's functional behavior and not the RAAC application itself.For additional information on changing the RAAC application Roles Mapping, see the Managing Policies with Fusion Middleware Control section in the Securing Applications with Oracle Platform Security Services Guide. |
The Manage Security Policies area of RAAC consists of the following task flows to fulfill the above mentioned business requirements.
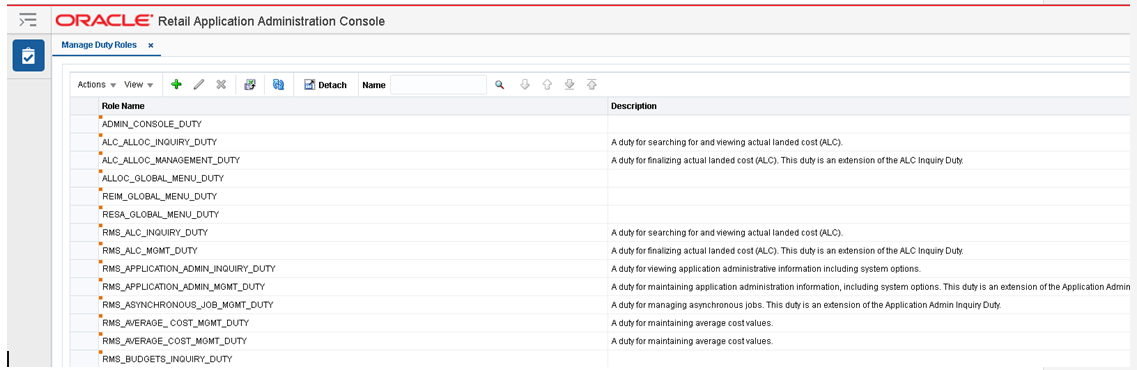
Manage Duty Roles
Manage Roles Mapping
Manage Policy Patching
Manage Backups
It is advisable that before starting to customize the Security Policies, the user should use the Manage Backups feature to make a backup of the current policies.
The Manage Duty Role task flow allows users to create or delete duties. Users can create a new duty role to map according to the retailers enterprise business model.
When a user clicks the manage duty role task flow from the regional area, it opens a new tab in the local area. A table is displayed with all the duties associated with the application. The table toolbar has the following action menu:
Add
Edit
Delete
Export to Excel
A quick search component is provided on the table toolbar to quickly look up any desired record.
The Add action is enabled at all times and allows you to add a new duty role.
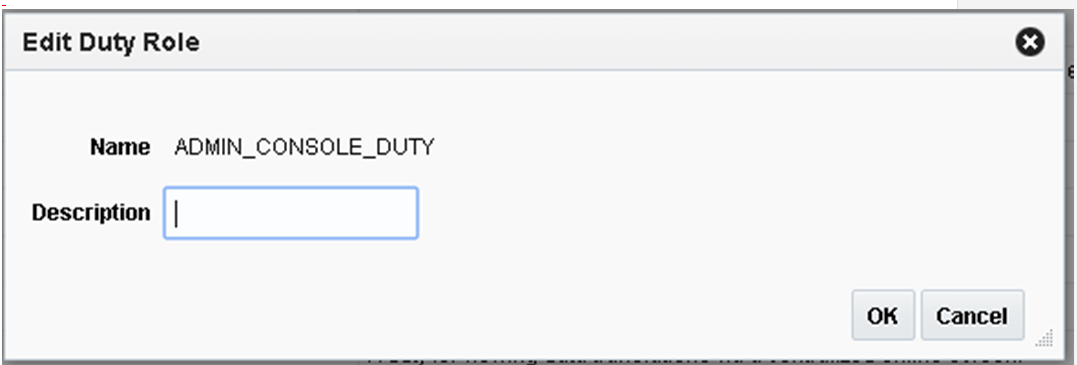
From the Actions menu, select Add. The Add Duty Role dialog is displayed.
Enter a duty name and (optionally) a description for the new duty role and click OK.
Upon entering a name and moving to the Description field or when you click OK, RAAC performs a validation to prevent name duplication. If the name entered already exists, the following error message is displayed; A Duty with this name already exists. Enter a unique name. If the duty name is unique, the new duty is created.
All newly created duties are reflected in the Policy Store, allowing them to be mapped to a role.
The Edit action is enabled when a duty role is selected. The Edit action is used to add or modify the description of an existing duty role.
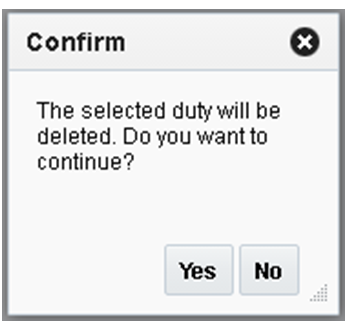
The Delete action is enabled when you select a level that can be deleted from the database.
Only empty duty roles that do not contain any child duty or child privilege roles can be deleted. This is because a child privilege is associated with application code. Therefore, to delete the duty role, you must first remove all mappings between the duty and the child duties and privileges. If you attempt to delete a duty role without first removing the mapping, the following error message is displayed; You cannot delete duty because it has duties or privileges associated with it. Remove these mappings using Manage Roles Mapping task.
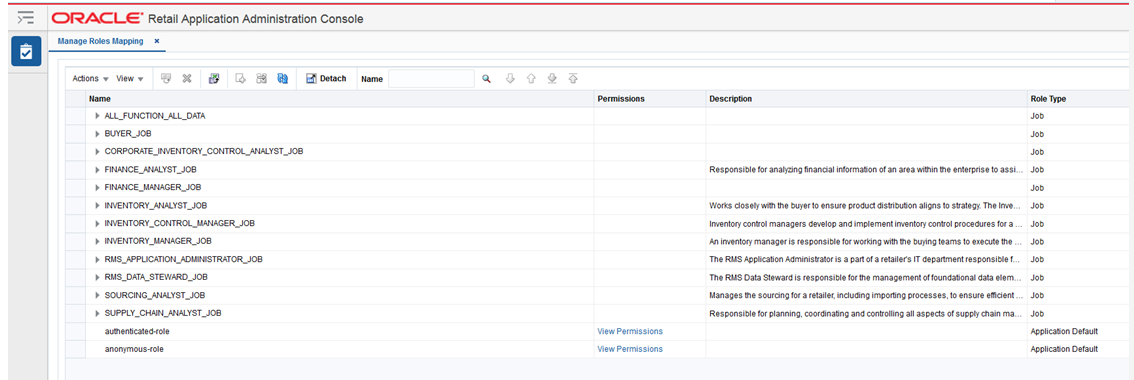
The Manage Roles Mapping task allows a user to add or remove duties or privileges associated with a job role.
When the user clicks on the Manage Roles Mapping link, a new tab is opened in the local area that displays a tree table with the already associated roles of the respective application (that is, the source application from which RAAC was launched). You can then choose to perform the following actions:
Duplicate
Delete
Export to Excel
Select and Add
Remap
A quick search component is provided on the table toolbar to quickly look up any desired record.
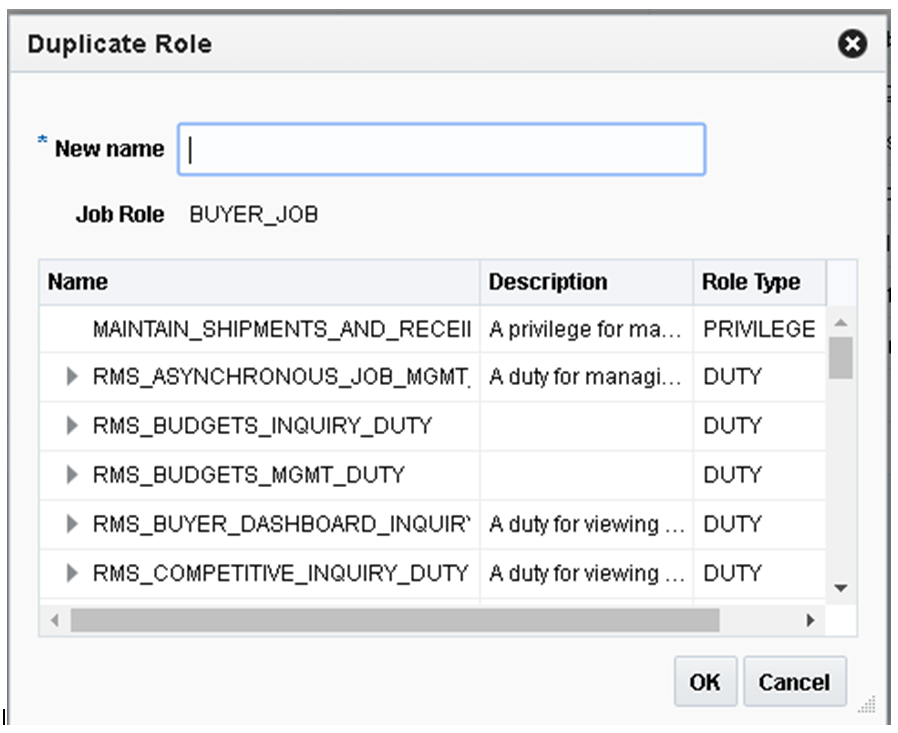
The Duplicate action allows you to copy and paste existing job roles to create a new role. For example:
Within a retailer enterprise security system there are two security groups called Allocator_xyz and Assistant_ Allocator_xyz. By default, only the Allocator role is provided. The Assistant Allocator role is a trimmed down version of the Allocator role with fewer privileges. You can use the Duplicate action to copy the Allocator role and then edit the privileges of the new role.
Select the job role you want to duplicate.
From the Actions menu, select Duplicate. The Duplicate Role dialog is displayed.
Enter a name for the duplicated role and click OK.
Upon clicking OK or tabbing out of the field, the New name is validated. The validation checks for a valid name in the enterprise security solution of the retailer. If it finds a match, then it allows the user to proceed. If the name is not valid, an error is displayed.
The Delete action is enabled when a duty or privilege role is selected.
Duty Role: When the user selects a duty and clicks Delete, the user is prompted with a warning message. Click 'Yes' and the selected duty role mapping will be removed from the corresponding Job role. All other Job roles mappings with that duty role will not be affected.
Privilege Role: When the user selects a privilege and clicks Delete, the user is prompted with a warning message. Click 'Yes' and the selected privilege role mapping will be removed from the corresponding duty role. All the Job roles having that duty role mapping will lose that privilege.
|
Note: The Delete action does not delete the role from the application policies, it only removes the mapping. |
The Export to Excel action is enabled whenever you have the Manage Roles Mapping window open. This action allows you to export the Manage Roles Mapping list to a Microsoft Excel spreadsheet.
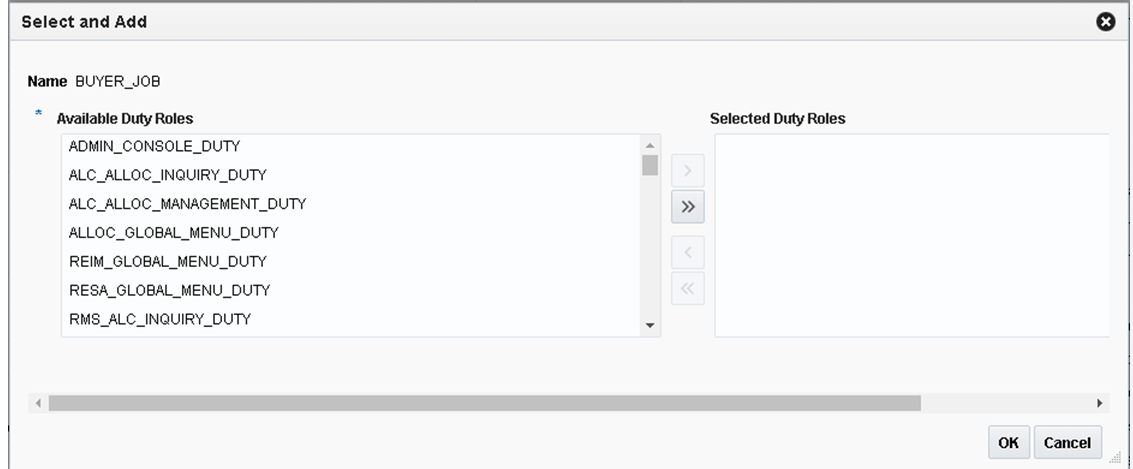
Select and Add is enabled when a job or a duty is selected. Select and Add allows you to do the following:
Add duty roles to job roles
Add duty and privilege roles to duty roles
Select the job role to which you want to add a duty role.
From the Actions menu, select Select and Add. The Select and Add dialog is displayed.
The Select and Add dialog has selected job or duty name displayed and a shuttle component for the user to select from all the available duties or privileges for the applications.
Select one or multiple duties and privileges and click OK to select and add them to the job role.
If you select a duty level then all the associated privileges with it are inherited to the job role. If a privilege is selected then only that privilege is added under the selected duty role.
|
Note: To add a new job role, the user should use the Duplicate feature. |
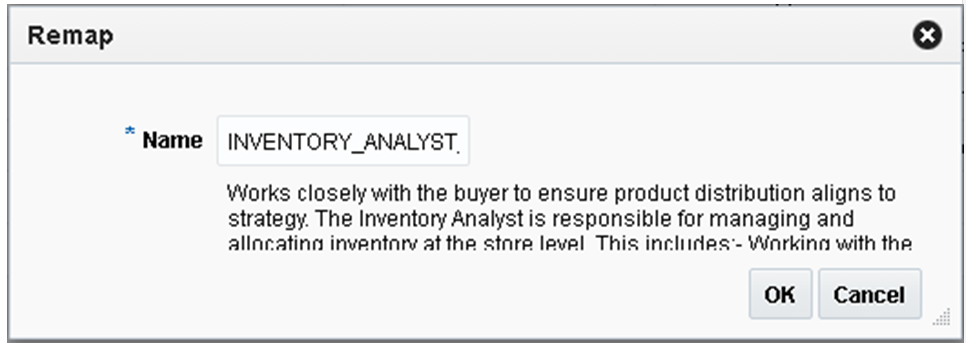
The Remap action is enabled when a job or duty is selected. The Remap action is used to move mapping from one role to another role. During this process, a new role is created and all the associated roles beneath the previous role are moved into the new role, leaving the old role as an orphan or with other roles associated with it.
Select the role you want to remap.
From the Actions menu, select Remap. The Remap dialog is displayed.
Enter a Name and (optionally) a Description for the remapped role.
Upon clicking OK, the New name is validated. The validation checks for a valid name in the enterprise security solution of the retailer. If it finds a match, then it allows the user to proceed. If the name is not valid, an error is displayed.
Job roles are handled in a different manner. When a job role is selected and remapped it will just change the current mapping to the new mapping without creating any new job role to be left as an orphan. This validation should be done once the user enters the new name and clicks OK. If there is no matching record found an error is displayed.
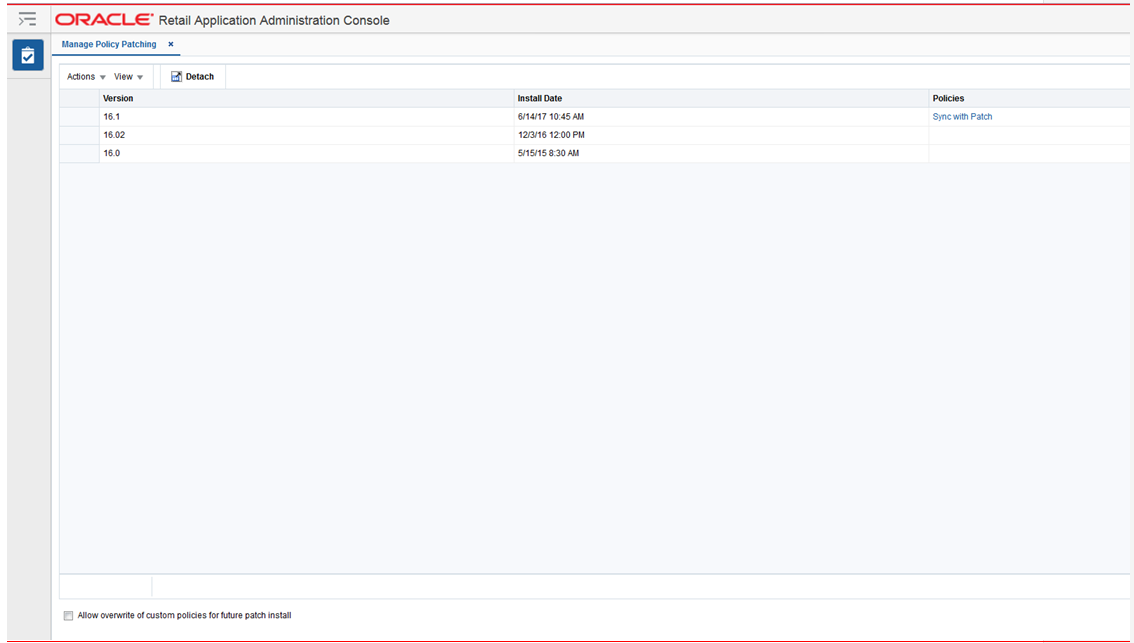
The Manage Policy Patching screen displays two different views. The first view is called the Patch History view. The Patch History view displays the list of patches applied to the application. The latest patch provides a link to synchronize the changes introduced in the patch with the changes done by the retailer on the applications policies. The Patch History view also provides a check box to allow overwrite of the application policies for future patch installs. When this check box is unchecked, the application installer will not overwrite any changes done by the retailer on the application policies. The retailer should merge the changes introduced in the patch with the changes done on the application policies using the Sync with Patch view. When the checkbox is checked, the application installer will overwrite the application policies with the ones in the patch. The installer backs up the custom policies before overwriting application policies. The backups can be managed using the Manage Backups screen.
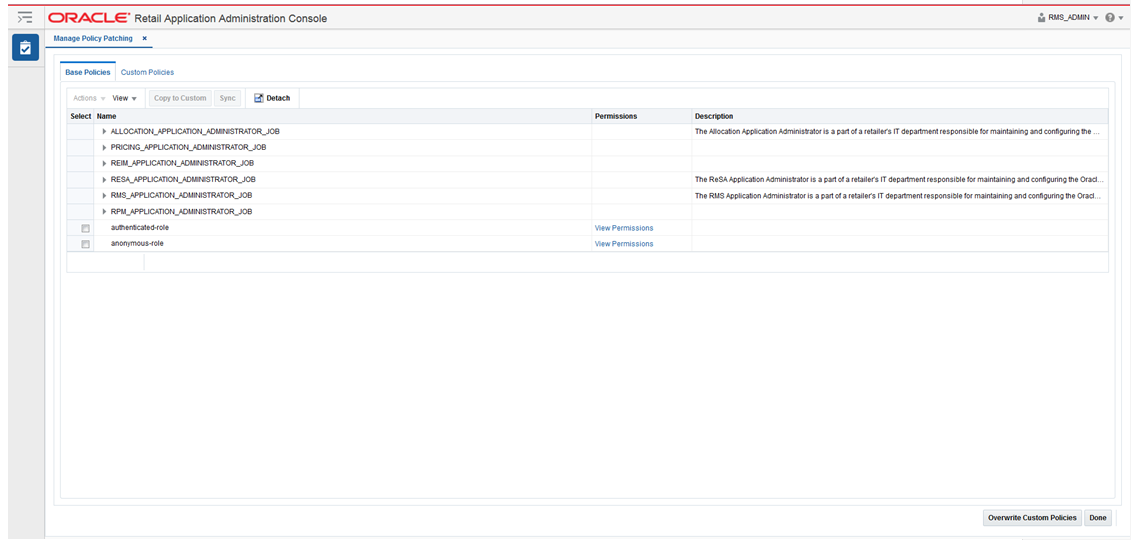
The Manage Policy Patching Screen Sync with Patch view provides a way for the retailer to synchronize the changes introduced in a patch with the changes done on the application policy setup. The Sync with Patch view displays two different tabs. The first tab called Base Policies displays the application policies that came in the patched application. The second tab called Custom Policies displays the application policies that the retailer has changed as per its business needs. The retailer can merge the changes introduced in the patch with the custom policy change using this view. In the current version of RAAC, the retailer can make use of the patch documented policy changes to help guide what changes to look for and merge.
The Sync with Patch view in the Manage Policy Patching screen provides the following actions
Copy to Custom
Sync
View Permissions
Overwrite Custom Policies
Done
Refresh
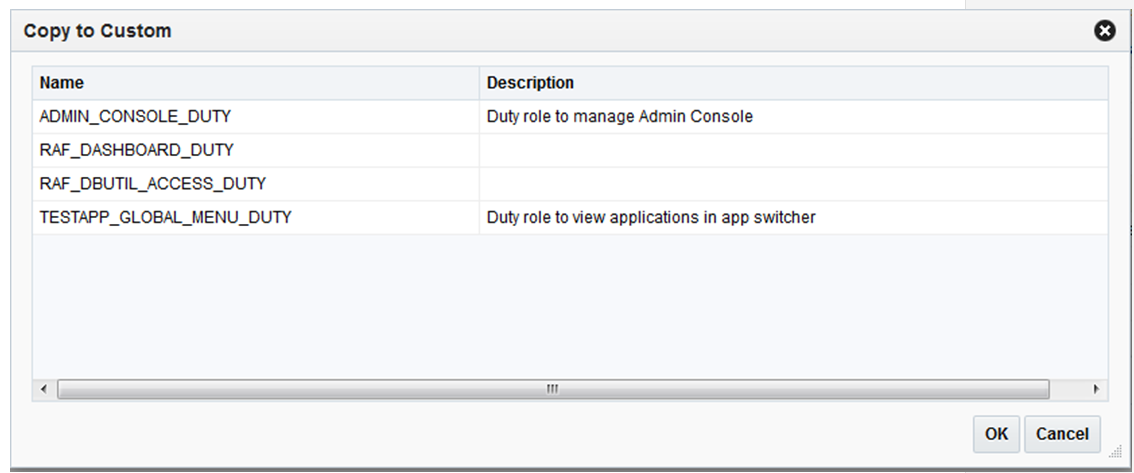
The Copy to Custom action is enabled when a privilege is selected and the privilege does not exist in the custom application policies. The Copy to Custom action copies the privilege to the selected duty in the custom application policy setup.
Select the privilege in the base policies.
If the privilege does not exist in the custom policies, the Copy to Custom action will be enabled.
Click on Copy to Custom action to display the Copy to Custom Dialog.
Select the duty where the privilege should be copied.
Click OK to copy the privilege to selected duty.
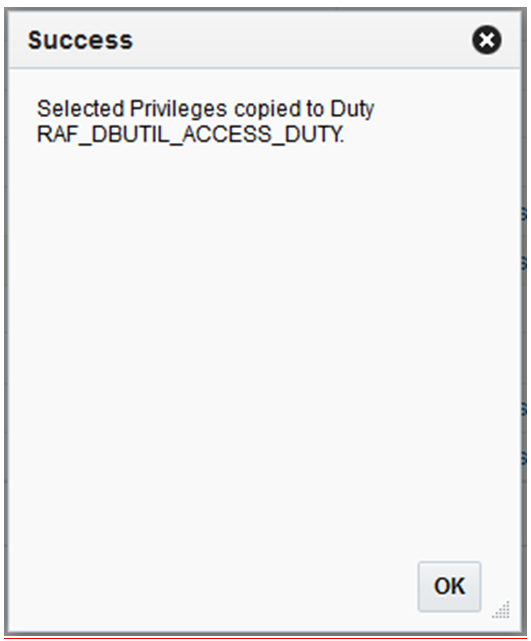
Successful copy will display the success dialog.
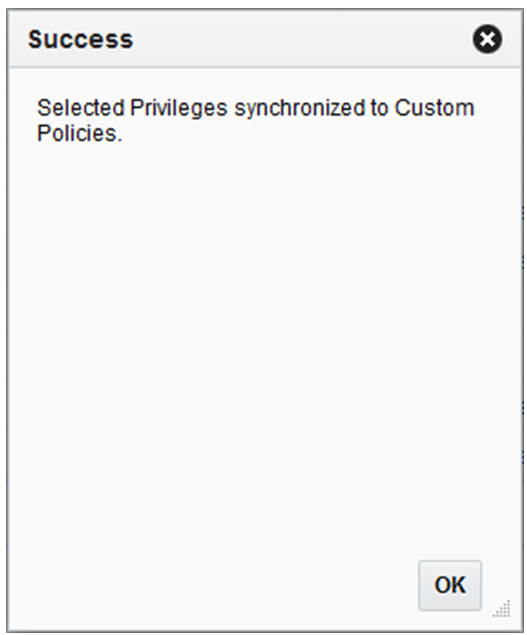
The Sync action is enabled when a privilege is selected and the privilege exists in the custom application policies. The Sync action synchronizes the permissions in the selected privilege with the same privilege in the custom application policy setup.
Select privilege in base policies.
If the privilege exists in the custom policies then the Sync action will be enabled.
Click on Sync to synchronize the permissions with the same privilege in the custom policy setup.
Successful sync will display the success dialog.
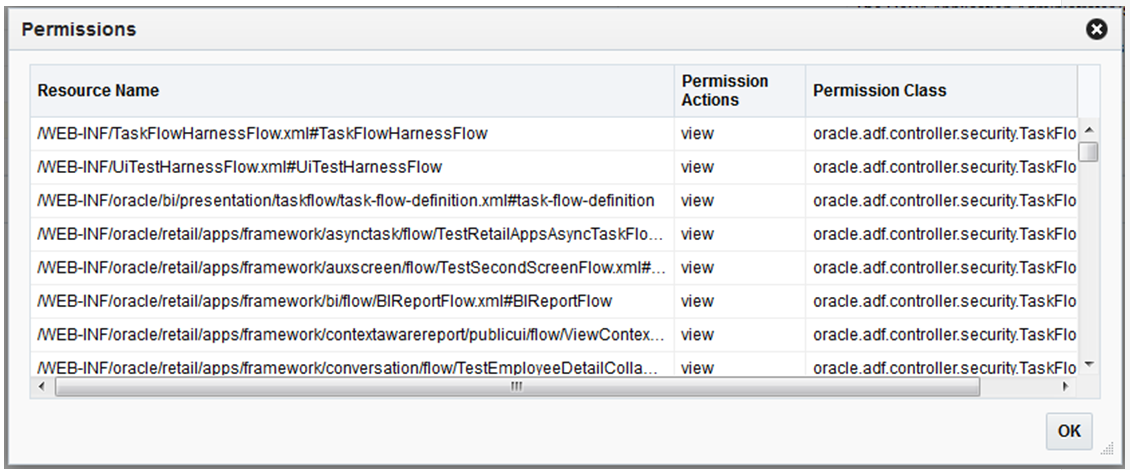
The View Permissions link is used to display the permissions associated with a privilege. This link opens up a popup that displays the Resource Name, Permission Actions and Permission Class for permissions.
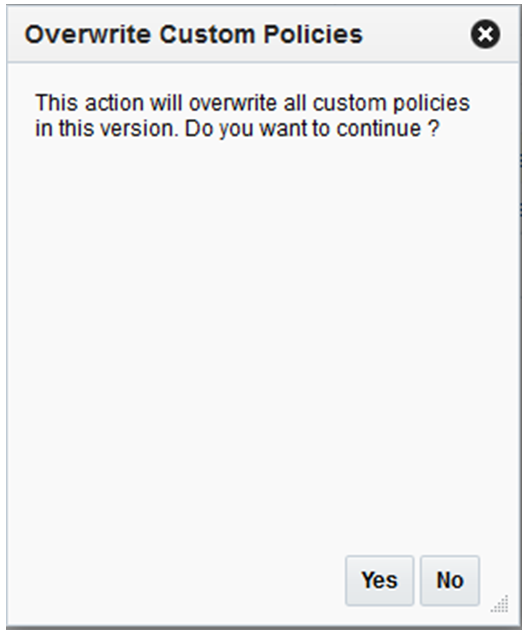
The Overwrite Custom Policies action overwrites the current application policy setup with the application policies available in the patched application. The action will cause the loss of any changes done by the retailer on the application policies. The action displays a warning popup before overwriting application policies with the patched policies. The action also backs up the application policies before overwriting and can be retrieved using the Manage Backups screen.
The Done action takes the user back to the Patch History view of the Manage Policy Patching screen.
The Refresh action is only available in the Custom Policies tab of the Sync with Patch view of the Manage Policy Patching screen. The action is used to refresh the custom application policies. The action can be used to verify the changes in the custom policies after a successful Sync or Copy to Custom action from the base policies.
|
Note: NoteThe Sync with Patch screen can be used for the synchronization of the privilege and its permissions from the patched application policies to the custom application policies. If a new duty role has been introduced in a patch then the Manage Duty Role screen should be used to create a duty role and Manage Role Mapping screen should be used to assign it to the appropriate job role. Once the new duty role has been created and assigned to a job role, the Copy to Custom action can be used to assign privileges to that duty. |
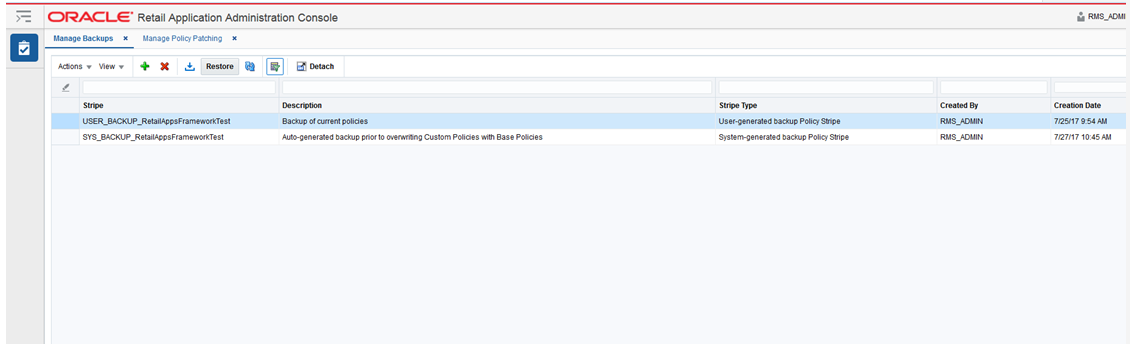
The Manage Backups screen is used to maintain the application policy backups. The backups can be used to restore the application policies back to the original state if something goes wrong with the application policy setup. The backups can be created by the following actions
Installer creates a backup before overwriting the application polices during a patch install. The installer created backup is prefixed with the name SYS_BACKUP. The installer overwrites the application policies and creates a backup only if the 'Allow Overwrite of Custom Policies' flag is checked in the Manage Policy Patching screen.
A user can create a backup using the Create action on the Manage Backups screen. The user created backup is prefixed with the name USER_BACKUP.
A user can initiate a backup using the 'Overwrite Custom Policies' action on the Manage Policy Patching screen. The Overwrite Custom Policies action creates a backup before overwriting the custom policies. The backup created by the Overwrite Custom Policies action is prefixed with the name SYS_BACKUP.
The Manage Backups screen provides the following actions:
Create
Delete
Download
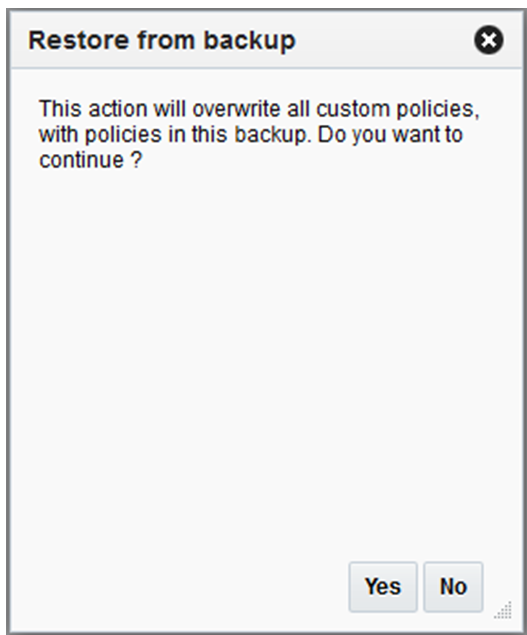
Restore
Refresh
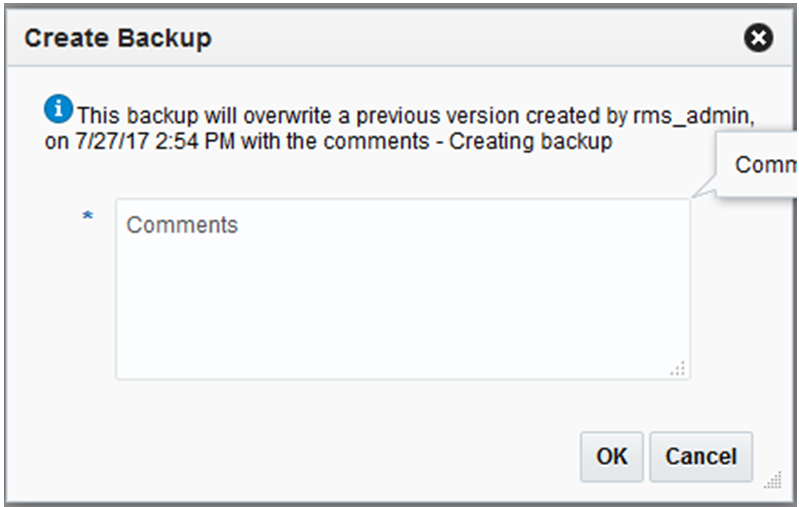
The Create action is used to create a backup of the current application policies. The backup stripe name will be prefixed with the text USER_BACKUP. The create action opens up a popup where the user can enter the comments for the backup.
The RAAC application allows only one user initiated backup. If a backup was already created by an administrator for the current application policies, it will be overwritten.
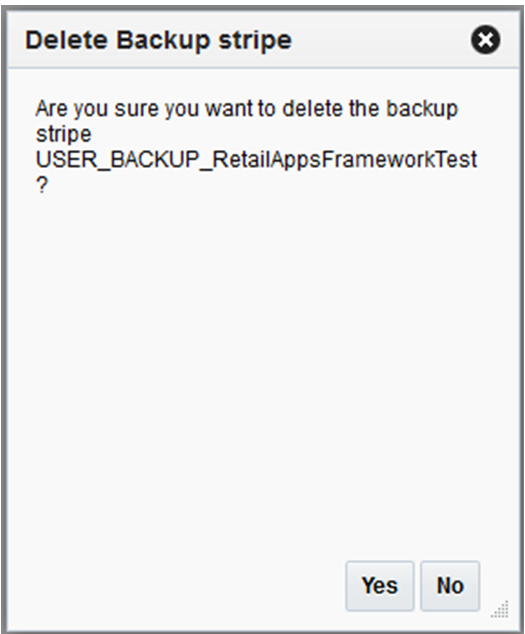
The delete action is used to delete the selected backup stripe. A confirmation dialog is displayed before deleting the backup.
The download action is used to download the selected backup stripe in an xml format. It will generate a file called backup.xml which can be stored on the device where the browser is running. The xml file can be opened in JDeveloper to look at the changes in the backup.