Create a Workflow Design
Workflow designs are like flowcharts. They broadly define the logic of workflows and help you visually arrange steps and the tasks that steps contain.
Here is the Project Proposal Approval workflow design you will create in this example:
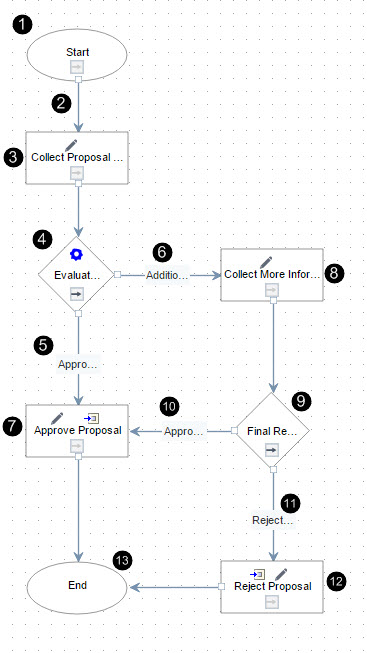
Workflow Example Image Highlights
Item | Description |
|---|---|
1 | Start step: Every workflow starts with the Start step. |
2 | Connector line: Connector lines define relationships between steps. When connector lines come from decision steps (the diamond-shaped steps), they correspond to options that the system or a user chooses. When they come from the start step or task steps (the rectangular steps), they only define the path of the workflow. |
3 | Collect Proposal Data task step: When a user creates a project proposal and assigns the Project Proposal Approval workflow to run against it, this step assigns the proposal creator a form task to provide more information. Among this information is the Risk Level value. This value determines the subsequent path of the workflow. |
4 | Evaluate Risk Level automatic decision step: In this automatic decision step, the system evaluates the Risk Level associated with the proposal. If the Risk Level field is set to Low, Very Low, or Medium, the workflow follows the Approve Proposal exit option (5). If the Risk Level field is set to High, Very High, or Not Identified, the workflow follows the Additional Information Required exit option (6). |
5 | Approve Proposal exit option: The workflow automatically chooses this exit option if the Risk Level field in the project proposal is set to Low, Very Low, or Medium. |
6 | Additional Information Required exit option: The workflow automatically chooses this exit option if the Risk Level field in the project proposal is set to High, Very High, or Not Identified. |
7 | Approve Proposal task step: In this task step, the system changes the status of the proposed project to Planned. It also sends the proposal creator a notification that the proposal has been approved. |
8 | Collect More Information task step: If the Risk Level field of the proposal is set to High, Very High, or Not Identified, this task step assigns the proposal creator a form task to provide more information. |
9 | Final Review manual decision step: In this manual decision step, the proposal approver reviews information about the proposal and then approves or rejects it. If the approver approves the proposal, the workflow follows the Approve Proposal exit option (10). If the approver rejects the proposal, the workflow follows the Reject Proposal exit option (11). |
10 | Approve Proposal exit option: This is the exit option the workflow follows if the approver approves the proposal. |
11 | Reject Proposal exit option: This is the exit option the workflow follows if the approver rejects the proposal. |
12 | Reject Proposal task step: In this task step, the system changes the status of the proposed project to Rejected and sends the proposal creator a notification that the proposal has been rejected. |
13 | End step: Every workflow ends with the end step. |
The following tasks describe the procedures for creating the Project Proposal Approval workflow design in the Workflow Design Editor.
- Adding the Workflow Design and Setting its General Properties
- Adding the Collect Proposal Data Task Step
- Adding the Evaluate Risk Level Automatic Decision Step
- Adding the Approve Proposal Task Step
- Adding the Collect More Information Task Step
- Defining the Paths from the Evaluate Risk Level Automatic Decision Step
- Adding the Final Review Manual Decision Step
- Adding the Reject Proposal Task Step
- Defining the Paths from the Final Review Manual Decision Task Step
- Validating and Publishing the Workflow Design