| Agile Product Lifecycle Management Product Cost Management User Guide Release 9.3.6 E71147-01 |
|

 Previous |
 Next |
| Agile Product Lifecycle Management Product Cost Management User Guide Release 9.3.6 E71147-01 |
|
Previous |
Next |
This chapter provides information about working with sourcing projects in PCM.
A sourcing project is the entry point of sourcing and product pricing. A sourcing project tracks data required for sourcing and pricing, to perform data analysis for effective pricing.
|
Note: The object previously known as the PPM Program was renamed as Project object. There is no relation between the PPM Project object and the PCM Sourcing Project. All references to projects in this guide are to PCM Sourcing Projects. |
The project data includes Items and Assemblies, Bills of Material (BOMs), and Approved Manufacturers Lists (AML). Multiple users can work as a team to complete sourcing and pricing activities, since the project lets multiple users view and modify the same components. Projects allow you to execute sourcing activities, including Request for Quotes (RFQs), depending on the lifecycle phase and analysis of your Item Master content.
Product Cost Management (PCM) consists of the Product Sourcing solution in combination with the Price Management solution to integrate and leverage valuable price and cost information within your business processes.
You can create a project from the beginning or create a copy of an existing project using the Actions > Save As command. The copied projects will not contain information such as partners, RFQs, supplier responses, and history.
|
Note: You access Sourcing Projects primarily through the Agile Web Client. |
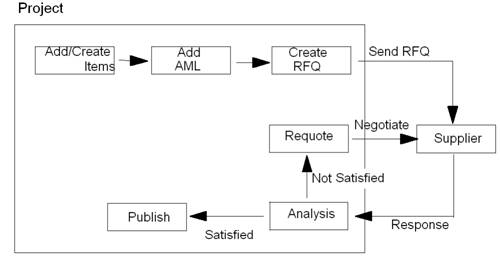
The following diagram shows how a project functions in the RFQ, supplier response, and analysis flow in Product Cost Management.
The lifecycle phases of a project are Draft, Open, and Closed. A project is in the Draft state when it is created. You can create RFQs and receive supplier responses when the project state is Open. You can change the status of the project from the Change Status menu.
|
Note: You must complete the Ship To Location field on the General Information tab before you change the state of the project from Draft to Open. |
A project remains open until the project owner changes the status to Closed.
| Status | Description |
|---|---|
| Draft | This is the initial lifecycle phase of a project. In this state, you can edit only the Cover Page attributes, Item component data, and Attachments. In this state, however, you cannot create RFQs from the project. |
| Open | The RFQ creation and supplier responses are active after the project is moved to the Open state. |
| Closed | Set by the project owner when all tasks for the project are completed. |
This section describes different methods to create a sourcing project.
You can create a project by choosing Create New > Sourcing Projects.
|
Note: The Project object in the Create New menu is a PPM object. It is different from the PCM Sourcing Project object. |
Click Create New > Sourcing Projects. The Create New Sourcing Projects dialog appears.
|
Note: The fields in the Create New Sourcing Projects dialog that are marked in bold are required fields. Fill in required fields to proceed. |
Select the type from the Type drop-down list.
Enter a unique identification number (unique identifier for the project) in the Number field, or click the Auto Number icon for the system to generate a number based on the Auto Numbering functionality defined for the Project Type.
|
Note: The number field could also be filled in automatically and may not be editable. Numbering for sourcing projects depends on the configuration set up by your Agile administrator. |
Define the price scenarios for the project. Select Quantity Breaks or Effectivity Periods. For more information, see "Specifying the Price Scenario."
If you selected Quantity Breaks in step 4, select the number of quantity breaks you want from the drop-down list. You can set up to six Quantity Breaks per project.
If you selected Effectivity Periods in step 4, follow these steps:
1. Select a number in the Number of Date Periods drop-down list. You can set up to 20 date periods.
2. Select the period type from the Period Type drop-down list. Available values are Monthly, Quarterly, Semi-Annually, Yearly, and Variable.
3. If you selected Monthly, Quarterly, Semi-Annually, or Yearly for the Period Type, select the effective start date from the Start Date drop-down list.
4. If you selected Variable for the Period Type, specify the start and end dates for each period.
5. Select a number from the Quantity Breaks per Period drop-down list.
6. Click Save. The General Info tab of the new sourcing project appears.
The specified project is created in the Draft state.
Enter general information for a sourcing project from the General Info tab of the project. The following table describes sourcing project fields that are included on the General Info tab.
| Field name | Constraint | Description |
|---|---|---|
| Number | Read-only | The unique identification number of the project. |
| Description | Optional | The description about the project. |
| Lifecycle Phase | Read-only | The current lifecycle phase of the project. The default state is Draft. |
| Program | Optional | The program to which the project applies. For example, you can define your programs and information needed for a specific program. You can select the program for which the project is being created from the drop-down list. If this field is blank, the project information applies to all the programs. |
| Customer | Optional | Customer to whom the project applies. You can select the customer by clicking the Search button next to this field and running a search. If this field is blank, the project information applies to all the customers. |
| Manufacturing Site | Optional | The site where the project will be handled. You can select the site from the drop-down list.
Select a site only if the project is site-specific. If it is, when adding an assembly from PC, only the bill of materials (BOM) belonging to the specific site is added to the project; the rest of the items are ignored. For example, if a project is specific to "San Jose" and if you add an assembly which has a BOM from "San Jose", "Milpitas", and "global", only the BOM for San Jose is added to the project. It will not add the global/common BOM or Milpitas BOM. |
| Ship To Location | Required (for RFQ creation) | The location to which the items in the project are to be shipped. You must specify the location to move the project into the Open lifecycle phase.
The list of Ship To locations is determined by the setting for the Authorized Ship To property in your user profile. If your user profile does not specify any authorized Ship To locations, you won't be able to select a value for this field. |
| Project Currency | Required | You can select the currency from the drop-down list.
The project currency determines how other currency values (for example, price quotes entered by suppliers in an RFQ response) are normalized based on the system's currency exchange rate table. The default currency depends on the currency of the current user. |
| Product Lines | Optional | The product line(s) the project is associated with. |
| Number of Periods | Read-only | Number of effectivity periods. |
| Number of Qty Breaks | Read-only | The number of quantity breaks in the project. |
| Data to Share | Optional | The data to share with the suppliers in all RFQs generated from the sourcing project. You can select the fields to expose to the supplier in the RFQ in the Data to Share with Suppliers window by clicking the button next to the Data to Share field. The Data to Share settings at the sourcing project level can be overridden at the RFQ level. |
| Response Required Fields | Optional | The response information required from the suppliers for all RFQs generated from the sourcing project. You can select the required fields from the Response Data Requirements window by clicking the button next to the Response Required Fields field. The Response Required Fields settings at the sourcing project level can be overridden at the RFQ level. |
| Supplier Instructions | Optional | Instructions that are communicated to suppliers through RFQs created from the project. |
| Owner | Required | The owner responsible for the project. Only the owner can create RFQs from the project. You can select the owner by clicking the Address Book button next to the Owner field. |
| Creator | Read-only | The creator of the project. |
| Created Date | Read-only | The date when the project was created. |
| Last Modified | Read-only | The date when the project information was last modified. |
| Project Type | Read-only | The type of the project. It is Sourcing Project by default. |
| Authorized Users | Optional | Users authorized to work with this project. You can select the authorized users by clicking the Address Book button next to the Authorized Users field. |
| Disallow AML Statuses | Optional | Specifies AML statuses for parts that you do not want brought into the project. Use this field to automatically filter out manufacturer parts that are not preferred, discontinued, or are disqualified for some other reason. |
|
Note: The Project Number, Lifecycle Phase, Number of Periods, Number of Qty Breaks, Creator, Created Date, and Last Modified Date fields are updated automatically. |
To enter data into a sourcing project:
Open the sourcing project.
Click the Edit button on the General Info tab.
Modify fields, as needed.
Click Save.
Once you have created a project, you can add items to a project in several ways. See "Adding Items to a Project" for more details.
You can create a project directly from the Item object within Agile Product Collaboration (PC).
Open an item.
Click Actions > Create New > Sourcing Project.
Select the Sourcing Project Type.
Enter Number.
Enter the Price Scenarios (either quantity breaks or effectivity periods).
Select the Manufacturing Site location from the drop-down list.
|
Note: The Manufacturing Site field and the Disallow AML Statuses field (from the next step) only appear if they have been enabled by the Agile administrator. |
Select any AML status in the Disallow AML Statuses field that you want to exclude. An AML with the selected status will not be added from PC into the sourcing project.
Click Save.
The two types of project price scenarios are Quantity Breaks and Effectivity Periods.
Specify Quantity Breaks to capture prices based solely on quantities. You can determine how the cost of products might change based on different quantity scenarios. When you select the Quantity Breaks price scenario, you can capture prices for up to six quantity breaks. Although the system automatically generates a start date for this type of price, you can choose to specifically set the Valid From and Valid Until date fields on the RFQ Response entry form. See "Response Entry Form"
Specify Effectivity Periods to capture prices based on future dates, which helps you assess the cost of products for future time periods. The Effectivity Periods scenario also supports quantity breaks per period, which enables you to create a combination of period and quantity scenarios. When you select the Effectivity Periods price scenario, you can capture prices for up to 20 price periods, and potentially six quantity breaks per period.
The following table provides an example of the Quantity Breaks price scenario, using three quantity breaks.
| Quantity breaks | Selected quantity breaks |
|---|---|
| 500 | X |
| 200 | X |
| 100 | X |
The following table provides an example of the Effectivity Periods price scenario, using four date periods and one quantity break per period.
| Quantity breaks | 01/01/09 to 03/31/09 | 04/01/09 to 06/30/09 | 07/01/09 to 09/30/09 | 10/01/09 to 12/31/09 |
|---|---|---|---|---|
| 500 | This cell is blank. | This cell is blank. | X | This cell is blank. |
| 350 | This cell is blank. | This cell is blank. | This cell is blank. | X |
| 200 | This cell is blank. | X | This cell is blank. | This cell is blank. |
| 100 | X | This cell is blank. | This cell is blank. | This cell is blank. |
The following table gives an example of the Effectivity Periods price scenario, using four price periods and two quantity breaks per period.
| Quantity breaks | 01/01/09 to 03/31/09 | 04/01/09 to 06/30/09 | 07/01/09 to 09/30/09 | 10/01/09 to 12/31/09 |
|---|---|---|---|---|
| 500 | This cell is blank. | This cell is blank. | X | X |
| 350 | This cell is blank. | X | X | X |
| 200 | X | X | This cell is blank. | This cell is blank. |
| 100 | X | This cell is blank. | This cell is blank. | This cell is blank. |
Agile PCM does not use a fixed calendar for its dates, so technically all price periods that you specify can have any start and end date. All dates related to prices are in DateOnly format in GMT.
When you create a project, the Sourcing Projects Creation dialog enables you to specify up to 20 price periods. However, there is no actual limit to the number of price periods in a project. If you open a project and choose Actions > Modify Price Scenarios, you can add more than 20 periods.
|
Note: The Modify Price Scenarios option appears in the Actions drop-down list only when the project has price periods. This option is not available when project is created with quantity breaks. |
If you delete a price period, the period and any price information associated with it are removed. If the Auto Publish Quote History SmartRule is set to "Allow," the system automatically creates quote histories when you delete a price period from a sourcing project, if and only if, the sourcing project has an RFQ associated to it. For more information about SmartRules, see Agile PLM Administrator Guide.
Because there is no fixed calendar in Agile PCM, effectivity periods can overlap. However, if the Overlap Price Line Effectivity Periods SmartRule is set to "Disallow," the system rejects any overlapping periods when you publish prices.
When you modify price scenarios, you can delete price periods or add new price periods before or after the existing range of price periods. For more information, see "Modifying Price Scenarios".
At times, you may want to create a project that requires the same general information and items as an existing project. To save time, search for the existing sourcing project and save it with a different name. Saving an existing sourcing project with a different name saves the general information about the project, the items it includes, and any attachments to the project. The partners, RFQs, responses, response lines, and history are not saved.
To reuse cover page information such as, Effective Periods, Data to Share, Response Required Fields, and/or Supplier Instructions, for all of your sourcing projects, you can create a sourcing project that has those fields set to specific values and use the project as a template. Every time you want to create a sourcing project, you can do a save-as on the template project so that the new project automatically inherits all the cover page information and attachments.
To save a copy of a project:
Open the project you want to use as the basis for a new project.
Select Actions > Save As. The Save As dialog appears.
Select the Type of sourcing project from the drop-down list.
The next available number appears in the Number field. You can click the AutoNumber button to generate the next project number, or enter the project number.
|
Note: AutoNumber functionality is controlled at the subclass level in Java Client and may have been changed by your Agile PLM administrator. |
Click Save.
Click Edit to modify the general project information. Click each tab in the project to verify and edit the information, as needed.
|
Note: You can modify the price scenarios of projects, which use Effectivity Periods and are created using the Actions > Save As feature. For more information, see "Modifying Price Scenarios" |
Sharing is how you define the people who have access to a project. When you share a project, you grant one or more of your roles to another Agile user or user group. The roles that you can share with a user include your own assigned roles and roles that have been shared with you by belonging to a user group. Any users or user groups that you share a project with can perform actions permitted by the role(s) for that project only.
For general information about sharing Agile objects with other users, see Getting Started with Agile PLM.
|
Note: You cannot share those roles that have been shared with you by another user. |
To share project:
Open the project.
Choose Actions > Sharing. The Share With Users dialog appears.
Click Add. The Add Users dialog appears.
Click the Address Book button to the right of the Users field. The Users search palette appears.
Use the drop-down filter in the Users search palette to select all users (Users) or all groups (Groups) or any other specific groups.
Enter your search criteria and click Search. You may also type a user's name if you know exactly how it appears in the system, but you must select a group first to populate the Available Users list.
Select the users one by one or select multiple users/user groups using the Ctrl button on your keyboard. Drag and drop your selected item(s) to the Users cell.
Click the list button to the right of the Roles field. The Roles palette appears. Select the appropriate role or roles for your chosen users to have available in relation to the project. Drag and drop them into the Roles cell.
Click Save. Your additions are listed in the Share With Users window.
Click Close.
To remove users from a project's Access Control List:
|
Note: To see the Access Control List for a project, choose Actions > Sharing again. The Access Control List shows the complete list of users who have access to the project. |
Open the project.
Choose Actions > Sharing. The Access Control List: Share With Users dialog appears.
Click the rows of users to remove.
Click Remove.
To see which objects have been shared with you:
Click the My Settings button in the Courtesy Controls area in the left pane.
Click the Share tab.
The Share tab lists the objects that have been shared with you by another user.
From your user profile, see if any objects have been shared with you through user groups.
Click the User Group tab.
Click a desired group.
Click its Share tab.
The Share tab lists the objects for which the group and all its users have been granted shared roles by another user.
The BOM filtering feature enables you to set up filters to selectively add components in BOM structures. You can filter components based on any enabled attributes from the cover page, P2, and BOM tabs of the Item object. Since the Parts and Documents classes are based on the Items base class, the Parts and Documents cover page fields are also available for filtering.
|
Note: P3 fields, Document-P2 fields, and all read through fields are unavailable for filtering. |
|
Note: Part-P2 fields are available for filtering. |
To use BOM filtering, you must first enable and configure BOM filters through the Java Client Admin tab. For procedural steps to set up the BOM filters, see "Configuring BOM Filters."
BOM filters are inherited by top-level assemblies when the assemblies are added into a sourcing project from PC Item Master. Alternatively, when adding an assembly to a sourcing project, a BOM filter can be set up for that assembly, which overrides the inherited filter.
Content update uses the same filter settings that you use during the item additions. These filter settings display in the sourcing project Item table. You can update the project filters even after you add the items.
|
Note: The settings affect only the future item additions and have no impact on the added items. |
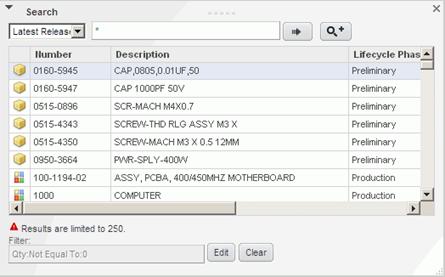
The BOM filter is updated through a special dialog that is similar to the controls of the general filter functionality. When adding items by search, you have access to BOM filtering from within the search palette, as shown below.
If you have BOM filters enabled and you try to add items using copy/paste or drag/drop, the BOM Item Filter pops up.
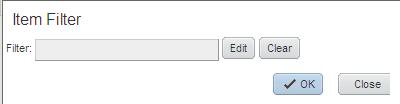
When you click the Edit button from within the search palette or the BOM Item Filter pop up window, the BOM filter window appears, as shown below.
You can set up filters to selectively add BOM components when you add items to a sourcing project.
To use BOM filters:
Attempt to add an item to a project by search, drag and drop, and so on.
If enabled, the BOM Filter field appears when you attempt to add existing items to a sourcing project. Go to "BOM Filtering" to see how the BOM filter appears in the UI.
|
Note: Your administrator must have enabled this field in the Java Client in order for it to appear when you add items by drag and drop or for it to be visible in the search palette (if you add by search). |
Apply BOM filters during the item addition process.
After an item addition, the filter is associated with the item.
Content Update uses the filter settings that are used during the item addition.
BOM filter setting defaults to the filter setting of the last import.
Alternate filters can be applied to each new item added to a single sourcing project.
The following are examples of BOM filter usage.
When you add items from PC to a sourcing project, duplicate items are not added. Only one instance of an item is retained.
Assume that the assembly belongs to several product lines. If you are interested in components of only a specific product line, you can set up the filter criteria in the BOM filter to be Product Line = 'X'. As a result, only components of that product line will be added to the sourcing project.
Take the following assembly structure as an example.
| Number | QPA |
|---|---|
| A1 | 1 |
| P2 | 1 |
| P3 | 0 |
| P4 | 3 |
Assume, for example, that your organization uses a QPA of 0 to indicate unwanted parts or items. When adding this assembly, you could use the BOM filter to only add items with "QPA not equal to 0". In that case, everything except P3 is added, which had a QPA of 0 indicating that it is unusable.
On some tabs of PCM objects, you can select which fields to view (and how to view them) to obtain better performance and to meet your specific needs. The default view appears when you open the tab after login. Use the Personalize button, which brings up the Table Personalization palette to reconfigure the tab display.
|
Note: Although the Personalize button is available for other PCM objects, this section focuses on Sourcing Projects since it is the object that buyers most frequently use. |
From the Table Personalization palette, depending on the tab that you are on, you may be able to:
Sort table results by up to three attributes.
For example, on the Discussions tab, you can sort discussions by the Create Date field in ascending or descending order. You can further sort the results by discussion Subject in ascending or descending order.
|
Note: On the Analysis tab, primary sorting occurs on the item number. You can further sort the rows according to manufacturer part fields (for example, MPN #), AML fields (for example, AML status), and manufacturer part response fields (for example, transportation terms). You cannot sort by item or item-level fields. You can only sort AML rows within the context of the parent IPN. |
Filter the information based on specified criteria.
For example, on the AML tab, you may want to view only the manufacturer parts that have a preferred status. To accomplish this, you can set your filter criteria to be "AML Status In Preferred". For details on how to filter table rows, see "Filtering Project Data."
Format/select the fields (columns) that appear on the tab and set the order of the fields
For example, on the Attachments tab, if the Modified Date field is not visible, you can make it visible, and also change the location of the column to make it easier to find. For example, you could make the Modified Date the third column in the Attachments table by changing the order in which it appears.
You can also lock a particular column to ensure that it is always visible as you use the horizontal scroll bar. For example, you can lock the Number column so that it is always visible as you scroll to view other data to the right of the column.
The following table shows the personalization features that are available for each Sourcing Project tab.
| Tab Name | Sort | Filter | Format | Properties |
| Items | This cell is blank. | This cell is blank. | X | X |
| AML | This cell is blank. | X | X | X |
| Changes
(All sub-tabs) |
This cell is blank. | This cell is blank. | X | X |
| Analysis | X | X | X | X |
| RFQs | This cell is blank. | This cell is blank. | X | X |
| Discussions | X | X | X | X |
| Relationships | X | X | X | X |
| Attachments | X | X | X | X |
| History | This cell is blank. | X | X | X |
|
Note: In addition to being able to personalize the data you see on a particular tab, you can also personalize which tabs you see for an entire object. You must have the "Manage Tab Display" privilege to do this. See Getting Started with Agile PLM for more details. |
To configure the display of a Sourcing Project tab:
Open a project and select one of the configurable tabs.
Click Personalize. The Table Personalization palette appears.
To sort fields: On the Sort tab, you can select up to three fields by which the table rows should be sorted. For each field, choose whether the sort should be done in ascending or descending order.
To filter data: See "Filtering Project Data."
To format fields: On the Format tab, select the fields that you want to view on the tab from the Hidden Fields list. Click the right arrow button to move fields into the Displayed Fields list. Use the up/down arrows to change the order of appearance of the columns.
To lock a field (column): To lock a field in the Displayed Fields list, go to the Format tab, select the column, and click the lock icon.
|
Note: If the selected field/column is not the first column in the table, all of the columns to the left of the selected column are also locked as you use the horizontal scroll bar. |
Click Apply to apply the new display.
|
Note: Once you click Apply, only the current view is affected. Once you go away from the current page, the applied view will be lost unless you save the view. When you make a change to the base view or a pre-defined view, you must click Save and then Save As to save the view as a new view. Later on, if you make changes to a view that was not pre-defined, you only have to click Save and the changes are saved to the existing view. |
|
Note: The attributes available on the AML, Analysis, and Responses tabs vary based on how your Agile PLM system has been configured. |
For more information about configuring your display using the Personalize button, see Getting Started with Agile PLM.
The filter tool enables you to filter the rows of a table that is on an object tab, such as the table on the Items tab of a Sourcing Project object. This feature is not available on all tabs. Filtering is only available on the AML, Analysis, History, Attachments, and Discussion tabs of sourcing projects.
The Personalize button appears on most tabs and enables you to sort and format table content, and filter table content. Use the filter tab on the Table Personalization palette to display only the table rows you need.
To filter data on a tab:
Open the sourcing project and click the desired tab.
Click Personalize. The Table Personalization palette appears.
Click the Filter tab.
Click the Field drop-down list to select a field by which to filter.
Click the Operator drop-down list to select a relational operator for the filter. The list of relational operators varies based on the type of attribute selected.
Select a value for the filter criteria.
For text attributes, type a value.
For list attributes, click the list icon to select a single or multiple values from available values list.
To add additional filters, click the Add button.
|
Note: Multi-column filtering is not available on all tabs. |
Click Apply.
|
Note: To save this filter for future use, click Save. You must then click Save As to save the settings as a new filter. |
Filters are specific to each tab and do not affect other tabs.
Only Text, Numeric, List, and Money fields are filterable. Date, Multi-list, and Multi-text fields are not filterable.
For complete information about the table personalization features, see Getting Started with Agile PLM.
You can add items to a project while on the Items tab or while on the Analysis tab. You can add them using one or more of the following methods:
Search and add items from the Item Master.
Drag items from your Bookmarks folder, Recently Visited folder, Navigator Drawer, or search (advanced or quick) window and drop them into the table on the tab.
Copy items from your Bookmarks folder, Recently Visited folder, Navigator Drawer, or search window and paste them into the table on the tab.
Import items from an external document, such as an Excel Workbook or a text file. See "Importing Item Data from a Spreadsheet."
Create new items. For more information, see "Creating Items to Add to a Project."
|
Note: You cannot create a BOM in a sourcing project. |
|
Note: The newly created items are not automatically added to the Item Master. You can publish content by using the publish feature on the AML or Analysis tabs. |
|
Note: If BOM filtering is enabled, the BOM filter appears when you attempt to add items by search, drag and drop, or copy/paste. |
To add existing items to a project:
Open a sourcing project and select the Items or Analysis tab.
Click Add > Search for Items.
Search for existing items. You can use either the quick search or custom search.
Quick search: Enter your search criteria and click the right to do a quick search. Select the revision state from the drop-down to narrow your search
Custom search: Click the custom search button. The custom search option launches the advanced search palette.
|
Note: From within the advanced search palette, you can also click to launch a palette that lists any saved searches that return objects of the same base class that is selected in the search criteria in the advanced search palette window. When you click the name of a saved search, the results appear in the advanced search palette. |
Once you have selected the row(s) you want to add, use your mouse to drag and drop them in the table. You can also double-click individual items to add them or select multiple rows and press Enter.
|
Note: You can also add items to a project by dragging items from the Bookmarks or Recently Visited folders or from the Navigator Drawer and dropping the items directly into the Items table. You can also copy and paste objects into the Items table. For general information about these shortcuts, as well as more details about searching for objects in Agile PLM, see Getting Started with Agile PLM. |
|
Note: If there are any duplicate components in the selected items, the QPA (Quantity Per Assembly) attribute of the duplicated components are automatically added together and the duplicate components are represented as a single item in the sourcing project. This automatic aggregation occurs only when the DuplicateItemNumbers SmartRule is set to Allow or Warning. If the SmartRule is set to Disallow, and duplicates are selected, PCM does not aggregate the QPAs, but instead selects the QPA of the first BOM entry that is encountered. |
When adding items from PC to a sourcing project, if BOM filtering is enabled, you can use BOM filters to filter out unwanted items.
To use BOM filters with the Add Project Items dialog:
Open the Sourcing Project and click the Items tab.
Click Add > Search for Items. The Search palette appears.
Click Edit next to the Filter field, which is located at the bottom of the Search palette. The BOM Filter palette appears.
Select a field and an operator from the corresponding drop-down lists.
Enter a value.
|
Note: The Search button does not appear when you are required to input a value. |
Click the Add button to add more filter criteria.
Click OK. The BOM Filter appears in the Filter field in the page.
You can import item data into a sourcing project.
For complete details on the import process, see Agile Import/Export Guide.
You can create items in the project in the Create Item dialog. Items created in this dialog are not published to the Item Master automatically. However, you can publish them later. For more details about publishing items, see "Publishing Items and Manufacturer Parts."
|
Note: You cannot add child items to an item created in a sourcing project until the item has been published to the Item Master. |
To create new items:
You can decide on the data about the project that you want to share with suppliers. You can restrict the information available to a supplier in an RFQ.
You can use the Data to Share with Suppliers palette to restrict the visibility of information to the supplier.
The types of data to share include:
Cover Page fields
Item and AML fields (including AML split percentages)
Other information (BOM view, RFQ attachments, and item and manufacturer part attachments, Propose Alternates, and so on)
|
Note: You can modify these fields at a later time by editing the information in the sourcing project's General Information tab. Changes in the Data To Share attribute is reflected in all new RFQs created in the future from the project. You can also modify this attribute in the RFQ's CoverPage tab (to apply changes to only an RFQ). |
Partners and suppliers can view the BOM structure only if the Content BOM View is shared with them. Partners can only see the Costed BOM, if the Costed BOM View is shared with them. These options provide partners and suppliers with more information before they submit their responses. Also remember that suppliers can only propose alternate parts if the Propose Alternates option is selected, which it is by default.
To select data to share with suppliers:
Open a project and go to the General Information tab.
Click Edit.
Click the list button next to the Data to Share field. The Data to Share palette appears.
Select the check boxes next to the fields and other information to make them visible to the supplier in the RFQ.
|
Note: You can restrict the visibility of internal part numbers and internal part information by clearing the IPN Info check box in the Items & AML Fields section. Doing so makes the BOM invisible to suppliers receiving RFQs for this project. However, if no AML is associated with a given IPN, suppliers can still view part of the IPN information so that they can respond to the RFQ. |
Click Apply.
You can require suppliers to submit specific data that you have requested through an RFQ. The Response Required Fields palette enables you to request certain data and make some (if not all) of the requested data required. Lead Time and Inventory Available are a couple of the data items that you may require from a supplier.
|
Note: You can modify these fields at a later time by editing the information in the sourcing project's General Information tab. Changes in the Response Required Fields attribute are reflected in all new RFQs created in the future from the project. You can also modify this attribute in the RFQ's CoverPage tab (to apply changes to only an RFQ). |
To select data to request and require from suppliers:
Open a project and go to the General Information tab.
Click Edit.
Click the list button next to the Response Required Field field. The Response Required Fields dialog appears.
Select the check boxes next to the fields that you want to make Requested or Required.
|
Note: To be selected as Required, a field must also be marked as Requested. The system automatically marks the Requested check box, if not already checked, for any field that you mark as Required. |
Click Apply.
You can update the content of a project with information about the latest revisions. For example, your manufacturing division might have added a part in an assembly in the Item Master, and you may have the older version of the assembly in the project. You can update the assembly with the part in the Item Master on the Items or Analysis tab of the project. You can specify to update all BOMs, AMLs, and item and manufacturer part information, or just specific attributes, such as standard cost. To check for updates to sourcing project content, go to the Unapplied Item Changes sub-tab on the Changes tab.
|
Note: If the project content update includes new components in assemblies, be sure to calculate new quantities after you do the update. |
The content update modifies the attributes of selected objects as follows:
BOM - Updates the BOM structure (additions or deletions), quantity requirement per assembly, and part revisions.
AML - Maintains AML attributes you changed, or resets all attributes to Item Master values.
Item attributes - Updates by selected attributes, including description, commodity, unit of measure, standard cost, custom part, and any flex fields that appear.
Manufacturer part attributes - Updates descriptions and any flex fields that appear.
|
Note: Target cost is not present in Item Attributes in Content Update pop up. To update Target Cost, the user must opt for updating all objects. This is the only item attribute that you cannot update selectively. You can also choose to synchronize the AML with the Item Master. |
To update project content:
Open a project and go to Items or Analysis tab.
Choose Edit > Update From Item Master. A caution message appears.
Click OK to update the content. The Update Content from Item Master dialog appears.
Select the All Content option to update all the objects associated in the project, or select the Selected Content option and select the attributes manually.
Regarding the Approved Manufacturer List, choose whether you want to update the sourcing project with AML information (Maintain AML changes made in Sourcing Project) or update the AML with the latest Item Master content (Synchronized AML with Item Master).
If you chose to update only "Selected Content", then you must also select the Item Part Attributes and Manufacturer Part Attributes that you want updated.
Click Update. The update is applied.
To view the update, click the Project Item Changes sub-tab on the Changes tab.
When a project uses the Effectivity Periods price scenario, you can remove old price periods, add new ones, and reset the current period. A notification lets you know when the current price period is about to expire so you can add new ones.
|
Note: You cannot change the set price scenario for a project. To change from a price period-based to a quantity-based scenario, you need to create a project. |
To modify price periods:
Open a project.
From any tab, choose Actions > Modify Price Scenarios. The Modify Periods dialog appears.
|
Note: The Modify Price Scenario command does not appear on the Actions menu if there are no price periods in the project. |
To delete a price period, click the Delete Row button to the right of a period's end date.
To insert a new price period, click the Insert Row button to the right of the last period's end date. Although the period is added after the last period in the project, you can specify any start date or end date.
|
Note: If you delete a price period, it is automatically deleted from the corresponding RFQ, as well. If you add a price period, you must manually add it to the RFQ, if needed. |
To make a price scenario required for supplier response check the Response Required box. By leaving the Response Required check box blank, users are providing the supplier the freedom to respond or not respond to the specified price scenario(s).
|
Note: If you are modifying the current price period for analysis purposes only, be sure to change it back before creating any new RFQs for the project. |
Click OK to confirm the changes.
Non PCM users, such as Engineering, Marketing, Finance, NPI Teams, and so on. require an intuitive mechanism to cost a BOM without going through PCM steps. This can be done using the Actions > Rollup Cost function.
Rollup cost generates an Assembly Cost Report (ACR) based on available prices using automated background processes. It picks up lowest costs from filtered data, performs Set as Best (on user defined or default parameters), and performs costed BOM rollup (aggregation) to generate an ACR.
|
Note: Any manually set best responses are over written when the Rollup Cost Report is run, since auto-set as best is executed as part of the report process. To keep your manually set best responses, run the Assembly Cost Report instead. |
To Rollup Cost:
Open the sourcing project.
Click Actions > Rollup Cost. You can opt for either:
the existing prices available in a sourcing project (Actions > Rollup Cost > Using Project Prices) or
the latest prices that have been published in Item Master (Actions > Rollup Cost > Using Price Repository).
If you opt to use previously published prices (Using Price Repository):
Click the list icon next to the Price Types field to select one or more available values.
This feature helps you base your BOM costing for varying sourcing situations, such as temporary requirements.
You may specify the remaining parameters or use default settings.
If desired, click Optional Criteria to specify the Ship To location, Suppliers, Customers, or Programs.
Click Look-up to generate the report.
|
Note: Time taken for report generation depends upon the size of the project. It is advisable to run it as a background process by clicking on Generate this report as a background process check box. |
This chapter already described how to use the Sharing and Save As actions, which appear on the Actions menu. The Actions menu for projects also includes the following commands:
Bookmark - Save a bookmark so that you can return to the project quickly. To see bookmarks you have saved in an Agile client, open the My Bookmarks folder.
Subscribe - Subscribe to the project and consequently receive notification of events that happen to that object.
|
Note: The subscription functionality is only for changes that happen to certain fields on the cover page of the sourcing project. It is not applicable to any changes on the other project tabs. |
Delete - Delete a project. You can delete a project at any lifecycle phase (Draft, Open, or Closed). Deleting a project does not in any way affect the product record. Deleting a project only soft-deletes the project.
|
Note: PCM does not support hard-deleting a project. |
Send - Send an email message containing a link to the project. You can send a project to any user listed in the Agile PLM address book.
For more information on how to perform these actions, see Getting Started with Agile PLM.