| Agile Product Lifecycle Management Product Cost Management User Guide Release 9.3.6 E71147-01 |
|

 Previous |
 Next |
| Agile Product Lifecycle Management Product Cost Management User Guide Release 9.3.6 E71147-01 |
|
Previous |
Next |
This chapter provides information about managing AML data in a sourcing project.
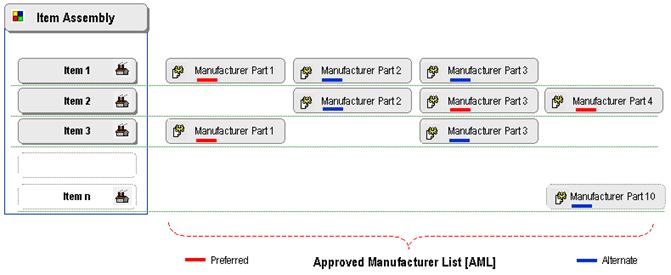
An AML is the Approved Manufacturer List for an item. It lists all of the preferred or alternate manufacturer parts that correspond to an internal part/item. When you source parts for a project, you can choose to source them by assembly, by AML, or both.
An AML can have manufacturer parts of status preferred, alternate, or any additional status that has been configured in the Java Client. For each internal item, there can be multiple manufacturer parts. In such cases, you can specify AML percentage splits. For example, you may want to use 70% of one manufacturer part and 30% of another, based on cost or availability. The sum of the AML percentage splits must equal 100.
Manufacturers listed in a project AML must already exist in the Item Master. You can validate both project manufacturers and manufacturer parts, correctly matching the information to objects in your system. After performing cleanup of project AMLs, you can publish them to the Item Master.
The AMLs of an item can be viewed, added, deleted, or modified in the AML tab. In the heading row, the Has AML icon marks the Has AML column. If a dot icon is present in the Has AML column, that item has AML.
You can view the AMLs by clicking on the right arrow icon next to the item number. To view AMLs of all the Items across the entire list simultaneously, click More > Display AML Rows. To hide all the AMLs across the entire list, click More > Hide AML Rows.
The approved manufacturers list shows all manufacturer parts at the lowest internal part number across all bills of material and assemblies in this project. You can edit the item attributes such as Quote As and Cost on the AML tab to get the responses you need from the supplier.
The Quote As and Cost of the item define the type of price required for that item - material, non material or both. For more information, see "Quote As and Cost Attributes."
When you need to make a universal change in certain visible attributes, such as Cost, Make/buy or Quote As, across the entire list of items or a set of selected items, you may bulk edit them.
|
Note: You cannot use bulk edit to modify all attributes of an item or manufacturer part. You can only edit flex fields and a few cover page standard attributes, such as Make/Buy, UOM, and Description. |
To bulk edit an attribute:
In a sourcing project, click the AML or Analysis tab.
Select the desired row(s) of Items or all the rows on displayed page or all the pages.
Click Edit > Bulk Edit Items (or Edit > Bulk Edit Mfr Parts). The Bulk Edit dialog appears.
|
Note: On the Analysis tab, your only option is to click Edit > Bulk Edit. |
Pick a field from the Attribute drop-down list and enter a corresponding Value.
To change more attributes, click the Add icon to open up more Attribute and Value rows.
Click OK to save the changes.
In the AML tab, you can use filters to see only a subset of data, instead of seeing the whole set. You can filter on any number of fields or you can use one of the pre-defined filters.
The pre-defined filters available through the Views drop-down list are:
Invalid Data - Displays items or manufacturer parts that do not exist in the product record. Click More > Validate Items to identify which are valid and which ones are not.
Items not in RFQ - Displays items that are not part of any RFQ.
Items with Splits - Displays items with AML
Supplier proposed Alternates - Displays items that have alternate manufacturer parts that have been proposed by suppliers.
|
Note: The Views drop-down is located next to the Personalize button. |
Alternatively, you can use filters by clicking on the Personalize button.
To filter AML Data in a project:
Open a project and click the AML tab.
Click Personalize.
Click the Field drop-down list to select a field by which to filter.
Click the Operator drop-down list to select a relational operator for the filter. The list of relational operators depends on the type of attribute selected.
Select a value for the filter criteria.
For text attributes, type a value.
For list attributes, click the list button to select a single or multiple values from available values list.
To add additional filters, click the Add button.
Click Apply.
|
Note: To save this filter for future use, click Save. You may have to click Save As to save the settings as a new filter. If you are unable to save, you may not have the proper privileges. |
An AML represents a manufacturer part made by a particular manufacturer. Each project item can have multiple manufacturer parts, and you can specify percentage splits to use for those parts. You can add AMLs to an item by specifying a manufacturer part, manufacturer, and its AML status.
When you add an AML, the manufacturer you specify must exist in your system. Otherwise, the AML will be invalid and you will not be able to quote on it. Manufacturer parts, however, do not have to exist in your system; you can publish them to the Item Master later.
You can add an AML to items in three ways:
Manually
By importing
By updating the project with data from the Item Master
|
Note: For information about updating the project with data from the Item Master, see "Updating Project Content from the Item Master." |
To add an AML to a project item manually:
Open the sourcing project and click the AML tab.
Click the number of the item to which you want to add an AML. The quick view window appears for the item.
Select the AML tab.
Click Add. The Add AML to Item dialog appears.
Click Search button next to the Manufacturer Name field. The search palette appears.
|
Note: If you know the Manufacturer Name, begin typing it in the Manufacturer Name field and the system will attempt to auto-complete the name. |
Enter the search criteria and click Search. The search results appear.
Add the manufacturers by double-clicking the row you want to add.
Enter the manufacturer part number and description in the corresponding fields.
Select the status of the AML, for example, Preferred or Alternate, from the Status drop-down list.
Click Finish.
Change the AML status and split percentage in the corresponding fields, as necessary.
|
Note: You can add an AML to other items from within this window, by clicking Next, finding the desired item, and then repeating steps 3-10 in this procedure. |
Click Close.
|
Note: If the manufacturer part information is not available in the Item Master, an invalid symbol appears in the Number field on the project AML tab. Click the symbol to search for the existing manufacturer part information. |
Using Agile PCM, it is easy to import manufacturer information, manufacturer part numbers, and commodity codes to add an AML row for an item. The import wizard walks you through the steps to import AML data.
You can import AML data into the Item Master or directly into a project, depending on your specific business process. If you import AML data directly into a project, it is not automatically added to the Item Master.
For complete information about how to import AML data, see the Agile Import/Export Guide.
|
Note: AML data often needs validation after it is imported into projects. A question mark symbol indicates the data that must be validated. |
The AML data for a project item may have been updated in the Item Master. At any time, you can retrieve AML data from the Item Master into a project.
To retrieve an AML from the Item Master:
Open a project and go to the AML or Analysis tab.
Select one or more items.
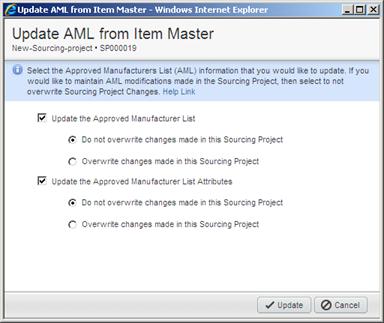
Chose Edit > Update AML from Item Master.
The Update AML from Item Master dialog, which facilitates you to "Update the Approved Manufacturers List" and/or ”Update the Approved Manufacturers List Attributes,” appears.
The check boxes enable you to select "Do not overwrite changes made in this Sourcing Project" or "Overwrite changes made in this Sourcing Project", thus bringing forth four possible scenarios:
Update the Approved Manufacturers List + Do not overwrite changes made in this Sourcing Project
AMLs added in the PC are brought into the Project.
AMLs deleted in the PC are deleted from the Project also, even if any of these AMLs were updated by the buyer.
AMLs added only in the Project, and not in the PC, are retained.
AMLs deleted only from the Project, and not in the PC, will not be added again.
Update the Approved Manufacturers List + Overwrite changes made in this Sourcing Project
AMLs added in the PC are brought into the Project
AMLs deleted in the PC are deleted from the Project also, even if any of these AMLs were updated by the buyer.
AMLs added only in the Project, and not in the PC, are removed.
AMLs deleted only from the Project, and not in the PC, will remain deleted, 'unless' they come again as part of PC.
Update the Approved Manufacturers List Attributes + Do not overwrite changes made in this Sourcing Project
The system updates only those AMLs and Manufacturer Parts that have not been modified by the buyer. If, however, buyer has modified the AML Split of a Manufacturer Part, then only Mfr Part attributes, such as Description, flex fields, and so on will be updated, not the AML Split & AML Status.
Update the Approved Manufacturers List AttribNoteutes + Overwrite changes made in this Sourcing Project
The system updates existing AML attributes, including AML Splits & AML Status, besides updating Manufacturer Part attributes, such as, Manufacturer Part flex fields, and Description.
Click Update.
You can delete AML rows of the item in the project.
To delete AML rows:
Open the sourcing project and click the AML tab.
Click the number of the item from which you want to delete an AML. The quick view window appears for the item.
Select the AML tab.
Select the row(s) of the AMLs you want to delete.
Click Remove.
Adjust the AML split percentage, if necessary.
Click Close.
|
Note: You can also delete an AML by selecting the row(s) you want to delete in the AML table and then clicking the Remove button. |
Validating is the process of checking the existence of the manufacturer in the Item Master. Validating can be useful when manufacturers are imported from an external source. For example, after importing data into a project, you need to validate it manually. A question mark icon appears next to the manufacturer names that you need to validate. First you attempt to validate all similar items in a batch. Manually entered manufacturers are validated automatically.
After you have validated a group of imported manufacturers against the Item Master, a question mark icon appears beside each item that you need to validate individually.
|
Note: If a supplier-proposed manufacturer exists in the Item Master, and you validate the manufacturer and manufacturer part once, the manufacturer will be shown as valid. There will be no need to create a manufacturer. |
To validate manufacturer names:
Open a project and go to the AML or Analysis tab.
Select the row(s) of the AML(s) you want to validate.
Click More > Validate Items. If the information is in the Item Master, the validation is successful.
If not successful, click the question mark icon next to the manufacturer name. The Search Manufacturers palette appears.
Enter in the search criteria and press Enter.
Select the correct manufacturer from the search results by double-clicking the row.
The AML table is updated with the manufacturer name.
At times, you may require a new manufacturer part number for an item in a specific project. You can enter the new manufacturer part number while adding the AML row to the item. You can validate the MPNs against the MPNs in the Item Master. The invalid MPNs (the MPNs not found in the Item Master) are identified and marked by a question mark icon in the Number column. You can click the icon to change the information. The new manufacturer part number is marked by a question mark icon, because it does not yet exist in the Item Master.
To validate MPNs:
Open a project and go to the AML or Analysis tab.
Select the row(s) of the AML(s) that you need to validate.
Click More > Validate Items. If the information is in the Item Master, the validation is successful.
If not successful, click the question mark icon next to the manufacturer part number. The Search Manufacturer Parts palette appears.
Enter the search criteria and press Enter.
Select the correct manufacturer part from the search results by double-clicking the row.
The AML table is updated with the manufacturer part information, including the name and number.
Target price is the price you quote for an item with the standard cost in mind. Standard cost is the market cost per unit of the item or the manufacturer part. The target cost of an item or the manufacturer part can be a percentage of the standard cost. In general, the target cost will be less than the standard cost.
The target price is specified when items are ordered in large quantities. When items are sent to suppliers for quotes, the suppliers may quote the price a bit lower or higher for the item according to their pricing conditions.
You can set a target price for an item and choose to share that price with the supplier. The target price can be different for each price scenario. For instance, if you have 2 quantity breaks, you can have different target prices for each quantity break.
You can enter the target price of items in two ways:
Auto - set the target price for selected items as a percentage of standard cost or any other price/cost field. For example, if you have multiple types of standard cost, one from an ERP system and one from an external source (which is stored as a price/cost field in the Items tab), you can set the target price to be a percentage of the actual standard cost or as a percentage of the cost from the external source.
Manual - set the target price for each selected item manually.
To auto-set the target price:
Open a project and go to the AML or Analysis tab.
Select the row(s) of the item(s) for which you want to set the target price.
Choose Edit > Auto set Targets. The Set Target Price dialog appears.
From the drop-down list located after the phrase "Set Target Price as a percentage of", select the base cost, such as Standard Cost, to establish targets.
|
Note: All money fields are listed as options in this drop-down list. |
In the Percentage of Base Cost field for each quantity break, enter the number that indicates the percentage of the standard cost you entered in the Item Master.
Click OK. The target price is updated on the tab of the project.
|
Note: This overwrites the existing target price displayed in the project. |
To manually set the target price:
Open a project and go to the AML or Analysis tab.
Select the row(s) of the item(s) for which you want to set the target price.
Choose Edit > Target Costs. The Set Target Price dialog appears.
Enter the target cost for each item (if multiple items were selected) in the corresponding Target Cost field. You can copy and paste values, as needed.
Click Apply. The target price is updated on the AML tab of the project.
|
Note: These target prices will be reflected in new RFQs. To apply these target prices to existing RFQs, choose More > Update RFQ Targets. |
You can update the target price of items that you have set in the project in RFQs. When you set the target price for an item at the project level, the change is not applied to any associated RFQs until you update the target price in the RFQs. You can update target prices in RFQs from the project.
|
Note: The target price stored in the Item Master may be different from the target price set in the project for items. |
|
Note: The target price is only updated for response lines that are locked and in draft mode. |
To update target prices in RFQs from a project:
Open a sourcing project and go to the AML or Analysis tab.
Select the row(s) of the items that you want to update in all RFQs in the project.
Choose More > Update RFQ Targets. The target price of the selected items is updated in all the RFQs in the project.
If you make changes to items or manufacturer parts, you can publish those changes to the Item Master. You can publish objects that already exist in the Item Master or that only exist in a project.
When you publish data, you can use Redlining or Authoring mode. You can add redlines to a change order, such as an ECO, MCO, or SCO. In PCM, you most often will use Price Change Orders (PCOs).
To publish items and manufacturer parts:
Open a project and go to the AML or Analysis tab.
Select the row(s) of the item(s) you want to publish.
Click More > Publish Items to Item Master. The Publish to Item Master dialog appears.
Set the following options:
Specify Contents to Publish - Check the box for each content type to publish. Depending on the project data you have selected, you can select Item, Bill of Material, Approved Manufacturer List, and Manufacturer Part.
Specify Default Types - Select the default type for items, manufacturers, and manufacturer parts. The items and manufacturer parts get published only to the types selected in this section. If the default type is different than the type that the item belongs to in the Sourcing Project, the item gets published based on the default type. For example, if the part is defined as a "Capacitor" in the Project-Items tab and during publish, if you choose "Resistor" as the default, the part is going to be published as a resistor and not as a capacitor.
Publish Mode - Select either Redlining or Authoring mode.
If you select Redlining mode, you must specify a change order. Redlining mode, as its name implies, highlights in red any existing BOMs or AMLs that have changed. All items published in Redlining mode are placed on the Affected Items tab of the specified change order.
If you select Authoring mode, you can update unreleased items and create new preliminary items. Once an item has a pending change, you can no longer use Authoring mode to update it.
Update Mode - Select "Only Add and modify data (do not delete it)" or "Add, modify, and delete data."
If you choose "Only Add or modify data (do not delete)," BOMs and AMLs are updated but no information is deleted. This is the default selection. If you choose "Add, modify, and delete data," new data will be added and existing BOMs and AMLs will be completely replaced with the published data.
If you selected Redlining mode, set the following option:
Change Order - You can select an existing change order or create a new one. Click to select an existing change order. Click to create a change order.
Click Publish Items to Item Master. After the BOM and AML changes are published to the Item Master, the tab from which you launched the publish action appears.
|
Note: If you published from the AML tab, the published date and time appear in the Publish Date field on the AML tab. If you published from the Analysis tab, the published date and time appear in the Publish Item Date field on the Analysis field. If the appropriate field is not visible, click Personalize to change the selected attributes. |