| Agile Product Lifecycle Management Product Cost Management User Guide Release 9.3.6 E71147-01 |
|

 Previous |
 Next |
| Agile Product Lifecycle Management Product Cost Management User Guide Release 9.3.6 E71147-01 |
|
Previous |
Next |
This chapter provides information about working with requests for quotes (RFQs).
You establish your sourcing contact with your suppliers through Requests For Quotes (RFQs). Using RFQs, you can request quotes for any items involved in a project, and the suppliers can respond to your requests. To create RFQs, you must have the create privilege for RFQ objects. Generally, this means you must either be assigned the Sourcing Administrator or RFQ Manager roles, or someone with similar privileges must share a sourcing project with you.
Once an RFQ is created, a sourcing project manager can send it to one or more suppliers for quotes. The rich features in Agile PLM help you negotiate prices and terms with suppliers. You can analyze responses from multiple suppliers and select the best terms.
You can use RFQs to do the following:
Create, prepare, and target RFQs to one or more suppliers.
Leverage contract and historical response information to eliminate unnecessary supplier requests.
Review and adjust RFQs when they are in the Draft state.
Send the RFQs to suppliers, and track their response status.
Review, compare, and analyze supplier responses.
Negotiate to establish better pricing or terms with specified suppliers and line items.
Mandate suppliers to accept RFQ Terms and Conditions before viewing an RFQ.
The following table describes the RFQ tabs and the actions you can perform from each one.
| Tab | Description | Actions |
|---|---|---|
| Cover Page | Displays general details about the RFQ. | View and edit RFQ details. |
| Responses | Displays response details. | View by Supplier Response Summary. Select a Price Scenario to view responses. Filter view of response details. Delete items. Add, auto-assign, and remove suppliers. Manage responses. View currencies. |
| Response Status | Displays a summary of the RFQ and supplier response. | Expedite the RFQ. Export or import the RFQ for non-Web suppliers. |
| Changes | Displays item or response changes in the RFQ. | View the item change summary by items that were added or changed. View Unapplied Item Changes in RFQ Changes tab. |
| Discussion | Displays the discussion objects related to the RFQ. | View the list of discussions in the table with the options to reply, delete, and add discussions. |
| Attachments | Displays a list of any file attachments for the RFQ. | View file attachment details. Edit, remove, and add attachments. |
| History | Displays a list of actions performed during the life of the RFQ. | View user, date, time, and description for each action. |
This section provides definitions of important terminology related to RFQs.
| Terms | Descriptions |
|---|---|
| RFQ | Request for quote. A medium for requesting quotes for items from suppliers. |
| RFQ Response (or Supplier Response) | The medium through which the supplier can respond to the RFQ. Multiple responses are created in the RFQ when multiple suppliers send responses. |
| Response line | The response medium between you and the supplier for negotiating the price terms. Each item has a response line in the response depending on the Quote As attribute set for the item. |
| Standard Cost | Applies to an item. This is the market cost of the item. It is site-specific. The standard cost is for a unit. |
| Target Cost | Applies to item. This is the expected cost of the item by you or the supplier. This can be a percentage of the standard cost. Target cost is for a unit. |
| Quote As | Applies to an item. This is used in the RFQ for getting the quote according to the option you set. There are three Quote As options:
Assembly - The supplier quotes only the non-material price. Component - The supplier quotes only the material price. Custom Component - The supplier quotes both the material price and non-material price. Non-material fields, including labor rate and sales tax, are flex fields and are not available out-of-box. |
| Cost | Applies to the item. This is site-specific. You can set the Cost to Yes or No to specify whether the item has a price in the Item Master. You can edit this setting in the project later. If the Cost is neither Yes nor No when an item is added to a project, it is set to Yes in the project by default.
Yes - Suppliers must quote a price for items. No - Suppliers cannot quote BOM parts (children in an assembly). |
| NCNR | Non-Cancelable Non-Returnable. Applies to an item. NCNR can be Yes or No, depending on the supplier. You can ask for the NCNR information in the supplier response. This is one of the critical factors in finding the best deal among the supplier responses.
Yes - The item ordered or purchased cannot be canceled or returned to the supplier even if the item is not needed or is defective. No - The item ordered or purchased can be canceled or returned to the supplier if the item is not needed or is defective. |
| UOM | Unit of measure. The standard unit of measure of the item. For example, fuel is measured in gallons. |
You can bind the suppliers to accept specialized terms and conditions before they can open an RFQ.
To specify Terms and Conditions that the supplier must accept before they can open an RFQ, you must configure the Java Client node, System Settings > Product Cost Management > RFQ Terms & Conditions from the Admin tab in the Java Client to activate this feature.
|
Note: For information on how to configure your RFQ Terms & Conditions form, read the section "RFQ Terms and Conditions." |
After you have configured the RFQ Terms & Conditions in the Java Client, you can set up the buyer side to see RFQ Terms & Conditions.
Users can make RFQ Terms & Conditions mandatory at the sourcing project level. To make the terms and conditions mandatory, select Yes for the "Require RFQ Terms and Conditions" field when you create the sourcing project. This setting automatically applies to all RFQs created from the sourcing project, however, you can override this at the RFQ level by altering the setting for "Require RFQ Terms and Conditions" on the RFQ cover page. You must have the correct privileges.”
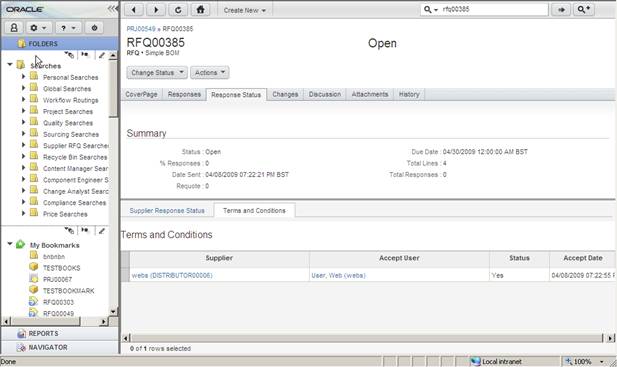
You can maintain status of the Terms and Conditions acceptance status. As supplier users accept the Terms and Conditions, you can see their acceptance status on the Terms and Conditions sub-tab on the Response Status tab of the RFQ.
When a supplier opens an RFQ, the Terms and Conditions form opens with Accept and Decline buttons. If the supplier declines, the RFQ will not open, and hence, the supplier user will not be able to see its contents. All avenues to the RFQ are blocked: search, link from notification and from Workflow Routings. The supplier needs to accept the Terms and Conditions only once to proceed with the RFQ. The Terms and Conditions form does not appear again after you accept them.
|
Note: If a supplier does not accept the Terms and Conditions the first time he tries to open an RFQ, the Terms and Conditions form continues to open every time he attempts to open the RFQ, until the terms are accepted. |
If a supplier user forwards the RFQ to another supplier user, the new user will also have to first accept the terms to open the RFQ.
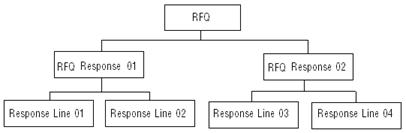
The RFQ process involves three related objects:
RFQ - You can ask for quotations for an item from suppliers and partners. You can send an RFQ to multiple suppliers.
RFQ response - A medium of communication between you and the supplier. One response from a supplier can contain multiple response lines for different items. Price data is added to the project automatically when the supplier submits the response.
Response line - Each response line has information about only one item. The negotiation of price and terms for items is dealt with in the response line.
RFQ responses and response lines are based on the items in an RFQ and the selected suppliers. Although you can select specific suppliers for items, Agile PLM can also automatically disseminate RFQ responses based on suppliers' manufacturer and commodity offerings and the selected routing rules for the RFQ. Consequently, suppliers can be sent an RFQ response to quote on one or more items, depending on their offerings.
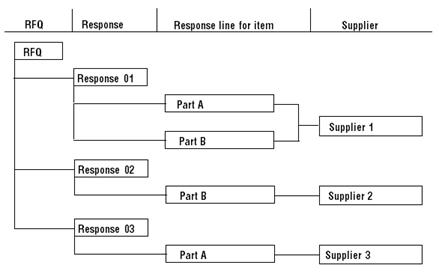
The following table shows an example of two items being quoted by three suppliers. Part A is being quoted by Supplier 1 and Supplier 3. Part B is being quoted by Supplier 1 and Supplier 2.
| Item | Supplier 1 | Supplier 2 | Supplier 3 |
|---|---|---|---|
| Part A | Yes | NA | Yes |
| Part B | Yes | Yes | NA |
The following diagram shows the responses, response lines, and suppliers for Part A and Part B.
The goal of an RFQ is to establish pricing and availability of parts from various suppliers. When you are finished with the RFQ process, you can publish negotiated prices to the Item Master. Here are the steps needed to complete the RFQ process:
Create an RFQ.
Add items to the RFQ.
Assign suppliers and partners.
Change RFQ status to Open.
Send the RFQ to suppliers and partners.
Review response lines from suppliers.
Negotiate or requote (if needed).
Publish prices to the Item Master.
The following table lists PCM symbols that help you quickly identify the status of RFQs. These symbols appear on tabs in either the sourcing project or the RFQ.
| Symbol | Represents | Description |
|---|---|---|
 |
RFQ | This icon represents an RFQ. |
 |
Quoted | On Items and AML tabs of a sourcing project, this icon appears for items that are added to the RFQ. |
 |
Error | This icon indicates that there is an error in the response line. When you enter invalid data, such as text data in a numeric field, or when you leave a required field unfilled, this icon appears. |
 |
Not Read | On the RFQs tab of a sourcing project, this symbol indicates that the RFQ has still not been opened to the Supplier. |
 |
Pending | On the Responses tab of an RFQ, this icon appears for items in RFQs to indicate that the RFQ for the item has been sent to the supplier and a response is pending. |
 |
Expedite | On the Responses tab of an RFQ, this symbol represents that a message to expedite the RFQ Response has been sent to the supplier. |
 |
Locked | This icon appears for items in RFQs to indicate that the supplier cannot make any changes to the response lines they have sent. Once you open the RFQ line to a supplier, you can edit it only when it is subsequently Unlocked. |
 |
Response | On the Responses tab of an RFQ, this icon appears for items that have received a response from the supplier. |
 |
Requote | On Responses tab of an RFQ, this icon appears for items that are sent to suppliers for requote. |
 |
Details | On the Responses tab of an RFQ, this icon marks the Has Price Information (price details) column. If a line item has a icon in this column, it means that it has price information available for it. You can click this dot icon to view the quoted amount. |
 |
View Response Changes | On the Responses tab of an RFQ, this icon indicates that some changes were made to the quotes since the first response. You can click the icon to view the changes that have been made to the quote. |
 |
Alternate/Proposed manufacturer part | On the Responses tab of an RFQ, this icon indicates that the supplier has proposed an alternate part for the quoted manufacturer part. The response line displays the icon and the part information. Note: Suppliers cannot propose alternates unless the Propose Alternates option is selected in the Data To Share in the RFQ. |
The lifecycle statuses of RFQs are Draft, Open, Locked, and Closed. The following table provides information about these statuses and the icons that represent them.
These symbols appear between RFQ Number and RFQ Description columns in RFQs Tab of a Sourcing Project
| Status | Description |
|---|---|
| Draft (in progress) | The default status of the RFQ upon creation is Draft. You can add items and assign suppliers to items manually or using the auto-assignment tool. Look up contract and response history. Flag items as pre-quoted, not to send to the suppliers, but to keep those items for analysis. |
| Open (in progress) | When the status of the RFQ is changed to Open, the RFQ is sent to the assigned suppliers. The suppliers see the RFQ notification in their inbox and can then quote for the RFQ items. You can send RFQs to suppliers for requote when the RFQ is open. |
| Locked (in progress) | You can analyze or make any changes to the response from the supplier for requote or acceptance. It temporarily blocks suppliers from updating the RFQ (supplier responses are not accepted). Quote Histories are created even if the RFQ is locked. |
| Closed | The final state of the RFQ. You can close the RFQ when you have received satisfactory responses. Suppliers cannot make changes to the RFQ.
Note: When you close an RFQ, you automatically trigger the creation of a Quote History object to preserve a snapshot of quoted prices (if any). For more information about SmartRules, see the Agile PLM Administrator Guide. |
You can create RFQs in the project from Items, AML, or Analysis tab. You can create multiple RFQs and send them to multiple suppliers and partners for a quote. To create RFQs, you must have the Create privilege for RFQ objects. Agile provides two roles that let users create RFQs:
Sourcing Administrator
RFQ Manager
If you have not been assigned either of these roles, someone with appropriate privileges can share a sourcing project with you, thereby allowing you to create RFQs. For more information, see "Sharing a Project with Other Users."
|
Note: You can create RFQs only when the project status is Open. |
To create an RFQ:
Open a sourcing project and select either the Items, AML, or Analysis tab.
Select the row(s) of the item(s) for which you want to create an RFQ.
Choose RFQ > Create. The Create Requests for Quote with Identify RFQ Number wizard appears.
Enter a unique identification number for the RFQ in the Number field, or click the AutoNumber icon to get an automatically generated number.
Click Next. The Enter RFQ Information page appears.
|
Note: On any page of this wizard, you can click Finish instead of Next. The system will create the RFQ, but you must fill in details at a later time. |
Enter mandatory information
A brief description about the RFQ in RFQ Description field.
Click the Due Date calendar and select a date. Suppliers should send responses by this date.
Enter optional information
Click the list button next to the Data to Share field, and select the data that you would like your suppliers to see.
Click the list button next to the Response Requirements field, and select the response data that you need from the suppliers.
Enter any instructions that you find important or useful for the suppliers in the Supplier Instructions field.
|
Note: The Data to Share, Response Requirements, and Supplier Instructions settings are all automatically inherited from the sourcing project. |
Select the Owner of the RFQ. The owner, by default, is the one who created the RFQ. Only users with the appropriate privileges can create RFQs.
Select the RFQ Type.
Add users to the Authorized Users field. These users will have access to the RFQ.
Click Next. The Select Part Addition Rule page appears. See "Part Addition Rule" for details.
Click Next. The Select Suppliers page appears.
All the partners associated with the item(s) appear under Select Partners. By default, all the partners are selected to receive the RFQ. To send the RFQ only to some of them, you may clear the check boxes of the rest. You can decide to send the RFQ only to the partners, only to the suppliers, or to both.
|
Note: This option to select partner appears only if the items have partners associated to them. See "Assigning Suppliers and Partners." |
Click the list button next to the Suppliers field to open the supplier search palette. You can narrow down your search by selecting Suppliers, Supplier Groups, or any other user-defined category of supplier. For easy identification of suppliers, see "Supplier Identification."
Select the dissemination method from the Dissemination Method drop-down list. For more information, see "Dissemination Methods."
Filter the selected suppliers based on their ratings, by selecting the desired check boxes next to the listed ratings. For example, if you want the RFQ to be responded to only by the Approved Suppliers, select the check box next to Approved. This filter eliminates the rest of the suppliers.
Click Next. The Add Attachments page appears.
Add attachments, and click Finish.
|
Note: Errors on the page are marked by the Error icon. |
In the Select Part Addition Rule page, you can select specific items for the RFQ. The following table describes the options.
| Option | Description |
|---|---|
| Add selected items and all sub-components | Adds selected assemblies, sub-assemblies, and items, and any of their sub-components. |
| Add selected items only, without sub-components | Adds only selected assemblies, sub-assemblies, items, and sub-components. If an assembly is selected, its sub-components are not added unless they are also selected. |
| Add only sub-components of selected items | Adds only sub-components of the selected assemblies and sub-assemblies. The sub-components include the BOM components and their associated manufacturer parts. |
The figure displayed for each option is a representation of the effect that the option has on the items in the RFQ. Use the figures to determine which option is best for you.
Dissemination is the process of assigning RFQs to suppliers based on the methods you specify. The manufacturer or commodity offerings that a supplier sets up indicate what products they sell. Agile PLM supports the creation of these offerings by geographic regions that can be associated with the project's specified Ship To location.
You can also apply a rating to the Product - Ship To location relationship, which lets you specify whether the supplier is strategic or approved to sell a product for your ship-to location. It can also specify that they offer the product, but that you have not approved it.
When RFQs are disseminated, Agile PLM looks at the manufacturer and commodity offerings for each supplier and assigns parts to suppliers according to the selected routing rules for the RFQ.
The dissemination method involves the supplier ratings. The pre-defined supplier ratings provided with Agile PLM are:
Approved
Strategic
Offered Active
Offered Inactive
|
Note: Agile PLM administrators can define additional supplier ratings. There is no implied order to the supplier ratings. When you disseminate an RFQ, you can select multiple supplier ratings. |
The RFQ dissemination methods include:
Manufacturer - The RFQ is assigned to suppliers based on their manufacturer offerings.
Commodity - The RFQ is assigned to suppliers based on their commodity offerings.
All - The RFQ is assigned to all suppliers regardless of their manufacturer or commodity offerings.
Project: PRJ
Part: Part A
Manufacturer: Acme
Ship To Location: San Jose
Supplier Rating: Strategic
Here is a list of suppliers and their manufacturer offerings:
| Supplier | Manufacturer | Ship To Location | Rating |
| Supplier A | Acme | San Jose | Approved |
| Supplier B | Acme | Bangalore | Strategic |
| Supplier C | Acme | San Jose and Bangalore | Strategic |
When the dissemination method is Manufacturer and the supplier rating is Strategic, the RFQ is assigned to Supplier C, since it is has a matching manufacturer offering.
Project: PRJ
Part: Part A
Commodity: Comm1
Ship To Location: San Jose
Rating: Approved
Here is a list of suppliers and their commodity offerings:
| Supplier | Manufacturer | Ship To Location | Rating |
| Supplier A | Comm1 | San Jose | Approved |
| Supplier B | Comm1 | Bangalore | Strategic |
| Supplier C | Comm1 | San Jose | Strategic |
When the dissemination method is Commodity and supplier rating is Approved, the RFQ is assigned to Supplier A since it has a matching commodity offering. Although Supplier C supplies the commodity, Comm1, for San Jose, it is not assigned the response line because its rating is Strategic.
Information that you enter when you create an RFQ determines which suppliers receive the RFQ. This can help you get the best deal from suppliers. To be sure an RFQ is sent to the correct supplier organizations, make sure all manufacturer and commodity offerings are current and suppliers are rated.
Every supplier organization has an RFx Routing table that defines how RFQs should be routed to specific users based on their region. When an RFQ is sent to a supplier, it is automatically routed to the appropriate user within the organization. If the Ship To location does not match any of the specified locations in a supplier's RFx Routing table, the RFQ response is routed to the supplier's default recipient.
After you create an RFQ, you can add more items to it even if you have already sent the RFQ to suppliers for quotes.
To add items to an RFQ:
Open a sourcing project and select the Items tab.
Select the row(s) of the item(s) you want to add to the RFQ.
Choose Quote > Add Items. The Add Items to RFQ with Select RFQ wizard appears.
Select the row(s) of the RFQ(s) to which you want to add the selected items.
Click Next. The Select Part Addition Rule page appears. For information, see "Part Addition Rule."
Click Next. The Select Suppliers page appears.
Select the suppliers or supplier groups.
Select the dissemination method from the Dissemination Method drop-down list. For more information, see "Dissemination Methods."
Click Finish.
For any item in the RFQ, you need to assign the supplier or partner information. This is the procedure that sets up RFx routing.
A partner is essentially a supplier that has the advantage of access to AMLs of the top level assemblies. A supplier only sees the Assemblies, and not its AMLs. You can assign partners to the items on the Items tab of a sourcing project. See "Adding Partners to Project Items" for details.
You can also assign suppliers to items on the RFQ Responses tab. See "Assigning Suppliers" for details.
Although partner splits are defined within the sourcing project, they do not directly impact the quantities within a sourcing project. Once you create an RFQ, the system splits the quantities in the RFQ based on the split percentages you had defined.
|
Note: Although partner splits do not affect quantities in a sourcing project, analysis on the Analysis tab does get impacted by the splits. |
If you have split desired quantities among partners using percentages, quantity calculations are automatically done within the RFQ. The following table shows a portion of a BOM. Assembly A1 has a Quantity of 1000. Two partners, P1 and P2, have been assigned to the assembly with percentage splits of 60% and 40%, respectively.
To find quantities for each partner assigned to a sub-component, the total quantity for the sub-component is multiplied by the split percentage:
[Quantity of P4 for P1] = 3000 * 0.60 = 1800
[Quantity of P4 for P2] = 3000 * 0.40 = 1200
| Number | QPA | Quantity | Partners/ Splits P1 (60%) | Partners/ Splits P2 (40%) |
|---|---|---|---|---|
| A1 | 1 | 1000 | 600 | 400 |
| P2 | 1 | 1000 | 600 | 400 |
| P3 | 2 | 2000 | 1200 | 800 |
| P4 | 3 | 3000 | 1800 | 1200 |
There is no restriction on the sum of the partner percentage splits. The sum does not have to equal 100 and can exceed a total of 100, if desired.
When you set the target price for an item at the project level, the change is not applied in any associated RFQs until you update the target price in the RFQs. You can update the target price of items in RFQs from the project or in the RFQ.
|
Note: You can edit the target price of the item in the AML tab of the project. For information about how to publish prices to the Item Master, see "Publishing Prices for Items and Manufacturer Parts.". |
The project-level update affects all the RFQs in the project that include the selected items.
To update target price of items in RFQs from the project:
Open a sourcing project and select the AML tab.
Select the row(s) of the item(s) for which you want to update the target price in the RFQ.
Choose More > Update RFQ Targets.
The RFQ-level update affects only the items in the selected RFQ with the project-level target price.
To update target price of items in RFQs from within the RFQ:
Open an RFQ and select the Responses tab.
Select the row(s) of the item(s) for which you want to update the target cost from the project.
Select Edit > Update Target From Project.
|
Note: You can set target prices only on draft or locked responses, or responses in a locked RFQ. |
You can delete items from RFQs when you decide to continue with the same price information available for an item and no longer need to request quotes from suppliers.
|
Note: You cannot delete items from RFQ that have already been sent to a supplier for quoting. |
To delete items from RFQs:
Open an RFQ and select the Responses tab.
Select the row(s) of the item(s) you want to delete.
Choose Remove > Items.
|
Note: The items are deleted only from the RFQ. They are not removed from the project. |
You can send RFQs to Web suppliers, or you can export an RFQ to an Excel Worksheet or Comma Separated Value (CSV) file and send it as an email attachment or as a hardcopy to non-Web suppliers. If an RFQ is sent to a non-Web supplier through Agile PLM, the RFQ originator receives the new RFQ notification since the non-Web supplier has no web contact to whom the system can send the notification.
|
Note: You can send individual line items that are ready for a quote before all the items in the RFQ are ready. |
RFQs are sent to suppliers and partners when the status is changed to Open.
To send RFQs by changing the status:
Open a sourcing project and select the RFQ tab
Open an RFQ by clicking the RFQ number.
Choose Change Status > Open.
The RFQ notification is sent to Web suppliers.
|
Note: Once you open an RFQ it cannot be changed to Draft state again. |
You can send out line items that are ready for quoting, rather than waiting until all the items in the RFQ are ready to send out for quotes.
|
Note: Make sure that each line item has an assigned supplier. |
To send line items in an RFQ:
From the Responses tab of an RFQ, select the row(s) of the items that you want to send out.
Choose Response > Send Requests to Suppliers.
|
Note: This sends only the selected line items to suppliers. |
Non-Web suppliers are those who do not perform transactions online. They do not have web access and therefore cannot use the Agile Web Client to respond to RFQs. You cannot send RFQs to non-Web suppliers by changing the status of the RFQ to Open or by opening the line items. To send RFQs to non-Web suppliers, you need to export the RFQ and send it as an attachment in email or as hardcopy through any appropriate channel.
|
Note: If a supplier is a non-Web supplier, the Web Supplier status on the supplier General Info tab should be set to No |
To export RFQs for non-Web suppliers:
Open an RFQ and go to Response Status tab.
In the Supplier Response Status section, select the row(s) of the non-Web supplier to whom the RFQ should be sent.
Click Export > Export (csv) or Export > Export (xls), depending on the file type you want to export (Microsoft Excel Workbook or CSV). The File Download dialog box appears.
Click the Save button to download the file.
|
Note: You can send the file as an attachment through email, or send a hardcopy of the RFQ through any appropriate channel to the non-Web supplier. |
This section consists of the following:
Finding RFQs
Viewing RFQs
Changing the RFQ Status
Deleting RFQs
Viewing RFQ Changes
Viewing RFQ History
All RFQs are associated with a specific sourcing project. To see the list of RFQs for a project, open the project and go to the RFQs tab.
Like any other Agile object, you can also find an RFQ through a search. You can use quick search, advanced search, saved search, or bookmarks to find the RFQ.
The search result displays the name and the identification number of the RFQ, the description of the RFQ, and the status of the RFQ. You can click the RFQ Number to view and edit the information about the RFQ.
To find RFQs assigned to you:
In the left pane, under Searches, expand Supplier RFQ Searches.
Click RFQ Requests that I Own. You may also use any of other preset search criteria as required.
|
Note: A user must have the (Restricted) RFQ Responder role to be able to view the Supplier RFQ Searches. |
You can view the RFQs created in a particular project in its RFQs tab. A dot symbol on RFQ tab denotes that the project has RFQs.
The table in the RFQs tab lists information including the RFQ description, status, response percentage, and the number of suppliers who responded.
To view the RFQ in the project:
Open a sourcing project and select the RFQs tab.
Click the RFQ number to view the RFQ information.
You should change the status of the RFQ when you want to edit the response line, send the response to suppliers, or close the RFQ.
To change the status of the RFQ:
Open a sourcing project and select the RFQs tab.
Select the row(s) of the RFQ(s) whose status you want to change.
Click Change RFQ Status, and choose the status you want.
You can delete an RFQ only if its status is Draft or Closed. You cannot delete open or locked RFQs. When you delete an RFQ, any prices previously published from the RFQ to the Item Master remain unaffected. Since there is no recycle bin search available for RFQs, once deleted, there is no way to bring an RFQ back.
To delete an RFQ:
Open an RFQ.
Click Change RFQ Status. The status of the RFQ must be either Draft or Closed.
|
Note: When you change an RFQ status to Closed, all suppliers and partners associated with the RFQ are automatically notified. |
Choose Actions > Delete. A message appears for you to confirm whether you want to delete the RFQ.
Click OK to delete the RFQ.
You can view RFQ changes to track items that were added, deleted, or changed, or to monitor response changes. The Changes tab displays a list of changes that have occurred to the RFQ because of project item updates. When a change is made to items in the project, and that change affects the contents of an existing RFQ, an RFQ change notice is generated.
You can view the item changes and the response changes made to the RFQ on the Changes tab. The filters are available in the Changes tab for viewing the added, changed, and deleted items individually. You can also view the Unapplied Items changes, for Items that are present in the RFQ.
|
Note: The content of the Changes tab is refreshed automatically when an action is performed on it. |
To view RFQ changes:
Open an RFQ and click the Changes tab.
Click the sub-tab that you want to view.
You can select the Unapplied Item Changes tab (default view), the Project Item Changes tab, or the Supplier Responses tab.
You can change the view on the sub-tabs by selecting a view from the Views drop-down list.
In the Project Item Changes tab, you can choose to see Items Added, Items Deleted, or Items Modified.
The History tab shows information about each action for this RFQ, including the name of the person who performed the action, the date and time of the action, and a description of each action.
To view RFQ history:
Open an RFQ.
Click History tab.
You can view the actions and transactions that happened in the RFQ since it was created.
Suppliers enter and submit their quotes for items in responses. The Responses tab of an RFQ displays all the items, BOMs, and the manufacturer parts of the items in the RFQ. It also displays the status of each response line, the details of the response from the supplier, and the changes made to the response.
This section consists of the following:
Filtering RFQ Responses
Assigning Suppliers
Expediting RFQ Responses
Viewing Responses in Different Currencies
Looking Up Price Information
On the Responses tab of an RFQ, the filter toolbar enables you to isolate the responses you want to see. You can use pre-defined filters/views, or filter by specific attributes.
|
Note: Alternatively, you can use one of the pre-defined filters, such as Items Without Price and Items With Split, which are listed in the Views drop-down list. This drop-down is located next to the Personalize button. |
To filter the Responses tab of an RFQ:
Open an RFQ and go to the Responses tab.
Click Personalize.
Click the Field drop-down list to select a field by which to filter.
Click the Operator drop-down list to select a relational operator for the filter. The list of relational operators depends on the type of attribute selected.
Select a value for the filter criteria.
For text attributes, type a value.
For list attributes, click the list icon to select a single or multiple values from available values list.
To add additional filters, click the Add button.
Click Apply.
|
Note: To save this filter for future use, click Save. You must then click Save As to save the settings as a new filter. |
The Responses tab lists all response lines from suppliers for items, BOMs, and manufacturer parts. The response line consists of the data that you requested from the supplier, such as the pricing information and the price change information. The suppliers receive the RFQ for the items to which they have been assigned.
You can add suppliers to items from the Responses tab either manually or automatically.
You can add any supplier to any item manually. Agile PLM ignores the dissemination method and assigns the selected suppliers to all the selected items.
To assign suppliers manually:
From the Responses tab of an RFQ, select the row(s) of the items to which you want to add suppliers.
Choose Add > Suppliers. The Search Suppliers palette appears.
Search for and select the suppliers you want to add. Double-click the suppliers or press Enter to add them to the Suppliers table.
Close the search palette.
Suppliers can be assigned at the AML level in an Item. This makes the RFQ process more efficient and effective, since the Supplier receives an RFQ, and has to respond, only for those Items that it supplies.
From the buyer's perspective, this function helps secure the information about other AMLs in an Item that need not be seen by a Supplier who does not supply them.
To assign Suppliers at the AML Level:
From the Responses tab of an RFQ, select the row(s) of the AML(s) in an Item, including the Item row, to which you want to add suppliers.
Choose Add > Suppliers. The Search Suppliers palette appears.
Search for and select the suppliers you want to add. You can double-click to add a supplier or drag and drop the supplier(s) to the Suppliers table.
Close the search palette.
When you attempt to auto-assign suppliers to items in an RFQ, the application determines which suppliers, from the suppliers you specified, satisfy the dissemination and rating constraints that you selected. When you auto-assign suppliers to items after the original RFQ creation, you can specify additional auto-assignment rules. Auto-assignment does not remove any current supplier assignments, but adds any additional assignments based on the criteria you define.
To Auto-assign suppliers to items:
From the Responses tab of an RFQ, select the row(s) of the item(s) to which you want to add suppliers.
Choose Add > Auto-Assign Suppliers. The Auto-Assign Suppliers dialog appears.
Click the Search button next to the Suppliers field. The Suppliers Groups search palette appears.
Search, and select the suppliers from the results. Double-click individual suppliers or select multiple rows and press Enter to add suppliers into the Suppliers cell.
Select a dissemination method from the RFQ Dissemination Method drop-down list.
Select ratings from the list of available ratings. Only suppliers with the selected ratings will be used.
Click OK.
|
Note: The auto-assign suppliers functionality only works on IPN levels, and is not applicable to the AML level. |
Tracking supplier response status and expediting delinquent supplier responses is an important part of the RFQ process. You can quickly view the progress of your RFQ and send email notifications to suppliers to remind them that the RFQ response is pending. You can request responses even after the specified due date.
To expedite RFQ responses:
From the Response Status tab of an RFQ, select the row(s) of the supplier(s) from whom you require a response.
Click Expedite. The Expedite window appears.
Enter the subject in the Subject line and the message in the Message field.
Click Send.
|
Note: A notification is sent to the supplier who has not responded to the RFQ. An expedited symbol appears in the Expedite column of the Supplier Response Status table. |
Non-Web suppliers are those who do not use the Internet or Agile Web Client. Therefore, RFQs have to be sent to them either as an email attachment or as hardcopy through any appropriate channel. They may return the response lines as an attachment or as hardcopy.
|
Note: To specify that a supplier does not have Web access, the Supplier Manager sets the Web Suppler field to No on the supplier's General Info tab |
If a non-Web supplier sends you a response line as an email attachment, you can import the file directly into a project. If a non-Web supplier sends you the response line as hardcopy, you need to enter the information in an electronic file and import it. You can import response lines only from non-Web suppliers. If, for any reason, you want to import response lines for a supplier with Web access, ask the Supplier Manager to set the Web supplier status to No temporarily on the supplier's General Info tab.
For information about importing responses from non-Web suppliers, see Agile Import/Export Guide.
You can view the response lines on the Responses tab of the RFQ. The supplier can respond to an RFQ in their own currency, which can be different from the project currency. You can view and analyze the quote information in either the supplier (original) currency or the project (normalized) currency. Using the normalized currency lets you analyze all responses in a single currency.
When you select the view, Agile PLM calculates and displays the price information based on the currency conversion rates. You select currency views and refresh currency conversion rates from the Responses tab the same way you do from the Analysis tab of a project. For more information, see "Converting Currency Values."
You look up price information in the Responses tab the same way you look up for price information in Analysis tab of a project. See "Looking Up Price Information."
|
Note: You can look up prices and bring them into an RFQ response only if suppliers are assigned to the items. |
At times, you might need to edit supplier responses so you can negotiate or request that the supplier provide another quote for an item. For example, you can ask for a shorter lead time or lower cost by specifying the changes in the response line. The supplier can choose to re-quote or stay with their previous quote.
You can edit a response line when the RFQ and Response lines are in draft state. Otherwise, only the assigned supplier can edit a response line.
To lock response lines:
From the Responses tab of an RFQ, select the row(s) of the response line(s) to lock.
Choose Response > Lock Response. A message may appear to warn you that a quote history will be created when the RFQ is locked.
Once you have locked the response, you can edit the response line.
To edit the response line:
From the Responses tab of an RFQ, select the row(s) of the locked response line that you need to edit.
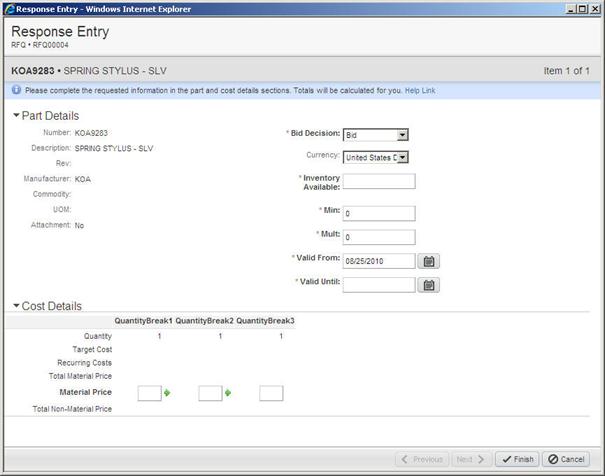
Choose Edit > Response Line. The Response Entry page appears. See Response Entry Form for more details.
Edit the information as necessary.
Click Next if you have selected multiple response lines, or click Finish.
|
Note: When you select the "Apply to all the selected response lines" check box, the Next button is disabled. |
In the Responses tab, "Sourcing Manager Edited" appears in the Source column of the response line you edited.
This is a dynamic entry form, which performs requisite calculations instantly. For example, when you enter a certain amount in Material Price field, and then change it to another amount, the Total Material Price figures change immediately to reflect the latest value that was entered.
On this form there is an Apply to all the selected response lines check box. When you select this box, the data (Inventory Available, Material Price, Valid Until, and so on) that you fill in for the current item, is applied to all the other response lines that you selected for editing.
A pre-quoted response line is one for which you do not need a quote from suppliers, perhaps because you are using published prices or existing contract pricing. When you set response lines to be pre-quoted, they are not sent out to suppliers for new quotes.
To set response lines as pre-quoted:
From the Responses tab of an RFQ, select the rows of the response lines to mark as pre-quoted.
Choose Response > Set As Pre-Quoted.
You can negotiate with suppliers by requesting that they quote again for an item.
To request Requotes:
From the Responses tab of an RFQ, select the row(s) of the response line(s) that require a requote.
Choose Response > Lock Responses.
Choose Response > Edit. See "Response Entry Form" for more details.
Click Next if you have selected multiple response lines, or click Finish.
Select the Apply to all the selected response lines check box to use the price and terms information of the current item for all the response lines selected. (Optional.)
Choose Response > Requote.
|
Note: The Requote Requested icon in the Response Status column indicates that a requote has been requested for the response line. |
You can view the status of the items that were sent to be requoted on the Response Status tab of the RFQ. The Open Requotes field in the Supplier Response Status section displays the number of requotes that suppliers have not yet responded to.
To view requote status:
Open an RFQ.
Select the Response Status tab.
You can see the total number of requotes in the Requote column of the RFQ Status section and the number of open requotes that need responses from suppliers in the Open Requotes column of the Supplier Response Status section.
You can share an RFQ with another user. Sharing an RFQ means that you are granting another user or user group one or more of your roles.
For general information about sharing Agile objects with other users, see Getting Started with Agile PLM.
|
Note: You cannot share those roles that have been shared with you by another user. |
To share an RFQ:
Open the RFQ.
Choose Actions > Sharing. The Share With Users dialog appears.
Click Add. The Add Users dialog appears.
Click the Address Book button to the right of the Users field.
Use the drop-down filter in the Users search palette to select all users (Users) or all groups (Groups) or any other specific group.
Enter your search criteria and click Search. You may also type a user's name if you know exactly how it appears (in the system), but you must first select a group to populate the Available Users list.
Select the users one by one, or select multiple users/user groups using the ctrl button on your keyboard. Drag and drop your selected item(s) to the Users cell.
Click the list button to the right of the Roles field. The Roles palette appears. Select the appropriate role or roles for your chosen users to have available related to the RFQ. Drag and drop them into the Roles cell.
Click Save. Your additions are listed in the Share With Users window.
Click Close.
To remove users from an RFQ's Access Control List:
|
Note: To see the Access Control List for a RFQ, choose Actions > Sharing. The Access Control List shows the complete list of users who have access to the RFQ. |
Open the RFQ.
Choose Actions > Sharing. The Access Control List: Share With Users dialog appears.
Click the rows of users to remove.
Click Remove.
To see which objects have been shared with you:
Click the My Settings button in the Courtesy Controls area in the left pane.
Click the Share tab.
The Share tab lists the objects that have been shared with you by another user.
From your user profile, see if any objects have been shared with you through user groups. Click the User Group tab. Click a desired group. Click its Share tab.
The Share tab lists the objects for which the group and all its users have been granted shared roles by another user.