| Agile Product Lifecycle Management Import/Export User Guide Release 9.3.6 E71157-01 |
|

 Previous |
 Next |
| Agile Product Lifecycle Management Import/Export User Guide Release 9.3.6 E71157-01 |
|
Previous |
Next |
This chapter includes the following:
Overview
Supported Formats
Agile PLM Fields
Importing Currency Values
Importing Money Values
Importing Mass Values
Importing Geographical Locations
Importing Values to Dynamic Lists
Importing Cascading Lists
Using BOM Reference Designators
Guidelines for Excel Files and Delimited Text Files
Importing Data from Microsoft Excel Files
Importing Data from Delimited Text Files
Importing Data from PDX Packages and aXML Files
Using Templates to Import Data
The Import feature supports importing data from external sources into PLM database files. This chapter describes and provides the necessary background and procedural information to import the supported data types and data formats.
The Import Wizard enables importing data in the following data formats:
Table 2-1 Formats supported by the Import Wizard
| Format | Description |
|---|---|
|
Delimited Text File |
A standard flat text file where each field of data is delimited by a special character, such as a comma or a tab. |
|
Excel Workbook |
Microsoft Excel workbook files. The Import Wizard supports files created with Microsoft Excel 2000, 2002, 2003, and 2007. |
|
Product Data eXchange (PDX) Package |
An industry standard format for product data based on XML (eXtensible Markup Language) technology. |
|
Agile XML (aXML) File |
Agile's proprietary XML format that includes data that is not supported by PDX, such as declarations, substances, prices, or suppliers. |
Before you import data from source files into the Agile PLM system, you should understand the requirements for each field for which you can import data. Certain fields are required, which means they must be mapped in the Import Wizard. Fields also have data types, which determine how the data should be formatted, and maximum lengths, which the Agile PLM system validates on import.
Each Agile object has the potential for several defining fields, which are instances of the attributes defined for that object's class or subclass. There are three-dozen default Agile classes, each with a default subclass, and the Agile Administrator can customize the system with additional subclasses that are applicable to your company.
Before importing data, print the Agile Classes Report from the Web Client. Read the report and become familiar with the Agile data model. Make sure your source data conforms to the data requirements specified in the report.
To run the Agile Classes Report from the Web Client:
Click Reports in the Navigation pane.
Select Reports and Analytics > Standard Reports > Administrator Reports > Agile Classes Report.
Click Execute.
Specify parameters used to run the report. Click Finish. After a few seconds a File Download window prompts you to save or open the file.
Save the report to your computer.
The Agile Classes Report is a comma-separated text file. It lists the attributes available on each table of each class. It also indicates whether a field is required for the Import Wizard. If a field is required for the Import Wizard, source data must be mapped to the target field. Otherwise, the object cannot be imported.
Each read/write Agile PLM field maps to one of the following data types:
Table 2-2 Data that types Agile PLM fields are mapped into
| Data type | Description |
|---|---|
|
Text |
A string value. |
|
MultiText |
Text that can span multiple lines. |
|
Date |
A date value. |
|
Numeric |
A number rounded to two decimal places. |
|
Money |
Similar to the Number data type, but it defaults to four decimal places and its unit is a particular currency. |
|
List |
A string value selected from a list of possible values. |
|
MultiList |
One or more string values (in comma-delimited format) selected from a list of possible values. |
|
Unit of Measure (UOM) |
A numerical quantitative measurement. The value is expressed as a number multiplied by a standard unit (for example, gram or ounce). |
Many Agile PLM fields have a maximum length. If a value exceeds the maximum length for a field, it is invalid and cannot be imported. The Import Wizard has a preference that lets you handle values that fail length validation. You can choose to either reject such values or truncate them so they can be imported. For more information, see "Setting Parsing and Validation Options."
All text fields have a maximum length. Some text fields are restricted to just a few characters. Others, such as the Parts Class > BOM > BOM Notes field can be much longer.
Date fields do not have a maximum length, but all date values must be a date format supported by the Agile PLM system. For more information, see "Supported Date Formats."
Several read-only fields have a child relationship with other parent fields. Child fields derive their values from parent fields. Examples of child fields include BOM table attributes such as BOM.Item List02 and BOM.Item Text01, whose parent fields are located on Page Two of the BOM Item.
It's important for the Agile PLM administrator to ensure that all child fields are configured identically to their parent fields. Otherwise, problems could occur when you import data.
The Import Wizard supports a variety of date formats based on several different criteria, including user preferences and locale.
|
Note: The upper limit for dates is today's date + 150 years. Date values later than that are invalid and cannot be imported. |
Each Agile user can select a preferred date format.
To change date format preferences for your Agile account:
Use one of the Agile Clients to set user preferences:
In Web Client, select My Settings button > Preferences > Edit.
In Java Client's tool bar, select Settings > Current User > Preferences.
Select the desired date format in the Preferred Date Format field.
Select a GMT time zone in the Time Zone field.
Click Save.
The Import Wizard supports all combinations of date and time formats available in the java.text.DateFormat class as well as additional formats. The DateFormat field provides several date and time formatting styles based on locale. The following table lists date formats available for the U.S. locale, evaluated in order:
Table 2-3 Date formats
| Date Format | Example |
|---|---|
|
MMM-dd-yyyy HH:mm:ss |
Jul-10-2001 14:08:35 |
|
MMM-dd-yyyy HH:mm |
Jul-10-2001 14:08 |
|
MMM-dd-yyyy hh:mm:ss a |
Jul-10-2001 02:08:35 PM |
|
MMM-dd-yyyy hh:mm a |
Jul-10-2001 02:08 PM |
|
MMM-dd-yyyy |
Jul-10-2001 |
|
dd-MMM-yyyy HH:mm:ss |
10-Jul-2001 14:08:35 |
|
dd-MMM-yyyy HH:mm |
10-Jul-2001 14:08 |
|
dd-MMM-yyyy hh:mm:ss a |
10-Jul-2001 02:08:35 PM |
|
dd-MMM-yyyy hh:mm a |
10-Jul-2001 02:08 PM |
|
dd-MMM-yyyy |
10-Jul-2001 |
|
EEEE, MMMM d, yyyy |
Thursday, June 25, 1998 |
|
EEEE, MMMM d, yyyy h:mm a |
Thursday, June 25, 1998 1:32 PM |
|
EEEE, MMMM d, yyyy h:mm:ss a |
Thursday, June 25, 1998 1:32:19 PM |
|
EEEE, MMMM d, yyyy h:mm:ss a z |
Thursday, June 25, 1998 1:32:19 PM GMT-05:00 |
|
MMMM d, yyyy |
June 25, 1998 |
|
MMMM d, yyyy h:mm a |
June 25, 1998 1:32 PM |
Each date format is specified using a time pattern string where:
y = year
M = month in year
d = day in month
H = hour in military time (24-hour clock)
h = hour in AM/PM (1~12)
m = minute in hour
s = second in minute
E = day in week
a = AM/PM marker
z = time zone
' = escape for text
'' = single quote
The count of each letter such as ”M” in the time pattern determines the format. For example, three ”M” characters indicate that the month is represented as text instead of a number; less than three ”M” characters means that the month is represented by a number.
For more information about Java date formats and time pattern syntax, refer to Oracle documentation for the SimpleDateFormat and DateFormat classes:
You can specify date values in reference to Greenwich Mean Time (GMT). If a date value omits the time zone, the user's time zone preference is used. Time zones must be entered in the following format:
GMT Sign hh:mm
P10011 Central|Chicago|Jeff Whaley
where:
GMT = Greenwich Mean Time
Sign = + or -
h = hour in AM/PM (1-12)
m = minute in hour
For example, GMT-05:00 and GMT+02:00 are valid time zones.
Do not use three-character codes (such as PST or PDT) to specify time zones. Three-character time zone codes are unreliable because some are used for multiple time zones. Consequently, the Agile PLM server might resolve a three-character time zone code to an incorrect time zone.
Published Price Lines and Supplier objects allow you to import values to currency fields. Currency values can be imported if they are entered as a three-letter ISO 4217 currency code or the full currency name. For example, ”USD” and ”U.S. Dollar” are both valid currency values that can be imported. ”U.S. Dollar (USD)” cannot be imported.
Agile supports many different currencies. The list of available currencies is determined when the Agile PLM system is installed. For more information about ISO 4217 currency codes, refer to the following Web site:
http://www.iso.org/iso/en/prods-services/popstds/currencycodeslist.html
ADP - Andorran Peseta
AED - UAE Dirham
ALL - Bulgarian Lek ALL
AMD - Armenian Dram
ANG - Netherlands Antillean Guilder
AON - New Kwanza
AOR - Kwanza Reajustado
ARP - Argentine Peso
ATS - Austrian Shilling
AUD - Australian Dollar
AWF - Aruban Florin
AWG - Aruban Guilder
AZM - Azerbaijani Manat
BAK - Bosnia - Herzegovina Convertible Mark
BBD - Barbados Dollar
BDT - Bangladeshi Taka
BEF - Belgian Franc
BGL - Bulgarian Lev
CRC - Costa Rican Colon
CUP - Cuban Peso
CVE - Cape Verde Escudo
CYP - Cyprus Pound
CZK - Czeck Koruna
DEM - Deutsche Mark
DJF - Djibouti Franc
DKK - Danish Krone
DOP - Dominican Peso
DZD - Algerian Dinar
ECS - Ecuadorian Sucre
EEK - Estonian Kroon
EGP - Egyptian Pound
ERN - Eritrean Nakfa
ESP - Spanish Peseta ESP
ETB - Ethiopian Birr
EUR - Euro
FIM - Finland Markka
FJD - Fiji Dollar
FKP - Falkland Islands Pound
FRF - French Franc
GBP - Pound Sterling
GEL - Georgian Lari
GHC - Ghanaian Cedi
GIP - Gibraltar Pound
GMD - Gambian Dalasi
GNF - Guinean Franc
GRD - Greek Drachma
GTQ - Guatemalan Quetzal
GYD - Guyanan Dollar
HKD - Hong Kong Dollar
HNL - Honduran Lempira
HRK - Croatian Kuna
GTG - Haitian Gourde
HUF - Hungarian Forint
IDR - Indonesian Rupiah
IEP - Irish Pound
ISL - Israeli Shekel
INR - Indian Rupee
IQD - Iraqi Dinar
IRR - Iranian Rial
ISK - Icelandic Krona
ITL - Italian Lira
JMD - Jamaican Dollar
JOD - Jordanian Dinar
JPY - Japanese Yen
KES - Kenyan Shilling
KGS - Kyrgyzstani Som
KHR - Cambodian Riel
KMF - Comorian Franc
KPW - North Korean Won
KRW - South Korean Won
KWD - Kuwaiti Dinar
KYD - Cayman Islands Dollar
KZT - Kazakhstani Tenge
LAK - Laotian Kip
LPB - Lebanese Pound
LKR - Sri Lankan Rupee
LRD - Liberian Dollar
LSL - Lesotho Loti
LTL - Lithuanian Litas
LUF - Luxembourg Franc
LVL - Latvian Lats
LYD - Libyan Dinar
MAD - Moroccan Dirham
MDL - Moldovan Leu
MGF - Malagasy Franc
MKD - Macedonia Denar
MMK - Myanmar Kyat
MNT - Mongolian Tugrik
MOP - Macau Pataka
MRO - Mauritania Ouguiya
MTL - Maltese Lira
MUR - Mauritius Rupee
MVR - Maldives Rufiyaa
MWK - Malawian Kwacha
MXP - Mexican Nuevo Peso
MYR - Malaysian Ringgit
MZM - Mozambican Metical
NAD - Namibian Dollar
NGN - Nigerian Naira
NIO - Cordoba Ora
NLG - Netherlands Guilder
NOK - Norwegian Krone
NPR - Nepalese Rupee
NZD - New Zealand Dollar
OMR - Omani Riyal
PAB - Panamanian Balboa
PEN - Peruvian Nuevo Sol
PGK - Papua New Guinea Kina
PHP - Philippine Peso
PKR - Pakistan Rupee
PLZ - Polish Zloty
PTE - Portuguese Escudo
PYG - Paraguay Guarani
QAR - Qatari Riyal
ROL - Romanian Leu
RUR - Russian Ruble
RWF - Rwanda Franc
SAR - Saudi Riyal
SBD - Solomon Islands Dollar
SCR - Seychelles Rupee
SDD - Sudanese Dinar
SEK - Swedish Krona
SGD - Singapore Dollar
SHP - St. Helena Pound
SIT - Slovenian Tolar
SKK - Slovak Koruna
SLL - Sierra Leone's Leone
SOS - Somali Shilling
SRG - Surinam Guilder
STD - Sao Tome Dobra
SVC - El Salvador Colon
SYP - Syrian Pound
SZL - Swazi Lilangeni
BHT - Thai Baht
TJR - Tajik Ruble
TMM - Turkmenistan Manat
TND - Tunisian Dinar
TOP - Tongan Pa\'anga
TLR - Turkish Lira
TTD - Trinidad and Tobago Dollar
TWD - New Taiwan Dollar
TZS - Tanzanian Shilling
UGX - Uganda Shilling
USD - U.S. Dollar
UYU - Uruguayo Peso
UZS - Uzbekistan Som
VEB - Venezuelan Bolivar
VND - Viet Nam Dong
VUV - Vanuatu Vatu
WST - Samoa Tala
XAF - Central African Franc
XCD - East Caribbean Dollar
XPF - CFP Franc (French overseas possessions)
YER - Yemeni Rial
YUN - Yugoslav New Dinar
ZAR - South African Rand
ZMK - Zambian Kwacha
ZWD - Zimbabwe Dollar
The money datatype is a compound datatype that includes a numeric value and a currency code, such as ”USD” for U.S. Dollars. Import supports both money value and currency. The user preferred currency is chosen if currency is not specified in source file. If the source file is a delimited text file or an Excel file, money values can be combined with currency code, in this format USD:100, or separate money value and currency code in two fields. The Import Wizard rejects non-numeric money values. If the source file is:
An aXML file, the Import Wizard loads the currency code from the source file.
A PDX package, the Import Wizard loads the user specified preferred currency, because there is no currency code in the source PDX file.
To change or view your currency settings:
In Web Client, select the My Settings button > Preferences > Edit.
In Java Client, select Settings > Current User > Preferences.
Be sure to save changes when applicable.
Several Product Governance & Compliance objects, including items, have Mass fields. Mass fields have both a numeric value and a unit of measure, for example, grams, kilograms, ounces, or pounds. The Import Wizard allows you to import both the numeric portion of a Mass value and the unit portion. When you import Mass values, make sure you map both the Mass and Mass-measure fields.
The default standard unit for Mass fields is Gram, although your Agile PLM administrator can choose a different standard unit.
Customer, Supplier, and Manufacturer objects all have country and region fields. You must specify valid country and region names in your source data. Otherwise, the specified values are not imported.
To see valid country names and region names in Java Client:
Click the Admin tab.
Choose Data & Workflow Settings > Product Cost Management > Ship-To Location.
Click the New button.
Click the Continent list, and select a continent.
Click the Country list, and select a country.
Click the Province/Region/State list, and select a region.
The Import Wizard supports importing values to list fields that use dynamic lists. Dynamic lists contain a selection of values that are updated at run time based on data that was already added to the system.
The Items, Changes, Users, and Suppliers lists are examples of dynamic lists. Because dynamic lists can contain thousands of value objects, you cannot enumerate values for them.
The Import Wizard is not able to validate whether a dynamic list requires upper-case or lower-case values before sending the data to the server. Consequently, any list values that are using the wrong case are rejected.
Excel Format Options when Importing Values into Dynamic Lists
Although Web Client displays the Supplier field in the form of supplierName (supplierNumber), because Suppliers list is a dynamic list, you can import data into this field using either the supplier number or the composite form: supplierName(supplierNumber.)
When importing a Manufacturer Part Number, the Manufacturer Name is part of the value. This requires a format described in "Specifying Excel Format to Import Manufacturer Part Numbers to Dynamic Lists" below, which is different from the format described for Items, Changes, Users, and Suppliers lists in "Excel Format Options when Importing Values into Dynamic Lists" above.
Specifying Excel Format to Import Manufacturer Part Numbers to Dynamic Lists
Because the Manufacturer Name is part of the Manufacturer Part Number, cannot specify Manufacturer Part Number, or Manufacturer Part Number(Manufacturer Name), as you did in importing Suppliers lists in to Dynamic Lists
Thus, if you have a Manufacturer called ABC and a Manufacturer Part Number that is equal to 123, the supported format is Manufacturer::PartNumber, or ABC::123.
You can configure an Agile PLM list field to be and behave as a cascading list. A cascading list presents its values in multiple hierarchical levels, letting you drill down to a specific value in the hierarchy.
To import values into a cascading list field, make sure you use the correct delimiter character to separate each level. The Cascade Delimiter Character preference specifies the character used to delimit cascading list values. For information to set the Cascade Delimiter Character preference, see"Setting Parsing and Validation Options." The default setting for the Cascade Delimiter Character preference is vertical bar (|).
The following example shows source data that includes cascading list values for a Page Two field called Regional Contact, which has three levels.
Part Number       Regional Contact
P10012     Western|Los Angeles|Jason Wong
P10013     Southern|Atlanta|Hsing-Hua Zhang
P10014     Northern|Boston|Leslie Ickes
Reference designators are commonly used in the electronics industry as a labeling system to refer to components. If your company uses reference designators, you can use the BOM > Ref Des field to assign and edit reference designators.
You can specify reference designators in several ways:
Delimited using comma (,), semicolon (;), or vertical bar (|). By default, the Import Wizard uses a comma for the reference designator delimiter. To change the delimiter, see "Setting Business Rule Options."
Individually (R1,R2,R3) or compressed, using the specified range character (R1-3orR1-R3). By default, the Import Wizard uses a hyphen for the reference designator range character. To change the range character, see "Setting Business Rule Options."
Uppercase, lowercase, or mixed case (they will be converted to whatever format is specified by the Agile PLM administrator).
Using continuation rows if there are too many reference designators to fit in one cell. All other cells must be left empty in these rows.
If you have few reference designators, you can enter them one by one (for example, R1,R2,R3).
To add groups of reference designators that begin with different letters, separate each group with a parse character, usually a comma. For example, to enter the 10 designators A1, A2, A3, B4, B5, B6, B7, C8, C9 and C10 you would type:A1-3,B4-7,C8-10
Depending on how your Agile database has been configured, Web Client may automatically contract ranges of reference designators. If you enter 1,2,3,4,5, when you press Tab, the Ref Des field shows 1-5.
If your Agile database has been configured to expand reference designators, then reference designators connected by hyphens (or another specified range character) are expanded when they are imported into the Agile database. For example, R1-5 becomes R1,R2,R3,R4,R5.
Reference designators that end in a letter (for example, R1a,R2a,R3a) must be entered individually. For more information about how Agile Import handles reference designator ranges, see "Reference Designator Ranges."
The following rules determine how ranges of reference designators are treated by the Import Wizard. If a reference designator does not qualify for expansion, the Import Wizard treats the range as one reference designator.
The two reference designators in a range statement must end in a numeric character to qualify for expansion. If the last value in a reference designator string is a text character, it does not qualify for expansion.
Examples: A202-A210 qualifies for expansion. A202-A210a does not qualify for expansion. A202a-A210a does not qualify for expansion.
If two reference designators in a range statement have prefixes, they must have the same prefix to qualify for expansion. Prefixes must be in <CHAR> format.
Examples: RB202-RB210 qualifies for expansion.
RB202-RC210 does not qualify for expansion.
If only the first reference designator in a range statement has a prefix, then the range qualifies for expansion.
Example: RB202-210 qualifies for expansion.
If neither reference designator in a range statement has a prefix, then the range qualifies for expansion.
Example: 202-210 qualifies for expansion.
If your Agile database has been configured to remove leading zeros in the numeric portion of reference designators, you should avoid using leading zeros in reference designator ranges in your import file. For example, the Import Wizard may parse R0203-R0225 as R203-R225, removing the leading zeros.
In Java Client, you can click the Admin tab and choose Server Settings > Preferences > Reference Designators Allow Range Expand Collapse to see whether reference designators can be expanded and collapsed on your Agile PLM system. If this preference is set to No, all reference designator range behavior is turned off. This prevents leading zeros from being removed from reference designators, but it also causes each reference designator range, such as R0203-R0225, to be treated as one reference designator. In this case, to enter reference designators with leading zeros, you must enter them individually and not as ranges.
|
Note: For information about how to change the Reference Designators Allow Range Expand Collapse preference setting in Java Client, contact My Oracle Support athttps://support.oracle.com. |
To ensure that reference designator fields in aXML and PDX packages are parsed correctly when they are imported, follow these guidelines:
Use a comma to separate multiple reference designators (R1,R2,R3).
Use a hyphen to indicate a range of reference designators (R1-R3).
Agile PLM will export all delimited text files (CSV). However, to import table files, including special table of the exported table files of user group table of user object, user table of user group objects, and Published Price Lines table of price object files, you must specify the header row and the last row. Otherwise, Agile PLM will not export these files.
Make sure Microsoft Excel files and delimited text files conform to the following structural guidelines before importing them:
Although a Microsoft Excel workbook can contain multiple sheets, you can import data from only one sheet at a time. Therefore, set up Excel sheets appropriately.
Numeric values in Microsoft Excel files are converted to either integers or decimals before being imported. If you want an integer to be treated as a decimal, enter the value as text by preceding it with a single quotation mark. For example, to import the number 1.0 instead of 1, type '1.0 in the Microsoft Excel cell.
Formulas in Microsoft Excel files must calculate to a numeric value. Otherwise, the Import Wizard imports the formula string. If your Microsoft Excel file has formulas that calculate to nonnumeric values, you can save the file to a CSV file to ensure that the formula values will be imported correctly.
Column headers cannot be blank. For example, in a comma-separated file, the following header row is considered invalid because of the blank header between Number and Description:
Number, Description,Product Lines,Category
The first row of import data, which is not necessarily the first row in an Excel file, must be the ”header” row, which contains field names. When you select the source file, you can click Configure to set the location of the header row.
Field names in the header row must be unique. Duplicate field names are not allowed. If the source file contains multiple data sections, you must set the Header and Last rows to specify the data that you want to import. This is applicable to the Table Format Export. When you select the Table Format Export, data in Page one, Page Two and Page Three are exported to one row in the exported Excel/CSV file.
Fields in the header row must not contain carriage returns or linefeed characters. If they do, the Import Wizard will not parse the file correctly. For more information, see "Removing Carriage Returns and Linefeed Characters."
The header row cannot end with a delimiter character, such as a comma.
Rows that follow the header row must contain data. Make sure there are no empty rows between rows of data.
You must remove any row(s) of data that you do not want imported into the Agile database.
All fields that are required for the particular object type you are importing must contain data.
Fields must use the same delimiter character. For example, for a comma-separated values file, each field must be separated by a comma.
Your import data must conform to the maximum lengths specified for each Agile field by the Agile PLM administrator. Otherwise, the Import Wizard's Length Validation preference will either reject or truncate the value.
An entry for a MultiList field (for example, the Product Line(s) field on the Title Block tab) must delimit separate list values. The default MultiList delimiter is a comma; you can also choose to use a vertical bar (|) or semicolon (;). For more information, see "Setting Parsing and Validation Options."
This is an example of a comma-delimited list of values for a MultiList field:
Scorpio,Taurus,Capricorn
|
Note: If you are importing user names into a MultiList field, you must use this format: Lastname,spaceFirstname;spaceLastname,spaceFirstname;spaceLastname; and so on. |
Money fields must contain numeric values. They should not include currency codes. Import supports currency codes and the user's preferred currency is selected if the currency code is not specified.
For BOMs, parent item rows must be grouped contiguously. That is, all BOM components for a parent item should appear in one group of rows.
For BOMs, the maximum length of individual reference designators is 19 characters.
For BOMs, reference designators can continue on subsequent rows. On each reference designator continuation row, the only field with data should be the reference designator field. Other fields should be blank.
For BOMs, the value in the Quantity field should equal the number of reference designators. Otherwise, the Import Wizard may display a warning message when you import the data.
For delimited text files, enclose text values within text qualifier characters (for example, quotation marks). Qualifying a text field allows the field's delimiting character, such as a comma, to be used within the field's text. In the following example, 21" Monitor, Tilt Pedestal is the item's description, which has both a comma (the field delimiter) and a quotation mark within the text:
Number,Description,Rev,BOM Component Number,QPA
170-50,"21"" Monitor, Tilt Pedestal",A,172-92,1
To avoid file parsing errors when importing Excel files or delimited text files, make sure the header fields do not contain carriage returns or linefeed characters. Such characters may be hard to spot in a delimited text file, but you can easily find them and remove them in Excel.
To remove carriage returns or linefeed characters from Excel header fields:
Choose the Select All button. This is the gray rectangle in the upper left corner of the worksheet where the row and column headings meet.
Choose Format > Row > AutoFit.
Delete any extra carriage returns or linefeed characters in the header.
Save the file.
Before importing a BOM from an Excel file or a delimited text file, make sure all BOM components for a parent item are grouped together in contiguous rows. If BOM components for a parent item are listed on noncontiguous rows, the Import Wizard imports only the last group of BOM components for that parent item.
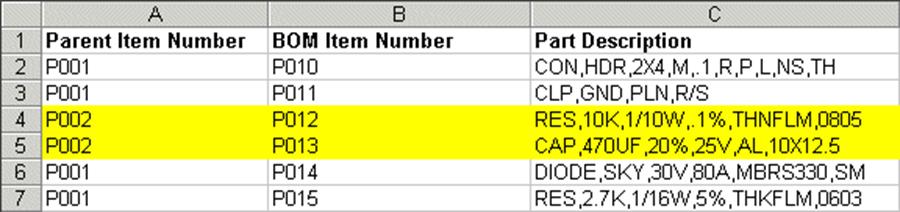
For example, the following BOM data is incorrect because the rows 4 and 5 are out of order.
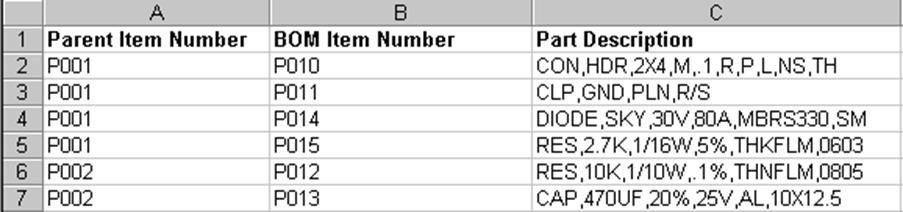
This is the BOM data after it is correctly sorted. BOM components for P001 are now grouped together.
To sort the BOM, open the source file in Microsoft Excel and sort the rows in ascending order by the Parent Item Number column.
|
Note: BOMs in aXML and PDX packages are automatically sorted appropriately. However, an XML file declares its encoding within the file. Therefore, you do not need to specify file encoding when you import data from aXML or PDX packages. |
Microsoft Excel is a popular spreadsheet program, which lets you format data in a matrix of rows and columns. The Import Wizard supports Microsoft Excel versions 2000, 2002, 2003, and 2007.
Excel workbook files, which have an XLS or XLSX filename extension, can have multiple sheets per file. Make sure you specify the sheet to import and the location of the header row on that sheet.
|
Note: For Variant Management it is also possible to import the Instances tab of a Part with the subtype Model. For more information see Agile PLM Product Collaboration User Guide > Variant Management chapter. |
To import data from an Excel file:
In Web Client, choose Tools and Settings > Import.
|
Note: The file must be a valid Excel 2000, 2002, 2003, or 2007 file. |
Specify the import source. Select File. Type the file name, or click Browse to select the file.
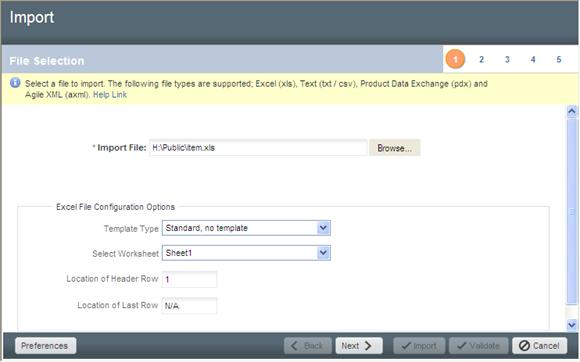
When Excel configuration options appears, you can continue with the default configuration settings or specify template type, worksheet, and the location of the header or last row.
When you are finished, click Next to proceed to the next Wizard step. The Specify File Content dialog opens.
Select the type of object to import, then click Next to proceed to the next step of the Wizard
|
Note: If the source file is Excel (level template), aXML, or PDX, you can select the mapping file during the import process, create one, or use a default mapping. |
Select a change order and a mapping file.
|
Note: A change order is required when you use Redlining mode to import. For more information about redlining, see "Using Redlining or Authoring Mode." |
Select or create a transformation definition file (optional). Click Next.
Review your import settings, then click Import to begin importing.
If you open a delimited text file in Excel, all cells use the General number format by default. This causes large numbers, such as item numbers and manufacturer part numbers, to be converted into scientific notation (for example, 8.1E+22). You can fix that problem by formatting the cells to use Text format.
To format numbers as text in Excel:
Select the cells you want to format.
Choose Format > Cells. The Format Cells dialog box appears.
Click the Number tab.
In the Category list, select Text, and then click OK.
If there are any cells that still display in scientific notation, click each cell, press F2, and then press Enter to re-enter the number as text.
After you format cells to use Text format, save the file as an Excel (XLS, or XLSX) file to preserve the formatting. If you save the file as a CSV file, the next time you open it in Excel the sheet will again use the General number format.
If a delimited text file has many item numbers or manufacturer part numbers that need to be reformatted as text, it may be more practical to import the file into a new Excel workbook. Excel's Text Import Wizard allows you to format the columns appropriately.
To import a delimited text file into an Excel workbook:
Open a new workbook.
Choose Data > Get External File > Import Text File.
Choose the file and choose Import. The Text Import Wizard appears.
Choose Delimited. Click Next.
In the Delimiters box, make sure only Comma is checked. Click Next.
In the Data Preview box, select columns to change the data format. For example, select the Item Number or Manufacturer Part Number column, and click Text in the Column Data Format box.
Click Finish.
Select Existing Worksheet, and click OK.
When you select an Excel file to import, the Import Wizard parses the data into a delimited text format before importing it. That is why many of the guidelines for importing delimited text files also apply to Excel files. The parser handles the following types of Excel values specially:
Number format - Numeric values in Excel files are converted to either integers or decimals before they are imported.
Date format - The parser supports native Excel date formats as well as any custom date formats that contain all three of the following identifiers: d m yy. For example, yyy/mm/dd and dd-MM-YYY hh:mm are supported date formats, but mm/yy is not. and dd-MM-YYY hh:mmyyy/mm/dd
Currency format - The parser treats any cells containing currency values as numbers. Therefore, a cell with the value $9.99 is treated as 9.99.
When you select an Excel file to import, you can specify how the file is configured. This allows the Import Wizard to identify the template you're using, the worksheet to import, and the header row where data starts.
To specify the configuration of an Excel file:
Enter the path of the file, or click Browse to select it.
The Excel Workbook Configuration options appear.
Specify the template type (Level Template, Parent-Child Template, or Standard).
Specify the sheet to import. The default is the first worksheet in the Workbook.
Enter the location of the header row and last row. The default is 1.
If necessary, type the location of the last row. The default value is ”N/A”.
|
Note: The Import Wizard maintains Excel file settings for the current import session only. |
Delimited text files are flat text files where each field of data is delimited by a special character, such as a comma, tab, or vertical bar. You can create delimited text files in a text editor. You can also export delimited text files using many applications, including Microsoft Excel and other spreadsheet programs.
|
Caution: A delimited text file must have a CSV or TXT filename extension. Otherwise, the file is invalid and cannot be imported. |
Generally, text files allow you to import only one type of Agile object at a time. However, when you import BOMs, AMLs, or Published Price Lines from a text file, you can also import the parent items or prices at the same time.
Text files should have a header row. If you are importing a text file, make sure you specify the location of the header row.
|
Note: For Variant Management it is also possible to import the Instances tab of a Part with the subtype Model. For more information refer to the Variant Management chapter in Agile PLM Product Collaboration User Guide. |
To import data from a text file:
In Web Client, choose Tools and Settings > Import.
|
Note: The filename must have one of the following extensions: CSV or TXT. |
Click Browse to locate and select the import file.
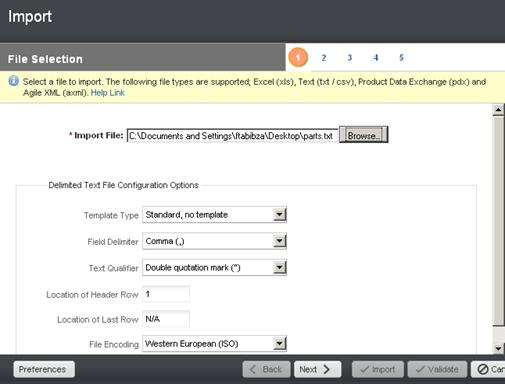
The Import Wizard displays the default configuration options for delimited text files. You can continue with the default settings and if necessary, specify template type and other settings. For procedures, see "Specifying Delimited Text File Configurations."
Click Next to proceed to the next Wizard step.
Select the type of object to import, then click Next.
Select a change order and a mapping file.
|
Note: A change order is required when you use Redlining mode to import. For more information about redlining, see "Using Redlining or Authoring Mode." |
Select or create a transformation definition file (optional). Click Next.
Review your import settings, then click Import to begin importing.
|
About Delimited Text Files Saved by the Export Wizard: Agile's Import Wizard does not support delimited text files saved by the Export Wizard, mainly because the Export Wizard adds a header section to the file and includes multiple tables in a flat format. You can reformat the data to import it successfully |
When you select a delimited text file, you can specify how the file is configured. This allows the Import Wizard to identify the template you're using, the header row, field delimiter, and text qualifier used in the file.
To specify the configuration of a text file:
Specify the template type (Level Template, Parent-Child Template, or Standard).
Choose the field delimiter. The default is Comma (,).
Choose the text qualifier. The default is Double quotation mark (”).
Enter the location of the header row. The default is 1.
If necessary, enter the location of the last row. The default value is ”N/A”.
Choose the file encoding type. The default is based on your locale. For the U.S. (English) locale, the default is ISO-8859-1, which includes all US and Western European characters. For Japan and China, the default encoding is Big5 and SJIS, respectively.
|
Note: The Import Wizard maintains delimited text file settings for the current import session only. |
The Import Wizard supports importing data from two different XML formats:
Product Data eXchange (PDX) - A standardized XML format for representing structured product content. It provides a means for partners in the e-supply chain (OEMs, EMS providers, and component suppliers) to exchange product content and changes (BOMs, AMLs, ECRs, ECOs). You can import items, BOMs, manufacturers, manufacturer parts, AMLs, and attachments from a PDX package. You can create PDX packages in the Web Client. In addition, Agile provides a free, Web-based application called Agile eXpress that lets you create and view PDX packages.
For more information about PDX, including a link to the DTD, refer the following site: http://webstds.ipc.org/2571/2571.htm
Agile XML (aXML) - Agile XML format is an XML representation of Agile's business schema. aXML contains all product content managed in Agile including items, change details, manufacturer information, cost, drawings and other files. As a representation of schema elements across all Agile products, aXML will evolve with Agile's business schema over time. Agile Content Service (ACS) and Agile Integration Services (AIS) both export Agile data in aXML format. Agile does not provide a separate tool to view aXML packages. However, you can open the XML file contained within an aXML package in any XML viewer. For example, Internet Explorer can be used to view XML files. For the latest aXML schema, see the following Web site: http://www.oracle.com/technology/products/applications/xml/plm/2009/06/aXML.xsd.
|
Note: The Import Wizard does not support importing changes or packages, even though these can be contained within a PDX package or an aXML file. |
PDX packages that you plan to import must adhere to the following guidelines:
The embedded XML file contained in a PDX package must be well formed and meet the structural requirements specified by PDX DTD Revision 1.0. (If you have a PDX 0.7 file, you can open it in Agile eXpress 9 and save it as a PDX 1.0 file.)
The PDX package must contain values for attributes that correspond to Agile key fields.
The PDX package must not contain multiple revisions of the same item. If you try to import items from a PDX package with multiple revisions, the Import Wizard rejects the file.
The Import Wizard supports PDX packages that use Agile's multi-site PDX 1.0 implementation. It does not support multi-site PDX implementations from other vendors.
To import data from a PDX package or an aXML file:
In Web Client click Tools and Settings > Import.
Type the filename, or click Browse to access the file.
|
Note: PDX packages have the.pdx extension, and aXML files have the.axml extension. |
Click Next.
The Specify File Content dialog opens and lists a set of options (contents to import) depending on the file type (aXML or PDX).
Select one or more types of objects to import and then click Next.
|
Note: The Preferences settings are optional. For descriptions and procedures to set preferences and perform the remaining step, see Chapter 3, "Setting Import Preferences." |
Select a change order and a mapping file. Use the default PDX mapping. Use the default PDX or default aXML mapping. You can edit the default mapping to add or remove field mappings. You can also select or create a transformation definition file (optional). Click Next.
|
Note: A change order is required when you use Redlining mode to import. For more information about redlining, see "Using Redlining or Authoring Mode." |
Review your import settings. Click Import to begin importing.
You can import the following objects from a Product Data eXchange Package file:
Manufacturer
Manufacturer only
Manufacturer Attachment
Manufacturer Part
Manufacturer Part only
Manufacturer Part Attachment
Item
Item only
Bill of Material
Approved Manufacturer List
Sites
Item Attachment
You can import the following objects from an aXML file:
Manufacturer
Manufacturer only
Relationships
Manufacturer Attachment
Manufacturer Part
Manufacturer Part only
Composition
Bill of Substances
Specifications
Relationships
Approved Supplier List
Manufacturer Part Attachment
Item
Item only
Composition
Bill of Substances
Specifications
Approved Supplier List
Bill of Material
Instances
|
Note: For Variant Management only! For more information see Agile PLM Product Collaboration User Guide > Variant Management chapter. |
Approved Manufacturer List
Sites
Item Attachment
Relationships
Declaration
Items
Manufacturer Parts
Part Groups
Item Bill of Substances
Manufacturer Part Bill of Substances
Part Group Bill of Substances
Specification
Declaration Attachment
Published Price
Published Price only
Published Price Lines
Price Attachment
Quote History
Quote History only
Quote History Lines
Part Group
Part Group only
Approved Supplier List
Relationships
Parts
Specifications
Part Group Attachment
User Group
User Group only
Users
User
User only
User Group
Product Service Request (PSR)
PSR only
Related PSR
Attachments
Affected Items
Relationships
Quality Change Request (QCR)
Quality Change Requests only
Relationships
Affected Items
Attachments
Declaration
Declaration only
Manufacturer Parts
Item Bill of Substances
Part Group Bill of Substances
Declaration Attachment
Item
Part Groups
Manufacturer Part Bill of Substances
Specification
Substance
Substance only
Substance Attachment
Composition
Specification
Specification only
Substances
Specification Attachment
An import template is a predefined format you can use to import items, BOMs, and AMLs from delimited text files or Microsoft Excel files. If you format your data according to one of the provided templates, the import process is simple. Once you specify the source file and select the default field mappings, you can click Import to begin importing.
The Import Wizard provides the following templates:
Level Templates
BOM Only Level Template - Represents the hierarchical levels of a BOM by specifying a numeric Level column. The relationship between a parent item and its components is set by the numeric level. Approved manufacturers are not included with this template.
When using the BOM Level Template to import data, make sure the Find Num field in the source file is not blank. If blank, the BOM data in the PLM is overwritten and is no longer available.
BOM & AML Level Template - Represents the hierarchical levels of a BOM by specifying a numeric Level column. The relationship between a parent item and its components is set by the numeric level. This template includes approved manufacturers for each part.
|
Important: In order for BOM and AML level templates to work with Blank Data Actions, you must specify a value for the Find Num field. If left blank, the Import Wizard will generate an error message. |
Parent-Child Template - Represents the relationship between a BOM and its components by Parent Number and Child Number columns.
If you use the BOM & AML Level Template or Parent-Child Template to import AMLs, make sure manufacturers listed in the AMLs already exist in the PLM data files. Otherwise, the AML is rejected.
To import data from a PDX package or an aXML file:
Format the data appropriately using one of the templates.
|
Note: Make sure the source file includes a header row and at least one row of data. |
Start the Import Wizard.
On the Import Source page, type the file path or click Browse.
For Template Type, select Level Template, or Parent-Child Template from the list.
Select other configuration options if necessary.
Select a change order and a mapping file. Use the default mapping. Click Next.
|
Note: A change order is required when you use Redlining mode to import. For more information about redlining, see "Using Redlining or Authoring Mode." |
Click Import to begin the import operation.
There are two level templates:
BOM Only Level Template
BOM & AML Level Template
They both share the same ”Template Type” option. If the source does not include any AML data, Import will choose the BOM Only Level Template type. Otherwise, BOM&AML Level Template is chosen.
In addition, Item supports exporting BOM&AML tables as a Level Template. The format is similar to the BOM Only Level Template. Field names in the Admin setting are dynamic and are not fixed attribute names as before. However, the BOM Only Level Template format with fixed attribute names is also supported.
The source file for Level Templates can include the fields shown in the table below.
|
Important: The column headers in your source file must match the specified field names exactly as they appear in the table below in English. You can not localize these field names. |
Table 2-4 Data fields in Level Templates
| Category | Field Name | Required |
|---|---|---|
|
Item |
Level |
Yes |
|
Item |
Item Number |
Yes |
|
Item |
Description |
NA |
|
Item |
Type |
NA |
|
Item |
Sites |
NA |
|
Item |
Revision |
NA |
|
Item |
Product Line |
NA |
|
Item |
Lifecycle Phase |
NA |
|
Item |
Size |
NA |
|
Item |
Category |
NA |
|
Item |
Effectivity Date |
NA |
|
Item |
Commodity |
NA |
|
BOM |
Quantity |
Yes |
|
BOM |
Find Number |
NA |
|
BOM |
Reference Designator |
NA |
|
BOM |
BoM Notes |
NA |
|
BOM |
BoM Site |
NA |
|
AML |
MFR Name |
Yes |
|
AML |
MFR Part Number |
Yes |
|
AML |
MFR Part Site |
NA |
|
AML |
Preferred Status |
NA |
|
AML |
Reference Note |
NA |
The level for the first record must be zero or any non-numeric value. Child items have a level other then zero, such as 1, 2, 3, and so on. After the first record, the Import Wizard ignores any non-numeric characters in the Level column.
If you are using the BOM Only Level Template, do not include AML fields in your source file. The MFR Name and MFR Part Number fields are not required for BOM Only Level Template.
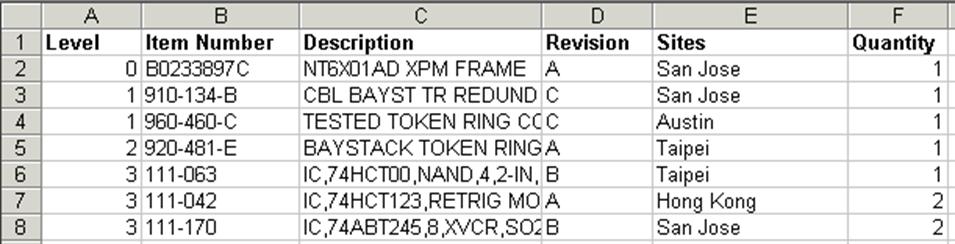
The following figure is an example of level template data for Items and BOMs.
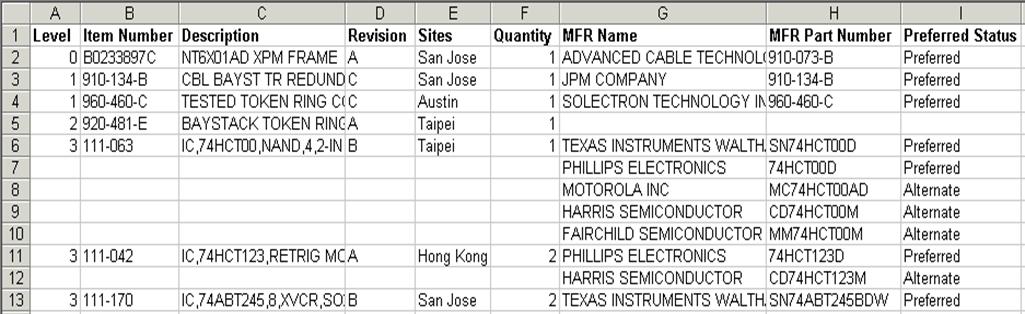
When the level template data includes AML information, each item can have multiple AML rows. The item information does not need to be repeated for each AML row. The following figure shows an example of level template data for items, BOMs, and AMLs.
To use the parent-child template, the source file can include the following fields. Column headers in your source file must match the specified parent-child template field names as shown in the table below.
|
Important: The column headers in your source file must match the specified field names exactly as they appear in the table below in English. You cannot localize these field names. |
Table 2-5 Data fields in parent-child template
| Category | Field Name | Required |
|---|---|---|
|
Item |
Parent Number |
Yes |
|
Item |
Parent Revision |
NA |
|
Item |
Parent Type |
NA |
|
Item |
Child Number |
Yes |
|
Item |
Child Revision |
NA |
|
Item |
Child Type |
NA |
|
Item |
Description |
NA |
|
Item |
Sites |
NA |
|
Item |
Product Line |
NA |
|
Item |
Lifecycle Phase |
NA |
|
Item |
Size |
NA |
|
Item |
Category |
NA |
|
Item |
Commodity |
NA |
|
BOM |
Quantity |
Yes |
|
BOM |
Find Number |
NA |
|
Item |
Parent Number |
Yes |
|
Item |
Parent Revision |
NA |
Parent Revision and Child Revision fields are imported only if both are included in the source file.
To include multiple manufacturer parts per item, expand the row horizontally. That is, add separate columns for each manufacturer part. Append a number to the manufacturer part field names from 1 to m, where m is the total number of manufacturer parts in the item.
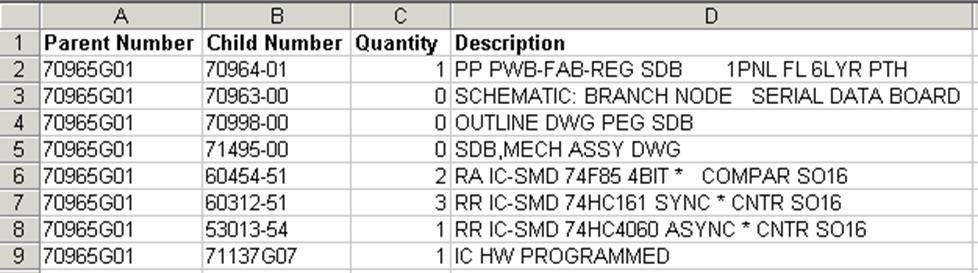
The following figure shows an example of parent-child template data for items and BOMs.
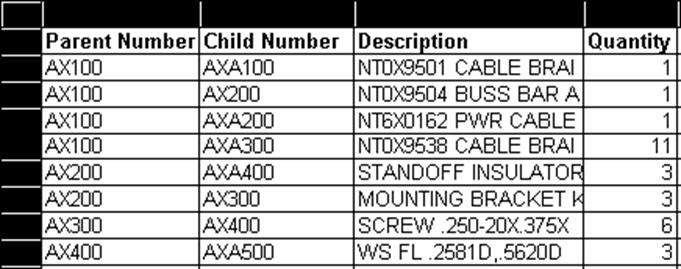
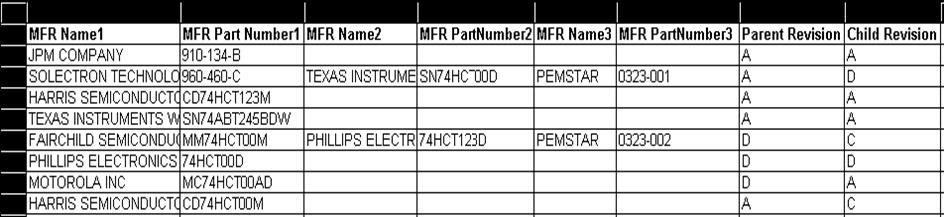
The next example shows parent-child template data for items, BOMs, and AMLs. Multiple manufacturer parts are specified for each component, and revision information is included in the optional Parent Revision and Child Revision columns.
Before importing parent-child data, make sure all parent items are grouped together in contiguous rows. If the same parent item is listed on noncontiguous rows, the Import Wizard imports only the last group of component parts for that parent item. This requirement to presort the parent-child data is similar to the way BOM data in Excel files and text files must be sorted. For more information, see "Sorting BOM Components."
You can import all Agile supported objects into Relationships tables of Item, Manufacturer, Manufacturer Part, and Part Group objects. In addition, you can insert all flex fields and Relationships rules using Import. For more information about Relationships tables, refer to Getting Started with Agile PLM.
|
Note: Import wizard always selects the Complete Replace mode when importing to Relationships tables. The Complete Replace mode will always replace the existing relationship table data with the Relationships table data of the imported source file. |
Importing objects, particularly impending Change Orders from the Relationships Tab is a function of the type of Change Order, its revision and status. As such, importing pending Manufacturer Change Orders (MCOs) differs from importing pending Engineering Change Orders (ECOs). That is, when you release an MCO having Rev A, after a new ECO with Rev B, the Rev of the ECO overwrites the Rev of the MCO and it is changed from A to B. Therefore, you can only map a blank into the revision attribute when importing pending MCOs. This is further explained with the aid of the following example.
Example 2-1 Importing the Item Row on the Relationships Tab with Pending Manufacturer Change Orders
aNum,bName,bNum,relType,Type,partRev,relRev,Change,TrackImpactK183,K810,K810,Part,Part,Introductory,,A,NoCreate parts K183 and K810Release K810 on an ECO with rev BCreate an MCO pending on K810
Import the above source file data with appropriate mappings