| Agile Product Lifecycle Management Import/Export User Guide Release 9.3.6 E71157-01 |
|

 Previous |
 Next |
| Agile Product Lifecycle Management Import/Export User Guide Release 9.3.6 E71157-01 |
|
Previous |
Next |
This chapter includes the following:
Overview
Selecting Product Content Objects to Import
Importing Items
Importing Bills of Materials
Importing Manufacturers and Manufacturer Parts
Importing BOMs with Duplicate Item and Find Numbers
Importing Approved Manufacturers Lists
Importing Product Relationships Data
Importing User Groups Data
This chapter addresses importing product content according to their classification as PLM objects. For example, BOMs, Items and so on, and corresponding file formats such as AXML or PDX. Referential and procedural information covers the content selection process and importation according to their object classification.
For Excel files and delimited text files, you can select only one object type to import. If the source format is an aXML or PDX package, you can select multiple object types to import.
The following table describes the types of objects you can import.
| Object | Description |
|---|---|
| Manufacturer | A manufacturer with which your organization collaborates |
| Manufacturer Part | A manufacturer part that your organization uses. A Manufacturer Part is identified by its Manufacturer Part number, not an internal part number. |
| Item | A unique part, material, subassembly, or product. Agile provides two out-of-the-box Item classes, Parts and Documents. |
| Bill of Material (BOM) | A listing of all the subassemblies, parts, and raw materials that go into a parent assembly. It shows the quantity of each part required to make an assembly. |
| Approved Manufacturer List (AML) | The list of manufacturers that have been approved to supply a particular Item. The list identifies the Manufacturer Part for that Item. |
| Quote History and Quote History Lines | Price quotes from previous projects or legacy data. |
| Published Price and Published Price Lines | Published prices or contract prices on current Items and Manufacturer Parts |
| Product Service Request (PSR) | A routable object used to issue problem reports and nonconformance reports for products |
| Quality Change Request (QCR) | A routable object used to generate reports addressing changes to improve product quality and conformance requirements |
| Customer | A customer that provides feedback on your company's products, alerting you to quality issues or problems they encounter |
| Attachment | Files attached to an object |
| Substance | Elements or compounds used in the composition of Items, Manufacturer Parts, and Part Groups |
| Declaration | Declarations are routable objects used to bring information concerning the environmental compliance of Parts (Items, Manufacturer Parts, and Part Groups) |
| Specification | A list of banned substances (or substances of concern) and their threshold values |
| Part Groups | A group of similar Items or Manufacturer Parts. For PG&C, Items and Manufacturer Parts are similar if they have the same chemical composition and thus similar compliance requirements; or PCM, Items and Manufacturer Parts are similar if they belong to the same commodity class |
| Relationship of Item, Manufacturer, Manufacturer Part, part Group | Replace relationship data from source into existing relationship data |
| Root Projects | Update P1,P2,P3, action Items, and discussion of root project |
| User | Create buyer/supplier user, update User preference, and User Group information |
| User Group | Create User Group, update User Group, and User information |
For information about importing supplier data, currency conversion tables, Root Projects, users, and User Groups, see Chapter 6, "Importing Supplier and System Data." You can also import project Items, project BOMs, and project AMLs from within a Sourcing Project. For more information, see Chapter 7, "Importing Data into a Sourcing Project."
An item is any unique manufactured or purchased part, material, subassembly, or product. An item can contain a BOM, which defines relationships with other items or subassemblies, and an AML, which defines the approved manufacturers and their respective manufacturer parts for that item. The composition, bill of substances, and part families belong to Product Governance & Compliance solution of Agile PLM. For information on these items, refer to the Product Governance & Compliance User Guide.
Items in the Item Master represent the approved product content for your enterprise. Because an item can go through several changes during a product lifecycle, it can have multiple revisions. The Item Master stores an item's revision history. Items contained within a Sourcing Project do not have multiple revisions. They serve as temporary data used to generate RFQs.
To import an item, you must map the Title Block > Number field. To specify a particular revision, you must also map the Title Block > Rev field. You can import items into the Item Master or a Sourcing Project.
|
Note: When using Import to create an Item, the revision number of the new Item is always the Introductory Revision number. |
When you import BOMs, the Import Wizard automatically creates the items that do not exist in the Agile PLM system. You have the option to specify the class type of the BOM component using the Agile bom.item type field. If you do not specify the class type of the BOM component using bom.item type, Import Wizard assigns the default item type and generates the following warning message as it automatically creates the BOM component:
The Item/Manufacturer Part ***' is auto created during import BOM/AML table without required fields provided.
If a BOM item is already in the Agile PLM system, the Import Wizard associates the item with its latest revision.
Under the following two conditions, the Import Wizard fails to automatically create child items on a BOM:
If the parent item's required fields (such as Cover Page > Number) are invalid
If you imported BOMs to a project and the BOMs are subsequently rolled back
When importing the Find Num field in a BOM:
You can change the value of the BOM > Find Num to another value, including blank, by using the Complete Replace option.
If you do not map the value of the BOM > Find Num, it will default to '0'.
To update a BOM without deleting existing BOM components, set the Multi Row Update Mode preference to ”Add/Update Only.” The Import Wizard will import the new BOM components and will update the existing components. For more information, see "Setting Business Rule Options."
During import, the description of the imported Item is impacted by its Redline and Authoring modes. In addition, this behavior is different in Agile PLM Release 9.2.2 and Agile PLM Release 9.3.x.
In the Redline or Authoring modes, the behavior of the description of the imported item differs whether a released version is or is not associated with the item.
In this mode, Agile PLM will only update the description of the pending version whether a released version is or is not associated with the imported item.
In this mode, the behavior differs when a released version is/is not associated with the imported item.
Agile PLM will always update the description of the Introductory version and those of all pending versions when a released version is not associated with the item. This occurs whether the item did/did not exist before importation.
Agile PLM will always update the description of the latest released version and those of all pending versions of the imported item when a released version is associated with this Item. However, with the exception of the released version, all other versions, including the Introductory and subsequent versions are read only copies.
In post 9.3.0 releases, in addition to the Release 9.2.2 behavior described above, when importing newly created items in Redlining or Authoring modes, Agile PLM will set the description of the imported item in the ”Introductory Revision.”
|
Note: When updating item descriptions, make sure all user privileges are verified. |
A bill of material is a listing of all the subassemblies, parts, and raw materials that go into a parent assembly. It shows the quantity of each part required to make an assembly.
You can import bills of material into the Item Master or a Sourcing Project. If you are importing BOMs from a text file or a Microsoft Excel file, make sure all BOM components for a parent item are grouped together in contiguous rows. For more information, see "Sorting BOM Components."
|
Note: When you import bills of material, the Import Wizard automatically creates any items listed in the source data that are not already in the Agile PLM system. |
To import BOMs from a text file or an Excel spreadsheet:
Start the Import Wizard.
Click Tools > Import.
Set import preferences.
a. Click the Preferences button in the bottom left corner of the Import Wizard. The Import Preference window appears.
b. Select the Business Rule tab. For more information on these options, see "Setting Business Rule Options."
c. For Change Mode, select Redlining (the default) or Authoring. If you select Redlining, the Import Wizard redlines any BOM fields that changed as a result of the import session. For more information about redlining, see "Using Redlining or Authoring Mode."
d. For Redline Mode Behavior, select the items that you want to add to the specified change order:
All items onto the Change
New items only onto the Change
New/Redlined items onto the Change
e. For Multi Row Update Mode, select:
Complete Replace
Add/Update Only
Selective Remove
|
Note: If you are importing data that includes partial BOMs and not complete BOM structures, select Add/Update Only or Selective Remove. |
f. See "Setting Business Rule Options." to set Price Quantity Break Default, Sourcing Project Qty Rollup, Reference Designator Range Character, and Reference Designator Delimiter Character.
g. Click Save to save your import preferences for this session.
Select the Import source file.
h. Click Browse to select the file.
i. Click Next to proceed to the next Wizard step.
Select the BOM type.
j. Select Item, and then select Bill of Material.
k. Click Next.
Select Content Options.
Data Mapping - Choose from Define attribute mapping in next step, Use Currently defined mapping definition, or Use a Saved Mapping file.
If you select Define attribute Mapping in next step, you must define the new mapping in the next step.
If you select Use Currently defined mapping definition, the mapping you defined earlier is selected
If you select Use a Saved mapping file, click Browse to select the file.
Data Transformation - Choose No transformations are necessary, or Use a Saved Transformation file.
If you select No transformations are necessary, go to set Redline Options.
If you select Use a Saved Transformation file, click Browse to select the file.
Redline Options - Choose Updates do not require redlining, or Use the following Change for redlining.
If you select Updates do not require redlining, click Next.
If you select Use the following Change for redlining, click Browse to select the file and then click Next.
Review your import settings, and then click Import to begin importing.
Each manufacturer name in the Agile PLM system is unique, just as an item number must be unique to an item.
While different manufacturers can use the same manufacturer part number, the combination of manufacturer plus manufacturer part number must be unique to one manufacturer part.
You can import manufacturers and manufacturer parts into the Item Master but not into a Sourcing Project.
|
Note: You must follow the recommended sequence and import manufacturers first, then manufacturer parts. Agile PLM does not allow you to import a manufacturer part for a manufacturer that does not exist. |
When Import encounters rows of duplicate Item Number and Find Number, it assumes it is processing a different BOM component even if the Item Number and Find Number are the same. Import will reject or accept the content based on smart rules settings that allow or reject duplicate BOM a component with duplicate Item Number and Find Number. If the same Item Number and Find Number are already in the system, Import will select the last BOM component (with the same Item Number and Find Number) from source file to update the last BOM component (with the same Item Number and Find Number).
An approved manufacturers list, or AML, is the list of manufacturers that are approved to supply a particular item. The list identifies the manufacturer part for that item.
You can import approved manufacturers lists into the Item Master or a Sourcing Project. The Import Wizard does not automatically create manufacturers when you import AMLs. However, it will automatically create manufacturer parts listed on AMLs. You also have the option to specify the class type of the AML component using the aml.manufacturer type field. If you do not specify the class type of the AML component using this field, Import will assign the default manufacturer type. Import will generate the following warning message when automatically creating the AML component:
The Item/Manufacturer Part ***' is auto created during import BOM/AML table without required fields provided.
|
Note: When you import AMLs to the Item Master, manufacturers listed in the AMLs must already exist in the Agile PLM system. Otherwise, the AML is rejected. |
When you import AMLs, the Import Wizard checks whether manufacturer parts listed in the AMLs exist in the Agile PLM system. If they do not, the Import Wizard automatically creates them. Under either of the following two conditions, the Import Wizard fails to automatically create manufacturer parts:
If the parent item's required fields (such as Cover Page > Number) have invalid data.
If you imported AMLs to a Sourcing Project and the AMLs are subsequently rolled back.
To update an AML without deleting existing AML rows, set the Multi Row Update Mode preference to ”Add/Update Only.” The Import Wizard will import the new AML rows and will update the existing rows. For more information, see "Setting Business Rule Options."
A price object is used to manage the price terms for a part with relation to a supplier, customer, and Sourcing Project. Each Price object has a Published Price Lines table that stores the prices and terms related to shipping locations, effectivity periods, and quantities.
There are two classes of Price objects that you can import: Quote Histories and Published Prices. Procedurally, there is no difference in importing either type of price object. However, if you are importing data from delimited text files or Microsoft Excel files, you must import Quote Histories and Published Prices in separate import operations. You must also maintain separate mapping files for each object.
The following are the two combination of the minimum required fields to import Published Price, Quote Histories, and Published Price Lines
Published Price and Quote Histories:
Supplier, Mfr_name, and Mfrpart_number
Supplier,Item_number
Published Price Lines:
ship_to, Effective_from_date, Currency_code
|
Note: When you import Published Price Lines data, your source data must provide the same consistent set of parent price fields for each row. For example, if your data uses the General Information > Number field to identify the parent price object, every row of the source data must include a value for that field. Otherwise, the import session may produce unexpected results. |
The price object can be defined in many ways due to the number of required and optional key fields the object has. A price is associated with either an item or a manufacturer part. At a minimum, your source data should include one of the following sets of key fields:
| Set 1 | Set 2 | Set 3 |
|---|---|---|
| General Information > Mfr. Part Number
General Information > Mfr. Name General Information > Supplier |
General Information > Item Number
General Information > Item Rev 1 General Information > Supplier |
General Information > Item Number
General Information > Supplier |
|
Note: The Item Rev field specified in Set 2 above is required only for items with released or pending revisions. |
The General Information > Supplier field supports two types of source values, either the supplier number or ”supplierName - supplierNumber”. In either case, values are case-insensitive. If you use the supplierName - supplierNumber format for supplier values, the spaces and hyphen are required.
Your data can include other optional fields, such as Manufacturing Site, Program, and Customer. Values for the Customer field should be the customer name, not the customer number. Customer names are case-sensitive; the Import Wizard rejects a price record if the customer name has the wrong case. If your source data does not include Program and Customer, the Import Wizard automatically assumes a value of All for those fields.
The General Information > Allow Qty Breaks field determines whether prices are broken out by different quantities. If the Allow Qty Breaks field is not mapped, the Import Wizard uses the Price Quantity Break Default preference to determine which value to use for it; for more information, see Chapter 3, "Setting Import Preferences."
Optionally, the source data can also include the General Information > Number field. If you are importing data to an existing price object, the General Information > Number field and all other required fields must match the target system exactly. Otherwise, the Import Wizard rejects the object. If you do not provide the price number, the Import Wizard attempts to find the price object using other key fields. If a price object with the specified key fields does not exist in the system, the Import Wizard creates it and assigns it a number based on the AutoNumber sequence for the price class.
|
Note: You cannot import Published Price Lines in Redline mode if the parent price object has a pending change order. |
At a minimum, your source data for Price Lines must include General Information > Price Number or the minimum fields that identify a price object (see "Key Price Fields" and the following key Price Lines fields:
Price Lines > Price Effective From Date
Price Lines > Ship To
In addition, if the Allow Qty Breaks field is set to Yes for the price object, then the Price Lines > Qty field is required and must be mapped.
All list fields on the Price Lines table, such as Ship From, Ship To, Currency, Country of Origin, and Transportation Terms must have valid values. For Ship To, only values listed in the Authorized Ship To list in the user's profile are supported. For Transportation Terms, you can enter three-letter abbreviations like FOB or the full description, FOB - FREE ON BOARD VESSEL Following is a complete list of values for Transportation Terms:
| Value | Full Description |
|---|---|
| CFR | CFR - COST AND FREIGHT |
| CIF | CIF - COST INSURANCE AND FREIGHT |
| CIP | CIP - CARRIAGE AND INSURANCE PAID TO |
| CPT | CPT - CARRIAGE PAID TO |
| DAF | DAF - DELIVERED AT FRONTIER |
| DDP | DDP - DELIVERED DUTY PAID |
| DDU | DDU - DELIVERED DUTY UNPAID |
| DEQ | DEQ - DELIVERED EX QUAY (DUTY PAID) |
| DES | DES - DELIVERED EX SHIP |
| EXW | EXW - EX WORKS |
| FAS | FAS - FREE ALONGSIDE SHIP |
| FCA | FCA - FREE CARRIER |
| FOB | FOB - FREE ON BOARD VESSEL |
To import price lines with overlapping effectivity periods, you must enable the Overlap Price Line Effectivity Periods Smart Rule and set it to Warning. Additionally, within the import preferences dialog, you have the option to Accept, Reject, or Allow the data based on Smart Rules Warning Violation Behavior. By default, the option is set to Reject, which prevents importing price lines with overlapping effectivity periods. You must set the option for the Smart Rules Warning Violation Behavior to Accept, which allows the import of overlapping price lines without any error messages.
If your Agile PLM system includes the Product Quality Management license, you can use the system to manage quality issues that arise with customers. A customer can submit problem reports or nonconformance reports that alert you to quality issues or problems they encounter. Problem reports and nonconformance reports are two types of Product Service Requests.
Customer data may be created in a Customer Relationships Management (CRM) system. If you haven't integrated your CRM system with the Agile PLM system, you can use the Import wizard to import customers and Product Service Requests.
The Customer class is the only out-of-the-box subclass for customers. You can define other Customer subclasses.
The Customers > General Info > Customer Name field is required to import customers. All other fields are optional.
The Customers > General Info > Customer Number field is a key field, but it does not need to be mapped. If you do not map the Customer Number field, the Import wizard uses the AutoNumber preference to assign numbers to new customers. For more information, see "Setting Default Autonumber Sources."
Similar to Customers, you can create Product Service Requests (PSRs) in a CRM system that is integrated with the PLM system. If the two systems are not integrated, you can import the PSR data into the PLM system.
The Import solution supports importing and validating PSR objects. The supported file formats are aXML, Excel, and delimited text files. The supported tables and components include Cover Page/P1, P2, P3, Related PSRs, Affected Items, Relationships, and Attachments.
To import a PSR object
Click Tools > Import.
The Import Wizard dialog appears.
In Import Wizard dialog, select the source file with PSR data (aXML, Delimited text file, Excel).
Click Next. The Specify File Content dialog appears.
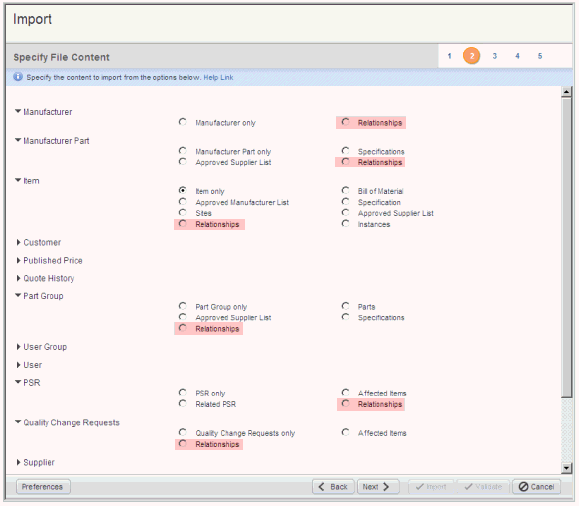
In Specify File Content expand PSR and check the applicable option: PSR only, Affected Items, Related PSR, or Relationships).
Click Next. The Select Content Options dialog appears.
Check applicable option for Data Mapping. (You can also select the Data Transformation option, if necessary).
Click Next. The Specify Attribute Mapping dialog (Wizard step 4) appears.
Map the attributes.
You have the option to validate the imported object now or in the remaining steps of the Wizard. If you choose Validate, the validation results summary is displayed. Here, you have the option to save the log file and click Import to import the content and bypass the remaining step. You can also click the Import Another File button to repeat the process.
Click Import to complete the process.
The following fields are required to import PSR Only:
Problem Reports > Cover Page > Number
Non-Conformance Reports > Cover Page > Number
If you are importing only one class of PSR at a time, you do not need to map fields for both Problem Reports and Non-Conformance Reports. If your source data includes both Problem Reports and Non-Conformance reports, you must map fields for both classes.
Other Cover Page PSR fields you can map include PSR Type, Description, Customer, Supplier, Severity, Disposition, and Expected Resolution Date. Values for the Customer field should be the customer name, not the customer number. Customer names are case-sensitive.
|
Note: All importable PSR fields are supported in the SDK and AIS. |
Before importing Affected Items of a PSR that were created using the AutoNumber preference in Setting Default AutoNumber Sources, open the spreadsheet and make sure the Number column of the PSR is not empty. If it is empty, update the file with applicable numbers. This is necessary because Import fails when the PSR's Number column is empty.
You can import items to the Affected Items table of a PSR. The following fields are required to import PSR Affected Items:
Problem Reports > Affected Items > Item Number
Problem Reports > Affected Items > Rev Found
Non-Conformance Reports > Affected Items > Item Number
Non-Conformance Reports > Affected Items > Rev Found
|
Note: The system supports importing duplicate affected items into a PSR. |
Affected items for a PSR can be in any revision state, including Introductory. If you try to import an affected item and it does not exist, the Import Wizard will reject the row.
You can import PSRs to the Related PSR table of a PSR. The following fields are required to import related PSRs:
Problem Reports > Related PSR > PSR Number
Non-Conformance Reports > Related PSR > PSR Number
If you try to import a PSR that does not exist, the Import Wizard will reject the row.
You can import objects to the Relationships table of a PSR. The following fields are required to import PSR Relationships:
Problem Reports > Relationships > Number
Problem Reports > Relationships > Type
Non-Conformance Reports > Relationships > Number
Non-Conformance Reports > Relationships > Type
If you try to import an object that does not exist, the Import Wizard will reject the row.
You can import PSR attachments. The following fields are required to import a PSR Attachment:
Problem Reports > Attachments > File Identifier
Problem Reports > Attachments > File Name
Non-Conformance Reports > Attachments > File Identifier
Non-Conformance Reports > Attachments > File Name
Similar to PSRs, you can create Quality Change Requests (QCRs) in a CRM system that is integrated with the PLM system. If the two systems are not integrated, you can import the QCR data into the PLM system.
The Import solution supports importing and validating QCR objects. The supported file formats are aXML, Excel, and delimited text files. The supported tables and components include Cover Page/P1, P2, P3, Affected items, Relationships, and Attachments.
To import a QCR object:
Click Tools > Import.
The Import Wizard dialog appears.
In Import Wizard dialog, select the source file with QCR data (aXML, Delimited text file, Excel).
Click Next. The Specify File Content dialog appears.
In Specify File Content expand Quality Change Request and check the applicable option: Quality Change Request only, Affected Items, or Relationships).
Click Next. The Select Content Options dialog appears.
Check applicable option for Data Mapping (You can also select the Data Transformation option if necessary).
Click Next. The Specify Attribute Mapping dialog appears.
Map the attributes.
You have the option to validate the imported object now or in the remaining steps of the Wizard. If you choose Validate, the validation results summary is displayed. Here, you have the option to save the log file and click Import to import the content and bypass the remaining step. You can also click the Import Another File button to repeat the process.
Click Import to complete the process.
You can import items to the Affected Items table of a QCR. The following fields are required to import QCR Affected Items:
Audits > Affected Items > Item Number
Corrective and Preventive Actions > Affected Items > Item Number
|
Note: The system supports importing duplicate affected items into a QCR. |
Affected items for a QCR can be in any revision state, including Introductory. If you try to import an affected item and it does not exist, the Import Wizard will reject the row.
You can import QCR attachments. The following fields are required to import a QCR Attachment:
Audits > Attachments > File Identifier
Audits > Attachments > File Name
Corrective and Preventive Actions > Attachments > File Identifier
Corrective and Preventive Actions > Attachments > File Name
You can import objects to the Affected Items table of a QCR. The following fields are required to import QCR Relationships Tables:
Audits > Relationships > Number
Audits > Relationships > Type
Corrective and Preventive Actions > Relationships > Number
Corrective and Preventive Actions > Relationships > Type
If you try to import an object that does not exist, the Import Wizard will reject the row.
If you use the Import wizard in Redlining mode (the default setting), you must specify a change order to import items, BOMs, AMLs, and prices. Redlining mode, as its name implies, highlights in red any fields that have changed. All items and prices imported in Redlining mode are placed on the Affected Items and Affected Prices tabs of the specified change order.
For released items and prices, the Import wizard redlines data based on changes made to the latest released revision. For prices, the Import wizard does not allow you to redline the Published Price Lines table if the price object has a pending revision.
When you import items in Redlining mode, all items are unconditionally added to the Affected Items tab of the selected change order. The Import wizard does not allow you to interactively select which items should be placed on the Affected Items tab.
When you make changes to a BOM, Manufacturers, or Published Price Lines table in Redlining mode, entire rows and partial rows can be redlined. If you add or remove a row, the entire row is treated as a redline addition or deletion. If you modify only a few fields in a row but do not update its key fields, the Import wizard redlines only the fields you have changed. For example, if you modify some BOM fields but do not modify the BOM > Item Number field, then the row is partially redlined.
If you use the Import wizard in Authoring mode, you can update an existing BOM, AML, or Published Price Lines if the parent item or price is unreleased and does not have a pending change. Authoring mode is helpful when you are importing BOM, AML, or Published Price Lines data for preliminary items or prices. Once an item or price has a pending change, you can no longer use Authoring mode to update its BOM, AML, or Published Price Lines data.
For information to set the Change Mode preference to Redlining or Authoring modes, see "Setting Business Rule Options."
On the Select Change Order and Mapping File step of the Import Wizard, you can specify a change order to use for the import session. In Redlining mode, a change order is required to import items, BOMs, AMLs, prices, and Published Price Lines data. In Authoring mode, a change order is optional.
Click Details to select a change order. The Select Change For Import window appears. This new window is another step in the Wizard that lets you specify the change order to use for the current import session. You can search for an existing change order or create a new ECO, MCO, SCO, or PCO, or a change order of a similar user-defined subclass.
|
Note: If you search for an existing change order, make sure it is in a non-released state. If you're importing prices in Redlining mode, search the PLM system to see if there is a pending PCO for the price object. If there is already a pending PCO associated with a price, you cannot add the same price object to a different PCO. |
To preserve the integrity of BOMs, AMLs, and Published Price Lines imported to the PLM system, the Import Wizard does not allow you to import partial import data to a new revision. If a BOM, AML, or Published Price Lines row cannot be imported because it is invalid, the revision is rejected and the Import Wizard rolls back the entire table to its original state prior to the import session.
During BOM, AML, and Published Price Lines rollbacks, parent items and prices are not removed from the Affected Items or Affected Prices tabs of the specified change order. Also, changes made to Title Block, Page Two, or Page Three fields are unaffected by rollbacks.
If a fatal error (for example, a database error) occurs while you are importing to a new revision of an item, the Import Wizard rolls back the revision. Despite the rollback, any child items automatically created during the import process are not removed; they remain in the PLM system.
If you import a BOM, AML, or Published Price Lines table to the latest revision and a validation error occurs, the replacement table is rejected.
If a fatal error occurs while you are importing BOMs, AMLs, or Published Price Lines to the latest revision, any replacement tables that are accepted before the error occurred cannot be rolled back. If this happens, try importing to the latest revision again.
If there are existing redlines for a pending Change order, the Import Wizard clears them before importing new redline data from the import file. The clearing of redlines and the importing of new data are separate operations. After the redlines are cleared, the transaction is committed, and then the import process starts. Therefore, if the import operation fails for any reason (such as a duplicate item number), the table rolls back to its pre-redlined state.
The following table shows how import errors affect released BOMs, AMLs, and Published Price Lines:
| Revision | Error Type | Result |
|---|---|---|
| New revision - importing a new revision to the parent item or price | Validation error | The new revision and the related BOM, AML, or Published Price Line table rejected. |
| Fatal error | The new revision and the related BOM, AML, or Published Price Lines table are rolled back. | |
| Current revision - importing changes to the current revision of the parent item or price | Validation error | The replacement BOM, AML, or Published Price Lines table is rejected. |
| Fatal error | Any replacement BOM, AML, or Published Price Lines tables imported before the fatal error cannot be rolled back. |
|
Note: The Import Wizard rolls back BOM, AML, or Published Price Lines data only when there are errors with the data. It does not roll back BOMs, AMLs, or Published Price Lines if the warnings or errors pertain only to associated objects, such as fields for items, manufacturers, manufacturer parts, and prices. |
You can import site-specific BOMs and AMLs from all supported import file formats. However, you must format the site-specific data appropriately and map the fields correctly. In particular, you must include the following:
Title Block > Sites field for the parent item
Compliance > Compositions > Bill of Substances field for item supported tables
BOM > Site field for BOMs
Manufacturers > Site field for AMLs
The Title Block > Sites field is a virtual field that represents the list of sites on the Sites tab of an item. You do not need to map the Title Block > Sites field to import BOMs or AMLs. If you do not map the field, the Import Wizard assumes that the value for Title Block > Sites is the complete list of site names specified for BOM > BOM Site or Manufacturers > Site in your source file.
|
Note: The Import Wizard does not remove site associations from existing parent items. That is, although you can add sites to the Title Block > Sites field, you cannot use the Import Wizard to remove sites from the Sites tab of an item. |
When you import site-specific BOMs and AMLs, the Import Wizard imports data only for sites specified in your source file. If your source file does not include a particular site already specified for an existing item, the Import Wizard will not update that section of the site-specific BOM or AML.
|
Note: You can import Substances to the Bill of Substances tables for Declarations, Manufacturer Parts, and Item from aXML files only. |
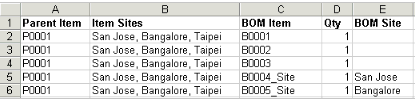
This illustration shows a BOM import source file with site-specific information. There are two columns with site information: Item Sites and BOM Site.
The Item Sites column is mapped to the Title Block > Sites field in the mapping window. It contains a comma-delimited list of the sites with which the parent part is associated.
The columns BOM Item, Qty, and BOM Site pertain to BOM components. The BOM Site column is mapped to the BOM > Site field in the mapping window. It indicates the site to which a component applies. Each row in this column can contain only one site. If the BOM Site field is empty, the component is used for all sites.
In the preceding figure, B0001, B0002, and B0003 do not have a specified BOM site. Consequently, those BOM components are common to all sites. B0004_Site has San Jose as the BOM site. This means that B0004_Site applies only to the portion of the BOM specific to the San Jose site.
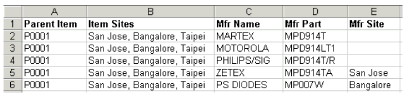
The following figure shows an AML import source file with site-specific information. There are two columns with site information: Item Sites and Mfr Site.
The Item Sites column, like the same column in the BOM import source file discussed previously, is mapped to the Title Block > Sites field in the mapping window.
The columns Mfr Name, Mfr Part, and Mfr Site are related to approved manufacturers. The Mfr Site column is mapped to the Manufacturers > Site field in the mapping window. It indicates the site to which an approved manufacturer applies. Each row in this column can contain only one site. If the Mfr Site field is empty, the approved manufacturer is used for all sites.
In the preceding figure, ZETEX has San Jose as the Mfr Site. This means that this approved manufacturer applies only to the portion of the AML that is specific to the San Jose site.
|
Note: If you use an SCO to import site-specific BOMs and AMLs in Redline mode, you can specify only one site per BOM/AML. BOMs or AMLs with multiple sites will be rejected. |
Agile PG&C has several different declaration classes. Based on the declaration class and the type of source file, there are restrictions on the tables that you can import.
The following table lists the PG&C-related objects that you can import. For more information on these objects and applicable procedures, refer to Importing and Exporting Data in the Agile Product Governance & Compliance User Guide.
| Declaration Type | Supported Tables | |
|---|---|---|
| aXML File Types | Delimited Text or Excel File Types | |
| Declaration Foot 1 | Cover Page, Page Two, Page Three, Item1, Manufacturer Parts, Part Groups, Item Bill of Substances2, Manufacturer Part Bill of Substances2, Part Group Bill of Substances2, Specifications, Attachments | Cover Page, Page Two, Page Three, Item1, Manufacturer Parts, Part Groups, Specifications |
| Supplier Declaration of Conformance | Cover Page, Page Two, Page Three, Specifications, Attachments | Cover Page, Page Two, Page Three, Specifications |
| Part Declaration | Cover Page, Page Two, Page Three, Items, Manufacturer Parts, Part Groups, Specifications, Attachments | NA |
| Homogeneous Material Declaration | Cover Page, Page Two, Page Three, Items, Manufacturer Parts, Part Groups, Item Bill of Substances, Manufacturer Part Bill of Substances2, Part Group Bill of Substances2, Specifications, Attachments | Cover Page, Page Two, Page Three, Item1, Manufacturer Parts, Part Groups, Specifications |
| IPC 1752-1 Declaration | Cover Page, Page Two, Page Three, Items1, Manufacturer Parts, Part Groups, Item Bill of Substances2, Manufacturer Part Bill of Substances2, Part Group Bill of Substances2, Specifications, Attachments | Cover Page, Page Two, Page Three, Item1, Manufacturer Parts, Part Groups, Specifications |
| IPC 1752-2 Declaration | Cover Page, Page Two, Page Three, Item1, Manufacturer Parts, Part Groups, Item Bill of Substances2, Manufacturer Part Bill of Substances2, Part Group Bill of Substances2, Specifications, Attachments | Cover Page, Page Two, Page Three, Item1, Manufacturer Parts, Part Groups, Specifications |
| JGPSSI Declaration | Cover Page, Page Two, Page Three, Item1, Manufacturer Parts, Part Groups, Item Bill of Substances2, Manufacturer Part Bill of Substances2, Part Group Bill of Substances2, Specifications, Attachments | Cover Page, Page Two, Page Three, Item1, Manufacturer Parts, Part Groups, Specifications |
| Substance Declaration | Cover Page, Page Two, Page Three, Items1, Manufacturer Parts, Part Groups, Item Bill of Substances2, Manufacturer Part Bill of Substances2, Part Group Bill of Substances2, Specifications, Attachments | Cover Page, Page Two, Page Three, Item1, Manufacturer Parts, Part Groups, SpecificationsFoot 2 |
| Item | Title Block, Page Two, Page Three, BOM, Manufacturers, Sites, Compliance > Specifications3, Suppliers, Attachments, Compliance > Composition, Compliance > Bill of Substances3 | Title Block, Page Two, Page Three, BOM, Manufacturers, Sites, Compliance > SpecificationsFoot 3 , Suppliers5 |
| Manufacturer Part | General Info, Page Two, Page Three, Compliance > Specifications, Compliance > Compositions > Bill of Substances2, Suppliers4, Attachments, Compliance > Composition, Compliance > Bill of SubstancesFoot 4 | General Info, Page Two, Page Three, Compliance > Specifications, Suppliers5 |
| Part Group | General Info, Page Two, Page Three, Parts, Compliance > Specifications, Suppliers, Attachments | General Info, Page Two, Page Three, Parts, ComplianceFoot 5 > SpecificationsFoot 6 , Suppliers |
| Specification | General Info, Page Two, Page Three, Substances2, Attachments | General Info, Page Two, Page Three, Substances2 |
| Substance | General Info, Page Two, Page Three, Composition, Attachments | General Info, Page Two, Page Three |
Footnote 1 If you do not map the Items > Item Rev field, the latest modified ECO or MCO of the latest released revision of the item is imported. If revision is specified, then the latest released modified ECO or MCO of the specified revision is imported. When the item has multiple revisions, use ”Introductory” instead of revision to import the introductory revision of the item into the declaration. If the item does not have a released revision, then the Introductory revision is imported..
Footnote 2 You can import Substances into the Bill of Substances tables for Declarations, Manufacturer Parts, and Items from aXML files only.
Footnote 3 You can import Substances into the Bill of Substances tables for Declarations, Manufacturer Parts, and Items from aXML files only.
Footnote 4 Only Substances that belong to the Substance Groups or Substances class are added to the Substances table of specifications. Subparts and materials will not add to specifications. Only substance groups and substances are added to specifications.
Footnote 5 Compositions, Bill of Substances and/or Supplier, and Specifications are version specific. To import them, you must specify the change number in the source file. You cannot import these four tables as you do BOM, AML, Site, or Attachments tables, because to import them, you must Redline them first and specify the change number in the import file. You can import specifications and suppliers into Items using comma-delimited (CSV) or Excel format. To import Compositions and Bill of Substances, you must import them in the aXML format.
Footnote 6 You can import Specifications into the Compliance table of Items, Manufacturer Parts, and Part Groups. Note that, Specification, Supplier, Compositions, and Bill of Substances that are imported into Item are Change Number specific.
Several Agile PG&C objects, including Items, have Mass fields. For information about importing data to Mass fields, see "Importing Mass Values."
For a list of Agile PG&C fields that must be mapped to be imported, see "Key Fields and Required Fields."
|
Note: When data is not in Agile, map all keys and required attributes. If they are in Agile (once created or soft deleted), you can avoid mapping the required attributes. |
You can import attachments-such as CAD drawings, images, and documents-from a PDX package or an aXML file. Attachments are usually binary files, sometimes quite large. Consequently, they cannot be imported from a text file. The following table shows the objects for which you can import attachments from PDX and aXML files.
| Object | Attachments in PDX | Attachments in aXML |
|---|---|---|
| Item | Yes | Yes |
| Manufacturer | Yes | Yes |
| Manufacturer Part | Yes | Yes |
| Price | Yes | Yes |
| Substance | NA | Yes |
| Declaration | NA | Yes |
| Specification | NA | Yes |
| Part Group | NA | Yes |
| Product Service Request | NA | Yes |
| Quality Change Request | NA | Yes |
When you import a BOM or an AML, attachments are not automatically imported for the associated items, manufacturers, and manufacturer parts; you must explicitly import them.
The following fields can be imported to the Attachments tab:
File Description
File Name
aXML and PDX packages also support custom fields on the Attachments tab. If the Agile PLM administrator enables Attachments fields such as Text01, List01, and Numeric01 by making them visible, you can import data into them.
URL Attachments - You can attach a Uniform Resource Locator (URL) instead of an actual file. A URL is the address of a file on the Internet, which means the file is not secured on the Agile file management server and can be modified without the knowledge of the Agile application. URL attachments have a file size of 0 bytes and cannot be checked out from the file management server. Similar to files, you can also import URLs.
Attachments and Rollback of Parent Items - If for some reason an attachment is not imported, its parent object (an item, manufacturer, or manufacturer part) is not rolled back.
Transforming Values for Attachments - Do not use a transformation definition file to modify attachment filenames. Otherwise, the Import wizard fails to import these files.
Importing Multiple-file (Folder) Attachments - PDX supports multiple-file attachments. In previous versions of Agile software, multiple-file attachments were represented as a folder. When you import an attachment folder from a PDX package, the Import wizard imports each file in the folder as a separate attachment.
Attachment Redlines - Agile PLM supports attachment redlines, that is, annotation layers added to the file. You cannot import Attachment redlines, you can only import the attached file and its associated fields.
Declaration classes have special export and import commands that enable suppliers to integrate data with other Agile PLM systems, or complete the compliance request form in other clients, such as Microsoft Excel or Adobe Reader. The following table lists these export and import commands.
| Class(es) | Commands | Description |
|---|---|---|
| All Declaration classes | Export AXML Import AXML | Exports and imports Agile XML for integration with Agile PLM systems. |
| IPC 1752-1 Declaration IPC 1752-2 Declaration | Export IPC XML Import IPC XML | Exports and imports XML data that can be used to complete IPC-1752-1 and IPC-1752-2 data compliance request forms. |
| JGPSSI Declaration | Export JGPSSI Import JGPSSI | Exports and imports a text file in block format for integration with the JGPSSI Excel template. |
| Open In Excel | Opens the Declaration in Microsoft Excel. | NA |
|
Note: These commands are listed in the Actions menu in each respective Declaration and you can access them from Java Client by selecting Admin > Classes > the Declaration Subclass > Process Extension tab. |
The data format for these special export and import commands is predefined by Agile's aXML format, the JPGSSI template, and the IPC-1752-1 and IPC-1752-2 forms. For more information about these commands, refer to the Product Governance & Compliance User Guide.
An Agile package is an object that has files and documents describing a proposed product. You can route an Agile package to other Agile users, including supply-chain partners.
Once an Agile package is reviewed and approved by the approvers and accepted by the program manager, the program manager can process the Agile package data using the internal procedures specific to your company. When the package is accepted, its attachments that are PDX files or delimited text files can be imported into your Agile PLM system.
To import an attachment from an Agile package:
Open the Agile package in Web Client.
Click the Attachments tab.
Select an attachment (either a PDX file or a delimited text file).
In the More actions menu select the Import option.
|
Note: The Import button is enabled only when the package is released. For the default package workflow, the released status is called Accepted. |
When the message box appears, click OK.
The Import Wizard appears. Follow the steps in the Wizard.
The Import Wizard supports importing Relationships data for Manufacturer, Manufacturer Part, Item, Part Group, Product Service Requests and Quality Change Requests.
Multi Row Update Mode's Add/Update Only and Selective Remove options described in "Multi Row Update Mode", impact the Relationships data as described below.
When in Import Preference dialog, select:
Business Rule > Multi Row Update Mode: >Add/Update Only option, the Import Wizard will add or update the Relationships data instead of performing a Complete Replace.
Business Rule > Multi Row Update Mode: >Selective Remove option, the Import Wizard will remove the Relationships specified in the file you are importing.
Importing the Relationships data for Reference Objects (Agile to Agile) is similar to importing PLM objects with Multi Row Update Mode options. For more information, see "Multi Row Update Mode."