| Agile Product Lifecycle Management Import/Export User Guide Release 9.3.6 E71157-01 |
|

 Previous |
 Next |
| Agile Product Lifecycle Management Import/Export User Guide Release 9.3.6 E71157-01 |
|
Previous |
Next |
This chapter includes the following:
Overview
Importing Suppliers
Importing Supplier RFQ Responses
Importing a Currency Conversion Table
This chapter provides referential and procedural information to interact with suppliers. They include importing supplier-related information such as supplier offerings, supplier RFQ responses, applicable currencies, and so on. It also supports responding to these supplier requests and queries.
You can collaborate with external suppliers to gather and prepare product content. Suppliers also negotiate pricing and directly respond to Requests for Quotes (RFQs).
The following two fields are required to import suppliers:
Suppliers > General Info > Name
Suppliers > General Info > Corporate Currency
The Suppliers > General Info > Number field is a key field, but it does not need to be mapped.
If you do not map the Suppliers > General Info > Number field, the Import wizard uses the supplier name to find an existing supplier. If the supplier name matches the names of multiple existing suppliers, the Import wizard rejects the row. If no supplier with that name exists, the Import wizard creates a new supplier and uses the AutoNumber preference to assign a number to it. For more information, see "Setting Default Autonumber Sources."
In the source data, make sure you specify the supplier type. There are five out-of-the-box supplier types, but you can add more to your Agile PLM system. The five supplier types are:
Broker
Component Manufacturer
Contract Manufacturer
Distributor
Manufacturer Representative
The Suppliers > General Info > Maximum Number of Licensed Contact Users and Suppliers > General Info > Maximum Number of Power Contact Users fields specify the maximum number of contact users and power users that can be added to the supplier organization, respectively. Both contact users and power users can respond to RFQs, but only power users can generate and view reports.
Currency values for the Corporate Currency field must be specified using a three-letter code. For more information, see "Importing Currency Values."
A supplier's manufacturer offerings define which manufacturer's products are sold by the supplier. For example, a supplier called ACME might sell Motorola and Kemet products. When you import manufacturer offerings, the Import Wizard validates the manufacturer name against existing manufacturer names in the PLM system. If the manufacturer does not exist, the Import Wizard rejects the offering.
The following fields are required to import supplier manufacturer offerings:
Suppliers > General Info > Name
Suppliers > General Info > Corporate Currency
Suppliers > Manufacturers > Mfr. Name
The Suppliers > General Info > Number field is a key field, but it does not need to be mapped. If you do not map the Number field, the Import Wizard uses the AutoNumber preference to assign numbers to new suppliers. For more information, see Setting Default AutoNumber Sources.
A supplier's commodity offerings define the product categories sold by the supplier. For example, a supplier called ACME might sell commodities like fuses, integrated circuits, and resistors. When you import a supplier's commodity offerings, the Import Wizard validates the commodity name against existing commodity names in the PLM system. If the commodity does not exist, the Import Wizard rejects the offering.
The following fields are required to import supplier commodity offerings:
Suppliers > General Info > Name
Suppliers > General Info > Corporate Currency
Suppliers > Commodities > Commodity
Once again, the Suppliers > General Info > Number field is a key field, but it does not need to be mapped. If you do not map the Number field, the Import Wizard uses the AutoNumber preference to assign numbers to new suppliers.
You can import either the Ship-To location or geographical values (Continent, Country/Area, and Region/Province/State fields) for each offering.
Only valid Ship-To locations can be specified. Otherwise, the offering is ignored. The Ship-To value can consist of multiple delimited locations (for example, ”Milwaukee, Nagoya, Taipei”). If multiple Ship-To locations are specified for a particular row, multiple offerings are created when you import the file.
|
Note: The PLM administrator can define valid Ship-To locations by logging in to Java Client and choosing Admin > System Settings > Product Cost Management > Ship To Locations. |
Offerings can be given a rating for each Ship-To location. This rating allows the buyer to describe their relationship with the supplier and a specific offering. Although suppliers have restricted access to the PLM system, they do not have privileges to view the assigned ratings.
By default, there are four possible values for the Rating field:
Approved
Offered Active
Offered Inactive
Strategic
|
Note: The PLM administrator can configure the available values for the Rating field by logging in to Java Client and choosing Admin > Data & Workflow Settings > Lists > Supplier Offering Rating. |
To import supplier offerings and ratings in one operation, you must provide either the Ship-To location or geographical values for the offering. Again, only valid Ship-To locations can be specified.
If a row in the source data includes a Ship-To value and it corresponds to a valid Ship-To location that has not yet been associated with the supplier, the Import wizard creates a new offering with the Ship-To value and the Rating value (if provided). If the specified Ship-To location is already associated with the supplier, the Import wizard updates the Rating field (if provided). If the specified Ship-To location is not valid, the entire row is rejected.
If a row in the source data does not include a Ship-To value but does include geographical values (Continent, Country/Area, and Region/Province/State fields), the Import wizard creates an offering and automatically associates the appropriate Ship-To locations with it. However, the following rules apply:
The Continent value is required. If values for Country/Area or Region/Province/State fields are blank or missing, the default value All is used, which results in a broad offering.
Only single values can be imported for each geographical value. Multiple delimited values (for example, ”Arizona, California, Texas”) are not supported.
|
Note: When you create an offering, make sure the geographical data you specify is not narrower than an existing offering for the same manufacturer or commodity. For example, if the Region/Province/State field for an existing offering is set to All, you cannot create a new offering for the same manufacturer or commodity with the Region/Province/State field set to California because the existing offering covers a broader region. |
Suppliers that quote on items in an RFQ can export items to prepare a response. When a supplier exports items, Agile PLM will generate a comma-delimited text file. The exported supplier response file is named RFQNumber.csv. Suppliers can use a spreadsheet program, such as Microsoft Excel, to edit the file. They can also use a non-Agile tool such as a quoting tool, to complete the responses offline. After suppliers complete the fields in a response file, they can import the file back into Agile PLM and send the response to the Sourcing manager.
Unlike other types of objects that you can import, supplier responses do not require mapping import fields to Agile PLM fields because the response is a modified version of the exported text file and mapping is automatic.
To import a supplier response:
Select an RFQ.
Click the Responses tab.
Choose Responses > Import. The Import wizard appears.
Click Browse, select the file, then click Open.
Click Import.
If a supplier does not have Web access to the Agile PLM client, the Sourcing manager can import the supplier's response file. Since the response is a modified version of the exported text file, the Import Wizard maps response fields automatically.
To import an RFQ response from a non-Web supplier:
Select an RFQ.
Click the Response Status tab.
Select a non-Web supplier
Click Import. The Import Wizard appears.
Click Browse, select the file, then click Open.
Click Import.
To successfully import a supplier response text file, you must follow these guidelines when you edit the file:
You can reorder column headings, but do not edit or add any data to the headings. If you modify column headings, the file cannot be imported.
Do not add new columns of data.
Do not modify any date fields except for EOL Date and Expiration Date.
Do not enter values in fields that already contain the comment ”do not fill out.” Those fields are not supposed to contain data, and the ”do not fill out” comment is intended to prevent you from editing the fields. For component parts, Nonmaterial Price fields should not be filled out. For assembly items, Material Price fields should not be filled out.
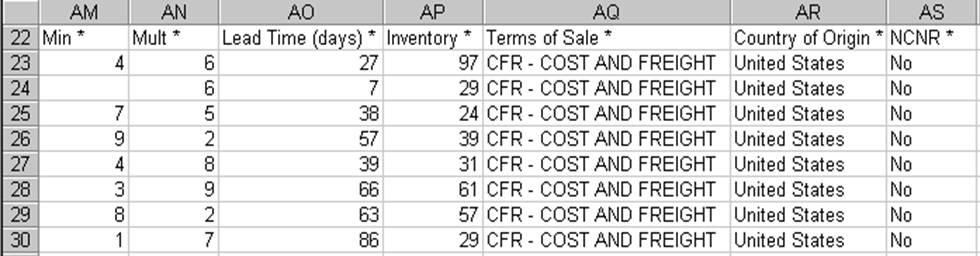
A required field has an asterisk (*) to the right of its column heading. In the following figure, all columns shown are required.
If you fail to complete all required fields, you can still successfully import the file. However, you can not send the response to the Sourcing manager. Required and requested fields are specified by the Sourcing manager who set up the project.
Empty fields are not imported. They are not equal to 0. To set a numeric field or a price field to 0, you must explicitly enter the value 0.
If you prefer, you can remove the <HEADER> section at the top of the file since it is not imported. To remove this section, make sure you remove the two rows containing the <HEADER> and </HEADER> tags and all rows in between.
When you import the supplier response file, the imported data replaces existing response field data.
When you edit a supplier response file, make sure you edit only fields you are allowed to edit. Generally, this means the Bid Decision field and fields to the right of it. Other fields are for viewing only.
You can import the supplier response file multiple times. Each time you import the file, only the editable fields are imported, replacing the previous values. The fields that appear in a supplier response file depend on whether the Sourcing manager specified them as requested and required.
Table 6-1 Editable and non-editable fields
| Field | Editable? |
|---|---|
|
AdderFoot 1 |
Yes |
|
Bid Decision |
Yes |
|
Country of Origin |
Yes |
|
EOL Date |
Yes |
|
Expiration DateFoot 2 |
Yes |
|
Inventory |
Yes |
|
Item Number |
NA |
|
Item or Mfr Part Description |
NA |
|
Lead Time |
Yes |
|
Material Cost |
Yes |
|
Min |
Yes |
|
Mult |
Yes |
|
Mfr Name |
NA |
|
Mfr Part Number |
NA |
|
NCNR |
Yes |
|
Nonmaterial Price1 |
Yes |
|
NRE |
Yes |
|
Period Start Date Quantity Break 1...6 - Quantity2 |
NA |
|
Period Start Date Quantity Break 1...6 - Target PriceFoot 3 |
Yes |
|
Quantity Break 1...63 |
NA |
|
Response Flex Fields1, 3 |
Yes |
|
RFQ Number |
NA |
|
Rev |
NA |
|
Terms of Sale |
Yes |
|
UOM |
NA |
Footnote 1 This field is configured by the Sourcing manager. Consequently, it may have a different display name
Footnote 2 The availability of this field depends on the price scenario selected for a particular project.
Footnote 3 There are 25 response flex fields that can be configured and enabled in the Agile PLM system: 5 date fields, 10 text fields, 5 number fields, and 5 currency fields.
Suppliers are often requested to quote on parts they are unable to supply for various reasons. For example, the part may be obsolete, on allocation, or have an End of Life (EOL) status. The part may also be unnecessarily expensive, or perhaps the supplier does not have the full quantity available within the required lead time. To remedy this problem, the supplier can suggest alternate parts in the RFQ response.
When you suggest an alternate part, you can also suggest new manufacturers for the part, including manufacturers the sourcing manager did not consider.
To add suggested alternate parts to the RFQ response:
Open the exported response file in a spreadsheet program (such as Microsoft Excel) or another application that supports comma-delimited files.
Insert a row for the part you wish to replace.
Enter appropriate values in the Mfr Part Number, Mfr Name, and Item or Mfr Part Description fields. The value in the Item Number field must be identical to the part you're replacing. In the Bid Decision field, enter Bid - Alternate. Leave the Rev and UOM fields blank; those fields are inherited from the parent item. Fill out other fields as appropriate.
You can insert additional rows to suggest more alternate parts.
Save the file in comma-delimited (CSV) format.
Supplier response files display price scenarios horizontally. The supplier can therefore fill out all response information for each component part on a single row.
Each price scenario represents either one quantity break or one quantity per price period. The following table shows quantity breaks and target prices that have been entered for one period for several different items.
Table 6-2 Quantity breaks and target prices
| Item Number | Q 4 30-Dec-2002 QuantityBreak1 - Quantity | Q 4 30-Dec-2002 QuantityBreak1 - Target Price |
|---|---|---|
|
10-007 |
1 |
0.04 |
|
10-008 |
10 |
12.80 |
|
10-009 |
1 |
0.04 |
|
10-010 |
10 |
16.60 |
|
10-011 |
1 |
0.04 |
|
10-012 |
1 |
0.09 |
|
10-013 |
5 |
2.95 |
|
10-014 |
100 |
122.00 |
The Import Wizard ignores empty fields. To set a price value to 0, you must explicitly enter 0.
Price values in the exported supplier response file are formatted according to the user's currency preference. To change your Agile user preferences in the Web Client, click Settings > User Profile > Preferences > Edit.
Certain supplier response fields require specific values that must be spelled correctly. If you type an invalid value in the field, it won't be imported. The following table shows the valid values for the supplier response fields that require specific values.
|
Note: The header for the supplier response file also lists values for these fields. |
Table 6-3 Valid values for supplier response fields
| Field | Valid values | Note |
|---|---|---|
|
Bid Decision |
Bid, Bid - Alternate Part, No Bid - Non-Franchise, No Bid - Obsolete Part, No Bid - On Allocation, No Bid - Other, No Bid - Unknown Part, Not Responded |
NA |
|
Country of Origin |
NA |
Enter a valid country name. Make sure the spelling is correct. |
|
NCNR |
Yes, No |
NA |
|
Terms of Sale |
CFR |
Cost and Freight |
|
Terms of Sale |
CIF |
Cost, Insurance, and Freight |
|
Terms of Sale |
CIP |
Carriage and Insurance Paid To |
|
Terms of Sale |
CPT |
Carriage Paid To |
|
Terms of Sale |
DAF |
Delivered at Frontier |
|
Terms of Sale |
DDP |
Delivered Duty Paid |
|
Terms of Sale |
DDU |
Delivered Duty Unpaid |
|
Terms of Sale |
DEQ |
Delivered Ex Quay (Duty Paid) |
|
Terms of Sale |
DES |
Delivered Ex Ship |
|
Terms of Sale |
EXW |
EX Works |
|
Terms of Sale |
FAS |
Free Alongside Ship |
|
Terms of Sale |
FCA |
Free Carrier |
|
Terms of Sale |
FOB |
Free on Board Vessel |
In addition to the three-letter abbreviations for Terms of Sale, you can enter the full Terms of Sale value, for example, ”CFR - COST AND FREIGHT” or ”CIF - COST, INSURANCE AND FREIGHT.” The value must be all uppercase.
Agile allows you to maintain up-to-date currency conversion rates that convert currency values to the selected corporate currency. You can use the Import wizard to update the conversion rates for all currencies enabled in the Agile PLM system. To import a currency conversion table, you must log in as a user assigned the Administrator role.
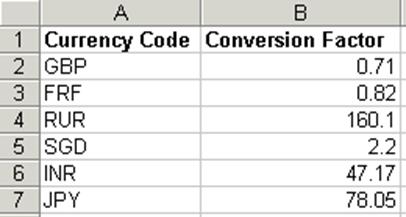
The currency conversion table that you import must meet the following requirements:
It must be either a Microsoft Excel file or a delimited text file.
The file should have two columns containing the currency code and the conversion factor.
Each currency specified in the source file must be enabled in the Agile PLM system. To check which currencies are enabled, log into the Java Client as an administrator and choose Admin > System Settings > Product Cost Management > Currency Exchange Rates.
Currencies must be specified using three-letter codes. For example, EUR and USD are the codes for the Euro and the U.S. Dollar, respectively. For a complete list of currency codes, see "Importing Currency Values."
referring to the contents of the Currency Conversion table appears in Figure 6-2, make sure you map the following Agile fields:
Currency Conversion > Currency Exchange Rates > Currency Code
Currency Conversion > Currency Exchange Rates > Conversion Factor
To import a currency conversion table:
Format the source file appropriately using either a Microsoft Excel file or a delimited text file.
Start the Import wizard.
Type the path of the file, or click Browse to select it.
Click Next.
Select Currency Conversion. Click Next.
Select a mapping file, or create new field mappings.
Click Import to begin the import operation.