| Agile Product Lifecycle Management Product Quality Management User Guide Release 9.3.6 E71165-01 |
|

 Previous |
 Next |
| Agile Product Lifecycle Management Product Quality Management User Guide Release 9.3.6 E71165-01 |
|
Previous |
Next |
In Product Quality Management, Quality Change Requests (QCR) creates and manages Audits and Corrective and Preventive Actions. The QCR enables you to aggregate problems into a routable quality record, perform an analysis of the cause of the failure and closes the problem using standard CAPA procedures
You can create QCR objects the same way you create other Agile PLM objects if you have the necessary privileges. The Quality Administrator role enables you to perform all the functions related to QCRs. For more details on roles and privileges, see Getting Started with Agile Product Lifecycle Management.
You can use the New Object button or the Save As feature to create a QCR.
To create a QCR in Java Client:
Launch the Java Client.
Click the New Object button. The New Object dialog box appears.
In the Type list, select a value.
In the QCR Number field, accept the number that appears, or enter a number, or click the Autonumber button to generate a number.
Click OK.
Agile Java Client creates the QCR object and displays the QCR (Audit or CAPA) with the Cover Page tab in the edit mode.
To create a QCR in Web Client:
Launch Agile Web Client.
From the main toolbar, click the Create New drop-down button. Select Quality Change Request > Audit or Corrective and Preventive Actions. The Create New dialog appears.
In the Type field, select a value from the list.
In the QCR Number field, accept the default number, enter a number, or click Autonumber button to generate a number.
Click Save.
Agile Web Client creates the QCR and displays it with the Cover Page tab in the edit mode. If you do not assign a workflow to the QCR, the QCR displays the Unassigned status.
To assign a workflow to the QCR:
Open a QCR and click the Edit button.
Select a workflow from the Workflow list. For details, see "Workflow Tab of a QCR."
Click Save.
The status of the saved QCR appears on the right corner of the page. For example, the assigned status can be - Prepared, Submitted, Review, or Released.
The system sends an audit reminder to the Originator and Quality Administrator before the audit date. If you have Modify privileges, you can configure the audit reminder date in the file.
You can create a QCR using the Save As feature. The Save As feature creates a similar object with different values, since it copies data from a field in the existing object to the same field in the new object.
|
Important: If Do not use the Save As feature to create an object in a different class or subclass, since they may not include the same tabs/fields, and hence lose data.If a field or list value in the existing object is not available in the new object, then the system does not copy that field or list value to the new object |
To create a QCR using save as in Java Client:
Open the QCR you want to use as the basis for the new QCR.
Right-click, and choose Save As. Alternatively, choose File and select Save As from the main toolbar. The Save As dialog box appears.
From the Type list, select an Audit or CAPA.
In the QCR Number field, accept the number that appears. You can also type a number or click the AutoNumber button to generate a number.
Click OK.
Agile Java Client creates the QCR (Audit or CAPA) and displays the QCR with the Cover Page tab in the edit mode. Modify required fields.
Click Save to save the changes.
To create a QCR using save as in Web Client:
Open the QCR you want to use as the basis for the new QCR.
Click the Actions drop-down menu.
Select Save As.
In the Save As dialog that appears, select Audit or CAPA from the Type list.
In the QCR Number field, accept the default number, enter a number, or click Autonumber button to generate a number.
Click Save.
The QCR opens displaying the Cover Page in edit mode. Modify required fields.
Click Save to save the changes.
The QCR appears displaying the Cover Page.
If the Agile PLM Administrator has set the appropriate preferences, the system copies fields in the optional Page Two and Page Three sections to the new object. For information about the behavior of Page Two and Page Three fields in your Agile PLM system, contact your Agile PLM Administrator. Since Page Three data applies only to a specific subclass, if you use the Save As feature to create a new object of a different subclass, the system does not copy Page Three data to the new object.
To enable Save As preferences for Page Two and Page Three fields, refer Admin> Server Settings> Preferences - Save As Page 2 for Different Classes, Save As Page 3 for Different Classes, & Save As Page 3 for Different Subclasses, in the Java Client.
You can create a QCR from a PSR or an individual Item. When you create a QCR from an Item to drive a problem to closure, you add:
the Item to the Affected Items table of the QCR.
the QCR to the QCRs table on the Quality tab of the Item.
After you approve the QCR, you can route the Item through the change to ensure you rectify the defect and change to the new revision of the Item.
To create a QCR from an item in Java Client:
Open an existing an Item.
Right-click in the object window and choose Create a Quality Change Request from the drop-down menu.
Select the required sub-class Audit or CAPA from the Type list.
In the QCR Number field, accept the number that appears, enter a number or click the Autonumber button to generate a number.
Click OK.
Agile Java Client creates the QCR and displays it with the Cover Page in the edit mode.
To create a QCR from a PSR or an item in Web Client:
Open an existing an Item. It opens displaying the Cover Page.
Click the Actions button on the Cover Page.
Choose Create New> Quality Change Request from the drop-down menu. The Create New dialog appears.
Select the required sub-class (Audit or CAPA) from the Type list.
In the QCR Number field, accept the number that appears, enter number or click Autonumber button to generate a number.
The Agile Web Client creates the QCR and displays it with the Cover Page in the edit mode.
The QCRs you create remain in the system until you delete them. Deleting QCRs does not remove them from Agile database. To delete a QCR permanently from the system you must hard-delete them.
For details on deleting QCRs, see "Deleting Agile Objects."
Creating QCRs from PSRs enables you to tag corrective actions on to a Product Service Request. You can create a QCR directly from a PSR or an individual item. You can create a QCR using the Actions Menu in Web Client and the More button in Java Client. The QCR enables you to aggregate incoming problems into a routable quality record, perform root-cause failure analysis, and drive the problems to closure using standard CAPA (corrective and preventive actions) procedures.
To create a QCR from a PSR in the Java Client:
Open an existing PSR.
Click the More button.
Select the Create Quality Change Request from the drop-down menu.
A New dialog appears. Select the required sub-class Type (Audit or CAPA).
In the QCR Number field, accept the default number, enter a number, or click the Autonumber button to generate a number.
Click OK.
The QCR opens in the edit mode.
To create a QCR from a PSR in Web Client:
Open an existing PSR.
Click the Actions menu.
Select the Create Quality Change Requests option.
A Create New dialog appears. Select the required sub-class (Audit or a CAPA) from the Type list.
In the QCR Number field, accept the default number, enter a number, or click Autonumber button to generate a number.
Click Save.
The QCR (Audit or CAPA) opens in the edit mode.
The following table lists and describes the fields on the Cover Page tab of a QCR.
| Field | Completed | Indicates |
|---|---|---|
| QCR Number | Automatically, when created | The number you assign to a QCR, when you create it. |
| QCR Type | Automatically, when created | The type of subclass you select when you create the QCR. |
| Category | Manually | List of categories defined by the Agile PLM Administrator. |
| Description | Usually manually, can contain a default. | Describes the QCR. Maximum number of bytes is set by the Administrator; can be up to 4000 bytes, including spaces and carriage returns (which count as two bytes). |
| Reason | Usually manually; can contain a default | Reason for creating the QCR. Maximum number of bytes is set by the Administrator; can be up to 4000 bytes, including spaces and carriage returns (which count as two bytes). |
| Customer | Manually. | The Customer associated with the QCR. |
| Supplier | Manually | List of Suppliers associated with the QCR.
For example, Suppliers can initiate a SCAR if they must resolve issues in the process, products or other areas. |
| Workflow | Usually selected manually. If you do not assign a Workflow to a QCR it remains in the Unassigned state.
You are prompted to select a Workflow, when you move the QCR to the next status without assigning a Workflow. You can change the workflow selection until the QCR is in the Pending status type. |
The name of the workflow used to move this QCR through the quality control process. |
| Quality Administrator | Select from a list. In the list, Departments appear first, followed by individual user names. | The default Quality Administrator.
If you prefer another QA over default QA, the system displays a message "Quality Administrator" selected is not one of the defaults. The default Quality Administrator list includes: Default QA UserName (Userid), " If you define the workflow to notify the default quality administrator, the user groups or user in this field receives notifications about the QCR. If this field is blank, the system notifies to all the quality administrators on the list. If the notification definition in the workflow is blank, no notifications are sent. |
| Status | Automatically, when created. Updates as the QCR moves through the assigned workflows. | Workflow status. If you do not select a workflow this field displays the Unassigned status. |
| Originator | Usually automatically, when created (with the default set by the Agile PLM Administrator). | The originator or creator of the QCR. |
| Date Originated | Usually automatically, when created. | The date you create the QCR |
| Date Submitted | Automatically generated based on workflow status. | The date when the QCR moves to the Submitted status in the workflow. |
| Date Released | Automatically generated based on workflow status. | The date when the QCR moves to the first released status in the workflow |
| Final Complete Date | Automatically when the QCR enters the Complete type status. | The date the QCR moves to the Complete status type. |
| Preventive Action | Usually manually; can contain a default. Maximum number of bytes is set by the Agile PLM administrator; can be up to 4000 bytes, including spaces and carriage returns (which count as two bytes). | A pro-active action taken to prevent the problem from happening again. Applies only to CAPAs. |
| Root Cause Analysis | Manually. Maximum number of bytes is set by the Agile PLM administrator; can be up to 4000 bytes, including spaces and carriage returns (which count as two bytes). | The root cause of the problem. Applies only to CAPAs. |
| Planned Audit Date | Manually | Date planned to audit the problem. |
| Audit Result | Usually manually, can contain a default.
For example, when you implement a CAPA, the Quality Analyst performs an Audit to ensure the CAPA actually solves the problem. If the fix for the problem is validated, then the result is pass. Otherwise it fails, and the Quality Analyst updates the Audit Result field. |
Audit process result. The default setting for the audit result is Pass/Fail. For more details, on other settings contact the Agile Administrator. |
| Product Lines | Usually manually; can contain a default. | List of product lines defined by the Agile Administrator. |
After you create a QCR, you can modify it to provide additional information or edit any information that has changed since its creation.
To update the cover page of a QCR (Java Client and Web Client):
Open the QCR you want to edit.
Click the Edit button.
Modify required fields. You can either enter text; use the drop-down lists or the palettes to edit the QCR.
Click Save to save changes.
In Web Client, once you edit a QCR and save it, a message bar displays that the changes have been successfully saved.
The Cover Page displays updates of the QCR.
The Affected Items table lists the items affected by the QCR. The Affected Items tab of a QCR includes the Affected Items tables and the PSR Items tables.
The table below lists and describes the default fields on the Affected Items tab.
| Field | Completed | Indicates |
| Item Number | Automatically, when created. | Number of the Affected Item |
| Item Description | Automatically, when created. | Description of the Item. |
| Item Rev | Manually | The revision of the Affected Item in which you find the problem.
For example, if the Item has undergone five revisions, and you identify the defect in revision B, then Item Rev field displays B. You can add multiple copies of an Item with the same revision number to the Affected Items tab of a QCR. |
| Affected Site | Automatically, when created. | The site where you find the problem. |
| Image | Automatically, when created. | The presence of a PSR Item. |
The Affected Items tab page includes the Affected Items and the PSR Items table. The Views and Personalize menus appear on both these tables.
|
Note: The Personalize menu enables you to create and customize Views. Use the personalize menu to create and save several views by defining filter conditions, and sort orders. You can later choose the required view from the list of available views. |
The PSR Items table lists Items referenced by problem reports and non-conformance reports associated with this QCR. This table populates itself when the Relationship Rule has the QCR affect the PSR.
Associate a PSR with the QCR by adding the PSR to the QCR Relationships tab and adding a Rule where the QCR affects the PSR.
Associate a PSR with the QCR by adding the QCR to the PSR Relationships tab and adding a Rule where the QCR affects the PSR.
Create a QCR from a PSR.
The table lists the default fields on the PSR Item table of the Affected Items tab.
| Field | Completes | Indicates |
| Item Number | Automatically, when created | Number of the Affected Item |
| Item Description | Automatically, when created | Describes the Item |
| Item Rev | Manually | The revision of the Affected Item in which you find the problem. |
| Affected Site | Automatically, when created | The site at which you find the problem. |
| PSR Number | Automatically, when created | The number of the PSR associated with the QCR. |
|
Note: The Item Number field indicates the ascending or descending order of the table, depending on the sort order you choose in the Personalize menu. |
The Relationships tab enables you to create relationships and dependencies between the current QCR and other routable/lifecycle objects.
When you create a QCR from a PSR the system copies the:
PSR to the Relationships table of the QCR.
QCR to the Relationships table of the PSR.
You can set the event trigger to move the PSR to a specific status in the workflow when the QCR event occurs.
The Relationships tab of a QCR is similar to that of a PSR. See also: "Relationships Tab."
The Workflow tab displays a flowchart of the workflow you selected on the Cover Page. An Agile PLM workflow is a sequence of statuses that a routable object follows as it goes through the different statuses in the quality control process. The status with the orange background (Web Client) or the yellow background (Java Client) is the current status. The Sign off History table displays past workflow and sign off information for the QCR.
The Workflow tab page includes the Views and Personalize buttons. For details on Views and Personalize menus, see the Getting Started with Agile Product Lifecycle Management Guide.
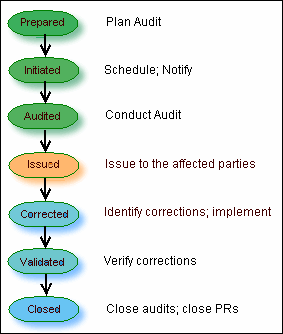
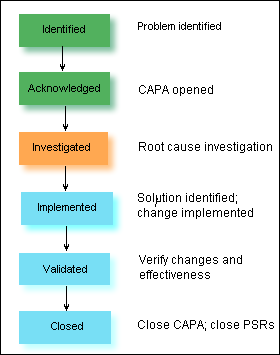
Notice that the Default Audits and Default CAPAs workflow statuses are different from those of other routable objects.
The status of the audit workflow begins with Prepared state and that of the CAPA with the Identified state.
The table below represents the status of a default CAPA.
The Next Status button on the Cover page also enables you to switch the routable object to any of the permissible order of statuses listed in the drop-down menu.
The general route for an Audit is as follows:
Prepared > Initiated > Audited > Issued > Corrected > Validated > Closed.
For an Audit, the Hold and Cancel statuses are indicated on the Workflow chart or on the Next Status drop-down menu, after it reaches the Initiated status.
The general route for an CAPA is as follows:
Identified > Acknowledged > Investigated > Implemented > Validated > Closed.
For a CAPA, the Hold and Cancel statuses are indicated on the Workflow chart or on the Next Status drop-down menu, after it reaches the Acknowledged status.
You can submit QCRs using the Next Status button. The process is the same as for submitting other routable objects. Before switching the QCR to a different status, always audit the routable object to detect any errors that may prevent switching to a different status. When you submit a QCR, you also notify the Quality Administrator by email. The Quality Administrator can also use the defined searches in the Workflow Routings area of the Inbox or the Quality Searches folder to find recently submitted QCRs.
For details, see the chapter 'Routing Objects with Workflows' in the Getting Started with Agile Product Lifecycle Management Guide.
You can reference files and attachments from the Attachments tab of a QCR. The Attachments tab of a QCR is similar to that of the PSR.
For details, see "Attachments Tab of a PSR."