|
Oracle CRM On Demand Desktop Administration Guide > Customizing Oracle CRM On Demand Desktop > Process of Adding a Predefined Oracle CRM On Demand Picklist to Oracle CRM On Demand Desktop >
Adding a Field to the Customization Package
This task is a step in Process of Adding a Predefined Oracle CRM On Demand Picklist to Oracle CRM On Demand Desktop. In this topic you add a field to the customization package. To add a field to the customization package
- Create a working set of files for the customization package:
- Open a DOS command prompt, and then navigate to the directory that contains the current files of the customization package.
For more information, see Files in the Customization Package.
- Create a copy of the current set of customization package files.
- Move the original set of files to a backup directory.
If it is necessary to restore the configuration that existed before you started this customization effort, then you can revert to this backup set of files.
- To create a working set of customization package files, rename the set of files you copied in Step b, for example, enter the following command:
rename v01* v02*
This command renames the prefix for all files in the directory that currently use v01 as the prefix. For example, it renames v01_forms_12.xml to v02_forms_12.xml. It is recommended that you use this technique to indicate that you have modified the customization package.
- To define the picklist, add the following element to the od_meta_info.xml file:
<picklist TypeId='PickList_Preferred_Communications' CollectionTypeFld Name='Type' SrcObjectTypeId='PickList_Preferred_Communications' ValueFldName='Value' LabelFldName='Value' LangFldName='Language' >
<master_filter_expr>
<![CDATA[
[Parent] = LookupValue ('OFFER_MEDIA', 'Package')
]]>
</master_filter_expr>
</picklist>
For more information, see Defining Attributes of the Picklist Element.
- Add the Preferred Communications field to the Contact object:
- To locate the Contact object, search for the following text:
object TypeID='Contact'
- Add the following element to the Contact object:
<field Name="Preferred Communications" Label="Preferred Communications" DataType="DTYPE_TEXT" HasPicklist="yes" PicklistIsStatic="yes" PicklistCollectionType="OFFER_MEDIA" PicklistTypeId="PickList Preferred Communications" IOElemName="PreferredCommunications" />
- Repeat Step 2 for each of the following objects:
- Add code that creates a map for the picklist between the Oracle CRM On Demand server and Oracle CRM On Demand Desktop for the parent Contact object:
- Use an XML editor to open the od_basic_mapping.xml file.
- Create a new object type for the picklist.
For more information, see Code to Create a New Object Type for the Picklist.
- To locate the parent object, search the od_basic_mapping.xml file for the following code:
<type id="Contact"
- Add code to the Contact object that defines a map between the Oracle CRM On Demand server and Oracle CRM On Demand Desktop.
For more information, see Code to Define a Mapping Between the Oracle CRM On Demand Server and Oracle CRM On Demand Desktop.
- Add code that creates a map for the picklist between the Oracle CRM On Demand server and Oracle CRM On Demand Desktop for the child Account Contacts object:
- Choose the code from the contact object that you use to map the child account object.
For more information, see Mapping Child Objects for a Custom Picklist.
- Copy this code to the clipboard.
- To locate the Account Contacts child object, search the od_basic_mapping.xml file for the following code:
type id="Account.Contact.Association"
- To locate the Contact field, search in the Account.Contact.Association object for the following text:
field id="ContactId"
- To locate the matching ContactId, search the ContactId field for the following text:
user_field id="OD Contact ID"
- Paste the contact fields that you copied to the clipboard in Step a into the OD Contact ID user field.
For more information, see Mapping Child Objects for a Custom Picklist.
- To map the Preferred Communications field, add the following code immediately after the code you pasted in Step f:
<field from="Preferred Communications" to="ContactPreferred Communications"></field>
- Repeat Step 5 for the opportunity child object.
Defining Attributes of the Picklist Element
If you define a picklist element in the od_meta_info.xml file, then the TypeId and SrcObjectTypeId attributes of this element must match the value in the PicklistTypeId property of the object definition. For example, assume you add the following field: <field Name='Note Type' Label='#fld_account_account_note@note_type' DataType='DTYPE_TEXT' HasPicklist='yes' PicklistIsStatic='yes' PicklistTypeId='AccountNoteType' IOElemName='NoteType' />
In this example, you must set the TypeId attribute in the picklist element to AccountNoteType. Table 16 describes the values to use in the picklist element. Adjust these values so they match the field names on the integration component field.
Table 16. Values to Use in the Picklist Element
|
|
CollectionTypeFldName |
Type |
ValueFldName |
Value |
LangFldName |
Language |
To add more filters, you can use the master_filter_expr attribute. In the example on Step 2, the master_filter_expr attribute constrains the values to the correct LOV Type. Code to Create a New Object Type for the Picklist
To create a new object type for the picklist, you must use the following format for the type id attribute: <type id="object_namefield_namePicklist" predefined_folder="1">
where:
- object_name is the name of the object type in the od_meta_info.xml file.
- field_name is the name of the field that resides in the object that you define in object_name.
For example: <type id="ContactPreferred CommunicationsPicklist" predefined_folder="1">
To create a new object type for a picklist, add the following code to the od_basic_mapping.xml file: <type id="ContactPreferred CommunicationsPicklist" predefined_folder="1">
<form message_class="IPM.Contact.OnDemand.ContactPreferred CommunicationsPicklist"></form>
<field id="Label">
<reader>
<mapi_user>
<user_field id="On Demand picklistLabel" ol_field_type="1"></ user_field>
convertor><string/></convertor>
</mapi_user>
</reader>
<writer>
<outlook_user>
<user_field id="On Demand picklistLabel" ol_field_type="1"></user_field>
<convertor><string/></convertor>
</outlook_user>
</writer>
</field>
<field id="Value">
<reader>
<mapi_user>
<user_field id="On Demand picklistValue" ol_field_type="1"></user_field>
<convertor><string/></convertor>
</mapi_user>
</reader>
<writer>
<outlook_user>
<user_field id="On Demand picklistValue" ol_field_type="1"></user_field>
<convertor><string/></convertor>
</outlook_user>
</writer>
</field>
<field id="SortOrder">
<reader>
<mapi_user>
<user_field id="od SortOrder" ol_field_type="3"></user_field>
<convertor><integer/></convertor>
</mapi_user>
</reader>
<writer>
<outlook_user>
<user_field id="od SortOrder" ol_field_type="3"></user_field>
<convertor><integer/></convertor>
</outlook_user>
</writer>
</field>
<field id="IsDefault">
<reader>
<mapi_user>
<user_field id="od IsDefault" ol_field_type="6"></user_field>
<convertor><bool/></convertor>
</mapi_user>
</reader>
<writer>
<outlook_user>
<user_field id="od IsDefault" ol_field_type="6"></user_field>
<convertor><bool/></convertor>
</outlook_user>
</writer>
</field>
</type>
Code to Define a Mapping Between the Oracle CRM On Demand Server and Oracle CRM On Demand Desktop
To define a map between the Oracle CRM On Demand server and Oracle CRM On Demand Desktop, add the following field element to the Contact object of the od_basic_mapping.xml file: <field id="Preferred Communications">
<reader>
<mapi_user>
<user_field id="od Preferred Communications" ol_field_type="1"></user_field>
<convertor><string/></convertor>
</mapi_user>
</reader>
<writer>
<outlook_user>
<user_field id="od Preferred Communications" ol_field_type="1"></user_field>
<convertor><string/></convertor>
</outlook_user>
</writer>
</field>
If you are adding your object to Oracle CRM On Demand Desktop's DB FACADE storage, then add this code: <field id = "Preferred Communications">
<type>
<simple type="string"/>
</type>
</field>
If you are adding a picklist object to DB FACADE storage, which is recommended for picklists, then you do not have to specify the predefined_folder attribute. Generally, the XML code to add picklists is as follows: <type id="ContactPreferred CommunicationsPicklist" icon="type_image:ContactPreferredCommunicationsPicklist:16">
<field id ="Label">
<type>
<simple type="string"/>
</type>
</field>
<field id ="Value">
<type>
<simple type="string"/>
</type>
</field>
<field id ="SortOrder">
<type>
<simple type="integer"/>
</type>
</field>
<field id ="IsDefault">
<type>
<simple type="boolean"/>
</type>
</field>
</type>
Mapping Child Objects for a Custom Picklist
It is recommended that you do not map a child object directly in the child object. Instead, copy values from the parent object, and then paste them into the child object. This technique provides the following advantages:
- Allows Oracle CRM On Demand Desktop to copy values on the contact to the child object, such as the account or opportunity
- If the user changes the value in a contact, then Oracle CRM On Demand Desktop automatically updates the child objects
Example Code to Map Child Objects for a Custom Picklist
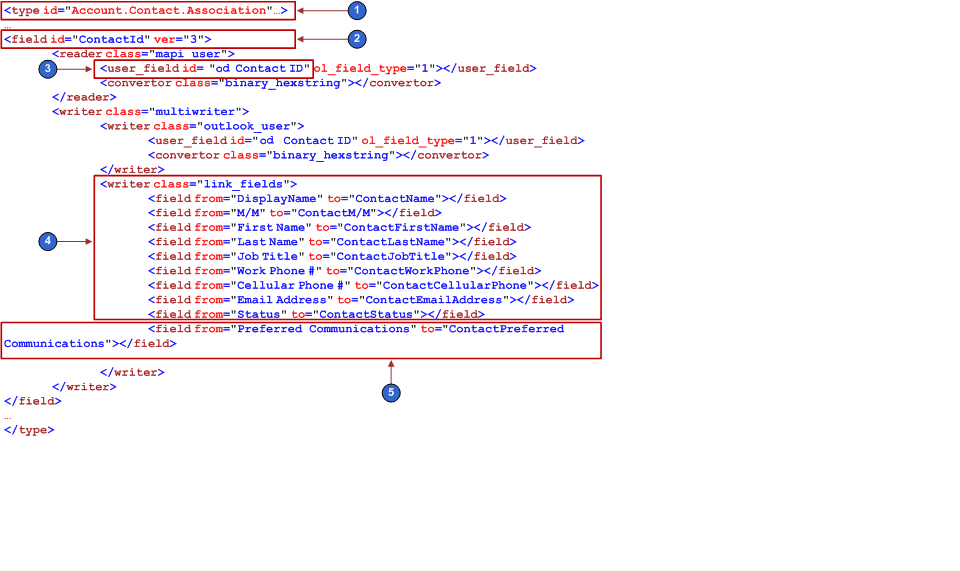
Figure 7 illustrates example code to map a child object for a custom picklist.
Figure 7. Example Code to Map Child Objects for a Custom Picklist
|
Explanation of Callouts
The example code to map a child object for a custom picklist includes the following items:
- The following attribute identifies the account child object of the parent contact:
type id="Account.Contact.Association"
- The following element identifies the Contact field in the account object:
field id="ContactId"
- The following attribute identifies the matching ContactId:
user_field id="od Contact ID"
- You copy these fields from the parent contact object and then paste them into the account child object.
- You add the Preferred Communications field to provide a way to add it to Account Contact forms. You define this field in Code to Define a Mapping Between the Oracle CRM On Demand Server and Oracle CRM On Demand Desktop.
|