4 Deploying Oracle Software on Oracle Database Appliance

Complete these tasks to deploy the Oracle Database Appliance software.

About Deploying Oracle Database Appliance Software

Review this information to understand the available deployment options.

The procedure to deploy software consists of the following steps:

  1. Copy the Oracle Database Appliance Single Instance software bundle that you downloaded earlier.

  2. Update the repository with Oracle Database Appliance Single Instance software bundle.

  3. Deploy your configuration.

The Web Console is the preferred method of deploying your configuration. The Web Console provides all of the fields necessary to provision Oracle Database Appliance, including configuring the system, network, database, and Oracle Auto Service Request (Oracle ASR). If you prefer to use the command-line interface, you must create a JSON file to configure the deployment options.

Deploying Oracle Database Appliance software requires approximately 1 hour to complete.

Verifying the DCS Agent Version

Ensure that your appliance has the latest dcs-agent before updating the repository.

  1. Check the dcs-agent rpm version.
    # rpm -qa | grep dcs-agent 
    dcs-agent-12.1.2.11.0_LINUX.X64_170607-1.x86_64
    
  2. See the Oracle Database Appliance Release Notes for details about the latest agent, most recently released versions and patches, and known issues.
  3. If you have an older version of the dcs-agent, then upgrade the dcs-agent before applying the latest patch bundle and updating both dcsagent and server components.

Special Instructions for Upgrading from a 12.1.2.7.0 Environment

If you are using Oracle Database Appliance 12.1.2.7.0, then you must upgrade the dcs-agent to 12.1.2.8.0 before installing the latest Oracle Database Appliance Patch Bundle. If you are using 12.1.2.8 or later, you do not need to update the dsc-agent.

The 12.1.2.8.0 version of the dcs-agent includes changes and information not available in the 12.1.2.7.0 version of the dcs-agent. The information is needed to use the command-line interface to install the update bundle and update the agent, server, and databases. Use the describe-job command to monitor the progress of each patching job. Run the update-image command to update the dcs-agent image to the latest version.

Note:

If you are using 12.1.2.7.0, you must run the update-image command to update the dcs-agent image to version 12.1.2.8.0. Once you are on version 12.1.2.8.0, use the update-repository command and follow the steps to install the latest update release. before using the patching command-line interface.
  1. Log into My Oracle Support and search for patch 24391174 for the 12.1.2.8.0 release. Review the ReadMe, then click Download to download the patch.
  2. Log in to Oracle Database Appliance as a root user.
  3. Unzip the downloaded patch.
  4. Update the dcs-agent using the update-image command.
    # /opt/oracle/oak/bin/update-image --image-files /tmp/oda-sm-12.1.2.8.0-160xxx-DCS.zip
    The agent automatically restarts. It may take 1-2 minutes for the dcs-agent to complete restarting. Wait until the agent completes restarting before updating the patch repository or performing any tasks.
  5. When the dcs-agent is upgraded to 12.1.2.8 and restarted, apply the latest patch bundle and update both thedcsagent and server components.

Caution:

Do not patch Oracle Database Appliance using individual patches for Oracle Grid Infrastructure, Oracle Database, or Oracle Linux. Also do not use individual infrastructure patches, such as firmware patches. You must only use Oracle Database Appliance patches.

If you use patches that are not intended for Oracle Database Appliance, or if you use Opatch, or a similar patching tool, then Oracle Database Appliance inventory is not updated, and you cannot complete future patch updates.

Updating the Infrastructure with the Latest Patch Bundle

If an older version of the dcs-agent is installed, then download the latest patch bundle and update the repository, dcs-agent, and server components.

In some cases, a machine might ship with an older version of the dcs-agent.

Note:

If you are on version 12.1.2.7, then you must upgrade the agent to a version that supports patching.
  1. Log in to Oracle Database Appliance as a root user.
  2. Download the latest dcs–agent patch from My Oracle Support.
  3. Update the repository.
     
     odacli update-repository -fileName patch bundle
    
  4. Update the dcs-agent .
      odacli update-dcsagent -version version
    
    # odacli update-dcsagent -v 12.2.1.1.0
    {
      "jobId" : "77e454d3-eb68-4130-a247-7633f8d6192b",
      "status" : "Created",
      "message" : null,
      "reports" : [ ],
      "createTimestamp" : "November 26, 2017 14:09:24 PM CST",
      "description" : "DcsAgent patching",
      "updatedTime" : "November 26, 2017 14:09:24 PM CST"
    }
    
    The agent automatically restarts. It may take 1-2 minutes for the dcs-agent to complete restarting.

    Note:

    Wait until the agent completes restarting before performing the next step.
  5. Update the server components.
      odacli update-server -version version
    
    # odacli update-server -v 12.2.1.1.0
    {
      "jobId" : "6f27a29a-959f-44e1-b984-7473e3c918ad",
      "status" : "Created",
      "message" : "Success of Server Update may trigger reboot of node after 4-5 minutes. Please wait till node restart",
      "reports" : [ ],
      "createTimestamp" : "November 26, 2017 14:13:45 PM CST",
      "resourceList" : [ ],
      "description" : "Server Patching",
      "updatedTime" : "November 26, 2017 14:13:45 PM CST"
    } 
    

Copying the Oracle Database Appliance Software

Copy the software bundle to the system and update the image to the latest version before deploying the appliance.

You must copy the Oracle Database Appliance Single Instance software bundle to the Oracle Database Appliance.

Copy the file using a Secure Copy (scp) or Secure File Transfer Protocol (sftp) protocol. To use scp or sftp, you must first set up a static IP address (for example, oda_host) and configure Oracle Database Appliance with that address by using the configure-firstnet command. This command ensures the system is available in your network, enabling you to use the Oracle Appliance Manager Web Console to deploy Oracle Database Appliance.

Alternatively, you can use a USB storage device. To use a USB drive to transfer the files, you must format it first as FAT32, ext3, or ext4. NTFS file formats are not supported.

Before running the update-repository command, ensure that your appliance has the latest version of the dcs-agent and that the initial network connection is configured.

  1. Copy the Oracle Database Appliance Single Instance software bundle (SIB) from the external client to Oracle Database Appliance. Use the scp or sftp protocol to copy the bundle.

    oda-sm-release number -date-GI-12.1.0.2.zip to root@oda_host

    oda-sm-release number -date–DB.zip to root@oda_host

    For example, if you use the scp command, then enter a command similar to the following, where the temporary host address is oda_host, the release number is 12.2.1.1.0, and you are copying the bundle to /tmp:

    scp oda-sm-release number -date-GI-12.1.0.2.zip root@oda_host:/tmp

    scp oda-sm-release number -date-DB-12.1.0.2.zip root@oda_host:/tmp

    scp oda-sm-release number -date-DB-11.2.0.4.zip root@oda_host:/tmp

    For example, if you use the sftp command, then enter a command similar to the following, where the temporary host address is oda_host, and you are copying the bundle to /tmp:

    sftp root@oda_host

    Enter the root password.

    put oda-sm-12.2.1.1.0-date-DB-12.1.0.2.zip

  2. Update Oracle Database Appliance with the single instance bundle files that have been copied to system in the previous step. If there is more than one file, you can list all of them separated by a comma. Spaces are not allowed between the filenames.

    For example, enter a command similar to the following to update the image file, where the temporary host address is oda_host, and you are copying the bundle to /tmp:

    # opt/oracle/dcs/bin/odacli update-repository –f /tmp/oda-sm-12.2.1.1.0-160XXXX-GI-12.1.0.2.zip,/tmp/oda-sm-12.2.1.1.0-160XXXX-DB-12.1.0.2.zip,/tmp/oda-sm-12.2.1.1.0-160XXXX-DB-11.2.0.4.zip

Deploying Oracle Database Appliance

Configure the system, network, user groups, database, and Oracle Auto Service Request (Oracle ASR) and deploy the appliance.

You must configure the initial network connection before you deploy, or create, Oracle Database Appliance.

Launch the Web Console to complete the following configuration steps to deploy Oracle Database Appliance:

  1. Configure the system

  2. Configure the client access network

  3. (Optional) Configure an additional network and an Oracle ILOM network

  4. Configure a database

  5. (Optional) Configure Oracle ASR

Use the checklists that you completed earlier as a reference for the configuration settings needed to deploy the appliance.

  1. Open a browser, and enter the following URL to launch the Web Console:
    The Google Chrome browser is preferred.
    https://ODA-host-ip-address:7093/mgmt/index.html
    
  2. Log in as administrator with the user name oda-admin. See Appendix A for the default password and instructions on how to change it.
  3. Click Create Appliance.
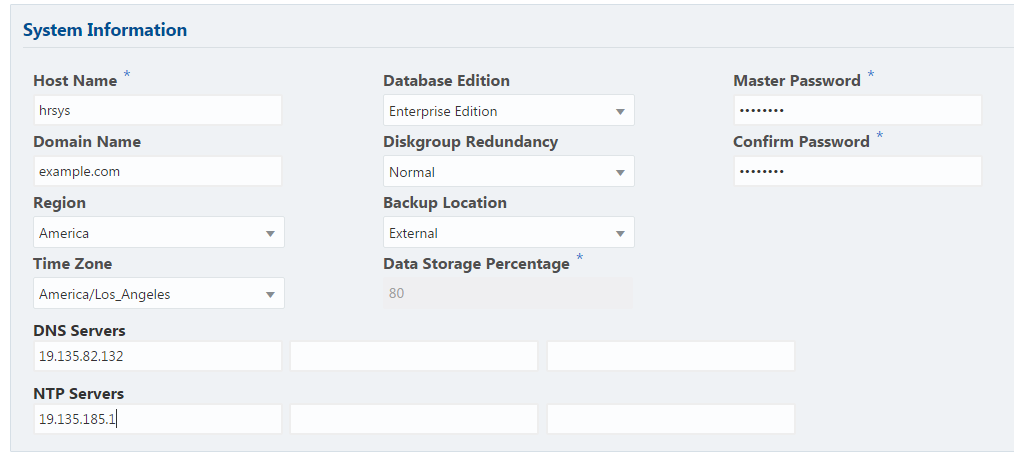
  4. Enter the following information to configure the system:
    1. Host Name: Enter the host name.
      The host name can contain alphanumeric characters and dashes (-), but cannot start with a number or dash (-) or end with dash (-). Do not exceed 30 characters.
    2. (Optional) Domain Name: Enter the domain name.
    3. (Optional) Region: Select the region of the world where the Oracle Database Appliance is located.
    4. (Optional) Time Zone: Select the time zone where the Oracle Database Appliance is located.
    5. (Optional) DNS Servers: Enter addresses for one or more DNS servers.
    6. (Optional) NTP Servers: Enter addresses for one or more NTP servers.
    7. Database Edition: Select the Oracle Database edition, either Enterprise Edition or Standard Edition.

      Note:

      You cannot mix editions. The database edition you select on this page determines the database editions that you create in the appliance. To change editions, you must redeploy Oracle Database Appliance.
    8. Diskgroup Redundancy: This field appears when the Web Console detects that the system has 4 NVMe. Select Normal or High.
      If the system has 2 NVMe, redundancy is automatically set to Normal and this field does not appear.
    9. Backup Location: Select one of the following backup locations:
      • External: reserves 80% of the storage for DATA and 20% for RECO.

      • Internal: reserves 40% of the storage for DATA and 60% for RECO.

      • Custom : enables you to define the percentage of storage for DATA, anywhere from 10% to 90%, the remainder is reserved for RECO.

    10. Data Storage Percentage: If you selected Custom in the previous step, enter a whole number between 10 and 90 to define the percentage of storage reserved for DATA.
    11. Master Passwordand Confirm Password: Enter the master password in both fields.
      The master password is the password set for UNIX users, root, SYS, SYSTEM, and PDBADMIN. The password must begin with an alpha character and cannot contain quotation marks. Do not exceed 30 characters.
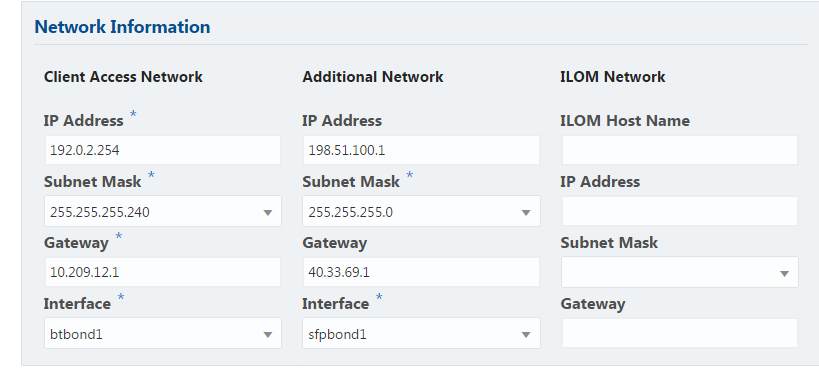
  5. Enter the following information to configure the network:
    This page enables you to configure the primary client access network, an additional network and an ILOM network. You are only required to configure the client access network.
    1. Client Access Network IP Address: Enter the IP address for the primary client access network.
    2. Client Access Network Subnet Mask: Enter the subnet mask address for the primary client access network.
    3. Client Access Network Gateway: Enter the gateway address for the primary client access network.
    4. Client Access Network Interface: Enter the interface for the primary client access network.
    5. (Optional) Additional Network IP Address: Enter an IP address to configure an additional network.
    6. (Optional) Additional Network Subnet Mask: Enter the subnet mask address for the additional network.
    7. (Optional) Additional Network Gateway: Enter the gateway address for the additional network.
    8. (Optional) Additional Network Interface: Enter the interface for the additional network.
    9. (Optional) ILOM Host Name: Enter the name of the Oracle ILOM host.
    10. (Optional) ILOM Network IP Address: Enter the IP address for the ILOM.
    11. (Optional) ILOM Network Subnet Mask: Enter the subnet mask address for the ILOM.
    12. (Optional) ILOM Network Gateway: Enter the gateway address for the ILOM.
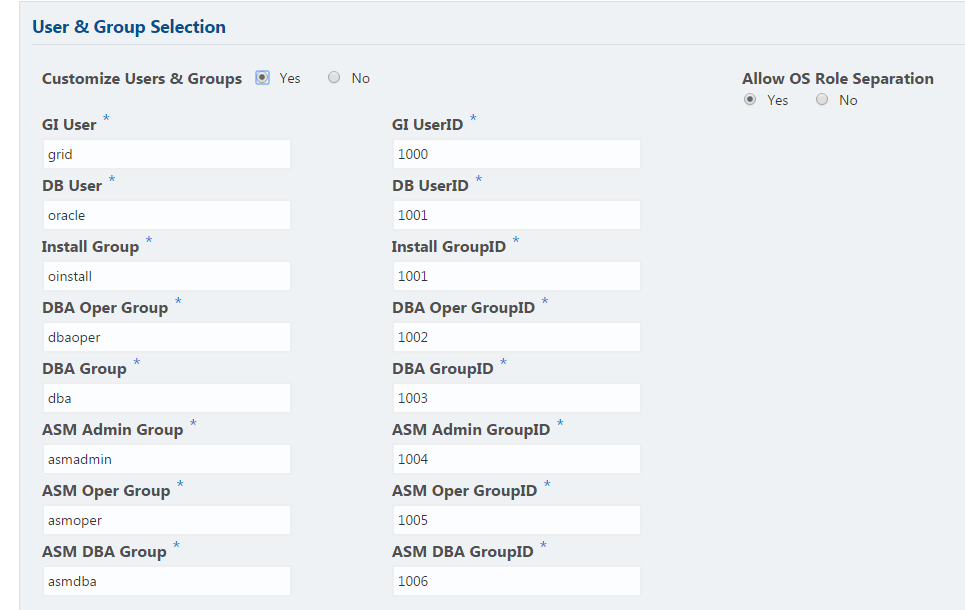
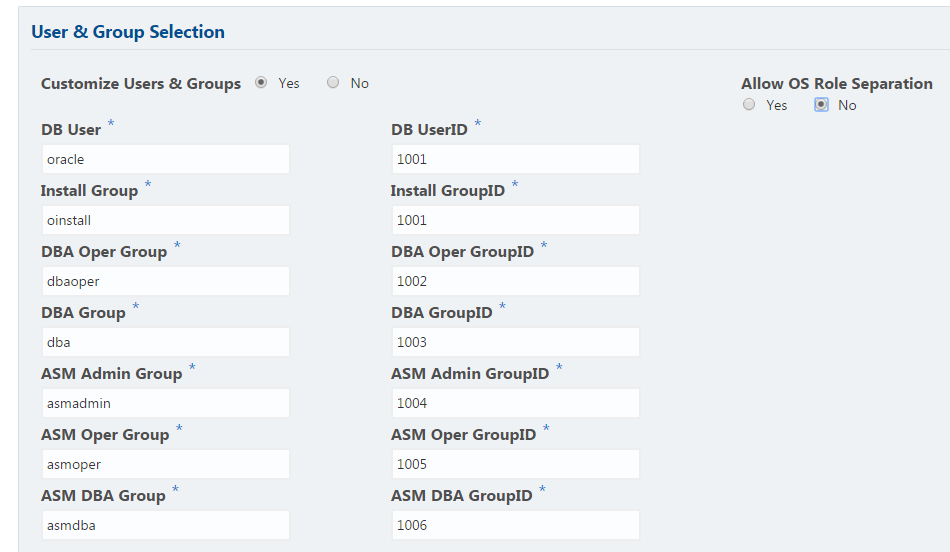
  6. Determine how you want to configure your users and groups and whether or not you want to allow operating system role separation:
  7. Do you want to create an initial database? Select Yes and go to Step 8 or select No and go to Step 9.
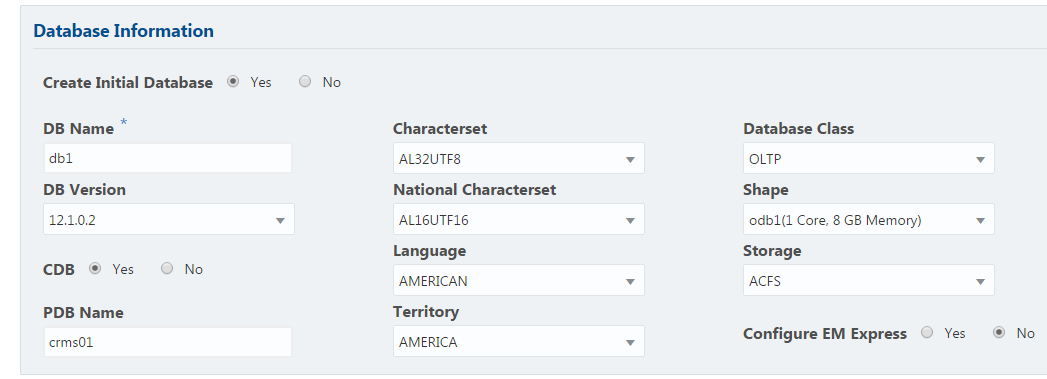
  8. Enter the following information to configure the database:
    1. DB Name: Enter a name for the database.
      The name must contain alphanumeric characters and cannot exceed 8 characters.
    2. (Optional) DB Version: Select a database bundle patch number.
    3. (Optional) CDB: Select Yes or No to specify whether or not you want a Container Database (CDB).
    4. (Optional) PDB Name: Enter a name for the pluggable database (PDB).
      The name must begin with an alphanumeric character. The following characters are valid: alphanumeric characters, and underscore (_).
    5. (Optional) Characterset: Select a characterset.
    6. (Optional) National Characterset: Select a national characterset.
    7. (Optional) Language: Select the database language.
    8. (Optional) Territory: Select a territory or location from the list.
    9. (Optional) Database Class: Select a database class from the list.
      Enterprise Edition supports OLTP, DSS, or IMDB. Standard Edition supports OLTP.
    10. (Optional) Shape: Select a database shape from the list.
    11. (Optional) Storage: Select ACFS or ASM.
      Only Oracle 12.1 databases can use ASM storage. Oracle Database 11.2 is only supported on Oracle ACFS.
    12. (Optional) Configure EM Express: Select Yes or No.
      Select Yes to configure the Oracle Enterprise Manager Database Express (EM Express) console for Oracle Database 12.1.0.2 or the Database Control Console for Oracle Database 11.2.0.4. Selecting Yes enables you to use the console to manage the database.
  9. (Optional) Configure and enable Oracle ASR on the ASR page.

    You can configure and enable Oracle Auto Service Request (Oracle ASR) now or later:

    • To not enable Oracle ASR during deployment, select No and click Submit. After deployment, you can configure an internal Oracle ASR or register with an external Oracle ASR Manager from either the Web Console or command-line interface.
      • Internal Oracle ASR: choose to configure Oracle ASR Manager on Oracle Database Appliance or use Oracle ASR Manager configured on another server in the same network as your appliance.

      • External Oracle ASR: If you already have Oracle ASR Manager configured elsewhere, you can register Oracle Database Appliance with your existing Oracle ASR Manager.

    • To enable Oracle ASR, select Yes and complete the fields:
    1. ASR User Name: Enter the e-mail address associated with the My Oracle Support account under which the server is registered.
    2. Password: Enter the password associated with the My Oracle Support account under which the server is registered.
    3. SNMP Version: Select V2 or V3.
    4. HTTP Proxy used for Upload to ASR: Select Yes or No.
    5. Proxy User Name: If you are using a proxy for upload, enter the proxy user name.
    6. Proxy Port: If you are using a proxy for upload, enter the proxy port.
    7. (Optional) HTTP Proxy Requires Authentication: If you are using a proxy for upload, select Yes if you require authentication. If you do not require authentication, select No.
    8. (Optional) Proxy Password: If you are using a proxy for upload and require authentication, enter the proxy password.
  10. Click Submit. When prompted, click Yes to confirm that you want to start the job to deploy the appliance.
Click the Activity tab to monitor the job progress. Click the job number to view the tasks.

After deployment, the root and database users SYS, SYSTEM, and PDBADMIN are set to the master password. The oracle and grid passwords are set to the administrator password for oda-admin. Change these passwords to comply with your user security protocols.