Configure SNMP on the Libraries
Configure SNMP on the libraries to allow STA to receive SNMP traps. In SNMP terms, STA is a client agent and each library is a server agent.
To configure SNMP on the libraries, complete the following in the order listed:
Retrieve the Library IP Address
Retrieve and record the library IP address so that you can configure the STA connection with the library.
For SL3000 and SL8500 libraries, choose the method that corresponds to the configuration, either: Redundant Electronics, Dual TCP/IP, or neither.
-
In the browser interface, select Configuration in the navigation tree.
-
Within the Network section, the library IP address is displayed in the Network Port 1 Settings (the Network Port 2 is reserved for service use).
Note:
The address must beStatic. If it is not, click Configure , and then select Configure Network Settings to specify a static IP address.
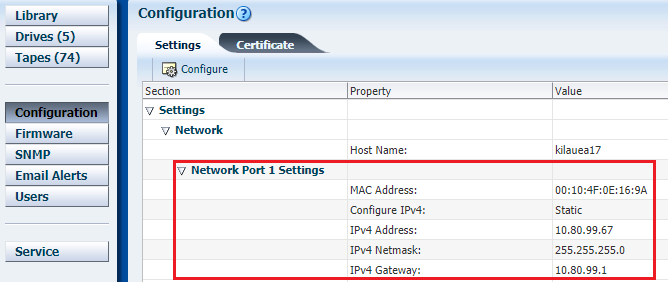
-
Using SLC, from the Tools menu, select System Detail.
-
In the navigation tree, select Library.
-
Select the Properties tab, then select the General tab.
The library IP address is listed under the Library Interface TCP/IP section.
-
Record the library IP address as the primary library IP address. (This address corresponds to the 1B port.)
SL3000 or SL8500 - Neither Dual TCP/IP nor RE
-
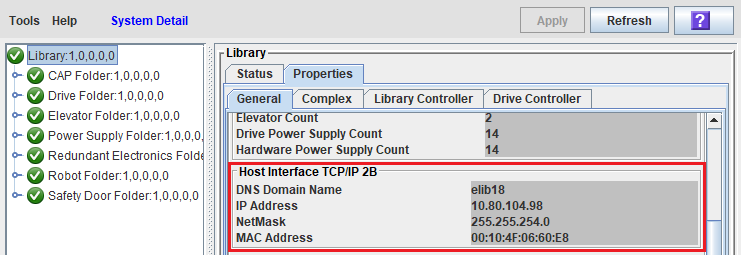
Using SLC, from the Tools menu, select System Detail.
-
In the navigation tree, select Library.
-
Select the Properties tab and General sub-tab.
-
The IP address information is displayed in the Host Interface TCP/IP 2B section. There is no IP address information in the 2A section.
Record the IP address as the primary library IP address.
SL3000 or SL8500 - Redundant Electronics Support
-
Using SLC, from the Tools menu, select System Detail.
-
In the navigation tree, select the Redundant Electronics folder.
If this folder is not listed, the Redundant Electronics is not available on the library.
-
In the Device State field, verify that one library controller shows
Duplex: software ready, switch possible(this is the active card) and the other showsStandby: software ready(this is the standby card).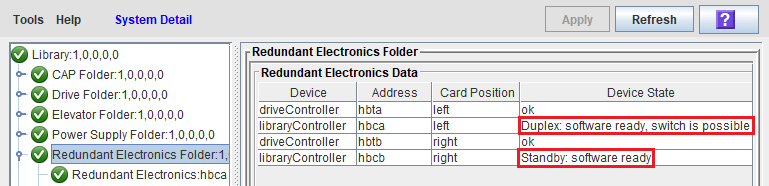
These statuses indicate that the controller cards are functioning normally. If you do not see these statuses, contact Oracle Support.
-
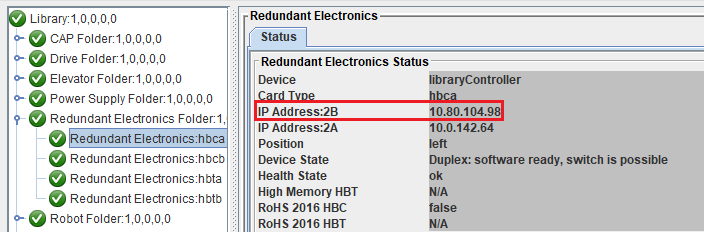
Expand the Redundant Electronics folder, and then select the active controller card. Record the IP address of the 2B port.
-
Repeat for the alternate (standby) controller card.
SL3000 or SL8500 - Dual TCP/IP Support
-
Using SLC, from the Tools menu, select System Detail.
-
In the navigation tree, select Library.
-
Select the Properties tab, then select the General tab.
The IP address information is displayed in the Host Interface TCP/IP 2B and Host Interface TCP/IP 2A sections.
Note:
If the library also includes the Redundant Electronics feature, the IP addresses displayed are for the active controller card only. -
Record the primary IP address (2B section) and secondary IP address (2A section).
Enable SNMP on the Library
Enable SNMP on the library public port so that the library can send data to STA.
Enable SNMP on port 2B using the CLI. If the library includes the Dual TCP/IP feature, this command also enables SNMP on port 2A.
> snmp enable port2b
Enable SNMP on port 1B using the CLI.
> snmp enable port1B
-
In the browser interface, select SNMP in the navigation tree.
-
If SNMP shows as disabled, select Enable SNMP.

Create an SNMP v3 User
The SNMP v3 user sends SNMP traps and MIB (management information base) data to the STA server.
Note the username and passwords you specify. You will use this information when you define an SNMP v3 trap recipient.
-
The authorization method must be
SHA(Secure Hash Algorithm), and the privacy method must beDES(Data Encryption Standard). -
All libraries monitored by a single STA instance must have the same SNMP v3 username. Oracle highly recommends defining a unique SNMP v3 user for this purpose and then defining this same user on all monitored libraries.
-
Do no not use the values "public" or "private" for the SNMP v3 username, as these values are well known and present a security risk. Use values that are not as easily discovered. The username can only contain alphanumeric characters (a–z, A–Z, 0–9). Special characters are not allowed.
-
Authorization and privacy passwords must be at least eight characters in length, and cannot contain commas, semicolons, or equal signs.
-
Using CLI, create an SNMP v3 user:
> snmp addUser version v3 name name auth SHA authPass auth_password priv DES privPass priv_password
Where:
-
nameis the SNMP v3 username -
auth_passwordandpriv_passwordare the authorization password and privacy password.
For SL3000 and SL8500 libraries, enclose variables in single quotes. For example:
SL3000> snmp addUser version v3 name 'STAsnmp' auth SHA authPass 'authpwd1' priv DES privPass 'privpwd1'For SL500, do not use quotes. For example:
SL500> snmp addUser version v3 name STAsnmp auth SHA authPass authpwd1 priv DES privPass privpwd1 -
-
List the SNMP users to verify that the SNMP v3 user has been added correctly.
> snmp listUsers
-
In the browser interface, select SNMP in the navigation tree.
-
In the SNMP Users section, select Add SNMP User
 .
. -
For Version, select
v3, and then complete the information as follows:-
User Name: The name of the SNMP v3 user. -
Authentication Protocol: SelectSHA. -
Authentication Passphrase: Specify an authorization password. -
Privacy Protocol: SelectDES. -
Privacy Passphrase: Specify a privacy password.
-
Retrieve the Library SNMP Engine ID (SL500, SL3000, SL8500)
Display the library's SNMP engine ID to use when you define STA as the SNMP v3 trap recipient. In the case of SL8500 library complexes, each library in the complex has its own SNMP agent, and therefore its own unique engine ID.
-
Using the CLI, use one of the following commands:
-
For SL3000 and SL8500 libraries:
> snmp engineId print -
For SL500 libraries:
> snmp engineId
-
-
Save the engine ID (for example, 0x81031f88804b7e542f49701753) to a text file for use in the remaining SNMP configuration tasks.
Create the STA SNMP v3 Trap Recipient
Define the STA server as an authorized recipient of SNMP v3 traps. Define the traps that the library will send.
Note the following configuration requirements:
-
To avoid duplicate records, do not define the STA server as a trap recipient in multiple instances. For example, do not create both an SNMP v3 and SNMP v2c trap recipient definition for the STA server.
-
Trap levels 13 (Test Trap) and 14 (Health Trap) were added in STA 2.0.x. Trap level 4 may not be supported by older library firmware versions; however, it can always be specified when creating a trap recipient.
-
Create an SNMP v3 trap recipient. Separate the trap levels with commas.
> snmp addTrapRecipient trapLevel 1,2,3,4,11,13,14,21,25,27,41,45,61,63,65,81,85,100 host STA_server_IP version v3 name recipient_name auth SHA authPass auth_password priv DES privPass priv_password engineId library_engineID
Where:
-
STA_server_IPis the IP address of the STA server. -
recipient_nameis the SNMP username you created in for the SNMPv3 user. -
auth_passwordandpriv_passwordare the authorization and privacy passwords you created in for the SNMPv3 user. -
library_engineIDis the library engine ID you displayed in Retrieve the Library SNMP Engine ID (SL500, SL3000, SL8500), including the 0x prefix.
For SL3000 and SL8500 libraries, enclose
recipient_name,auth_password, andpriv_passwordin single quotes. For example:SL3000> snmp addTrapRecipient trapLevel 1,2,3,4,11,13,14,21,25,27,41,45,61,63,65,81,85,100 host 192.0.2.20 version v3 name 'STAsnmp' auth SHA authPass 'authpwd1' priv DES privPass 'privpwd1' engineId 0x00abcdef000000000000000000For SL500, do not use quotes. For example:
SL500> snmp addTrapRecipient trapLevel 1,2,3,4,11,13,14,21,25,27,41,45,61,63,65,81,85,100 host 192.0.2.20 version v3 name STAsnmp auth SHA authPass authpwd1 priv DES privPass privpwd1 engineId 0x00abcdef000000000000000000 -
-
List the trap recipients, and verify the recipient has been added correctly.
> snmp listTrapRecipients
-
In the browser interface, select SNMP in the navigation tree.
-
In the SNMP Trap Recipients section, select Add Trap Recipient
. -
Complete the fields as follows:
-
Host Address—IP address of the STA server. -
Trap Level—Comma-separated list of trap levels the library should send to STA: 1,2,3,4,11,13,14,21,25,27,41,45,61,63,65,81,85,100. -
Version—Selectv3. -
Trap User Name—SNMP username you created in for the SNMPv3 user. -
Authentication Protocol—SelectSHA. -
Authentication Passphrase—Authorization password you created for the SNMPv3 user. -
Privacy Protocol—SelectDES. -
Privacy Passphrase—Privacy password you created for the SNMPv3 user. -
Engine ID—This field will be supplied automatically. Do not modify the value.
-