This chapter provides information about the tasks that must be performed before installing FCC Studio.
Topics:
· Hardware and Software Requirements
· Prerequisite Environmental Settings
· Configure the Elastic Search Component
· Configure the Interpreter Settings
· Assign Grants for the Database Schemas
· Setup Password Stores with Oracle Wallet
· Create the Credential Keystore
The Linux machine must satisfy the following conditions:
· BD (Behavior Detection) or the ECM (Enterprise Case Management) application pack must be installed.
· Kubernetes (k8s) cluster must be installed with the following:
§ Registry to store docker images.
§ Minimum of 8 GB memory (inclusive of all nodes) available for the installation. The actual memory requirement depends on the workload/container size configuration.
· Docker and kubectl must be installed.
· kubectl is configured (that is, connected to cluster where you want to install FCC Studio).
· Docker has push access to a private registry.
· 12GB free space is available to store the FCC Studio Installer zip file in some directory.
· 45GB free space is available in the docker root directory. You can find the docker root directory using the docker info command.
The following hardware and software are required for this version of FCC Studio. The installation environment or setup must have these requirements for an application to run smoothly and efficiently.
Table 5: Hardware and Software Requirements
Hardware or Software Category |
Component Version |
|---|---|
Browser |
· Chrome 57.x · Firefox 52.x |
Java Version |
Java 8 |
Docker Registry |
· Docker registry must be present to store docker images · Min of 45GBspace is required to save docker images |
Database Server |
· Oracle Database Server 12c Release 2 (12.2.0.1+) Enterprise Edition · Oracle R Enterprise 1.5.1 with Oracle R Distribution 3.3.0 |
Elastic Search |
elasticsearch-7.6.2 |
Elastic Search Hadoop Jars |
ES - Hadoop v7.6.2 You must download the ZIP file from https://www.elastic.co/downloads/past-releases/elasticsearch-apache-hadoop-7-6-2 |
Kubernetes Cluster |
|
Processing Server |
· RHEL 7.4+ · SFTP · Oracle JRE Standard Edition 1.8.x(with JCE) · Kubernetes(K8s) cluster |
PGX (Graph) Server |
· RHEL 7.4+ · Kubernetes(K8s) cluster · Minimum gcc library version 4.8.2 |
Big Data |
|
Cloudera Distribution Hadoop 6.x |
· CDH Version 6.3.1 · Apache Hadoop Version 3.0.0 · Apache Hive Version 2.1.1 · Apache Spark Version 2.4.0 · Apache Sqoop Version 1.4.7 · The .profile file must be present with the SPARK_HOME and PYTHON_HOME parameters already set. |
Cloudera Hive Connectors |
Hive JDBC Connectors V 2.5.15 |
Hadoop Security Protocol |
· Kerberos R release 1.6.1 · Sentry-1.4.0 |
NOTE |
If Cloudera is not installed, the
following versions are required:
· Hadoop Version 3.0.0 · Hive Version 2.1.1 · Spark Version 2.4.0 · Sqoop Version 1.4.7 |
The following prerequisite environmental settings must be set before beginning the installation of FCC Studio. These settings are the configuration that a system must have for an application to run smoothly and efficiently.
Table 6: Prerequisite Environmental Settings
Category |
Expected Value |
|---|---|
Java Settings |
· PATH in the .profile file must be set to include kubectl and the Java Runtime Environment (Java 8) absolute path. NOTE: · Ensure the absolute path to JRE/bin is set at the beginning of the PATH variable. For example: PATH=/usr/java/jre1.8/bin:$PATH · Ensure no SYMBOLIC links to Java installation are set in the PATH variable. |
Oracle Database Settings |
NOTE: This setting is required only if the Wallet has to be created on the same server as that of the FCC Studio server. Oracle Processing Server · ORACLE_HOME must be set in the .profile file pointing to the appropriate Oracle DB Client installation. · PATH in the.profile file must be set to include the appropriate $ORACLE_HOME/bin directory. |
Download Directory |
Indicates the directory where the product installer zip file is downloaded or copied. The user permission must be set to 755 for this directory. |
Installation Directory |
Indicates the directory where the product installer zip file is extracted and the installation files are placed. The user permission must be set to 755 for this directory. NOTE: The Installation and the Download Directory can be the same if the product installer zip file is not copied separately to another directory. |
OS Locale |
Linux: en_US.utf8 Execute the following command to check the locale: locale -a | grep -i 'en_US.utf' The locale is displayed. |
Download the following configuration files from the Cloudera installation setup:
NOTE |
These files must be kept ready and provided in the following file structure that is used during FCC Studio installation. |
Table 7: Required File Structure
File Category |
File Names |
|---|---|
Hadoop Cluster |
· core-site.xml · hadoop-env.sh · hdfs-site.xml · log4j.properties · ssl-client.xml · topology.map · topology.py |
Kerberos Files |
· krb5.conf · keytab file name as mentioned in the config.sh file. NOTE: Ensure to rename your .keytab file to fccstudio.keytab. |
Additional Jars |
· hive-exec-*.jar. For example, hive-exec-1.1.0-cdh5.13.0.jar. · HiveJDBC4.jar. · hive-metastore-*.jar. For example, hive-metastore-1.1.0-cdh5.13.0. · hive-service-*.jar. For example, hive-service-1.1.0-cdh5.13.0.jar. NOTE: · The version of the jars is client or user-specific. These jars can be obtained from the existing jars of the Cloudera installation. · The HiveJDBC4.jar file is not available in the Cloudera installation setup. You must download the same from the Cloudera website. |
ES-Hadoop Jars |
elasticsearch-spark-20_2.11-7.6.2.jar To download the elasticsearch-spark-20_2.11-7.6.2.jar file, follow these steps: 1. Download the ZIP file from https://www.elastic.co/downloads/past-releases/elasticsearch-apache-hadoop-7-6-2. 2. Extract the downloaded file. 3. Navigate to the dist directory and download the elasticsearch-spark-20_2.11-7.6.2.jar file. |
The Validation Checklist section provide you the information about the parameters that you can validate to avoid installation issues. This section explains the validation and actions that can be taken for some of the common parameters that are used in the studio-env.yml file for the installation. The parameters that can be validated are as follows:
Table 8: Required File Structure
Parameters |
Validation |
|---|---|
External Service (OFSAA_SERVICE URL) |
The OFSAA_Service URL can be validated by clicking the URL for verification. |
DB Details for Studio Schema |
You can login to SQL developer and verify the DB Details for Studio Schema. |
BD Config Schema |
You can login to SQL developer and verify the BD Config Schema. |
Studio BE Wallet Details |
You can verify the Wallet details by reviewing the steps in Verify the Connectivity of the Wallet. |
Atomic Wallet Details |
You can verify the Wallet details by reviewing the steps in Verify the Connectivity of the Wallet. |
SQL Scripts |
You can login to FCC Studio using SQL developer and validate the Studio_DBLINK_BD, if link type is DBLINK, if Schema is not DBLINK, there is no validation required. |
Cloudera |
You can verify the Cloudera details and validate it by reviewing the steps in Create the Credential Keystore. |
Cloudera (Keytab) |
Run the command kinit -V <KERBEROS_PRINCIPAL> -k -t <KEYTAB_FILEPATH> to verify the keytab. |
To configure the Elastic Search component, follow these steps:
NOTE |
· Ensure that a minimum of 4GB free RAM space is available for elastic search. If RAM is low, the shards of the elastic search fails and correct result is not fetched. · You must manually clean the cache if facing performance issue. |
1. Navigate to the elasticsearch-7.6.2/config directory.
2. Configure the elasticsearch.yml with the following variables:
Table 9: elasticsearch.yml File
Interaction Variable Name |
Significance |
|---|---|
cluster.name |
Indicates the name of the cluster. |
node.name |
Indicates the name given for the node. |
node.master |
Indicates whether the node is a master. |
node.data |
Indicates the node data. |
path.data |
Indicates the directory where you want to store the data. |
path.logs |
Indicates the directory where you want to store the logs. |
network.host |
Indicates the hostname of the machine where you want to install the elastic search service. |
http.port |
Indicates the port number where the elastic search service is installed. |
discovery.seed_hosts |
(Optional) Indicates the hostnames of the nodes of the cluster. |
cluster.initial_master_nodes |
(Optional) Indicates the number given to the nodes of the cluster. |
indices.breaker.total.use_real_memory |
· Indicates the static setting to determine whether the parent breaker must consider the real memory usage into account or only consider the amount that is reserved by the child circuit breakers. · This setting is used to prevent the OutOfMemory error. |
3. Configure the jvm.options file as follows:
Table 10: elasticsearch.yml File
Interaction Variable Name |
Significance |
|---|---|
-Xms1g |
· Set the value for these parameters. · The maximum value set can be up to 50% of the RAM size of the machine. · Recommended value: Less than 32GB. |
-Xmx1g |
4. Enter the URL in the following format into the browser:
http://<network.host>:<http.port>
The following output is displayed to indicate successful installation of the Elastic Search service.
{
"name" : "node-1",
"cluster_name" : "my-application",
"cluster_uuid" : "_D-2qEGGSgKQPd3i-UtgWQ",
"version" : {
"number" : "7.3.2",
"build_flavor" : "oss",
"build_type" : "tar",
"build_hash" : "1c1faf1",
"build_date" : "2019-09-06T14:40:30.409026Z",
"build_snapshot" : false,
"lucene_version" : "8.1.0",
"minimum_wire_compatibility_version" : "6.8.0",
"minimum_index_compatibility_version" : "6.0.0-beta1"
},
"tagline" : "You Know, for Search"
}
You must configure the interpreter settings for the following interpreters before installing FCC Studio.
NOTE |
Ensure to configure the settings only for the interpreters that you require. |
Table 11: Pre-installation Interpreter Settings
Interpreter |
Prerequisite Settings |
|---|---|
fcc-jdbc |
No additional configuration is required. NOTE: The FCC Studio application installed without OFSAA can use the Vanilla jdbc interpreter instead of the fcc-jdbc interpreter to connect to the Studio schema. |
fcc-ore |
For the required configuration, see Configure the fcc-ore Interpreter. |
fcc-pyspark |
· Install the py4j package in the Spark cluster. · Install the Livy server (0.5.0) on the master node of the Big Data cluster. |
fcc-python |
For the required configuration, see Configure the fcc-python Interpreter. |
fcc-spark-scala |
Install the Livy server (0.5.0) on the master node of the Big Data cluster. |
fcc-spark-sql |
Install the Livy server (0.5.0) on the master node of the Big Data cluster. |
jdbc |
No additional configuration is required. |
md |
No additional configuration is required. |
pgql |
No additional configuration is required. |
pgx-algorithm |
No additional configuration is required. |
pgx-java |
No additional configuration is required. |
pyspark |
For the required configuration, see Configure the PySpark Interpreter . |
spark |
For the required configuration, see Configure the Spark Interpreter. |
Topics:
· Configure the fcc-jdbc Interpreter
· Configure the fcc-ore Interpreter
· Configure the fcc-python Interpreter
· Configure the Spark Interpreter
· Configure the PySpark Interpreter
To create context for the fcc-jdbc interpreter, follow these steps:
1. Log in to Oracle Database as a SYSDBA user.
2. Grant Execute permission to the user using the following command:
grant execute dbms_rls to <Studio_DB_Username>;
The Execute permission is granted to user.
3. Grant Create permission to the context using the following command:
grant create any context to <Studio_DB_Username>;
The Create permission is granted to context.
To configure the fcc-ore interpreter you must install the Oracle R Distribution.
To install the Oracle R Distribution (ORD), enable the addons and optional_latest channels in yum as shown in the following code:
```bash
(root)# yum-config-manager --enable ol7_addons
(root)# yum-config-manager --enable ol7_optional_latest
```
After completing the previous step, pull ORD from the yum repository using the following command:
```bash
(root)# yum install R.x86_64 R-core-extra
```
To install ORD, see Install Oracle R Distribution on Linux.
The fcc-python interpreter image includes the following:
· The support for python2 has been deprecated.
· By default, the Python interpreter points to the Python 3.6 version.
· The following Python libraries are part of the fcc-python interpreter images for Python 3.6 version:
§ pandas 0.25.3
§ numpy 1.17.4
§ scipy 1.3.2
§ scikit-learn 0.21.3
§ matplot-lib 3.1.1
§ seaborn 0.9.0
§ cx-oracle 7.2.2
§ sqlalchemy 1.3.11
To modify the Python packages in the Python 3.6 or to add a different version of Python to the Python interpreter, you must modify the Python image. As an example, follow the steps provided in the Modifying the Python Images for the Python Interpreter section in the OFS Crime and Compliance Studio Administration Guide.
Following are the prerequisites to install Python libraries:
· FCC Studio supports any-version of Python with the following required conditions:
§ The preferred Python version is installed on the Processing Server (Studio Notebook Server) and is accessible to the Linux user of FCC Studio.
§ The Python Library (py4j) package is present for the preferred Python version.
· The prerequisites to install the Python 3.6 libraries that are packaged with the FCC Studio Installer are as follows:
§ The Python3.6 version is installed on the Processing Server (Studio Notebook Server) and is accessible to the Linux user of FCC Studio.
§ The Python Library (py4j) package is installed and is accessible to the Linux user of FCC Studio.
FCC Studio uses spark 2.4.0. Before you begin the configurations, check the prerequisites depending on your operation mode.
To operate the Spark interpreter in local mode or yarn mode, perform the following:
To operate the Spark interpreter in local mode or Yarn mode, the spark.master property must be set accordingly.
You can update the Spark Master by changing the default value of the spark.master property in the Interpreter Settings of the Spark interpreter (spark.json) or the Interpreters page of the FCC Studio application UI after startup.
· The default value of spark.master property is local[*], which means that the interpreter will run in local mode.
· For a Yarn cluster, you must change the default value of spark.master property to yarn-client.
NOTE |
The Hadoop client-configuration files are required to connect to a Yarn cluster. |
No additional configuration is required to operate the Spark interpreter in local mode.
To operate the Spark interpreter in yarn mode, you must provide custom Spark libraries. To provide your own Spark libraries and (or) Hadoop client-configuration files for the Spark interpreter to connect to a Spark Standalone or Yarn cluster, follow these steps:
a. Download the Spark libraries from the Spark's Official Release Archive.
b. Prepare Spark libraries by following these steps:
i. Place your libraries in the <Studio_Installation_Path>/docker/user/spark-interpreter-libraries/ directory.
NOTE |
Ensure that the directory name of the Spark library is prefixed with the term ’spark’ |
ii. To use separate Hadoop libraries, download them as well and place the Hadoop libraries directory in the same directory.
iii. Be cautious when linking the two libraries, since the path where they are located is in the K8s pod, and the location is as follows:
/var/olds-spark-interpreter/interpreter/spark/libs/
c. Change the image of the Spark interpreter Init Container in the <Studio_Installation_Path>/deployments/spark.yml file to {{imageRepository}}/fcc-studio/3rdparty:init.
d. (Optional) Place your Hadoop Client Configuration files in the <Studio_Installation_Path>/configmaps/spark-interpreter-conf/ directory.
The cluster's Hadoop client-side configuration files that include XML files such as yarn-site.xml are required and must be supplied with the Spark libraries. These files are available in the Hadoop configuration directory (HADOOP_CONF_DIR) of the cluster or can be downloaded from the cluster manager's user interface if you are using a Cloudera cluster.
The Spark interpreter configuration can be divided into the following categories:
· Configuration related to deployment
These properties can be set either in the Spark libraries, for example, the spark-defaults.conf file, or through the system environment variable, SPARK_CONF, for example, SPARK_CONF="--conf spark.driver.memory=2g".
NOTE |
These properties cannot be changed when the Spark interpreter is running. |
· Configuration related to Spark runtime control
These properties can be set from the Interpreters page of the FCC Studio application UI. This includes properties such as spark.executor.memory.
NOTE |
The properties related to the driver cannot be set during runtime and are considered deployment configuration. The properties related to the executors can be set during runtime. Hence, the latter option of runtime control configuration is preferred. |
A list of possible properties are available in the Spark Official Documentation. All the properties prefixed with the term "zeppelin", that are listed in the Zeppelin Spark Configuration Document can also be set from the Interpreters page of the FCC Studio application user interface.
FCC Studio uses PySpark 2.4.0. Before you begin the configurations, check the prerequisites depending on your operation mode.
· Use the Python Virtual Environments with PySpark
The PySpark interpreter has the same prerequisites as that as the Spark Interpreter. For more information, see Configure the Spark Interpreter. Also, all Spark components must be configured to use the same Python version.
The PySpark interpreter can be configured through the Spark interpreter with the only exception being the Python version used. By default, the Python version is set to 3, that can be changed either in the interpreter JSON files before the startup or from the Interpreters page of the FCC Studio application UI during runtime by changing the following properties:
· In the Spark Interpreter Settings page of the FCC Studio application UI (or spark.json file), change the value of the spark.pyspark.python property to the path of the Python executable that is to be used by the Spark executors.
· In the PySpark Interpreter Settings page of the FCC Studio application UI (or pyspark.json file), change the value of the zeppelin.pyspark.python property to the path of the Python executable that is to be used by the Spark driver.
To ensure that the two Python versions match, in case your components run on different machines, you must use the Python virtual environments with PySpark.
To use Python Virtual Environments with PySpark, follow these steps:
1. Create a Virtual Environment with Conda
2. Include Virtual Environment in the Init Container
3. Update the Interpreter Properties
NOTE |
You can also use virtualenv to create your virtual environment instead of conda. |
To create a virtual environment with Conda, follow these steps:
1. Ensure that you have conda and conda-Pack installed.
2. Create your virtual environment using the following command:
conda create -y -n <environment-name> python=<python-version> <additional-packages>
NOTE |
The <environment-name> can be chosen freely and subsequently has to be substituted in further commands. |
3. Activate your virtual environment using the following command:
conda activate <environment-name>
4. Execute the following to obtain the path to your virtual environment:
which python
The obtained result is referred to as <environment-abs-path>.
5. Compress your virtual environment using the following command:
conda pack -n <environment-name> -o <environment-abs-path>/<environment-name>.tar.gz
To include the virtual environment in the Init container, you must place the Virtual Environment in the same path as the Spark libraries. To provide your own Spark libraries and (or) Hadoop client-configuration files for the Spark interpreter to connect to a Spark Standalone or Yarn cluster, follow these steps:
a. Download the Spark libraries from the Spark's Official Release Archive.
b. Prepare Spark libraries by following these steps:
iv. Place your libraries in the <Studio_Installation_Path>/docker/user/spark-interpreter-libraries/ directory.
NOTE |
Ensure that the directory name of the Spark library is prefixed with the term ’spark’ |
v. To use separate Hadoop libraries, download them as well and place the Hadoop libraries directory in the same directory.
vi. Be cautious when linking the two libraries, since the path where they are located is in the K8s pod, and the location is as follows:
/var/olds-spark-interpreter/interpreter/spark/libs/
c. Change the image of the Spark interpreter Init Container in the <Studio_Installation_Path>/deployments/spark.yml file to {{imageRepository}}/fcc-studio/3rdparty:init.
d. (Optional) Place your Hadoop Client Configuration files in the <Studio_Installation_Path>/configmaps/spark-interpreter-conf/ directory.
The cluster's Hadoop client-side configuration files that include XML files such as yarn-site.xml are required and must be supplied with the Spark libraries. These files are available in the Hadoop configuration directory (HADOOP_CONF_DIR) of the cluster or can be downloaded from the cluster manager's user interface if you are using a Cloudera cluster.
The interpreter properties can either be configured in the interpreter JSON files or from the Interpreters page of the FCC Studio application UI after starting the FCC Studio application.
· In the Spark Interpreter Settings page of the FCC Studio application UI (or spark.json), change the following:
§ Change the value of the spark.yarn.dist.archives property to <environment-abs-path>/<environment-name>.tar.gz#<environment-name>
§ Change the value of the spark.pyspark.python property to ./<environment-name>/bin/python
· In the PySpark Interpreter Settings page of the FCC Studio application UI (or pyspark.json), change the value of the zeppelin.pyspark.python parameter to <environment-abs-path>/bin/python.
To create studio schema, create a new Oracle Database schema user using the following script:
CREATE USER <Studio Schema User Name> IDENTIFIED BY <Password>;
A new Oracle Database schema (Studio schema) is created.
Grant the following permissions to the newly created Oracle Database Schema:
· GRANT create session TO <Studio Schema User>;
· GRANT create table TO <Studio Schema User>;
· GRANT create view TO <Studio Schema User>;
· GRANT create any trigger TO <Studio Schema User>;
· GRANT create any procedure TO <Studio Schema User>;
· GRANT create sequence TO <Studio Schema User>;
· GRANT execute on dbms_rls TO <Studio Schema User>;
· GRANT execute on sys.dbms_session TO <Studio Schema User>;
· ALTER USER <Studio Schema User> QUOTA 100M ON users;
· GRANT create sequence TO <Studio Schema User>;
· GRANT create SYNONYM TO <Studio Schema User>;
· GRANT create any context TO <BD or ECM Schema User>;
· GRANT execute on dbms_rls TO <BD or ECM Schema User>;
· GRANT ALL privileges TO <Studio Schema User>;
As part of an application installation, administrators must set up password stores for database user accounts using Oracle Wallet. These password stores must be installed on the application database side. The installer handles much of this process, the administrators must perform some additional steps.
A password store for the application and application server user accounts must also be installed; however, the installer takes care of this entire process.
Topics:
· Setup the Password Stores for Database User Accounts
· Verify the Connectivity of the Wallet
After the database is installed and the default database user accounts are set up, administrators must set up a password store using the Oracle Wallet. This involves assigning an alias for the user name and associated password for each database user account. The alias is used later during the application installation. This password store must be created on the system where the application server and database client are installed.
This section describes the steps to create a wallet and the aliases for the database user accounts. For more information on configuring authentication and password stores, see Oracle Database Security Guide.
NOTE |
In this section, <wallet_location> is a placeholder text for illustration purposes. Before running the command, ensure that you have already created the <wallet_location> directory where you want to create and store the wallet. |
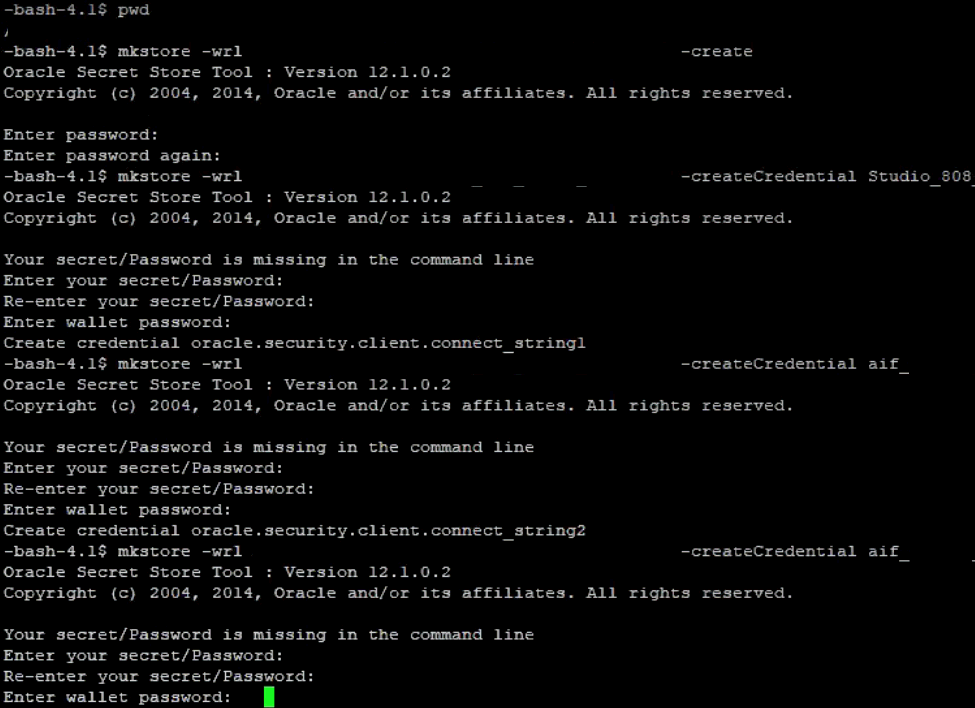
To create a wallet, follow these steps:
1. Login to the server as a Linux user.
2. Create a wallet in the <wallet_location> using the following command:
mkstore -wrl <wallet_location> -create
NOTE |
The mkstore utility is included in the Oracle Database Client installation. |
After you run the command, a prompt appears. Enter a password for the Oracle Wallet in the prompt.
Figure 1: Wallet Creation
3. Create the database connection credentials for the studio schema alias using the following command:
mkstore -wrl <wallet_location> -createCredential <alias-name> <database-user-name>
After you run the command, a prompt appears. Enter the password associated with the database user account in the prompt. You are prompted to re-enter the password. You are prompted for the wallet password used in Step 1.
4. Create the database connection credentials for the atomic schema alias using the following command:
mkstore -wrl <wallet_location> -createCredential <alias-name> <database-user-name>
NOTE |
Creating an atomic schema is not required when you install FCC Studio without OFSAA. |
5. Create the database connection credentials for the config schema alias using the following command:
mkstore -wrl <wallet_location> -createCredential <alias-name> <database-user-name>
NOTE |
Creating a config schema is not required when you install FCC Studio without OFSAA. |
In this manner, create a wallet and associated database connection credentials for all the database user accounts.
The wallet is created in the configmaps/<wallet_location> directory with the auto-login feature enabled. This feature enables the database client to access the wallet contents without using the password. For more information, see Oracle Database Security Guide.
After the wallet is created, go to the <wallet_location> directory and click Refresh  to view the created wallet folder.
Figure 2: Location of the Created Wallet Folder

The wallet folder contains two files: ewallet.p12 and cwallet.sso.
6. Move the wallet folder to the <Studio_Installed_Path>/<alias-name> directory.
7. In the <wallet_location> directory, configure the tnsnames.ora file to include the entry for each alias name to be set up.
Figure 3: Location of the Created Wallet Folder
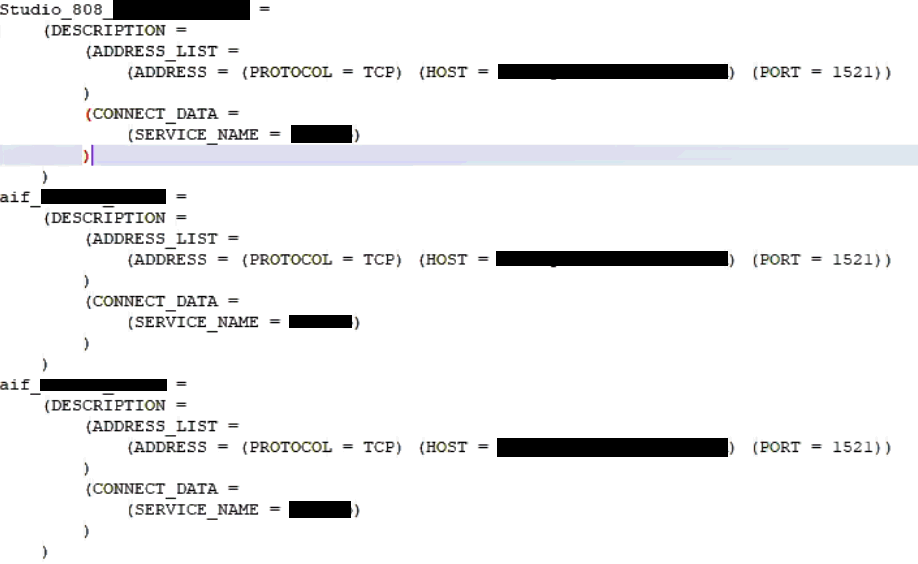
NOTE |
· You can either update the existing tnsnames.ora file with the above details or create a new tnsnames.ora file and add the required entries. · <alias-name> is a user-defined value. |
To verify the connectivity of the wallet, follow these steps:
1. Create a sqlnet.ora file in the wallet directory using the following content:
WALLET_LOCATION = (SOURCE = (METHOD = FILE) (METHOD_DATA = (DIRECTORY = <Wallet_Location>)) )
SQLNET.WALLET_OVERRIDE=TRUE
SSL_CLIENT_AUTHENTICATION=FALSE
2. Test the connectivity using the following command:
NOTE |
The ORACLE_HOME used with the wallet must be the same version or higher than what the wallet was created. |
$ export WALLET_LOCATION=<wallet_location>
$ export TNS_ADMIN=<tnsnames.ora_location>. If you have created a new tnsnames.ora file, provide the location of the new file.
$ sqlplus /@<alias_name>
The output is similar to:
SQL*Plus: Release 11
Connected to:
Oracle Database 12c
To verify if you are connected to the correct user:
SQL> show user
The output is similar to:
USER is "<database-user-name>"
Credential keystore must be created for the Behavior Detection (BD) or Enterprise Case Management (ECM) Atomic schema and FCC Studio Schema. To create a credential keystore, follow these steps:
1. Login as HDFS Superuser.
2. Create a credential keystore on HDFS using the following command:
hadoop credential create mydb.password.alias -provider jceks://hdfs/user/root/oracle.password.jceks
3. Verify the credential keystore file using the following command:
hadoop credential list -provider jceks://hdfs/user/root/oracle.password.jceks
4. Grant Read permission to the keystore file using the following command:
hadoop fs -chmod 744 /user/root/oracle.password.jceks
NOTE |
Ensure the credential keystore file path and the alias are correctly mentioned in the config.sh file. |
To copy the jar files, follow these steps:
1. Create the folder in the GRAPH_FILES_PATH parameter in a node of the big data cluster.
2. Create a folder called jars.
3. Navigate to the <STUDIO_INSTALLED_PATH>/ficdb/etlJars directory and copy all the jars present in this directory into the big data node inside the folder jars.
NOTE |
To use the ES-Hadoop connector, download the commons-httpclient-3.0.1.jar and elasticsearch-spark-20_2.11-7.6.2.jar files and place them in the jars folder. |
To download the software as a .zip folder, download the following mandatory one-off patch 31761460 from My Oracle Support (MOS).