Activity 1: Setting Up the Integration Gateway
In this activity you:
Define the integration gateway URL and load target connectors.
Register nodes on the local gateway.
Define integration gateway keystore values
Defining the Integration Gateway URL and Loading Target Connectors
The integration gateway URL specifies the location of the PeopleSoft listening connector used to “listen” for inbound request/integrations. The target connectors handle outbound requests/integrations.
To define the integration gateway URL and load target connectors use the Gateways page. To access the page select
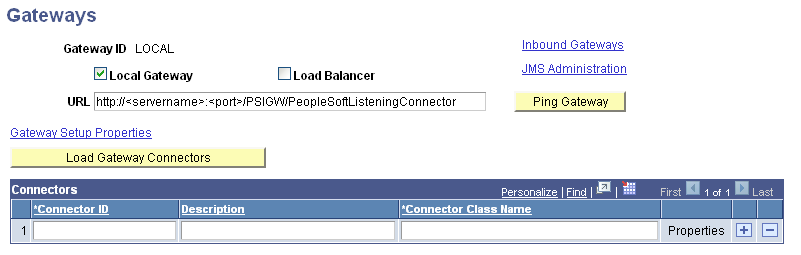
Image: Gateways page
This example illustrates the Gateways page as it appears prior to any configuration.
After you complete the configuration tasks on this page the URL field is populated with the URL where PIA is installed and the target connectors delivered with PeopleSoft Integration Broker are populated in the Connectors grid.
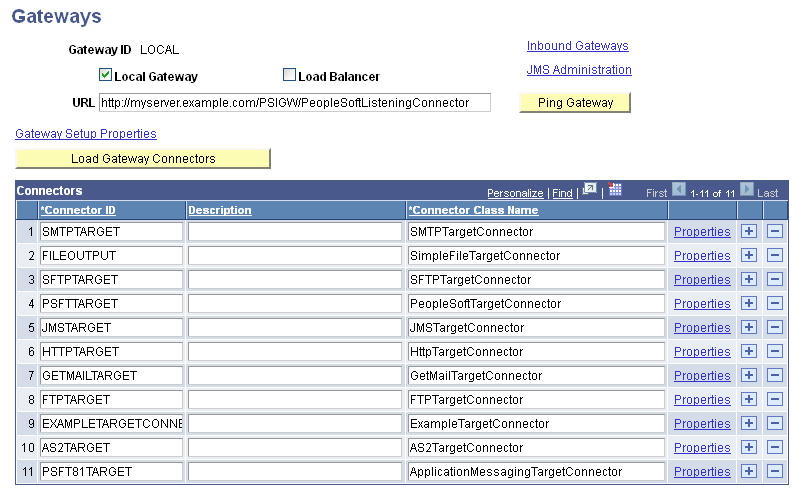
Image: Gateway page
This page illustrates the Gateways page when the gateway URL is defined and the target connectors are loaded.
You can test proper connectivity to the gateway by using the Ping Gateway button. The results of the ping appear in a new window.
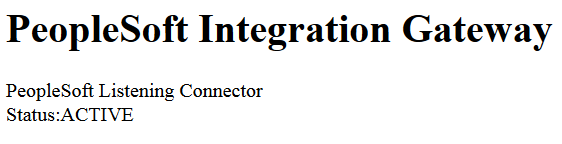
Image: PeopleSoft Integration Gateway
This example illustrates the PeopleSoft Integration Gateway page and the results of pinging the integration gateway after configuring the gateway URL and loading the target connectors. The status shown in the example is ACTIVE and indicates proper communication with the gateway.
To define the gateway URL and load target connectors:
Access the Integration Broker Configuration activity guide ( and expand the Integration Broker Configuration pagelet).
In the left navigation page, click Set Up Gateway.
The Gateways page appears.
In the URL field enter the gateway URL in the following format:
http://<machinename>:<port>/PSIGW/PeopleSoftListeningConnectorThe machine name is the name of the machine where PIA is installed. By default the port number is 80 for HTTP and 443 for HTTPS. If using the default port number, you do not need to specify it in the URL.
An example URL, assuming the default HTTP port is used, is shown in the following example:
http://myserver.example.com/PSIGW/PeopleSoftListeningConnectorClick the Load Gateway Connectors button.
A message appears that indicates the connectors were successfully loaded.
Click the OK button.
Click the Save button.
Click the Ping Gateway button.
A successful ping means that the system can properly communicate with the gateway.
If the ping is not successful, check that the correct URL is entered and that it is entered in the proper format..
Important! When you save the changes on the Gateways page, the system marks the “Setting up gateway” activity complete. However you still need to register nodes on the local gateway and define integration gateway keystore values for the gateway configuration to be complete.
Registering Nodes on the Local Gateway
You must register the local node and any PeopleSoft nodes on the integration gateway. If you are integrating with other PeopleSoft systems, you must register their associated nodes on the local gateway. In turn, your integration partners must add a node definition in their databases that represents your system and register your node on their gateways.
You must also provide an application URL that specifies the application server to process integrations if no valid target node to process the integration can be determined.
The technology that you are using may require that you register other PeopleSoft nodes on the gateway. See the product documentation for the technology that you are using for more information.
Use the PeopleSoft Node Configuration page to register nodes on the gateway. This is a password-protected page that you access from the Gateways page. To access the page use the user ID and password that you defined for the integration gateway during the installation of PIA.
To access PeopleSoft Node Configuration page, from the Gateways page, click the Gateway Setup Properties link. The Gateway Properties page appears and you must enter the gateway user ID and password that were set up during the PIA installation process.
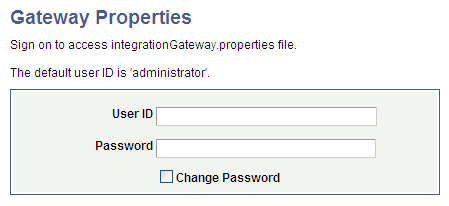
Image: Gateway Properties page
This example illustrates the Gateway Properties page.
After you successfully enter the integration gateway security credentials, the PeopleSoft Node Configuration page appears.
Image: PeopleSoft Node Configuration page
This example illustrates the PeopleSoft Node Configuration page prior to any configuration.
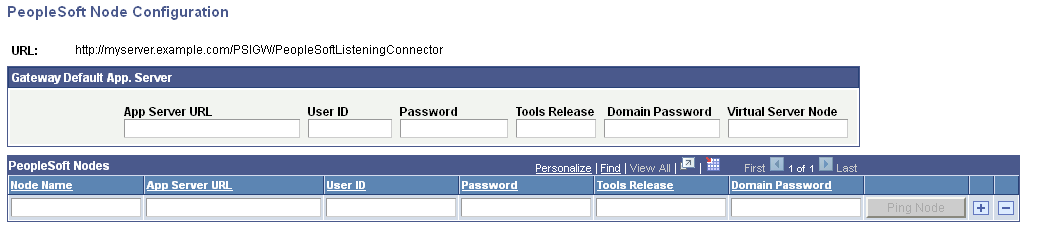
The Gateway Default App. Server section is where you define the application server to process integrations if inbound integrations do not specify a target node. The PeopleSoft Nodes section is where you register PeopleSoft nodes that will handle integrations.
To register nodes for your PeopleSoft integration partners, you must obtain the following information from them:
Node name.
The node should be defined in the database.
Application server URL.
Application server user ID.
Application server password.
PeopleTools release number.
Application server domain password (if applicable).
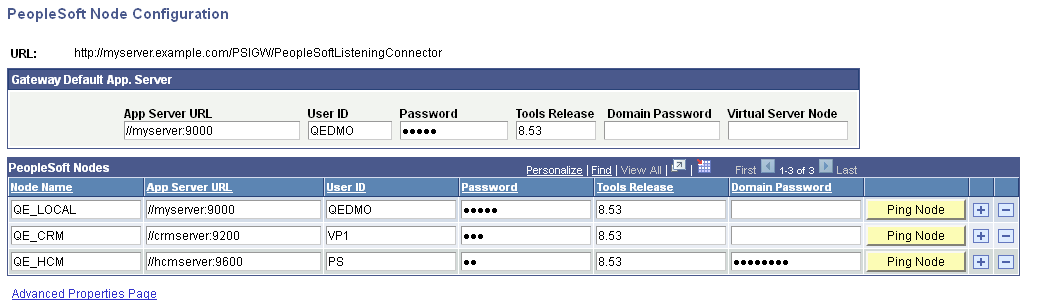
Image: PeopleSoft Node Configuration page
This example illustrates the PeopleSoft Node Configuration page. The Gateway Default App. Server section shows that an application server has been registered to handle inbound integrations that do not specify a target node. The PeopleSoft Nodes grid shows the default local node, QE_LOCAL, as well as several other PeopleSoft nodes registered.
To register nodes on the local gateway:
On the Gateways page, click the Gateway Setup Properties link.
The Gateway Properties page appears.
Enter the user ID and password for the integration gateway.
These credentials were defined when PIA was installed.
In the User ID field, enter the gateway user ID.
In the Password field, enter the gateway password.
Click the OK button.
The PeopleSoft Node Configuration page appears.
In the Gateway Default App Server grid, define the following:
In the App Server URL field enter the machine name and Jolt port of the application server.
The format is //<machinename>:<port>.
An example is //myserver:9000.
Note: The App Server URL is case sensitive in Windows.
In the User ID field, enter the application server user ID.
In the Password field, enter the application server password.
In the Tools Release field, enter the release number of the PeopleTools version installed. For example, 8.55.
In the Domain Password field, enter the domain password if one was defined when the application server was configured.
In the PeopleSoft Nodes grid, define the following fields for the local default node.
Note: Depending on the technology you’re using, you may need to define other PeopleSoft nodes in the grid
In the Node Name field, enter the name of the local default node.
In the App Server URL field enter the machine name and Jolt port of the application server.
The format is //<machinename>:<port>.
An example is //myserver:9000.
In the User ID field, enter the application server user ID.
In the Password field, enter the application server password.
In the Tools Release field, enter the release number of the PeopleTools version installed. For example, 8.55.
In the Domain Password field, enter the domain password if one was defined when the application server was configured.
Click the Ping Node button.
A successful ping means that the integration gateway can communicate with the node.
Define Integration Gateway Keystore Values
You must define an encrypted keystore password in the integration gateway properties file. The path to the keystore is populated during the PIA installation process, but it’s good practice to confirm that the path is accurate during this task.
Important! Integrations will fail if you do not enter an encrypted keystore password for the secureFileKeystorePasswd property.
You define the keystore values in the
The following code snipped shows an example of the keystore values before they are configured:
secureFileKeystorePath=C:/Users/admin/psft/pt/8.55/webserv/peoplesoft/piaconfig/keystore/pskey
#secureFileKeystorePasswd=
To configure these settings confirm that the path to the keystore is correct. Next, encrypt the keystore password with the provide encryption utility, uncomment the secureKeystorePasswd property, and set the property equal to the encrypted password.
The following code snippet shows an example of the keystore values after they are properly configured:
secureFileKeystorePath=C:/Users/admin/psft/pt/8.55/webserv/peoplesoft/piaconfig/keystore/pskey
secureFileKeystorePasswd={V1.1}7m4OtVwMGDyLc1j6pZG69Q==
To define integration gateway keystore values:
From the PeopleSoft Node Configuration page, click the Advanced Properties Page link.
The Gateway Properties page appears.
Scroll to the ## Integration Gateway CERTIFICATE Section of the file.
Locate the secureFileKeystorePath property.
Confirm the keystore path setting:
Uncomment the secureFileKeystorePath property if it is not already uncommented.
Confirm that the path defined for the keystore path is accurate.
Enter an encrypted keystore password.
Expand the Password Encryption utility at the bottom of the page.
In the Password field, enter the keystore password.
In the Confirm Password field, enter the password again.
Click the Enter button to encrypt the password.
The encrypted password appears in the Encrypted Password field.
Copy the value in the Encrypted Password field to the clipboard.
Navigate back to the secureFileKeystorePasswd property in the file.
Uncomment the property and paste the encrypted value, setting the property equal to the encrypted value.
Click the OK button