Creating Layouts
This section describes how to:
Plan a layout.
Open an existing layout.
Create a new layout.
Save a spreadsheet as a layout.
Select a layout type.
Specify a layout definition.
Before you begin to define a layout online, you should do some planning and outlining on paper so you fully understand what data you want to retrieve, what you want the resulting reports to look like, and so on. The following checklist is a good way to make sure that you cover all bases before you start defining a layout.
Outline your report specifications on paper, showing the desired rows, columns, and headings.
Examine existing layouts and copy them, if possible, instead of starting from scratch.
Determine the naming convention for your layout, scope, report request, and instances.
Determine at which levels (worksheet, column, row, or cell) you should specify the queries and ledgers, fields, and labels you want to use as your criteria.
Identify existing PeopleSoft queries that might support your query criteria. If they don’t exist, you’ll have to create them. Do you want to use TimeSpans?
Identify existing PeopleSoft trees that might support your field criteria, because it’s simpler to use tree nodes than to specify detail values as your field criteria. Do you want to use nPlosion?
You can open an existing layout to copy the report and then make minor changes to it. To open an existing layout in PS/nVision:
Select from the nVision menu of PS/nVision (Nvsuser.)
Alternatively, click the Open Layout button.
The Open nVision Layout dialog box appears.
Select a layout (.xnv) file.
The directory this dialog box opens to is defined in the Configuration Manager.
Specify whether to create the layout as read-only.
Click the Open button.
After the file is open, select the Save as Layout option from the nVision menu and give the layout a new name.
Note: If you used Microsoft Excel 2007 to save a layout with named cell using the File Name field, when you open this layout file through PS/nVision, the named cell reference might be corrupted and the named cell details are not properly shown.
You can create a new layout from scratch rather than basing a new layout on an existing one.
To create a new layout in PS/nVision:
Select from the nVision menu.
The Create New nVision Layout dialog box appears.
Enter a name in the File name field.
PS/nVision supports file names of up to 50 characters in length. You cannot change the default .xnv extension.
Specify whether you want to open the new layout as read-only.
Selecting this option enables you to open layouts in read-only mode. This protects shared layouts from accidental changes and eliminates Excel messages indicating that the layout is in use (or resides on a read-only network drive). Changes made to a read-only layout are not saved and are not reflected in the report instances produced.
Click the Save button.
The new layout is created, saved, and opened for you to define.
You can save an existing Excel spreadsheet or layout as a new layout.
To save an Excel spreadsheet or layout as a new layout:
From PS/nVision, open the spreadsheet by selecting from the nVision menu.
Select from the nVision menu.
The Save As nVision Layout dialog box appears, which enables you to save an opening Excel spreadsheet (.xls file) as an nVision layout (.xnv file), or to save an opening layout as a new layout.
Type in a file name and click the Save button.
An Excel spreadsheet opens in PS/nVision.
Enter any text, such as headings in the columns and rows, that you need to type in manually.
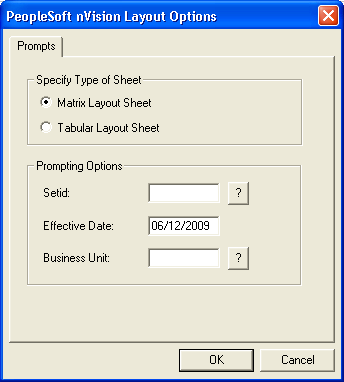
When you first create a new layout, the type – matrix or tabular – is not yet defined. You use the PeopleSoft nVision Layout Options dialog box to specify the layout type.
Image: PeopleSoft nVision Layout Options dialog box
This example illustrates the fields and controls on the PeopleSoft nVision Layout Options dialog box.
To specify a layout type in PS/nVision:
Select from the nVision menu.
The PeopleSoft nVision Layout Options dialog box appears.
Select either the Matrix Layout Sheet option or the Tabular Layout Sheet option.
Enter a setID, effective date, and business unit.
A setID identifies the table set you want to work with and corresponds to the set control value used in establishing table set sharing within the PeopleSoft database.
The effective date determines which values in PeopleSoft tables are valid at the time you develop the report. The effective date is not the same as the as of date that is entered in the report request. (The as of date determines the current period for data retrieval.)
The business unit represents part of your corporation that is independent with regard to one or more operational or accounting functions. PeopleSoft General Ledger business units typically comprise individual entities for accounting purposes.
Note: The values you enter here do not determine the setID and effective date used for the reports—runtime controls are specified on the report request. Instead, PS/nVision uses the setID and effective date you enter here to determine the data you can select from while creating your layout.
Click the OK button.
The nVision Layout Definition dialog box appears prompting you to define your layout further.
You set layout options for your report using the nVision Layout Definition dialog box. The tabs at the top of the dialog box vary depending on the type of layout you are creating. Select a tab to select layout criteria or special nVision functionality for your worksheet.
Note: You are able to run nVision reports that include up to 16384 columns of data if your nVision layouts are in Microsoft Excel 2007 file formats. Notice that nVision report execution time is directly proportional to the number of columns of data returned. When you design the nVision layout, the location of column criteria can also be set at up to column 16384. However, nVision report execution time is dependent on the location of column criteria; for example, if the column criteria is defined at column 16384 instead of the same column criteria at the column 100, then the report execution time increase because the used area of the worksheet increases when the criteria is defined at the farthest column.
Informational Group Boxes
A group box in the upper-left corner of the Summary tab displays information about the contents and location of the selected cells.
Image: PeopleSoft nVision Layout Definition dialog box: Summary tab
This example illustrates the fields and controls on the PeopleSoft nVision Layout Definition dialog box: Summary tab.

When no PS/nVision information is stored in the current selection, the group box appears as it does in this dialog box. The box is titled Undefined, followed by the location of the cells selected. If you have an entire row selected, the name of that row appears; the same applies to columns. If you have the entire worksheet selected, the location text is Sheet Defaults.
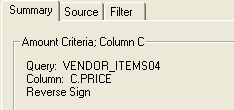
If the current selection contains PS/nVision information, the title of the group box reflects it. Also, the details about that information appear as the contents of the group box.
Image: Informational group box displaying PS/nVision cell contents
This example shows the informational group box displaying PS/nVision cell contents.
Note: When you view a PS/nVision layout, you’ll notice that Row 1 and Column A are always hidden. PS/nVision reserves them to store control information, such as data selection criteria; you cannot use Row 1 or Column A in your layout. The first available column is B, and the first available row is 2. Whenever you open a new layout definition, the cell pointer is automatically placed at cell B2—the upperleft cell available for use in the layout.
Navigating Within Layouts
To move between cells and columns, use the navigate buttons in the dialog box.
For example, clicking the right arrow moves the cell pointer in Excel one cell to the right. You can select individual cells, or you can select entire rows and columns by navigating to the uppermost and leftmost sides of the layout. You can also select the entire worksheet by navigating to the upper-left corner of the layout. The new cell selection appears in the informational section title.
Image: Navigate section
This is an example of the navigate section.
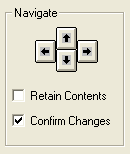
Select the Retain Contents option to preserve the currently displayed information in the informational group box when you navigate elsewhere. You can then apply the same information to the new cells and make only minor changes, if necessary.
Clear the Confirm Changes option to stop being prompted to save your changes each time you change the PS/nVision information and navigate elsewhere. This can save time if you are creating a new layout. When this option is cleared, changes you have made to the current row, column, and so on are automatically saved when you use the arrow keys.
Dialog Box Control Buttons
|
Field or Control |
Definition |
|---|---|
| OK |
Click this button to close the dialog box and you are able to access the Microsoft Excel menus, or to enter text into the worksheet manually. |
| Clear All |
Click this button to remove any existing criteria from the current selection. Note: If you clicked the Clear All button and you navigate to another cell or other area of the layout, your criteria are permanently deleted unless you click the Cancel button before you move the cursor. |
| Apply |
This button is only available after you click the Clear All button. Click this button to apply your changes. |
| Cancel |
Click this button to exit the sheet without clearing criteria. |
Layout Definition Tabs
Six tabs appear at the top of most Layout Definition dialog boxes. Not all layout types require the same information, so not all of these tabs appear with each type of layout.
Image: Example of the Layout Definition tabs
This is an example of six taps in the PeopleSoft nVision Layout Definition dialog box.
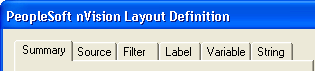
Using these tabs, you can specify options for your worksheet and for rows and columns. The controls on the dialog box vary depending on whether you have a cell, row, column, or the entire worksheet selected.
|
Field or Control |
Definition |
|---|---|
| Summary |
Displays the information about the contents and location of the selected cell. |
| Source |
Enables you to select query, ledger, and TimeSpan criteria as well as some nPlosion options. |
| Filter |
Identifies specific detail values from PeopleSoft trees. These act to limit query, ledger, and label criteria. |
| Label |
Retrieves descriptive field values from either tree nodes or detail values. Like queries and ledgers, these criteria also perform the role of a data source—although the data is always textual rather than numeric. |
| Variable |
Displays information that is specific to each report request and report instance—for example, scope instance number, reporting period, and other information that can change when you use a different scope. |
| String |
Enables you to build multilingual layouts. Certain text strings are replaced by specially formatted strings whose user-language equivalents are retrieved from a table in the database. |
| Column |
Enables you to map the layout columns to the appropriate query columns. The columns contain the data that the query returns. This tab is only available if you have selected a tabular layout. |
| Options |
Enables you to select one of the Sheet Options, Row Options and Column Options. This tab is only available if you have selected a tabular layout. |