Creating Report Definitions
This section provides an overview of report definitions and discusses how to:
Define reports.
Associate templates.
Use data transform.
Set output options.
Set report properties.
Set security options.
Set bursting options.
Report definitions associate a data source with template files. A data source registers the schema and sample data design files. The extracted application fields from the data source files are placed into the template files to create the final report.
A report can include multiple templates. A template is used to associate different layout formats as required by different countries and regions or as required by different channels (web posting, printer, fax, and so on).
The defined output options from the report definition are reflected on the output type and format prompts on the Process Scheduler request page when the application process that runs the report is assigned the process type of BI Publisher. Security settings for a report definition determine who can view the report when it has been run.
Report properties can be set to control formatting of the report.
With the advanced bursting feature, report generation results in separate output files when bursted reports are run through Process Scheduler.
Report definition access is based on user permission list security and roles. For example, bursting is read-only for BI Publisher power users, because only developers can set up bursting, and the page only appears when settings exist.
BI Publisher power users can start to define a report to download the sample data files to create their templates.
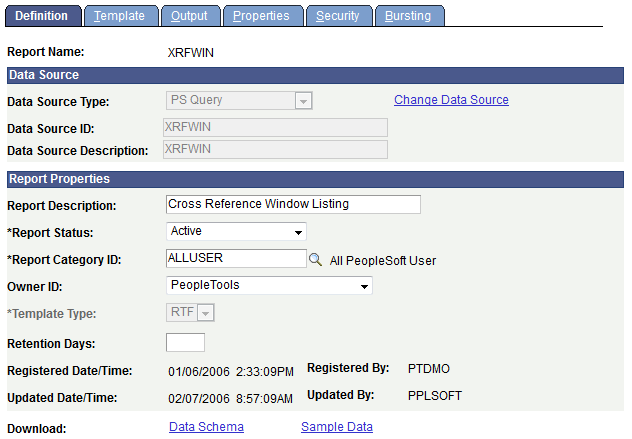
Access the Definition page (.)
Image: Report Definition – Definition page
This example illustrates the fields and controls on the Report Definition – Definition page. You can find definitions for the fields and controls later on this page.
|
Field or Control |
Definition |
|---|---|
| Report Name |
Enter a report name. The report name must be unique, and it must not contain any special characters. If you enter spaces in the report name, the system replaces them with underscores. |
| Data Source Type |
Select Connected Query, PS Query, Rowset, XML Doc, or XML File. Note: For BI Publisher power users, the data source types available are PS Query and Connected Query only. Rowset and XMLDoc are deprecated in PeopleTools 8.50. If the data source was defined in a previous release, it will be available. You can not create a new data source for rowset or XmlDoc. |
| Change Data Source |
This control appears on existing report definitions for uses with the XMLP Report Developer role. When you click the link the Data Source Type and Data Source ID fields become editable and you can define new values. Warning! Changing the data source may make the report unusable. If you change the data source, you may need to change other dependant parts of the report definition, such as the report template, report-level properties, bursting values, and so on. After you change the data source, be sure to review the entire report definition to verify that the report values match the newly selected report Data Source. Before changing the data source for a report, you may want to make a copy of the report and test the impact of changing the data source. See Copying Report Definitions. |
| Cancel Data Source Changes |
This control appears after you click the Change Data Source link. Click the link to revert the report back to the initial state. Important! You are able to revert back to the initial state only prior to saving the page. |
| Data Source ID |
Select the data source ID. You can choose from data source IDs that are based on previously registered data sources. You can select queries regardless of whether they have been previously registered as data sources. For queries, the lookup table respects the public, private, and query access group security for the current user ID. When you save a report definition with an unregistered query data source, the query is systematically registered as a data source. The query has no object owner ID, but that value can be entered manually on the Data Source page, if required. |
| Data Source Description |
This is a read-only field that reflects the value that was entered when the data source was registered. For unregistered query data sources, this field reflects the query description. |
| Report Description |
(Optional) Enter descriptive text that provides more detail about the report. If this field is left blank, the report name appears by default. |
| Report Status |
Select Active, In Progress, or Inactive. Setting the report status allows work in progress as well as retirement of report definitions. Active reports must have at least one active template. Only active reports can be selected at runtime and run to success. |
| Report Category ID |
Select a report category ID. This is a grouping mechanism for reports that provides row-level security for editing report definitions per the rights defined on the report category setup table. |
| Object Owner ID |
(Optional) Indicate which product, feature, or application owns this report. Note: The default value that appears here is based on the Object Owner ID setting in the Report Category component (PSXPSETUPRPTCAT). |
| Template Type |
Select PDF, RTF, ETX, or XSL. Note: ETX is only available if the data source is XML file. Only one template type is allowed per report. The template file extension that you can upload on the Template page is controlled by this value. This value also controls which report templates appear on the Translation component (PSXPTMPLTRNS), because only RTF templates are translatable. |
| Retention Days |
(Optional) Enter a value to set the option to purge the reports from the Report Repository and archive the data to the Report Archive table. The value that you enter overrides the system setting for retaining reports. The maximum value that you can enter is 9999 days. If you don't select a value, the value from the page applies. Only BI Publisher report developers or power users with permission list PTPT2600 or PTPT2500 can set this value. See Maintaining Reports. |
| Registered Date/Time |
This is a read-only field maintained by the system that indicates the date that the initial report definition was registered. |
| Updated Date/Time |
This is a read-only field maintained by the system that indicates the date that the last update to the report definition was made. |
| Registered By |
This is a read-only field maintained by the system that indicates the user ID of the operator who initially registered the report definition. |
| Updated By |
This is a read-only field maintained by the system that indicates the user ID of the operator who last updated the report definition. |
| Download |
Click Data Schema to detach the schema file orSample Data to detach the data file. Detaching the files enables the user to view the data elements prior to finalizing the report definition. These links appear if the related files exist on the registered data source. For PS Query data sources, both links always appear regardless of whether the data source is registered because these files are system-generated. |
Access the Template page (.)
Image: Report Definition-Template page (RTF template)
This example illustrates the fields and controls on the Report Definition-Template page (RTF template). You can find definitions for the fields and controls later on this page.
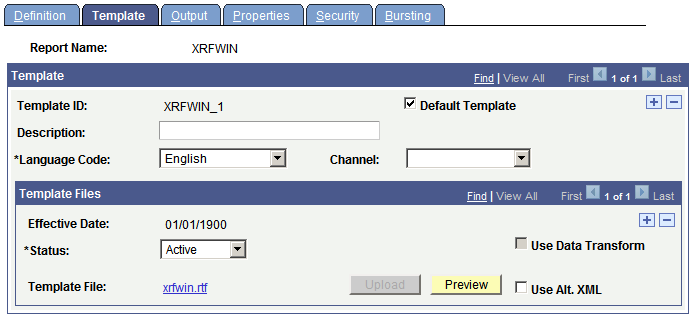
The Template group box on the Template page refers to a particular template layout, because one report definition can associate multiple template layouts differentiated by language code or channel.
|
Field or Control |
Definition |
|---|---|
| Template ID |
Enter a template ID that uniquely identifies this template. The default template ID is a system-generated ID based on the report name. You can edit this ID when you first add a template to the report definition, but it must be unique across all templates in the system, not just within the current report definition. |
| Description |
(Optional) Enter descriptive text that provides more detail about the template and identifies its use. Entering a meaningful description helps the user select the proper template at runtime. For example, indicate a unique layout or channel. |
| Language Code |
Select a language code for the template. The default value reflects the default template language. |
| Default Template |
Indicate whether this is the default template. You can select only one template as the default template. The first template that you add to the report definition is automatically selected as the default. You can change this selection as necessary. Default templates are automatically used at runtime if no other value is supplied. |
| Channel |
(Optional) Select the distribution channel for the template. The Channel attribute supports the need to identify different layout formats as required by the various distribution mechanisms. For example, a printout may require a different template layout than an email or a web posting. Leaving the channel blank would indicate that this particular template does not have a format that is specifically suited to just one channel. These values are for information only and do not trigger a particular Process Scheduler distribution mechanism. Developers can drive a template choice based on channel through the PeopleCode BI Publisher classes. |
Adding Template Files
Within each template layout defined previously is one or more effective-dated versions of the template. For example, you can have a new government form for each year. In the Template Files group box, you attach effective-dated files that are the actual report templates.
|
Field or Control |
Definition |
|---|---|
| Effective Date |
Select an effective date for the template file in order to maintain new versions or versions specific to a particular time period. For example, a new file could be uploaded to reflect a new format, effective for reports as of the new date. The default date for a newly added template file is the current system date. The user can change the data per effective-dating logic with Update, Update/Display, and Correction modes. |
| Status |
Select a status of In Progress Active, or Inactive for the template file. This field indicates the usability of the template file. Runtime selection logic for a template file uses this field in conjunction with the Effective Date field to determine which template file to use. At least one file must be active to save a report definition. |
| Template File |
When you upload the template, the template name appears as a link. Click this link to download the template file to your local computer for updating the field or tag assignments. |
| Upload |
Click to attach a template file to the template. The file extension is checked against the template type value on the Definition page and a warning is issued if no match is found. When you save the report definition, this button becomes disabled. To reupload a new version of the template, you must either delete and add it again in correction mode or add a new effective-dated row. |
| Preview |
Click to preview the report using the current template file based upon the sample data file that was registered with the data source. The Preview button is not enabled when no sample data file is registered with the data source. The preview tab title depends on the default output type as follows:
|
|
Field or Control |
Definition |
|---|---|
| Use Data Transform |
Select to specify a data transform program to be applied to this report definition. Once you save the report definition, this field will be Display Only. See Using Data Transform. |
|
Field or Control |
Definition |
|---|---|
| Use Alt. XML (Use alternate XML) |
Select to use an alternate XML file for previewing. When you click the Preview button, a dialog box appears, where you can select the file. |
Note: The preview button uses the sample XML data file to generate report output. Sometimes, if the sample data does not match the real data, you may find discrepancies between preview and real report outputs. This is specifically true when the report template uses sample data in variables and conditional formatting. Creating your own sample file with real data makes the report look more realistic. This sample file can also be used to preview reports using template builder.
See Mapping Data Tags.
Mapping PDF Template Files
For PDF files, a mapping is sometimes required between the field elements from the data source and the form field elements on the PDF template in order for the XML data element tags to print in the correct place within the PDF template. This is often true for third-party PDF templates, for which the form fields already exist inside the form template. However, if you create PDF form fields and XML tag names that are the same, no mapping is necessary.
Image: Template page for PDF mapping
This example illustrates the fields and controls on the Template page for PDF mapping. You can find definitions for the fields and controls later on this page.

The following fields appear on the Template page for PDF templates files:
|
Field or Control |
Definition |
|---|---|
| Map File |
When you upload the mapped PDF file, the file name appears as a link. Click this link to open or download the file to your local computer. If changes are required in the map file, you can make the changes and upload the revised file without creating a new effective-dated row. |
| Generate |
Click to generate the PDF map file. The system uses the uploaded PDF template file and the sample XML data associated with the data source definition to generate a PDF template embedded with a Visual JavaScript plug-in used for mapping. Any changes made to XML tag names and structure after the template is defined or mapped, require you to redefine or remap the template. Note: PDF file security must allow altering and saving for the mapping to be completed. This depends on the version of Adobe with which you are working. When working with PDF map files, some indication of mapping file should be included in the file name to distinguish the mapping file from the unmapped template file. By default, the generated mapping file name is the name of the template file followed by a dash and either an m for map file or mfp for full path mapping. |
| Upload |
Click to upload the PDF map file when the tags have been mapped. |
| Full Path Mapping |
Select this check box if your XML data has elements with the same name at different levels. For instance, ADDRESS is used at the company level and also at the employee level. |
This is an example of XML file that requires full path mapping:
<PayChecks>
  <PayCheck>
    <EmpNo>00001</EmpNo>
    <CompanyInfo>
      <Address>1 Company st. CA 00001</Address>
      <Description>Company Info</Description>
    </CompanyInfo>
    <EmployeeInfo>
      <Address>1 Employee st. CA 00001</Address>
      <Description>Employee Info</Description>
      <Salary>50000</Salary>
      <Vacation>12</Vacation>
      ......
    </EmployeeInfo>
  </PayCheck>
  <PayCheck>
    ......
  </PayCheck>
  <PayCheck>
    ......
  </PayCheck>
</PayChecks>
The JavaScript plug-in will use the full path for address data elements instead of the element name. So it will use PayCheck.Employee.Address to map to the employee’ address form field, and use PayCheck.Company.Address to map to the company’s address field.
See Mapping Data Tags.
Data transform allows you to create a common template and then use the same template with different data sources. Each report template contains pre-defined placeholders (XML element tags) that are used for the mapping between the layout and the xml data file. These XML element tag names must be used in order to get the proper report output. When you create a new report definition that uses a common template, you will need to create a new xsl program or use an existing xsl program that will map the data fields in the original schema to the data fields for your new report.
When using Query or Connected Query as a data source, the data schema is auto-generated by the system. These system generated tags may not match the XML element tags defined in the common template. In order to generate the standardized or common report properly, the XML data will need to be transformed to match the tags defined in the common template. To do this, an XSLT transform process will need to be applied to the incoming xml data source ahead of the standard BIP template processing.
You can manually create an xsl program or select to use the Oracle XSL Mapper directly from a link on the page. In order to use Oracle XSL Mapper, the system must be properly configured.
Launching Oracle XSL Mapper from Report Definition Template Page
To use Oracle XSL Mapper from the Report Definition Template page you must:
Install Oracle JDeveloper. If you are using Oracle JDeveloper 11g
See Prerequisites for Developing Transforms Using Oracle XSL Mapper.
If you are using Oracle JDeveloper 11g, you need to install Jdeveloper extensions – Oracle SOA Composite Editor from Oracle Fusion Middleware Update Center.
In JDeveloper, select Help, Check for Updates.
Set environment variables on client machine for JDEV_HOME and JDEV_MAPPER_CLASSPATH.
JDEV_HOME should be set to the directory where Jdeveloper was installed. For example: D:\Oracle\JDeveloper.
JDEV_MAPPER_CLASSPATH for JDeveloper 11.1.1.x should be set to:
jdev\extensions\oracle.bpm.mapper.jar;integration\lib\bpm-ide-common.jar;ide\lib\javatools.jar;jdev\lib\xmleditor.jar;modules\oracle.xdk_11.1.0\xmlparserv2.jar;modules\oracle.xmlef_11.1.1\xmlef.jar;modules\oracle.javatools_11.1.1\javatools-nodeps.jar
Assign the role XMLP Service User to the Default User defined for the default local node.
Note: You must reboot your machine after adding the environment variables.
Defining the Transform
To define the transform program:
Access the Template page in the report definition.
Select the Use Data Transform check box.
Click Upload and select the common template.
Click Upload and select the data schema associated with the common template.
Click Save.
Note: Both the data schema and template must be uploaded for the Mapping Tool link to appear when the page is saved.
Click the Mapping Tool link, if you want to create an XSLT program using XSL Mapper. If you already have an xsl program defined, you can skip this step and upload the transform file.
Note: The first time you access this link, the dialog box will be presented to open with Java(TM) Web Start Launcher (default). Select the check box Do this automatically for files like this from now on and click OK.
Oracle XSL Mapper will open with the source and target schema.
Map the source fields to the target.
Click Save.
Note: The xsl file is saved using the template ID name.
Close JDeveloper.
On the Report Definition page, click the Correct History button.
Open the Report Definition.
On the template page, click Preview and verify your report format.
Set the Report and Template Statuses to Active.
Click Save.
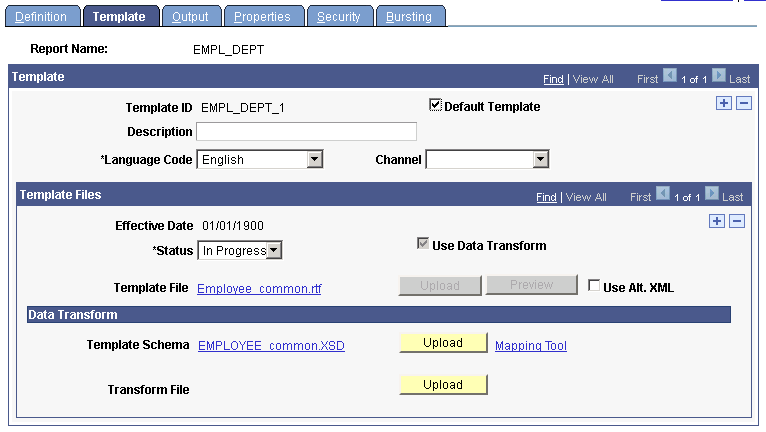
Image: Template defined to use data transform
This example illustrates the Template page defined to use data transform.
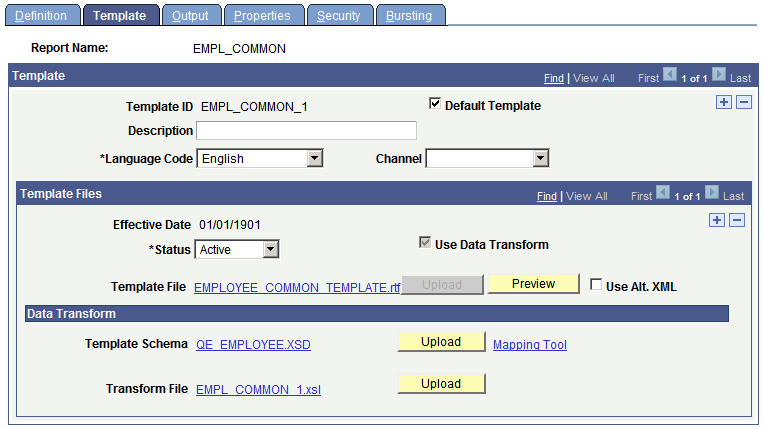
Transform Example
In this example, a common template is created for Employee. The tags generated from the query that will use this template, do not match the common template:
|
Common Template Tags |
Query Schema Tags |
|---|---|
|
EMPLID NAME FIRST_NAME LAST_NAME SOC_SEC_NBR JOBCODE DEPTID |
EMPLID QE_EMPLOYEE_NAME QE_FIRST_NAME QE_LAST_NAME QE_SOC_SEC_NBR QE_JOBCODE DEPTID |
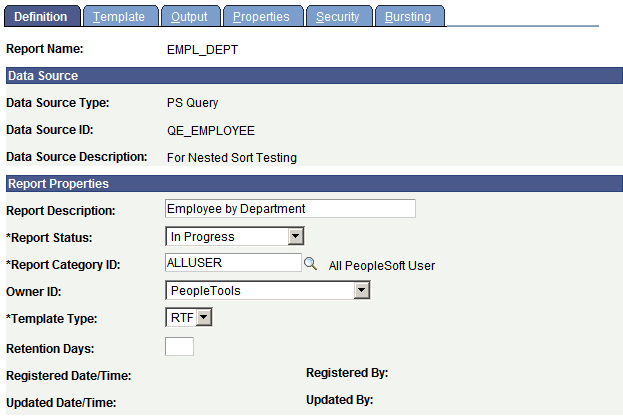
To create the report with the query data source using the common template:
Select PeopleTools, BI Publisher, Report Definition.
Select Add a New Value and enter the report name, then click Add.
Enter a report description and category. The default template type is RTF.
Image: Report definition page specifying RTF template
This example illustrates the Report Definition page, which is defined to use the RTF template.
Select the Template page, enter the effective date and select Use Transform.
Upload the template file.
Upload the template schema.
Save the page.
Image: Mapping Tool link is displayed
This example illustrates the Mapping Tool link on the Report Template page.
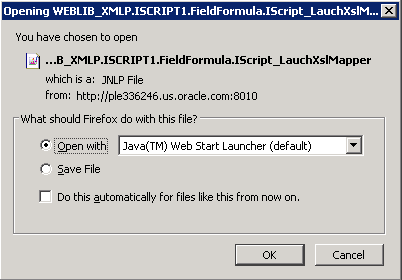
Click the Mapping Tool link.
XSL Mapper will open and you can map the fields. Depending on your environment setup, you may get prompted to open a JNLP file. (JNLP : Java Network Launching Protocol)
Image: Java Network Launching Protocol
This example illustrates opening a Java Network Launching Protocol (JNLP) file.
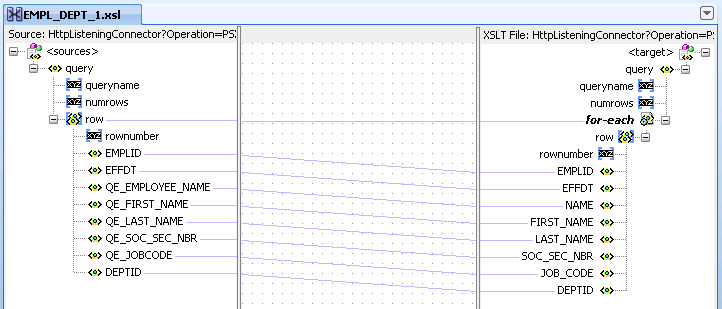
When XSL mapper opens, you make the necessary mappings between the source and target fields by dragging the field from the source to the target pane in the mapper.
Image: XSL mapping
This example illustrates mapping between the source and the target fields.
Select File, Save in XSL Mapper when you have completed your mapping.
Note: This will automatically save the xslt file to the PeopleSoft system. The file will not appear on the page until you click Save again, or reopen the Report Definition.
If you want to save the xslt file locally, then select File, Save As and supply the file path.
Note: When you use Save As to a local file, the file is not saved to the PeopleSoft system. You will need to manually upload the xslt file on the Report Definition.
After saving the file, you can exit XSL Mapper.
On the Report Definition page, click the Correct History button.
Open the Report Definition.
On the template page, click Preview and verify your report format.
Set the Report and Template Statuses to Active.
Click Save.
If you are using a PDF template, keep the following in mind when determining which method to use for your report template:
PDF mapping
Used to change template fields to match data file field names. This method is more efficient than data transform as it requires significantly less processing.
Data Transform
Used to change XML data file field names to match the template field names. This method should be used when a common template is required to run in different organizational units.
Access the Output page (Select .)
Image: Report Definition-Output page (RTF template)
This example illustrates the fields and controls on the Report Definition-Output page (RTF template). You can find definitions for the fields and controls later on this page.

|
Field or Control |
Definition |
|---|---|
| Format Type |
Dynamically lists the available output formats based on the template type. |
| Enabled |
Select specific values to limit the output choices for the user at runtime. |
| Default |
Select a default format type. This value appears at runtime on the prompt or run control page. It specifies the output format that the system uses if no other value is fed into the BI Publisher engine. |
| Location |
Select one of the following locations:
|
| File Name |
Specify a file name template that gets translated at runtime to a physical file name. This field accepts a combination of output variables and plain text. Output variables are enclosed within percent signs (%) and used as part of the descriptive report name visible in the Report Manager or on the BIP Report Search page. The following variables are supported.
For example, if you have a report CERTIFICATE that is burst by STUDENT_ID, you can use the file name to provide more details:
Note: If you leave the File Name field blank, the system uses the report ID as the file name. For bursted report, burst value can be used as file name if set programmatically through the ReportDefn class property UseBurstValueAsOutputFileName. The ReportFileName can also be set programmatically as a property of the ReportDefn class. If a ReportFileName is set either in PeopleCode or on the page, it overrides the UseBurstValueAsOutputFileName property. |
Note: The BI Publisher report definition output options are reflected in the output type and output format prompts on the Process Scheduler Request page only when the application process that runs the report is assigned the process type of BI Publisher.
Output Format Options
The output options are based on the template type as shown in this table:
|
Template Type |
Output Options |
|---|---|
|
RTF |
.pdf, .html, .rtf, .xls (html) |
|
|
|
|
E-Text |
.txt |
|
XSL |
.pdf, .html, .rtf, .xls (html) |
Printing BI Publisher Report Output
PeopleSoft applications support batch printing BI Publisher reports directly from a server using several output formats such as HTML, PCL, PDF, PS, RTF and XLS.
Bursted reports are sent to a single printer, but as multiple print jobs
Users can print BI Publisher reports from process scheduler, query report scheduler, or PeopleCode.
Note the following points when printing reports in Microsoft Windows:
BI Publisher functionality uses the Copy DOS command to print reports from Microsoft Windows:
copy file-name printer-nameFor printing in Microsoft Windows the printer must be shared in a windows print server and the printer name has to be specified in UNC format:
\\server-name\printer-name
Note the following points when printing reports from Unix, GNU, and Linux environments:
BI Publisher functionality uses the “LP” command in Unix, GNU, and Linux environments:
lp -c –d printer-name file-nameFor Unix and GNU environments, the printer can be local or in a network, and it doesn’t necessarily need to be in a print server.
See Setting Up BI PublisherRunning Reports Using PeopleCodeRunning Reports in Process SchedulerUsing RTF Templates
Access the Properties page (Select .)
Image: Report Properties page
This example illustrates the fields and controls on the Report Definition – Properties page.
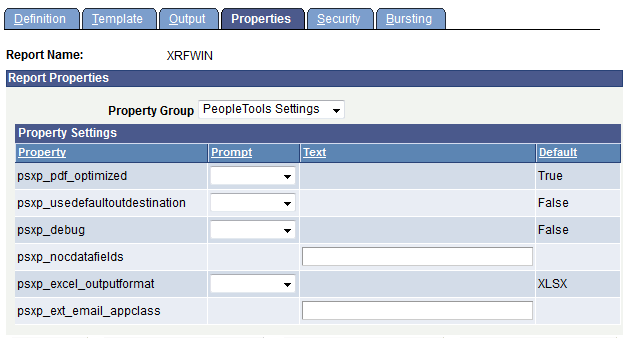
Properties defined in the report definition will override the global properties for this report.
See Defining Global Properties for information about the fields and controls that appear on this page.
Access the Security page (Select .)
Image: Report Definition-Security page
This example illustrates the fields and controls on the Report Definition-Security page. You can find definitions for the fields and controls later on this page.
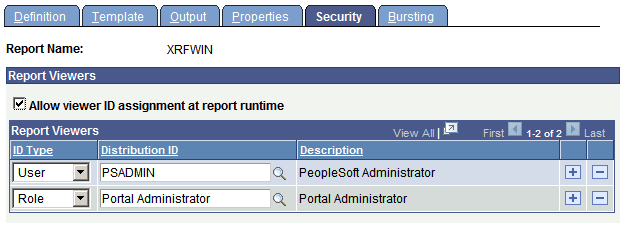
The Security page captures attributes regarding who can view web-posted output in the Report Manager repository and through the BIP Report Search page.
|
Field or Control |
Definition |
|---|---|
| Allow viewer ID assignment at report runtime |
Select to indicate that the report requestor can add users or roles to the standard distribution list on the Process Scheduler Request page, under the Distribution Detail link. The users and roles added in the report definition security tab will appear grayed out in the Distribution Detail page to disallow modifying the distribution items coming from the report definition. When there are no distribution items in the report definition or in the run control tables, the current user is added automatically. Note: If you are using security join tables to limit report distribution, leave this check box cleared. If you add a user or role at runtime, the associated users will be able to view all bursted reports for that report instance. |
| ID Type |
Select an ID type of either Role or User ID. |
| Distribution ID |
Select a corresponding distribution ID based on the ID type. |
| Description |
Displays the related description of the distribution ID. |
Note: The users and roles defined on this page can view all bursted reports. If you are using security join tables to limit report distribution, do not enter any roles or users on this page.
Bursting is an optional advanced feature that is available only when reports are run through Process Scheduler. It is not intended for real-time online viewing. It is typically used when you are repeating the generation of a templated report layout many times for multiple like sets of data, for example, generating a batch run on vendor purchase orders or customer invoices. With bursting, you can generate individual report files resulting in separate secured output, for example, generating a file for each vendor, customer or employee.
Setting up bursting requires thorough knowledge and understanding of data values and schema structures. You could possibly make entries on the Bursting page that would cause the report to fail at runtime. When you generate a bursted report, the system creates separate document files for each unique data value for a specified field tag.
Note: This Burst by field tag must be from the highest level repeating group (node) in the XML data. For bursting to work, only one high-level repeating group should be in the XML source.
Because bursting is an advanced feature, PeopleTools delivers permission list security that is intended for BI Publisher report developers (PTPT2600). When users are assigned a role with this permission list, they have access to setup entries on the Bursting page. A view-only permission list (PTPT2500) option also exists for BI Publisher power users that provides view-only access to the bursting information. The Bursting page appears for the power user only when bursting instructions exist for the report.
Note: In previous versions of BI Publisher, schemas were necessary for bursting. For backwards compatibility, you can still register and use schemas to define bursting.
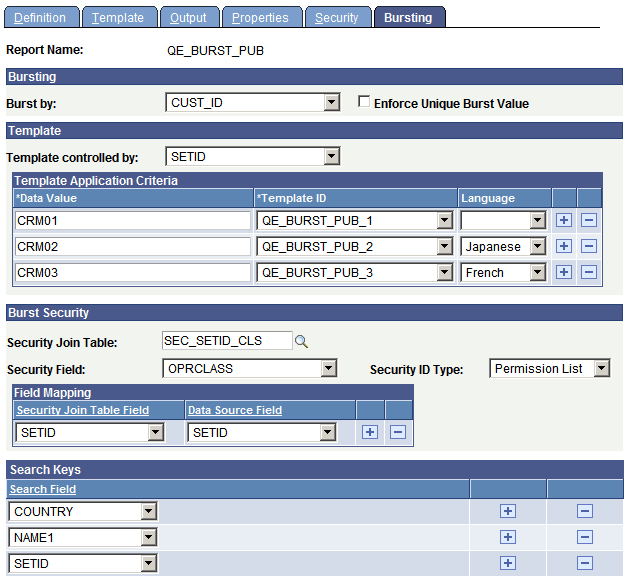
Access the Bursting page (Select .)
Image: Report Definition-Bursting page
This example illustrates the fields and controls on the Report Definition-Bursting page. You can find definitions for the fields and controls later on this page.
|
Field or Control |
Definition |
|---|---|
| Burst by |
Select a burst by field to enable report bursting. All subsequent bursting features are disabled until you select this value The values in the drop-down list box are the children from the highest-repeating level (group node) in the XML schema associated with the data source that is assigned to the report definition. When you select a burst field, the report generates multiple files at runtime with a separate report instance file generated each time a unique value appears for the Burst by data tag. For example, this could be one report file for each employee when you are bursting by EmplID or one report for each department (that includes multiple occurrences of the report, one for each employee) when you are bursting by DeptID. |
| Enforce Unique Burst Value |
Select this check box to indicate that the Burst by field contains unique values. If a non unique value is found, the report will not be published and an error will be logged. It is recommended to use unique bursting values. If this check box is cleared, bursted files with the same Burst by field will be combined in one report. Note: Prior to 8.5x, unique burst value was not enforced. Non unique burst value will produce unpredictable results including incorrect search. |
Template Assignment for Bursting (Optional)
This feature dynamically drives the template assignment at runtime based upon the data value of a designated schema tag. You can assign a language code to apply a specific template translation as well. This means that the various bursted report occurrences in one batch run can each have an appropriately assigned template and translation. For example, you can print Canadian paychecks in English or French depending upon the employee’s preference.
You should select a template ID for each data value that requires a special template.
At runtime, the process looks for the specified template and language. If the language does not exist, then it applies the base untranslated template. If the process encounters a data value that is not assigned on the report definition, then it assigns the template ID that is entered on the run control. If the system captures no template ID selection at runtime, then it applies the default template of the report definition.
|
Field or Control |
Definition |
|---|---|
| Template controlled by |
Select the schema tag value from the first child level to indicate the field with the template translation preference. |
| Data Value |
Enter a row for each data value that requires a specific template or template translation. |
| Template ID |
Select the template ID to apply when the data value specified previously is found in the XML data. These drop-down list box values are dynamically determined by those already defined on the report. |
| Language |
(Optional) Select a language code for the desired translation of the template when the specified data value is found in the XML data. The language choices in the drop-down list box reflect the complete list of available languages and are not limited by the existing registered Translation XLIFF files. |
Security for Bursting (Optional)
When a report is set up to be bursted, the report designer can also designate how the generated documents are secured when they are posted to the Report Manager. At runtime, the system uses this information to determine who can view each bursted report instance. You can use bursting security to supplement or replace the basic report viewer security by role or user ID. Otherwise, the system limits access to each report instance based on preexisting system security definitions.
The system automatically limits access to each report instance based on the Burst by field. For example, if the report is burst by employee ID, only the users designated with access to each employee ID can view the output file.
The report designer must provide the record name of the security join table and designate the common fields to join with the bursting field. The system performs the join and determines who can view the report instances. This matching allows the Report Manager’s posting process to dynamically identify the user IDs or roles that are assigned viewing rights for each report instance.
Note: If a user has the role ReportDistAdministrator, that user can view all bursted reports, regardless of security join table.
|
Field or Control |
Definition |
|---|---|
| Security Join Table |
Select the record name for the table that stores either a user ID or a permission list assigned to a data value in the XML data. |
| Security Field |
Select the field from the Security Join table that stores the user ID or permission list to secure on. |
| Security ID Type |
Select either User ID or Permission List to indicate what type value is in theSecurity Field. |
| Security Join Table Field |
Select the field from the Security Join table that joins with the data tag to identify the proper row from which to find the value in the in the Security Field that is used to secure the bursted file. |
| Data Source Field |
Select the data tag that stores the values that determines the security assignment. This may require more than one tag, because they must be first-child level tags. For example, they could be employee, customer, department ID, or a set ID/vendor ID combination, and so on. |
Search Keys (Optional)
When report results are burst into separate files, you should be able to locate the desired individual report from the Report Manager repository. Delivered search keys include Burst By, Report Definition Name, and Generated On Date. You can define additional search keys to provide even more specific granularity.
At report runtime, the report posting program uses this information to store the key names defined here along with the specific data values for each burst report. From the BI Publisher Report Search page, users can use these configurable search fields to locate a specific report occurrence. For example, if the pay advice report runs regularly and posts numerous report files for self-service access, and as an employee you want to locate a particular dated advise, you would not want to browse through all the advise files to locate the one you want to see. By assigning the pay period as a Search Field in the report definition, the user can enter a date to search for the correct advise.
|
Field or Control |
Definition |
|---|---|
| Search Field |
Select an additional field to search on from within the BI Publisher Report Search page. The drop-down list box values are taken from the children from the highest repeating level (group node) in the XML schema. Make sure that these values are unique per burst value. At design time, you can select as many search fields as are required. However, at search time, the BI Publisher Report search page allows only two search criteria in addition to the Burst by value. An API is provided to facilitate finding bursted BI Publisher reports in the Report Manager repository. When reports are burst into multiple separate files and posted in the Report Manager, the configurable search keys with their values are available as search keys in addition to Report Name, Burst By, Date, and Process Instance ID. Note: The search feature uses Integration Broker functionality. The service operation PSXP_RATTR is used to insert BIP report metadata for searching. This service operation must be active with a local-to-local routing. |