Go to primary content
Oracle® Communications EAGLE Database Administration - System Management User's Guide
Release 46.6
E93319 Revision 1
Go To Table Of Contents
Contents

Previous
Previous
Next
Next

Repairing the Database

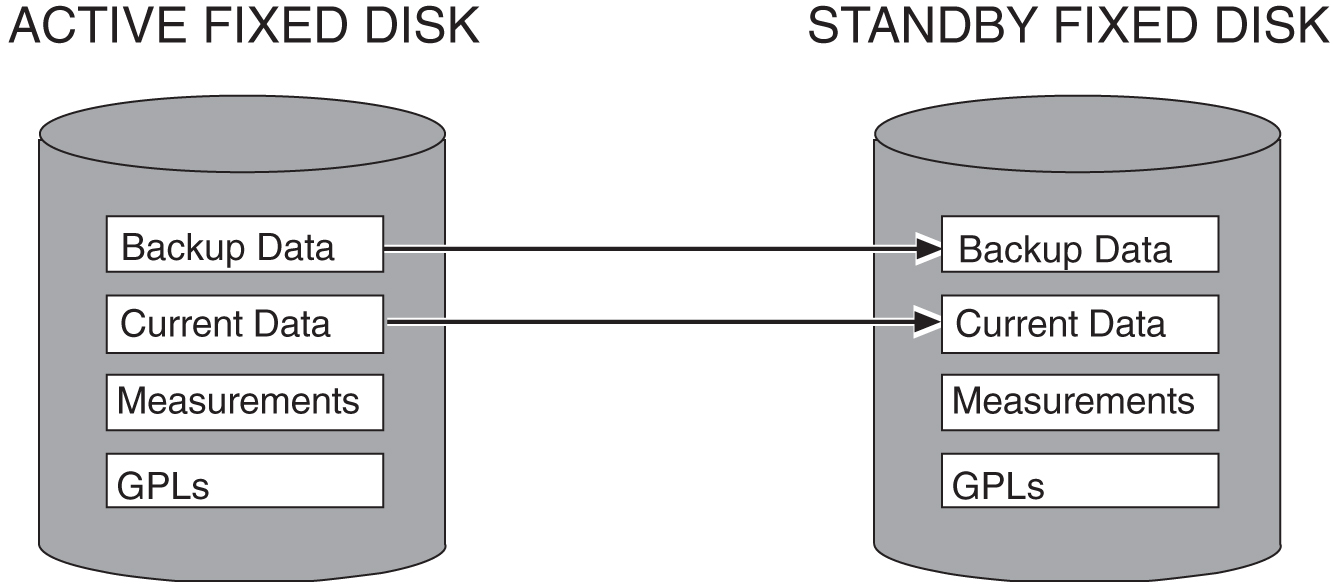
Perform the repair procedure whenever the two fixed disks have a different database image, such as after a MASP failure. This procedure copies the fixed disk image of the database associated with the active MASP to the fixed disk of the standby MASP. Figure 2-8 illustrates this action. To repair a database, The chg-db command uses only one parameter, action=repair – the operation to perform on the database, repairing a database

Figure 2-8 Action of the Repair Procedure

To repair the database, perform this procedure.

The databases in the current (FD CRNT) and the backup (FD BKUP) partitions of the active MASP must be coherent. For more information on verifying the database, refer to Verifying the Database.

Caution:

To prevent any potential database corruption when performing this procedure, the terminals must be placed out of service with the rmv-trm command before executing the chg-db:action=repair command.
  1. Verify that the databases in the current (FDCRNT) and the backup (FDBKUP) partitions of the active MASP are coherent using the rept-stat-dbcommand.

    This is an example of the possible output.

    rlghncxa03w 13-07-01 16:07:48 GMT  EAGLE5 45.0.0
    DATABASE STATUS: >> NOT OK <<
             E5TDM 1114 ( STDBY)               E5TDM 1116 ( ACTV )
             C  LEVEL     TIME LAST BACKUP     C  LEVEL     TIME LAST BACKUP
             - -------- ---------------------  - -------- ---------------------
    FD BKUP  N       35 INCOHERENT             Y       55 DIFF LEVEL           
    FD CRNT  N      106 INCOHERENT             Y       55 
             E5MDAL 1117
             - --------
    RD BKUP  -    -         -        -
    

    If E5-based control cards are installed in the EAGLE, this is an example of the possible output.

    rlghncxa03w 13-07-01 16:07:48 GMT  EAGLE5 45.0.0
    DATABASE STATUS: >> OK <<
             E5TDM 1114 ( STDBY )              E5TDM 1116 ( ACTV )
             C  LEVEL     TIME LAST BACKUP     C  LEVEL     TIME LAST BACKUP
             - -------- ---------------------  - -------- ---------------------
    FD BKUP  N       35 INCOHERENT             Y       55 DIFF LEVEL           
    FD CRNT  N      106 INCOHERENT             Y       55 
            E5MCAP 1113                         E5MCAP 1115
            - --------                        - --------
    RD BKUP -    -         -        -         -    -         -        - GMT
    USB BKP -    -         -        -         -    -         -        - GMT
    
  2. Display the terminal configuration in the database with the rtrv-trm command.

    The SEAS terminals are shown in the output with the entry SEAS in the TYPE field. This is an example of the possible output. In this example, the SEAS terminals are terminals 18 and 27. If no SEAS terminals are shown in the rtrv-trm command output, go to step 5.

    rlghncxa03w 10-07-01 16:02:08 GMT EAGLE5 42.0.0
    TRM  TYPE     COMM        FC    TMOUT MXINV DURAL
    1    VT320    9600-7-E-1  SW    30    5     99:59:59
    2    KSR      9600-7-E-1  HW    30    5     INDEF
    3    PRINTER  4800-7-E-1  HW    30    0     00:00:00
    4    VT320    2400-7-E-1  BOTH  30    5     00:30:00
    5    VT320    9600-7-O-1  NONE  30    5     00:00:30
    6    VT320    9600-7-O-1  NONE  30    5     00:00:30
    7    PRINTER  9600-7-N-2  HW    30    5     00:30:00
    8    KSR     19200-7-E-2  BOTH  30    5     00:30:00
    9    VT320    9600-7-O-1  NONE  30    5     00:00:30
    10   VT320    9600-7-E-1  HW    30    5     00:30:00
    11   VT320    4800-7-E-1  HW    30    5     00:30:00
    12   PRINTER  9600-7-E-1  HW    30    4     00:30:00
    13   VT320    9600-7-O-1  NONE  30    5     00:30:00
    14   VT320    9600-7-E-2  SW    30    8     00:30:00
    15   VT320    9600-7-N-2  HW    30    5     00:30:00
    16   VT320    9600-7-E-2  BOTH  30    3     00:30:00
    
    TRM  TYPE      LOC              TMOUT MXINV DURAL      SECURE
    17   TELNET    1201             60    5     00:30:00   yes
    18   SEAS      1201             60    5     00:30:00   yes
    19   TELNET    1201             60    5     00:30:00   yes
    20   TELNET    1201             60    5     00:30:00   yes
    21   TELNET    1201             60    5     00:30:00   yes
    22   TELNET    1201             60    5     00:30:00   yes
    23   TELNET    1201             60    5     00:30:00   yes
    24   TELNET    1201             60    5     00:30:00   yes
    25   TELNET    1203             60    5     00:30:00   yes
    26   TELNET    1203             60    5     00:30:00   yes
    27   SEAS      1203             60    5     00:30:00   yes
    28   TELNET    1203             60    5     00:30:00   yes
    29   TELNET    1203             60    5     00:30:00   yes
    30   TELNET    1203             60    5     00:30:00   yes
    31   TELNET    1203             60    5     00:30:00   yes
    32   TELNET    1203             60    5     00:30:00   yes
    33   TELNET    1205             60    5     00:30:00   yes
    34   TELNET    1205             60    5     00:30:00   yes
    35   TELNET    1205             60    5     00:30:00   yes
    36   TELNET    1205             60    5     00:30:00   yes
    37   TELNET    1205             60    5     00:30:00   yes
    38   TELNET    1205             60    5     00:30:00   yes
    39   TELNET    1205             60    5     00:30:00   yes
    40   TELNET    1205             60    5     00:30:00   yes
    

    Note:

    The rtrv-trm command output contains other fields that are not used by this procedure. If you wish to see all the fields displayed by the rtrv-trm command, see the rtrv-trm command description in Commands User's Guide.
  3. Display the status of the terminals with the rept-stat-trm command with the terminal number of the SEAS terminals.

    For this example, enter these commands.

    rept-stat-trm:trm=18

    This is an example of the possible output.

    rlghncxa03w 06-10-01 15:08:45 GMT EAGLE5 36.0.0
    TRM   PST           SST           AST
    18     IS-NR         Active        -----
    Command Completed.
    

    rept-stat-trm:trm=27

    This is an example of the possible output.

    rlghncxa03w 06-10-01 15:08:45 GMT EAGLE5 36.0.0
    TRM   PST           SST           AST
    27     IS-NR         Active        -----
    Command Completed.
    
  4. Place the SEAS terminals out of service using the rmv-trm command with the number of the terminal displayed in step 3 whose state is not OOS-MT-DSBLD.

    The force=yes parameter must be used when placing the last SEAS terminal out of service.

    For this example, enter these commands.

    rmv-trm:trm=18

    rmv-trm:trm=27:force=yes

    If the status of the SEAS terminals shown in the PST field in step 3 is OOS-MT-DSBLD (out-of-service maintenance disabled), the terminal is already out of service and the rmv-trm command does not need to be executed for that terminal.

    This message should appear when each of these commands have successfully completed.

    rlghncxa03w 06-10-01 15:08:45 GMT EAGLE5 36.0.0
    Inhibit message sent to terminal
    
    rlghncxa03w 06-10-01 15:08:45 GMT EAGLE5 36.0.0
    Command Completed.
    
  5. Enter the chg-db:action=repair command.

    This command can take up to 30 minutes to execute, depending on the size of the database and other system activity that is in progress when this command is entered.

    Note:

    If this command takes more than 60 minutes to execute, contact My Oracle Support (MOS).

    During command execution, these messages appear:

    REPAIR: MASP A - Repair starts on standby MASP.
    REPAIR: MASP A - Standby MASP will reboot to load data.
    REPAIR: MASP A - Repair from fixed disk complete.
    
  6. Verify that the databases of both MASPs are coherent using the rept-stat-dbcommand.

    The following is an example of the possible output:

    rlghncxa03w 13-07-01 16:07:48 GMT  EAGLE5 45.0.0
    DATABASE STATUS: >> OK <<
             E5TDM 1114 ( STDBY )              E5TDM 1116 ( ACTV )
             C  LEVEL     TIME LAST BACKUP     C  LEVEL     TIME LAST BACKUP
             - -------- ---------------------  - -------- ---------------------
    FD BKUP  N       55 09-03-01 13:11:43 GMT  Y       55 09-03-01 13:11:43 GMT
    FD CRNT  N       55                        Y       55  
            E5MCAP 1113                        E5MCAP 1115
            - --------                        - --------
    RD BKUP -    -         -        -         -    -         -        - GMT
    USB BKP -    -         -        -         -    -         -        - GMT
    

    If SEAS terminals are shown in the rtrv-trm command output in step 2, go to step 7. Otherwise this procedure is completed.

  7. Put the SEAS terminals back into service with the rst-trm command with the number of the terminals specified in step 4.

    For this example, enter these commands.

    rst-trm:trm=18

    rst-trm:trm=27

    This message should appear when each command has successfully completed.

    rlghncxa03w 06-10-01 15:08:45 GMT EAGLE5 36.0.0
    Allow message sent to terminal
    
    rlghncxa03w 06-10-01 15:08:45 GMT EAGLE5 36.0.0
    Command Completed.
    

Figure 2-9 Repairing the Database