Shift the Workloads to the Target
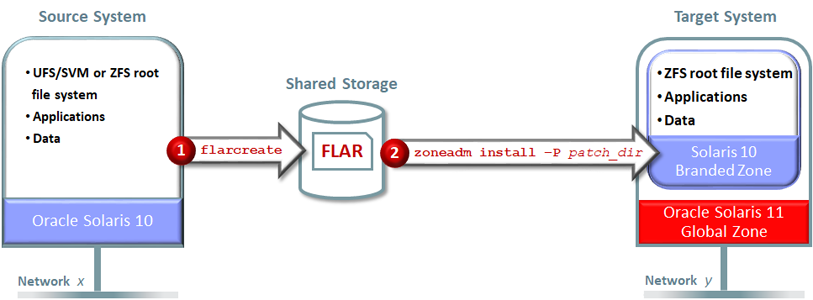
This procedure deploys the FLAR on the target system.
- Log into the target global zone as superuser.
-
Verify that the new zone is configured.
The zone was created in Prepare the Target System.
root@TargetGlobal# zoneadm list -vc
  ID NAME             STATUS      PATH                         BRAND      IP
   0 global           running     /                            solaris    shared
   - TargetS10bz      configured  /zones/TargetS10bz           solaris10  excl
-
Install the workloads in the new zone using the FLAR that was created on the source system.
This step uses the zoneadm(1M) command with the FLAR to restore the Oracle database installation and data into corresponding UFS file systems that are configured in the solaris10 branded zone.
Syntax
zoneadm -z zonename install -a flar_pathname
Where:
-
-z zonename – Specifies the name of the zone.
-
-a flar_pathname – Specifies the full path name of the FLAR file.
In addition to the basic syntax, these zoneadm options enable you to control how the branded zone is created:
-
-p – Preserves the system configuration parameters such as the node name and IP parameters. The -p and -c options are mutually exclusive.
-
-c profile_pathname – Enables you to change the system configuration parameters (node name and IP parameters) by specifying the path to a file that provides the new configuration parameters (created in Configure an Oracle Solaris 10 Branded Zone on the Target System). The -p and -c options are mutually exclusive.
-
-P patchset_pathname – Required for systems running Oracle Solaris 10 Update 8 or earlier. This option is only available on target systems running Oracle Solaris 11.4 SRU 12. This option applies the Recommended or CPU OS patchsets to the branded zone during the installation.
Examples
-
Preserving the system configuration parameters such as the node name
and IP parameters (-p).
root@TargetGlobal# zoneadm -z TargetS10bz install -a /ovas/SourceSystem.flar -p
-
Changing the system configuration parameters such as the node name and
IP parameters (-c
profile_pathname).
This is the method used for the example in this document.
root@TargetGlobal# zoneadm -z TargetS10bz install -a /ovas/SourceSystem.flar -u -c /ovas/sysidcfg_s10brandzone_profile Progress being logged to /var/log/zones/zoneadm.20180717T225458Z.TargetS10bz.install Installing: This may take several minutes... Postprocessing: This may take a while... Postprocess: Updating the image to run within a zone Postprocess: Migrating data from: TargetS10bz/rpool/ROOT/zbe-0 to: TargetS10bz/rpool/export Postprocess: A backup copy of /export is stored at /export.backup.20180717T230536Z. It can be deleted after verifying it was migrated correctly. Result: Installation completed successfully. Log saved in non-global zone as /zones/TargetS10bz/root/var/log/zones/zoneadm.20180717T225458Z.TargetS10bz.install -
Applying patchsets to the branded zone (-P
patchset_pathname):
The -P option is required for source systems running Oracle Solaris 10 Update 8 or earlier because Oracle Solaris 10 branded zones require an Oracle Solaris image that is equivalent to Oracle Solaris 10 Update 9 (or later). The patchsets applied with this option bring the zone image up to that level. If your source system is running Oracle Solaris 10 Update 9 or later, you can choose to use the -P option or not.

Recommended Patchset example:
root@TargetGlobal# zoneadm -z s10zone install -a /ovas/SourceSystem.flar -u -P /ovas/10_Recommended
Progress being logged to /var/log/zones/zoneadm.20190730T185340Z.s10zone.install

    Installing: This may take several minutes...

Zone image is running older release of Solaris, which cannot be run in solaris10 branded zone.
      Patching: This may take a while ...
      Patching: Applying prerequisite patches to the base ZBE ...
      Patching: Applying 120900-04 ( 1 of 10) ... skipped
      Patching: Applying 121133-02 ( 2 of 10) ... skipped
      Patching: Applying 119254-93 ( 3 of 10) ... success

<output omitted for brevity>

      Patching: Applying 152927-12 (419 of 421) ... skipped
      Patching: Applying 152959-01 (420 of 421) ... success
      Patching: Applying 153172-01 (421 of 421) ... skipped
      Patching: Patch log files are saved in non-global zone directory:
      Patching: /zones/s10zone/root/var/sadm/install_data/
      Patching: /zones/s10zone/root/var/sadm/patch/
Postprocessing: This may take a while...
   Postprocess: Updating the image to run within a zone
   Postprocess: Migrating data
        from: s10zone/rpool/ROOT/zbe
          to: s10zone/rpool/export
   Postprocess: A backup copy of /export is stored at /export.backup.20190730T200153Z.
It can be deleted after verifying it was migrated correctly.

        Result: Installation completed successfully.
Log saved in non-global zone as /zones/s10zone/root/var/log/zones/zoneadm.20190730T185340.s10zone.install
-