4Ongoing Application Administration Tasks
Ongoing Application Administration Tasks
This chapter describes how to set up defaults that are used throughout your Siebel application. It includes the following topics:
About Setting Defaults in a Siebel Application
For some implementations, the default settings provided through the seed data meet a company’s needs without customization. In other cases, administrators find it useful to make adjustments to these defaults.
Setting System Preferences
System preferences control how Siebel Business Applications operate in your environment. Review default settings and modify these settings as appropriate for your environment. For a list of the system preferences in Siebel Business Applications, see System Preferences.
Some system preferences might not take effect until the affected components are restarted. For information about shutting down and starting Siebel Server components such as a Siebel Application Object Manager, see Siebel System Administration Guide.
To set system preferences
Navigate to the Administration - Application screen, then the System Preferences view.
Check that the default system preference values are correct in your environment.
Change values for system preferences as needed.
Setting Up Predefined Queries
To set up predefined queries, review the following topics:
About Setting Up Predefined Queries
Predefined queries (PDQ) automate queries that a user can perform online. Rather than creating a query, entering criteria, and running the query, the user selects a PDQ from the Queries drop-down list.
Predefined queries can be private (available only to the person who created them) or they can be public (available to all the users of the Siebel application).
Set up predefined queries in the following ways:
Create and execute a query in the usual way, and then save the query.
Create or modify a predefined query in the Predefined Query screen.
Guidelines for Setting Up Queries
When setting up queries, remember:
The Administrator can define a PDQ using both displayed and nondisplayed fields.
You can reference only fields from the current applet’s business component in your query.
On occasion, using the asterisk (*) wildcard character to find all entries in a field can cause a performance problem. If you encounter a performance problem, then use IS NOT NULL instead. For more information about query operators, see Siebel Fundamentals.
Predefined queries are defined on a business object. All screens that are based on the same business object display all the predefined queries created for that business object.
Querying on fields of data type DTYPE_NOTE is not supported on some databases.
Creating Predefined Queries
The following procedure describes how to create a predefined query by saving a query.
To create a predefined query by saving a query
Navigate to the screen where you want to run the query.
Create and execute a query.
From the application-level menu, select Query, then Save Query As.
In the Save Query As dialog box, enter a name for the query.
The query is added to your list of predefined queries. This query is private, and only you can view it.
If you want to make the query public, then perform the following steps:
- Navigate to the Administration - Application screen, then the Predefined Queries view.
In the Predefined Queries list, deselect the Private field in the record for the query you just created.
Setting Up Queries in the Predefined Query View
The following procedure describes how to set up a query in the Predefined Query view.
To set up a predefined query in the Predefined Query view
Navigate to the Administration - Application screen, then the Predefined Queries view.
In the Predefined Queries list, create a new record, and complete the necessary fields.
Some fields are described in the following table.
Field Comments Object
Select the object on which the query is performed.
Name
Type the name that appears in the predefined query drop-down list.
Private
Select the check box to indicate the query is available only to the person who created it.
When you clear the check box y to make a query public, the other users must first exit the Siebel application and reenter before they can see the newly public query.
Query
Type the SQL code for the query.
When you create a query for a field that is a multi-value group, you can use the EXISTS operator to query nonprimary child records. For more information about the syntax, see information about operators, expressions, and conditions in Siebel Developer's Reference.
Note: You cannot use SQL functions in the query for a predefined query.Cache Result
Select the check box to indicate the query returns all rows up to the value of the DSMaxFetchArraySize parameter set for the data source. For information about setting DSMaxFetchArraySize, see information about modifying Named Subsystems in Siebel System Administration Guide.
Note: Setting DSMaxFetchArraySize to -1 and Cache Result to Y can cause memory problems for queries returning many rows.
Enabling Cancel Query
The cancel query feature allows users to stop their slow or incorrect queries while using Siebel Web Client. If the query does not return records within a specific number of seconds (the timeout period), then a dialog box that allows the user to cancel the query appears.
The cancel query feature is enabled through the CancelQueryTimeOut parameter. However, this parameter does not apply to search and find queries.
To enable the cancel query feature
Navigate to Administration - Server Configuration, Enterprises, and then Component Definitions.
Query for Call Center Object Manager (ENU) and select it.
In Component Parameters, change the CancelQueryTimeOut parameter to:
CancelQueryTimeOut = timeout
where: timeout is any integer of zero or greater.
For example, if CancelQueryTimeOut is 3, then the cancel query dialog box appears if records are not returned within 3 seconds.
Note: A timeout value of less than zero, for example, -1, disables the feature.Restart the Siebel Server.
Setting Up Currencies
You specify the currencies your company uses by:
Making Currencies Active. If the Siebel application includes the currency definitions you need, then make these currencies active.
Defining Currencies. If you need additional currencies that have definitions the Siebel application does not include, then you must also define these currencies.
Making Currencies Active
The Siebel application includes more than 30 currency definitions. If your currency is one of these currencies, then mark it as active.
To make currencies active
Navigate to the Administration - Data screen, then the Currencies view.
For any currency that you want to make active, click the Active field in the Currencies list.
(Optional) Enter the Start Date and End Date in the form to specify the date when this currency is active and the date when it is no longer active.
Defining Currencies
If your company uses any currencies that the Siebel application does not include, then you must define them and mark them as active.
If you modify the definition of currencies, then you must clear the cache or log out and back in to the Siebel application before the modification becomes visible. For more information about clearing the cache, see Clearing the Cache.
You cannot delete a currency after you have defined it. If you no longer use it, then you can mark it as inactive.
To define a currency
Navigate to the Administration - Data screen, then the Currencies view.
Create a new record, and complete the necessary fields.
Some fields are described in the following table.
Field Comments Code
Type the three-letter code for the currency.
Name
Type the name of the currency.
Issuing Country
Select the country that issues the currency.
Symbol
Type the symbol for the currency, such as $.
Scale
Type the number of places after the decimal for displaying currency in the interface. For example, U.S. Dollars has a scale of 2 to accommodate the cents, so an amount appears as $10.50. If the scale is 1, then this same amount appears as $10.5.
Smallest Denomination
Type the smallest unit of currency available. For example, the smallest unit of currency for the U.S. Dollar is one cent, or .01 dollars. If there are no cents, then the scale is still 2, but the smallest denomination is $0.05.
EMU Triangulation
Select the check box to indicate that this currency must be converted to other checked currencies using the EMU Triangulation method.
Active
Select the check box to indicates the currency can be chosen by the user.
Start Date
Select the date when the currency becomes active.
End Date
Select the date when the currency is no longer active.
Extended Scale
Type the number of places after the decimal for storing currency data in the Siebel database.
The following values must be the same:
The number of decimal places that the value in the Extended Scale field designates
The number of decimal places that the value in the Scale field designates
The number of decimal places after the decimal in the value in the Exchange Rate field (in the Exchange Rate view in the Currencies view of the Administration - Data screen)
If these values are different, then results of currency calculations (for example, conversions or discounts) might be different than expected. Unexpected calculations result because the currency values that are stored in the Siebel database, and not the displayed values, are used for the calculations.
Setting Up Currency Conversion
To set up exchange rates, review the following topics:
Setting Up Exchange Rates
After you have set up your currencies, but before you use any currency features or import data with foreign currencies, you must set up exchange rates that are used to convert currencies.
If you fail to set up an exchange rate, then currency is converted on a one-to-one basis. Consequently, the amount stays the same, but the currency symbol changes.
To set up exchange rates
Navigate to the Administration - Data screen, then the Currencies view.
In the Currencies list, select the currency for which you want to establish exchange rates.
Navigate to the Exchange Rates view.
In the Exchange Rates list, create a new record, and complete the necessary fields.
Some fields are described in the following table.
Field Comments Type
Select a value for the type of exchange rate. Currently, Daily is the only type used.
To Currency
Select the currency to which you are converting the currency selected in the currencies list.
Exchange Rate
Type the conversion rate. If the number of places to the right of the decimal in this field does not match the value in the Extended Scale field and Scale field in the Currencies list, then the results of currency calculations might be different than expected.
Exchange Date
Select the date of this conversion rate. When converting currencies, Siebel Business Applications use the exchange rate date is closest to, but not past, the date of the transaction. Depending on the accuracy that you need and on how much currency values are fluctuating, you might want to enter a new exchange rate every week, month, quarter, or year.
Siebel Business Applications use the Exchange Date only to convert currencies in transactions in which money is received. For example, Quote Item Price has an Exchange Date field, because it represents money that your company will receive, and your sales representatives enter the date when the money will be received.
Repeat step 4 to add additional exchange rates.
You must restart the Siebel client or use the clear cache command before any changes to exchange rates can be seen in your Siebel application. For more information about clearing the cache, see Clearing the Cache.
The Euro and Triangulation
If a country is a member of the European Monetary Union (EMU), then convert its currency to other currencies through the Euro. This currency conversion is called triangulation, and is used when either currency being converted has EMU Triangulation checked.
For example, if you are converting from USD to DEM and DEM has EMU Triangulation checked, then you must set up the conversion rates between US dollars and the Euro and between the Euro and US dollars. You do not have to check the EMU Triangulation field for USD. The DEM is converted to EUR according to the fixed exchange rate set by the European Monetary Union, and then the amount in EUR is converted to USD according the exchange rate you set up.
The EMU Triangulation field is already checked for the following European Monetary Union member nations: Germany (DEM), Belgium (BEF), Spain (ESP), France (FRF), Ireland (IEP), Italy (ITL), Netherlands (NLG), Austria (ATS), Portugal (PTE), Finland (FIM), and Luxembourg (LUF). However, you can check or clear this field. For example, if the United Kingdom or Sweden joins the EMU, then you can check the field for that currency.
To calculate triangulation conversion, the conversion rate is always expressed to six significant figures. Conversions from one national currency unit into another currency are made by:
Converting the monetary amount from the national currency unit into the Euro.
Rounding the result to not less than three decimal places.
Converting the result to the target national currency.
Rounding the result to the lowest subunit of the target national currency, such as pfennig for the German mark or centime for the French franc.
Currency Conversion Functionality
Currency conversions currently occur in your Siebel application in various features. Some examples follow:
Price lists. When you change the currency code of a price list, it prompts you for an exchange date and converts the prices of all of the price list items.
Quotes. When you change the currency code of a quote, it converts the discount amounts and discount prices.
Forecasting. When you update forecast information from the opportunity, it converts from the opportunity currency to the forecast currency if the currencies are different. When you roll up the forecast lines, it converts from the forecast line currency to the rollup forecast currency if the currencies are different.
Projects. When you create expenses in a currency different from the project’s currency and submit the expenses to the project, the expense amount is converted from the expense currency to the project currency in the Project Time Expenses Summary and Project Time Expenses Adjustments views.
Rate lists. When you change the currency code of a rate list, you are prompted for an exchange date and the prices of all of the price list items are converted.
Expense reports. When you prepare expense reports, you can perform currency conversion between the expense currency and your default currency.
Reports. The following reports support currency conversion:
Opportunity Pipeline Report by Rep. Opportunity revenues created in different currencies are converted in the Total and Subtotal fields to the user’s default currency.
Euro Expense Report. If expenses have been created in an EMU currency, then all expenses appear in dual currencies.
Project Limit Summary Report.
Forecasting Reports.
Current Quotes Report.
Charts. The following charts support currency conversion:
Opportunity Current Opportunity Analysis. Opportunity revenue is converted to the user’s default currency if both the opportunity currency and the revenue currency are different from the user’s default currency.
Forecast Analysis.
Setting Up Expense Types
When employees create expense reports, they select an expense type for each line item in the report. For example, when employees travel on business, they might have to enter line items with expense types Food, Airfare, Car Rental, Hotel, and so on.
When you set up expense types, you specify the expense types that are available to employees in the drop-down list that they use to select expense types. You also specify how these expense types are to be categorized and summarized in expense reports.
You can also create establishments that are associated with these expense types. For example, if the expense type is Airfare, then you might associate establishments with it such as Air Canada and British Airways. For more information about associating expense types with establishments, see Siebel Project and Resource Management Administration Guide.
To set up expense types
Navigate to the Expense Reports screen, then the Expense Types view.
Create a new record, and complete the necessary fields.
Some fields are described in the following table.
Field Comments Expense Type
Select a value for the expense type that the employee selects in the Expense Type drop-down list of expense report line items, such as Airfare.
Report Category
Select a category for this expense type. This category is used in summary reports, such as Air/Rail Fare.
Summary
Type a larger summary category for this expense type, such as Travel Cost. This summary category is used in summary reports.
Setting Up Payment Terms
Payment terms are the different terms that you offer to your customers, such as Net 30 days and Net 60 days. You set up payment terms so that they are available in your Siebel application, for example in the Quotes screen.
To set up a payment term
Navigate to the Administration - Data screen, Orders, and then the Payment Terms view.
Create a new record, and complete the necessary fields.
Some fields are described in the following table.
Field Comments Payment Term
Type a name for the payment term, such as Net 30.
Net Days
Type the number of days if the payment term requires payment in a specific number of days after the order date.
Description
Type a description of the payment term.
Discount
Select a value for the amount of the discount if there is a discount for early payment.
Discount Days
Type the number of days within which a customer must pay to qualify for the discount if there is a discount for early payment.
Due
Select the due date if there is a specific due date for payment.
Integration ID
Displays a cross-reference that links the Siebel application to corresponding payment term information in the back-office application. Do not modify this field.
Setting Up Periods
Periods are time periods that are used in your business, such as Q1 2002 or Jan. 2001. Periods are used extensively in the Siebel application, such as in forecasting, time sheets, and expense reports.
Be sure to set up periods far enough into the future to accommodate forecasting. For example, the default forecast is for seven months ahead. Therefore, if you keep this default, then you must create periods defined for at least seven months from the current date for forecasting to work correctly.
To set up periods
Navigate to the Administration - Data screen, then the Periods view.
In the Period Definition list, create a new record, and complete the necessary fields.
Some fields are described in the following table.
Field Comments Period
Type a name for the period, such as Q1 2001.
Closed
Select the check box to indicate that the period has already closed.
Start
Select the start date for the period.
End
Select the end date for the period.
Type
Select a value for the type of period, such as month, quarter, or year.
Description
Type a description of the period.
Associating Period Units with a Period
After setting up a period, you can associate Period Units with it. Period Units allow you to define one time unit in terms of another time unit. For example, day periods can be associated with week periods for use in Timesheets. When a new timesheet is created for a week period, each day in that week is also added to the timesheet. This functionality requires the day periods to be associated as Period Units with the week period.
To associate period units with a period
Navigate to the Administration - Data screen, then the Periods view.
Select the appropriate period.
In the Period Units list, create a new record, select all the period units to associate with the period in the Period Units dialog box, and click OK.
Working with Telephone Formats
Telephone formats specify how phone numbers are formatted when users enter the numbers in phone number fields. You can have only one phone format for each country code. The phone format is applied only when users enter numbers without other formatting symbols, such as a slash (/), or dash (-).
Before users enter phone numbers, perform the following tasks:
Set the default locale. The default phone format is determined by the locale setting. For more information, see Setting Up Locales.
Define phone formats for countries that do not have a format already defined. For more information, see Specifying Phone Formats.
If a user enters a phone number from a country for which the format has not yet been specified, then the phone number might be formatted incorrectly.
North American Phone Formats
The default format for North American phone numbers is (000) 000-0000. The phone formatting logic for North American phone numbers works as follows:
If the user enters 10 digits in a phone number field, then the number is formatted as (123) 123-1234.
If the user enters more than 10 digits, then the first 10 digits are formatted as (123) 123-1234, and the rest of the digits are formatted as the extension number. The user can enter up to 40 digits.
If the user enters fewer than 10 digits, then an error message appears.
If the user begins the phone number with a zero (0), then an error message appears.
This formatting logic is followed even when the default locale is not North America.
International Phone Formats
An international phone number is a phone number for a country other than the current default country.
To enter an international phone number in a phone number field, the user must enter a plus sign (+), followed by the country code. For example, the user can enter +44. If the user does not enter a country code, then the default country code is assumed.
When a user enters an international phone number in a phone number field, the formatting of the number depends on the following:
The number of digits that the user enters
The number of digits specified for the country in the phone format
The following table describes the formatting logic.
Table Formatting Logic
| Number of Digits | Formatting Details |
|---|---|
Same as in format |
Formatted as specified. |
More than in format |
First digits are formatted as specified. The rest of the digits are formatted as an extension number. |
Fewer than in format |
Entry is accepted without an error message to accommodate phone numbers of different lengths. |
If there is no phone format for the indicated country, then the number remains formatted in the same way that the user enters the number. No error message appears.
Maximum Length for International Phone Numbers
The following table shows how to calculate the safe maximum length for international phone numbers.
Table Maximum Length for International Phone Numbers
| Is there a phone format for the country? | Then, the safe maximum length for international phone number is |
|---|---|
Yes |
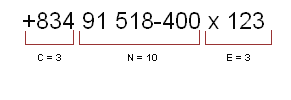
C + 2N + E + 2 ≤ 40 |
No |
2C + 2N + E + 2 ≤ 40 |
In the formulae in this table:
C is the length of the country code.
N is the length of the city code and the subscriber number, including any formatting, such as spaces or hyphens.
E is the length of the extension number.
An example calculation of the maximum length of an international phone number follows:
Specifying Phone Formats
If your users must enter phone numbers for countries for which a format has not been entered in your Siebel application, then you must specify phone formats for those countries.
To specify phone formats
Navigate to the Administration - Data screen, then the List of Values view.
Query the Type field for the entry PHONE_FORMAT to see the existing phone formats.
Create a new record, and complete the necessary fields.
Some fields are described in the following table.
Field Comments Type
Select a value of PHONE_FORMAT.
Display Value
Type the format string for the display value.
Language-Independent Code
Type the language-independent code. Use the number zero (0) to represent required digits, the # character to represent optional digits, and other formatting characters to represent how to format the phone number. Do not include any alphanumeric characters other than zero. For example, to format an Australian phone number, which includes a two-digit area code and a six- or eight-digit number, use (00) 000# 000#.
You do not have to include characters to represent the country code in the format. When a user enters a number, the country code is automatically shown if the default country is different from the country code.
Order
Type the country code of the new format. When adding new codes, make sure that no country code is a prefix of any other. For example, because India’s country code is 91, do not add a country code of 9 or of 910 (or any other number beginning with 91).
Restart the Siebel Server.
Examples of Formatting of Phone Numbers
The following table shows how phone numbers appear under various circumstances. In this example, the default country is the United States. Therefore the default format is the North American format, (000) 000-0000. The 00-000-0000 format has been entered for country code 91.
Table Examples of Phone Number Formatting
| User Enters | Number Is Formatted As |
|---|---|
1234567890 |
(123) 456-7890 |
1234567890123 |
(123) 456-7890 x123 |
123456 |
The following error message: Invalid data has been entered. |
+91123456789 |
+9112-345-6789 |
+9112345678910 |
+9112-345-6789 x10 |
+9112345 |
+9112345 |
+2512345 |
+2512345 |
?0+9112345678 |
?0+9112345678 (you see the ‘?’ and the ‘0’) |
?0HelloWorld |
?0HelloWorld (you see the ‘?’ and the ‘0’) |
Sorting Phone Numbers
Phone numbers are stored in the Siebel database without special format characters, so the special format characters have no effect on the sort order.
Querying Phone Numbers
When performing a query on a phone number, do not include any format characters such as commas (,), hyphens (-), periods (.), the letter x, or spaces.
You can query for only country 61 by typing +61* but you cannot query for only North American phone numbers this way, because +1* returns all phone numbers. To query for North American phone numbers, type the following: not like +1*.
When you use a phone number in a query, the country code of the default locale is automatically added to the query, unless the default locale is North America. If the default locale is North America, then no code is added. For example, if the default locale is Germany, and the user types 0181 in the phone field of a query, then the German country code (+49) is added to the query. The query becomes +490181*.
To find a number for a country other than the default country, the user must specify the country code in the query. To avoid limiting the query to one country, the user must refine the query, and remove the country code portion of the query specification.
To see a demonstration of this behavior, look at the Contacts screen. Every phone number for a country other than the default contains +n at the beginning, while every phone number for the default country code appears as local (without a plus sign). Phone numbers that have the +n require explicit queries. The user must specify the country code and the number. Local numbers are returned normally.
The following table provides examples of how to query phone numbers.
Table Phone Number Queries
| Query Result | Query Criteria |
|---|---|
(123) 456-7890 |
1234567890 |
+61(123) 45.67.89 x0 |
+611234567890 (if 61 is defined as a country code) |
Country code 61 phone numbers |
+61* |
All phone numbers |
+1* |
All North American phone numbers |
not like +* |
415 area code numbers (North America only) |
415* |
Null phone numbers |
is null |
415 area code or null (North America only) |
415* or is null |
(800) SKY-PAGE |
800SKY* |
Importing Information with EIM
Siebel Enterprise Integration Manager (EIM) manages the exchange of data between Siebel database tables and other corporate databases. When you use EIM to import information that includes international phone numbers, the numbers are handled as described in Working with Telephone Formats. For more information about EIM, see Siebel Enterprise Integration Manager Administration Guide.
Updating the Phone Format with EAI Adapter
When you update the phone format using Siebel EAI Adapter, the plus (+) sign and the country code are required, but the phone format can be in any form (not only US format).
Setting Up Pager Companies
Pager companies can be set up so they are available from the Pager Company field in the Send Page dialog.
To set up a pager company
Navigate to the Administration - Communications screen, then the Pager Companies view.
In the Pager Companies list, create a new record, and complete the necessary fields.
Note: The pager companies you use to send pages must support Telocator Alphanumeric Protocol (TAP), which is an industry standard for sending alphanumeric pages.
About Date Formats
For the Siebel Web Client, the display format for date and time is determined by the locale settings of the application server. For more information, see Setting Up Locales.
For the Siebel Developer Web Client and the Siebel Mobile Web Client, the date format is determined by the specification in the client computer’s operating system.
When a user creates a query using a date field, the user must use the appropriate date format.
Setting Up ZIP Codes
ZIP Codes facilitate finding address attributes (City, State, and so on). They also facilitate using the street address to find nine-digit postal codes. Siebel Business Applications ship with a table of United States Postal Service ZIP Codes, and the table is available for customer use.
To add a ZIP Code
Navigate to the Administration - Data screen, then the ZIP Code Administration view.
In the ZIP Geocodes list, create a new record, and complete the necessary fields.
Administering Global Time Zone Support
The time zone records that are shipped as seed data with Siebel Business Applications include the world time zones, each with a start date of 1 January 1900. The world time zones that are available at the time of a Siebel release are included in the release.
Time zone detail records are included with time zone records. Time zone detail records are important for tracking minor differences in time zones. For example, there is a time zone detail record for each of the continental United States time zones with a start date of 1 January 2007, which reflects the changes in start and end dates for daylight savings time for 2007. If the daylight savings time start and end dates change again, then add a new record for the year of the change. For more information about global time zone support, see Siebel Global Deployment Guide.
Use the Time Zone administration view to:
Edit the text descriptions of time zones and their abbreviations.
Manage the active status of time zones to control which time zones are available to users for use in the Siebel Business Applications.
Manage multilingual translations to control how time zone information appears to users in multiple languages.
Set the start and end dates for daylight savings time for different years and zones.
Tasks for administering time zones include:
Modifying Time Zones
You rarely modify a time zone’s regional settings. However, you might want to modify other time zone settings such as the display name or daylight savings rules, because these settings occasionally change.
To modify time zone settings
Navigate to the Administration - Data screen, then the Time Zone Administration view.
In the Time Zone list, select the time zone record you want to modify.
Modify the fields as necessary.
In the Detail list, add or modify the records as necessary.
Some fields are described in the following table.
Field Comments Name
Type the name of time zone.
Standard Abbreviation
Type the abbreviation for the time zone.
DST Abbreviation
Type the abbreviations for daylight savings time (DST).
Start Date
Select the date on which the offset rule becomes effective.
UTC Offset
Type the number of minutes for the offset from Coordinated Universal Time (UTC) when DST is not in effect.
DST Bias
Type the number of minutes for the incremental DST offset from UTC when DST is not in effect.
DST Start Ordinal
Select a value for the DST start ordinal. This field is part of the rule that determines when DST starts. For example, if the rule is the first Sunday in April, then First is defined in this field.
DST Start Day
Select a value for the DST start day. This field is part of the rule that determines when DST starts. For example, if the rule is the first Sunday in April, then Sunday is defined in this field.
DST Start Month
Select a value for the DST start month. This field is part of the rule that determines when DST starts. For example, if the rule is the first Sunday in April, then April is defined in this field.
DST Start Time
Type the number of minutes after midnight that DST starts. For example, if DST starts at 2:00 A.M., then set the start time to 120.
Maintaining Translations of Time Zones
You maintain translations of the text-based fields for each time zone using the Time Zone Administration view.
To maintain translations of time zones
Navigate to the Administration - Data screen, then the Time Zone Administration view.
In the Time Zone list, select the time zone you want to translate.
In the Time Zone Translation list, create a new record, and complete the necessary fields, including the translation of the Name field for the selected language.
Repeat step 3 for each language required for translation.
Date and Timestamps
The date and time used for timestamping records are obtained by the Siebel Server. When a remote user runs the Siebel client in disconnected mode, the Siebel Server runs on the user’s computer and takes the date and time from that computer.
If the Global Time Zone feature is enabled, then fields of data type UTCDATETIME are converted to UTC during operations for the Siebel Application Object Manager. For more information, see Siebel Global Deployment Guide.
Setting Up Email, Fax, and Mail Accounts (Contact Us)
Salespeople use the Contact Us screen to answer questions and provide contact information to customers. If your organization uses Siebel eService, then your customers can access this information directly from a Contact Us screen on your Web site.
Creating a Contact Us Account
To help your salespeople provide information about a chosen topic, you can create different accounts, such as Technical Support, Shipping, and Sales.
To add a Contact Us account
Navigate to the Administration - Application screen, then the Contact Us view.
In the Email, Fax and Mail Accounts list, create a new record, and complete the necessary fields.
Some fields are described in the following table.
Field Comments Account Type
Displays Contact Us.
Access List
Select the employees who can view the Contact Us account.
About Adding Email Addresses and Subjects
If your organization uses Siebel eService, then any email addresses you include in Contact Us accounts appear on a Contact Us screen on your Web site. You can create default email subjects that are added to the user’s Subject line when the user sends email through your Web site. For more information, see Siebel eService Administration Guide.
Setting Up Industries
You can set up and maintain industry information used throughout the Siebel application. The information in the Industries view populates the Industries drop-down list, which is found in a variety of screens and views, such as in the Accounts and References screens. The Industry list can also be used by Siebel Assignment Manager to assign new leads or service requests to Siebel users. For example, a sales representative who covers the pharmaceutical industry can be automatically assigned to new accounts using a Pharmaceutical Industry value.
To add an industry
Navigate to the Administration - Data screen, then the Industries view.
In the Industries list, create a new record, and complete the necessary fields.
Some fields are described in the following table.
Field Comments Industry
Type the name of the industry. If you enter a value that already exists, then an error message appears.
SIC Code
Type the Standard Industry Classification Code for the industry. If you enter a value that already exists, then an error message appears.
Type
Select the type of industry.
Setting Up Languages
You can set up and maintain language information used throughout the Siebel application. The information in the Languages view populates the Language drop-down list, which is found in a variety of screens and views, such as in the References and SmartScripts screens. The Language field can also be used by Siebel Assignment Manager to give assignments to call center agents who work for international companies and speak a variety of languages with customers.
For example, a sales representative for a German chemical manufacturing company can use a Danish SmartScript to make a sales call to a prospective customer in Copenhagen, and then make the same sales call using an Italian SmartScript when speaking to a prospective customer in Rome. In these cases, the Language field is used to identify the language into which each SmartScript has been translated.
To add a language
Navigate to the Administration - Data screen, then the Languages view.
In the Languages list, create a new record, and complete the necessary fields.
Some fields are described in the following table.
Field Comments Name
Type the name of the language. If you enter a value that already exists, then an error message appears.
Code
Type the code for the language. If you enter a value that already exists, then an error message appears.
About Case-Insensitive and Accent-Insensitive Queries and Searches
By default, queries and searches in Siebel Business Applications are sensitive to case and accent. If you perform a query or search, then a match occurs only if the search criteria you enter are capitalized and accented in the same way that the data is capitalized and accented in the Siebel database. For information about how to implement CIAI queries and searches on particular columns or fields, see Configuring Siebel Business Applications. For information about how the CIAI feature affects performance, see Siebel Performance Tuning Guide.
If you do not want queries and searches to be case sensitive and accent sensitive, then you can enable case-insensitive and accent-insensitive (CIAI) queries and searches on particular columns and fields in Siebel Tools. If you enable CIAI queries on a column, then when you enter the query in the Siebel application, the field for the CIAI column is empty. When you enter the queries for fields that are not CIAI-enabled, <Case Required> text appears in the field.
Not all types of databases support both case-insensitive and accent-insensitive queries and searches on CIAI-enabled columns. The following information lists the CIAI features that are supported in each type of database.
Table Database Support for CIAI Queries
| Database | Case Insensitive | Accent Insensitive |
|---|---|---|
DB2 |
Yes |
No |
MSSQL |
Yes |
Yes |
Oracle |
Yes |
No |
Forcing Case-Sensitive or CIAI Queries or Searches
Regardless of the setting for case-sensitive and accent-sensitive queries, users can use operators to force case-sensitive or CIAI queries or searches. The following table describes the operators to use to force case-sensitive or CIAI queries or searches.
Table Operators to Force Case-Sensitive or CIAI Queries or Searches
| Type of Query | Operator | Examples |
|---|---|---|
Case sensitive and accent sensitive |
= followed by the criterion in single quotation marks |
=‘Computer’ returns only records that have Computer spelled with a capital C. |
CIAI |
~ followed by other operators if required, and the criterion |
~LIKE computer returns all records that have computer in the field, regardless of capitalization. ~LIKE francais returns all records that have francais in the field, regardless of capitalization or accent. |
In searches with complex criteria, the user must also use the tilde (~) operator to force the CIAI feature, regardless of the setting for case-sensitive and accent-sensitive queries and searches.
Adding Additional Web Browsers
If you must add a Web browser definition that is not included in the standard Siebel application, then you can choose between the following two methods.
Add a parent browser definition. This definition includes all of the browser capabilities. Use this method if you must add a completely new browser (such as Opera), or a major upgrade release of an existing browser (such as future releases of Microsoft Internet Explorer or Mozilla). For information about this procedure, see Adding a Web Browser.
Add a child browser definition. Child browser definitions inherit the capabilities of the parent browser, and add additional capabilities as necessary. Use this method for adding interim releases that are based on a browser that is already defined. For information about this procedure, see Adding a Web Browser.
Required Browser Capabilities
For a browser to work correctly, it must include two capabilities that allow the browser to be identified at run time. The required capabilities are:
User-Agent. This capability names the browser.
Accept. This capability indicates the types of documents the browser can open.
These capabilities are part of HTTP standard information and appear in HTTP request headers sent from a browser. For example, a request from an HTML5 browser sent to a Web application might include the following lines:
Accept: image/gif, image/x-xbitmap, image/jpeg, image/pjpeg, */*
User-Agent: Mozilla/5.0
Both the User-Agent and Accept capabilities must be included because at run time the User-Agent is checked to identify the browser. If the User-Agent is not recognized, then the values for the Accept parameter in the header are compared to the Accept parameters of the browsers listed in the Web Browser Administration screen to find the browser with the most closely matching Accept parameters.
In addition to the User-Agent and Accept capabilities, if a browser is based on an existing parent browser, then it must include the Parent capability.
Adding a Web Browser
Whether you are adding a parent browser or a child browser, the process is similar. However, in the case of a parent browser, you add all detailed components, and in the case of a child browser, you base the browser on an existing browser.
To add a parent Web browser
Navigate to the Administration - Web Browser screen, then the Browsers view.
In the Browser list, create a new record, and complete the necessary fields.
Note: If there is an existing browser that contains most of the appropriate capabilities, then you can copy it, and make changes to it. To do so, click the cogwheel icon, and select Copy Record.Drill down on the Name field for the record.
In the Capabilities list, create records for each of the capabilities of the browser.
Adding a Child Web Browser
Complete the following procedure to add a child Web browser.
To add a child Web browser
Navigate to the Administration - Web Browser screen, then the Browsers view.
Note the name of the parent browser (the browser on which you base the new browser).
Create a new record, and complete the necessary fields.
Drill down on the Name field for record.
In the Capabilities list, create the following 3 records:
For the first record, select the Parent capability in the Add Capabilities dialog box, and enter the parent browser you identify in Step 2 in the Capability Value field.
For the second record, select the User-Agent capability in the Add Capabilities dialog box, and enter the appropriate user-agent in the Capability Value field.
For the third record, select the Accept capability in the Add Capabilities dialog box, and enter the types of documents that the browser can open in the Capability Value field.
In the Capabilities list, add any additional capabilities that are not included in the parent browser or that differ from those inherited from the parent browser.
Administering Quick Fill Templates
Users can create quick fill templates for their personal use. Administrators can make these templates public so that all users have access to them. For information about creating Quick Fill Templates, see Siebel Fundamentals.
To make a quick fill template public
Navigate to the Administration - Application screen, then the Quick Fill Templates Administration view.
Select the template record.
Select the Public Flag field for the template.
Editing a Quick Fill Template
Administrators can also delete any quick fill template and make simple changes to the template record (such as name, sequence, and public flag).
To edit a quick fill template
Navigate to the Administration - Application screen, then the Quick Fill Templates Administration view.
Select the template record.
In the Details form, edit the fields as necessary.
The Sequence Number determines the order in which the fields are populated.
Setting Up Default View Links for Screen Home Pages
Administrators can define links that appear on the quick links area of screen home pages. These default view links are visible to all users. For more information about screen home pages and setting up view links, see Siebel Fundamentals.
To add a default view link to a screen home page
Navigate to the Administration - Application screen, then the View Links view.
In the Screen Homepages list, select the home page.
In the View Links list, create a new record, and complete the necessary fields.
Make sure that the view you specify is available to all users.
Tip: Use increments of 10 to sequence the links to provide users space to create their own view links between the default links that you create.