8Getting Started with Siebel Mobile Disconnected Applications
Getting Started with Siebel Mobile Disconnected Applications
This chapter describes how to get started with Siebel Mobile applications, and the common procedures that you can execute in online (connected) and offline (disconnected) mode in all applications. Tasks and features that are not supported in offline mode are called out. It includes the following topics:
Siebel Life Sciences Guide
Siebel Applications Administration Guide
Siebel Order Management Guide
Siebel Marketing User Guide
Siebel Field Service Guide
Logging In to Siebel Mobile
This topic describes how to log in to Siebel Mobile on your mobile device.
To log in to Siebel Mobile
Start the browser on your mobile device.
Type the URL address for the Siebel Mobile disconnected application in the following format:
http://<web site domain>/<objmgr>/<lang>
For example, if the Web site is www.localhost.com and the Siebel Application Object Manager component (Objmgr) is epharmam_enu, salesm_enu, and servicem_enu, then the URL is as follows:
http://www.localhost.com/epharmam/enu
http://www.localhost.com/salesm/enu
http://www.localhost.com/servicem/enu
Do not use a previous URL (with SWE commands) because the connection to the server might fail. You can also create an icon on your iPad for the mobile application, and tap this icon to start the application, rather than typing the URL address each time to start the application. Siebel Mobile disconnected applications have their own URL addresses, which are different from the URL addresses that you use to access the Siebel applications on a desktop. You can access Siebel Business Applications with full functionality on your mobile device browser by logging in using the appropriate URL address.
Type your login credentials, for example, as follows:
UserID: JSmith
Password: password
Note: In offline mode, you will not be prompted to re-enter your login credentials when you relaunch the mobile application after performing a full download.(Optional) Tap the HTML5 Browser Compatibility link on the login screen to show your browser's compatibility with HTML5 features.
HTML5 is a core technology markup language of the Internet and is used to structure and present content on the Web. If an HTML5 feature is not compatible with your browser, then you can tap the question mark icon to review more information about that feature and about the limitations that you might experience in the Siebel CRM application because of its incompatibility.
Tap Login, and then tap Increase when prompted with the following message:
Do you want to allow "http://localhost" to use up to 50MB of storage on your
iPad
When you log in to a disconnected application, you are connected to a unique mobile-enabled and offline-enabled Siebel Application Object Manager for the Siebel application. By default, you log in to disconnected applications in connected mode, where you are connected to the Siebel Server. Notice that the airplane icon on the application banner is solid, which indicates a connected state.
If this is your first time logging in to the application, then accept the Siebel Mobile End User License Agreement when prompted; otherwise, you will not be able to continue.
Logging Out of Siebel Mobile
This topic describes how to log out of Siebel Mobile on your mobile device.
To log out of Siebel Mobile
Tap Settings (the photo icon) on the application banner, and then tap Logout.
Navigating the Siebel Mobile User Interface
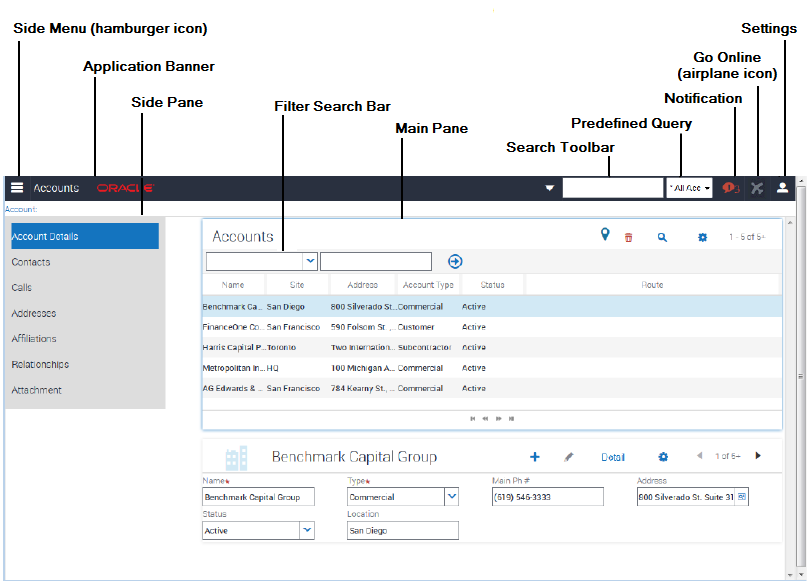
The application user interface for Siebel Mobile is divided into three areas: the side pane, the main pane, and the application banner. These areas are shown in the following image.
If you navigate away from the Siebel Mobile application in online or offline mode and then return to the application, then the application reloads. The current application context is also maintained even after the application reloads. You can navigate away from the mobile application by, for example, selecting a URL link from within the application on your iPad or switching to another application.
Side Pane
The side pane appears to the side of the UI and typically displays the related item information according to the object that is selected from the Side Menu. In the previous image in, for example, Accounts is selected from the Side Menu and the related items for Accounts are: Contacts, Calls, Addresses, Affiliations, Relationships, and Attachment.
Main Pane
The main pane or work area of the UI typically displays context information according to the selection that you make in the Side Menu on the application banner, in the side pane, and in the UI in general.
Application Banner
The application banner appears across the start of each page in the UI and it persists for all views. The Side Menu is available on one side of the application banner and the following options are available on the other side of the application banner, as shown in previous image: Search Toolbar, PDQ (Predefined Query) drop-down list, Notification, Airplane, and Settings.
Side Menu (the hamburger icon). Tap to display the Siebel Objects available in the mobile application. Selecting any Siebel object redirects you to a screen where you can manage the selected Siebel object. The following table shows the Siebel objects that are typically available from the Side Menu for each Siebel Mobile disconnected application.
Search Toolbar. Tap to perform a search. For more information, see Searching for Records in Siebel Mobile.
PDQ. Tap the drop-down list to display a list of the available predefined queries, which you can run for the object selected from the Side Menu. For more information, see Running Predefined Queries in Siebel Mobile. PDQ is supported only in online mode.
Notification (the exclamation mark icon). Tap to display notification messages. For more information, see Reviewing Notification Messages in Siebel Mobile.
Go Offline/Go Online (the airplane icon). Tap to go offline and work in disconnected mode, to go back online after you have finished working in offline mode, or to synchronize data as required. For more information about the behavior of the airplane icon, see Using the Airplane Icon on the Application Banner.
Settings (the photo icon). Tap to configure the behavior of and notification settings for Siebel Mobile disconnected applications, or to log out of Siebel Mobile disconnected applications. For more information, see Configuring Application Settings for Siebel Mobile. Log out is supported only in online mode.
Table Siebel Objects Available from the Side Menu on the Application Banner
Application |
Siebel Objects |
|---|---|
Siebel Mobile application for Siebel Pharma |
The following Siebel objects are typically available from the Side Menu on the application banner: Calls, Accounts, and Contacts. For more information, see Using the Siebel Mobile Disconnected Application for Siebel Pharma. |
Siebel Mobile application for Siebel Sales |
The following Siebel objects are typically available from the Side Menu on the application banner: Accounts, Contacts, Leads, Opportunities, Quotes, Orders, and Activities. For more information, see Using the Siebel Mobile Disconnected Application for Siebel Sales. |
Siebel Mobile application for Siebel Field Service |
The following Siebel objects are typically available from the Side Menu on the application banner: Activities, Service Requests, Accounts, Browser, Orders, Invoices, Assets, and Shifts. For more information, see Using the Siebel Mobile Disconnected Application for Siebel Field Service. |
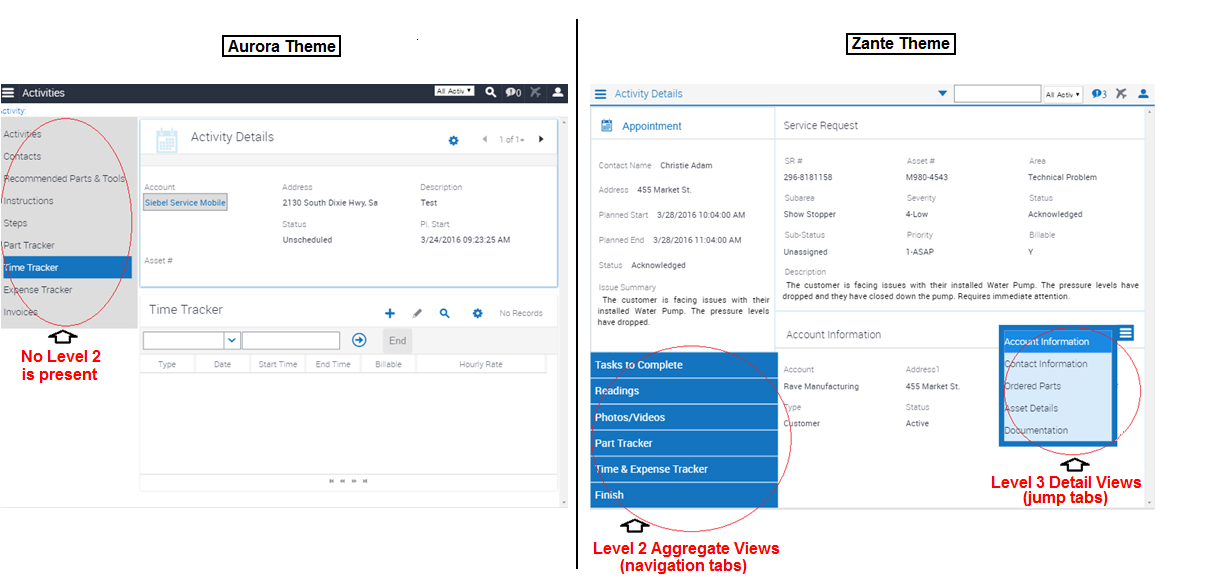
About the Siebel Mobile Aurora and Zante UI Themes
The Siebel Mobile applications for Siebel Field Service and Siebel Consumer Goods use the Zante UI theme by default, which is different from the Aurora UI theme which is the default theme used by the other Siebel Mobile applications (for Siebel Pharma, Siebel Sales, and Siebel Finance).
For information about navigating Siebel Mobile applications using the Aurora theme, see Using the Home Page for Siebel Pharma.
For information about navigating Siebel Mobile applications using the Zante theme, see Using the Home Page for Siebel Field Service.
For information about how to change the UI theme for your Siebel Mobile application, see Configuring Application Behavior Settings for Siebel Mobile.
The main difference between the Zante and Aurora themes is that the Zante theme uses second level navigation views as shown in the following image (see Level 2 Aggregate Views). For information about how to set up second level navigation views for your Siebel application, see Configuring Second Level Navigation Views.
Selecting Fields, Drop-Down Lists, and Records
When selecting fields, drop-down lists, and records in Siebel Mobile, you can perform the following actions:
Tap an editable field in the application to automatically display one of the following, according to the field type: drop-down list, text box, or date selector.
An asterisk (a star icon) beside a field name indicates that the field is a required field. Some required fields have a default value, other required fields display an error if no value is entered.
Tap anywhere on a drop-down list field to open the drop-down list.
Select multiple options from an associated drop-down list.
Tap once to select an option. Tap the same option again to deselect the option.
Tap a record to open and display the record details.
Tap a related item belonging to a record to open the related item.
Close a dialog box by tapping anywhere outside the dialog box.
Double-tapping is supported in Siebel Mobile.
For example, you can close a dialog box by double-tapping the selected entry in the dialog box.
Inline Editing
Inline editing is configured by default in Siebel Mobile and allows you to do the following:
Edit fields directly on Form (detail) and List applets without opening the Edit page for the record.
Edit fields in tables, windows and dialog boxes, and in many linked records on main record Form (detail) applets.
You cannot edit fields inline if any one of the following is true:
If the field is read-only, then you cannot edit the field inline.
If the field is a calculated field, then you cannot edit the field inline.
After you edit the fields in a record, you must navigate away from the record to save your changes to it.
Check Boxes
Check boxes can be configured to appear in one of the following formats in your mobile application:
As a regular check box. Tap the check box to display a check mark icon. Tap the check box again to remove the check mark icon.
As a flip switch. This is the default behavior. Tap or swipe the switch to display On. Tap or swipe the switch again to display Off.
For more information about customizing check boxes, see Configuring Siebel Open UI.
Data Display
For each applet in your mobile application, you can configure the data in the applet to display in list, tile, or tabular format. For more information about how to configure lists, tiles, and tables for Siebel Mobile data, see Configuring Siebel Open UI.
Managing Records in Siebel Mobile
This topic contains the following information:
Creating Records in Siebel Mobile
You typically add a record by tapping Add (the plus (+) icon) or create a new record by tapping New (the plus (+) or double plus (++) icon) from different areas within Siebel Mobile. You can add and create records in both online and offline mode.
When you add or create records, note the following about data entry:
You can type information directly into some fields, or select values from a drop-down list.
When you tap some fields, another dialog box appears from which you can select values or type values.
For some fields that already have a value, you can tap an icon beside the field to display a window from which you can select values or type values.
For example, you can tap Route to display location details. For more information, see Displaying Location Details in Siebel Mobile.
Note: This field functionality is supported only in online mode.An asterisk (a star icon) beside a field name indicates that the field is a required field.
To add or create records in Siebel Mobile
From any page within your Siebel Mobile application, tap Add (the plus (+) icon) or New (the plus (+) or double plus (++) icon).
Type in the details for the new record.
You must navigate away from the record to save it.
Linking Records to Your Selected Record
You can link one record to another. Linking records gives you access to all related information from records that you view. For example, you can see a complete view of customer information by linking contacts, opportunities, and activities to an account record.
You can associate a single record (single association) to the record that you are working with or you can select multiple records (multiple associations) to link to the record that you are working with as follows:
Single associations are supported in form and list views. For example, when associating an existing contact to an account in the Siebel Mobile application for Siebel Pharma, you can select the contact in the single-association popup window that opens.
Multiple associations are supported in form and list views. For example, when creating an account call in the Siebel Mobile application for Siebel Pharma, you can select multiple contacts to attend a call using the Attendees related item. A multi association popup window opens when you tap Attendees, and you can select one or more contacts as required.
Search supports searches for values within a single-association or multiassociation popup window. This feature enables you to filter search results.
Searching for Records in Siebel Mobile
You can perform a global search in Siebel Mobile by tapping the search toolbar on the application banner. Elsewhere in Siebel Mobile, you can search or query for records provided that a search control has been configured in Siebel Tools for the specific view or applet in question.
If you do not see a search bar when you navigate to a view or applet in Siebel Mobile, then a search control has not been configured in Siebel Tools for that particular view or applet.
You perform searches and inline queries (using Query, the magnifying glass icon) in Siebel Mobile in the same way that you do in Siebel CRM. For more information about querying and searching for records in Siebel CRM, see Siebel Fundamentals Guide. For more information about configuring Siebel search controls, see Siebel Search Administration Guide.
Modifying Records in Siebel Mobile
Use the following procedure to modify records in Siebel Mobile.
To modify records
From any Form (detail) applet within Siebel Mobile, do the following:
Tap the record field that you want to update, and update the field value. You might not be allowed to update all fields in the record.
Navigate away from the record or tap Save to save your changes to it.
Deleting Records in Siebel Mobile
The following procedure shows you how to delete records in Siebel Mobile. Users can delete only the records that they own. The delete button is disabled for business components that are marked as Owner Delete.
To delete records
Navigate to and select the record that you want to delete.
Tap Delete (the trash can icon) and then tap Yes when prompted for confirmation to delete the record.
In list format, you can also swipe across the record you want to delete and then tap Delete.
About Menu (the Cogwheel Icon) in Siebel Mobile
A Menu typically appears on all list and detail pages in Siebel Mobile. The following options are available when you select Menu, but you can configure other options for Menu as required by using Siebel Tools:
About Record. See Reviewing Record Summary Information.
Record Count. See Displaying the Total Number of Records.
Create Bookmark. See Creating Bookmarks in Siebel Mobile.
Columns Displayed. See Formatting the Columns to Display in the List View.
For more information about configuring Menu (the cogwheel icon) for Siebel Mobile, see Configuring Siebel Open UI.
Reviewing Record Summary Information
Use the following procedure to review the summary information for a selected record.
To review record summary information in Siebel Mobile
Navigate to and select the record whose summary information you want to review.
Tap Menu (the cogwheel icon) in the work area and then select About Record.
The summary information for the selected record appears and includes the following data:
The date when the record was created and by whom
The last date the record was updated and by whom
The number of modifications that have been made to the record
Tap OK to close the record summary information.
Displaying the Total Number of Records
Use the following procedure to display the total number of records in a parent object.
To display the total number of records in a parent object
Navigate to the parent object view that you want by doing one of the following:
Tap Side Menu and then select an object from the drop-down list.
Tap Side Menu, select an object from the drop-down list, and then a related item from the side pane.
Tap Menu (the cogwheel icon) in the work area and then select Record Count.
The total number of records in the parent object is returned.
Tap OK to close the record count information.
Field |
Guideline |
|---|---|
Parent Organization |
If this organization is a suborganization, select the parent organization. This allows an organization to be associated with another organization. |
Partner Flag |
Used for Siebel Partner Relationship Manager. This is a read-only check box. When the box is checked, this indicates that the organization represents an external enterprise that is a partner of your company.
Note: Partners are registered and promoted to organizations using the Approved Partners view in the Administration - Partner screen, as described in
Developing and Deploying Siebel Business Applications.
|
Creating Bookmarks in Siebel Mobile
Use the following procedure to create bookmarks for information that you want to return to later.
To create bookmarks in Siebel Mobile
From any page or view within Siebel Mobile, tap Menu (the cogwheel icon), and then select Create Bookmark.
A dialog box opens showing the URL address for the current page.
Copy the URL address and save it elsewhere (for example, in an email).
Tap OK to close the dialog box.
Formatting the Columns to Display in the List View
Use the following procedure to specify the columns to appear in the list view and in what order. Columns Displayed option is available on list pages only. Columns Displayed is not available on detail pages.
To format the columns to display in the list view
Navigate to the object view that you want by doing one of the following:
Tap Side Menu and then select an object from the drop-down list.
Tap Side Menu, select an object from the drop-down list, and then a related item from the side pane.
Tap Menu (the cogwheel icon) in the work area and then select Columns Displayed.
In the dialog box that opens, do the following:
Use the navigation arrows to move selected items forward and back between the Selected Columns list and the Available Columns list.
Use the up and down arrows to reorder the Selected Columns list.
Save the changes when finished.
Configuring the Number of Records Displayed on Mobile Devices
In Siebel CRM, you can configure the number of records displayed on mobile devices at the applet or application level using the following parameters:
HTML Number of Rows (applet parameter). Specifies the number of rows that Siebel CRM displays in the user interface for a particular list applet. If this parameter is not set (or is empty), then Siebel CRM uses the value specified in the NumberOfListRows parameter in the application configuration file to determine the number of rows to display in the UI. For more information about the HTML Number Of Rows applet parameter, see the topic about Applet in Siebel Object Types Reference.
NumberOfListRows (application parameter). Specifies the default number or records or rows to display per page on mobile devices. This parameter applies or is used only when a given applet’s HTML Number of Rows parameter is not set. For more information about using the NumberOfListRows application parameter, to configure the number of records displayed on each page, see the following procedure.
If neither the HTML Number of Rows applet parameter nor the NumberOfListRows application parameter are set, then Siebel CRM displays 10 records by default.
To facilitate smooth scrolling in list applets on mobile devices, the Siebel CRM client framework fetches three times the number of records specified by the HTML Number of Rows applet parameter or the NumberOfListRows application parameter. This keeps a buffer of records on the client which is higher than the displayed number of records so that the client does not have to go to the server every time a small scroll occurs. If neither parameter is set, for example, then a mobile device would display 10 records by default in the UI but fetch 30 records (and only 10 records would be visible in the UI at any one time).
To configure the number of records displayed on each page
In the Siebel Web client, navigate to the Administration - Web Browser screen and then the Browsers view.
Select the entry for which you want to configure the number of records displayed on each page, or if there is not entry, create one by selecting New Record from the drop-down list.
With the browser selected, click the Capabilities list.
If the NumberOfListRows appears in the list, then select it, click Edit, set the Capability Value to <the number of records to display per page >, and then save the record.
If the NumberOfListRows does not appear in the list, then click New.
In the Add Capabilities dialog box that appears, the NumberOfListRows may or may not appear in the list of capabilities.
If the NumberOfListRows appears in the list, then do the following:
Select NumberOfRows in the list and click OK.
In the Capabilities list, select NumberOfListRows, click Edit and then set the Capability Value to <the number of records to display per page>.
Save the record.
If the NumberOfListRows does not appear in the list, then do the following:
Click New.
Set the Capability Name to NumberOfListRows.
Set the Capability Value to <the number of records to display per page>.
Save the record.
Reviewing Notification Messages in Siebel Mobile
You can receive notification messages from time to time. Notifications provide a way for administrators, managers, and other users with access to the Message Broadcast view in Siebel CRM to send important information directly to user screens.
You review notification messages in Siebel Mobile by tapping Notification (the exclamation mark icon), which is shown in the following image. on the application banner. Note the following about notifications:
The counter beside the Notification button indicates the number of messages that are waiting for you to read. When there are zero messages, zero appears next to the button.
If there is one or more message waiting to be read that has an Urgent with Alert severity, then the Notification button blinks. The button stops blinking after the message is read.
The Notification button does not blink if there are messages waiting to be read with only a Normal, High, or Urgent severity.
If there is one or more message waiting to be read, then the Notification button shows the color of the highest priority unread message.
For more information about enabling and disabling, creating, reviewing, and updating notifications in Siebel CRM, see the chapter about Notifications in Siebel Fundamentals. See also Configuring Notification Settings for Siebel Mobile.
Configuring Application Settings for Siebel Mobile
You use Settings (the photo icon) on the application banner to configure the application settings for Siebel Mobile. When you tap Settings on the application banner, the following information appears:
The logged in user’s photo, provided one is uploaded to the user’s profile on Siebel Server. Otherwise, a default generic photo appears. For more information, see Uploading a User Profile Image to Siebel Server.
The logged in user’s name and email address.
The following options: Settings and Logout.
Settings. Has the following suboptions: Behavior and Notifications.
Behavior. See Configuring Application Behavior Settings for Siebel Mobile.
Notifications. See Configuring Notification Settings for Siebel Mobile.
Log Out. See Logging Out of Siebel Mobile.
Uploading a User Profile Image to Siebel Server
You can set a user profile image for your application, which involves uploading a user profile image to Siebel Server. The uploaded user profile image will appear instead of the default generic photo for Settings in Siebel Mobile applications. For more information about uploading a user profile image to Siebel Server, see the topic about setting a user profile image in Siebel Online Help.
Configuring Application Behavior Settings for Siebel Mobile
You use the Behavior option under Settings to configure the application behavior for Siebel Mobile including the startup view, navigation control, UI theme, and view transition.
Startup View. The default startup view for Siebel Mobile varies according to the mobile application that you are using, but you can change the startup view as required.
Navigation Control. The default navigation control for Siebel Mobile applications is Side Menu (hamburger navigation control), but you can change this to Tab or Tree as required, provided that the control is configured for your mobile application.
Theme. The UI theme that is used by Siebel Mobile applications. You can change this to a custom theme as required, provided that a custom theme is configured for your mobile application.
Transition. The default view transition that is set for Siebel Mobile applications is None, but you can change this to a custom view transition as required, provided that a custom view transition is configured for your mobile application.
For more information about navigation control configuration, creating a new mobile theme, and creating a custom view transition for Siebel Mobile, see Configuring Siebel Open UI.
To configure the application behavior settings for Siebel Mobile
Tap Settings (the photo icon) on the application banner, and then select the Settings option.
Tap Behavior, and then complete the fields shown in the following table as required.
Field
Description
Startup View
The name of the view to display when the application starts. Tap Startup View, and select a view from the drop-down list.
Navigation Control
Specifies the navigation control to use in the mobile application. Tap Navigation Control, and select one of the following options as required:
Side Menu. Indicates to use the hamburger navigation control (which is the default navigation control) in the application where all Siebel objects appear in a menu drop-down list in the UI.
Tab. Indicates to use the tab navigation control in the application where all Siebel objects appear in tab format in the UI.
Tree. Indicates to use the tree navigation control in the application where all Siebel Objects appear in tree format in the UI.
Theme
The UI theme to use throughout the application. Tap Theme, and select a theme from the drop-down list. The following themes are available:
If Side Menu is selected as the navigation control, then the following themes are available:
Aurora. This theme is used by default in the Siebel Mobile applications for Siebel Pharma, Siebel Sales, and Siebel Finance.
Zante. This theme is used by default in the Siebel Mobile applications for Siebel Field Service and Siebel Consumer Goods.
For more information, see About the Siebel Mobile Aurora and Zante UI Themes.
If Tab is selected as the navigation control, then the following themes are available: Synergy, Vanilla.
These themes are available only in the Siebel Mobile applications for Siebel Pharma, Siebel Sales, and Siebel Finance.
If Tree is selected as the navigation control, then the following theme is available: Aurora.
Transition
The view transition mode to use when moving from one view or applet to another view or applet in the mobile application. Tap Transition, and select a view transition from the drop-down list. The options are:
None
Slide In (that is, slide forward)
Slide Left (that is, slide backward)
Flip
Fade
Confirm Before Deleting Record
Specifies whether or not to prompt users for confirmation before deleting a record, as follows:
On indicates to prompt users for confirmation.
Off indicates not to prompt users for confirmation before deleting a record.
Tap the Confirm Before Deleting Record option so that a check mark icon or On appears. Tap the option again so that X or Off appears.
Log Events
Set Log Events to one of the following options to configure logging for Siebel Mobile applications:
Metadata Extraction
Data Extraction - Basic
Data Extraction - Detailed
ClientSystem, UpSync
All
Note: Log Events do not apply to Siebel Mobile connected applications. Log Events apply only to Siebel Mobile disconnected applications.Save the changes when finished.
Configuring Notification Settings for Siebel Mobile
You use the Notifications option under Settings to configure the settings for notification messages in your Siebel Mobile application.
To configure notification settings for Siebel Mobile
Tap Settings (the photo icon) on the application banner, and then select the Settings option.
Tap Notification (the exclamation mark icon), and then complete the fields shown in the following table as required.
Field
Description
Example Value
Update Interval (Seconds)
Type the time interval in seconds at which you want notifications to refresh.
120
Prefix of Normal Priority Message
Type the text to appear before a normal-priority message. This aids accessibility. For example, a letter is useful if you have difficulty distinguishing the colors of the messages.
N
Prefix of High Priority Message
Type the text to appear before a high-priority message. This aids accessibility. For example, a letter is useful if you have difficulty distinguishing the colors of the messages.
H
Prefix of Urgent Priority Message
Type the text to appear before an urgent-priority message. This aids accessibility. For example, a letter is useful if you have difficulty distinguishing the colors of the messages.
U
Save the changes when finished.
Displaying Location Details in Siebel Mobile
Global Positioning System (GPS) is integrated with Siebel Mobile so that when you tap the Route button, shown in the following image, a map window opens showing the location details. Mapping is configured by default for some list and form applets in Siebel Mobile, but you can set up mapping for any other Siebel Mobile applet as required by configuring the Route button (or the map functionality) in Siebel Tools for the applet in question. For more information, see the topics about maps in Configuring Siebel Open UI.
The Route button is available in the main pane or work area of Siebel Mobile, provided that the map functionality is enabled for the mobile application. If you cannot see Route button or if you can see it but it is disabled, then the map functionality is not enabled for the mobile application.
Information about the following is included in this topic:
Enabling the Map Functionality for Siebel Mobile
The map functionality is disabled by default in Siebel Mobile. Before you can use the map functionality in Siebel Mobile, you must enable it first. This involves enabling location services and disabling block pop-ups on your mobile device.
To enable the map functionality for Siebel Mobile
Enable location services on your mobile device (iPad) as follows:
Start your iPad.
Go to Settings, Privacy, Location Services, and then turn on Location Services.
If location services are disabled on your mobile device, then you will not be able to use the map functionality in Siebel Mobile.
Disable block pop-ups on your mobile device (iPad) as follows:
Start your iPad.
Go to Settings, Safari, and then turn off Block Pop-ups.
Displaying Route Details Using the Route Button
The following procedure shows you how to use the Route button to display the route details for a call or an account. The procedure is the same when using the Route button in other views. This procedure assumes that the map functionality is enabled for Siebel Mobile as shown in the following image.
To display route details using the Route button
Navigate to and open a call or an account in your mobile application.
All details for the selected call or account appear in the work area.
Tap Route (the pin icon) in the work area.
If prompted, select Allow to enable Siebel Mobile to use the location of your mobile device.
A map window opens with pins pointing to the location of the selected call or account, and showing the route from starting address (current mobile device location) to the destination call or account address.
If a route is not found for a given address, then an error message appears in the map window.
Running Predefined Queries in Siebel Mobile
You can run a saved predefined query (if available) for some Siebel objects in Siebel Mobile, as shown in the following procedure.
To run a predefined query in Siebel Mobile
Tap Side Menu and then select an object from the drop-down list.
Tap the PDQ drop-down list (shown in the following image. on the application banner to display the list of saved predefined queries for the object.
Scroll up and down the predefined query list that opens to find the query that you want to run.
Tap a predefined query in the list.
This step runs the predefined query, returning the appropriate data in the list view.
Tap PDQ on the application banner again to close the predefined query.
Scanning Barcodes in Siebel Mobile
Barcode scanning is supported by default for activity parts in the Siebel Mobile application for Siebel Field Service. To use the barcode feature in a different application view, then you must set up the barcode interface for the view in question. To use the barcode feature in a different mobile application (for example, the Siebel Mobile application for Siebel Pharma), then you must set up the barcode interface for a view in the required mobile application. For more information about setting up the barcode interface, which is an administrator task, see the chapter about barcodes in Siebel Field Service Guide.
The barcode interface in the Siebel Mobile application for Siebel Field Service allows you to scan barcodes for parts using a barcode reader. For more information, see Modifying Part Tracker for an Activity by Scanning Barcode Data.
You can also search for records by scanning barcode data in the Siebel Mobile application for Siebel Field Service. For more information, see Searching for Records by Scanning Barcode Data.
Searching for Records by Scanning Barcode Data
You can use a barcode reader to search for records in the Siebel Mobile application for Siebel Field Service by scanning barcode data. For example, the following procedure shows you how to search for a service request by scanning the service request number. For more information about the barcode functionality in Siebel Mobile, see Scanning Barcodes in Siebel Mobile.
To search for records by scanning barcode data
Select QuickSearch in the search toolbar on the application banner.
In the Barcode drop-down list, select Asset#.
A text box field appears.
Scan the barcode (in this example, the asset number).
A query is performed and results are returned in the view containing the record with the Asset# data.
Using Attachments in Siebel Mobile
Attachments are supported by default in the Siebel Mobile application for Siebel Pharma version 8.1.1.10 or later. To use attachments in a different mobile application (for example, in the Siebel Mobile application for Siebel Consumer Goods, Siebel Sales, Siebel Field Service, or Siebel Finance version 8.1.1.10 or later), then you must use the following Siebel Pharma application views as templates and configure them accordingly for the required mobile application:
Pharma Account Attachments View - Mobile
Pharma Contact Attachments View - Mobile
The attachment feature in Siebel Mobile allows you to keep supporting material for account and contact records by permitting you to associate an attachment with individual account and contact records. For more information about using attachments in the Siebel Mobile application for Siebel Pharma, see the following topics:
Setting the Attachment Path
If your mobile application is running on Windows but your Siebel application (for example, Call Center) is running on AIX, then you will not be able to add attachments in online mode because the attachment path is pointing to AIX. In such a case, you will get an error message similar to the following:
ObjMgrLog Error 1 0000394051801038:0 2017-05-09 02:43:27 (dirmgr.cpp (702))
SBL-DAT-00176: The path '\export\home'a1\23021\fs\userpref' does not exist or is
not a directory.  If the problem persists, please contact your systems
administrator.
ObjMgrLog Error 1 0000394051801038:0 2017-05-09 02:43:27 (modpref.cpp (958))
SBL-DAT-00801: LoadPreferences: \export\home'a1\23021\fs\userpref\SADMIN&Siebel
ePharma Mobile.spf: Preference file directory not found.
To resolve this issue, make sure that you have configured a hybrid server setup for Siebel Mobile. For more information, see Configuring the Mobile Node for Siebel Mobile Disconnected Application Users.
Starting an External Application from Siebel Mobile
An external application can be configured in Siebel Tools for Siebel Mobile so that you can start it from within the mobile application. For example, you can link contacts to LinkedIn or Facebook so that you will be able to display a contact’s LinkedIn or Facebook profile from within mobile applications. The URL link to start an external application appears on the details page in the work area of mobile applications.
You use the Symbolic URL Administration view in Siebel Tools to specify how the HTTP request to the external application should be constructed and to define any arguments and values to be sent as part of the request. For more information about how to configure an external application to start from Siebel Mobile, see Configuring Siebel Open UI and the topic about defining symbolic URLs in Siebel Portal Framework Guide.
To start an external application from within a mobile application
Tap the External Application URL link (or icon) on the details page in the main pane.
Printing from Siebel Mobile
You can print from Siebel Mobile, using the print option from your browser’s Settings menu, provided that you have access to one of the following:
A printer that is set up on a wireless network to which your mobile device is connected or a Bluetooth-enabled mobile printer.
A wireless printer that is compatible with and supports Apple’s AirPrint™ technology.
To print from Siebel Mobile
With the page that you want to print displayed, tap Settings on the browser navigation bar.
The following options are available from the browser’s Settings menu:
Add Bookmark
Add to Reading List
Add to Home Screen
Mail Link to this Page
Tweet
Print
Tap Print, Select Printer, and then the name of your wireless printer.
Specify the number of copies that you want to print.
Tap Print to start printing.
If you do not have an AirPrint-compatible wireless printer, then email a link of the page to yourself, open the link on your desktop computer, and then print the page.
Process of Using Siebel Mobile Disconnected Applications in Offline Mode
You can use Siebel Mobile in offline mode if your mobile device has a wireless network connection. In offline mode, your mobile device is not connected to the Siebel Server and you cannot synchronize any changes that you make while working in offline mode. You must switch back to online mode, and then synchronize the changes. To use Siebel Mobile in offline mode, perform the following tasks.
Log in to Siebel Mobile.
For more information, see Logging In to Siebel Mobile.
Switch your mobile application to work in offline mode.
For more information, see the following:
Modify the cached data in offline mode as required.
For more information, see Working in Offline Mode.
Synchronize the changes that you made while working in offline mode with the Siebel Server.
For more information, see the following:
Verify that the synchronization changes that you made while working in offline mode have been synchronized with the Siebel Server.
For more information, see Verifying Data Synchronization.
Review the synchronization errors.
For more information, see Reviewing Synchronization Errors.
Using the Airplane Icon on the Application Banner
The airplane icon on the application banner indicates whether Siebel Mobile (the mobile application) can connect to and synchronize data with the Siebel Server. If Siebel Mobile can connect to and synchronize data with the Siebel Server, then the application is connected to the Siebel Server and in online mode. If Siebel Mobile cannot connect to and synchronize data with the Siebel Server, then the application is disconnected from the Siebel Server and in offline mode.
The airplane icon, shown in the following table, indicates the state of the connection (online or offline) for Siebel Mobile.
Table Airplane (Go Offline/Go Online) Icon on Application Banner
Icon |
Description |
Status |
|---|---|---|
Go Offline (Solid Airplane Icon) |
Indicates a connected or online state, where synchronization (data upload and download) between Siebel Mobile and Siebel Server takes place automatically. |
|
Go Online (Empty Airplane Icon) |
Indicates a disconnected or offline state, where synchronization (data upload and download) between Siebel Mobile and Siebel Server does not take place automatically. In this instance, you must manually upload or synchronize data between the mobile application and Siebel Server by tapping Go Online (the empty airplane icon) and selecting a reconnection option as required. For more information, see the following procedure. |
To use the airplane icon
Tap Go Offline (the solid airplane icon) on the application banner to go offline and work in disconnected mode. For more information, see the following topics:
Tap Go Online (the empty airplane icon) on the application banner, and then select one of the following options as required:
Upload and Go Online. Select this option to trigger a data upload and go online.
Sync and stay Offline. Select this option to synchronizes data but remain in offline mode.
Upload Only and stay Offline. Select to trigger a data upload only but remain in offline mode. For more information, see Synchronizing Data.
Switching to Offline Mode for the First Time
Use the following procedure to switch to offline mode. When you switch to offline mode for the first time, a full data and metadata download is initiated from Siebel Server to the mobile device. But when you subsequently switch to offline mode, then either a full or an incremental synchronization process is initiated according to how the Siebel Mobile Always Full Sync system preference is set. For more information, see the following:
To switch to offline mode
Wait for the following data synchronization notification message:
Data is ready for download.
Tap Go Offline (the solid airplane icon) on the application banner to switch to offline mode.
A down arrow appears next to the solid airplane icon, which shows that the data and metadata is being downloaded to the mobile device.
A progress bar appears after the solid airplane icon, which shows the progress of the data and metadata download. When the progress bar is full, this indicates that the metadata has downloaded to the mobile device.
For more information about the airplane icon, see Using the Airplane Icon on the Application Banner.
(Optional) Tap Log (the bug icon) on the application banner to review the log event messages and debug information for the Siebel Mobile disconnected application as required. For more information, see Siebel Mobile Disconnected Application Logging.
After the full data and metadata has downloaded to the mobile device, the application UI automatically refreshes and goes into offline mode.
You are now in offline mode and disconnected from the Siebel Server. Notice that the solid airplane icon on the application banner changes to an empty airplane icon to indicate a disconnected state. You can now modify the cached data while disconnected from the Siebel Server. For more information, see About Switching to Offline Mode Subsequently and Working in Offline Mode.
About Switching to Offline Mode Subsequently
When you switch to offline mode for a second and subsequent time, then either a full or incremental synchronization process is initiated according to how the Siebel Mobile Always Full Sync system preference is set. Provided that network connectivity is available and a reconnection to Siebel Server can be made when you switch to offline mode for a second or subsequent time, note the following:
If an incremental synchronization is initiated between Siebel Server and the mobile device, then all changes from the server database that were made by others are downloaded to update the local database on the mobile device. When the incremental synchronization process is complete, the mobile application device moves to offline mode and the user can work with the updated data.
-
If any of the following situations occurred since the last offline data package was downloaded, then users are prompted to perform a full data and metadata download again. After the download is complete, the mobile device moves to offline mode and the user can work with the latest data.
The repository changes
The responsibility of the user changes
The position of the user changes
The data changes
The user node is re-extracted
A business component filter changes
A business object filter changes
If network connectivity is unavailable or a reconnection to Siebel Server cannot be made when you switch to offline mode for a second and subsequent time, then the mobile device moves to offline mode and the user can work with the last data package that was downloaded.
If network connectivity is unavailable or a connection to Siebel Server cannot be made when you log in to Siebel Mobile, then the application automatically launches in offline mode using the last data package that was downloaded (provided that one exists). The user works in offline mode with the last data package that was downloaded.
Related Topic
Configuring Synchronization for Siebel Mobile Disconnected Applications
Working in Offline Mode
After the offline data package has downloaded successfully to your mobile device, you are ready to modify the cached data while disconnected. You can start working in offline mode straight away, or you can close the browser instance and work offline at a later time.
The following procedure shows you how to work in offline mode. The procedure assumes that you have already successfully downloaded the offline data package, and that you have closed the browser instance.
To work in offline mode
(Optional) Switch your mobile device to airplane mode as follows:
Tap Settings on your mobile device.
Set Airplane Mode to On.
This is an optional step. Switching your mobile device to airplane mode disables the wireless communication abilities on your mobile device, and prevents a reconnection to the Internet.
Start a browser and log in to the Siebel Mobile disconnected application.
Notice that the airplane icon on the application banner is empty, which indicates that you are in a disconnected state.
Modify the cached data as required.
You can create, edit, update, and delete records for parent objects and associated related items, and so on. Notice that when you modify the cached data, a clock icon appears next to the empty airplane icon to indicate that there are data changes waiting to be uploaded to the Siebel Server. For more information about the other synchronization icons that can appear next to the airplane icon, see Synchronization Icons.
When you have finished modifying the cached data, you can synchronize the changes made while working in offline mode.
For more information, see Synchronizing Data.
Synchronizing Data
If you have been using a Siebel Mobile disconnected application (in offline mode), then you must manually synchronize the changes that were made while you were working in offline mode with the Siebel Server. The following procedure shows you how to manually synchronize the data changes made in offline mode.
To manually synchronize data
If required, switch your mobile device from airplane mode back to connected mode as follows:
Tap Settings on your mobile device.
Set Airplane Mode to Off.
Start a browser and log in to the Siebel Mobile disconnected application.
Tap Go Online (the empty airplane icon) on the application banner, and then select one of the following options as required:
Upload and Go Online. Tap to automatically trigger a data upload and to go back online after the data upload has finished.
Note: If the UI session has not expired before going offline, then selecting Upload and Go Online will use the same UI session to synchronize data. If the UI session has expired, then the Siebel login page appears prompting you to log in to the application again. After login, synchronization will automatically start and once complete, the UI refreshes.Sync and stay Offline. Tap to synchronize data (that is, upload data changes made while working in the mobile application in offline mode and download any new changes made on the server) but remain working in offline mode.
When this option is chosen, any records seen in offline mode are one of the following:
Records that have been newly modified (created, updated, or deleted) on the server since the last synchronization.
Records (user owned) that were successfully uploaded to the server and processed since the last synchronization.
Records that have just been uploaded to the server and are waiting to be processed.
Upload Only and stay Offline. Tap to trigger a data upload only but remain working in offline mode.
No matter what option you choose, the transactions are stored in a text file in the HHsync folder under
\USER_NAME\SYNC_NODE_ID\upsync\pretxn_x.txtbefore being uploaded.An empty airplane icon indicates a disconnected or offline state, where synchronization (data upload and download) between the mobile application and Siebel Server does not take place automatically. A clock next to the airplane icon indicates that there are changes waiting to be synchronized. For information about the other synchronization icons that can appear next to the airplane icon, see Synchronization Icons.
Close the browser instance.
Verify that all data has synchronized correctly.
For more information, see Reviewing Synchronization Errors.
Synchronization Icons
This following table describes the various synchronization icons that can appear next to the airplane icon on the application banner of your Siebel Mobile disconnected application.
Table Synchronization Icons and What They Mean
Icon |
Description |
Status |
|---|---|---|
Full Metadata Download in Progress icon (a down arrow). |
Indicates that a full metadata download is in progress. |
|
Data Download Failure synchronization icon (an exclamation mark in a red triangle). |
Indicates that there has been a full metadata download failure. |
|
Data Synchronization Pending synchronization icon (a clock with hands). |
Indicates that data changes are waiting to be synchronized. |
|
Data Download In Progress synchronization icon (a box with a check mark). |
Indicates that a data download is in progress. |
|
Incremental Data Download Failure synchronization icon (a horizontal bar in a red circle). |
Indicates that there has been an incremental data download failure. |
|
Data Upload In Progress synchronization icon (an up arrow). |
Indicates that a data upload is in progress. |
|
Data Upload Failure synchronization icon (an exclamation mark in a red triangle). |
Indicates that there has been a data upload failure. |
Verifying Data Synchronization
Verify that the synchronization changes that were made while working in offline mode have been synchronized with the Siebel Server.
To verify data synchronization
Log in to the Siebel Mobile disconnected application.
Typically, you log in to Oracle’s Siebel Mobile in connected mode, where you are connected to the Siebel Server.
Verify that all changes that you made while working in offline mode have been synchronized with the Siebel Server and that you can now see them when connected to the Siebel Server.
If you cannot see some changes, then review the synchronization errors as shown in Reviewing Synchronization Errors.
Reviewing Synchronization Errors
If conflicts or errors occur during synchronization, the Notifications feature lists all the synchronization errors, including summary information about the error. You can also review the respective synchronization log files in the Conflict - Administration screen. Use the following procedure to review the synchronization errors.
To review the synchronization errors
Log in to the mobile application.
Tap Notification (the exclamation mark icon) on the application banner.
Review all the messages that have a Sync Error, Data Sync, or Login notification.
For more information, see the following:
Siebel Mobile Disconnected Application Logging
You use the Log button (the bug icon), shown in the following image. on the application banner to review the log event messages and debug information for Siebel Mobile disconnected applications, provided that logging has been enabled for the application.
The Log button is visible on the application banner only after logging has been enabled for the application. If you cannot see the Log button on the application banner, then logging has not been enabled for the application yet.
Information about the following is included in this topic:
Enabling Logging for Siebel Mobile Disconnected Application Users
You enable logging in Siebel CRM for each mobile application user role and assign users to that role. You configure Log Events for logging in to the mobile application. You must set Log Events for logging in the mobile application when in online mode - that is, when you are connected to the Siebel Server.
To enable logging for Siebel Mobile disconnected application users
Log in to Siebel Tools and add the following application user property and value for the Siebel Mobile disconnected application:
Application User Property
Value
Client Business Service
Web Engine UI Preferences
Note: The Client Business Service user property is added by default for the Siebel Mobile application for Siebel pharma so it is not necessary to add it again. For all other mobile applications, this step is required.Enable logging in Siebel CRM for Siebel Mobile disconnected application users:
Log in to the Siebel business application with administrative responsibility.
Navigate to the Administration - Application screen, then the Responsibilities view.
Query for and select the appropriate mobile application user role.
For example, query for the following: PH Pharma Sales Rep - US Sales.
In the Views applet, add the User Profile Logs View to the selected application user role.
In the Users applet, add users to the selected application user role.
Doing this enables the User Profile Logs View for each user that you add.
Select Clear Cache in the Responsibilities view.
Configure Log Events for logging in the Siebel Mobile disconnected application:
Log in to the mobile application with the User Profile Logs View responsibility.
If you have not been assigned the User Profile Logs View responsibility (as shown in the previous step), then you will not be able to view log information.
Tap Settings (the photo icon) on the application banner, and then select the Settings option.
Tap Behavior, and then set Log Events to one of the values described in the following table.
Value
Description
Metadata Extraction
This log event option logs the following:
Server error messages in the metadata extraction.
The errors in parsing metadata.
Data Extraction - Basic
This log event option logs the following:
Server errors in the data extraction for full and incremental synchronization downloads.
The number of records for each business component.
The errors in the caching data.
Data Extraction - Detailed
This log event option logs the following during full and incremental synchronization downloads:
The user keys extracted for each business component.
UpSync
This log event option logs the details of records to be uploaded and all records that are uploaded.
Client System
This log event option logs the following:
Errors when navigating to different views within the application.
Errors during create, update, and delete operations.
Debug information for the following:
Create, update, and delete operations.
Successful inserts to synchronization, business component, and intersection tables.
Successful business component updates, and so on.
SQL queries performed on the Web database and the number of records affected.
All
Logs event and debug information for all of the following log event options combined: Metadata Extraction, Data Extraction - Basic, Data Extraction - Detailed, UpSync, and Client System.
Log out of the mobile application and then log back in again for the changes to take effect.
Notice that after you log back in to the mobile application, the Log button (the bug icon) appears on the application banner.
Clearing Log Information for Siebel Mobile Disconnected Applications
Log information is stored locally in the browser cache. When local storage is full, the following message appears in the log console: Local storage is full. It is recommended that you clear log information on a regular basis to prevent the unnecessary usage of browser storage space. You must have a minimum of 50 megabytes (MB) of available storage on your mobile device at all times.
Before clearing the log information for Siebel Mobile disconnected applications, review the existing log information just in case you might want to save any of it. The following procedure assumes that logging has been enabled for the Siebel Mobile users as shown in the following image.
To clear the log information for disconnected applications
Tap Log (the bug icon) on the application banner.
The log console opens showing all recent log event messages and debug information.
Tap clear to clear the log information.
All log information is deleted from the browser local storage.
Uploading Siebel Mobile Log Information to Siebel Server
The following procedure shows you how to upload Siebel Mobile log information to Siebel Server. This procedure assumes that logging has been enabled for Siebel Mobile users as shown in the following image.
To upload Siebel Mobile log information to Siebel Server
Tap Log (the bug icon) on the application banner.
The log console opens showing all recent log event messages and debug information.
Tap Upload Logs to upload all log information to Siebel Server.
Siebel Server saves all log information that it receives in the
<server location>/logfolder:<server location>/log/<user_id>/DMLog_<nodeid>_<timestamp>.log
where:
<user_id>indicates the ID of the logged in user.<nodeid>indicates the client device. The node ID is generated when the user switches to offline mode. If the user does not switch to offline mode, then the log information is saved as follows:DMLog_No-Node-ID_<timestamp>.log.<timestamp>indicates the date and time that the log was saved.
Saving Siebel Mobile Log Information
The following procedure shows you how to save Siebel Mobile log information. This procedure assumes that logging has been enabled for Siebel Mobile users as shown in the Enabling Logging for Siebel Mobile Disconnected Application Users.
To save Siebel Mobile log information
Tap Log (the bug icon) on the application banner.
The log console opens showing all recent log event messages and debug information.
Tap anywhere in the log console, tap Select All, and then tap Copy.
Save the log information, for example, as follows:
Open the Notes feature on your mobile device.
Tap New to create a new note.
Tap anywhere in the new note that opens, then tap Paste to paste the contents of the clipboard (that is, the log information that you copied in the previous step) into the note.
About Siebel Mobile Log API
The Siebel Mobile log function stores data locally in the browser cache. When the local browser storage is full, the log event messages and debug information for Siebel Mobile disconnected applications are no longer logged and the following error message appears in the console log:
Local storage is full.
The following table describes the Siebel Mobile log function in more detail. For information about troubleshooting Siebel Mobile disconnected application logging, see Troubleshooting Siebel Mobile Disconnected Applications.
Table Siebel Mobile Log Function
Item |
Description |
|---|---|
Function Name |
SiebelApp.S_App.LogOfflineEvent() |
In Parameters |
The Siebel Mobile log function takes the following in-parameters: message: string, params: string |
Out Parameter |
The Siebel Mobile log function takes the following out parameter: Type: void |
Description |
This function takes two values (message and params) which are formatted and stored in the local browser storage. An error message appears (Local storage is full) in the console log when the local browser storage is full. Siebel stops logging error messages after this error message appears. |
Example |
SiebelApp.S_App.LogOfflineEvent('%1 - %2:= %3', 'class1', 'method1', 'data');
//This will be logged as: class1 - method1:= data |
Unsupported Siebel Mobile Features in Offline Mode
The features listed in this topic are not supported in offline mode. You must be connected to the Internet and, in some cases, to the Siebel Server to do the following in your Siebel Mobile disconnected application:
Searching for Records in Siebel Mobile
The Search toolbar is not supported in offline mode, except to perform barcode-related functionality. Performing an inline query in offline mode is supported only in Siebel CRM 18.9 Update and later releases.
Use the cogwheel icon, see About Menu (the Cogwheel Icon) in Siebel Mobile
Use the following icons to make a selection or type some text: Phone, Email, Pin, URL
Select multiple records in list applets
Note: Multiple record selection for associate applets only is supported in offline mode.Other features not supported in offline mode include:
Cascade delete
Currency pop-up controls
Default Applet Menu items
Dynamic drilldowns
Dynamic controls
Execution of joined fields
MVG (multi-value group) fields. MVG fields are read-only in offline mode
Thread bar
Toggle applets
The Back button to go to a previous page
The Show More option in List applets is unavailable
The User Settings view is unavailable.
The expression parser is limited
The expression parser is used for parsing expressions such as those for field validations, predefault and post-default properties, Business Component search specifications, and so on.
The expression parser does not support all the expressions that are supported by Siebel Server.